How to Add PBR Textures to 3D Models (Blender, Unity, Unreal & Web)
TL;DR
- To add PBR textures to 3D models, UV-unwrap the mesh, load each map, connect it to the matching shader input, and check color-space settings.
- Base color is color data; normal, roughness, metallic, AO, and height maps are data textures. Unity uses smoothness, which is the inverse of roughness.
- Blender, Unity, Unreal Engine, and glTF follow the same metallic-roughness logic. Tripo AI Texturing can generate a PBR set that you can inspect and refine.
Introduction: What Is PBR Texturing?
You can spend hours building a convincing model and still have it render like cheap plastic. The missing piece is often not geometry but material response: how the surface absorbs, scatters, and reflects light.
PBR, or Physically Based Rendering, splits those surface properties across several texture maps. Game assets, film work, product visualization, and real-time web content all use this approach because the material can respond consistently when the lighting changes. This guide covers the maps, UV preparation, and the setup process in Blender, Unity, Unreal Engine, and web workflows.
Types of PBR Texture Maps
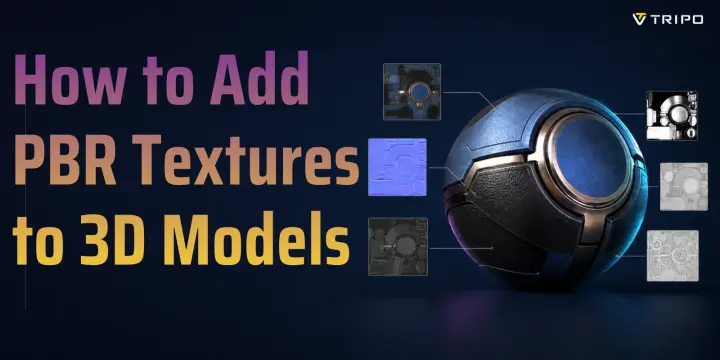
A PBR material is a stack of images that share one UV layout. Each image answers a different lighting question, so swapping files between the wrong inputs produces a material that may look acceptable in one view but fail as soon as the light moves.
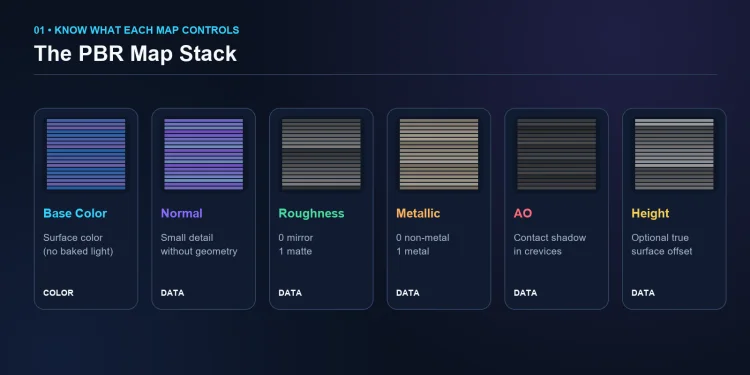
Figure 1. The core PBR texture maps and the property controlled by each map.
| Map | What it controls | Practical tip |
|---|---|---|
| Base Color / Albedo | Visible surface color, without baked shadows or highlights. | Treat as color data and use sRGB. |
| Normal | Small bumps and grooves by changing the shading normal. | Use a Normal Map node and Non-Color data. |
| Roughness | Reflection sharpness: 0 is smooth; 1 is matte. | Do not confuse it with Unity smoothness. |
| Metallic | Whether a pixel behaves like metal or a dielectric. | Use mostly black or white for clean materials. |
| Ambient Occlusion | Soft contact darkening in creases and tight gaps. | Keep subtle to avoid double-shadowing. |
| Height / Displacement | Optional geometric or parallax surface offset. | Use enough mesh subdivision for true displacement. |
For ready-made practice assets, Poly Haven and ambientCG provide free PBR texture packs. Download a complete set rather than mixing maps from unrelated materials; consistent scale and capture conditions matter.
Step 1 - UV Unwrap Your Model
PBR maps are 2D images, so the mesh needs a 2D road map that tells every pixel where to land. In Blender, apply the object's scale, enter Edit Mode, select all faces, press U, and choose Smart UV Project for a quick result or Unwrap when you need deliberate seam control.
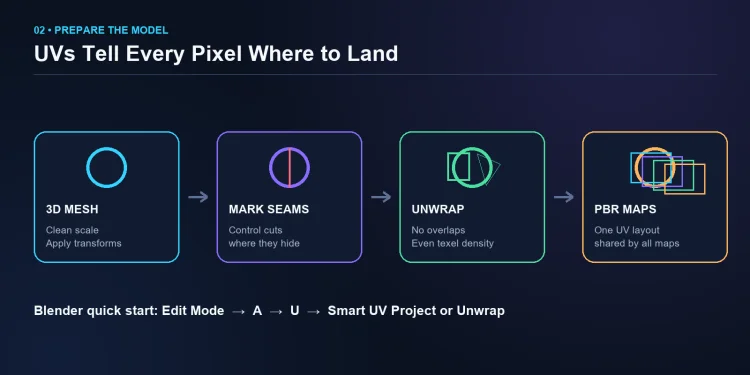
Figure 2. A practical UV workflow before applying PBR maps.
Inspect the UV Editor before texturing. UV islands should not overlap unless the design intentionally mirrors details. Leave padding between islands and keep texel density comparable across similar parts. Check for stretching now, since even a well-made material will look wrong on distorted UVs. For concept work, Tripo AI Texturing can generate PBR materials for an uploaded or generated model. Inspect its seams and surface alignment before using the asset in production.
Step 2 - Apply PBR Textures in Blender
Blender's Principled BSDF shader accepts the standard metallic-roughness map set directly. Assign a material to the mesh, then connect the maps as follows:
- Open the Shader Editor from the editor-type menu. Shift+F3 opens the Node Editor in some keymaps, but the menu is the most reliable route across custom shortcuts.
- Keep the default Principled BSDF and Material Output nodes. Add one Image Texture node for each map and load the matching file.
- Connect base color to Base Color, roughness to Roughness, and metallic to Metallic. Send the normal texture through a Normal Map node before connecting it to Normal.
- Set base color to sRGB. Set normal, roughness, metallic, AO, and height maps to Non-Color so Blender does not apply a display color transform to numeric data.
- Preview in Material Preview, then render with F12 under representative lighting. Adjust mapping scale and normal strength only after confirming that every map is connected correctly.
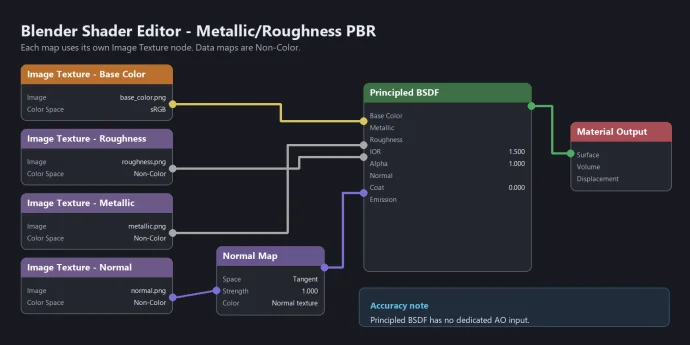
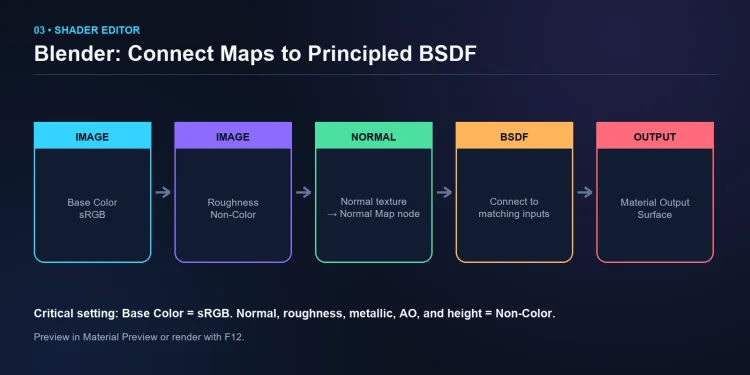
Figure 3. A simplified Blender node flow for PBR maps.
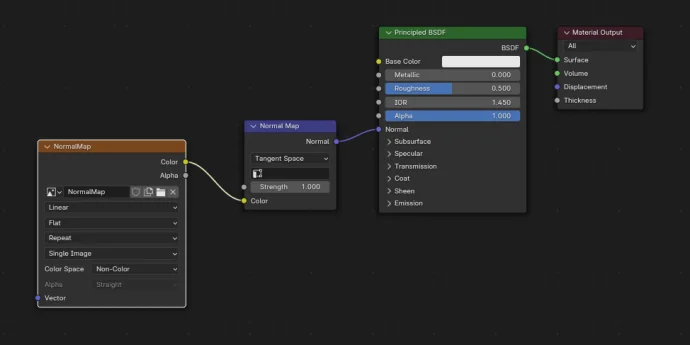
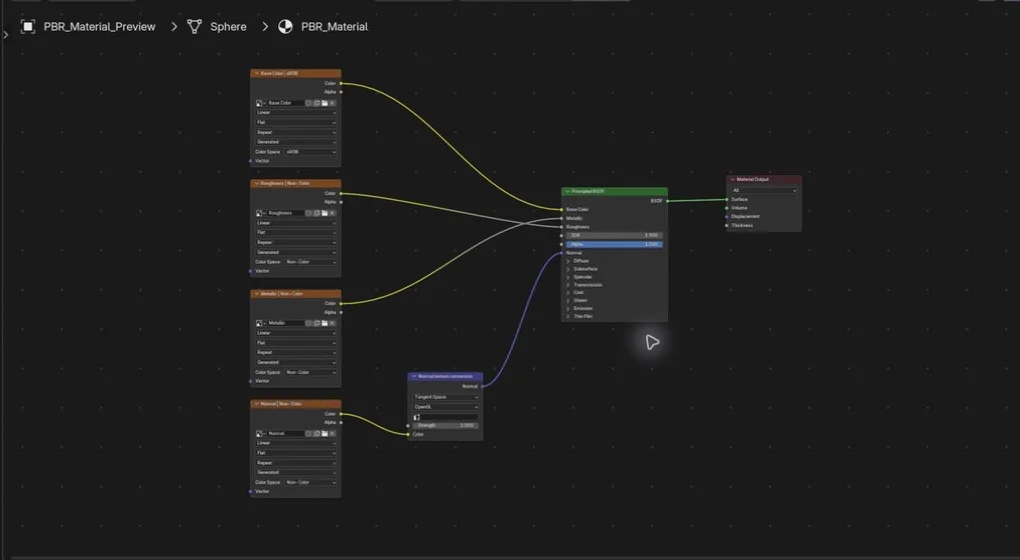
Blender's color-management documentation specifically treats normal and displacement images as non-color data. Blender has no dedicated AO input on Principled BSDF; if your target requires visible baked AO, combine it subtly with base color or preserve it as a separate map for export. Avoid heavy multiplication because it can double-darken creases under real lighting.
Step 3 - Apply PBR Textures in Unity
For a Universal Render Pipeline project, import the files into Assets, create a Material, and select Universal Render Pipeline/Lit. Assign the albedo image to Base Map, add the normal map to Normal Map, and place AO in the Occlusion slot. Unity may ask to fix the normal texture type; accept the conversion if the import settings are still marked as a regular image.
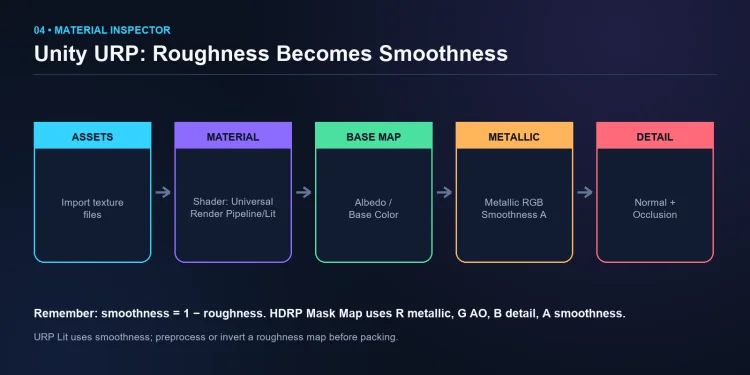
Figure 4. The key PBR slots in a Unity URP Lit material.
Unity exposes smoothness, not roughness. Smoothness equals 1 - roughness, so invert an external roughness map before using it. In URP Lit, the metallic map's alpha channel commonly stores smoothness. HDRP uses a different Mask Map layout: metallic in R, ambient occlusion in G, detail mask in B, and smoothness in A. Check the active render pipeline before packing channels. Unity's URP Lit documentation lists the version-specific inspector settings.
Step 4 - Apply PBR Textures in Unreal Engine
Drag the texture files into the Content Browser, create a Material, and open it in the Material Editor. Drag each texture onto the graph, then connect albedo to Base Color, roughness to Roughness, metallic to Metallic, normal to Normal, and AO to Ambient Occlusion. Click Apply and Save, then drag the material onto the mesh in the viewport.
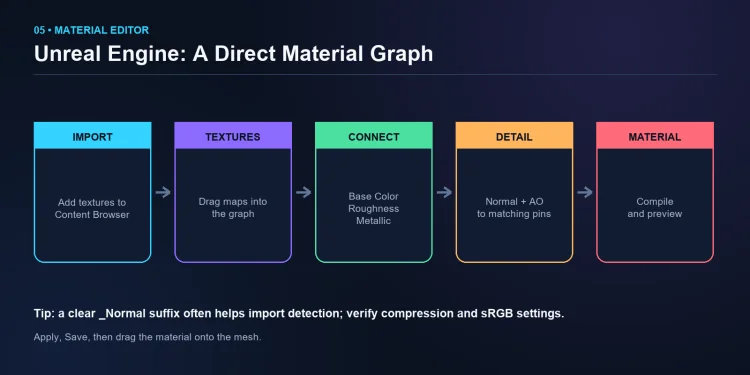
Figure 5. A compact Unreal Engine PBR material workflow.
Unreal often recognizes a clear _Normal suffix and proposes normal-map compression, but verify the result rather than relying on the name alone. Disable sRGB for numeric masks such as roughness, metallic, and AO, while keeping it enabled for base color. The Unreal material inputs reference confirms that roughness 0 is mirror-like and roughness 1 is fully matte. If you channel-pack masks, document the channel order for the next artist.
Apply PBR Textures for Web, Three.js, and glTF
glTF 2.0 is a common web delivery format for metallic-roughness PBR. Export a .glb from Blender to bundle geometry, materials, and textures, then load it in Three.js with GLTFLoader or inspect it in the Tripo AI 3D Viewer. The viewer accepts both GLB and glTF files.
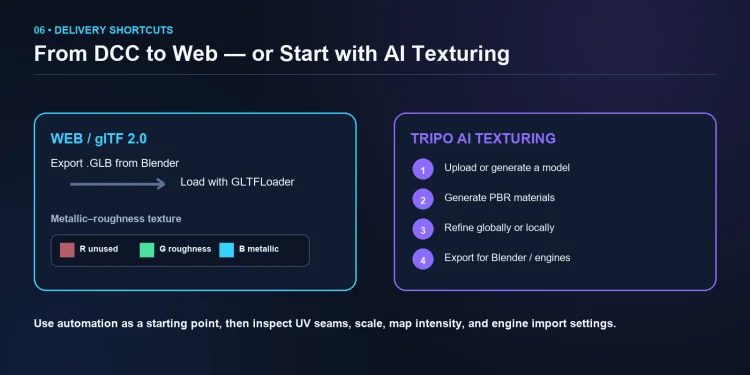
Figure 6. Web delivery and an AI-assisted PBR texturing path.
glTF combines metallic and roughness in one texture: the blue channel stores metallic and the green channel stores roughness. Occlusion is a separate texture and reads its red channel. If a model looks correct in Blender but wrong online, inspect UVs, image color spaces, flipped normal conventions, and channel packing before changing lights. A portable .glb should be tested in at least one independent viewer before publication.
Speed Up the Workflow with AI Texturing
Tripo is an AI-powered 3D modeling platform developed by VAST. Its AI Texturing tools can generate Base Color, Normal, Roughness, Metallic, and other PBR maps, then let you edit the result. This saves setup time during concept work, but the normal quality checks still apply. Review texture scale, seams, material boundaries, and the import settings in your target engine.
You do not have to follow one fixed sequence. If a mesh already exists, upload it and begin with texturing. If you need a new asset, the Tripo AI 3D Model Generator supports text-to-3D, image-to-3D, and multi-view generation. Choose Smart Mesh for lower-poly game assets or HD Model when the project needs more geometric detail, then texture, segment, retopologize, rig, or export as needed. Tripo Web supports this interactive workflow, while Tripo API is intended for application and enterprise-scale integration.
For web delivery, export GLB so textures travel with the model. Tripo also supports USD, FBX, OBJ, STL, and 3MF exports for animation, editing, and 3D-printing workflows. Match the format to the destination rather than treating one export as universal.
Common PBR Texturing Mistakes
- Treating data maps as sRGB images. The renderer changes their numeric values, which can make roughness, normals, or displacement look incorrect.
- Using roughness directly in a Unity smoothness slot. Invert it first or pack the inverted result into the correct alpha channel.
- Ignoring UV padding and texel density. Seams, bleeding, and inconsistent detail become obvious at distance or under mipmapping.
- Overdriving AO or normal strength. Stronger is not automatically more realistic; compare the material under neutral light.
- Judging only in one renderer. Exported materials can reveal channel, tangent-space, and color-management differences.
Frequently Asked Questions
Q: How do you install PBR textures?
Download the texture pack, extract the images, and place them in your project's texture folder. Create a material, load the maps, and connect each file to the matching shader input for Blender, Unity, Unreal, or your target renderer.
Q: How do you add a texture to a 3D model?
First make sure the model has usable UV coordinates. Then create a material, load the texture image, assign it to the relevant shader input, and preview the result under lighting that reveals stretching and scale problems.
Q: How do you import PBR textures into SketchUp?
SketchUp 2025 and later supports Photoreal Materials with metalness, roughness, normal, and ambient-occlusion maps. Open the Materials panel, edit or create a material, add the maps, and use the Photoreal Materials face style; older versions may require a renderer such as V-Ray or an export to another PBR-capable tool.
Q: How do you create a PBR texture?
Artists commonly author PBR sets in Substance 3D Painter, Quixel Mixer, or image-editing tools that support a metallic-roughness workflow. Tripo AI Texturing can also generate the map set and let you edit it for the target asset.
Q: What are the different PBR maps used for?
Base Color stores surface color, Normal adds apparent fine detail, Roughness controls reflection sharpness, Metallic separates metal from non-metal, and AO adds contact shadowing. Height or displacement is optional when the surface needs real or simulated depth.
Q: Can beginners do PBR texturing in Blender?
Yes. Principled BSDF exposes the standard PBR inputs directly, and free packs from Poly Haven or ambientCG let beginners practice without painting every map from scratch. Start with base color, roughness, and normal, then add metallic and AO only when the material needs them.
Conclusion
The workflow stays much the same across tools: prepare the UVs, connect each map to the right input, set the correct color space, and test in the target renderer. Learn that logic once and moving between Blender, Unity, Unreal Engine, and glTF becomes far less confusing.