How to Create 3D Models with AI: A Step-by-Step Workflow

TL;DR
- AI 3D generation creates base meshes quickly, but usable assets still need cleanup, texturing, and the right export settings.
- Use text-to-3D for ideas, image-to-3D for fidelity, and multi-view inputs for more accurate hidden surfaces.
- Choose HD Model for detail or Smart Mesh for lightweight, game-ready topology.
- Check fragments, non-manifold edges, normals, UVs, scale, and texture maps before delivery.
- Export GLB or FBX for games, OBJ for editing, and STL or 3MF for printing.
Creating a 3D model used to mean months of software training. Today, AI tools can turn a text prompt or reference photo into a usable base model in seconds to a few minutes. This guide walks through the complete workflow — from picking your input method to downloading a file your game engine or 3D printer can actually use.
The shift is bigger than it sounds. According to Precedence Research, the AI-driven image-to-3D market is projected to grow from $394M in 2026 to over $2B by 2035. Whether you're prototyping game props, printing figurines, or building AR scenes, the workflow is the same. But raw generation is only half the job. You'll learn how to prepare inputs that actually work, clean up the mesh AI hands you, and export the right format for your use case.
How Does AI 3D Model Generation Work?
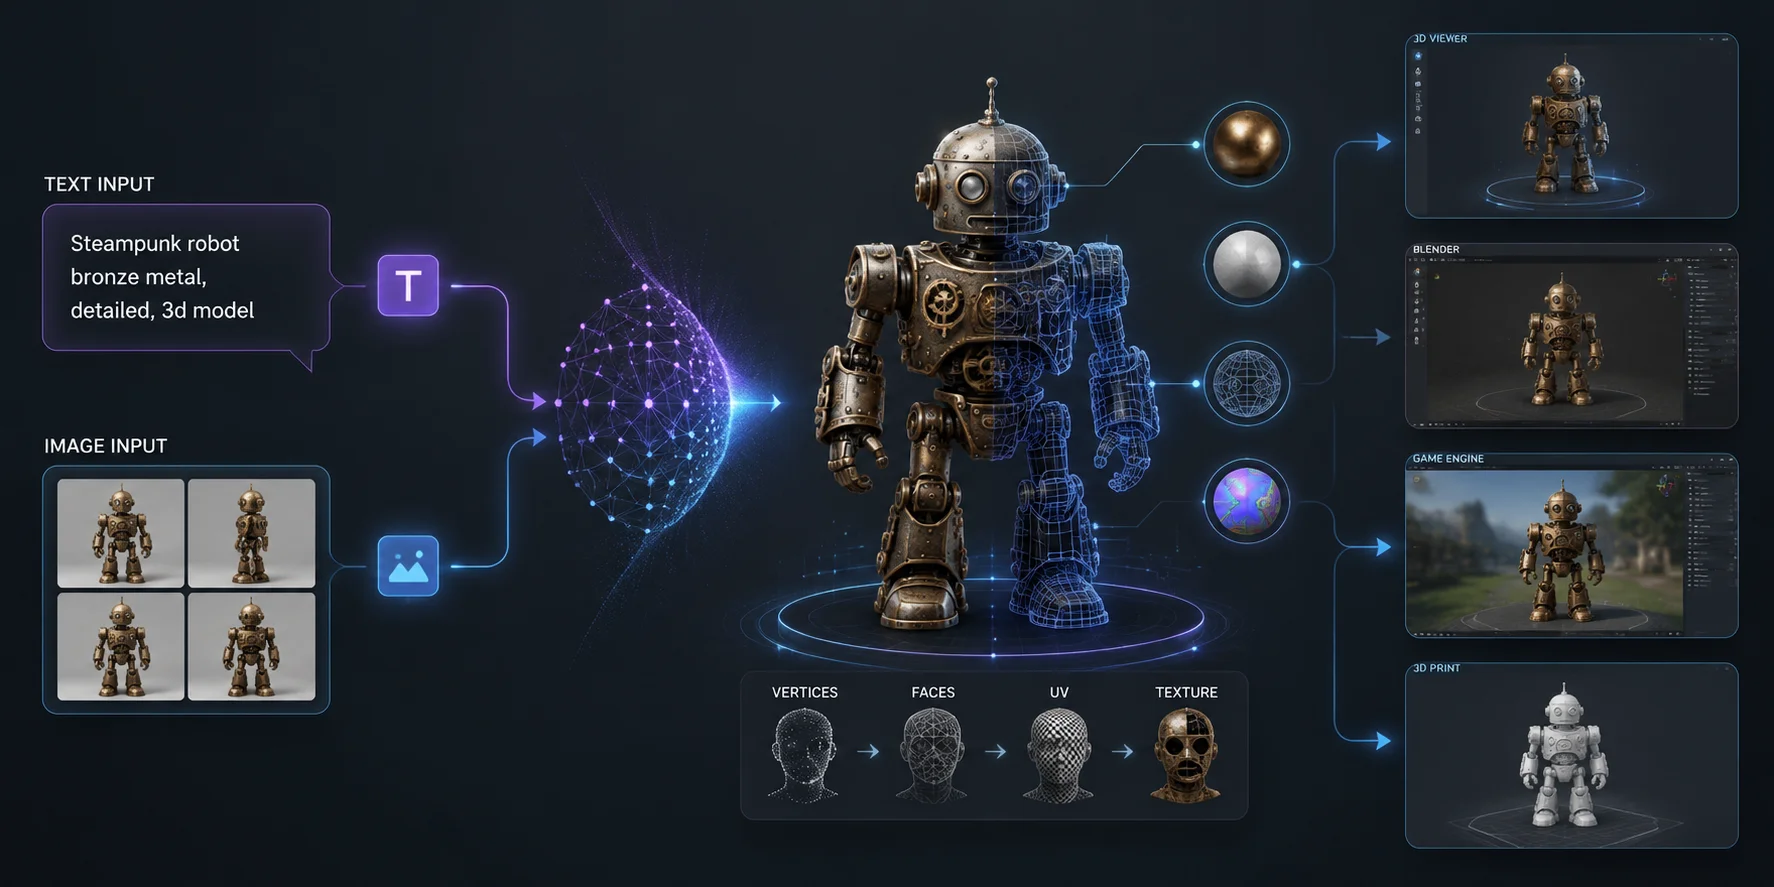
AI 3D generation begins with text, an image, or several images of the same object. The system estimates shape, surface detail, materials, and hidden structure, then creates a 3D mesh.
That output usually includes vertices, faces, UV coordinates, and texture maps. In practice, it is a model you can inspect in a viewer, edit in Blender, import into a game engine, or prepare for printing.
Modern tools use diffusion-style generation and multi-view reconstruction. They do not understand an object exactly as a human modeler would. Instead, they predict likely geometry from patterns in training data and the information you provide. Clear references usually produce more reliable models than vague instructions.
The two main input routes are text-to-3D and image-to-3D. They offer different trade-offs between speed, control, and accuracy.
Text to 3D vs. Image to 3D: Which One Should You Use?
The best input type depends on whether you are exploring an idea or reproducing a known visual design.
| Input Method | Strengths | Limits | Best Use |
|---|---|---|---|
| Text-to-3D | Fast, requires no source image, and works well for broad concept exploration. | Shape and proportions can be less predictable, especially for complex objects. | Original props, stylized assets, quick concept variations. |
| Image-to-3D | More predictable silhouette, colors, and visible surface detail. | Hidden sides must be inferred; cluttered backgrounds can become geometry errors. | Existing concepts, products, sketches, props, and reference-driven assets. |
| Multi-view input | Gives the model more information about depth, occluded surfaces, and proportions. | Requires extra preparation and consistent views. | Hero assets, figures, products, detailed props, and assets that need better accuracy. |
Use text-to-3D when you need to explore quickly. A short description can generate several potential directions before you decide which form deserves more work.
Use image-to-3D when the object already has a clear visual identity. A concept drawing, clean product photo, character illustration, or previous render gives the system stronger guidance. If you are still torn, this breakdown of when to pick image over text input explains the trade-offs.
For important assets, multi-view input is usually worth the effort. Two to four consistent views give the generator more evidence about the sides, back, depth, and proportions. Use text for quick exploration, one image for reference-led work, and multiple views when the final model needs to hold up under close inspection.
How to Prepare Your Prompt or Image for AI 3D
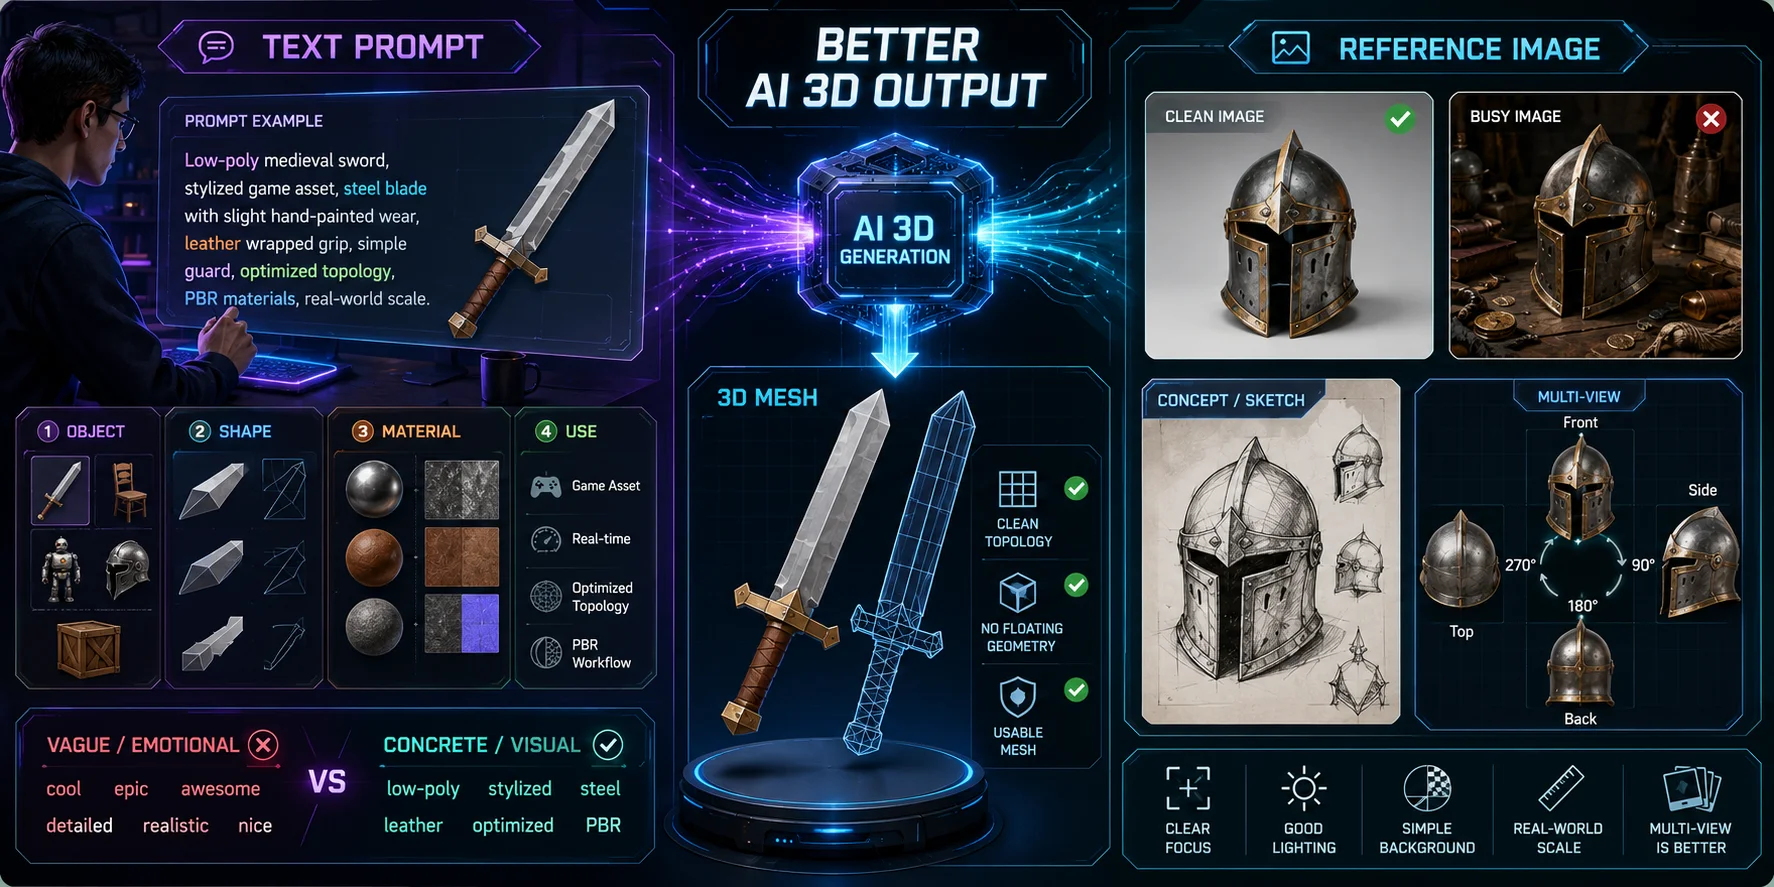
Good AI output begins before you press Generate. Most disappointing results come from vague prompts, overly busy images, weak silhouettes, or references that hide the object’s real structure.
Writing a Text Prompt That Works
A useful text-to-3D prompt describes the object in one clear sentence. Focus on shape, material, style, and intended use.
For example:
A low-poly medieval sword with a worn iron blade, leather-wrapped handle, broad guard, clean topology, no floating geometry, suitable for a game engine.
This prompt explains what the asset is, how it should look, and where it will be used. It gives the generator useful constraints without trying to describe every tiny surface detail.
Strong prompts often include four parts:
- Object: sword, chair, robot, helmet, desk lamp, crate, creature, figurine.
- Shape: broad blade, rounded shell, cylindrical body, square base, layered panels.
- Material or style: worn iron, polished wood, ceramic, stylized low-poly, realistic PBR.
- Technical intent: game asset, printable figure, clean topology, no floating parts, separate components.
Avoid relying on emotional words alone, such as “beautiful,” “cool,” or “scary.” They may influence mood, but they rarely specify useful geometry. Replace them with visual details: “dark gothic armor with layered shoulder plates” is more actionable than “scary armor.”
Getting the wording right matters. These prompt-writing tips for text-to-3D can help you avoid vague results and improve control over the output.
Do not over-edit the prompt after the first generation. Try regenerating once or twice without changing it. AI output has some variation, and a second or third attempt may solve a weak silhouette without adding unnecessary wording.
Preparing a Reference Image
For image-to-3D, the reference image is effectively your brief. The cleaner it is, the easier it becomes for the generator to distinguish the main object from the background.
Use an image with:
- one main subject;
- even lighting;
- a plain or simple background;
- clear edges around the object;
- minimal motion blur;
- no hands blocking important surfaces;
- a centered, readable composition.
Crop tightly around the object. Busy scenery, furniture, vegetation, reflections, or shadows can bleed into the generated mesh and create floating fragments or strange background geometry.
A front-facing image works well for objects with a clear front, such as characters, masks, figurines, furniture, or product packaging. For objects without a clear front, such as a bottle, lamp, sculpture, or mechanical part, use consistent views from several angles.
For multi-view input, capture the object at approximately:
- 0 degrees: front;
- 90 degrees: right side;
- 180 degrees: back;
- 270 degrees: left side.
For top-heavy objects, include a top-down image as well. Keep lighting, distance, and scale consistent across all views. Changing focal length or moving the object too much between images can make reconstruction less reliable.
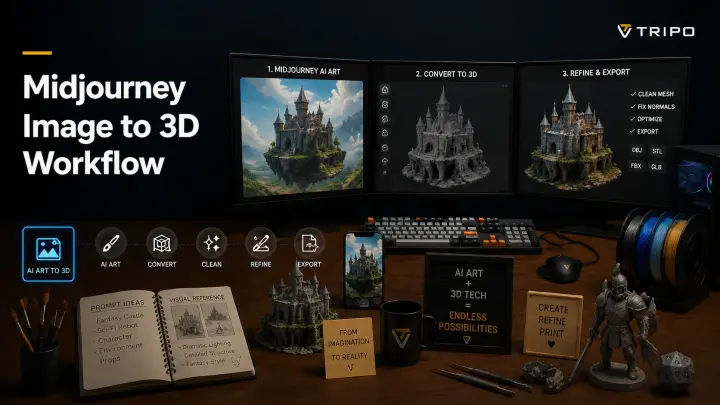
Sketches and concept art can work too. A clean illustration often produces better results than a low-quality real-world photo because the silhouette is more explicit. You can also generate concept art in Midjourney or Stable Diffusion first, then pass it into an image-to-3D converter to turn it into a mesh.
How to Generate a 3D Model with AI: Step by Step
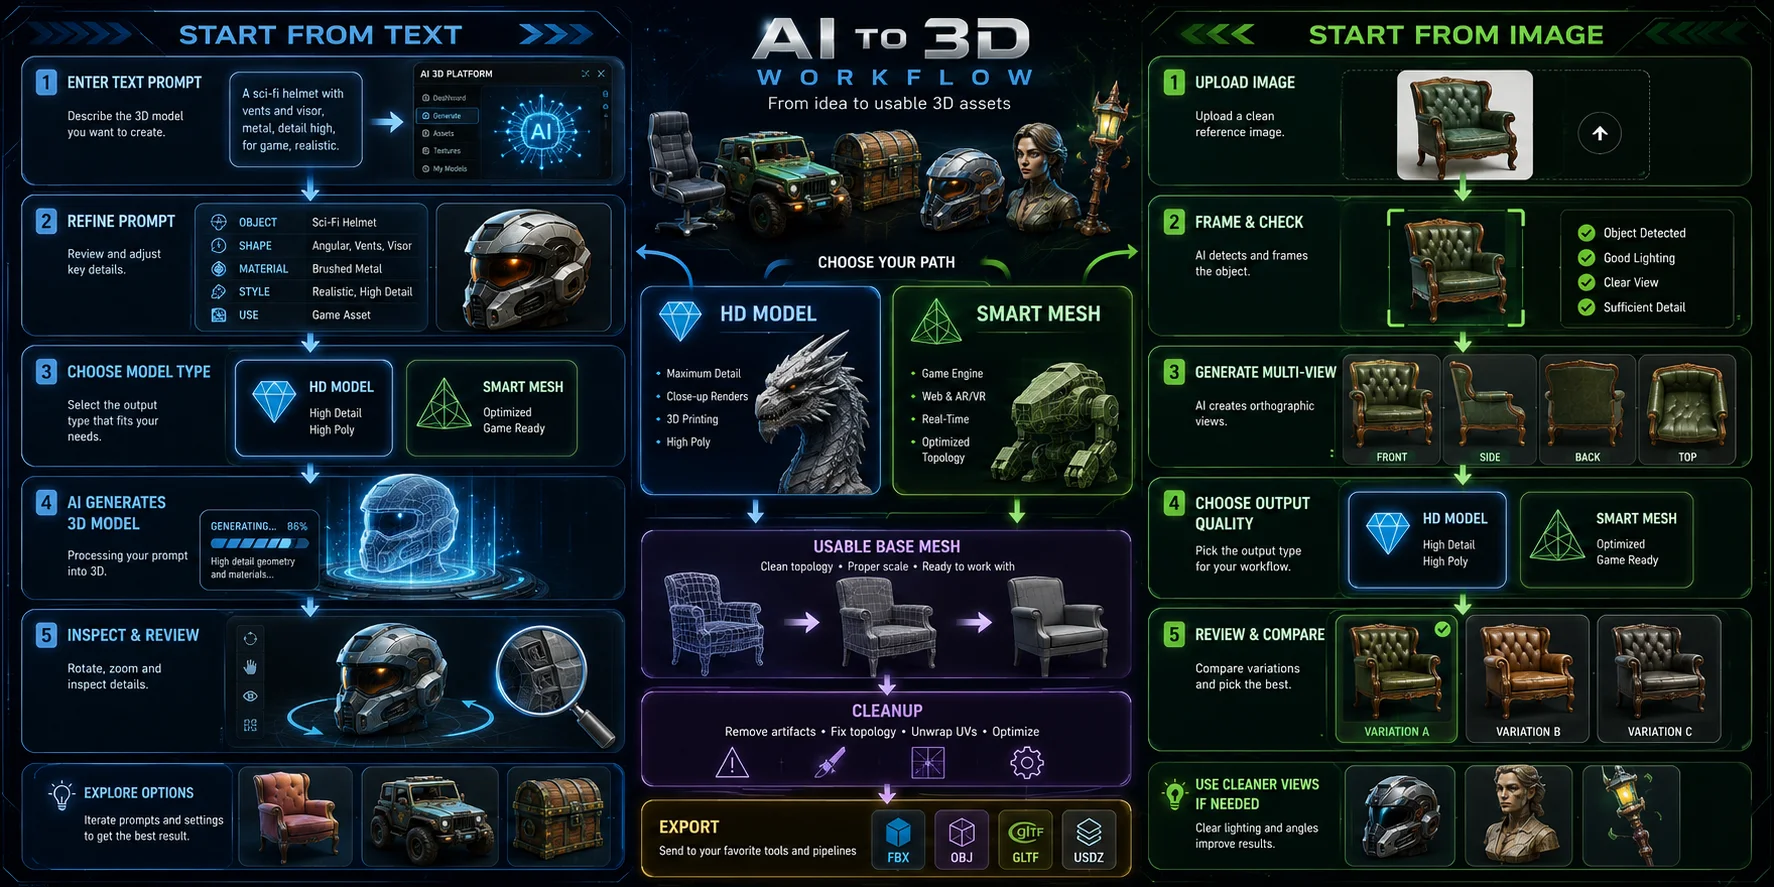
The exact interface differs by tool, but the overall workflow stays consistent. The key decision is whether you need a highly detailed visual model or a lighter game-ready asset.
If You’re Starting From Text
- Open an AI 3D platform. Start in a workspace such as Tripo AI Studio and choose the text-to-3D option.
- Write a focused prompt. Include the object, shape, material, style, and intended use. Avoid adding competing styles or too many unrelated visual ideas.
- Choose the model type. Use an HD Model when close-up detail, display quality, or 3D printing is the priority. Use Smart Mesh when the destination is a game engine, web scene, or real-time application.
- Generate the base model. Base generation can take from seconds to a few minutes depending on complexity and selected quality.
- Inspect before moving forward. Rotate the model in the viewer. Check the silhouette, back, major details, and any obvious floating or missing geometry. If the overall form is wrong, regenerate before spending time on cleanup.
Text is best for exploration. Generate several options, choose the strongest one, and only then invest in refinement.
If You’re Starting From an Image
- Choose image-to-3D. Upload a clean sketch, photo, render, or concept image.
- Check the framing. Confirm that the object is centered and that the background is not likely to become part of the mesh.
- Use multi-view input when available. Add side, back, and top views for important assets. This is especially useful for characters, products, vehicles, furniture, and physical objects that must look correct from more than one angle.
- Select the right output quality. An HD Model can reach up to 2 million polygons for detailed printing and high-end visualization. Smart Mesh is intended to create optimized topology for real-time workflows and produces roughly 5,000 polygons by default.
- Generate, review, and compare variations. Inspect the visible side, hidden side, texture placement, edge quality, and object separation. If the reference was strong but the model still fails, try a tighter crop, a cleaner image, or another view before changing tools.
The goal at this stage is not perfection. It is a usable base mesh with the correct form language. Cleanup and export choices determine whether that base becomes a finished asset.
How to Clean Up an AI-Generated Mesh
AI-generated geometry is rarely finished without review. Even strong models can contain hidden technical issues that matter in games, animation, 3D printing, and professional editing workflows.
Common Mesh Problems
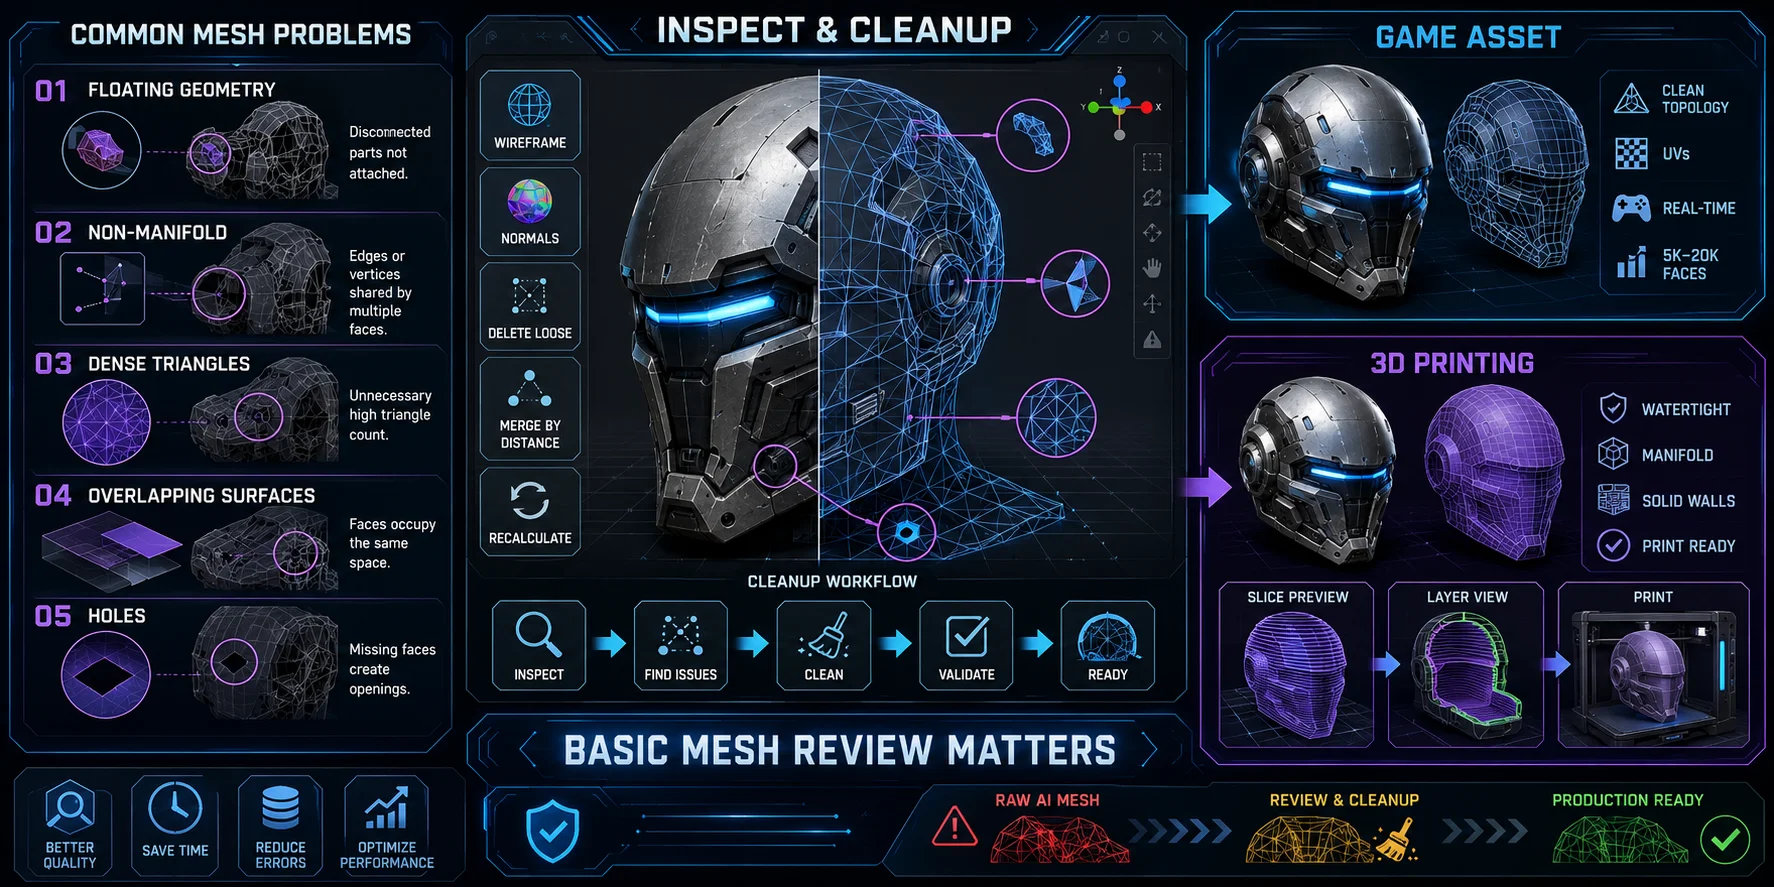
The most common issues are floating geometry, non-manifold edges, excessive triangle density, and disconnected or overlapping surfaces.
Floating geometry means small pieces of mesh sit near the object without connecting to it. This may appear as fragments, spikes, isolated dots, or accidental surface patches. In a game engine, these fragments waste polygons and can create shading problems. In 3D printing, they may turn into failed layers or weak sections.
Non-manifold edges mean the mesh does not describe a physically valid closed surface. A hole, self-intersection, internal face, or incorrectly shared edge can make a slicer interpret the model unpredictably. This is particularly important for printing, where the slicer needs a watertight volume.
Dense triangles in flat areas create unnecessary file size and make manual editing harder. A highly detailed model may look good, but it can become slow to edit, slow to import, or impractical for real-time use.
Start cleanup by inspecting the model in solid view and wireframe mode. Rotate around the asset and look for holes, detached pieces, inverted surfaces, and overlapping shells. Do not assume the side facing the original image is the only area that matters.
Cleaning Up for Game Assets
Games need efficient geometry, predictable shading, usable UVs, and a sensible polygon budget. A dense generated model may be appropriate for baking detail, but it is usually not the final mesh for a game engine.
For many props, aim for a clean mesh in the rough range of 5,000 to 20,000 faces, depending on whether it is a background asset, standard prop, or close-up hero object. A mobile game may need much less. A cinematic real-time asset may need more.
In Blender, begin with basic cleanup:
- Select the mesh and enter Edit Mode.
- Choose Mesh > Clean Up > Merge by Distance to remove duplicate nearby vertices.
- Use Select > Select All by Trait > Non-Manifold to locate open edges or invalid areas.
- Use Delete Loose for unconnected vertices and edges. For detached mesh islands, use Select Linked or Separate by Loose Parts, inspect them, and delete only unwanted fragments.
- Recalculate normals with Shift + N.
- Use a Decimate modifier carefully if the mesh is unnecessarily dense.
Manual retopology gives the most control but takes time. Use Smart Mesh for lighter game-ready triangle topology. For animation or editing pipelines that need quad-based edge flow, use AI Quad Remesher or manual quad retopology.
Before importing into Unreal or Unity, it is worth checking whether the model is game-ready. Check polygon count, UVs, texture size, normals, pivot placement, scale, and whether the asset has unnecessary hidden geometry.
Cleaning Up for 3D Printing
For 3D printing, the mesh must be watertight, manifold, and thick enough to survive slicing and physical handling.
Open the model in Blender, Meshmixer, or your slicer. In Blender, enable the 3D Print Toolbox when available, then check for non-manifold edges, intersecting faces, and thin walls.
Use these fixes:
- Holes: Select the boundary edge loop and use Face > Fill, or repair it with Meshmixer Inspector.
- Floating fragments: Use Delete Loose for stray vertices or edges. For detached mesh islands, select linked geometry, inspect the separate component, and delete it only if it is not part of the intended model.
- Internal faces: Select and delete hidden or overlapping faces in Edit Mode.
- Incorrect normals: Press Shift + N to recalculate outside normals.
- Thin shells: Add a Solidify modifier, then apply it after confirming the thickness.
- Separate pieces: Using Ctrl + J places parts in one object but does not weld or seal them. For a watertight solid, use Boolean Union or Voxel Remesh, then repeat the non-manifold check.
After repair, inspect the layer preview in PrusaSlicer or another slicer; missing walls or strange infill usually signal mesh problems. Tripo's Segment & Complete workflow can split printable parts and complete exposed surfaces before export, but still verify thickness, watertightness, and scale.
For physical prints, this guide to preparing 3D-printable models covers thickness, splitting, supports, and print orientation. The walkthrough on cleaning up AI meshes in Blender covers the manual route.
Skip deep cleanup only for quick previews or private tests. Any model intended for a game build, client presentation, marketplace listing, animation shot, or print bed deserves at least a basic mesh review.
Adding AI Textures and Materials
Geometry gives a model shape; textures make it feel like an object.
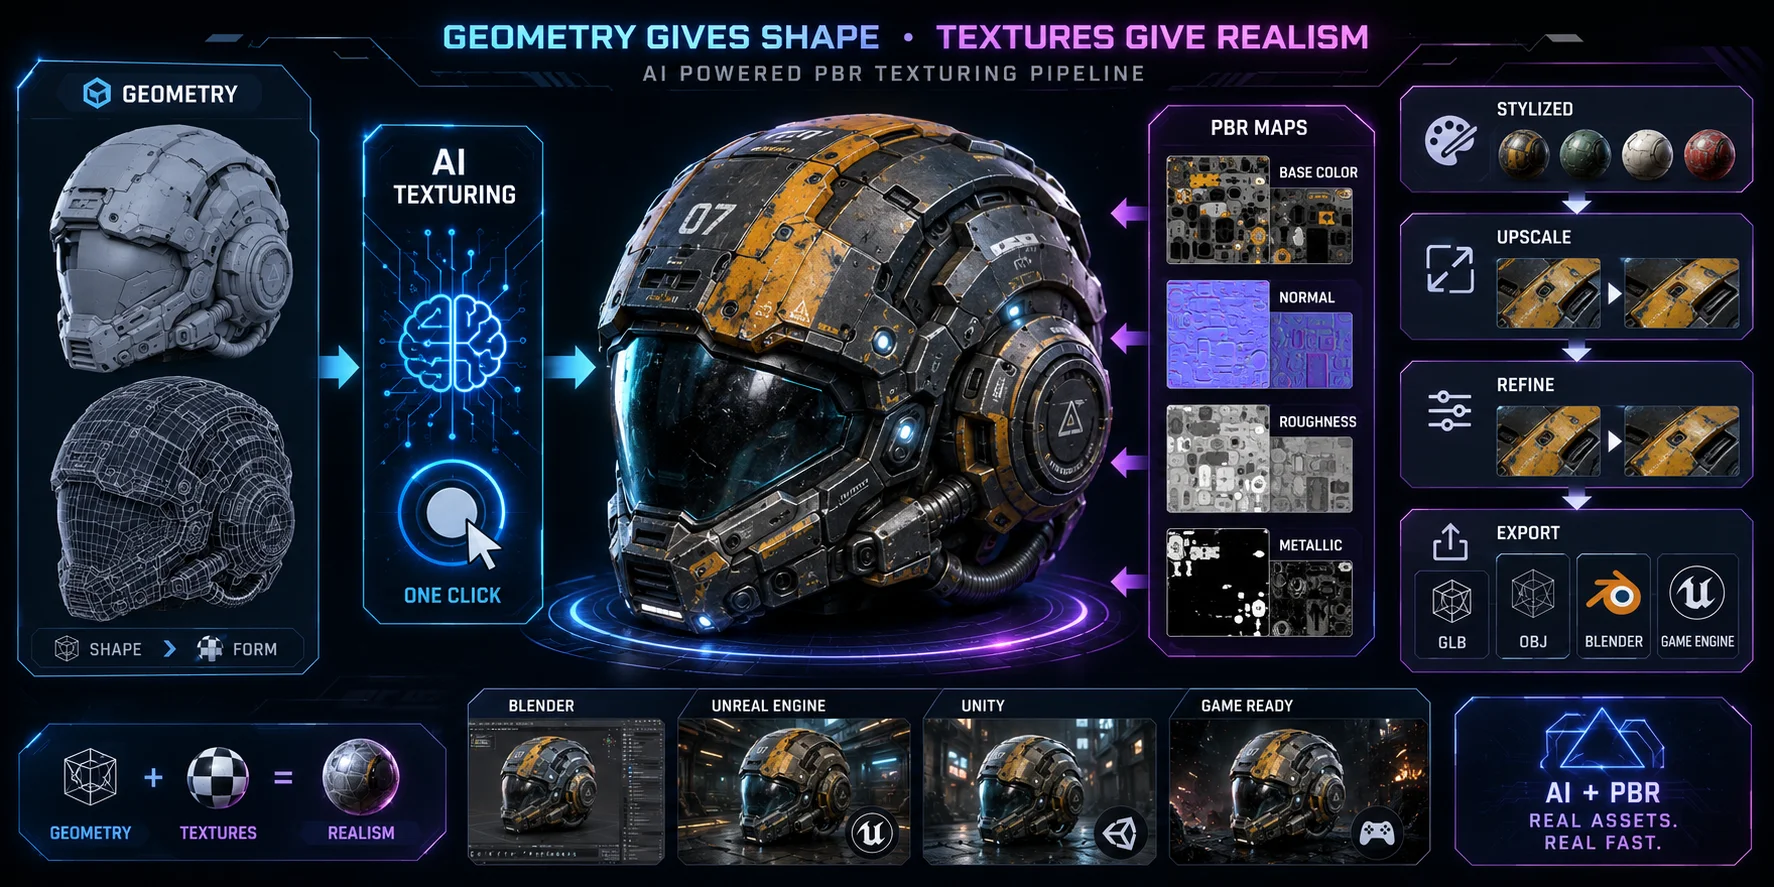
Modern AI 3D tools can generate PBR materials, including Base Color, Normal, Roughness, and Metallic maps. These maps tell Blender, game engines, and renderers how the surface should respond to light.
One click on AI texturing can generate PBR maps that you can refine later. Tripo describes the feature as generating high-quality textures and materials with support for further editing and customization.
For stylized assets, choose a consistent visual direction before texturing. Mecha props, wooden toys, fantasy weapons, fabric characters, and realistic products should not all use the same surface treatment. Stylization modes and material presets can establish a coherent base before manual edits.
If a texture lacks sharpness, increase detail with texture upscaling. For local changes, use Magic Brush to correct flaws, enhance details, or repaint a small area instead of regenerating the entire texture.
For game engines and web delivery, GLB is often convenient because it can package textures with the geometry. For manual editing, export OBJ with texture maps and rebuild or refine materials in Blender’s Shader Editor or Substance Painter.
Which 3D File Format Should You Export?
Your export format should match the next step in the workflow. There is no single best option for every destination.
| Format | Best Use | What to Know |
|---|---|---|
| GLB | Game engines, AR, VR, web viewers, portable textured assets. | Often the safest default because geometry and textures can travel together. |
| FBX | Blender, Maya, Unity, Unreal, animation and rigging pipelines. | Use when skeletons, animation, or broader DCC compatibility matter. |
| OBJ | Manual editing, broad compatibility, Blender and Substance workflows. | Usually comes with separate material and texture files. |
| STL | 3D printing. | Geometry only; textures are lost. Export availability depends on eligible subscription access. |
| USD | VFX, Omniverse, advanced collaborative workflows. | Best suited to advanced users and pipeline-based production. |
| 3MF | Modern 3D printing, color, and multi-material workflows. | Often more useful than STL when supported by the printer and slicer. |
GLB is a sensible default for games, web, AR, and textured assets. FBX is a better choice when animation or rigging matters. OBJ remains useful for general editing and compatibility. For physical printing, choose STL for geometry-only output or 3MF when you need color or multi-material information.
STL exports contain geometry only, so textures and material data will not survive. Use 3MF only when the destination slicer and printer support the color or multi-material information you need; otherwise STL remains the simpler geometry-only handoff. Export availability varies by plan and model version; check current pricing before download.
GLB is usually the safest default, but which format you pick depends on where the model is headed.
Common AI 3D Modeling Mistakes and How to Avoid Them
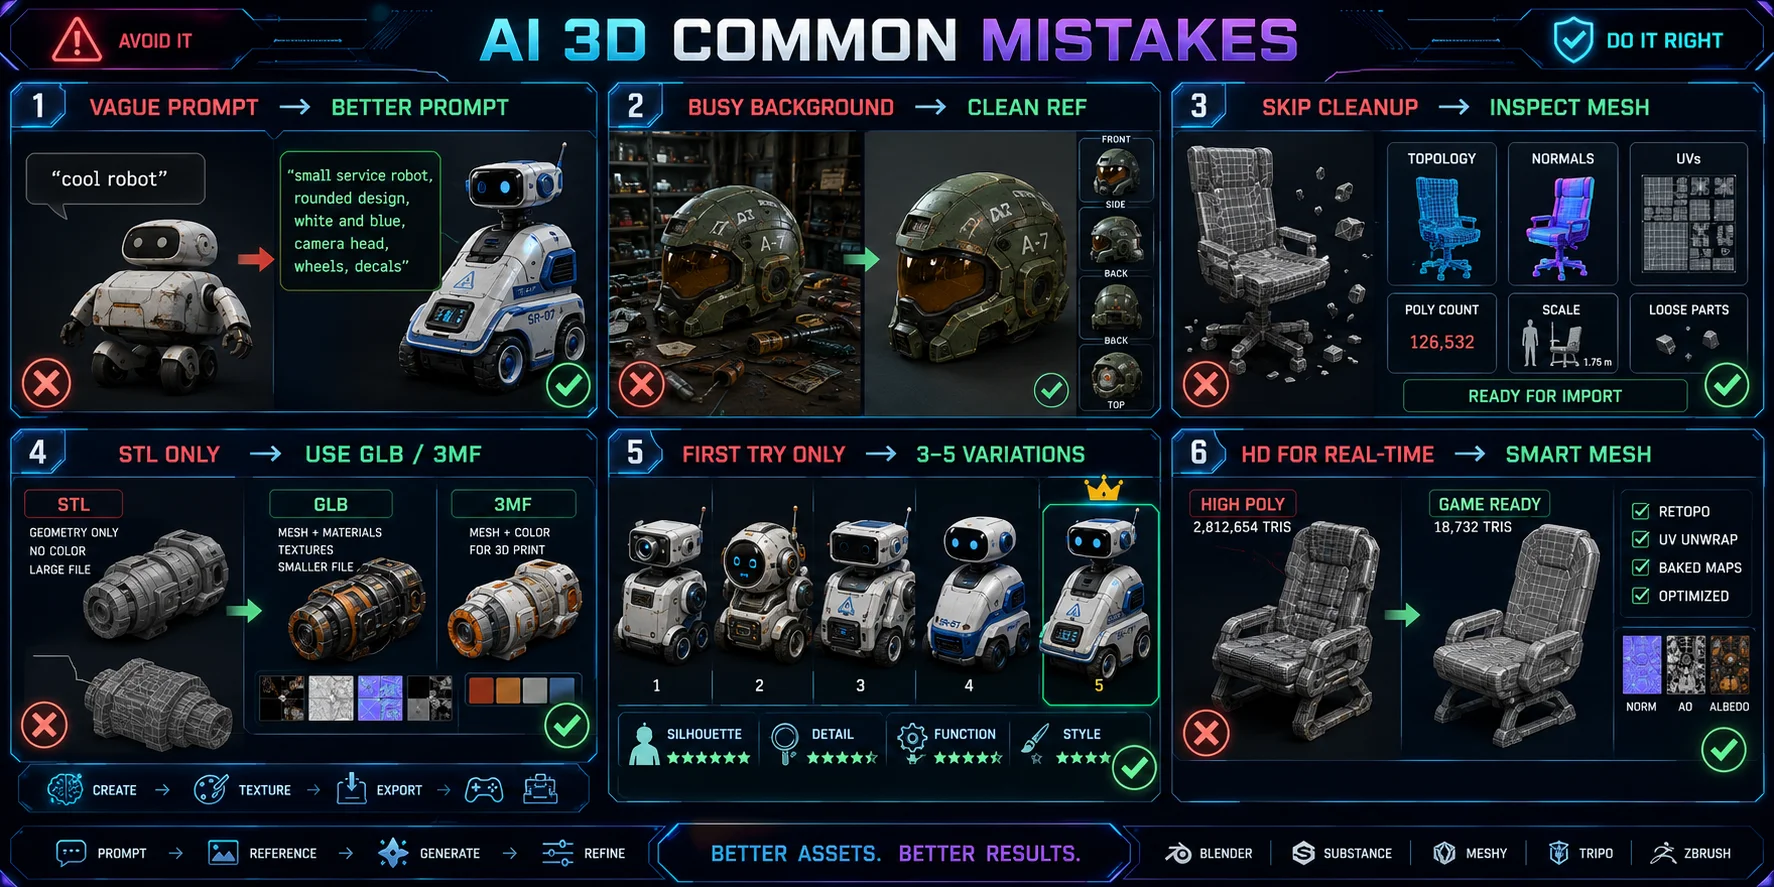
- Using vague prompts → Describe shape, material, style, and technical intent. Replace “cool robot” with “small stylized service robot, rounded body, two wheels, white plastic shell, clean topology, game asset.”
- Using a single image with a complex background → Crop tightly around the object and use a plain background. Add extra angles for objects with important hidden sides.
- Skipping cleanup before game import → Always inspect topology, normals, UVs, polygon count, scale, and loose fragments before importing into Unity or Unreal.
- Exporting STL and expecting textures → STL stores geometry only. Use GLB for textured game or web assets, or 3MF for compatible color-printing workflows.
- Assuming the first generation is final → Generate three to five variations before giving up. AI output varies between runs, and another pass may produce a much stronger silhouette.
- Using HD Model for real-time apps → High-density meshes can reach up to 2 million polygons and are often too heavy for real-time scenes. Use Smart Mesh or retopology for game-ready topology.
Frequently Asked Questions
Can I use AI to generate 3D models?
Yes. AI 3D tools can create textured 3D models from a text prompt, a single image, or multiple reference images. You still need to inspect scale, topology, and export settings before using the result in production.
Can ChatGPT create a 3D model?
ChatGPT can improve prompts or generate code for simple procedural geometry. For textured, editable assets and production controls, use a dedicated AI 3D platform such as Tripo AI Studio.
Which AI is good for 3D modeling?
Choose a tool that supports both text-to-3D and image-to-3D, offers practical export formats, and includes cleanup or post-processing options. Tripo AI Studio combines generation, Smart Mesh optimization, texturing, and multiple export paths in one workflow.
How do I create a 3D model of myself using AI?
Upload a clear front-facing image to an image-to-3D tool. For better proportions, provide three or four images from different angles under consistent lighting. Neutral poses and simple backgrounds generally produce more reliable geometry.
What is the difference between text-to-3D and image-to-3D generation?
Text-to-3D converts a written description into a mesh and is best for fast exploration. Image-to-3D reconstructs a model from visible visual information and usually gives more predictable shape fidelity. Multi-view input improves hidden-side accuracy further.
How do I prepare a reference image for better AI 3D conversion results?
Use a clear, evenly lit image with one centered object and a simple background. Crop away unnecessary surroundings. For complex objects, provide front, back, left, and right views to improve reconstruction of occluded surfaces.
What file format should I download for a game engine versus 3D printing?
For Unity, Unreal, web, AR, or VR, GLB is often a practical default because it can include textures. For printing, use STL for geometry-only output or 3MF when the workflow supports colors or multiple materials. OBJ remains a flexible editing fallback.
How do I fix topology or mesh quality issues in an AI-generated model?
Common problems include floating fragments, non-manifold edges, holes, and overly dense triangles. For games, retopologize the mesh to an appropriate polygon budget. For printing, repair holes and intersections with Blender, Meshmixer, or slicer repair tools.
Does AI 3D generation work for characters and humanoids?
Modern tools can generate characters and humanoids, especially from clear front-facing references. Neutral T-pose characters generally work better than complex action poses. After generation, use auto-rigging to create a starting skeleton, then inspect weights and joint deformation before animation.
How long does it take to generate a 3D model with AI?
A base model can take from roughly 10 seconds to a few minutes, depending on complexity and selected quality. Texturing, retopology, and export add additional time. A usable asset can often be prepared in minutes, while production cleanup may take longer.
Conclusion
AI 3D generation has made it practical for creators without traditional modeling experience to produce usable starting assets quickly. The most important skills now include preparing strong inputs, choosing the right generation route, reviewing topology, and exporting for the intended destination.
With a disciplined workflow, an AI-generated model can move through a practical workflow from prompt or reference image to its intended destination. Ready to build your first asset? Start free in Tripo AI Studio, or review plans and pricing when you need expanded access.