How to Create Clean Meshes in Blender & Tripo AI: The Complete Guide
Creating clean meshes is essential for optimal rendering, better performance, and more professional results. Whether you've created models from scratch, downloaded them from online repositories, or generated them using ai 3d model generators, mesh cleanup is a crucial step in the 3D production pipeline. In this comprehensive guide, we'll explore the most effective manual methods for creating clean meshes in Blender, plus introduce you to Tripo Studio's game-changing retopology feature.
The Power of Tripo AI for Clean 3D Models
Before diving into manual cleanup techniques, it's worth highlighting how Tripo AI is transforming the 3D modeling workflow. As a leading ai 3d model generator, Tripo AI stands out for its ability to not only create stunning 3D assets from text descriptions or images but also for its powerful mesh optimization capabilities.
Why Choose Tripo AI for Your 3D Modeling Needs

Tripo AI is revolutionizing the 3D modeling workflow by combining advanced AI-powered generation with powerful mesh optimization tools, making it an ideal choice for artists, game developers, and designers alike.
Key Advantages of Tripo AI:
- Speed: Generate detailed, production-ready 3D models in seconds instead of hours of manual work.
- Quality: Produce high-fidelity models with clean, optimized meshes right from the start.
- Accessibility: Create professional 3D assets without requiring deep technical expertise.
- Versatility: Convert images or text prompts into 3D models, supporting a wide range of creative inputs.
- Optimization: Leverage built-in mesh cleaning, retopology, and texture mapping tools to streamline your workflow.
Why Clean Meshes Matter
Before diving into techniques, let's understand why mesh cleaning is so important:
- Improves rendering performance
- Reduces file size
- Creates better topology for animation
- Ensures proper lighting and shading
- Makes models more suitable for game engines
- Prepares meshes for 3D printing
Manual Methods for Cleaning Meshes in Blender
Merge Vertices by Distance (Remove Doubles)
One of the most common mesh issues is overlapping or duplicate vertices, which can cause shading artifacts and increase vertex count unnecessarily. This is especially common when dealing with models from an image to 3D conversion process.
How to do it:
- Select your mesh and go into Edit Mode (Tab)
- Select all vertices (press A)
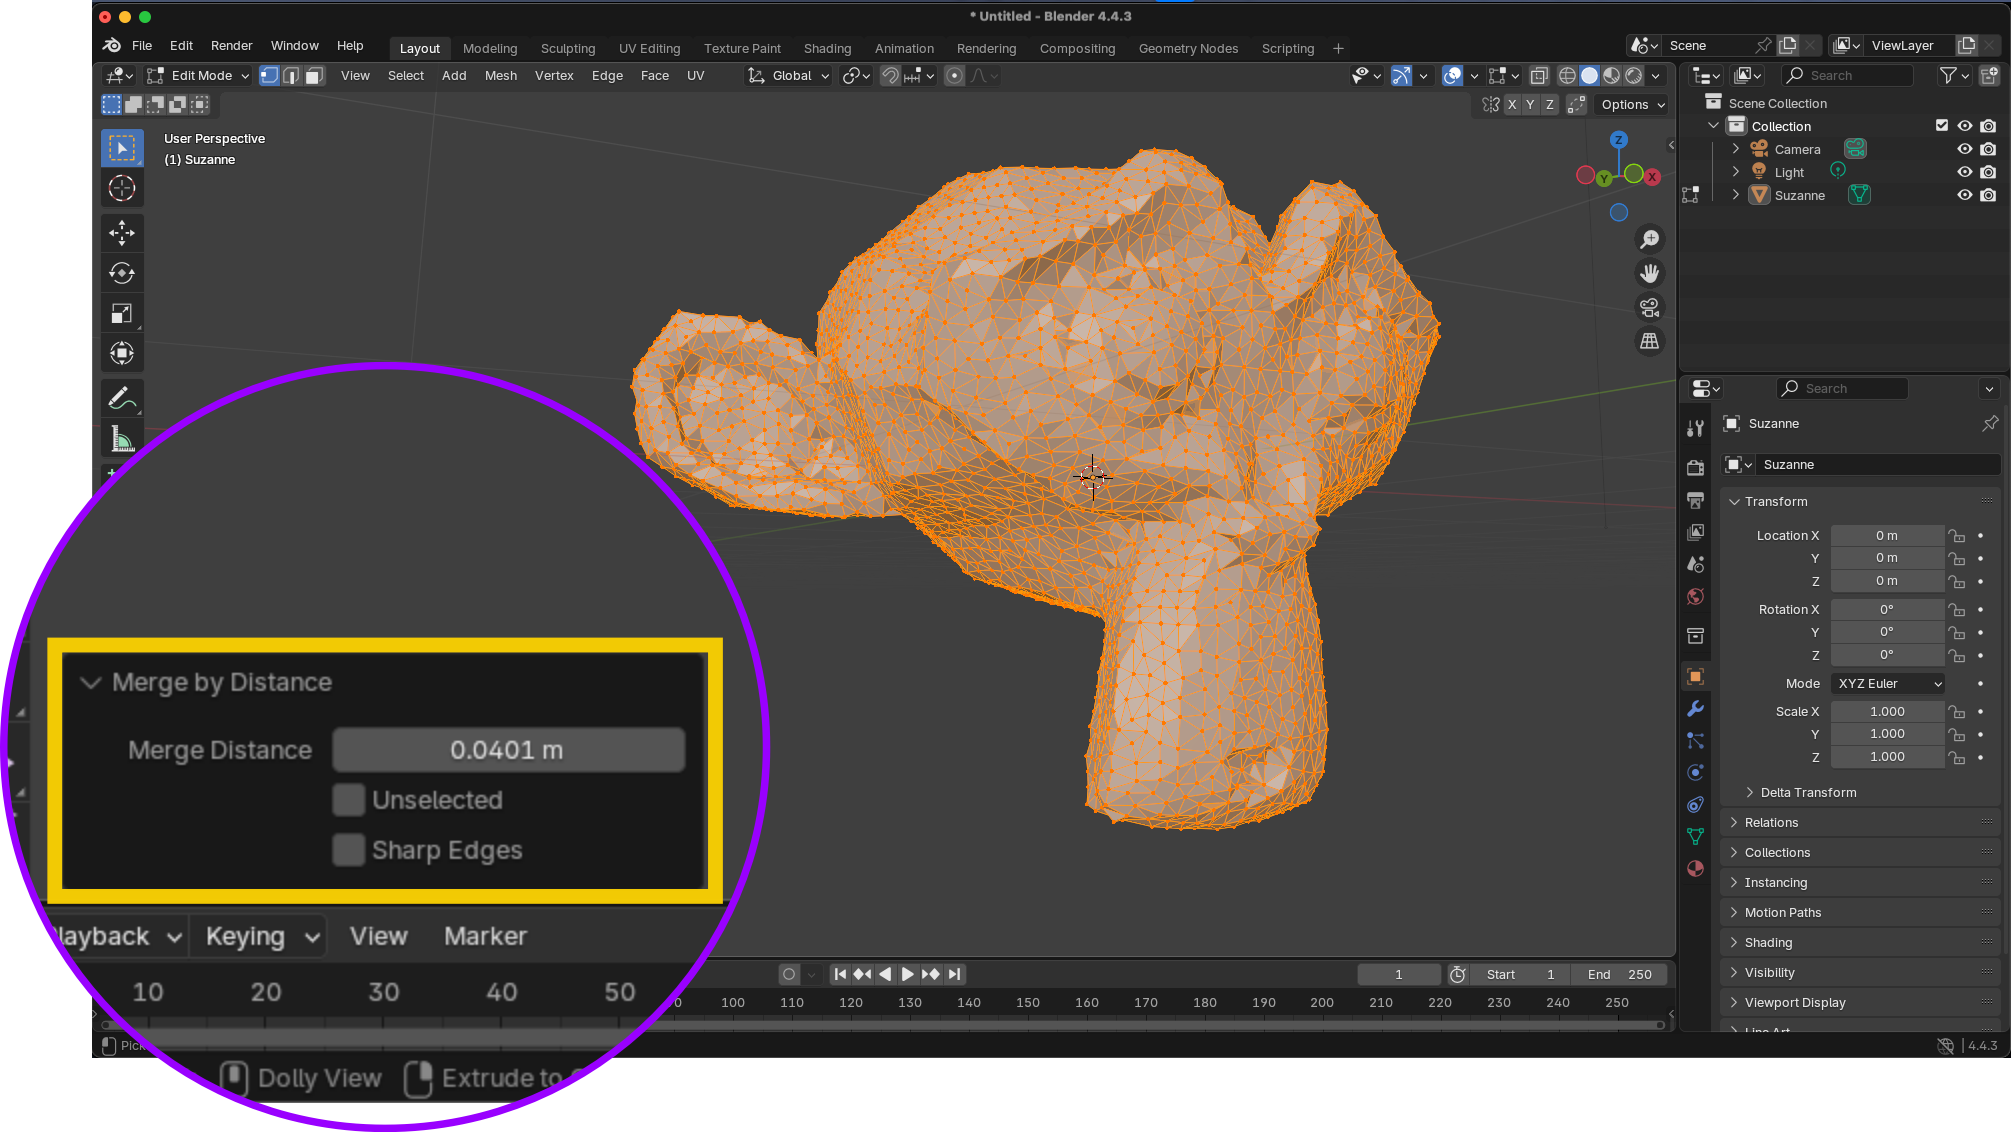
- Navigate to Mesh > Clean Up > Merge by Distance
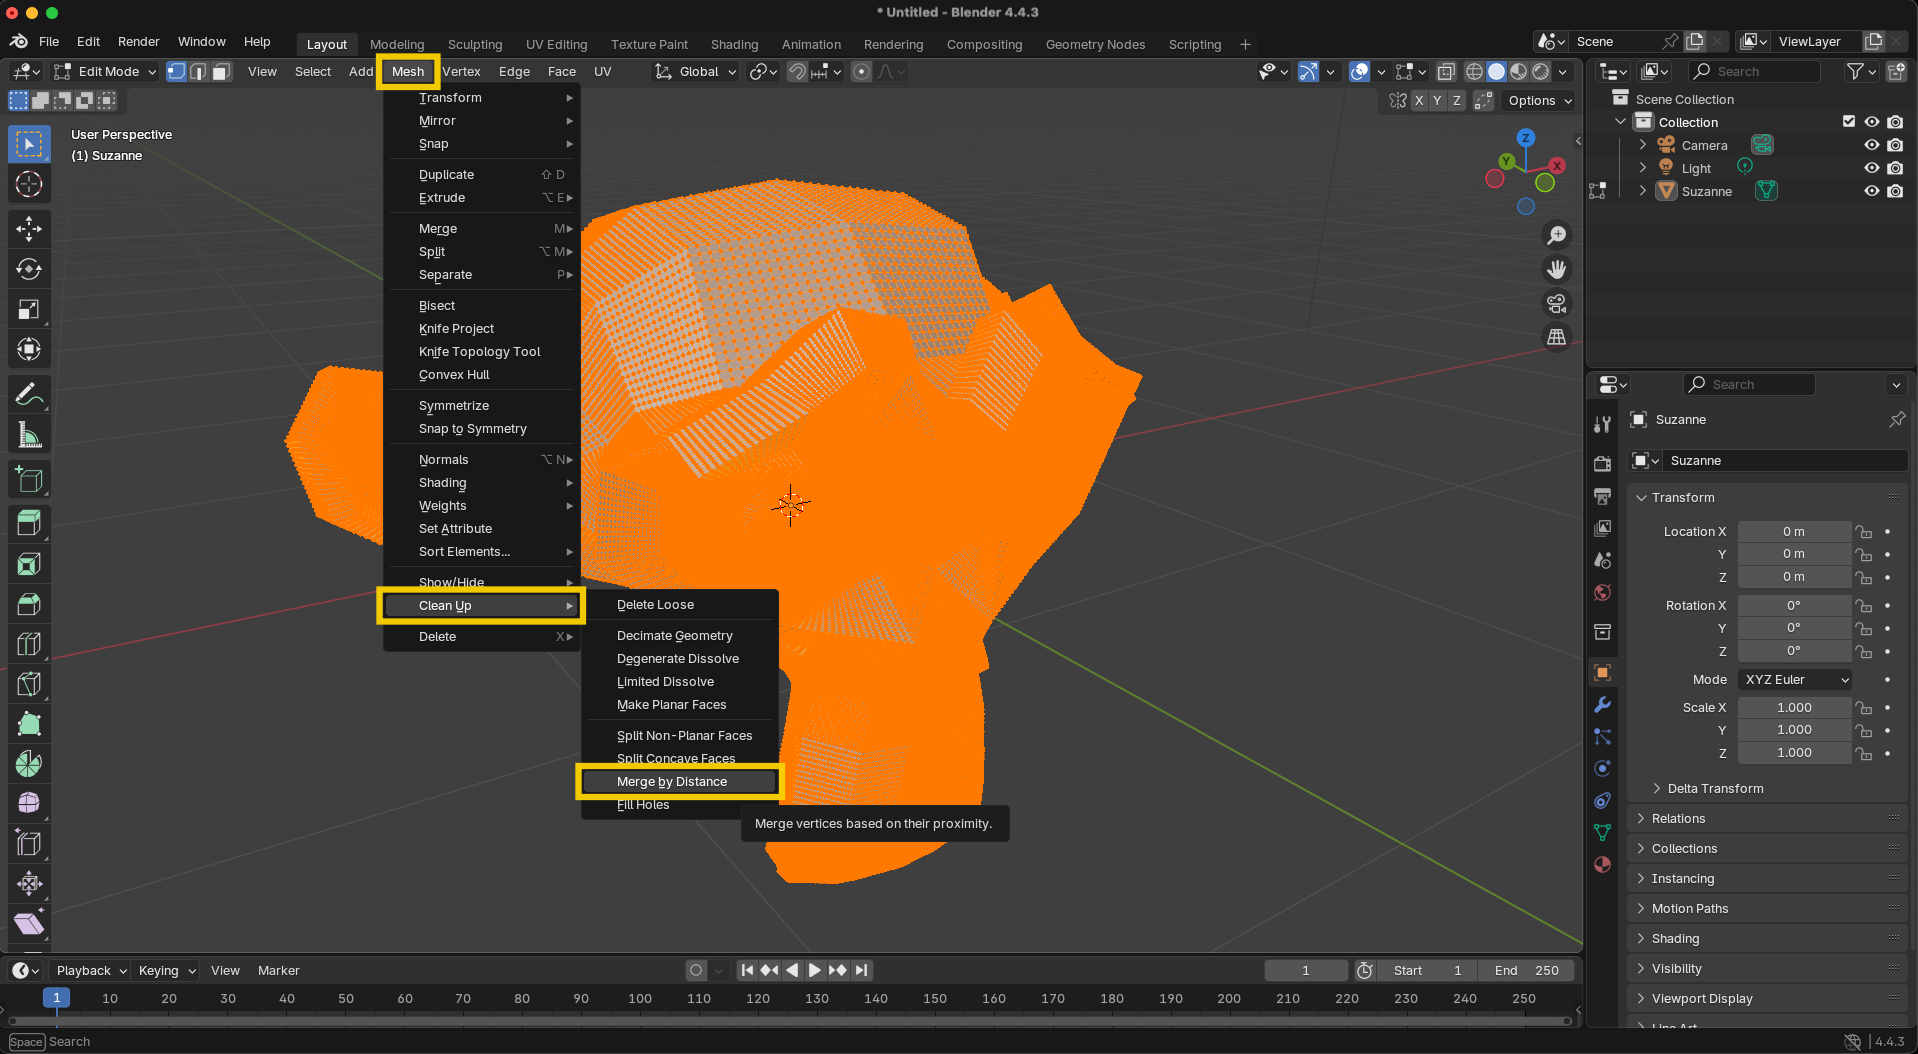
- Adjust the "Merge Distance" threshold as needed
- Monitor the operation report to see how many vertices were merged
Pro tip: For meshes with varying density, you may need to apply this operation multiple times with different threshold values to different parts of your mesh.
Recalculating Normals
Face normals determine which direction a face is "pointing" and affect how light interacts with your model. Inconsistent normals can create strange shading effects.
How to do it:
- In Edit Mode, select all elements (A)
- Press Shift+N to recalculate normals facing outward
- Alternatively, use Mesh > Normals > Recalculate Outside
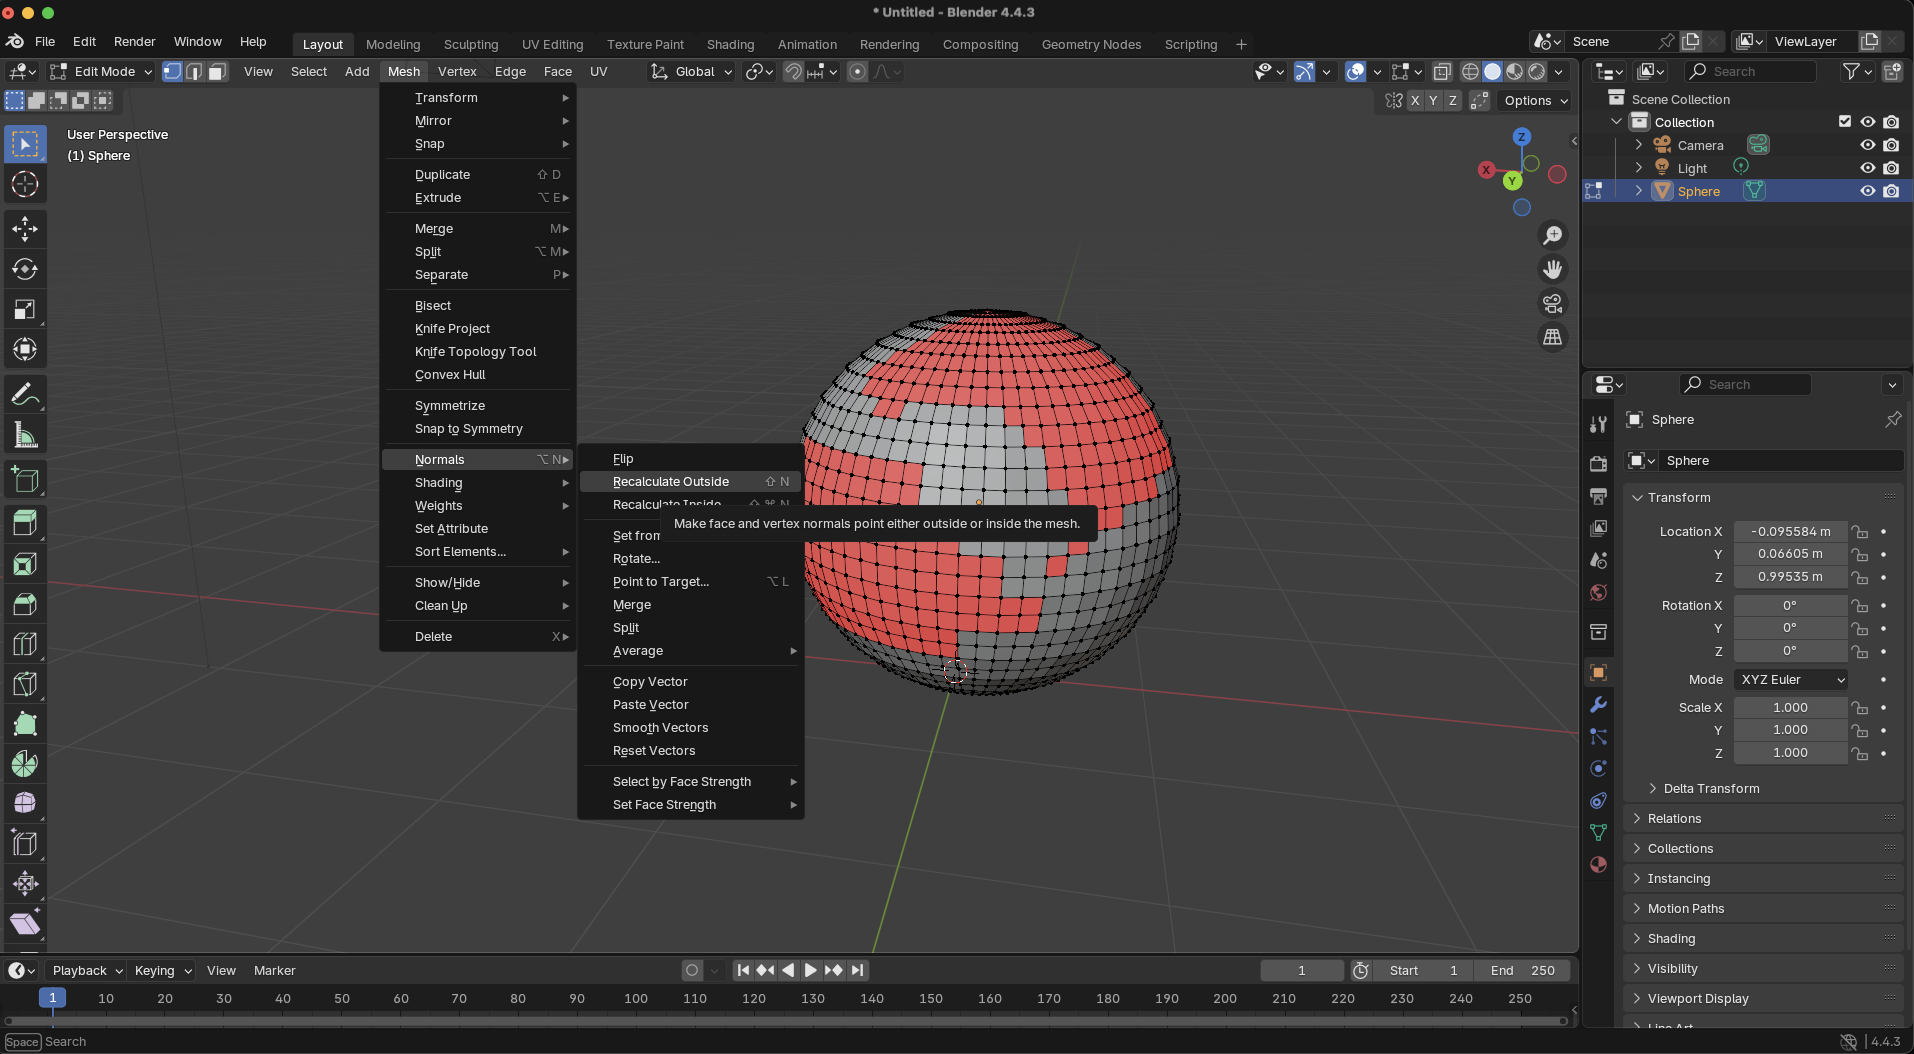
Checking normals:
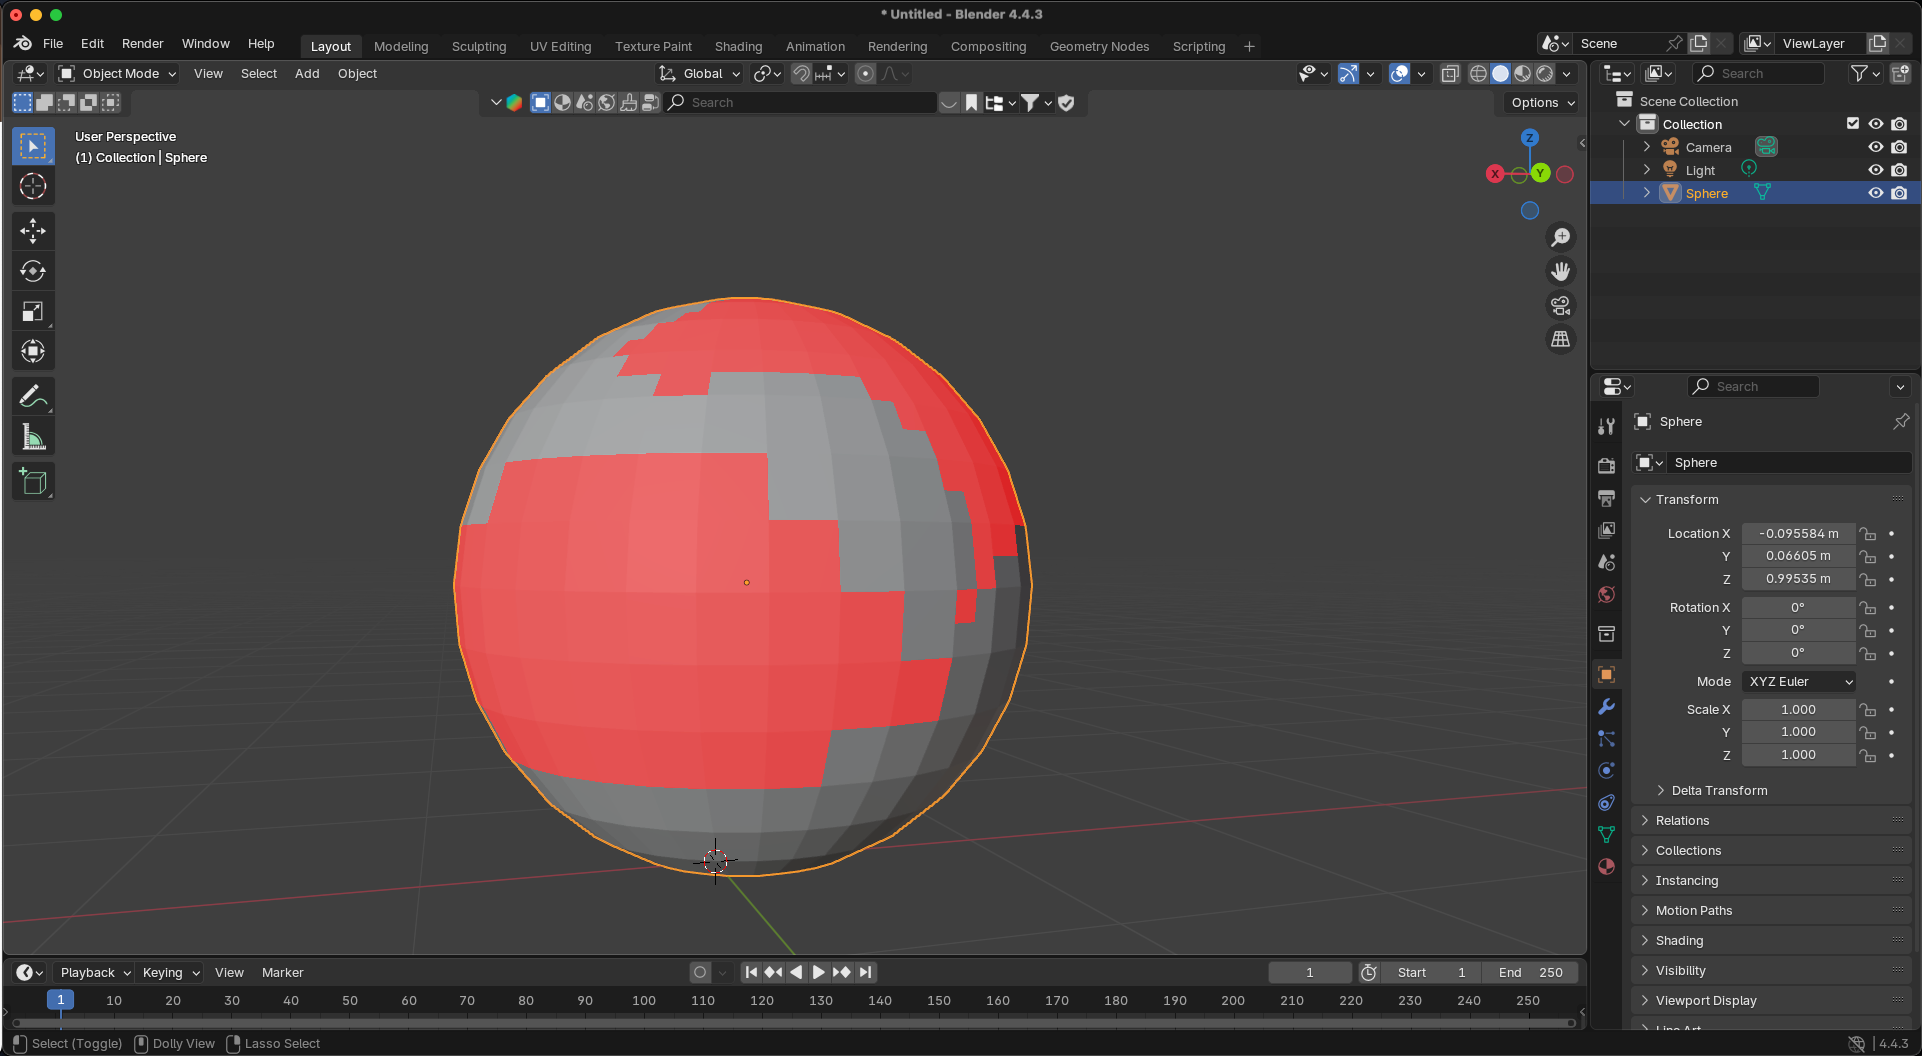
- In the Viewport Overlays menu, enable "Face Orientation"
- Blue faces indicate outward-facing normals, red faces indicate inward-facing normals

For complex models, especially those generated by an AI 3D model generator, you might need to manually fix some normals by selecting problematic faces and using Mesh > Normals > Flip.
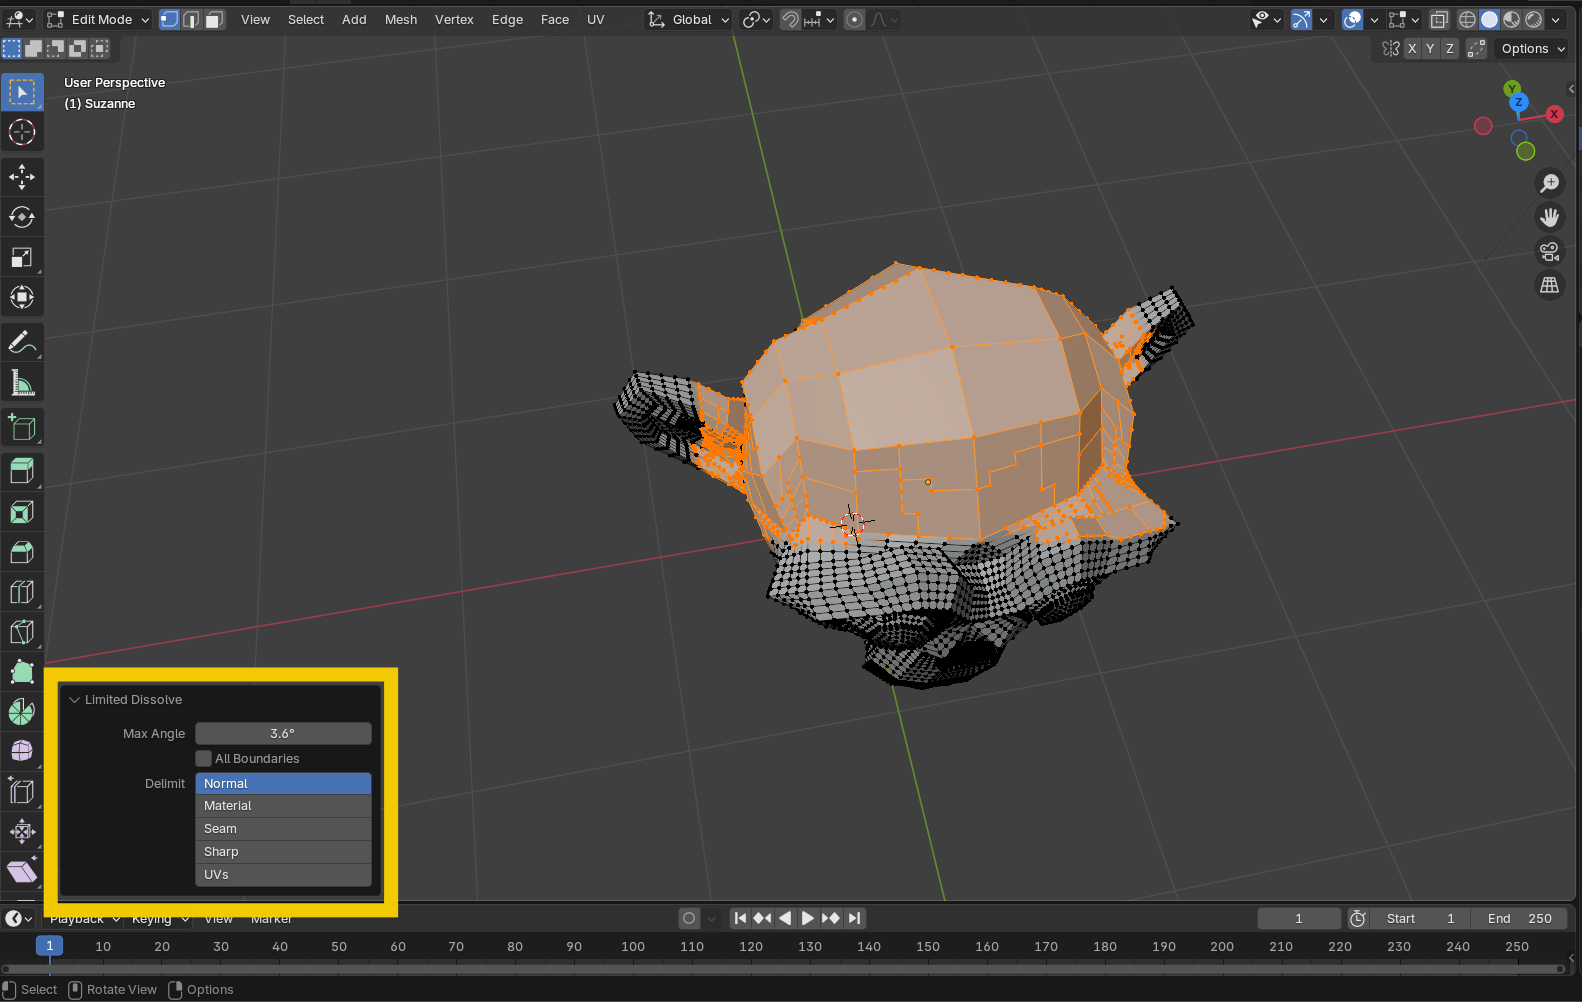
Limited Dissolve
This powerful tool simplifies flat surfaces by dissolving unnecessary edges while maintaining the overall shape of the model. It's particularly useful for reducing polygon count in areas that don't need high detail.
How to do it:
- Enter Edit Mode and select the area you want to simplify
- Go to Mesh > Delete > Limited Dissolve
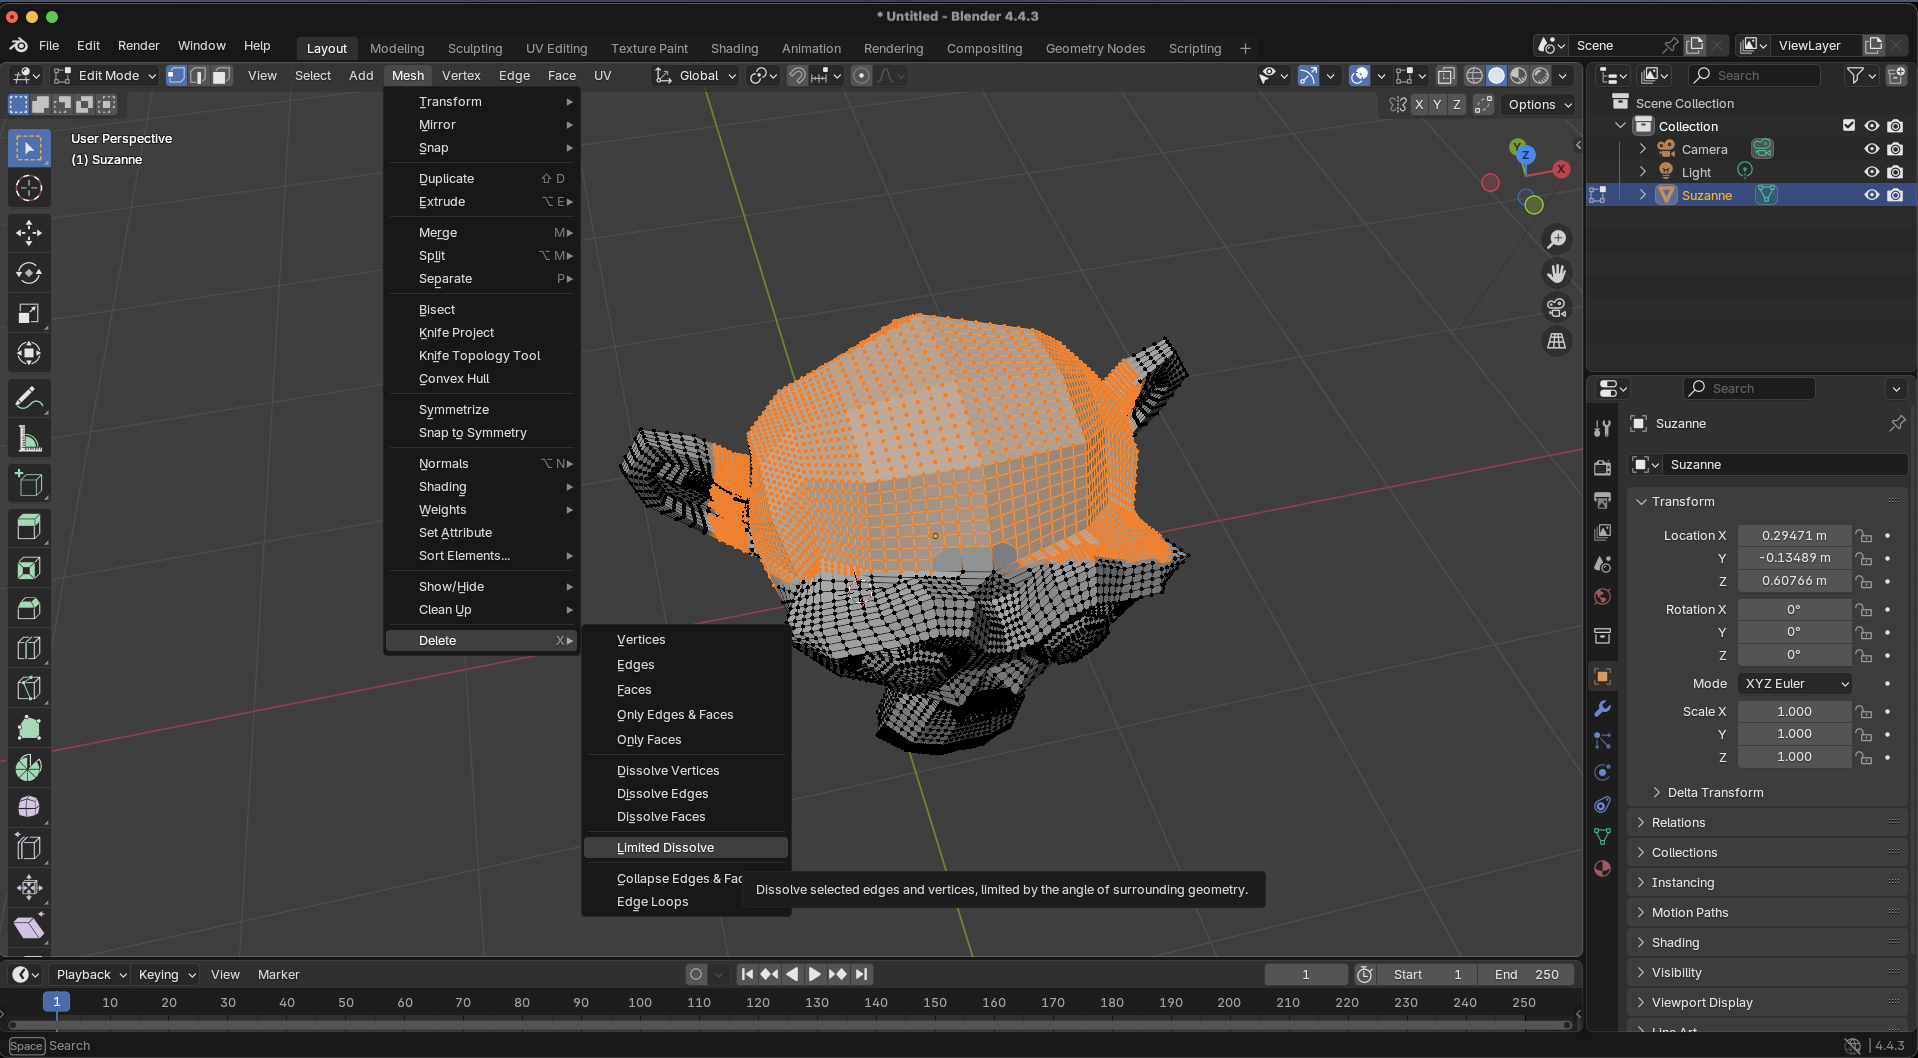
- In the operator panel, adjust the "Max Angle" to control how aggressively suggestion I have done itsedges are dissolved
- Use the "Delimit" options to prevent dissolving across material boundaries or UV seams
Perfect for: Models with unnecessarily high polygon counts in flat areas, common in scan data or image to 3D conversions.
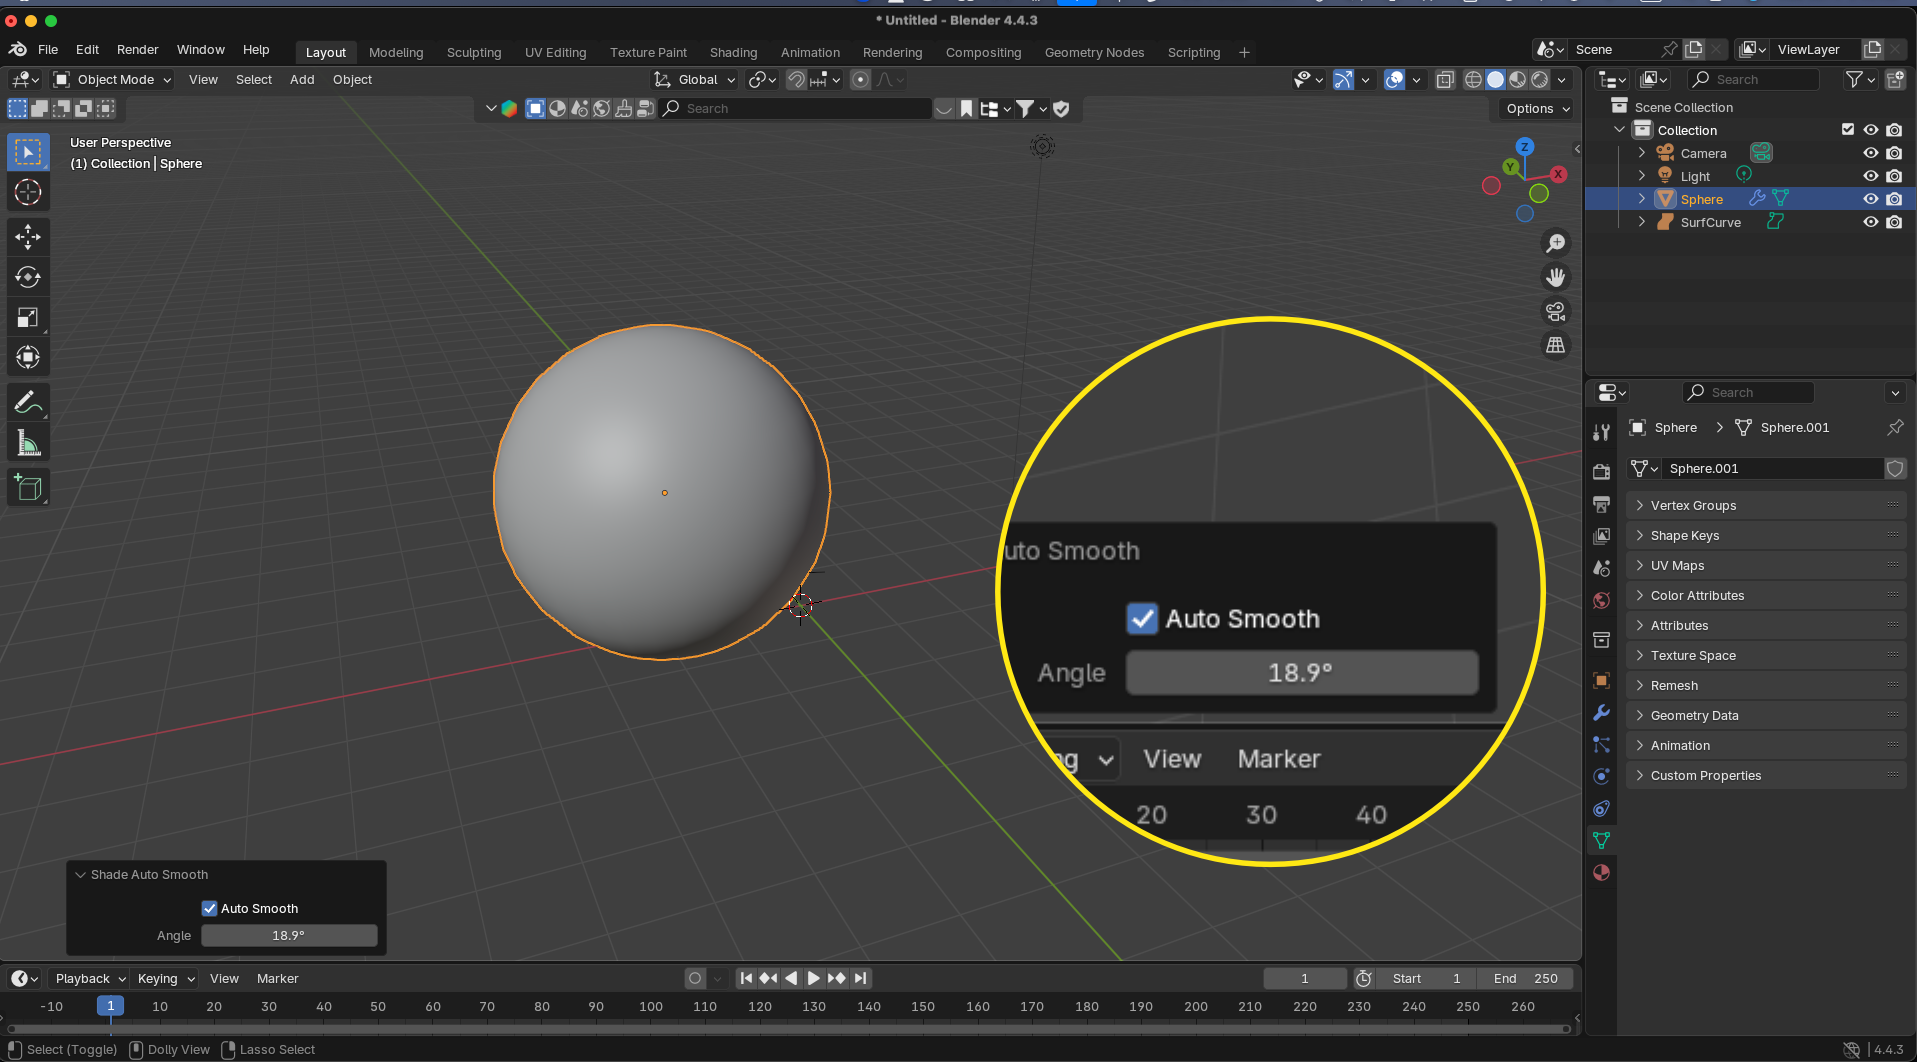
Auto Smooth
This method allows you to maintain sharp edges where needed while keeping the overall mesh smooth. It's ideal for hard-surface models that need crisp edges but smooth faces, providing a non-destructive workflow that keeps your geometry clean.
How to do it:
- Select your object in Object Mode
- Right-click on the object to open the context menu
- Choose "Shade Auto Smooth" from the three shading options (Shade Flat, Shade Smooth, Shade Auto Smooth)

- After selecting Shade Auto Smooth, click and drag left or right to adjust the angle threshold until you're satisfied with the result
- For manual control over specific edges:
- Enter Edit Mode (Tab)
- Select the edges you want to remain sharp
- Right-click and choose "Mark Sharp" (or use Mesh > Edges > Mark Sharp)
- Return to Object Mode to see the final results
Bonus tip: You can also use "Clear Sharp" to remove sharp markings from selected edges if you need to adjust your shading later. This method maintains clean topology while giving you full control over which edges appear sharp or smooth.
Decimate Modifier
The Decimate modifier reduces polygon count while trying to preserve the overall shape. It's perfect for optimizing high-poly models for games or VR.
How to do it effectively:
- First, enable the Statistics overlay in your viewport (Viewport Overlay → Statistics) to monitor your polygon count in real-time
- Select your object and navigate to the Modifier Properties panel
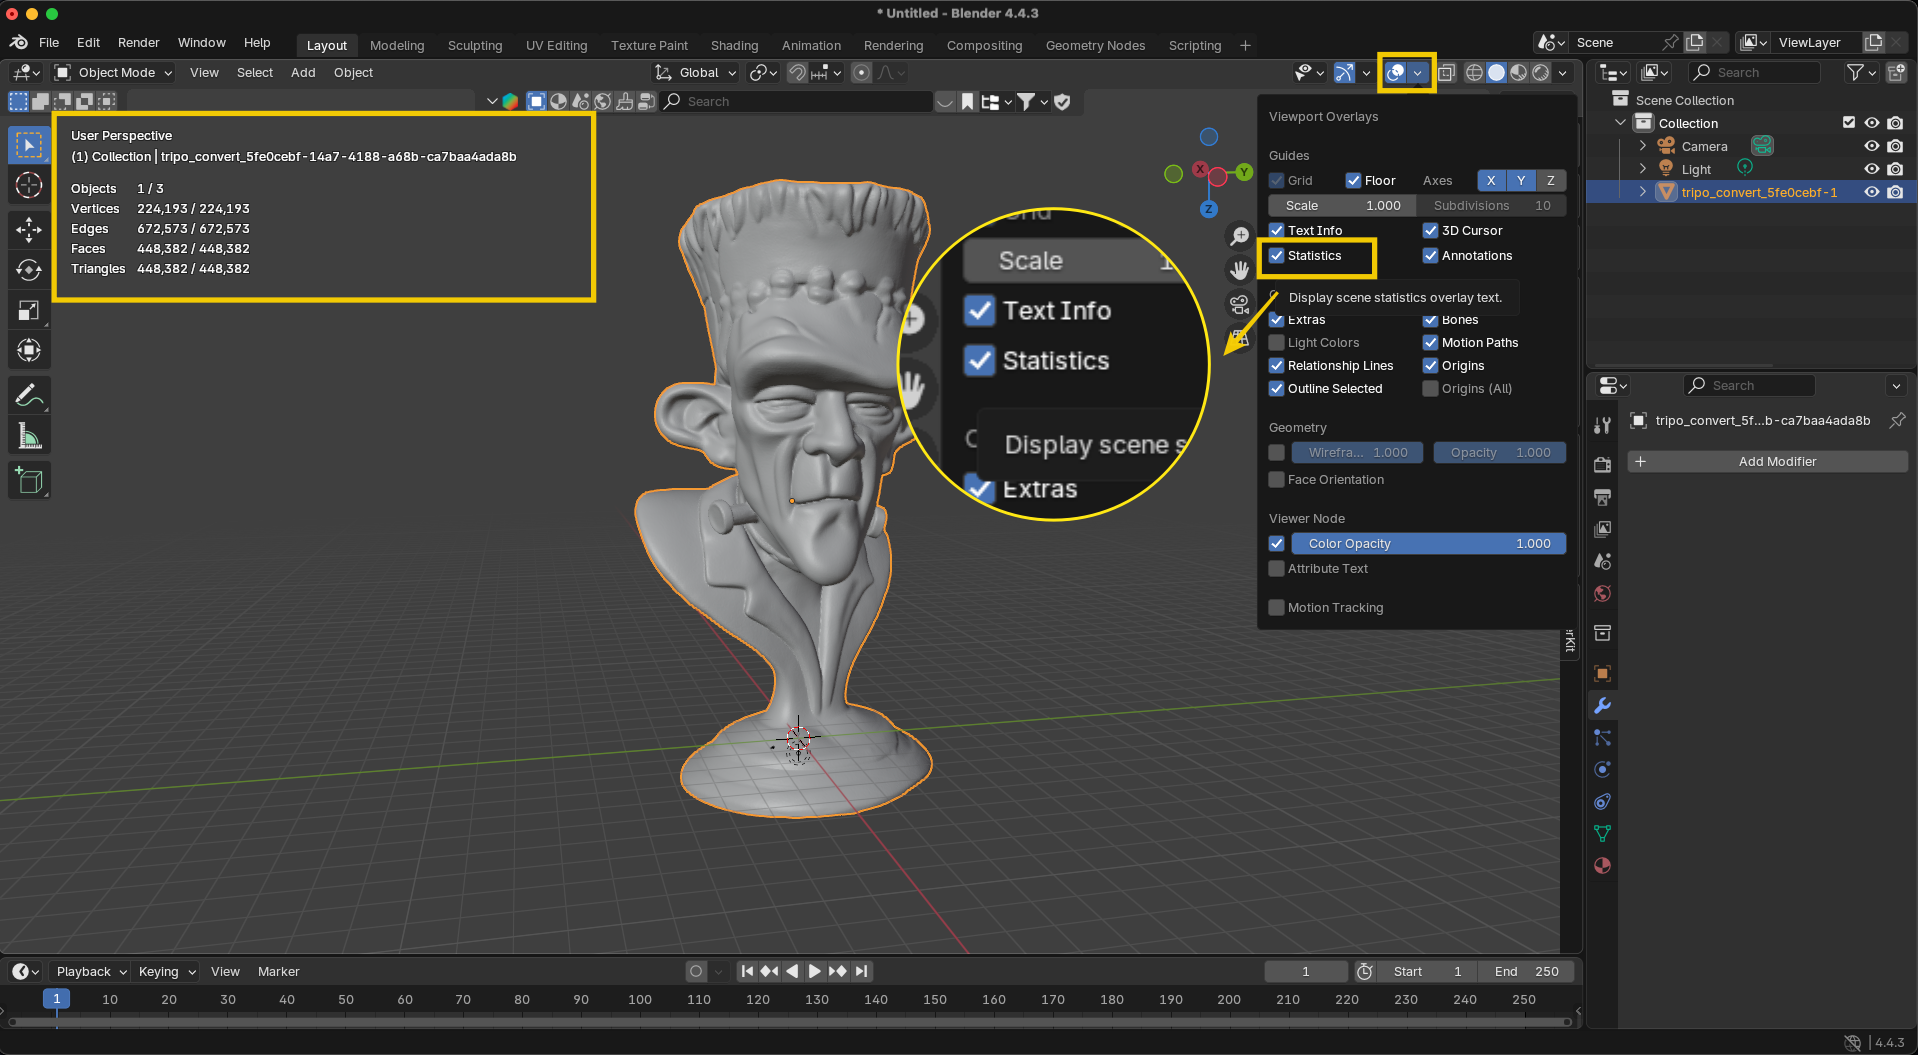
- Add a Decimate modifier from the dropdown menu
- Choose from three reduction methods:
- Collapse: General-purpose reduction controlled by the Ratio slider—start with small adjustments and observe the balance between detail and polygon reduction
- Un-Subdivide: Removes subdivision levels evenly across the entire mesh
- Planar: Dissolves coplanar faces based on the specified angle threshold
- Collapse: General-purpose reduction controlled by the Ratio slider—start with small adjustments and observe the balance between detail and polygon reduction
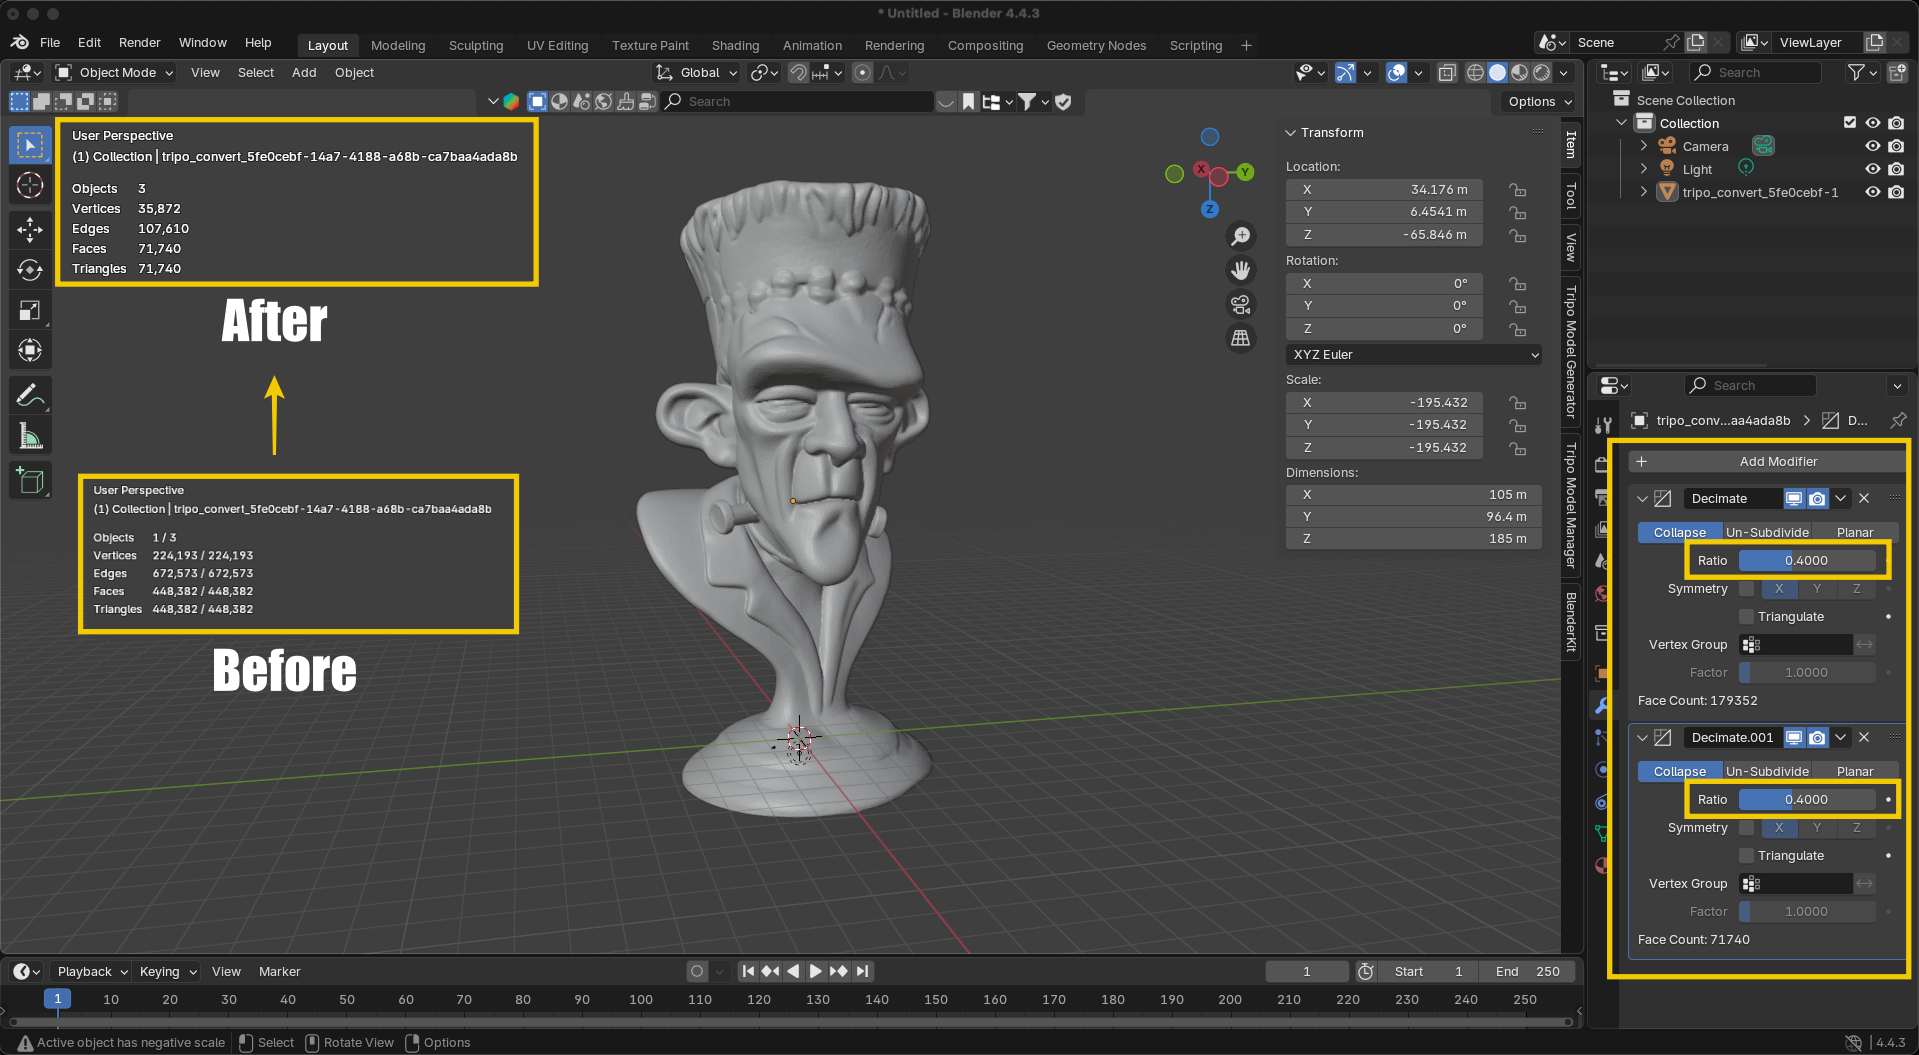
For best results with complex models, try applying multiple Decimate modifiers in sequence. For example, in a recent test with a high-resolution model starting at 448,382 faces, setting the Collapse ratio to 0.4 reduced it to 179,352 faces. Adding a second Decimate modifier with another 0.4 ratio further reduced the count to just 71,740 faces—a reduction of over 84% from the original while maintaining the essential form.
This stacked approach allows you to find the optimal balance between quality and file size. The key is monitoring your polygon reduction through the Statistics display while visually checking that important details aren't lost. Be careful not to reduce too aggressively—excessive decimation can destroy visual quality and create topology problems that are difficult to fix.
Best practice: Keep the Decimate modifier non-destructive (don't apply it) until you're completely satisfied with the results, allowing for adjustments as your project requirements change.
Revolutionize Your Workflow with Tripo Studio's Retopology Feature
While Blender's manual methods are powerful, they can be time-consuming, especially for complex models. This is where Tripo Studio's revolutionary retopology feature comes in.
6. Tripo's One-Click Retopology: The Ultimate Solution for Clean Meshes
The most efficient way to create clean meshes is through Tripo's advanced AI-powered retopology system. This method eliminates hours of manual work while delivering professional-quality results.
How to do it:
- Visit Tripo AI Studio

- Import your existing model (Quick note: the "Upload 3D Model" feature is coming very soon)
- Alternatively, create a new model using Tripo's text-to-3D or image to 3D features
- Navigate to the "Retopology" tab in the top navigation menu
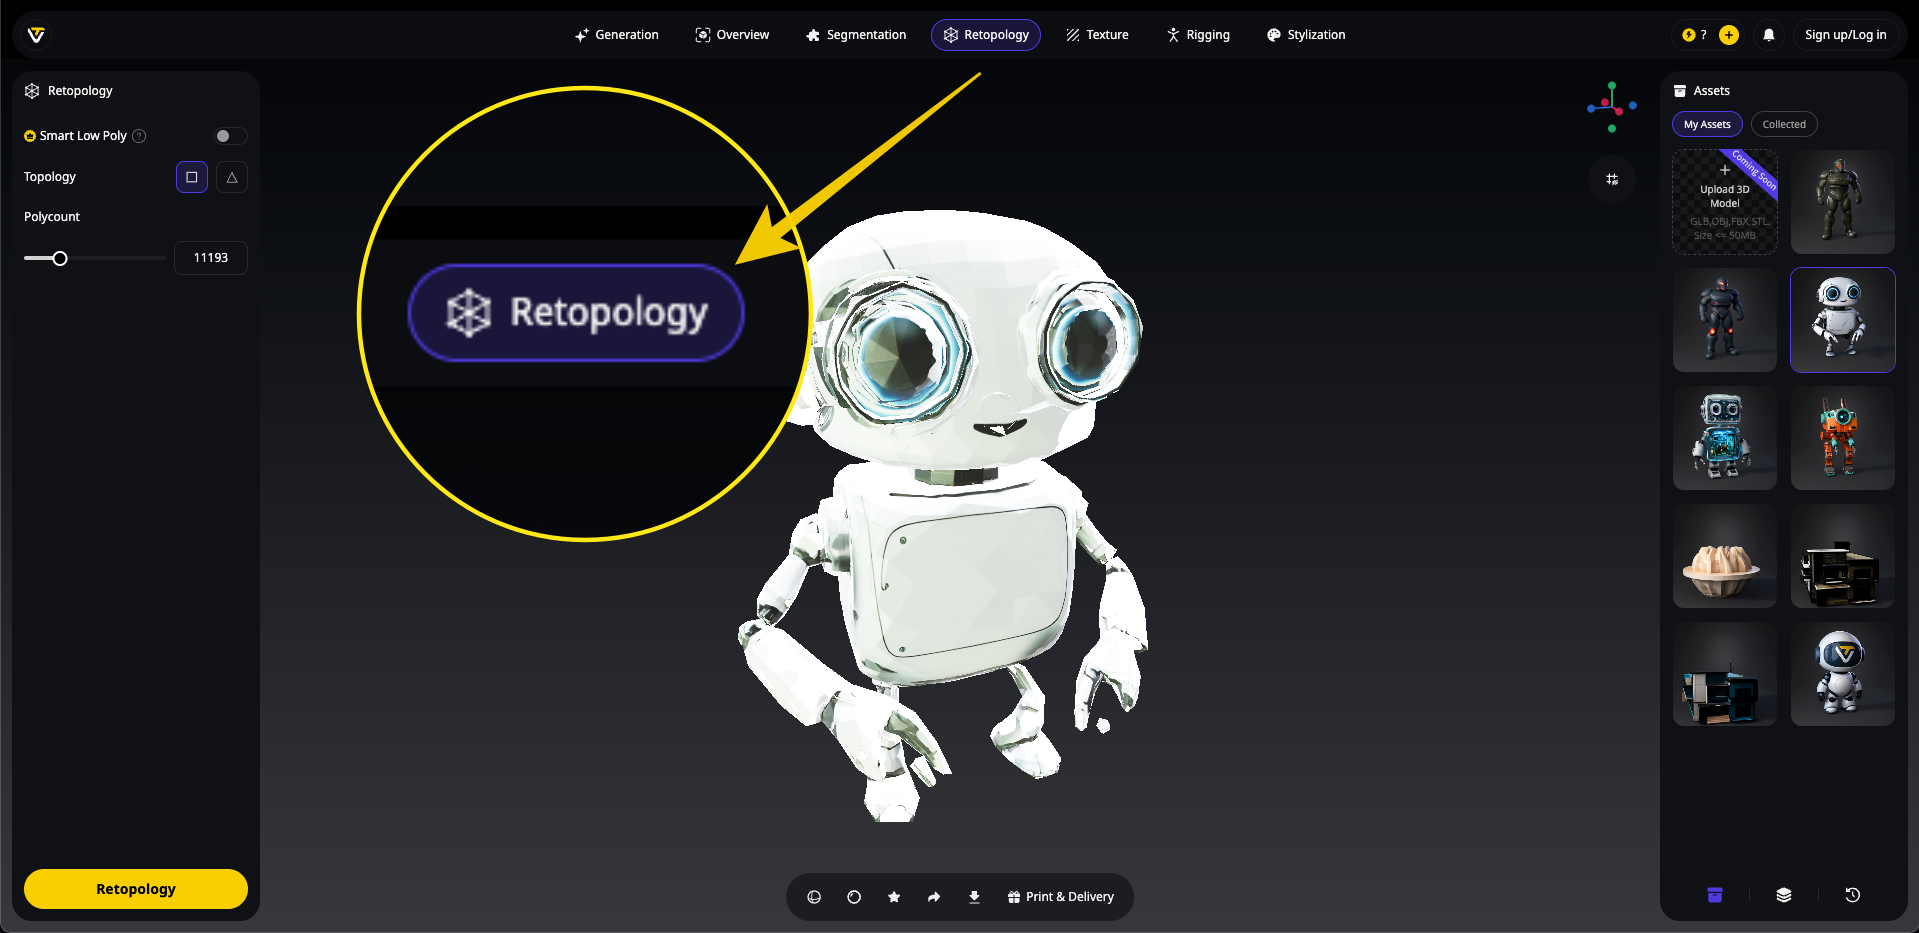
- Configure your optimization settings:
- Smart Low Poly: Enable this option to intelligently reduce polygon count while preserving important details
- Topology: Choose between quad-based (square) or triangle-based topology depending on your needs
- Polycount: Set a specific target polygon count or leave it on "Auto" to let Tripo determine the optimal density
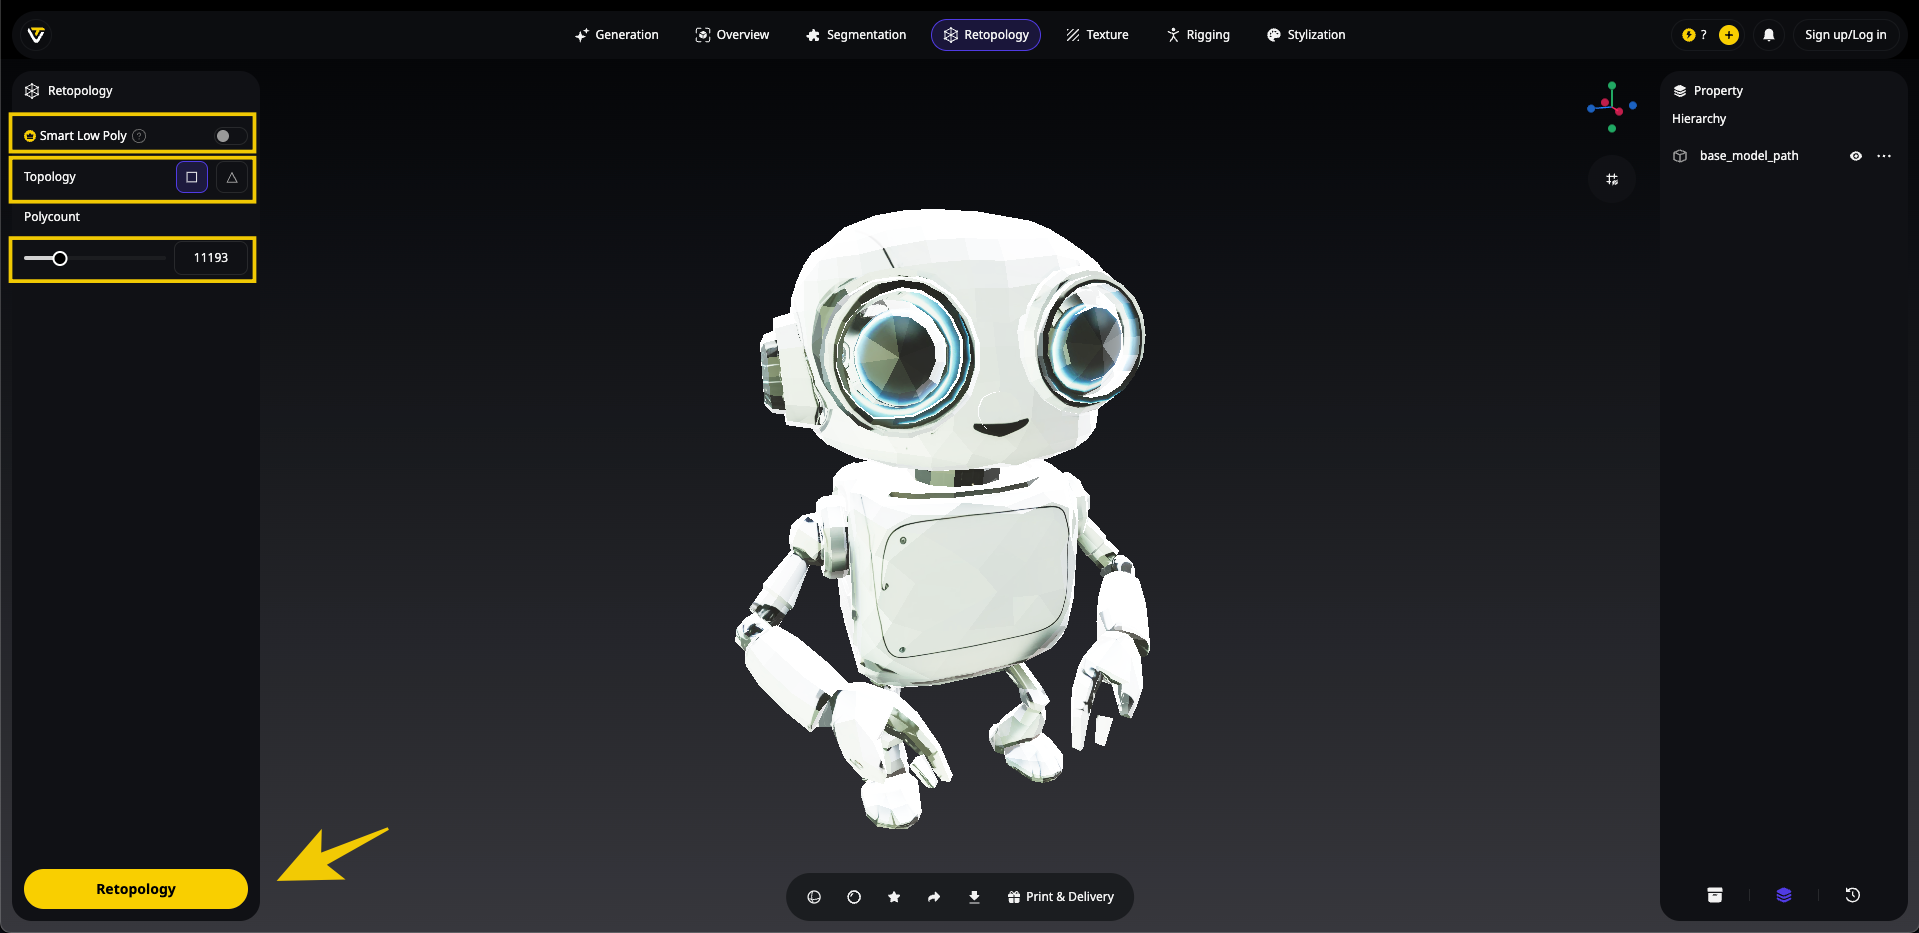
- Click the "Retopology" button to process your model
- After just seconds of processing, your optimized model will be ready to download
This method represents the perfect balance of speed, quality, and accessibility. The ai 3d model generator technology analyzes your model's geometry to determine where detail is needed and where simplification can occur, producing clean meshes with proper topology that would take hours to create manually.
Key benefits of Tripo's retopology feature:
- One-click operation: Transform complex meshes into clean, optimized models instantly
- Smart edge preservation: Maintains important features while reducing polygon count
- Customizable density: Control how aggressively the mesh is simplified
- UV preservation: Retains texture mapping during retopology
- Animation-ready results: Creates topology suitable for rigging and animation
For models created through image to 3D conversion or text-to-3D generation, Tripo's retopology feature seamlessly integrates into your workflow, eliminating hours of manual cleanup work.
How Tripo's Retopology Compares to Manual Methods
While manual cleanup in Blender gives you precise control, Tripo's automated approach offers:
- Speed: Complete retopology in seconds rather than hours
- Consistency: Uniform quad-based topology across the entire model
- Accessibility: No need for advanced technical knowledge
- Integration: Works seamlessly with models created in or imported to Tripo
Best Practices for Creating Clean Meshes
Regardless of which methods you choose, follow these best practices for optimal results:
- Work non-destructively: Use modifiers when possible and keep original meshes as backups
- Clean progressively: Start with major issues like doubles and normals before fine-tuning
- Check your mesh: Use Blender's "Select > Select All by Trait" to find problematic geometry
- Test as you go: Verify that your cleanup doesn't create new problems
- Consider your target platform: Different applications (games, VR, 3D printing) have different requirements for clean meshes
Conclusion
Cleaning up 3D meshes is an essential skill for any 3D artist or designer. While Blender offers powerful manual tools for mesh optimization, Tripo AI's retopology feature represents the next evolution in AI 3D model generation and optimization.
Whether you choose to clean your meshes manually in Blender or leverage Tripo's automated solution, the result will be more efficient, professional models ready for your next project. As image to 3D and AI-generated content become increasingly common in 3D workflows, having efficient cleanup processes in place will save you countless hours and frustration.
Ready to transform your messy models into clean, efficient meshes? Try Tripo Studio today and experience the future of 3D model creation and optimization!
