PBR Texture Maps: The Complete List (With What Each One Does)
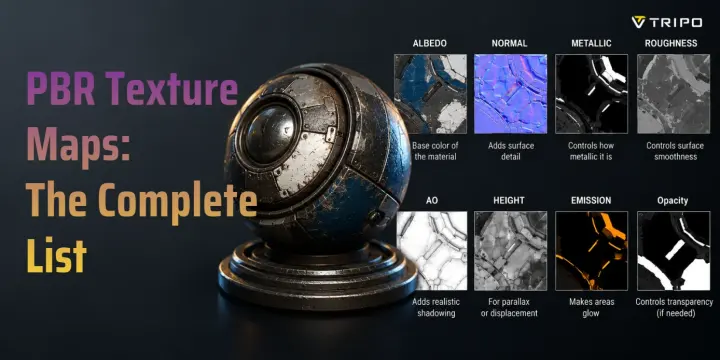
- PBR materials use multiple maps, not one texture.
- Base Color, Normal, Roughness, and Metallic are the core maps.
- AO, Displacement, Emissive, and Opacity add realism when needed.
- Metallic/Roughness is today’s default workflow for most new assets.
- Tripo AI can generate PBR-ready textures from prompts or references.
PBR, or Physically Based Rendering, textures are not a single image. They are a set of specialized maps, and each map controls a different property of how a surface looks and reacts to light. The most important PBR maps are Base Color, Normal, Roughness, and Metallic, but a complete PBR asset can include more map types depending on complexity.
Understanding what each map does, and what black versus white means on each grayscale image, is the difference between guessing your material settings and knowing exactly what to adjust. Demand for production-ready 3D assets is growing fast: Grand View Research projects the global 3D digital asset market to reach about USD 60.6 billion by 2030. This guide covers every major PBR texture map type, what it controls, and how to create or generate one.
What Are PBR Texture Maps?
PBR texture maps are images that tell a render engine how a surface should behave under light. Instead of painting one flat texture with color, shadows, highlights, and reflections baked together, PBR separates surface properties into different maps.
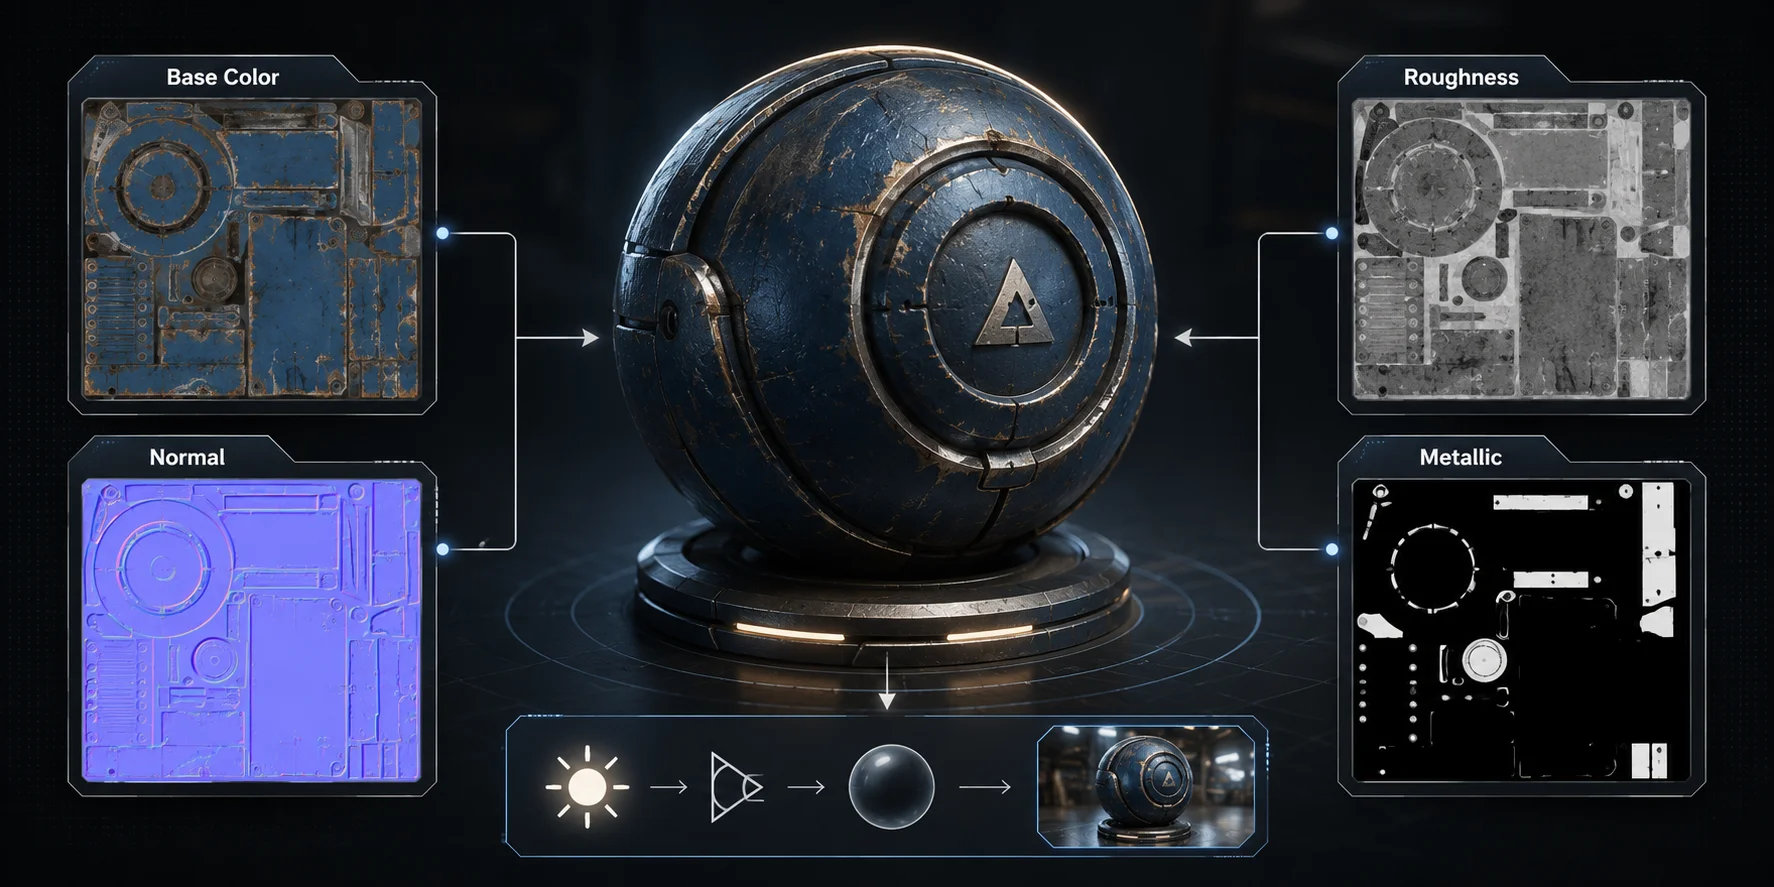
A PBR material is like a stack of instructions. One map controls color. Another controls fake surface bumps. Another controls reflection sharpness. Another tells the renderer whether the surface is metal or non-metal. The engine reads them together and calculates how the material should look under different lighting environments.
There are two main PBR workflows. The most common today is the Metallic/Roughness workflow, used in modern real-time pipelines such as Unreal Engine, Unity, Blender’s Principled BSDF, glTF, and USD. The older Specular/Glossiness workflow still appears in some VFX and legacy rendering pipelines.
For most new projects, learn Metallic/Roughness first. That workflow starts with four core maps.
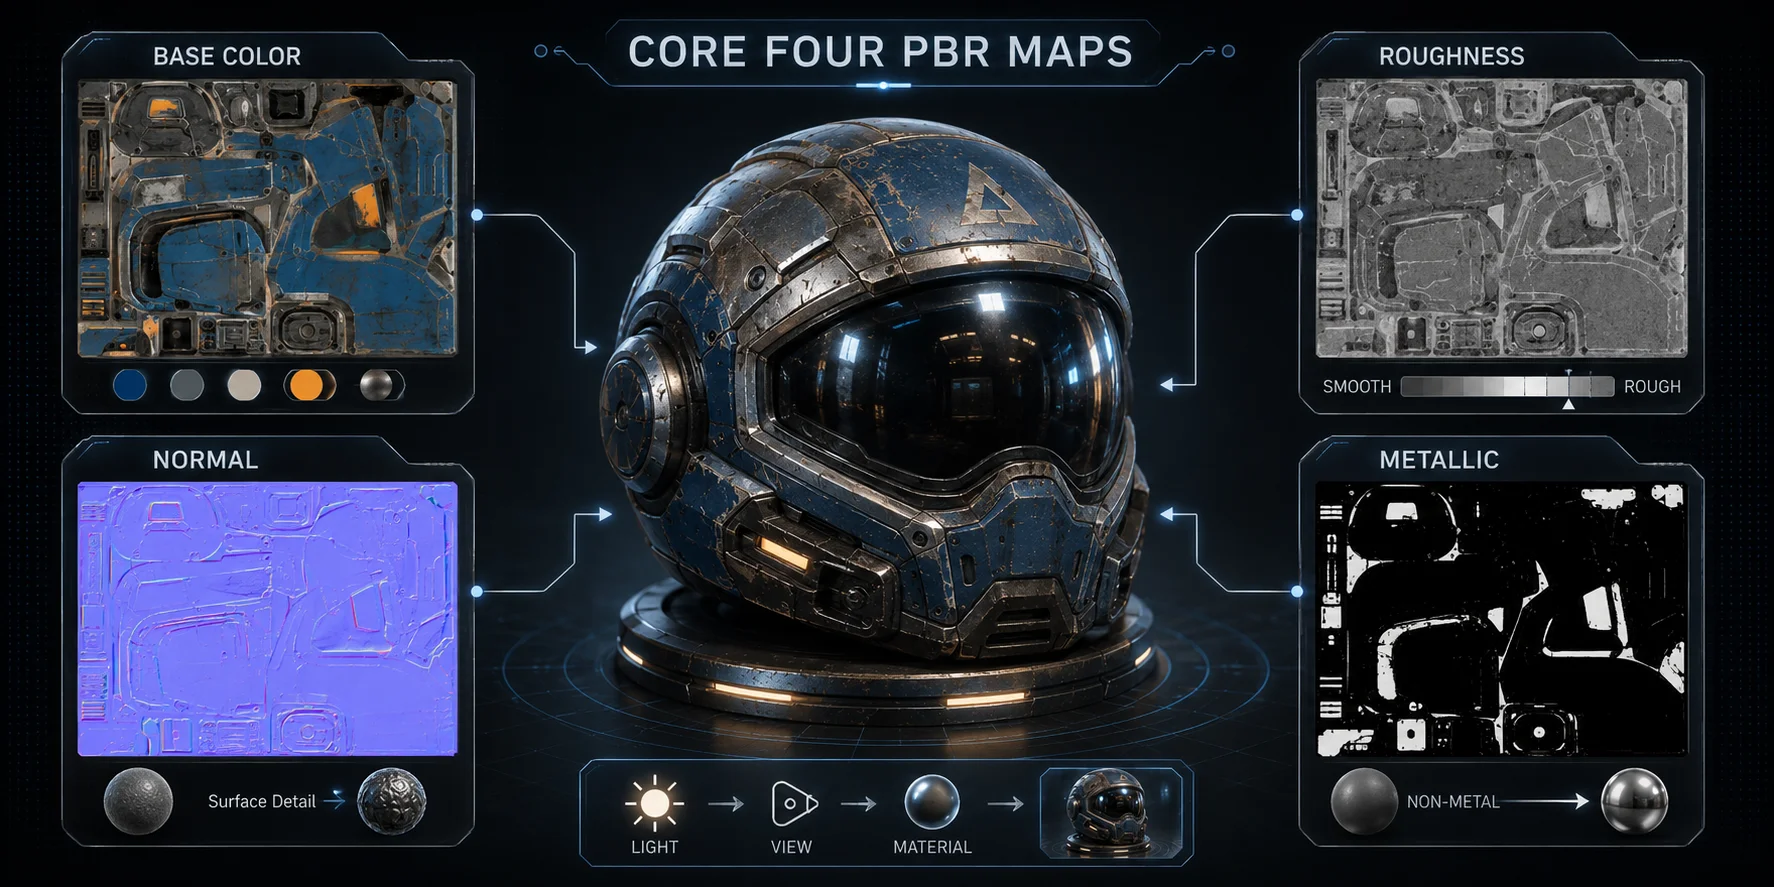
The Core Four PBR Maps
The core four PBR maps are Base Color, Normal, Roughness, and Metallic. These maps are the foundation of most modern 3D assets. If you are making a game prop, character, product render, AR model, or ecommerce asset, these are the maps you will use most often.
Base Color (Albedo)
The Base Color Map, often called Albedo, stores the raw color and pattern of the surface. It should not contain baked lighting, strong shadows, highlights, reflections, or ambient occlusion. Think of it as the material’s color under neutral lighting.
For example, a wooden table’s Base Color Map contains the brown wood grain. A painted metal helmet contains the paint color and design. A concrete wall contains grey surface color and stains, but not strong directional shadows.
In a grayscale explanation, black means the surface reflects almost no visible color, while white means a very bright surface color. In practice, Base Color is usually a full-color RGB texture, not a black-and-white map.
This map is called Albedo in physics-based workflows because it represents the color a surface reflects without lighting influence. Older workflows may call it Diffuse or Color Map, but in true PBR, “Diffuse” can be misleading because older diffuse maps often include painted shadows.
A useful artist rule: avoid pure black or pure white unless the material truly needs it. Very dark materials should often stay above value 30–50, because pure black can look like a hole in space under many lighting setups.
Normal Map
A Normal Map is the blue-purple texture that makes a surface look detailed without adding more geometry. It does not move vertices. Instead, it changes how light reacts to the surface, creating the illusion of bumps, scratches, pores, fabric weave, rivets, cracks, or carved text.
Normal maps look blue and purple because they encode surface direction. In a tangent-space normal map, the red and green channels store sideways surface direction, while the blue channel stores the outward direction. A mostly blue-purple color means “flat surface.” Small color shifts tell the renderer to bend the lighting as if the surface had tiny detail.
This is why normal maps are so useful in games. A low-poly model can look much richer when it has a strong normal map. A 20,000-poly character can appear to have far more sculpted detail because the map fakes wrinkles, armor dents, stitching, and skin pores.
Normal maps are commonly created by baking detail from a high-poly sculpt onto a low-poly model in tools such as Blender, Substance 3D Painter, or Marmoset Toolbag. They can also be generated from height information, photos, or AI texturing tools.
Unlike Roughness or Metallic maps, black and white do not have simple meanings here. A normal map stores direction, not brightness.
Roughness Map
A Roughness Map controls how sharp or blurry reflections appear on a surface. It is usually a grayscale map where black means smooth and white means rough.
Black, or 0.0 roughness, creates sharp mirror-like reflections. Think polished chrome, clean glass, glossy plastic, or a freshly waxed car. White, or 1.0 roughness, creates a matte surface with soft, diffused reflections. Think chalk, raw concrete, dry clay, or unfinished wood.
Most real materials sit between these extremes. Brushed metal might be around 0.3. Human skin may sit near 0.5. Worn leather may be around 0.6. Dirty plastic, dusty paint, and old rubber often contain roughness variation across the surface.
A common beginner mistake is leaving the whole Roughness Map at flat 0.5 grey. Real surfaces are rarely that even. A sword blade, for example, should not have the same roughness everywhere. The polished edge may be smoother, the handle rougher, and rust spots much rougher than clean metal.
In the older Specular/Glossiness workflow, you may see a Glossiness Map instead. Glossiness is the inverse of Roughness:
Roughness = 1 - Glossiness
Metallic Map
A Metallic Map tells the renderer whether a surface behaves like metal or non-metal. It is usually a grayscale map, but in most workflows only two values are meaningful: black and white.
Black means non-metal, also called dielectric. Plastic, wood, skin, rubber, cloth, stone, ceramic, and painted surfaces should usually be black in the Metallic Map. These materials reflect neutral white or grey highlights and still show their Base Color as diffuse surface color.
White means metal. Gold, copper, steel, aluminum, brass, and chrome should use white metallic values. Metals behave differently because they do not have the same diffuse color response as non-metals. Their Base Color becomes the tint of their reflections. This is why gold reflects golden light and copper reflects reddish-orange light.
A common mistake is making everything slightly metallic. Do not set plastic, skin, leather, fabric, or painted wood to 0.2 metallic just because you want it to look “cool.” That usually creates physically incorrect materials.
Most clean materials should be either 0 or 1. Mid-values such as 0.3–0.7 are rare and usually represent transitional surfaces like corroded, dirty, oxidized, or partially worn metal.
Extended PBR Maps
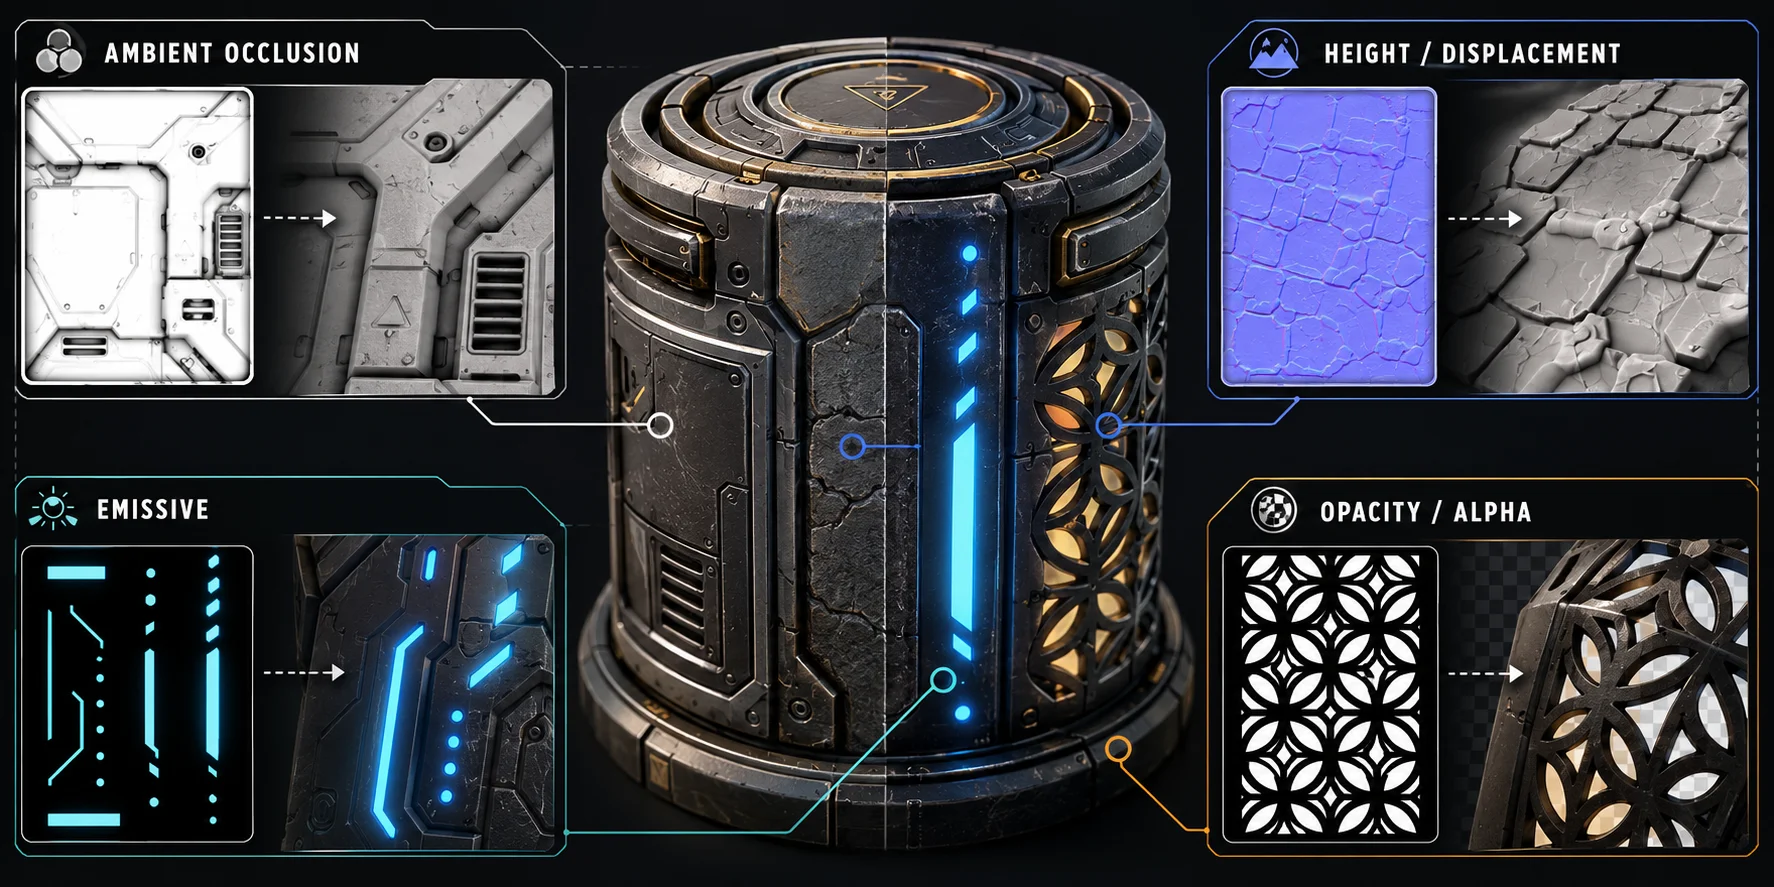
The core four maps cover most assets, but extra maps can add realism or support special surfaces. You do not need every map for every material. Use these only when the asset needs them.
Ambient Occlusion (AO)
An Ambient Occlusion Map, or AO Map, is a grayscale baked-shadow texture that captures soft contact shadows in cracks, corners, folds, seams, and other tight spaces.
White represents fully exposed areas, while black indicates strong occlusion or deep shadow.
AO is not real-time lighting. It is precomputed and stored in a texture, then multiplied over the Base Color or connected to the shader’s AO input.
Without AO, surfaces may appear flat or disconnected. With AO, corners and contact areas gain immediate depth. AO maps can be baked in Blender, Marmoset Toolbag, Substance 3D Painter, or generated from mesh geometry.
Height / Displacement Map
A Height Map or Displacement Map is a grayscale texture that moves geometry during rendering. Unlike normal maps, which simulate detail through lighting, displacement physically changes the surface shape.
Black usually represents the lowest point, white the highest, and mid-grey the unchanged surface level.
Displacement works well for bricks, cobblestones, carved stone, bark, cracked earth, terrain, and detailed product surfaces. It remains convincing at close range because it can alter both geometry and silhouette.
The trade-off is performance. Displacement requires dense geometry or render-time subdivision, making it more common in film, VFX, archviz, and high-end rendering than in performance-sensitive games.
Emissive Map
An Emissive Map makes selected surface areas glow independently of scene lighting. It may contain full-color glow information or use grayscale values to control brightness while the shader defines the color.
Black means no emission, while white represents maximum intensity.
Typical uses include LEDs, neon signs, sci-fi panels, glowing runes, lava cracks, screens, holograms, magical effects, and glowing eyes. In real-time engines, emissive maps may also trigger bloom.
Opacity / Alpha Map
An Opacity Map, or Alpha Map, controls surface transparency.
Black means fully transparent, white means fully opaque, and grey creates partial transparency when supported by the material.
Opacity maps are commonly used for leaves, hair cards, fences, lace, decals, torn paper, glass, and other complex cutout surfaces.
Alpha cutout uses binary visibility and is efficient for games. Alpha blending supports soft transparency for glass, smoke, frosted materials, and fading effects.
Metallic/Roughness vs Specular/Glossiness Workflows
Many beginners get confused because different tutorials use different map names. The reason is simple: there are two PBR workflows.
| Metallic/Roughness | Specular/Glossiness | |
|---|---|---|
| Industry adoption | Default in Unreal Engine, Unity, Blender Principled BSDF, glTF, and USD | Legacy or pipeline-specific |
| Main maps | Base Color + Metallic + Roughness | Diffuse + Specular Color + Glossiness |
| Metallic control | Metallic map uses 0 for non-metal and 1 for metal | Specular map stores reflection color and intensity |
| Reflection sharpness | Roughness: 0 = smooth, 1 = rough | Glossiness: 1 = smooth, 0 = rough |
| Best use case | New projects, game assets, real-time engines | Legacy compatibility or specific VFX pipelines |
If you are starting a new asset today, choose Metallic/Roughness. It is the modern default and the easiest to move between engines and tools.
If someone gives you a Glossiness Map and your shader needs Roughness, invert the grayscale values:
Roughness = 1 - Glossiness
That means black becomes white, white becomes black, and mid-grey stays mid-grey.
How to Get PBR Texture Maps
Knowing what PBR maps do is only half the workflow. You also need a way to create them. There are three main approaches.
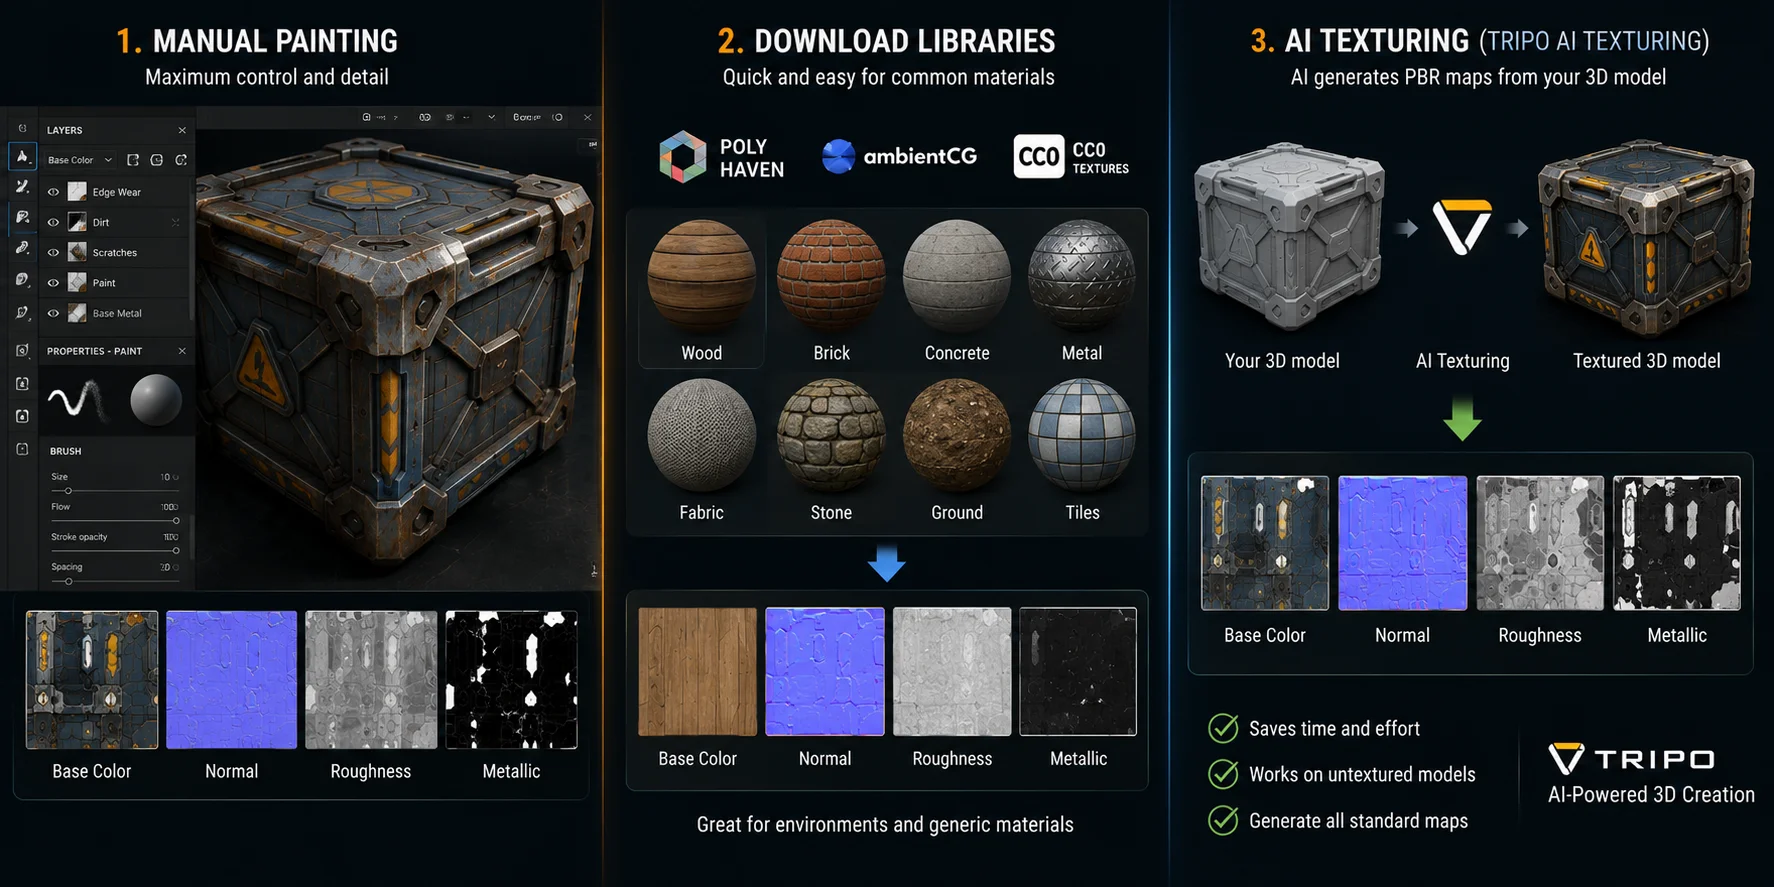
The first is manual painting with tools such as Substance 3D Painter, Blender Texture Paint, or Mari. This method gives you the most control over scratches, dirt, edge wear, fabric patterns, and material transitions. However, it also has the steepest learning curve and may take 4–20 hours to texture a single asset.
The second option is downloading free texture sets from libraries such as Poly Haven, AmbientCG, and CC0Textures. These sites provide high-quality, seamless PBR materials for common surfaces like wood, brick, concrete, metal, and stone. The limitation is that these materials are generic and may not fit a specific robot, weapon, product, or creature.
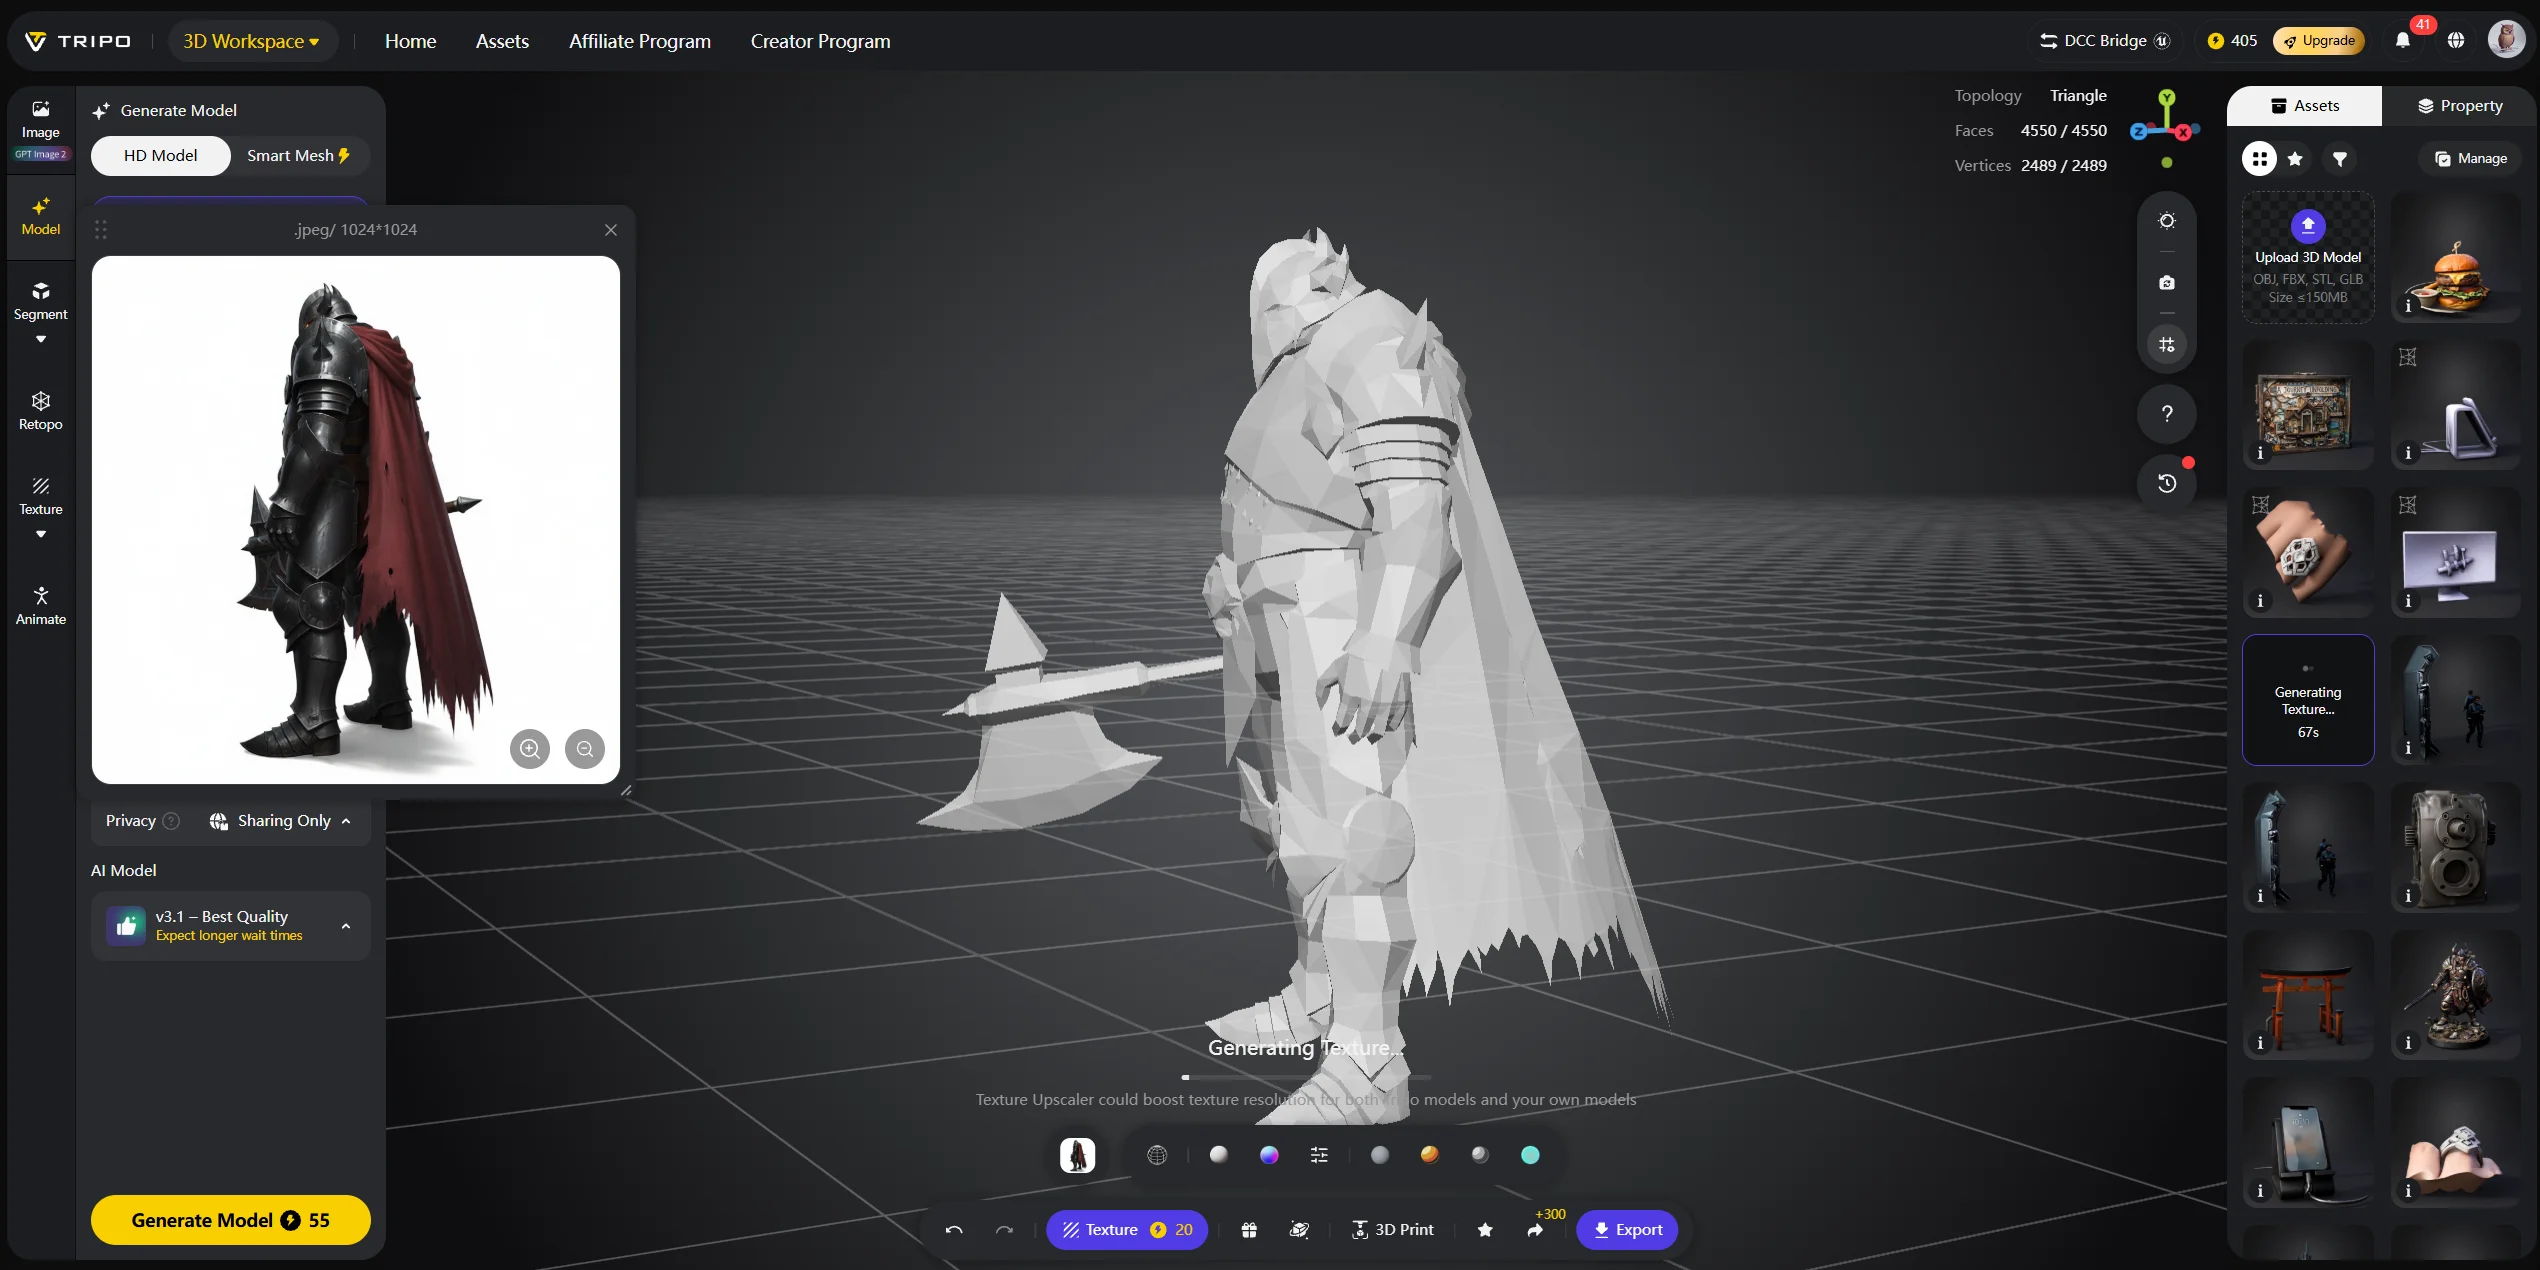
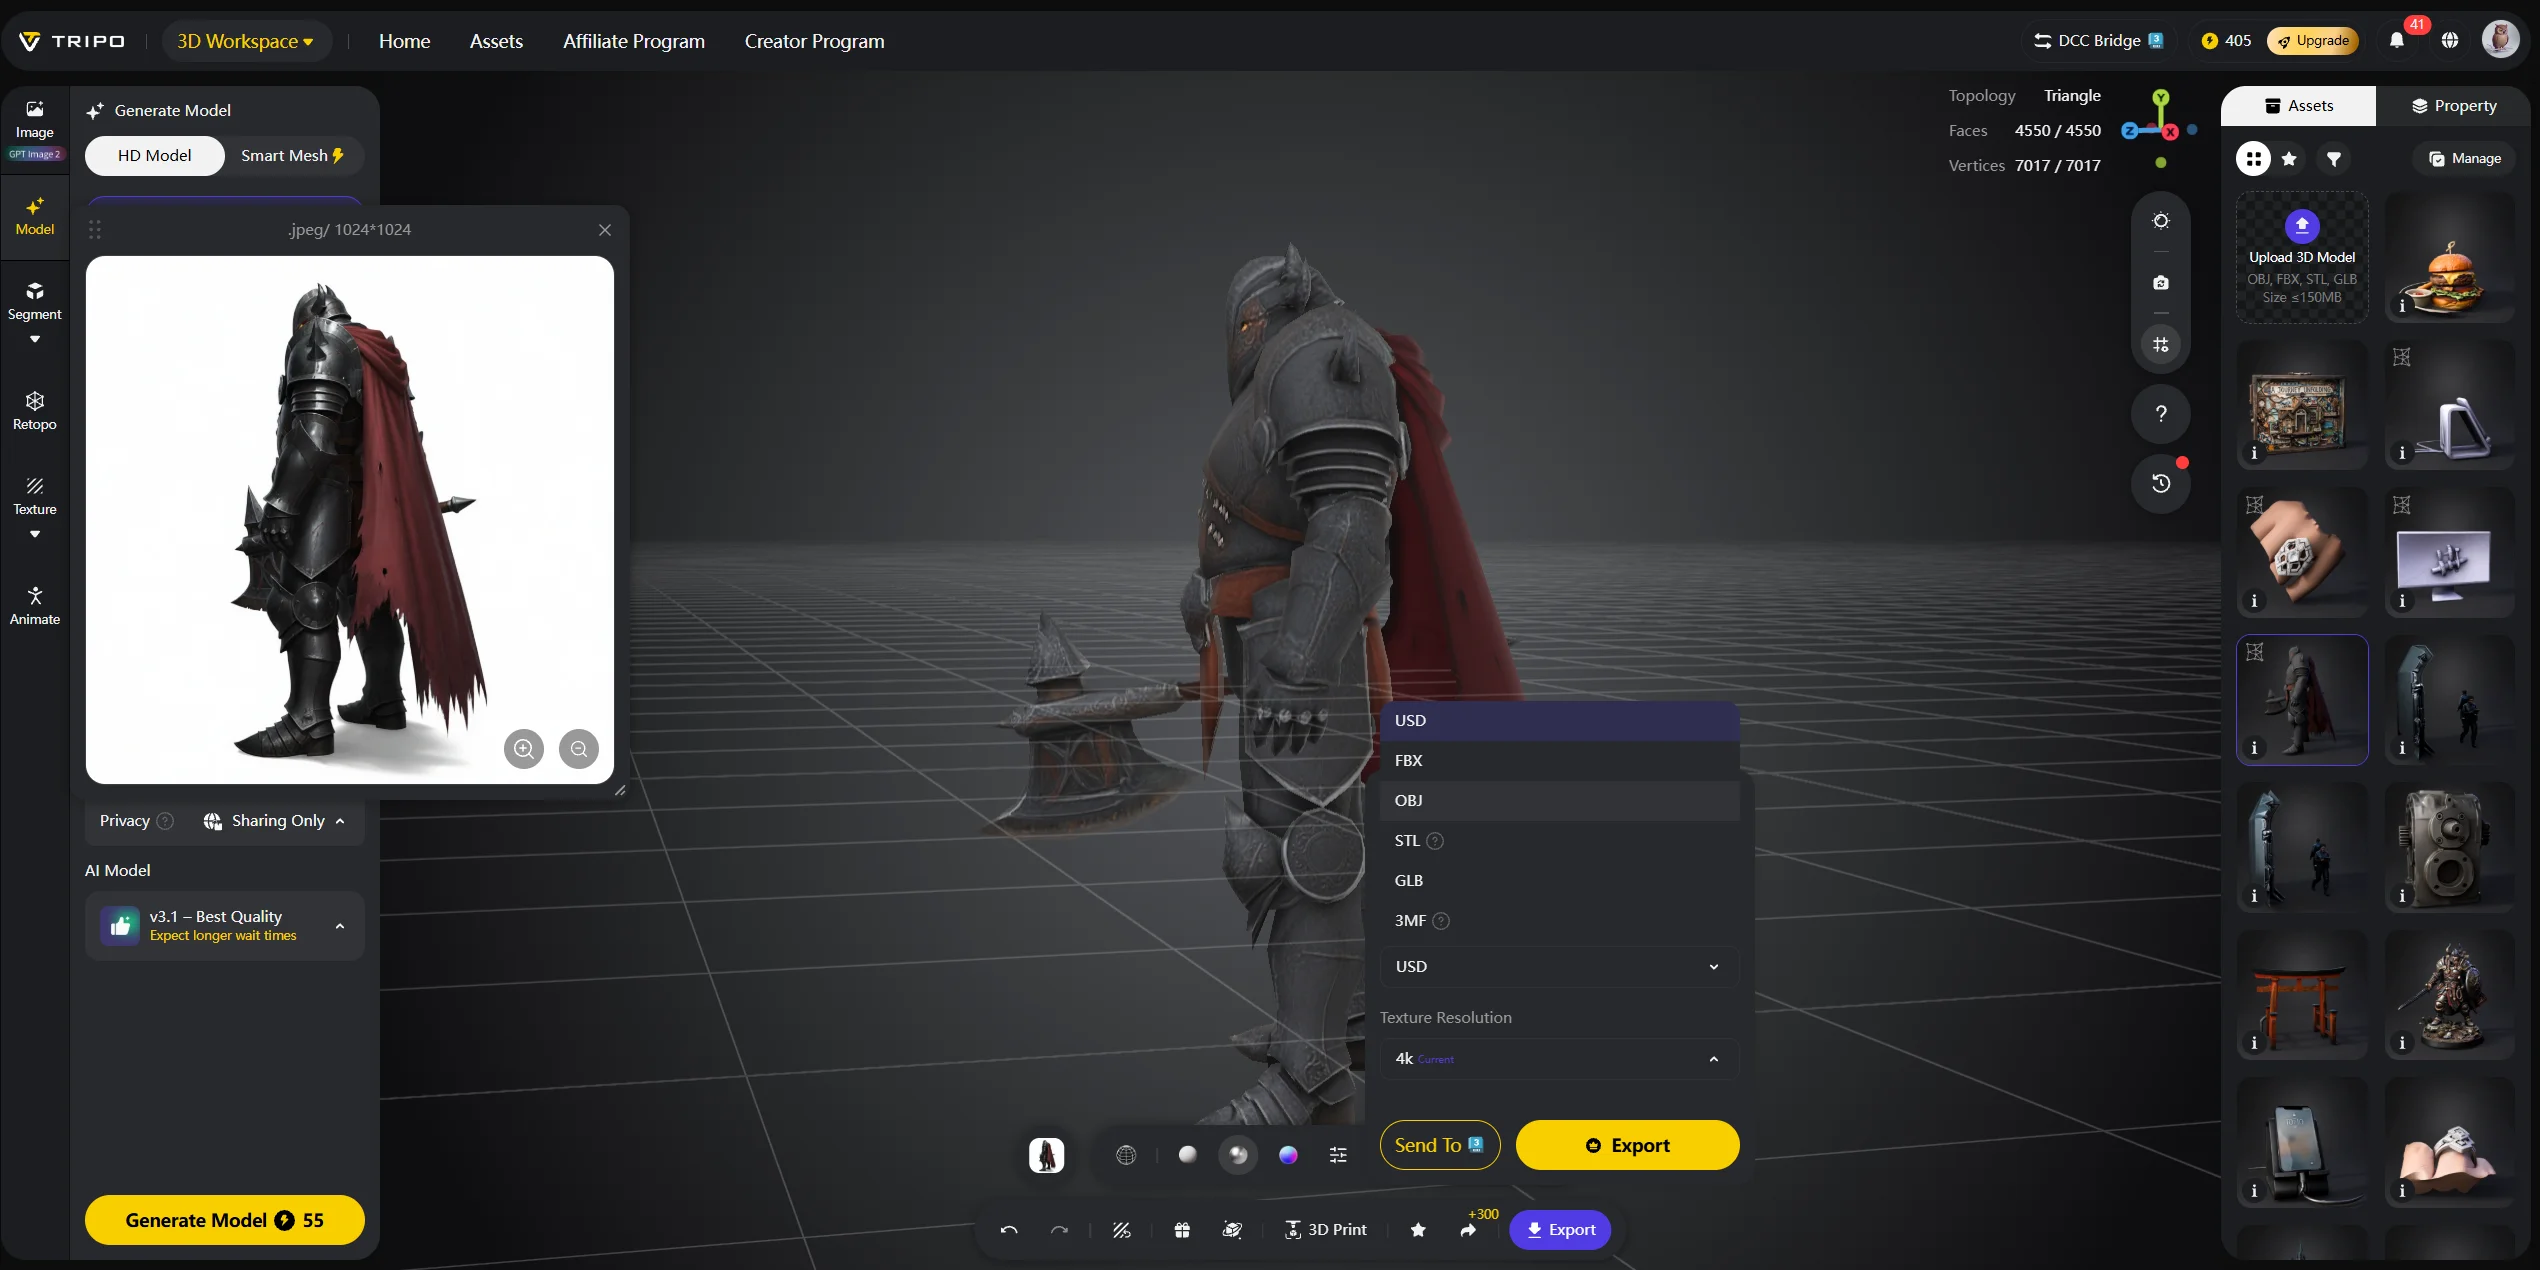
The third approach is Generate with AI. Tripo AI Texturing can generate a complete PBR map set, including Base Color, Normal, Roughness, and Metallic maps, directly on your 3D model from a text prompt in seconds. You can describe the desired appearance, preview the generated texture, and refine it before export.
After generation, Tripo’s 3D texture upscaling improves map resolution and surface detail, making the result more suitable for high-resolution rendering, production assets, and detailed 3D printing.
Frequently Asked Questions
What are the different maps in PBR textures?
A complete PBR asset typically uses four core maps: Base Color for surface color, Normal for fake surface detail, Roughness for reflection sharpness, and Metallic for metal or non-metal behavior. Extended maps such as Ambient Occlusion, Displacement, Emissive, and Opacity are added when the surface needs more realism or special effects. Most modern projects use the Metallic/Roughness workflow.
What are PBR maps?
PBR maps are texture images that encode specific surface properties for Physically Based Rendering. Instead of baking color, light, shadow, and reflection into one image, PBR stores each property separately so the renderer can calculate realistic lighting under different environments. This makes the same asset more consistent across tools and scenes.
How are PBR textures made?
PBR textures are made by hand-painting, baking from high-poly geometry, scanning real-world surfaces, downloading texture libraries, or generating them with AI. Artists often use tools such as Substance 3D Painter, Blender, Marmoset, or Mari. AI tools like Tripo AI can generate PBR texture sets from a prompt or model input, which speeds up early material creation.
Do I need all PBR maps for every asset?
No. Most assets need the core four: Base Color, Normal, Roughness, and Metallic. Add AO for complex shapes, Emissive for glowing parts, Opacity for cutouts or transparency, and Displacement for close-up surfaces where real geometric depth matters. For most game assets, the core four plus AO is enough.
Conclusion
PBR texture maps are easier to understand once you know what each one controls. Base Color carries the surface color, Normal fakes geometry detail, Roughness controls reflection sharpness, and Metallic tells the renderer whether the surface behaves like metal or non-metal. Together, these maps give the render engine the information it needs to simulate realistic lighting.
If creating all these maps manually sounds daunting, Tripo AI Studio can help generate a complete PBR-ready texture set from a prompt or reference workflow in seconds. See plan options at Tripo AI Pricing.