How to Create a Medieval House 3D Model with AI Tools
TL;DR
- AI tools make creating a medieval house 3D model much faster, allowing you to generate a textured asset from a single reference image without advanced modeling skills. The workflow covers image-to-3D generation, material creation, mesh optimization, and final export.
- For realistic results, focus on authentic medieval details like timber framing, stone walls, aged wood, thatched roofs, and natural imperfections. Choose HD Model for detailed visuals or Smart Mesh for game-ready performance.
- After refining textures, polygon count, and small architectural details, you can export your finished medieval house to Blender, Unity, Unreal Engine, or other 3D workflows.
Introduction
Building a medieval house 3D model used to take hours of manual work in Blender. With AI tools, you can now generate a textured, game-ready asset from a single reference image in minutes — no advanced modeling skills required. This guide covers the complete workflow, from creating the base model and applying stone and wood materials to optimizing polygon count, preparing the asset for real-time use, and exporting it into your preferred game engine.
A single AI-generated 3D model can replace dozens of hours of traditional blockout and asset creation work, making medieval environments faster and more accessible for indie developers and creators. In this guide, you’ll learn how to turn a simple concept into a usable medieval house asset, including AI generation methods, texture improvements, mesh cleanup, optimization techniques, and final export steps for professional workflows.
What Makes a Good Medieval House 3D Model?
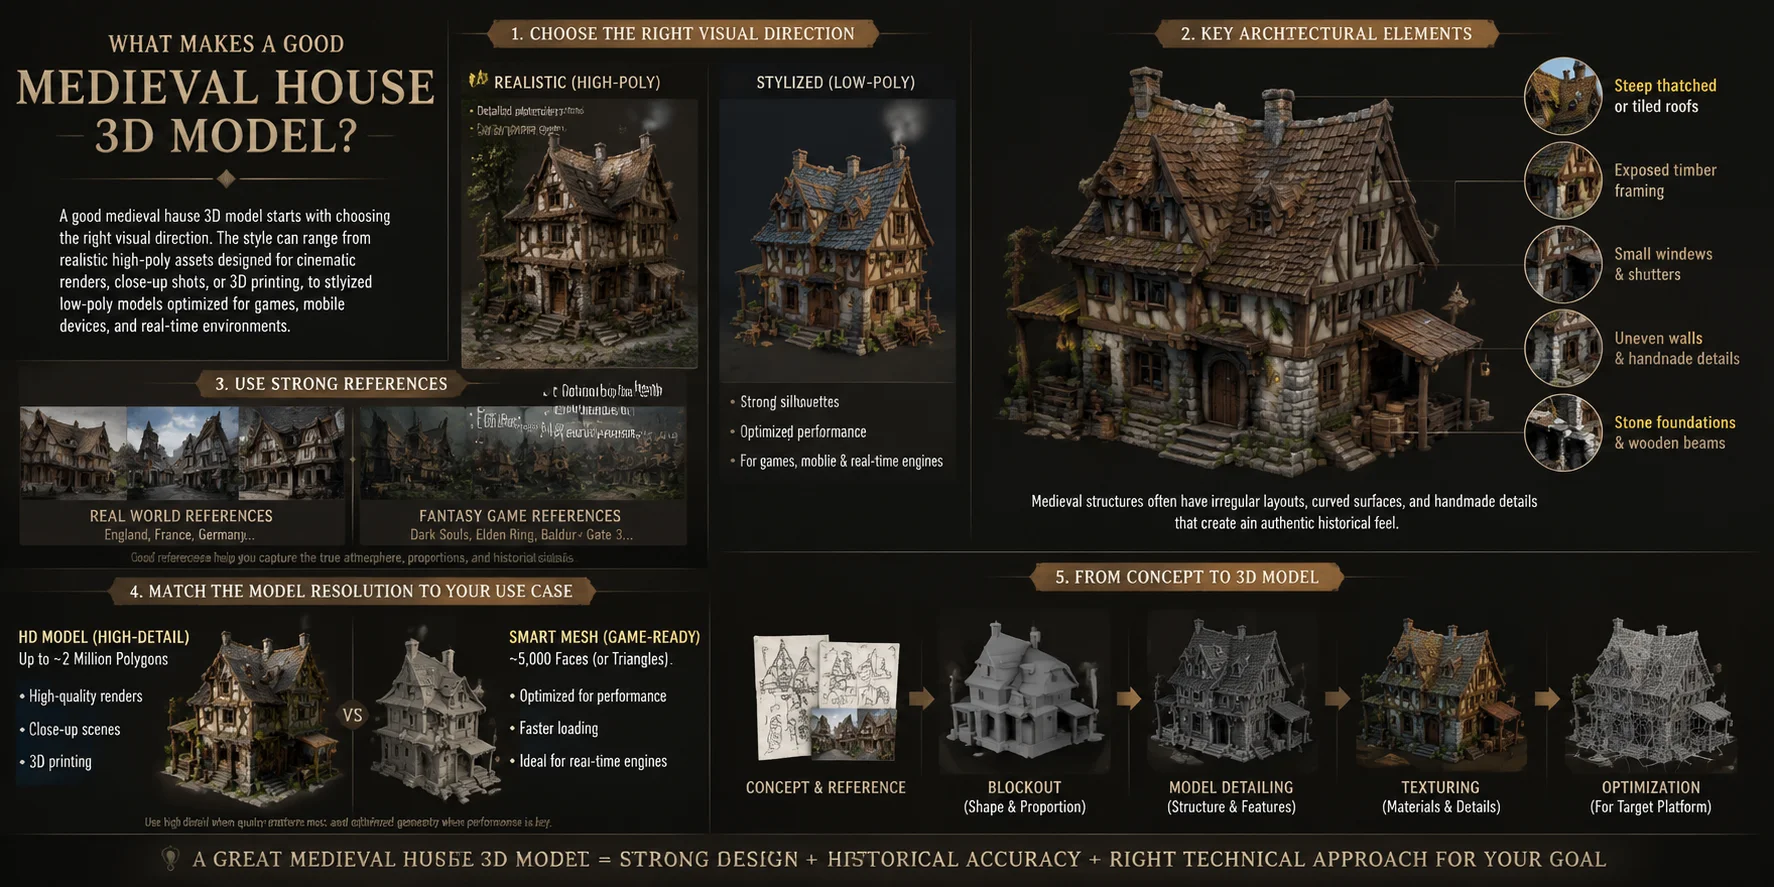
A good medieval house 3D model starts with choosing the right visual direction. The style can range from realistic high-poly assets designed for cinematic renders, close-up shots, or 3D printing, to stylized low-poly models optimized for games, mobile devices, and real-time environments. Realistic models focus on detailed materials, weathering, and small surface features, while stylized models prioritize strong silhouettes and efficient performance.
The most recognizable medieval houses share a few key architectural elements: exposed timber framing, stone foundations, wooden beams, small windows, uneven walls, and steep thatched or tiled roofs. Unlike modern buildings with perfect symmetry, medieval structures often have irregular layouts, curved surfaces, and handmade details that create an authentic historical feel. A strong reference can make a major difference, so look at real medieval village houses from regions like England, France, and Germany, or study fantasy game environments inspired by medieval architecture, such as those seen in Dark Souls, Elden Ring, and Baldur's Gate 3.
Your target use case should also determine the model resolution. An HD Model with up to around 2 million polygons works well for high-quality renders, close-up scenes, and detailed printing. For real-time games, a lighter Smart Mesh version with roughly 5,000 faces is usually a better choice because it loads faster and performs better in engines.
Once you've settled on the look and feel, here's how to generate it.
How to Generate a Medieval House 3D Model with AI (Step by Step)
Creating a medieval house 3D model from scratch can take hours of manual modeling, but AI tools can speed up the process by turning a single reference image into a complete 3D asset. The key is providing a clear visual reference and choosing the right generation settings for your final goal, whether you need a cinematic scene, a game environment, or a printable asset.
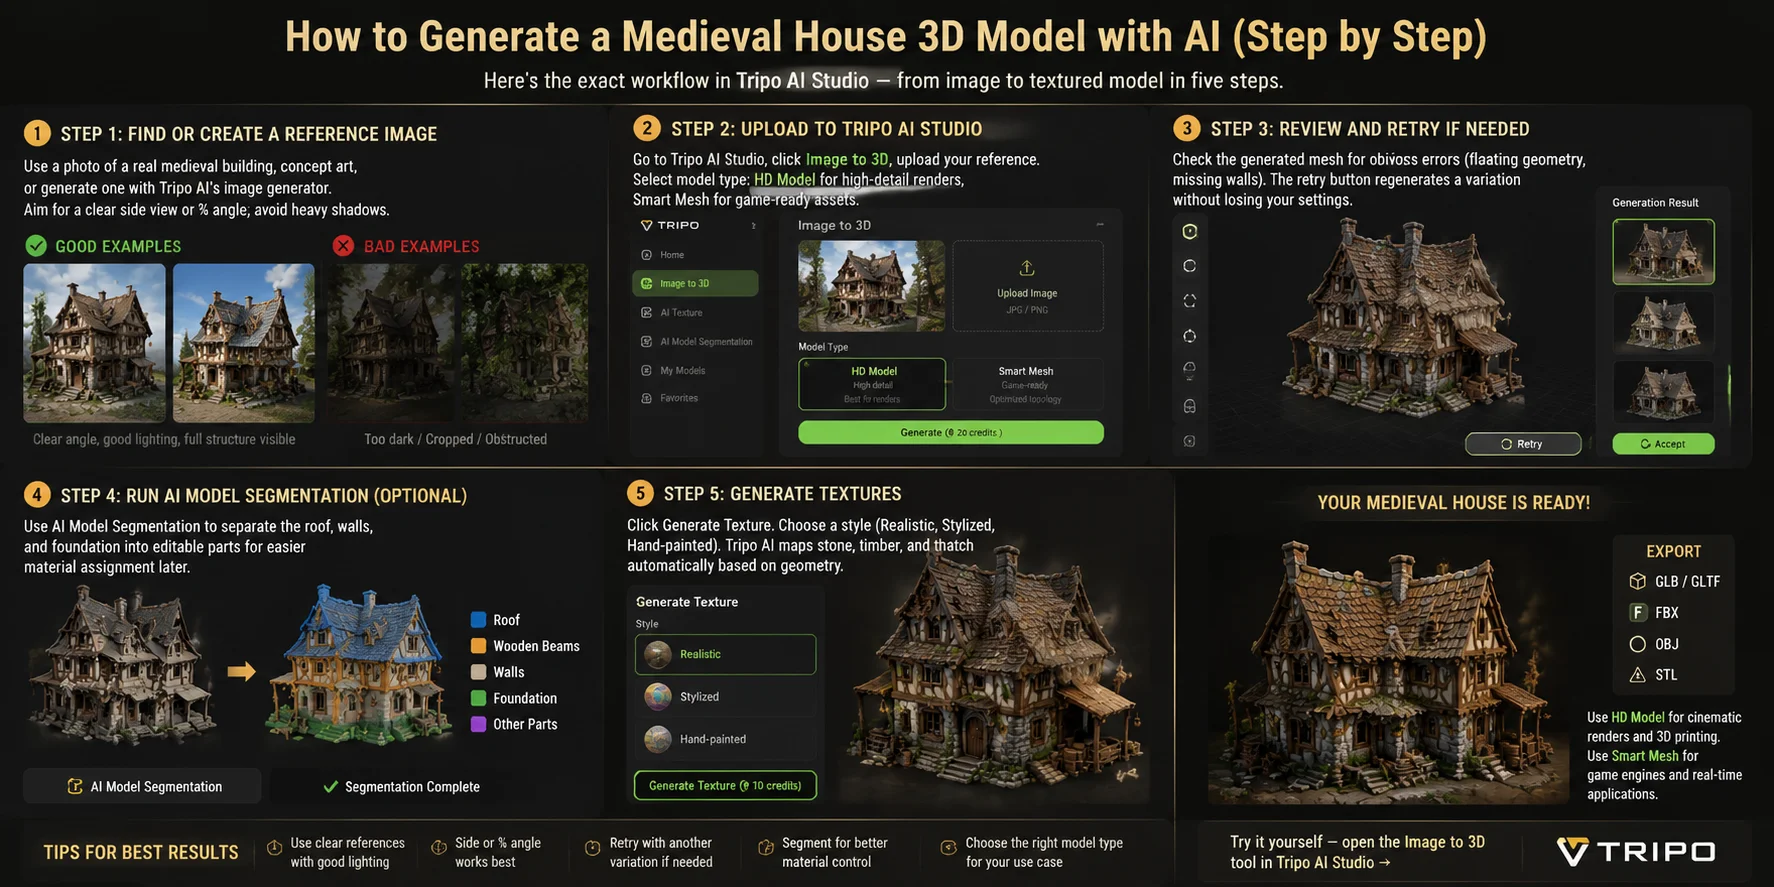
Here's the exact workflow in Tripo AI Studio — from image to textured model in five steps.
Step 1: Find or Create a Reference Image
The quality of your AI-generated medieval house starts with the reference image. You can use a photo of a real medieval building, historical architecture references, fantasy concept art, or create an original image with an AI image generator.
For the best results, choose an image that clearly shows the building structure. A side view or ¾ perspective angle usually works better because the AI can understand the roof shape, wall proportions, and overall depth more accurately. Avoid images with heavy shadows, extreme camera angles, cropped sections, or objects blocking the house, as these can cause missing details or distorted geometry.
For medieval architecture, useful references often include timber-framed houses, stone foundations, wooden beams, steep roofs, small windows, and irregular handmade structures.
Step 2: Upload to Tripo AI Studio
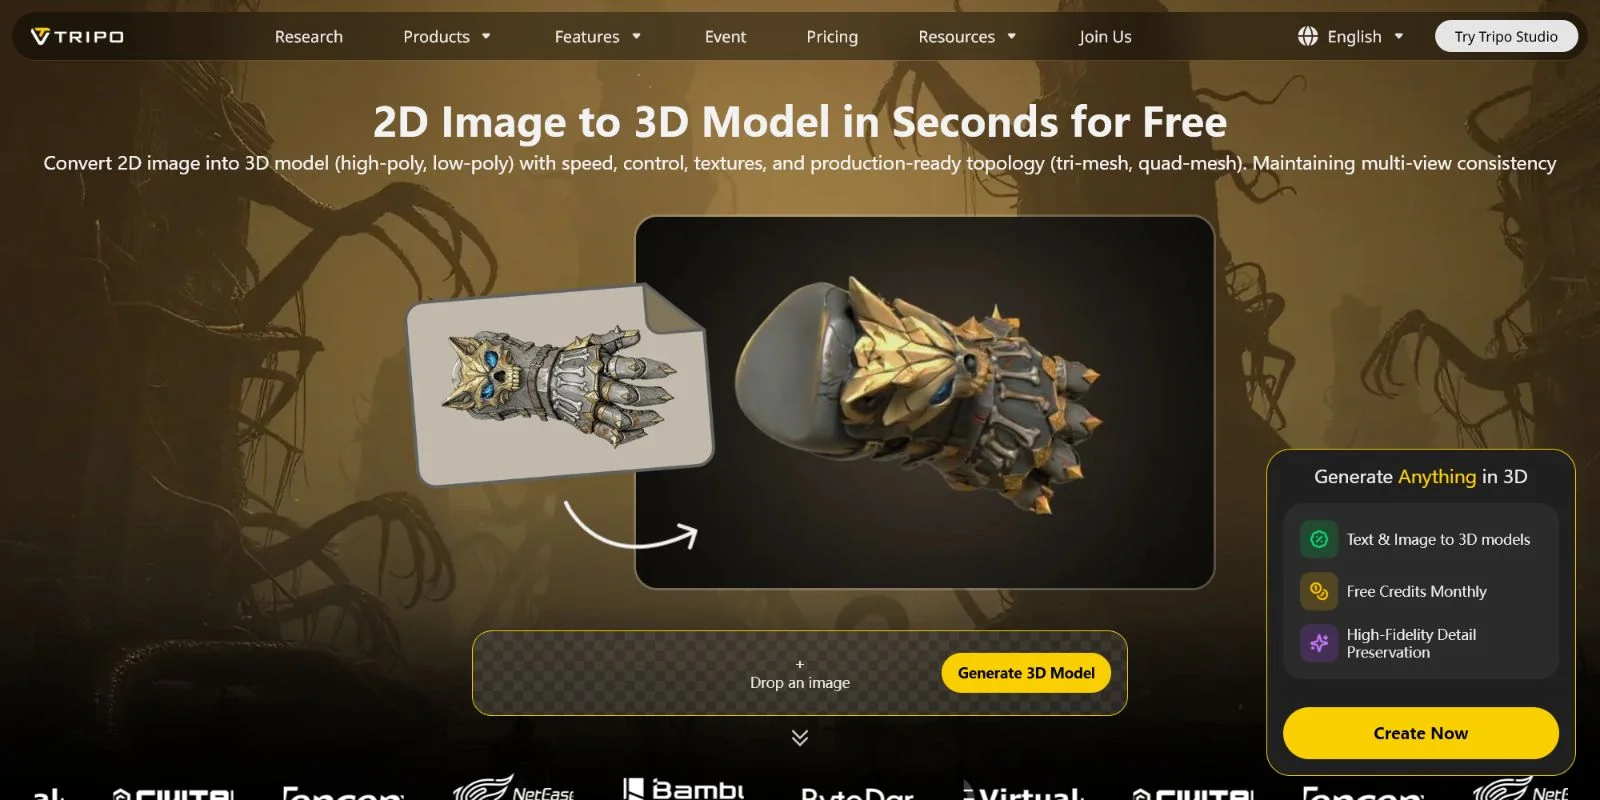
Once you have your reference image, open Tripo AI Studio and start the image-to-3D workflow.
Select Image to 3D, then upload your medieval house reference. Before generating, choose the model type based on how you plan to use the asset:
- HD Model — Best for detailed renders, close-up shots, and high-quality visualization. It preserves more surface details and supports more complex geometry.
- Smart Mesh — Designed for real-time applications such as games, VR, and interactive scenes. It creates a lighter model with better performance.
For a cinematic medieval village scene, HD Model is usually the better choice. For a game environment where dozens of buildings may appear together, Smart Mesh provides a better balance between quality and speed.
Step 3: Review the Generated Model and Retry if Needed
After generation, inspect the 3D model before moving forward. AI-generated assets are usually impressive, but complex architecture can sometimes produce unexpected results.
Look for common issues such as:
- Floating or disconnected geometry
- Missing walls or roof sections
- Incorrect window placement
- Warped building proportions
- Unclear separation between different materials
If the result does not match your reference, use the Retry option to generate another variation. The retry process creates a new version while keeping your previous settings, making it easier to compare different outputs without starting over.
Small changes in the reference image can also improve results. A cleaner image, stronger silhouette, or better camera angle often produces a more accurate medieval house model.

Step 4: Run AI Model Segmentation (Optional)
For more control over editing and texturing, use AI Model Segmentation after generation.
This feature separates the model into individual components, such as:
- Roof
- Walls
- Stone foundation
- Wooden beams
- Other structural elements
Separating these parts makes later editing much easier. For example, you can assign different materials to the roof tiles, wooden framework, and stone base instead of treating the entire house as one object.
Segmentation is especially useful for game development and product visualization workflows where different parts need separate materials, colors, or adjustments.
Step 5: Generate Textures
The final step is adding realistic materials and surface details. Click Generate Texture and choose a visual style that matches your project:
- Realistic — Creates detailed stone, aged wood, and weathered roof materials for realistic scenes.
- Stylized — Produces cleaner shapes and colors suitable for fantasy games or mobile environments.
- Hand-painted — Works well for artistic game assets with a painted appearance.
Tripo AI automatically analyzes the model geometry and applies suitable textures. A medieval house can receive materials such as rough stone foundations, wooden timber frames, aged roof tiles, and thatched surfaces based on the structure of the generated model.
After texturing, your medieval house is ready to export, optimize, or place into a larger 3D environment.
Try it yourself — open the Image to 3D tool in Tripo AI Studio → and turn your medieval house idea into a fully textured 3D model.
Texturing Your Medieval House: Stone, Wood, and Thatch
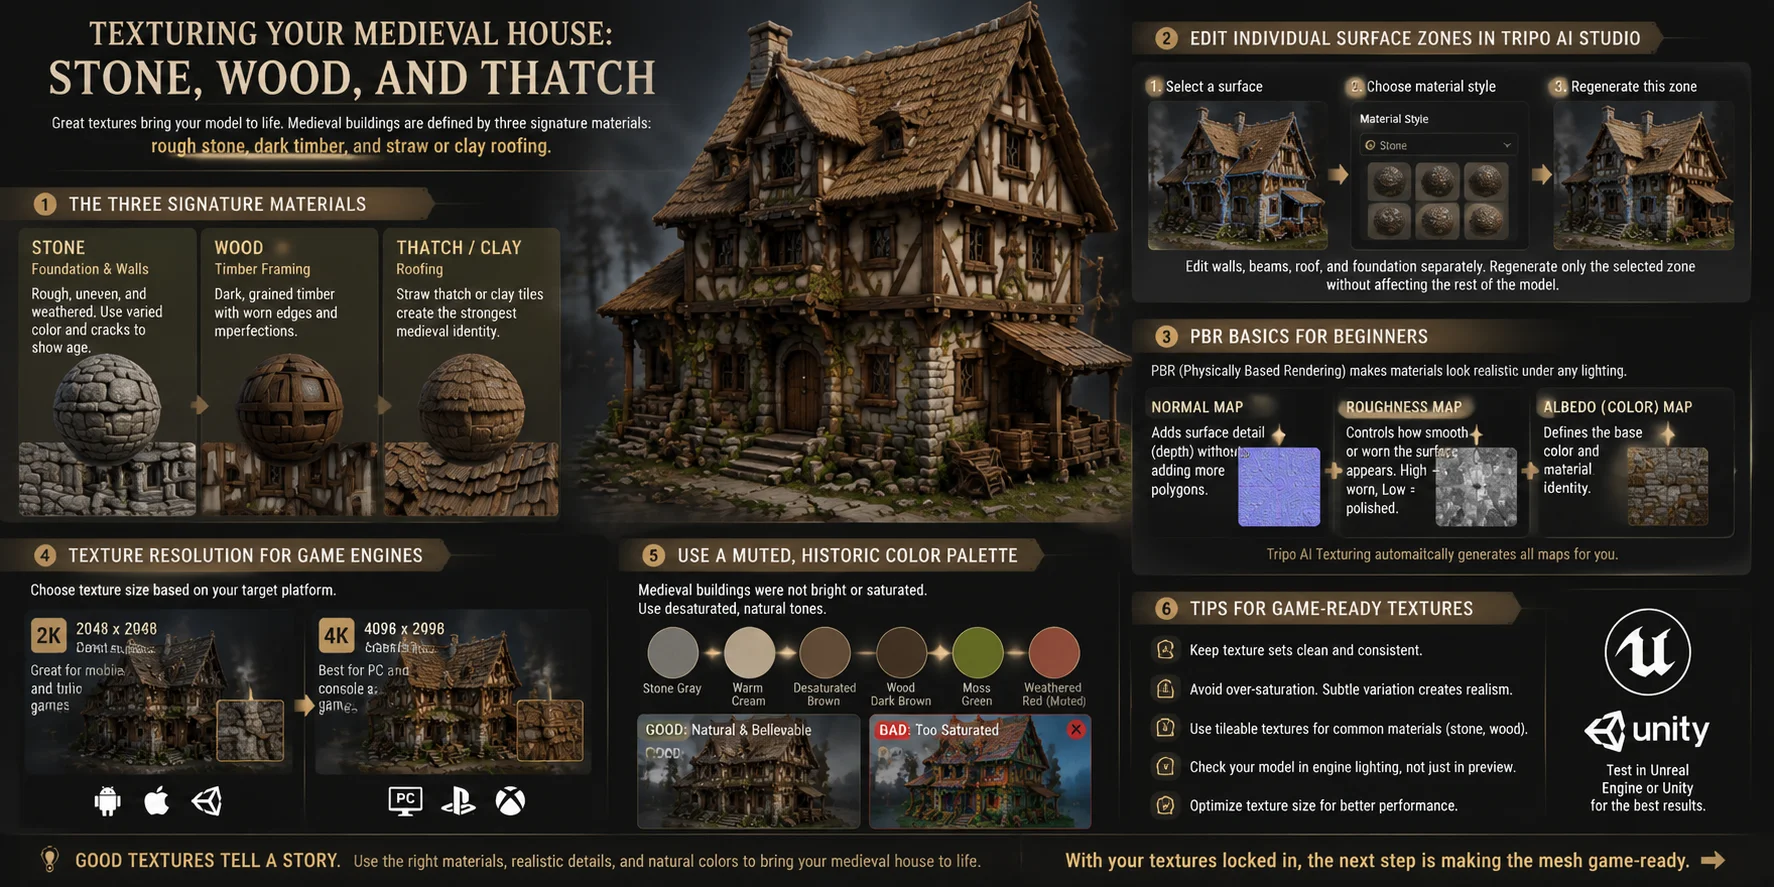
Textures are what transform a basic medieval house 3D model into a believable historical structure. The geometry defines the shape, but the materials create the atmosphere. Medieval architecture is recognized by three signature surface styles: rough stone, dark timber, and straw or clay roofing. These materials instantly communicate age, craftsmanship, and the handmade character of a medieval village.
The foundation and lower walls usually rely on rough stone textures with uneven surfaces, visible cracks, and weathered color variation. Stone should feel heavy and aged rather than perfectly clean. The exposed wooden beams and timber framing often use dark wood materials with grain patterns, worn edges, and subtle imperfections. For roofs, straw thatch or clay tiles create the strongest medieval identity. A thatched roof needs soft, layered fibers, while tiled roofs benefit from irregular shapes and slightly faded colors caused by years of exposure.
In Tripo AI Studio, AI-generated textures can be adjusted after the first generation. Instead of rebuilding the entire model, you can edit individual surface areas and refine specific materials. For example, select a wall surface, change the material style, and regenerate only that zone. This makes it easier to experiment with different stone types, wood tones, or roof styles while keeping the rest of the model unchanged.
For beginners, understanding basic PBR (Physically Based Rendering) concepts helps create more realistic results. PBR textures usually include several maps that control how a surface reacts to light:
- Normal maps add small surface details, such as cracks, wood grain, and stone bumps, without increasing polygon count.
- Roughness maps control how smooth or worn a material appears. High roughness makes stone look aged and dusty, while lower roughness creates a cleaner or polished appearance.
- Albedo/color maps define the base color and material identity.
Tripo AI’s AI Texturing tool automatically generates these material details, making it easier to create realistic medieval surfaces without manually painting every texture map.
When preparing the model for a game engine, texture resolution should match the target platform. A 2K texture set is usually enough for mobile games and indie projects because it balances quality and performance. For higher-end PC or console environments, 4K textures can provide more visible detail for close-up scenes.
One common texturing mistake is making medieval materials too colorful. Historical buildings rarely used bright, saturated colors. A more authentic palette usually includes desaturated browns, gray stone, faded wood, and warm cream tones. Subtle variation creates realism, while overly bright reds or blues can make the model feel more like a fantasy cartoon than a medieval structure.
With your textures locked in, the next step is making the mesh game-ready.
Low-Poly Medieval House: Optimizing Polygon Count for Games
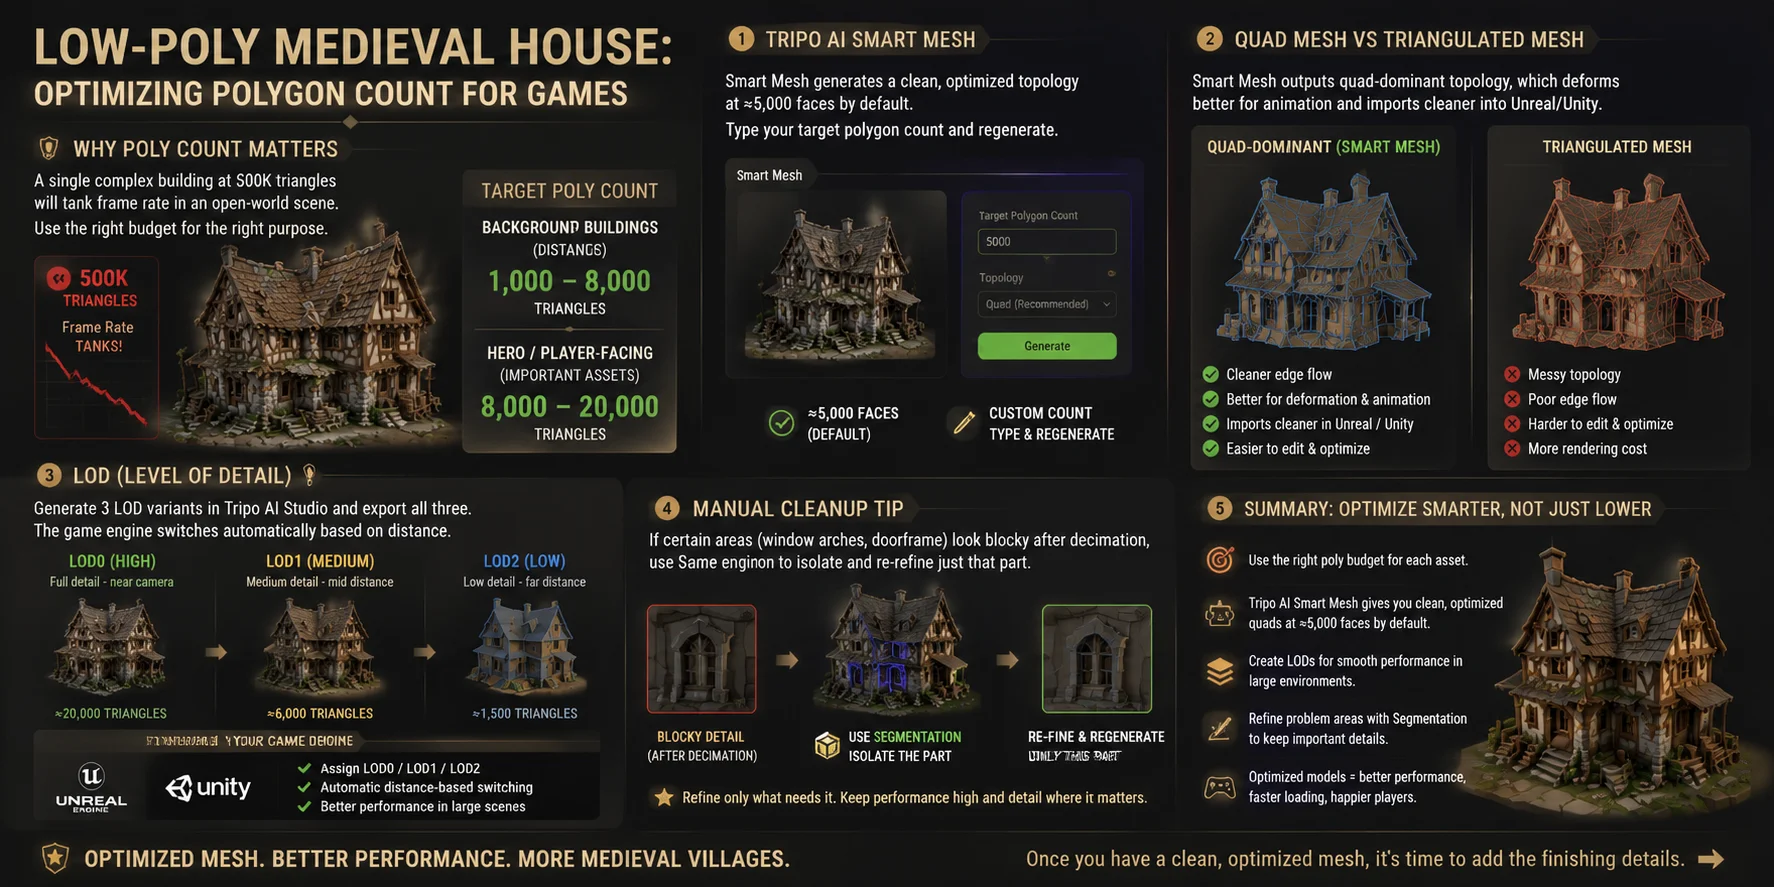
A beautiful medieval house model can quickly become a performance problem if the polygon count is too high. In games, every asset competes for GPU resources, and a single overly detailed building can affect the entire scene. For example, a medieval house with 500,000 triangles may look impressive in a close-up render, but placing multiple buildings like this in an open-world village can significantly reduce frame rates and increase loading times.
The right polygon budget depends on how important the asset is in the scene. Background buildings that are viewed from a distance usually work well with around 1,000–8,000 triangles, while hero assets or player-facing structures may need 8,000–20,000 triangles to preserve important details. The goal is not to remove all detail, but to keep the geometry focused on the areas players actually notice, such as the roof silhouette, doors, windows, and major architectural features.
Using Tripo AI Smart Mesh for Game-Ready Optimization
Instead of manually reducing polygons, you can use Tripo AI Smart Mesh to create a lighter, game-ready version of your medieval house model. Smart Mesh automatically generates cleaner topology with an optimized structure and produces around 5,000 faces by default, making it suitable for real-time engines and interactive environments.
The polygon count can also be customized based on your project needs. If your game requires extremely lightweight assets for mobile devices, you can enter a lower target polygon count and regenerate the model. For larger PC or console environments, you can increase the budget to preserve more architectural details.
This workflow is especially useful when converting AI-generated HD models into production assets. Instead of keeping millions of unnecessary polygons, Smart Mesh creates a balance between visual quality and runtime performance.
Quad Mesh vs Triangulated Mesh: Why Topology Matters
Polygon count is only one part of optimization. The way those polygons are arranged also affects how the model behaves inside a game engine.
Traditional decimation often creates irregular triangulated meshes. While these may reduce file size, they can make editing, deformation, and future optimization more difficult. A cleaner quad-dominant mesh usually provides better edge flow and imports more reliably into tools like Unreal Engine and Unity.
Smart Mesh uses a more organized topology that is easier to work with, especially when the asset may later require animation, additional editing, or material adjustments.
Creating LOD Versions for Better Performance
For large game environments, one model is rarely enough. Games use LOD (Level of Detail) systems, which automatically switch between high- and low-resolution versions depending on the camera distance.
For example:
- LOD0 — Full-detail version used when the player is close to the building.
- LOD1 — Reduced polygon version for medium distances.
- LOD2 — Lightweight version used for far-away background objects.
In Tripo AI Studio, you can generate multiple LOD variations of your medieval house model. Export all versions and assign them inside your game engine so the highest-quality mesh appears only when needed, while simpler versions handle distant views.
This approach allows you to build large medieval villages with dozens or even hundreds of structures without sacrificing performance.
Manual Cleanup for Problem Areas
Even after automatic optimization, some small details may lose quality during polygon reduction. Areas like window arches, door frames, roof edges, and decorative beams are especially sensitive because they define the medieval style.
If a specific section becomes too blocky, use AI Model Segmentation to isolate that part and refine it separately. You can regenerate or improve only the affected area instead of rebuilding the entire model.
Once you have a clean, optimized mesh, it's time to add the finishing details.
Refining Details: Windows, Doors, and Aged Surfaces
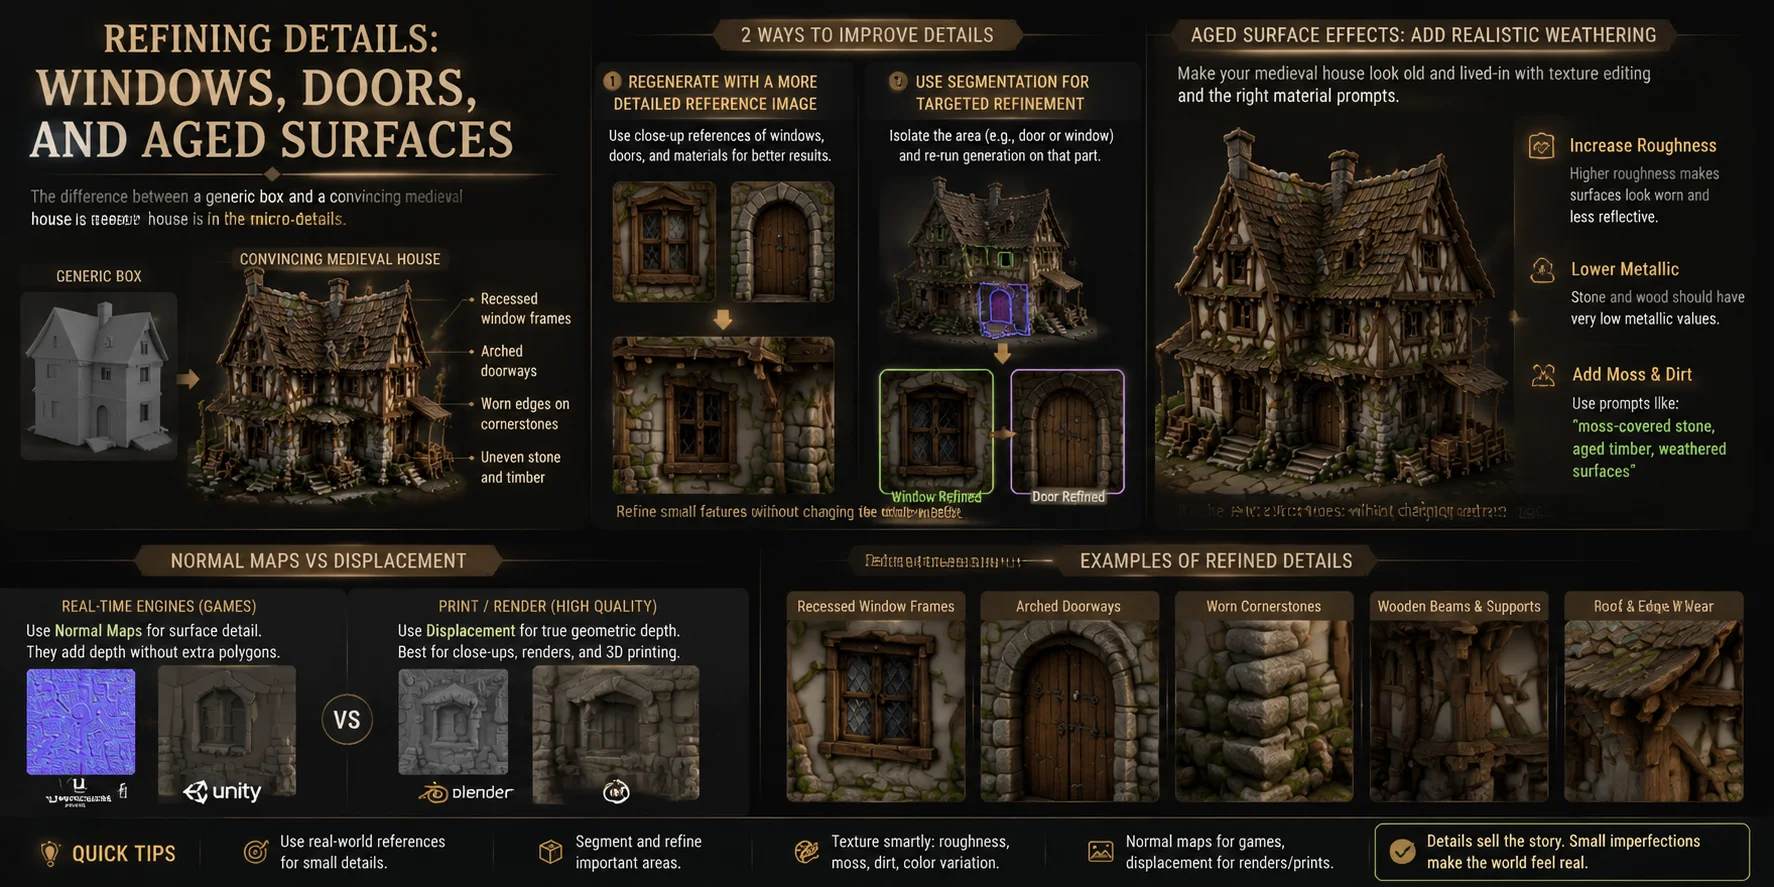
The difference between a generic medieval house and a convincing one often comes down to the smallest details. A basic model may have the correct shape, roof, and walls, but it is the micro-details that make the building feel historically authentic. Features such as recessed window frames, arched doorways, uneven stone corners, cracked wooden beams, and worn edges on foundations add depth and character that viewers immediately recognize.
Windows and doors are especially important because they define the scale and personality of a medieval structure. A flat window placed directly on the wall can make the model feel artificial, while recessed frames, wooden shutters, and slightly irregular openings create a more believable handmade appearance. Similarly, arched doorways, thick wooden doors, and damaged edges around entrances help communicate age and craftsmanship.
There are two effective ways to improve these details in an AI-generated medieval house model. The first approach is to regenerate the model using a more detailed reference image. Instead of using a distant building image, provide close-up references showing window designs, door frames, stone patterns, or timber construction. More visual information gives the AI a better understanding of the small structural elements.
The second approach is to use AI Model Segmentation to isolate specific areas. For example, you can separate the door or window section from the rest of the house, then run a targeted generation or refinement process only on that area. This allows you to improve important features without changing the entire model.
Surface aging is another key element for realism. Medieval buildings should rarely look brand new. Use texture editing to introduce weathering effects such as faded wood, cracked stone, dirt buildup, and moss growth. Increasing roughness can make surfaces appear older and more weathered, while lowering metallic values keeps natural materials like stone and wood physically accurate. Texture prompts such as “moss-covered stone” or “aged timber with weathered surfaces” can help generate a more authentic appearance.
When preparing the model for different uses, choose the right surface detail method. For real-time applications like games, normal maps are usually the best option because they add visual depth without increasing polygon count. Displacement creates true geometric depth but requires more processing power, making it better suited for high-quality renders or 3D printing workflows.
With the details refined, exporting to your target software is straightforward.
Exporting Your Medieval House to Blender, Unity, or Unreal
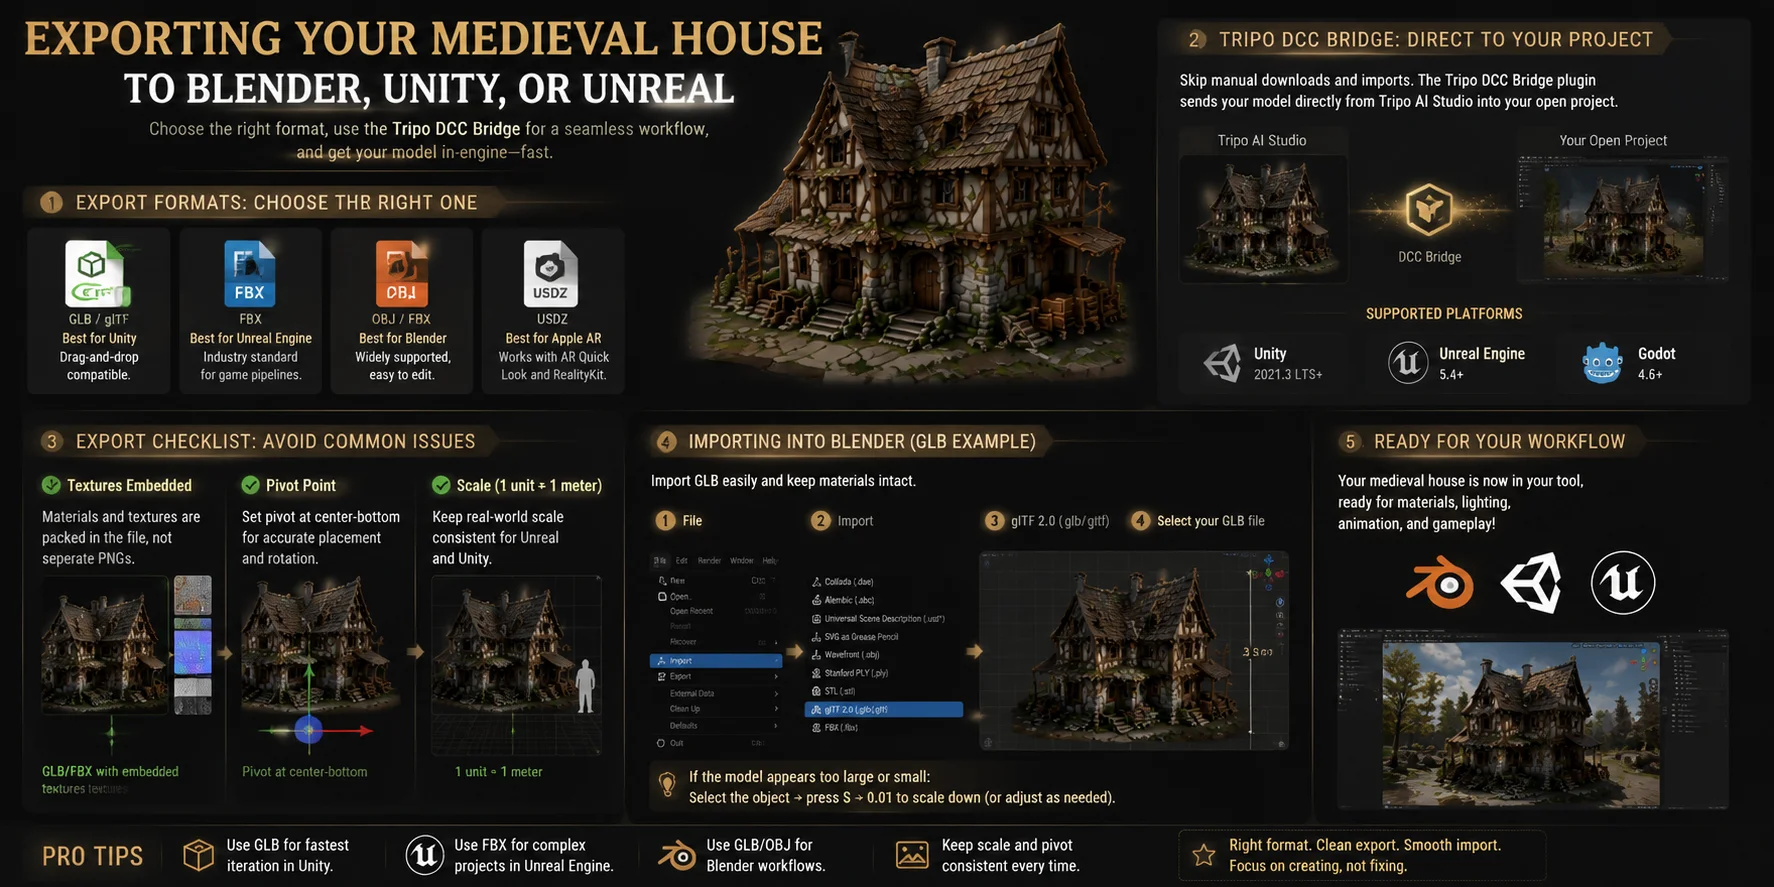
Once your medieval house 3D model is generated, textured, and optimized, the next step is moving it into your creative workflow. The correct export format depends on where you plan to use the asset. Choosing the right format helps preserve materials, reduce import issues, and ensures the model works correctly inside your target software.
For most modern workflows, GLB/glTF is the best choice for Unity because it stores the model, materials, and textures together in one portable file. You can drag and drop a GLB file into a Unity project and quickly preview the medieval house with its materials attached. For Unreal Engine, FBX remains a common standard because it provides strong compatibility with professional game pipelines, including meshes, materials, and additional asset data. If you are working in Blender, both OBJ and FBX are widely supported, while GLB is also a convenient option for keeping textures and materials organized. For Apple AR experiences, USDZ is the preferred format because it works directly with Apple’s AR Quick Look ecosystem.
Instead of manually downloading files and importing them one by one, you can use the Tripo DCC Bridge workflow to send your medieval house model directly from Tripo AI Studio into an open project. The bridge reduces file management and speeds up iteration by transferring the asset directly into your development environment. It supports major engines and tools, including Unity 2021.3 LTS+, Unreal Engine 5.4+, and Godot 4.6+.
Before exporting, check a few important settings to avoid common problems:
- Textures are embedded — Make sure materials are included with the model instead of being exported as missing or separate image files.
- Pivot point placement — Set the pivot point near the center-bottom of the building so placement, rotation, and snapping work correctly inside game engines.
- Correct scale — Keep the real-world scale consistent. A common setup is 1 unit = 1 meter in Unity and Unreal Engine.
For Blender users, importing is straightforward. Open Blender, go to:
File → Import → glTF 2.0 → Select your GLB file
The model should appear with its materials and textures automatically connected. If the medieval house appears extremely large or small, adjust the scale by selecting the object and pressing S → 0.01 to reduce oversized imports.
With your medieval house successfully inside Blender, Unity, or Unreal, you can continue with lighting, environment design, animation, or gameplay integration.
Now that your medieval house is in-engine, here are the details that will make it look pro.
Pro Tips for Realistic Medieval Architecture
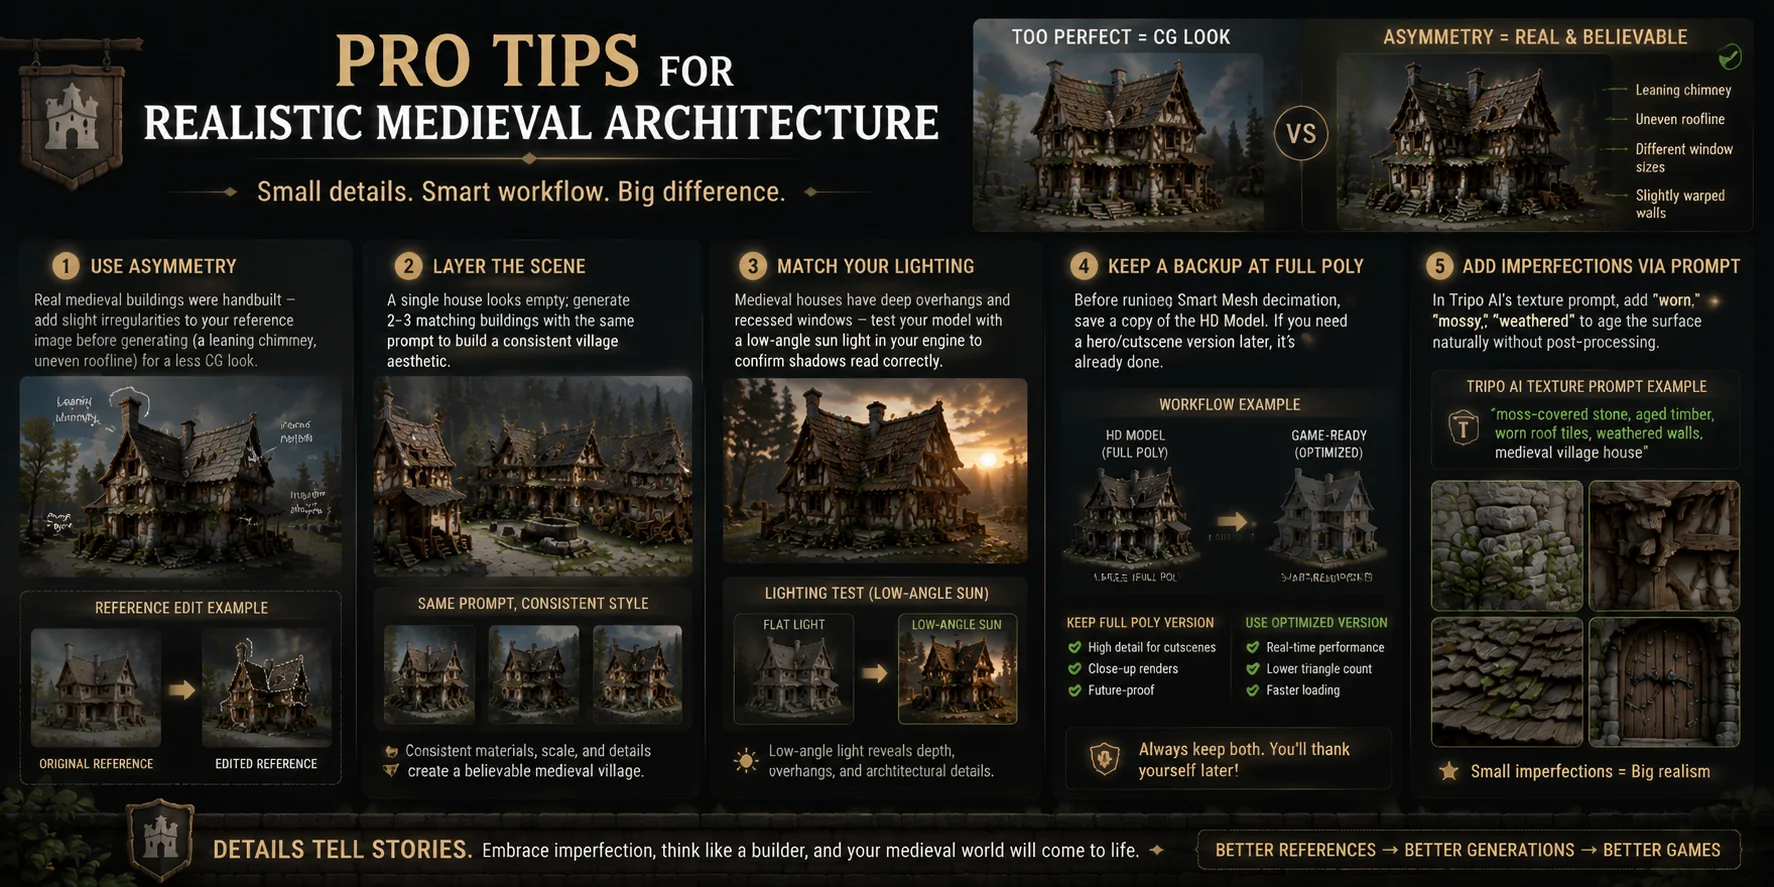
Creating a convincing medieval house 3D model is not only about adding more polygons or higher-resolution textures. The most realistic results come from capturing the small imperfections, environmental details, and design choices that made historical buildings unique. Use these practical tips to make your AI-generated medieval architecture feel less like a perfect CG asset and more like a real structure.
Use Asymmetry
Real medieval buildings were usually built by hand, so they were rarely perfectly symmetrical. Add slight irregularities to your reference image before generation, such as a leaning chimney, uneven roofline, different window sizes, or slightly warped walls. These small variations help the AI create a more authentic structure and avoid the clean, artificial look common in computer-generated buildings.
Layer the Scene
A single medieval house can look isolated in a game environment or render. Instead, generate multiple matching buildings using the same prompt style to create a consistent village atmosphere. Two or three houses with similar materials, architectural features, and lighting can quickly transform an empty scene into a believable medieval settlement.
Match Your Lighting
Lighting plays a major role in showing architectural depth. Medieval houses often feature deep roof overhangs, recessed windows, wooden beams, and uneven surfaces that create strong shadows. Test your model with a low-angle sunlight setup inside your game engine or rendering software to make sure the shadows and shapes read correctly from the camera view.
Keep a Backup at Full Poly
Before optimizing your model with Smart Mesh or other decimation tools, always save a copy of the original HD Model. The optimized version is perfect for games and real-time use, but the high-poly version may be needed later for close-up shots, cinematic scenes, or detailed renders. Keeping both versions gives you more flexibility throughout production.
Add Imperfections Through Prompts
Small surface imperfections make materials feel more natural. When generating textures in Tripo AI, include descriptive words such as “worn,” “mossy,” “weathered,” “aged wood,” or “cracked stone” to guide the AI toward realistic medieval surfaces. Adding these details during generation is often faster and cleaner than manually editing every texture afterward.
If you still have questions, here are the ones we get most often.
Frequently Asked Questions
How do I create a 3D model of my house?
You can create a 3D model of your house by taking a clear photo from a 45-degree angle and uploading it to an AI 3D generator like Tripo AI Studio. Select Image to 3D, and the AI will generate a 3D model in minutes. You can then refine the details, add textures, and export the model to Blender, Unity, Unreal Engine, or other 3D software without needing CAD or professional modeling skills.
How to build a medieval style house?
To build a medieval-style house, start with a strong reference image of a real medieval building, such as an English or German half-timbered house. Upload the image to an AI 3D generator like Tripo AI Studio to create the base model, then refine it with realistic materials like stone walls, dark timber beams, and thatched or tiled roofs. The most important design elements are exposed timber framing, steep roofs, small windows, and a stone or wattle-and-daub foundation.
What is the free software to build a house 3D?
For free software to build a 3D house, you can use Tripo AI Studio for AI-assisted generation or Blender for traditional 3D modeling. Tripo AI offers free credits to create your first 3D models, while Blender is a completely free, open-source tool for manually designing and editing houses. For AI workflows, Tripo AI’s free tier can generate and export models depending on the included limits.
Can I 3D model for free?
Yes, you can create 3D models for free. Tools like Tripo AI Studio offer free credits that allow you to generate models, including textured assets such as medieval houses. Free plans usually include standard-quality generation and common export formats like GLB, OBJ, or FBX, while advanced features may require a paid upgrade.
Conclusion
Building a medieval house 3D model is now faster and more accessible than ever. Start with your idea, refine the details that bring the structure to life, and turn it into a ready-to-use asset for games, renders, or creative projects.
Ready to build your medieval world? Open Tripo AI Studio.
Want to compare plans and features first? Check the Tripo AI pricing page.