How to Create Your First 3D Model with AI: A Beginner's Tutorial
TL;DR
- You can create a first 3D model from a text prompt or reference image.
- No design skills or 3D software experience are required.
- Use text-to-3D when you have an idea in words.
- Use image-to-3D when you already have a reference photo.
- Tripo AI supports both beginner workflows in a browser.
Traditional 3D modeling can involve learning specialized tools such as Blender, Maya, or ZBrush. This first 3D model AI tutorial shows a much easier path: type a description or upload a photo, then review the generated model before deciding whether it is ready for your intended use.
This guide explains what AI 3D generation is, which tool to use, and how to create your first model step by step. We will cover both text-to-3D and image-to-3D workflows. No prior experience is needed.
What Is AI 3D Model Generation — and Why It Helps Beginners
AI 3D model generation lets you create a 3D model from a text prompt or image instead of building every shape by hand. Traditional 3D modeling usually requires months of practice with tools like Blender, Maya, or ZBrush. You need to understand geometry, materials, topology, UVs, and export settings before your model becomes usable.
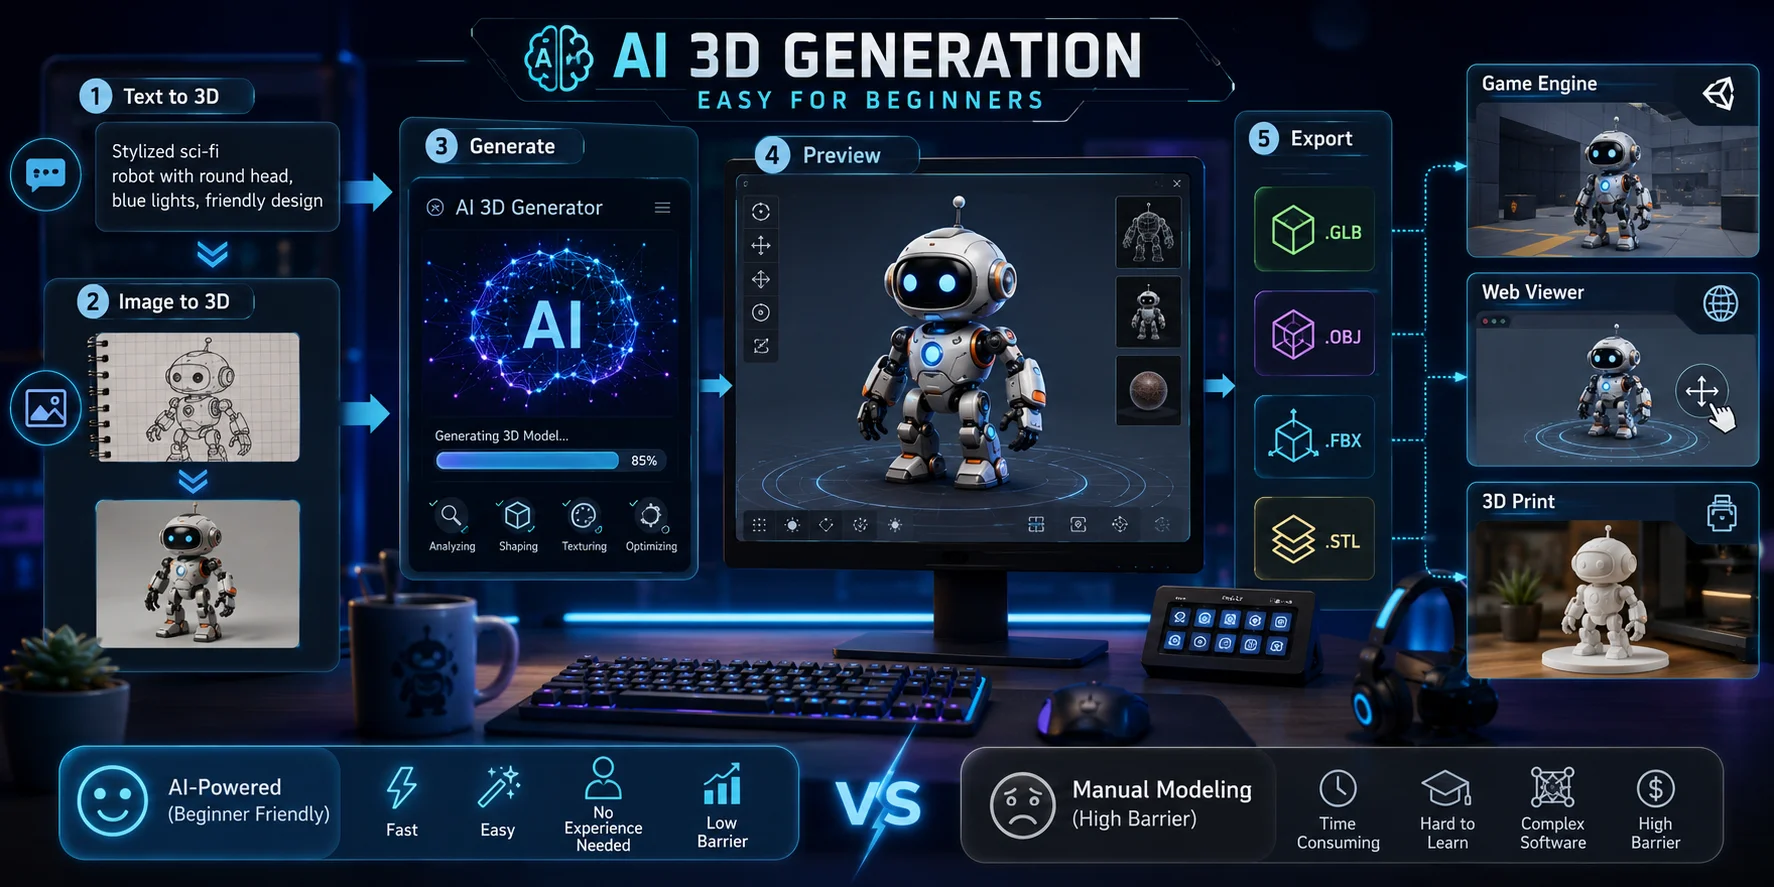
AI tools lower that barrier. The basic workflow is simple: describe what you want, generate the model, preview it, and download the file. Instead of manually placing vertices and sculpting forms, you start with an AI-generated mesh and improve it if needed.
There are two main ways to begin. Text-to-3D works when you can describe your idea in words. Image-to-3D works when you already have a reference photo, sketch, toy, product image, or concept art.
The output can usually be exported in formats like GLB, OBJ, FBX, or STL. That makes AI-generated models useful for game engines, web viewers, editing tools, and 3D printing. For hobbyists, game developers, content creators, educators, and makers, AI can provide a practical starting point for a first usable 3D model.
AI Tools for Your First 3D Model — What to Use
Beginners may see several AI 3D tools in search results, including Tripo AI, Meshy AI, and CSM 3D. These tools all aim to make 3D creation easier, but this tutorial uses Tripo AI because it is browser-based, free to start, and supports both text-to-3D and image-to-3D workflows.
For a complete beginner, the most important thing is simplicity. You should be able to open the tool, enter an idea, generate a model, rotate the preview, and export a file without installing complex software. Tripo AI fits that beginner path well.
This tutorial uses Tripo AI Studio and naturally covers Tripo AI’s Text to 3D, Image to 3D, and AI 3D Model Generator workflows.
Meshy AI is another popular option and can be useful for experimentation. For this beginner tutorial, however, Tripo AI provides a browser-based path from an idea to a model you can review, with export formats useful for printing, editing, and digital use when available under your current plan and model settings.
Step-by-Step: Create Your First 3D Model with Tripo AI
This is the most important part of the tutorial. Follow these steps, and you should be able to create your first AI-generated 3D model even if you have never opened a 3D tool before.
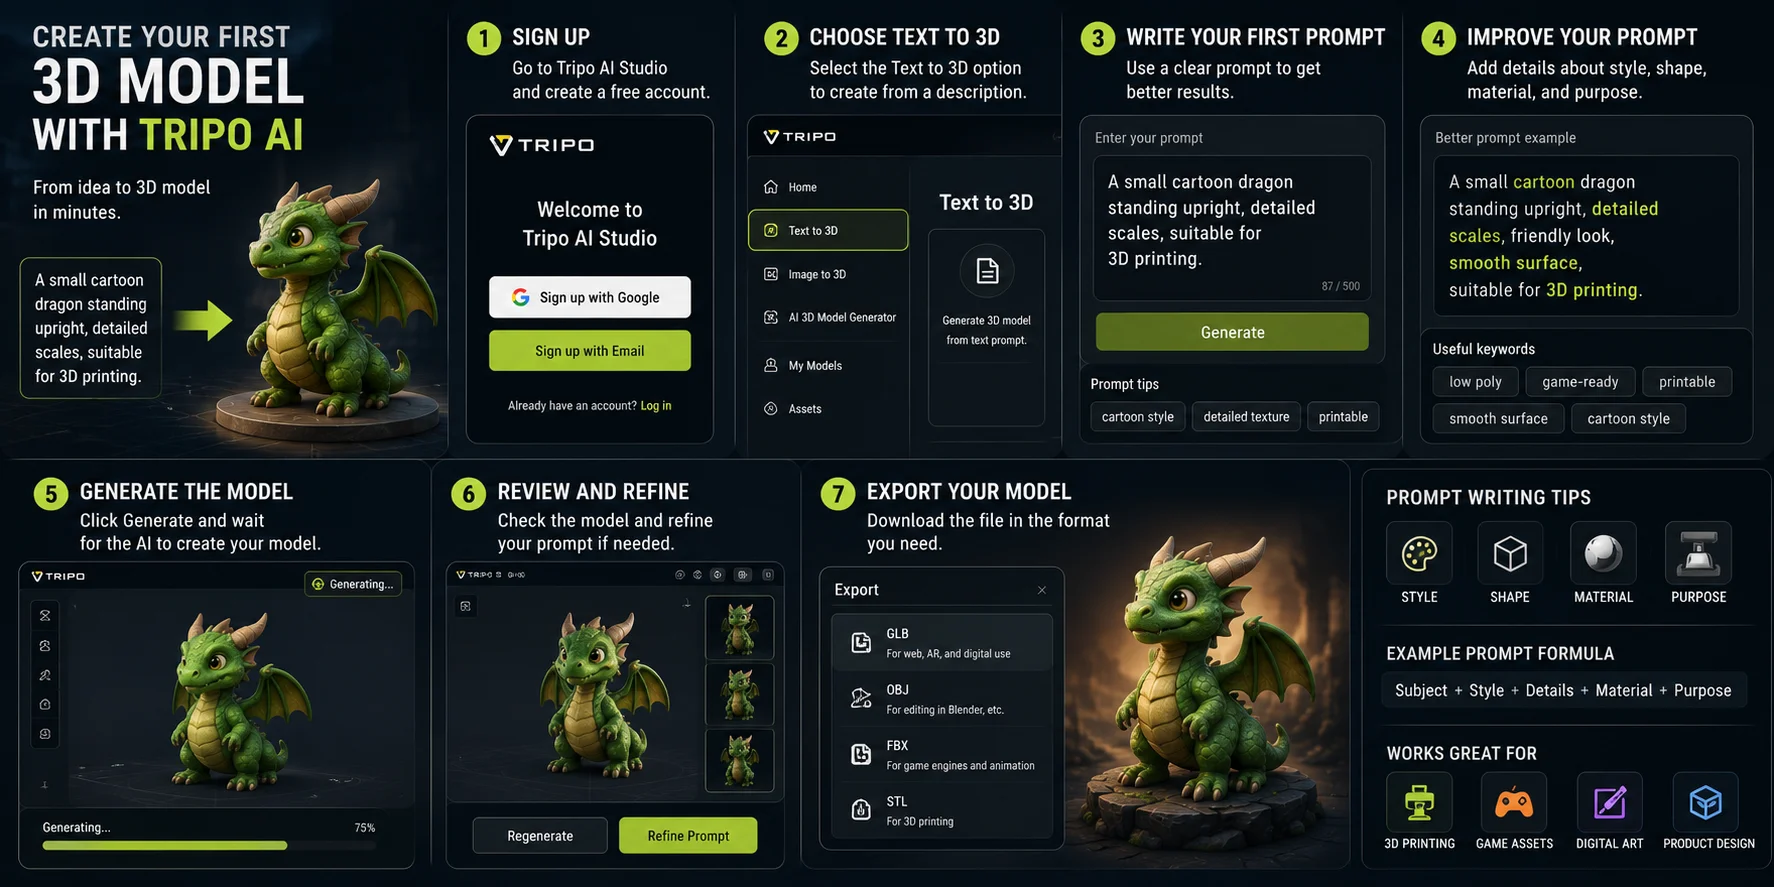
Step 1 — Open Studio. Go to Tripo AI Studio. Follow the current access prompts if they appear; the workflow runs in your browser, so you do not need to install a desktop 3D application to begin.
Step 2 — Choose “Text to 3D.” After entering the dashboard, select the Text to 3D option. This tells Tripo AI that you want to create a model from a written description.
Step 3 — Write your first prompt. A prompt is simply a sentence that explains what you want. For your first attempt, use something clear and not too complex:
“A small cartoon dragon standing upright, detailed scales, suitable for 3D printing.”
This prompt tells the AI the subject, style, visual detail, and intended use. That is much better than only writing “dragon.”
Step 4 — Improve your prompt with details. Good prompts usually mention shape, style, material, and purpose. For example, instead of writing “a box,” try “a small low-poly treasure chest with metal corners, game-ready style.” If you want to print the model, include words like “printable” or “smooth surface.”
Step 5 — Generate the model. Click Generate and wait for the result. Tripo AI will return a 3D preview you can rotate in the browser. Look at the model from the front, back, sides, top, and bottom.
Step 6 — Review and refine. Check whether the shape matches your idea. If the model is too realistic, add “cartoon style.” If it looks too detailed, add “low poly.” If it is meant for printing, add “printable” or “single solid object.” Regenerating is part of the process.
Step 7 — Export your model. When you like the result, export the file if your current plan and model settings make that option available. Use GLB for digital viewing or web use, OBJ for editing in Blender, FBX for many game workflows, or STL for 3D printing.
Prompt-writing tip: Add words like “low poly,” “game-ready,” “printable,” “cartoon style,” “smooth surface,” or “detailed texture” to guide the output.
Image-to-3D Workflow: Turn a Photo into a 3D Model
Use image-to-3D when you already have a visual reference. This could be a product photo, a toy, a sketch, a figurine, a concept image, or something you want to recreate as a 3D model.
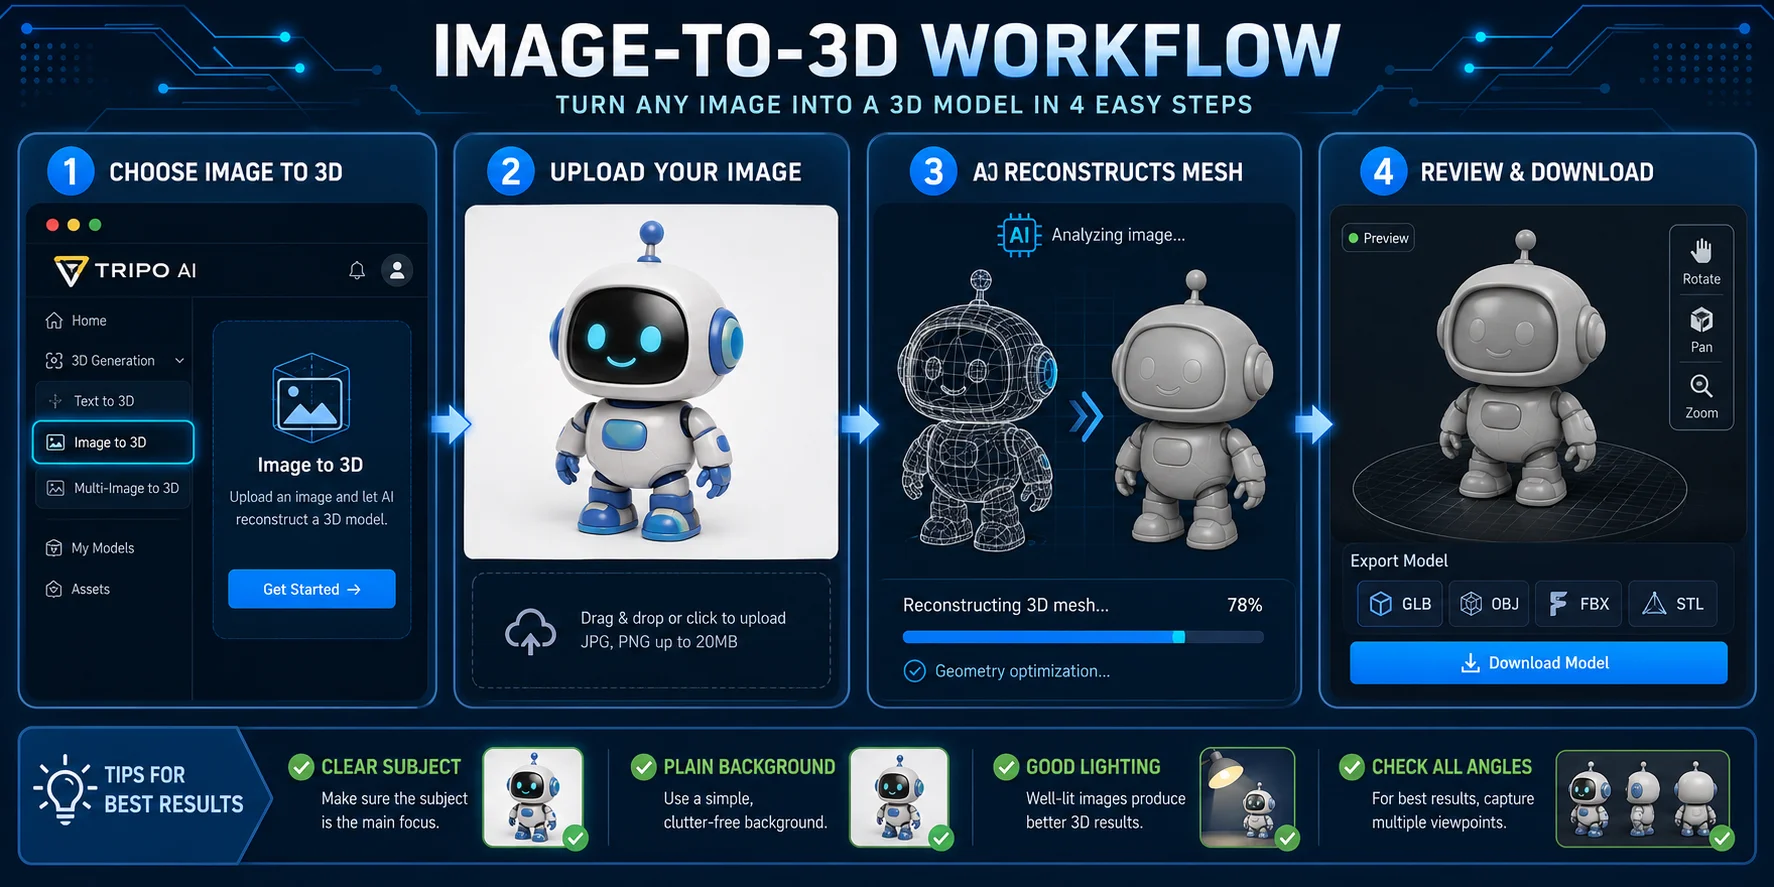
Step 1 — Choose “Image to 3D.” In Tripo AI Studio, select the Image to 3D option. This workflow uses your uploaded image as the main input.
Step 2 — Upload your image. Choose a clear image with one main subject. A well-lit photo on a plain or white background usually works best. Avoid blurry photos, heavy shadows, cluttered scenes, and objects partly hidden by other items.
Step 3 — Let Tripo AI reconstruct the mesh. After upload, Tripo AI analyzes the image and generates a 3D mesh. This is useful when your idea is easier to show than describe.
Step 4 — Review and export. Rotate the model and check the shape from all angles. If the result looks usable, export it in the format you need when your current plan and model settings make that option available.
Image-to-3D is helpful for turning a product sketch into a mockup, recreating a simple figurine, building a game asset from concept art, or creating a classroom model from a visual reference.
Beginner Course — Key Concepts to Know Before You Start
You do not need to become a 3D expert, but a few basic terms will make the process easier.
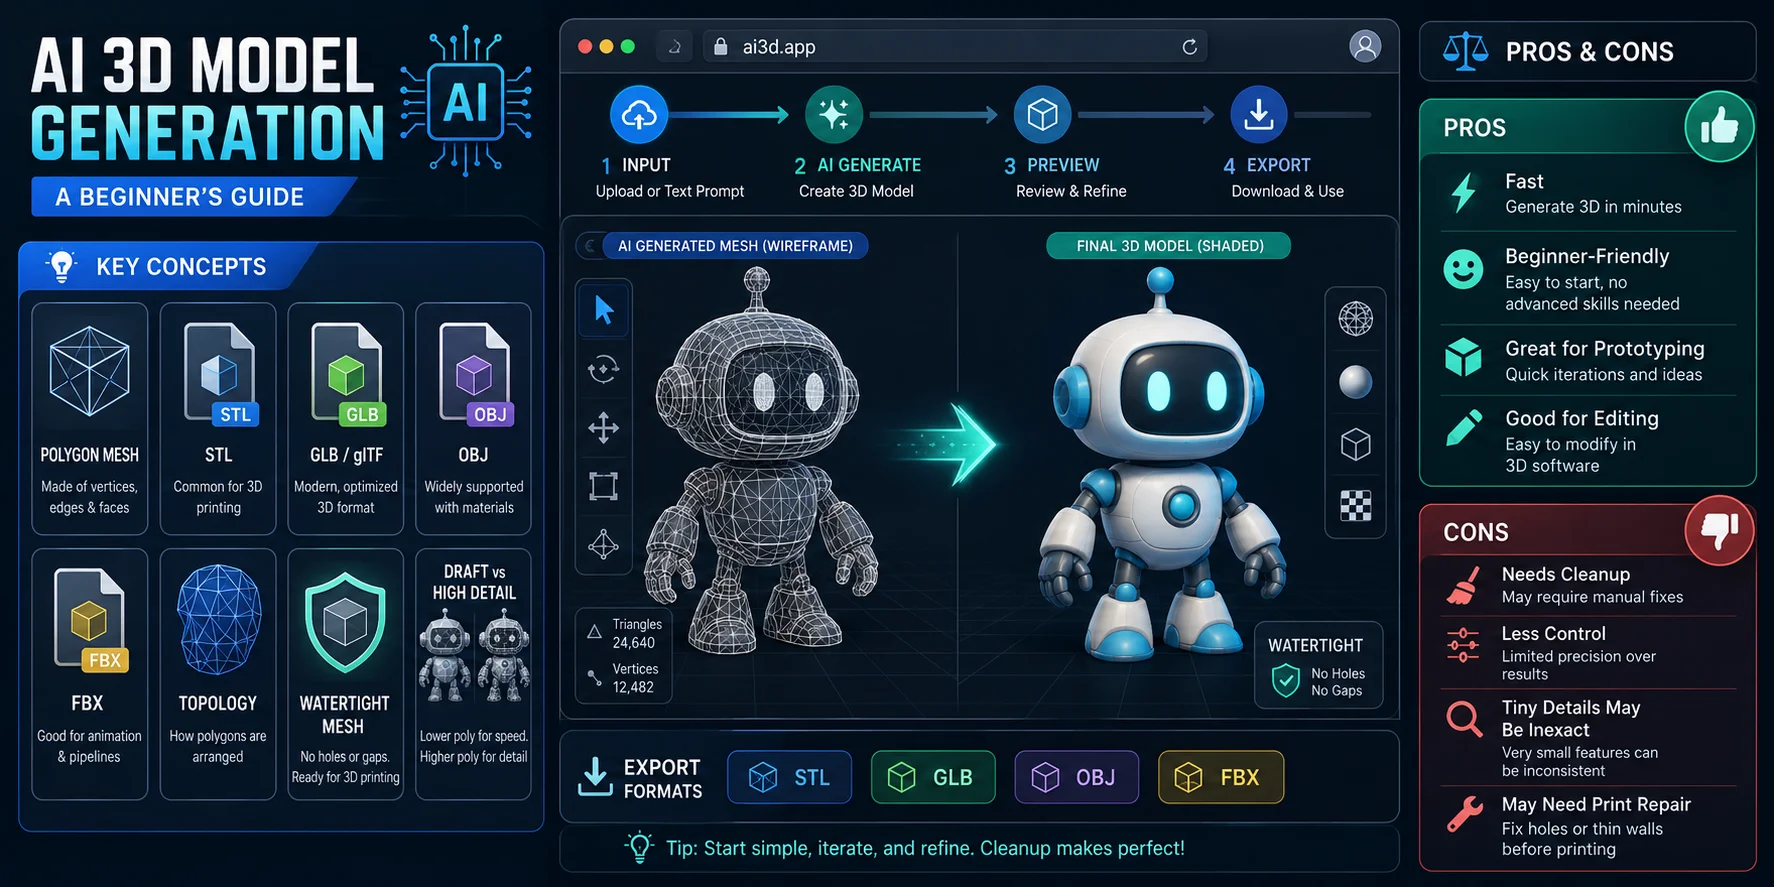
Polygon mesh: A 3D model is usually made from many small connected faces called polygons.
STL: A common file format for 3D printing.
GLB / glTF: Good formats for web, AR, 3D viewers, and digital display.
OBJ: A common format for editing models in Blender or other 3D software.
FBX: A format often used in game and animation workflows.
Topology: The structure of the mesh. Clean topology helps a model animate, deform, print, or edit correctly.
Watertight mesh: A model with no holes or broken surfaces. This matters most for 3D printing.
Draft vs. high-detail: Draft models are faster and good for testing. High-detail models are better for final output.
Tripo AI handles much of this automatically. As a beginner, you mainly need to know which format to export and what problems to check.
Pros and Cons of AI 3D Model Generation
AI 3D generation is one of the easiest ways to start, but it is not perfect.
Pros
- No design or CAD skills required.
- Can speed up early drafts and rapid prototyping.
- Useful for further editing in Blender or ZBrush.
- Cost-effective for testing many ideas quickly.
Cons
- Complex professional assets may still need cleanup.
- You have less control than manual modeling.
- Tiny text, small mechanical details, or micro features may be imprecise.
- Some models may need repair before printing.
For beginners and rapid iteration, AI generation can be a useful starting path. For production-grade assets, treat AI output as a strong draft that can be refined.
Export and Next Steps — What to Do with Your 3D Model
Once your first model is ready, choose the next step based on your goal.
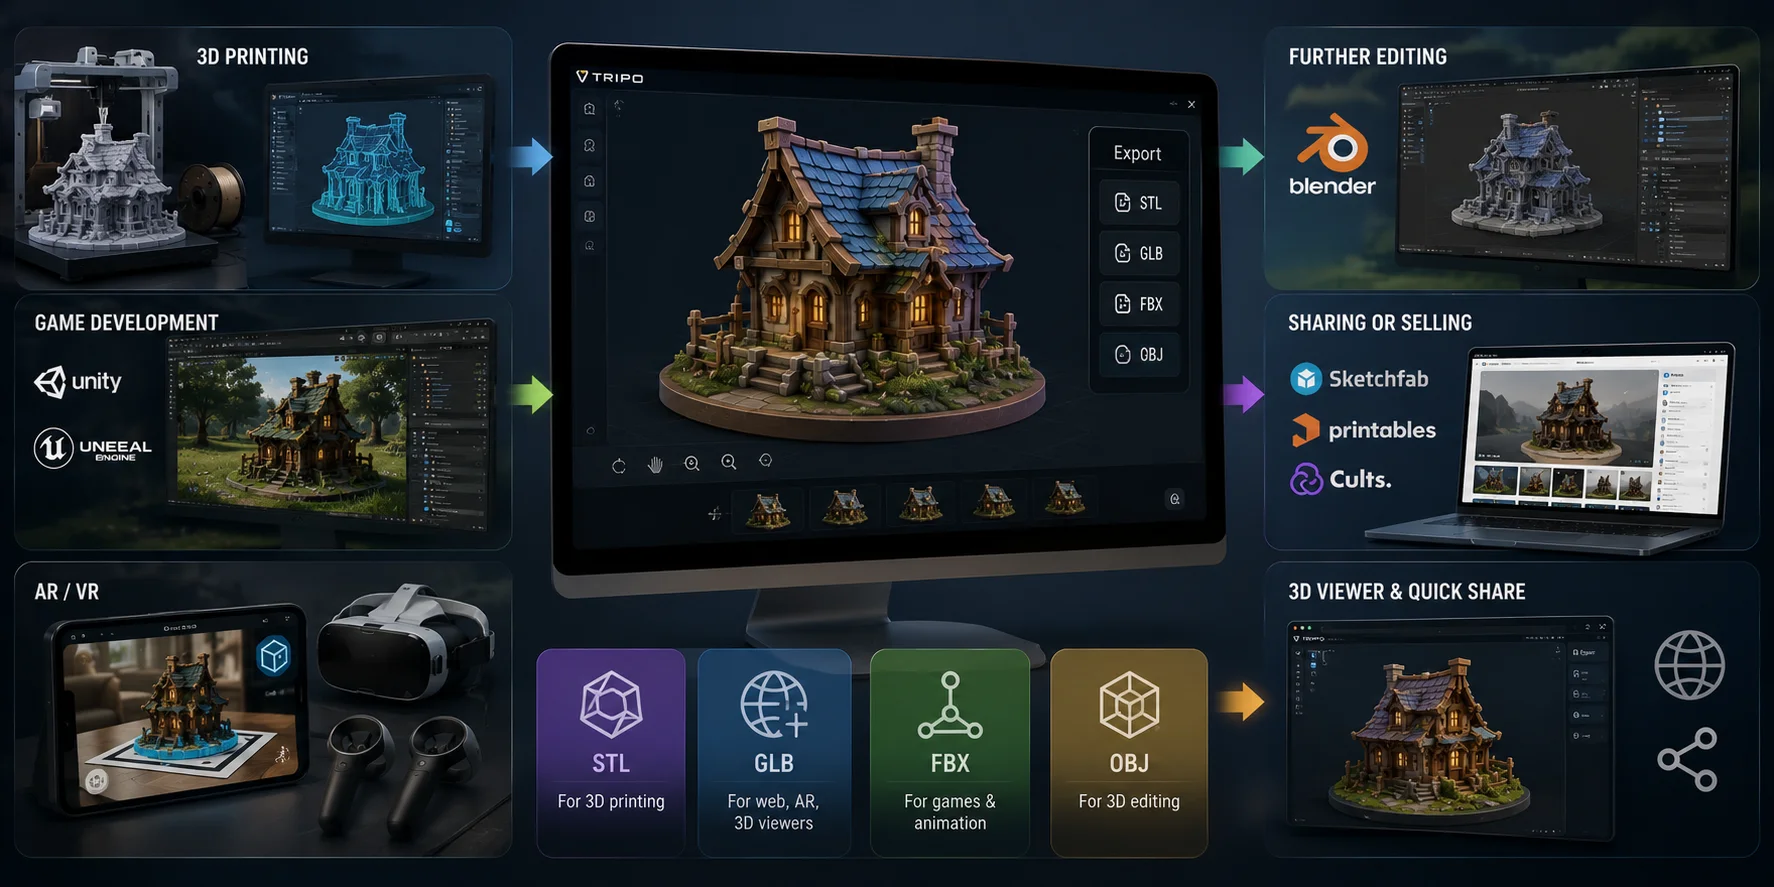
3D printing: Export as STL, open it in a slicer such as Bambu Studio or Cura, check scale and supports, then print.
Game development: Export GLB or FBX and import the file into Unity, Unreal, Godot, or another engine.
AR / VR: Use GLB for 3D viewers, web display, and many WebXR-style workflows.
Further editing: Export OBJ and open it in Blender if you want to clean the mesh, adjust materials, or combine it with other objects.
Sharing: Use the export option and review the destination platform rules plus the rights to your source material before you publish, share, or sell a model.
Use the Studio preview to inspect your model before moving it into another tool.
Frequently Asked Questions
Is there an AI for creating 3D models?
Yes. Tools like Tripo AI, Meshy AI, and CSM 3D let you generate 3D models from text or images without modeling experience. Tripo AI is a strong free-to-start option for beginners because it supports both main workflows.
What was the first 3D model ever made?
There is no single uncontested “first 3D model.” Ivan Sutherland’s 1963 Sketchpad is a landmark interactive computer-graphics system and an important predecessor of later CAD tools.
Can ChatGPT create a 3D model?
ChatGPT can help you write prompts, plan a model, or explain 3D workflows. For a native text-to-3D or image-to-3D workflow that produces a model for review and export, use a dedicated 3D generation tool such as Tripo AI.
What was the first 3D modeling program?
Sketchpad, created by Ivan Sutherland in 1963, is widely considered one of the earliest interactive computer graphics and CAD systems. It was not a modern 3D modeling app, but it helped shape later design software.
Do I need a powerful computer to use AI 3D tools?
Browser-based tools such as Tripo AI Studio can let you begin without installing a desktop 3D application. You still need a compatible browser, a reliable internet connection, and enough local capability to view and handle the exported file.
Can I 3D print models made with Tripo AI?
Yes. Export your model as STL, open it in a slicer such as Bambu Studio or Cura, and prepare it for printing. Some models may need minor mesh repair or support adjustments first.
Conclusion
Making your first 3D model with AI is now genuinely beginner-accessible. Pick a text prompt or upload an image, and Tripo AI handles most of the technical work.
Start your first model by opening Tripo AI Studio and following the current generation flow.
Review current plans and access details on Tripo AI Pricing.