The AI 3D Printing Checklist: From Prompt to Perfect Print
TL;DR
- An AI-generated model is a starting point, not proof that a file will print successfully.
- Describe the object’s purpose, dimensions, intended print method, and assembly needs before generation.
- Inspect the exported mesh, set size and wall requirements from your real printer profile, then validate orientation and supports in the slicer.
- Use a small test print when the model has fine details, tight fit requirements, tall geometry, or significant support contact.
Introduction
AI tools can generate a 3D model in seconds — but a printable file takes more than a good prompt. Scaling issues, non-manifold geometry, and missing supports are among the most common reasons a model fails at the slicer stage. This checklist walks you through every step: from writing your AI prompt to running a final slicer test, so you can move from idea to print-ready file with confidence.
Set Up Your Print Profile Before You Generate
Printability starts with the intended use, not the final export button. Before you write a prompt or upload a reference image, decide whether the part is decorative, functional, load-bearing, dimension-critical, or intended to fit another object. A display figurine can prioritize surface detail and orientation; a bracket, lid, or replacement part needs more attention to measurement, clearance, and the direction of the applied load.
Record the printer and material you plan to use, then open the active slicer profile. The practical limits for wall thickness, small features, bridges, supports, and clearance are specific to that printer, nozzle or resin setup, material, and print orientation. The model does not need to contain every setting in the prompt, but the prompt should make its intended job clear enough that you can judge the result against the right constraints.
For functional objects, include target dimensions and identify any surfaces that must mate with another part. Leave room for the tolerances recommended by your printer and material workflow rather than assuming a digitally exact fit will print exactly as modeled. For decorative objects, identify the faces that should remain clean, the fragile details that need protection, and whether the object can be split into intentional parts for easier printing or finishing.
After generation, export a format your downstream workflow supports and inspect the model at full size in the slicer. Confirm units, overall dimensions, and the orientation on the build plate before tuning supports. This early check is where an attractive AI result becomes a practical print plan.
How to Read the Slicer Preview
A slicer preview is a manufacturing check, not just a final click-through screen. Move layer by layer and look for isolated islands, thin sections that disappear, unsupported overhangs, unexpected internal walls, and support contact on visible surfaces. Compare the estimate for time and material with the size and complexity of the object; a surprising estimate can signal an unintended scale change, excessive supports, or geometry that needs another look.
Use the preview to choose an orientation that balances surface quality, strength, stability, and support removal. A different angle can reduce supports but may introduce weaker layer alignment or a more visible seam. There is no universal best orientation, so prioritize the surfaces and loads that matter for the actual object. When the consequences of failure are high, test the riskiest feature rather than relying only on the complete model preview.
The Complete AI 3D Printing Checklist
Step 1 — Write a Print-Focused Prompt
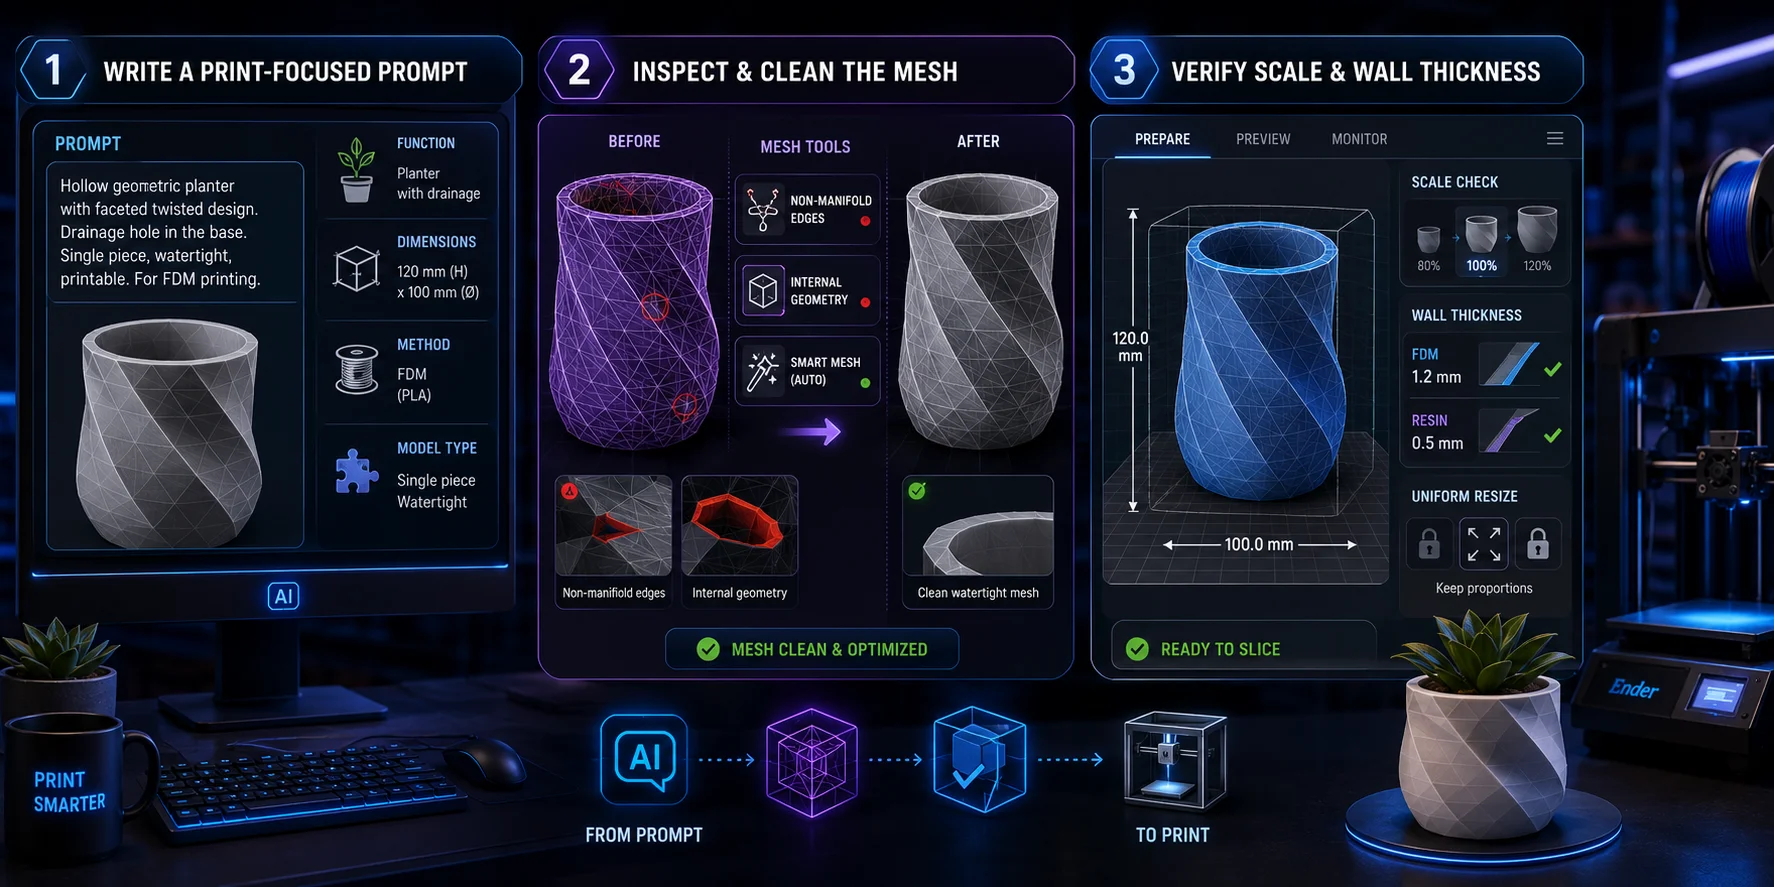
When a reference image is the starting point, Image-to-STL conversion can create the printable source mesh that you will still need to inspect and repair.
Step 2 — Inspect and Clean the Mesh
Step 3 — Verify Scale and Wall Thickness
Step 4 — Run a Watertightness Check
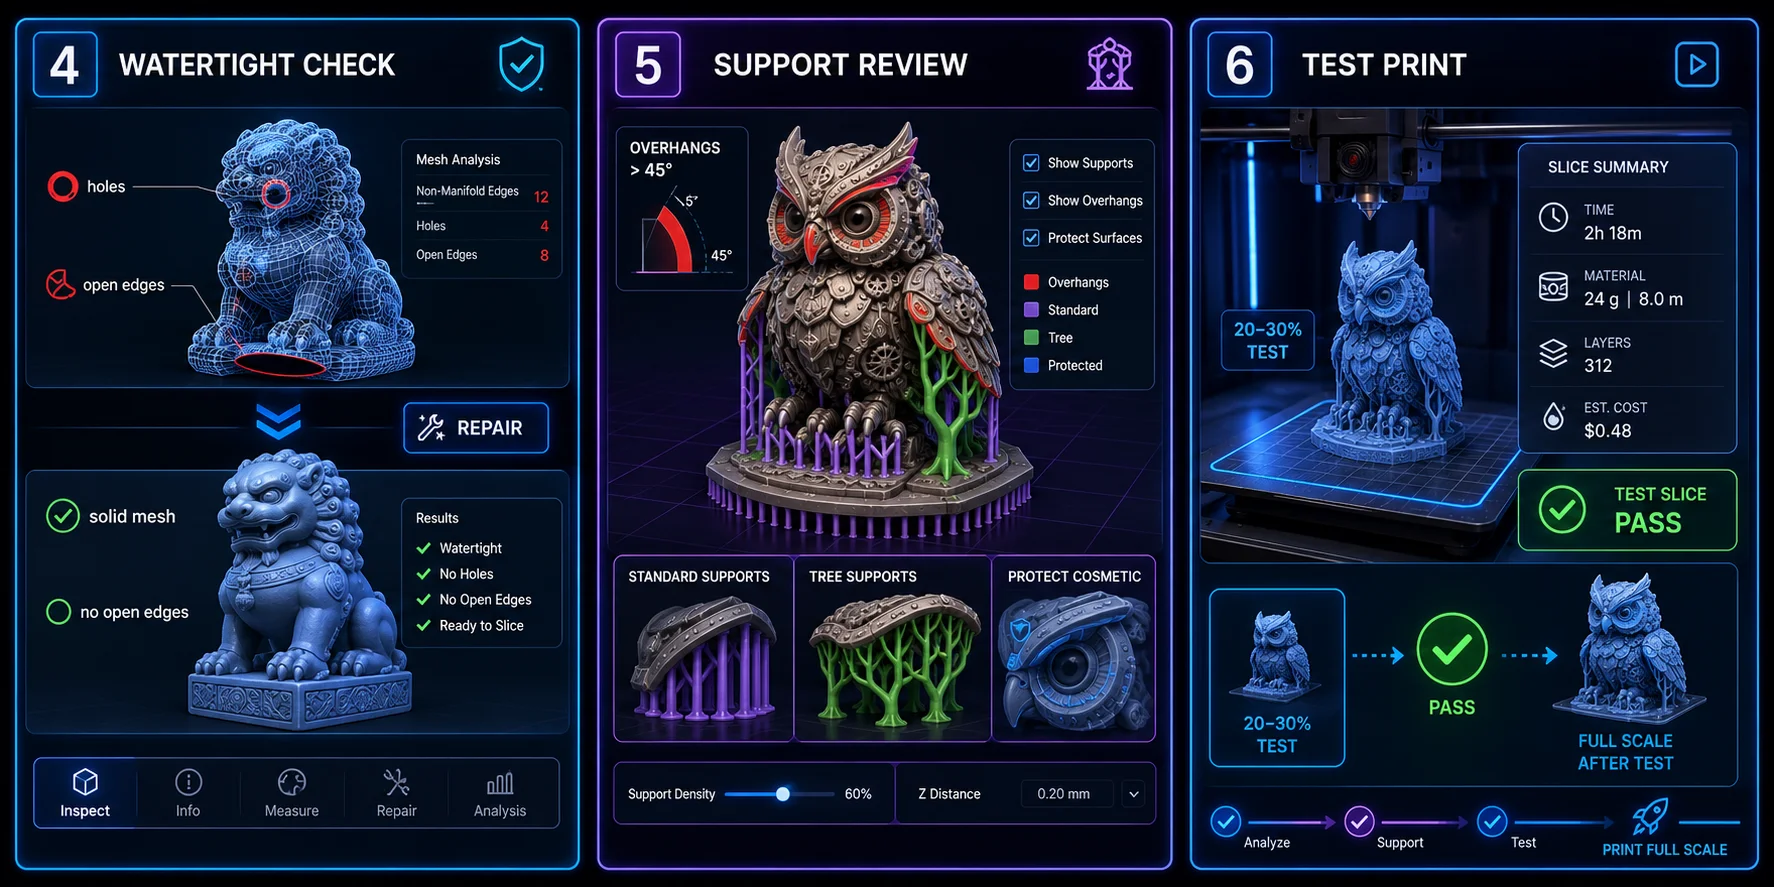
Step 5 — Place and Review Supports
Step 6 — Run a Slicer Test Print
If your chosen printer or slicer only accepts STL, you can convert 3MF to STL before the final slicer check.
AI Tools That Support This Checklist
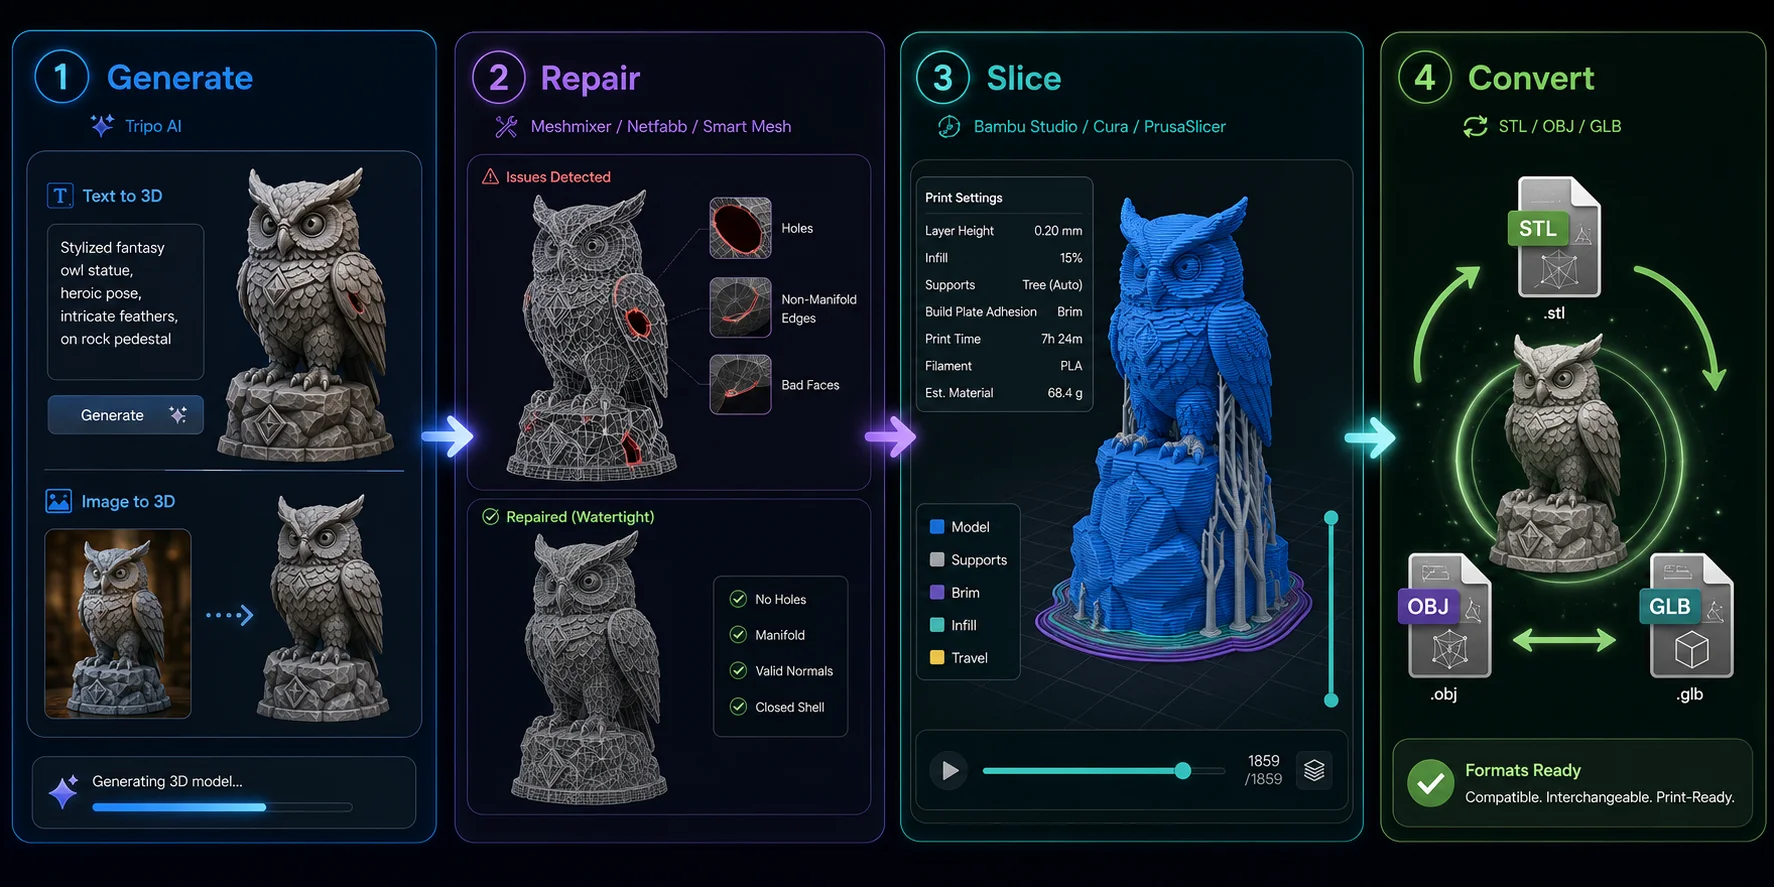
The right tool at each stage speeds up the checklist considerably:
- Model generation:Tripo AI provides text-to-3D and image-to-3D generation for creating a starting model. Use text-to-3D for concept models or image-to-3D to convert reference photos, then validate the exported model for printability.
- Mesh repair: Use a dedicated mesh-repair or slicer workflow to inspect holes, non-manifold geometry, internal shells, and surface errors. Treat Tripo Smart Mesh as a lightweight topology option, not a replacement for printability validation.
- Slicing: Bambu Studio, Cura, and PrusaSlicer can help prepare and preview a print, but their diagnostics and repair workflows differ. Check the tool and version you use for its current mesh-repair or validation options.
- Format conversion: Tripo AI Convert handles STL, OBJ, and GLB in one step.
For an OBJ asset that is ready for a standard print pipeline, you can convert OBJ to STL before validating scale, walls and supports.
Common Mistakes to Avoid
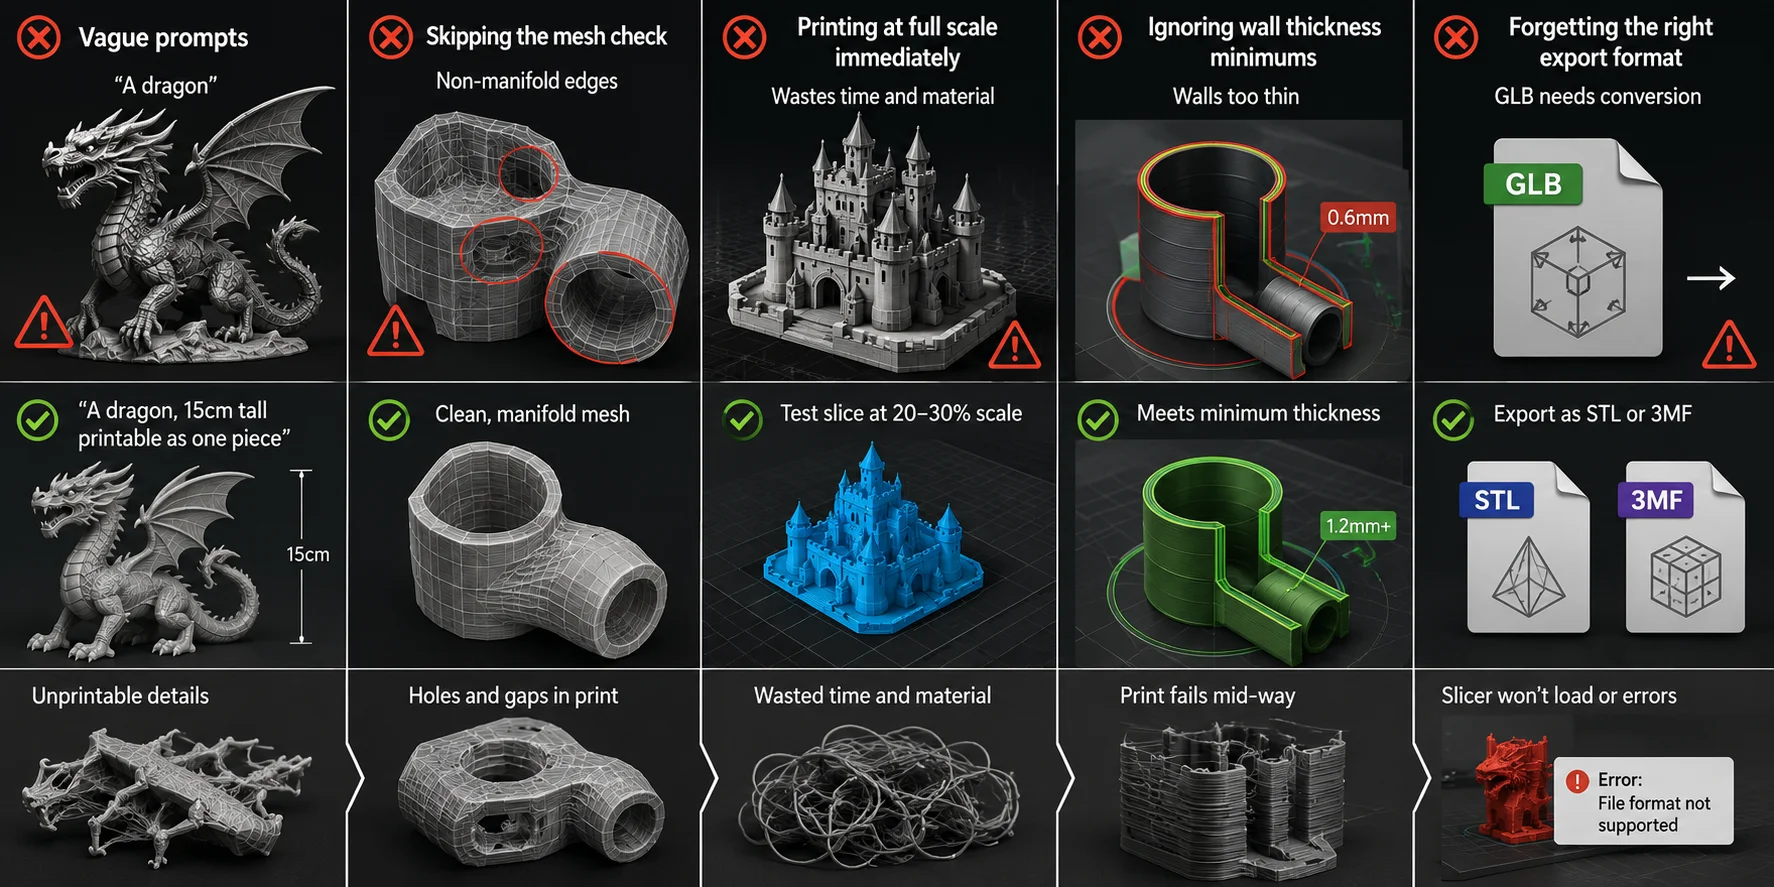
- Vague prompts: “A dragon” generates beautiful geometry that is often impossible to print. Add function and scale constraints.
- Skipping the mesh check: Non-manifold edges cause silent slicer errors — the file looks fine but prints with gaps.
- Printing at full scale immediately: For a new or high-risk model, print a small test that includes the fragile, supported, or dimension-critical features before committing to the final size.
- Ignoring your printer profile: Wall thickness, feature size, and clearance depend on the printer, nozzle, material, orientation, and slicer settings. Check the current profile instead of relying on a universal threshold.
- Forgetting to export in the right format: Most slicers prefer STL or 3MF; GLB or glTF files need conversion first.
Frequently Asked Questions
What is an AI 3D printing checklist?
An AI 3D printing checklist is a step-by-step verification process for AI-generated models. It covers prompt writing, mesh repair, scale verification, watertightness, support placement, and a slicer test before printing.
What are the prerequisites for using AI in 3D printing?
You need an AI model generator such as Tripo AI Studio, a slicer application, and basic knowledge of your printer’s material requirements. Check wall thickness, layer height, support behavior, print scale, and tolerance against the active printer and material profile.
Is there a free AI 3D printing checklist?
Yes. The checklist in this article is free to use. Many tools listed here, including Meshmixer, Blender, Cura, and PrusaSlicer, offer free access or free tiers; check current plan terms before relying on a feature.
What are the best AI tools for 3D printing?
The right tool depends on the stage of the workflow. Tripo AI can create a starting model from text or images, while a mesh-repair or slicing workflow validates the exported geometry and prepares orientation, supports, and print settings.
How does AI improve the 3D printing workflow?
AI reduces the time needed to create a base model from scratch and makes it easier to explore variations. It does not remove the need to inspect geometry, set print-specific constraints, and validate the model in a slicer before printing.
What is the most common mistake in AI 3D printing?
The most common mistake is treating a visually convincing model as a print-ready file. Check mesh integrity, scale, feature size, orientation, supports, and the slicer preview before committing to a full print.
Conclusion
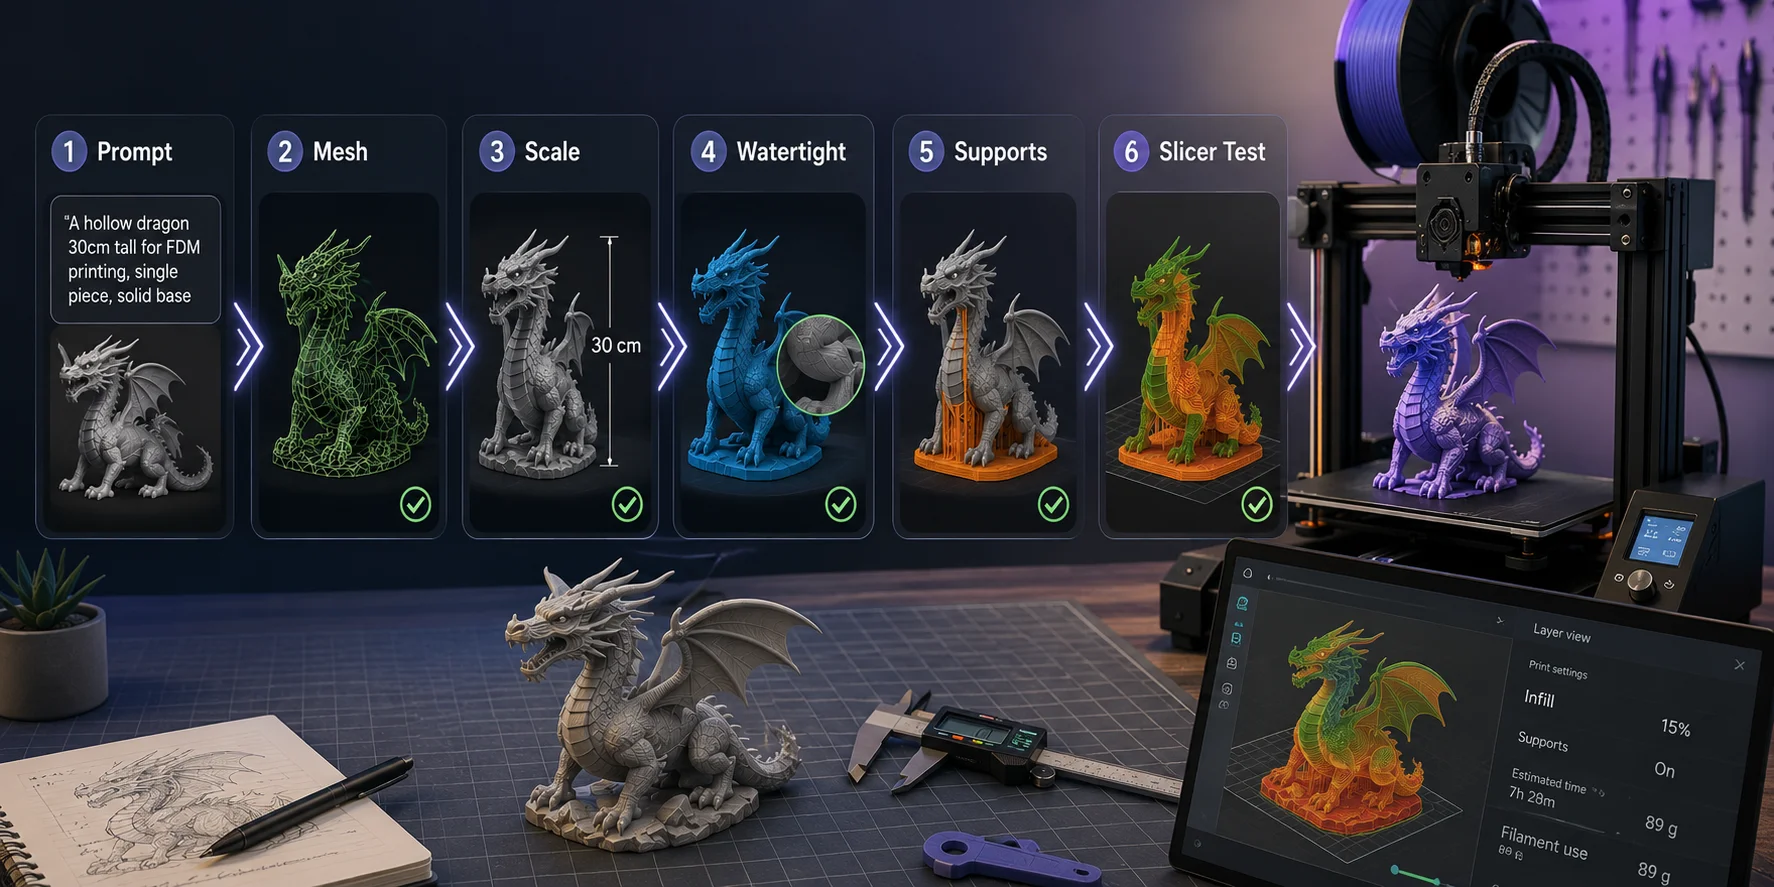
AI has removed the biggest barrier to 3D printing — creating a model from scratch — but printability still depends on the steps that follow generation. Run this checklist every time: prompt, mesh, scale, watertight, supports, slicer test. Six steps, and you'll spend less time on failed prints and more time on what matters.
Ready to generate your first print-ready model? Try Tripo AI Studio free, or explore Tripo AI Pricing for team and production plans.