What Is Retopology? A Beginner's Guide to Clean 3D Meshes
TL;DR
- Retopology is rebuilding a 3D mesh with clean, optimized geometry, usually quads, from a high-poly sculpt or scan.
- High-poly meshes can be difficult to rig, may exceed real-time budgets, and can cause print problems if they are not print-ready.
- Manual retopology gives full control; automatic and AI retopology, including Tripo AI's Quad Remesher, can speed up routine cleanup.
- Key tools include Blender, Maya, and dedicated AI solutions such as Tripo AI.
- Game and 3D-printing workflows have distinct topology requirements.
You spend dozens of hours sculpting a character, then import it into a game engine and discover that the frame rate drops, the rig bends badly, and the file is too heavy to animate. The model looks detailed, but its mesh was built for sculpting rather than production.
Retopology is the process of rebuilding a dense or disorganized 3D model as a cleaner, lower-polygon mesh with purposeful edge flow.
This guide covers its purpose, workflow, and main tools.
What Is Retopology?
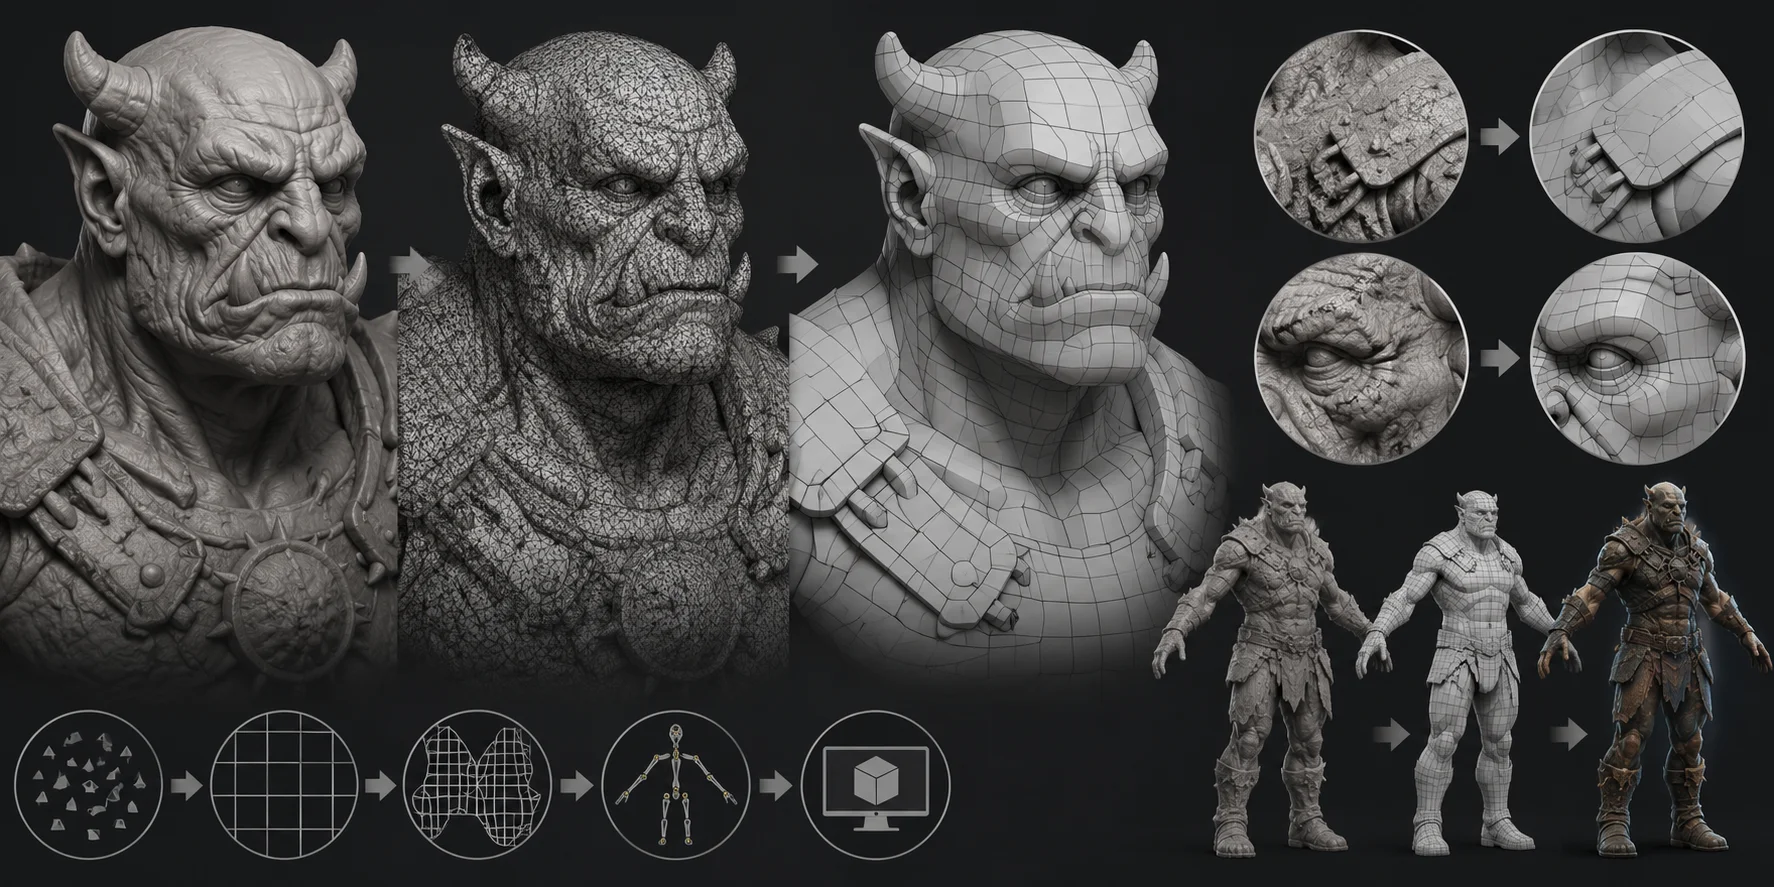
Retopology means creating a new mesh over a high-poly sculpt, 3D scan, or generated model while preserving its shape. The replacement uses fewer polygons organized for UVs, animation, rendering, or printing.
Raw sculpts and scans may contain millions of tiny triangles, dense quads, uneven spacing, holes, or noisy geometry. They are inefficient and difficult to control.
Triangles are valid and game engines ultimately render them, but quads are easier to edit, subdivide, unwrap, and arrange around bending joints. Tripo AI Smart Mesh can also produce optimized low-poly geometry for real-time workflows.
Why Retopologize? The Importance of Good Topology
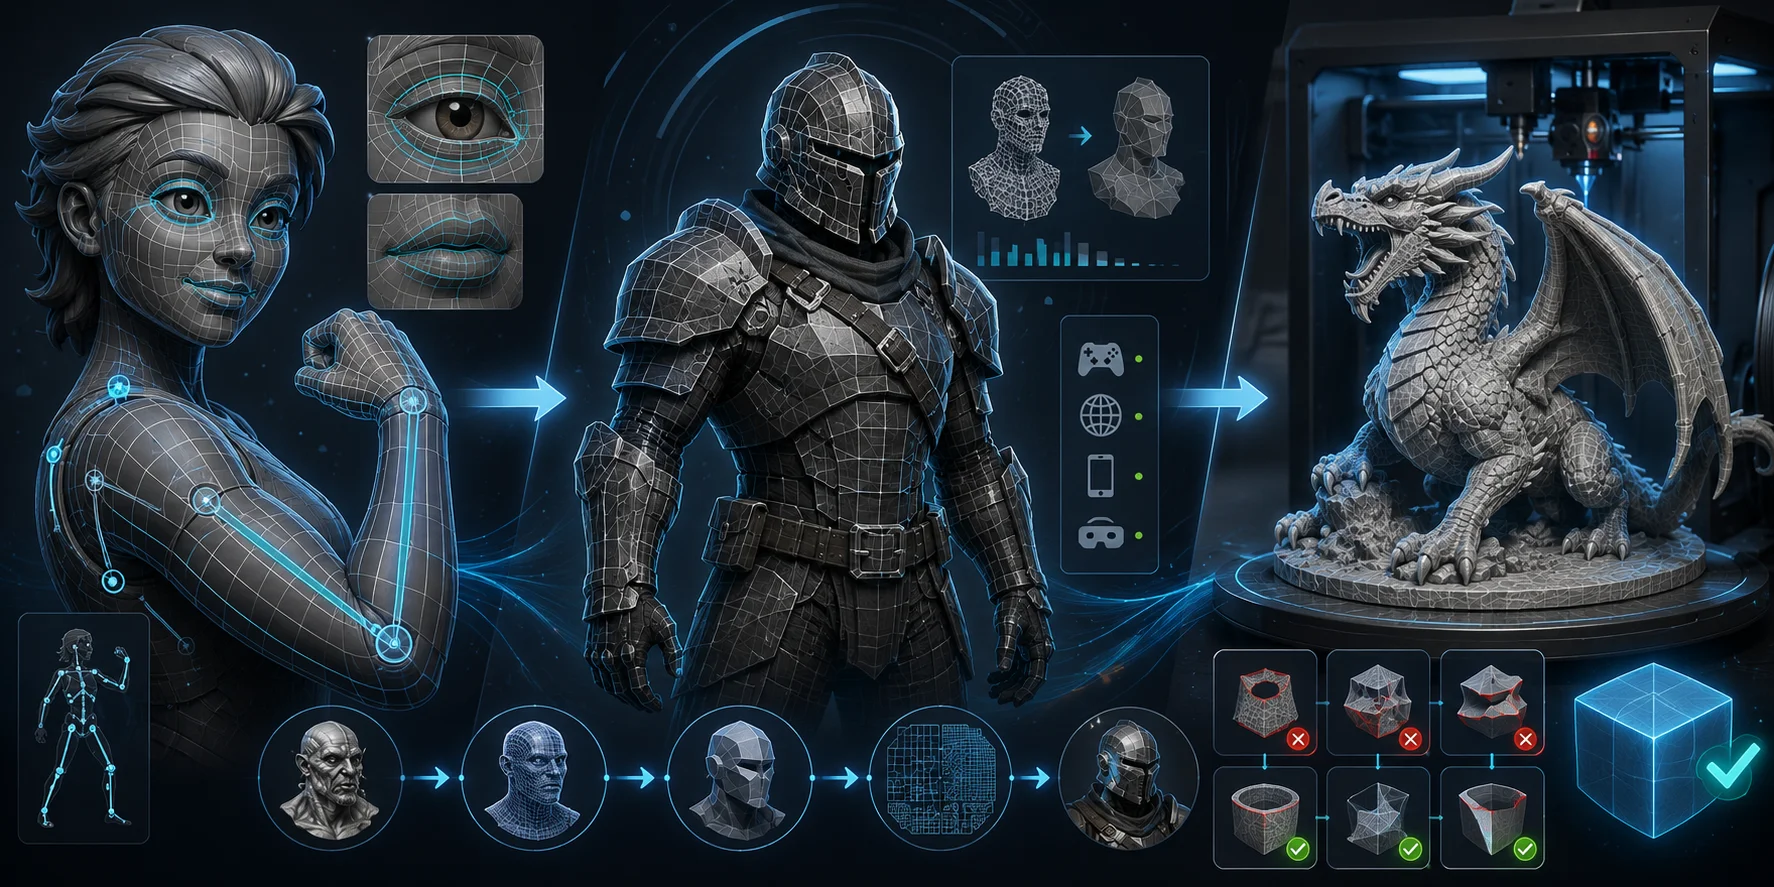
Animation and rigging: Quad loops around shoulders, elbows, knees, eyes, and mouths influence how a surface bends. Poor flow causes pinching, collapsing joints, and difficult skin-weight painting.
Real-time rendering: Every polygon adds processing and memory costs. Retopology helps assets meet polygon budgets for games, WebGL, AR, and mobile.
3D printing: A printable mesh does not require animation-friendly quads, but it must be clean. Non-manifold edges, open holes, intersecting shells, and reversed normals can cause failed prints.
Benefits of Retopology
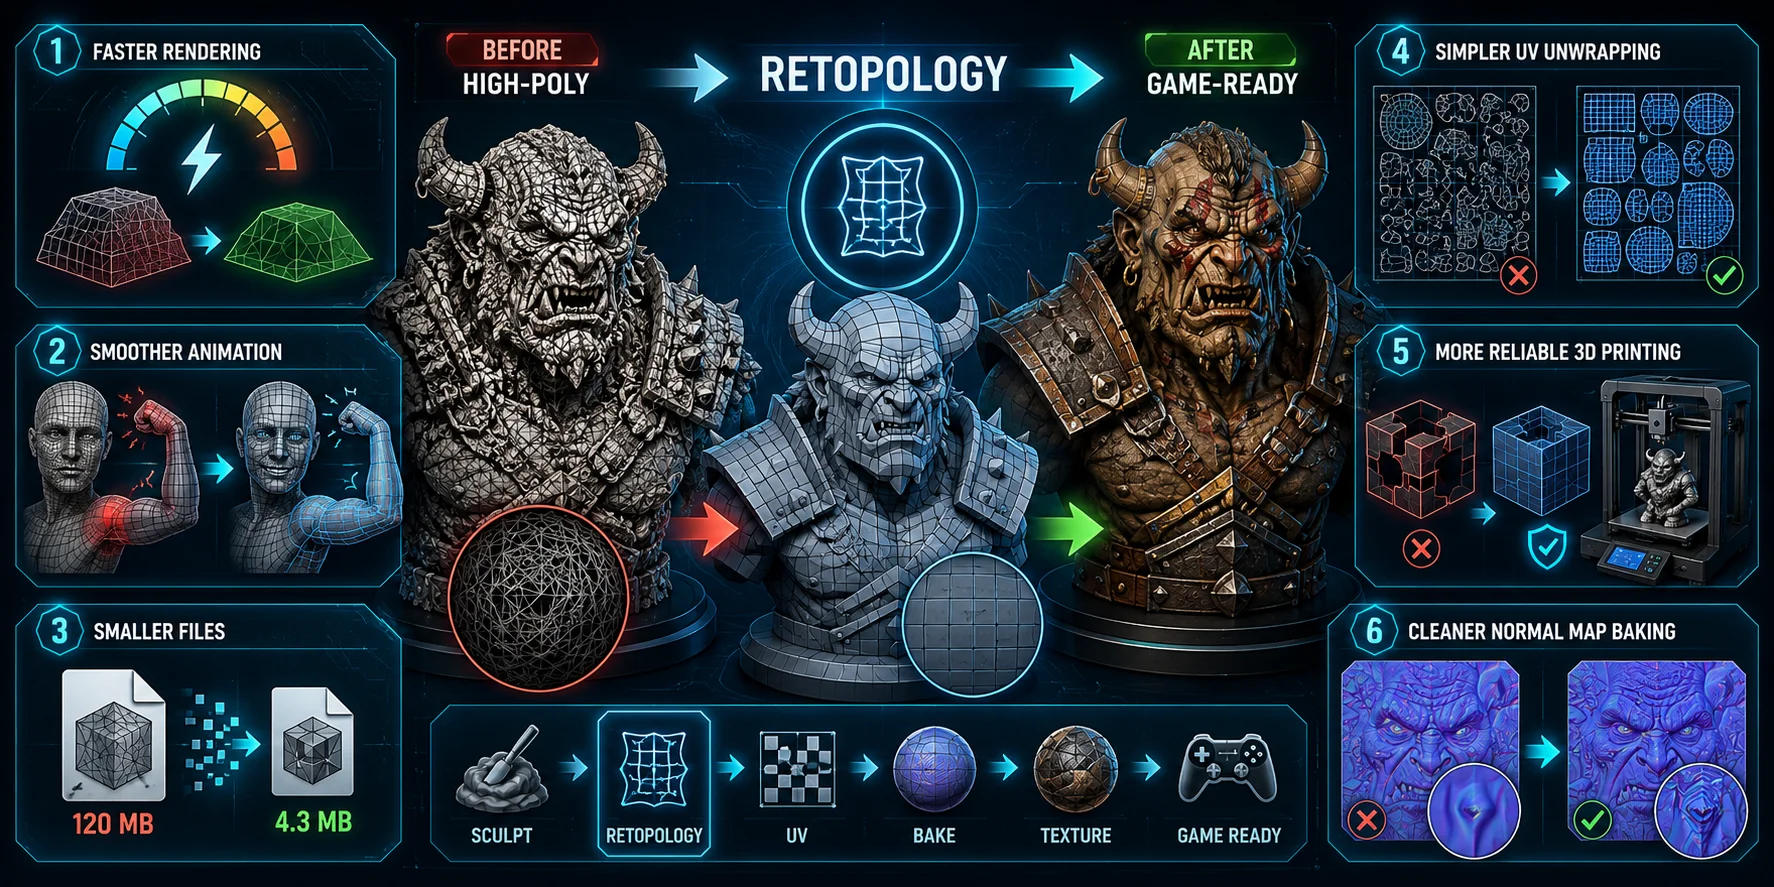
- Faster rendering: Removing unnecessary geometry reduces processing overhead.
- Smoother animation: Planned loops help joints and facial features deform naturally.
- Smaller files: Lightweight meshes are easier to save, transfer, and load.
- Simpler UV unwrapping: Organized faces make seams and UV islands easier to manage.
- More reliable printing: Cleaning mesh errors reduces problems during slicing.
- Cleaner normal-map baking: Stable geometry captures detail with fewer shading artifacts.
Retopology Workflow: Step by Step
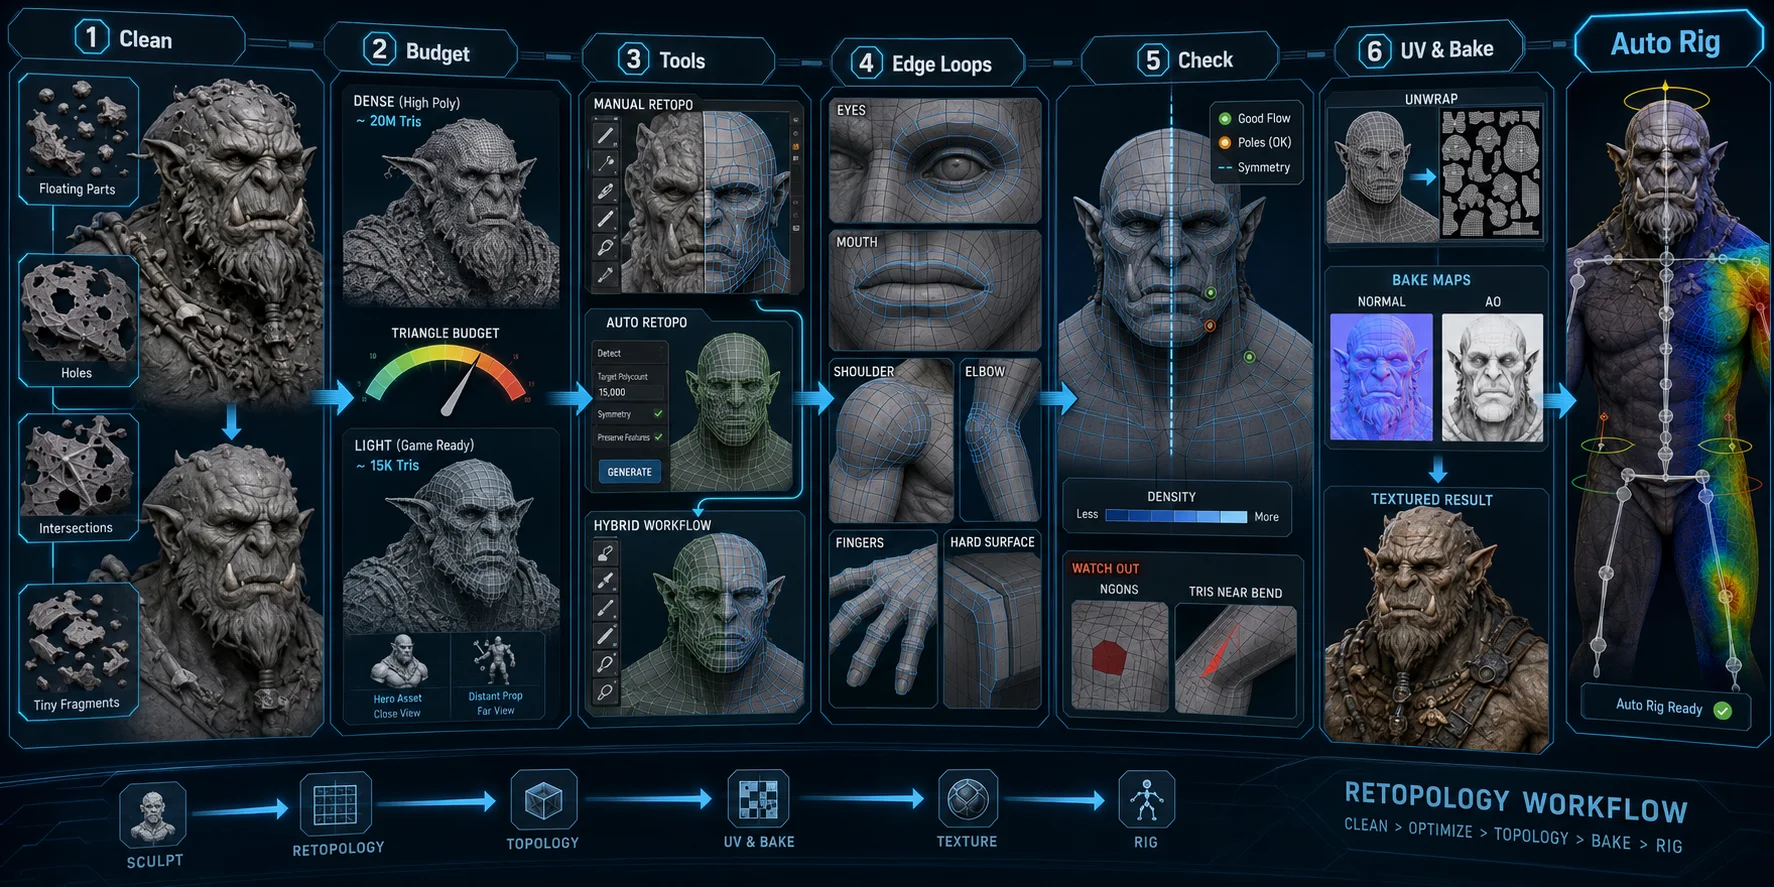
- Prepare the high-poly reference. Remove floating fragments, duplicate shells, major intersections, and holes. Keep an untouched copy for baking.
- Set a target polygon count. Base the budget on platform, viewing distance, deformation needs, and asset importance. A hero character needs more geometry than a distant prop.
- Choose the tools. Manual retopology provides control, while automatic tools create a fast starting point. A hybrid approach often works best.
- Build critical edge loops first. Start around joints, eyes, mouth, fingers, openings, and hard-surface boundaries. Connect them across simpler areas.
- Inspect the topology. Check density, flow, poles, symmetry, and projection. Aim for clean quads and remove unnecessary triangles or N-gons near deformation areas.
- UV unwrap and bake detail. Create UVs for the low-poly mesh, then bake normal and ambient occlusion maps from the source. Test the result under realistic lighting.
A practical game-character workflow: Start with the high-detail sculpt or generated reference, then decide which areas must deform. Mark the shoulders, elbows, knees, eyelids, mouth, fingers, and any clothing seams that need predictable motion. Those areas deserve the most deliberate edge flow; broad surfaces such as a back plate or a simple accessory can use a more even, lower-density layout.
Next, choose a polygon target before rebuilding the mesh. Treat it as a production constraint rather than a quality score: the right target depends on the engine, camera distance, platform, number of characters on screen, and how much deformation the asset needs. Keep enough resolution for silhouettes and bending areas, but do not spend polygons where they will not improve the final view.
Once the low-poly mesh is in place, project or bake the high-detail information onto it and test the asset in context. Rotate joints through the poses that matter to the animation, inspect the silhouette at the expected viewing distance, and check seams, normal-map artifacts, and UV stretching. A clean-looking wireframe is only the start; the asset should also behave correctly in the lighting and motion it will use in production.
After baking, Tripo AI Auto Rigging can create a skeleton and skin weights automatically, though the result should still be reviewed.
Manual vs Automatic Retopology
| Manual | Automatic |
|---|---|
| Precise control over loops, density, and deformation | Generates a new mesh with limited input |
| Slower and dependent on artist skill | Produces a first pass in seconds or minutes |
| Best for hero characters, faces, joints, and exact hard surfaces | Best for props, scans, prototypes, and batches |
| Example: Blender surface-snapping workflow | Example: Tripo AI Quad Remesher |
Use manual retopology when close-up quality, facial animation, or predictable joint deformation matters. It gives artists direct control over important loops.
Use automatic retopology when speed and volume are the priority. Tripo AI Quad Remesher converts dense triangulated models into lower-density quad meshes at a target polygon count.
How to choose: Use manual retopology when the asset has close-up facial work, joints that must deform predictably, or hard-surface transitions where every loop affects the silhouette. It is also the better route when a rigging or art team has a specific topology convention that the asset must match.
Use automatic retopology for scans, background props, rapid concepts, and batches where a clean starting mesh matters more than hand-placed loops. Tripo AI Quad Remesher supports converting triangulated meshes into quad topology and lets users set a target polygon count, making it useful when the production target is known before cleanup begins.
Automatic output still needs an asset review. Inspect whether loops follow the main forms, whether density is concentrated where deformation or silhouette demands it, and whether small holes, overlapping shells, non-manifold edges, or unwanted internal faces remain. For a character, test the mesh with representative poses before committing to UVs, baking, and rigging. If the result is close but not ready, keep the automatic mesh as a base and manually refine the eyes, mouth, shoulders, elbows, knees, fingers, and other high-risk areas.
A hybrid process is often the practical middle ground: use automatic retopology to establish an even, lower-density mesh, then spend manual time only where the asset will be seen up close or needs reliable deformation. This keeps the decision tied to the intended use of the model rather than treating manual and automatic retopology as competing all-or-nothing methods.
Retopology Tools in Blender
What is retopology in Blender? It usually combines a high-poly reference, surface snapping, and tools for constructing a new low-poly mesh.
Shrinkwrap modifier: Shrinkwrap projects vertices onto the reference surface. Artists can adjust the new geometry while keeping it attached to the sculpt.
Poly Build tool: Poly Build combines operations for creating, moving, and removing faces. Blender identifies it as especially useful for retopology.
Snap to Surface: Face snapping keeps vertices aligned with the original model as they are moved or extruded. It works well with Poly Build.
Retopology in Maya
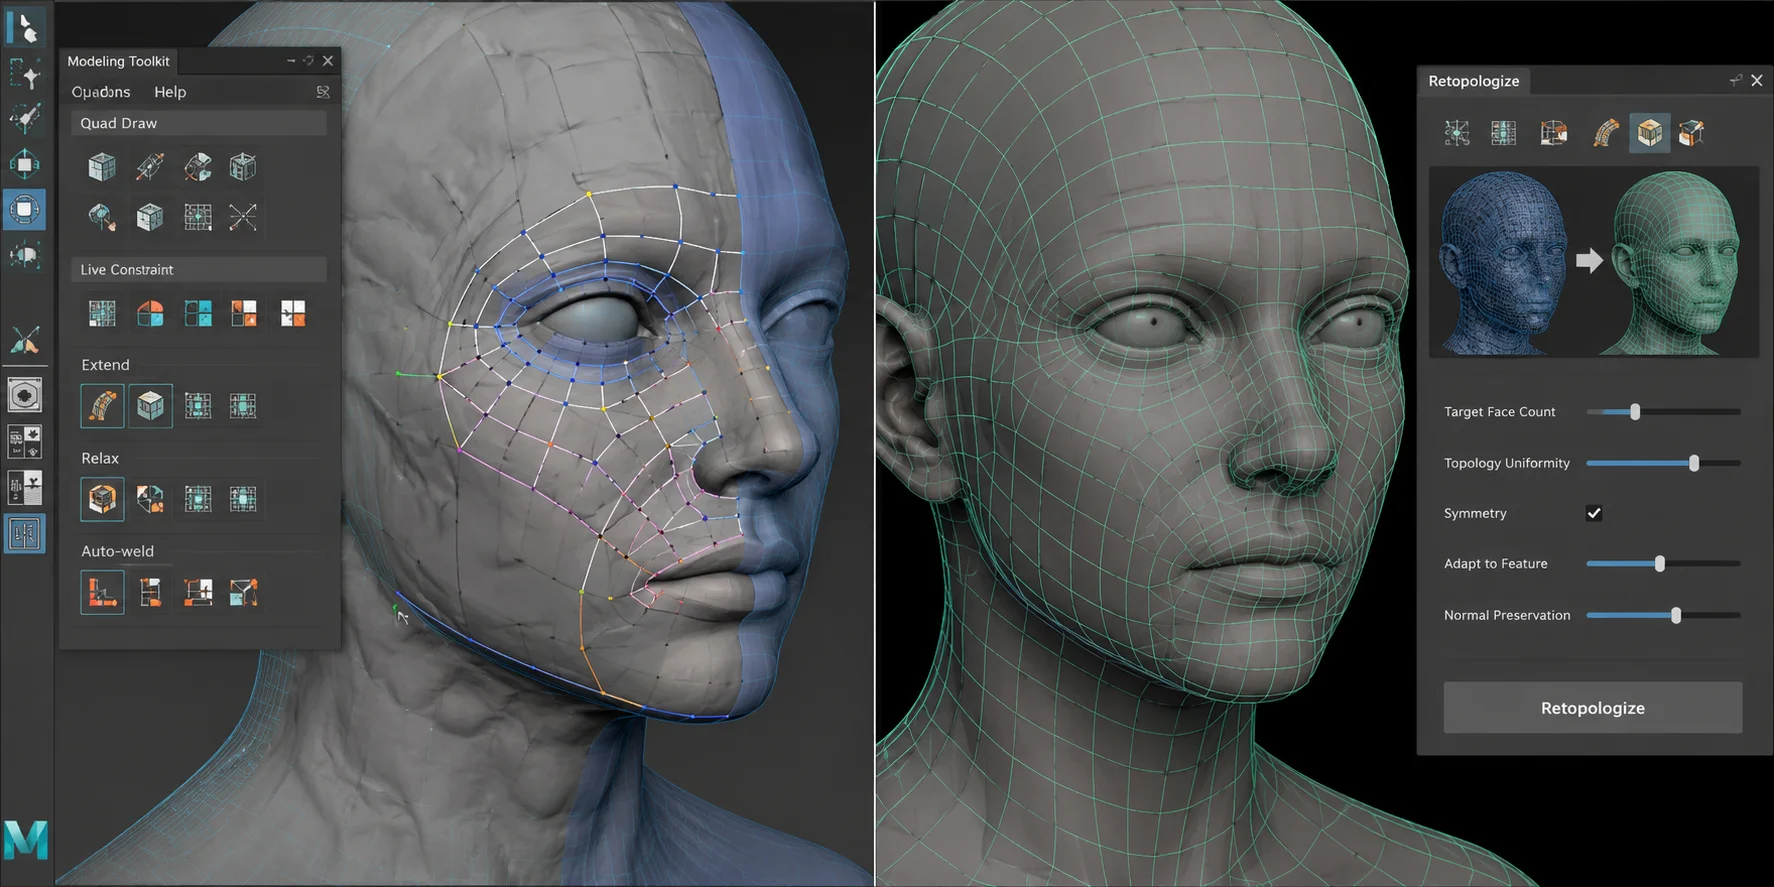
Maya's Quad Draw tool in the Modeling Toolkit lets artists plot points and create polygons over a live reference surface. Extend, Relax, and Auto-weld help build connected quad strips and improve spacing.
Maya 2023 and later also include an automatic Retopologize command for rebuilding an entire mesh as quad-based geometry. Artists can move between Maya and Blender for cleanup, UVs, and baking.
Is Retopology Necessary?
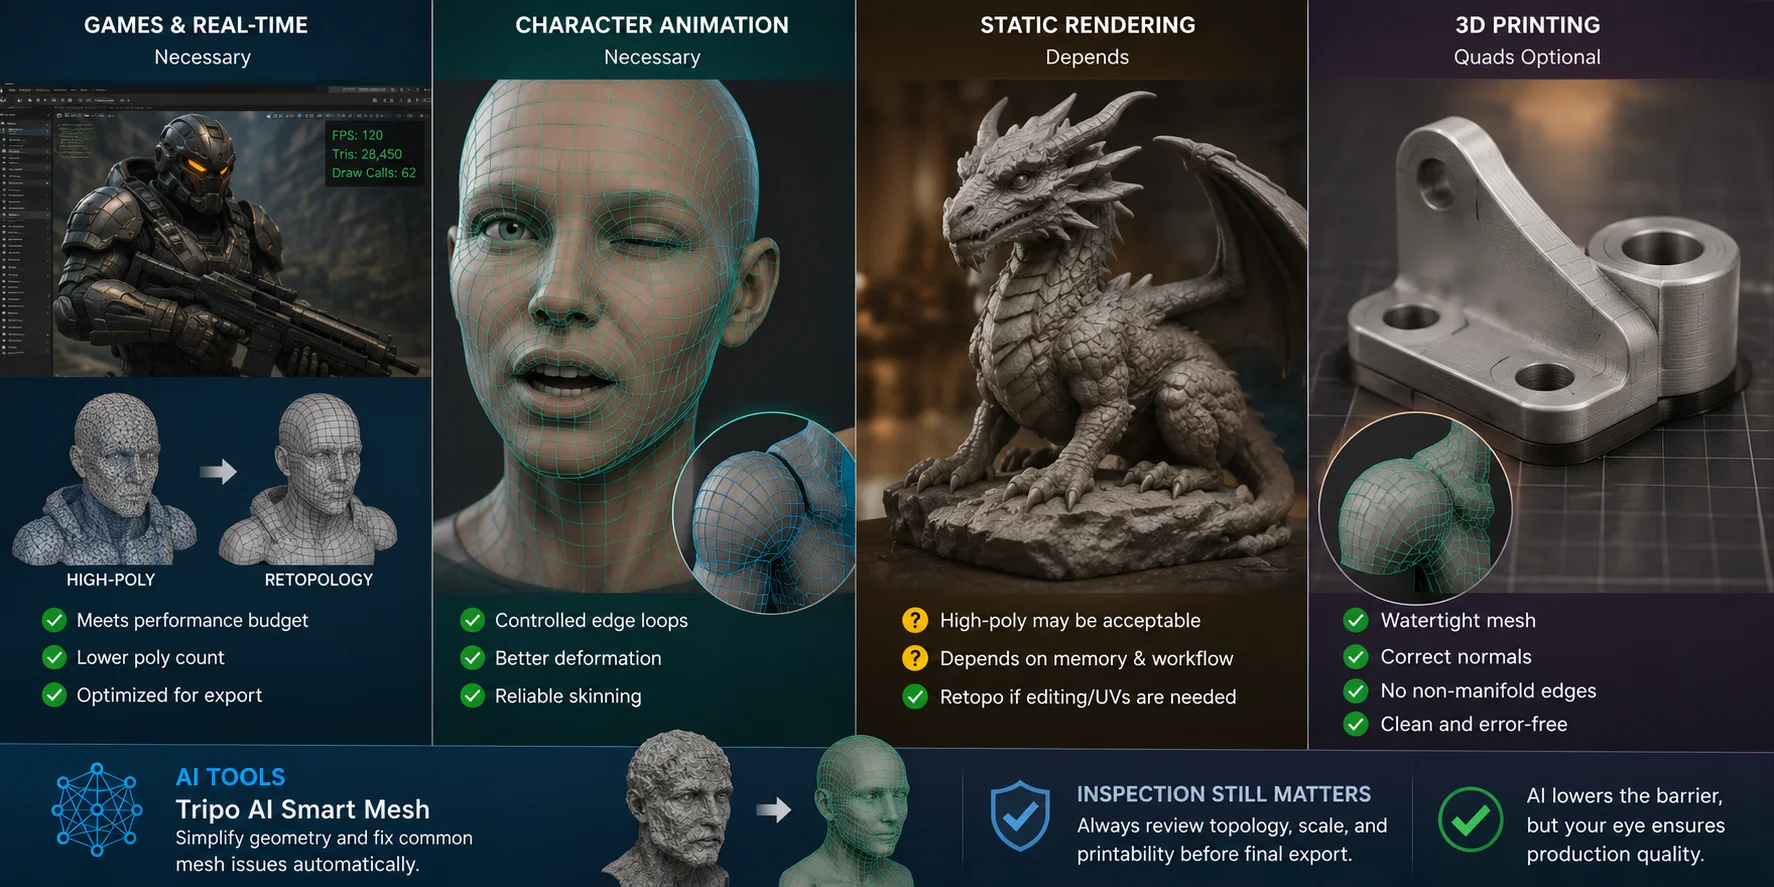
For games and real-time rendering, usually yes: assets must meet performance and export requirements. For character animation, yes: controlled loops are essential around joints and facial features.
For static rendering, it depends; a dense sculpt may be usable when memory and editing remain manageable. For 3D printing, quads are optional, but the model must be watertight, correctly oriented, and free of serious errors. Tripo AI Smart Mesh can help simplify geometry, but printable files still need inspection.
AI lowers the manual-retopology barrier, but inspection remains necessary.
Frequently Asked Questions
What Is the Purpose of Retopology?
It converts a dense or disorganized model into clean geometry suitable for animation, game engines, UV mapping, rendering, or 3D printing. The shape remains while the mesh becomes easier to use.
How Long Does Retopology Take?
A simple prop may take one or two hours manually, while a complex character head can take four to eight hours or longer. AI tools can generate a first pass in minutes, though cleanup may still be required.
Is Retopology Needed for Sculpting?
Not during early sculpting, when detail matters more than edge flow. It becomes necessary when the sculpt must be animated, UV unwrapped, optimized, or imported into a real-time engine.
Do I Need to Retopo for 3D Printing?
You do not strictly need quad topology. You do need a watertight mesh without holes, non-manifold edges, major intersections, or reversed normals.
What Is Retopology in 3D Modeling?
It is the process of rebuilding how vertices, edges, and faces connect across a model. The goal is to optimize geometry for the next production stage.
Can AI Do Retopology Automatically?
Yes. Tools such as Tripo AI Quad Remesher can turn dense triangle meshes into cleaner quad-based meshes at a chosen density. They suit batches and rapid iteration, though deformation areas may need correction.
Conclusion
Retopology turns a detailed but difficult-to-use sculpt or scan into geometry that is lighter, cleaner, and easier to animate, unwrap, render, or print. Manual work offers maximum control, while automatic tools can speed up routine cleanup. Try AI retopology in Tripo AI Studio. For current plan details, see Tripo AI Pricing.