How to Convert SVG to 3D Model (4 Methods)
TL;DR
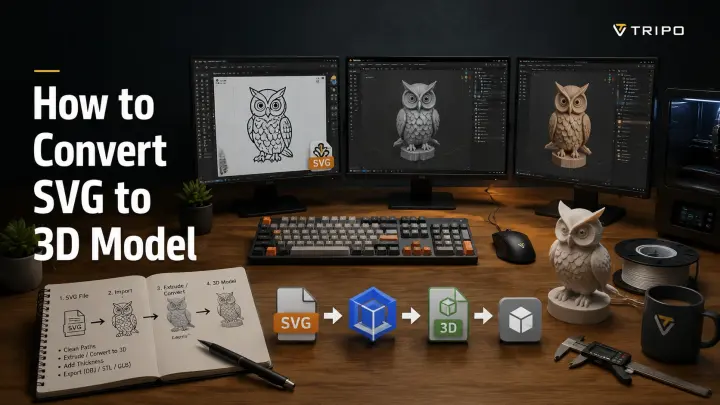
- SVGs are 2D vector files; converting them to 3D means extruding or inflating paths into solid geometry.
- Blender's built-in SVG import is the most flexible free method.
- Online tools (Vectary, Tinkercad, svg2stl) work without installing software.
- AI platforms like Tripo AI can generate 3D from an image of your SVG in seconds.
- Export to STL or OBJ for 3D printing; GLB for web or game use.
Converting an SVG to a 3D model means taking a flat vector path and giving it depth through extrusion, inflation, or AI generation. You can do it for free in Blender, directly in your browser with tools like Vectary or svg2stl, or use your SVG artwork as a reference image for an AI 3D generator to create a more complete asset.
A simple SVG logo can become a 3D-printable badge, a game icon can turn into an in-engine asset, and a flat architectural drawing can become a detailed 3D element. This guide covers four SVG-to-3D methods ranked by skill level — from no-install browser converters and simple online workflows to Blender’s full modeling pipeline and AI-powered generation for faster, production-ready results.
What Is an SVG File (and Why It Converts Well to 3D)
SVG (Scalable Vector Graphics) is a vector-based image format that stores graphics as mathematical descriptions of paths, curves, and shapes rather than a grid of pixels. Unlike PNG or JPG files, an SVG contains editable outlines defined by coordinates and equations, which means the artwork can be resized infinitely without losing sharpness.
This vector structure is exactly why SVG files work well as a starting point for 3D modeling. 3D software can read SVG paths as curves, convert them into editable geometry, and add thickness through extrusion to create solid 3D objects. A flat logo, icon, or illustration can quickly become a raised badge, printable object, or 3D design element.
Bitmap images such as PNG and JPG become blurry when enlarged because they store fixed pixel information. SVG paths remain crisp at any size, making them much better source geometry for 3D conversion. Common SVG sources include Adobe Illustrator exports, Inkscape designs, Figma graphics, and online icon libraries.
In simple terms: an SVG already contains the shape information that 3D tools need — the conversion process mainly adds depth, volume, and surface detail.
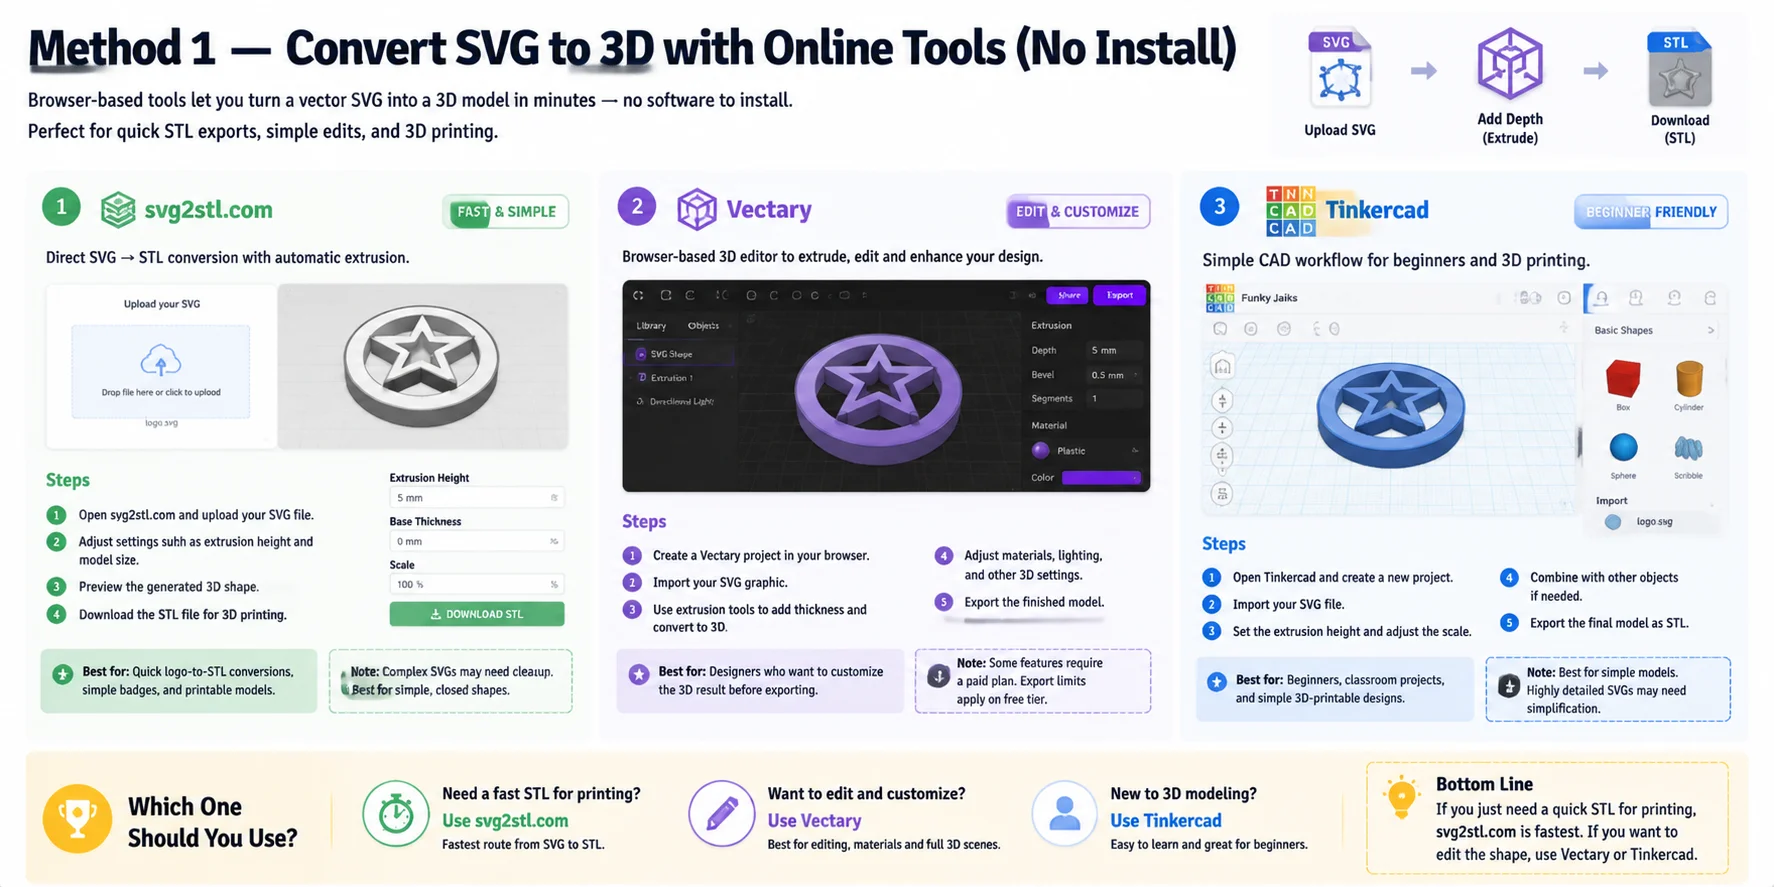
Method 1 — Convert SVG to 3D with Online Tools (No Install)
Browser-based SVG-to-3D tools are the fastest option if you want to turn a vector graphic into a simple 3D model without installing software. They are ideal for logos, icons, badges, and basic shapes that need to become printable STL files or editable 3D objects.
svg2stl.com — Fastest SVG to STL Conversion
svg2stl.com is the simplest option because it directly converts an SVG file into an STL model with automatic extrusion.
Steps:
- Open svg2stl.com and upload your SVG file.
- Adjust settings such as extrusion height and model size.
- Preview the generated 3D shape.
- Download the STL file for 3D printing.
Best for: Quick logo-to-STL conversions, simple badges, and users who only need a printable model.
Note: Because it focuses on direct conversion, it provides fewer editing options compared with full 3D editors. Very complex SVG files may require cleanup before conversion.
Vectary — Browser-Based 3D Editing
Vectary is a web-based 3D design platform that lets you import SVG files and edit them inside a 3D workspace. Instead of only converting the file, you can modify the shape, add depth, and combine it with other 3D elements.
Steps:
- Create a Vectary project in your browser.
- Import your SVG graphic.
- Use extrusion tools to add thickness and convert the shape into 3D geometry.
- Adjust materials, lighting, and other 3D settings.
- Export the finished model.
Best for: Designers who want to customize the 3D result before exporting.
Note: Some advanced features may require a paid plan, and browser-based workflows may have project or export limitations depending on the account level.
Tinkercad — Beginner-Friendly 3D Printing Workflow
Tinkercad is a free browser-based CAD tool from Autodesk that works well for simple SVG extrusion projects, especially for beginners preparing models for 3D printing.
Steps:
- Open Tinkercad and create a new project.
- Import your SVG file.
- Set the extrusion height and adjust the scale.
- Combine the shape with other objects if needed.
- Export the final model as STL.
Best for: Beginners, classroom projects, and simple 3D-printable designs.
Note: Tinkercad is designed for simple CAD workflows, so highly detailed SVG artwork may need simplification before import.
Quick Comparison
If you only need a fast STL file for 3D printing, svg2stl.com** is the fastest route**. If you want to edit the shape, add materials, or create a more complete 3D design, choose Vectary or Tinkercad. The right tool depends on whether your priority is speed, customization, or beginner-friendly editing.
Method 2 — SVG to 3D in Blender (Step-by-Step)
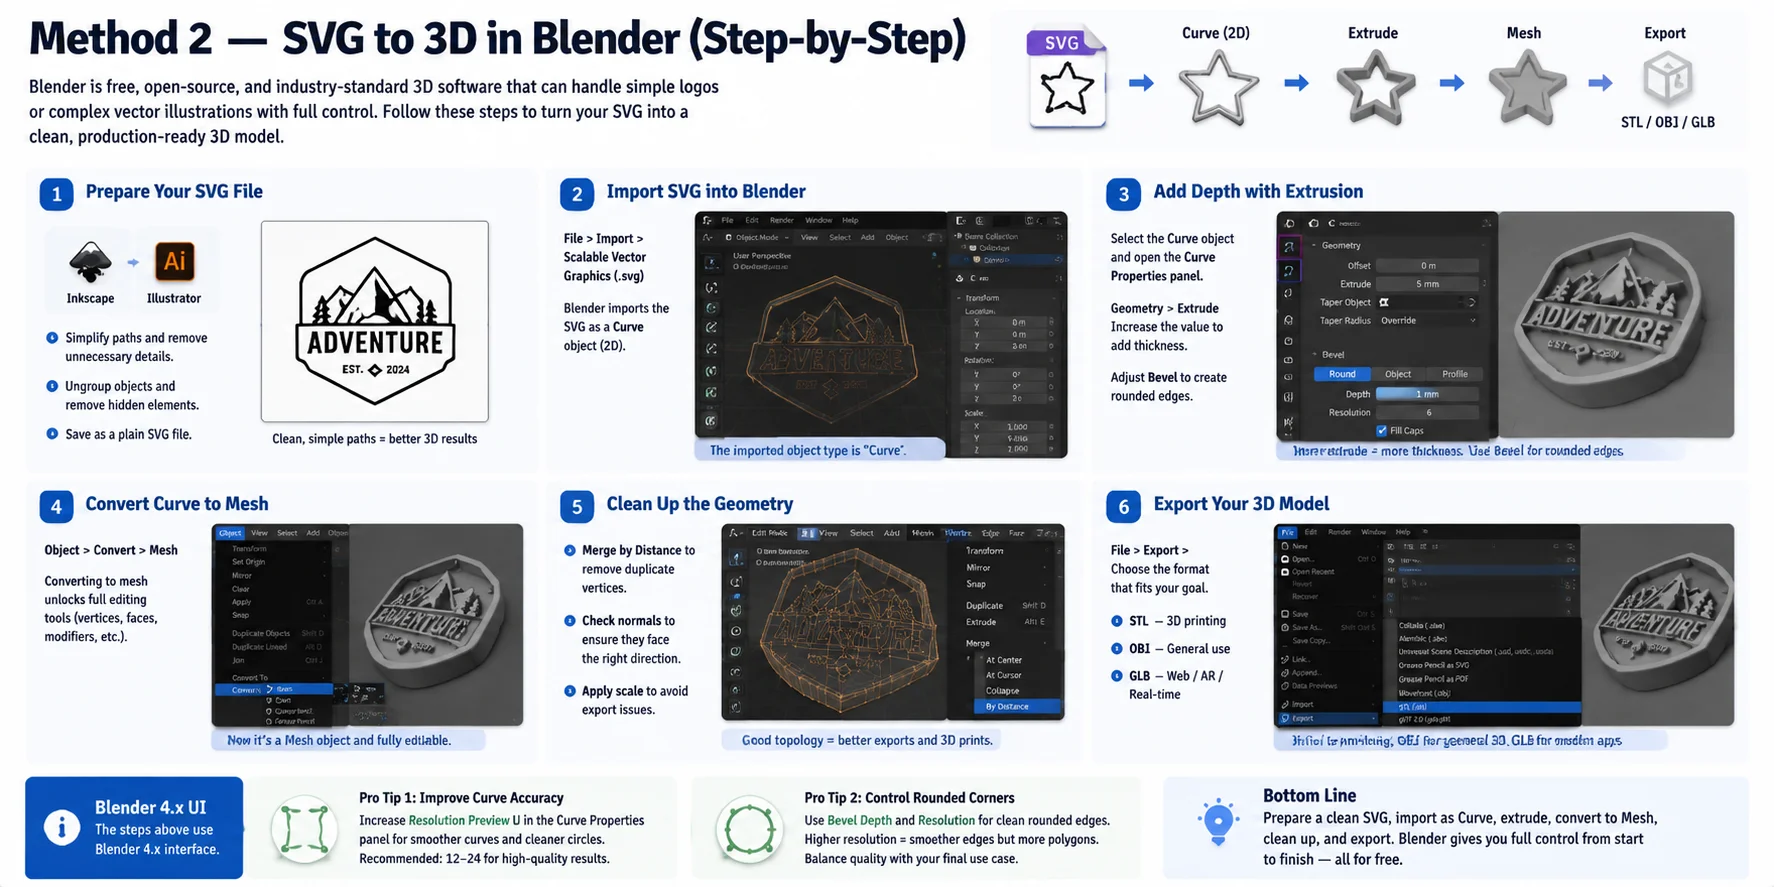
Blender is one of the most powerful free options for converting SVG graphics into 3D models. As an open-source, industry-standard 3D application, Blender can handle everything from simple logos to complex vector illustrations with multiple paths. Unlike one-click converters, it gives you full control over geometry, thickness, cleanup, and export formats.
Follow these steps to turn an SVG into a 3D model:
Step 1: Prepare Your SVG File
Before importing, clean up your SVG in a vector editor such as Inkscape or Adobe Illustrator. Simplify unnecessary paths, remove excessive groups, and save the file as a standard SVG. Cleaner paths produce better 3D geometry and reduce cleanup work inside Blender.
Step 2: Import SVG into Blender
Open Blender and go to:
File → Import → Scalable Vector Graphics (.svg)
Blender will import the SVG as a Curve object, preserving the vector paths. At this stage, the object is still a 2D curve rather than a mesh, which makes it easy to adjust thickness and edge settings.
Step 3: Add Depth with Extrusion
Select the imported Curve object and open the Curve Properties panel.
Under:
Geometry → Extrude
increase the extrusion value to give the SVG shape physical depth. You can also adjust Bevel settings to create rounded edges instead of sharp corners, which is useful for badges, logos, and decorative objects.
Step 4: Convert the Curve into a Mesh
Once the shape and thickness look correct:
Object → Convert → Mesh
Converting the curve unlocks Blender’s full mesh editing tools. After conversion, you can edit vertices, add modifiers, optimize topology, or prepare the model for 3D printing and game workflows.
Step 5: Clean Up the Geometry
Before exporting, check the mesh quality:
- Use Merge by Distance to remove overlapping vertices.
- Check normals to make sure surfaces face the correct direction.
- Apply object scale with:
Ctrl + A → Scale
A clean mesh helps prevent problems when exporting to STL, OBJ, or GLB.
Step 6: Export Your 3D Model
When the model is ready, choose the format based on your goal:
- STL → best for 3D printing
- OBJ → good for general 3D exchange
- GLB → better for web, AR, and real-time applications
Export through:
File → Export → STL / OBJ / glTF 2.0
Pro Tip 1: Improve Curve Accuracy
SVG curves can lose detail if Blender’s curve resolution is too low. Increase the Resolution Preview U value in the Curve Properties panel to create smoother edges, especially for circles, typography, and detailed logos.
Pro Tip 2: Control Rounded Corners
For cleaner curved edges, adjust Bevel Depth and Resolution instead of relying only on mesh smoothing later. Higher bevel resolution creates smoother rounded edges but increases polygon count, so balance quality with your final use case.
Version Note: The workflow above follows the Blender 4.x interface, where SVG import, Curve Properties, and conversion menus may appear slightly different from older versions. The overall process remains the same: SVG path → Curve → Extruded geometry → Mesh → Export.
Method 3 — SVG to STL for 3D Printing
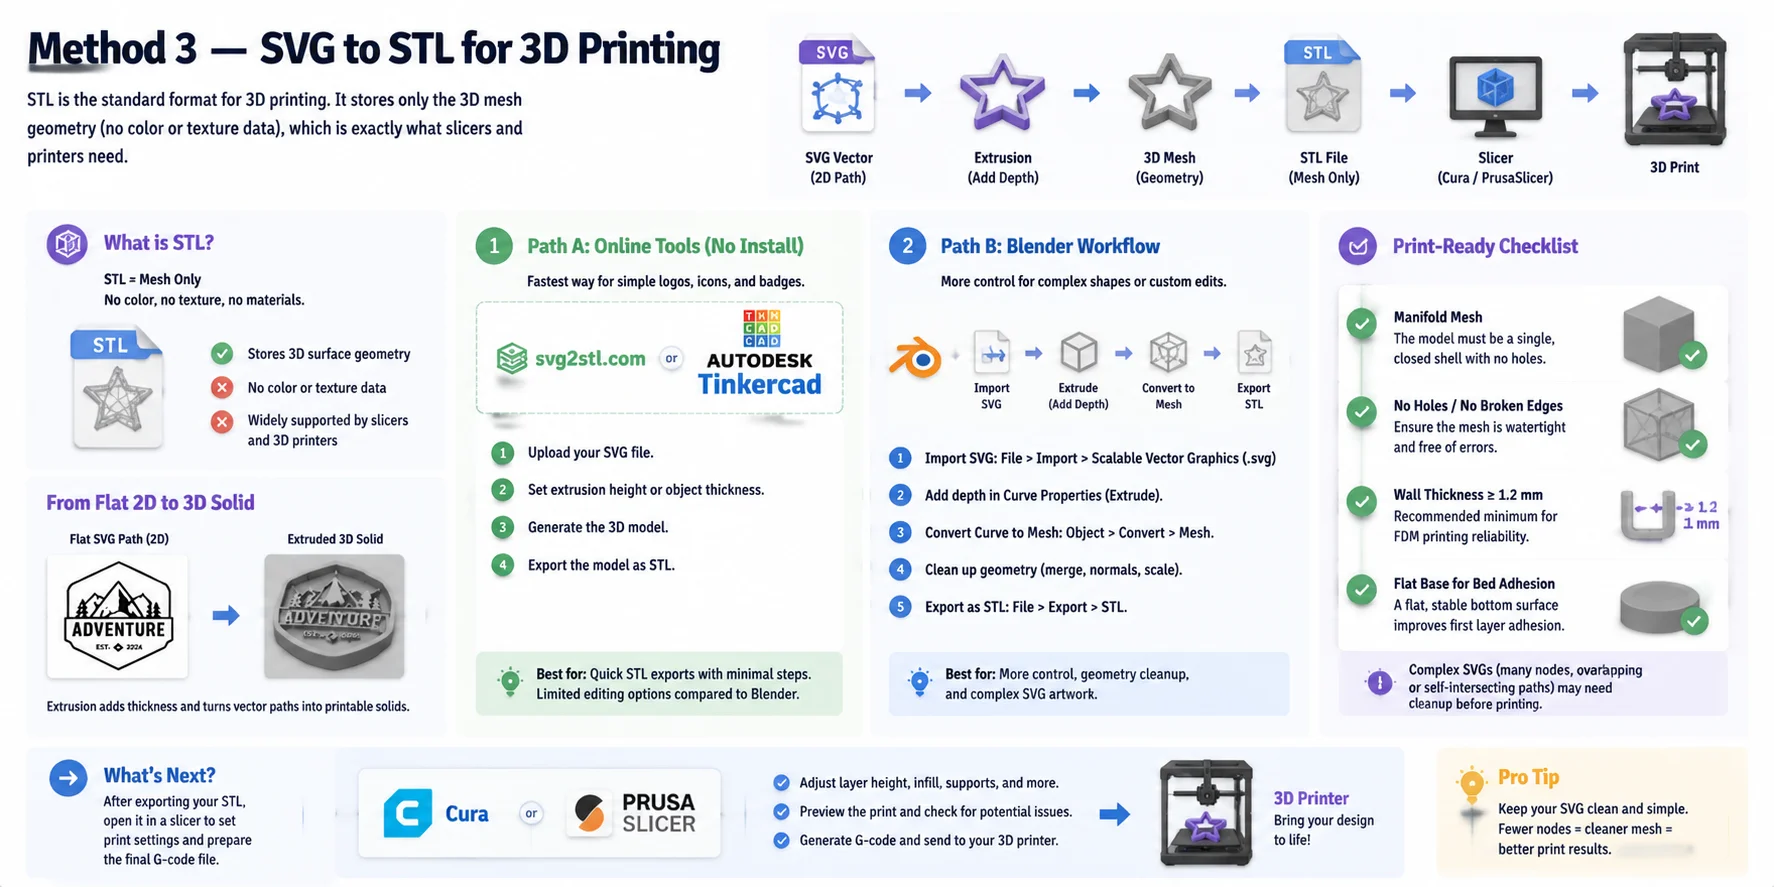
If your goal is physical printing, STL is usually the preferred output format because it is supported by almost every slicer and 3D printer workflow. Unlike SVG, which stores 2D vector paths, STL contains only 3D mesh geometry — it describes the surface shape of an object but does not include color, textures, or advanced materials.
There are two common ways to convert SVG into STL:
Option 1: Online SVG to STL Conversion
For a quick workflow, tools like svg2stl.com or Tinkercad can convert an SVG directly into a printable model.
Basic process:
- Upload your SVG file.
- Set the extrusion height or object thickness.
- Generate the 3D shape.
- Export the result as STL.
This method works best for simple logos, icons, and flat designs that only need basic depth.
Option 2: Blender SVG to STL Workflow
For more control, use Blender’s SVG import pipeline:
- Import the SVG as a Curve object.
- Add depth using the Extrude setting.
- Convert the Curve into a Mesh.
- Clean the geometry.
- Export through File → Export → STL.
This approach is better for complex shapes that need editing before printing.
Before sending your STL to a slicer, check that the model is print-ready:
- Manifold mesh: The object should have no holes, broken edges, or non-manifold geometry.
- Wall thickness: A minimum thickness of around 1.2 mm or more is recommended for reliable FDM printing.
- Flat base: A stable bottom surface improves bed adhesion and reduces printing failures.
After exporting, open the STL in a slicer such as Cura or PrusaSlicer to set print settings and prepare the final file.
Keep in mind that complex SVG artwork with thousands of nodes, overlapping paths, or self-intersecting shapes may need cleanup before conversion. A cleaner SVG usually produces a cleaner 3D print.
Method 4 — Use AI to Generate 3D from Your SVG Artwork
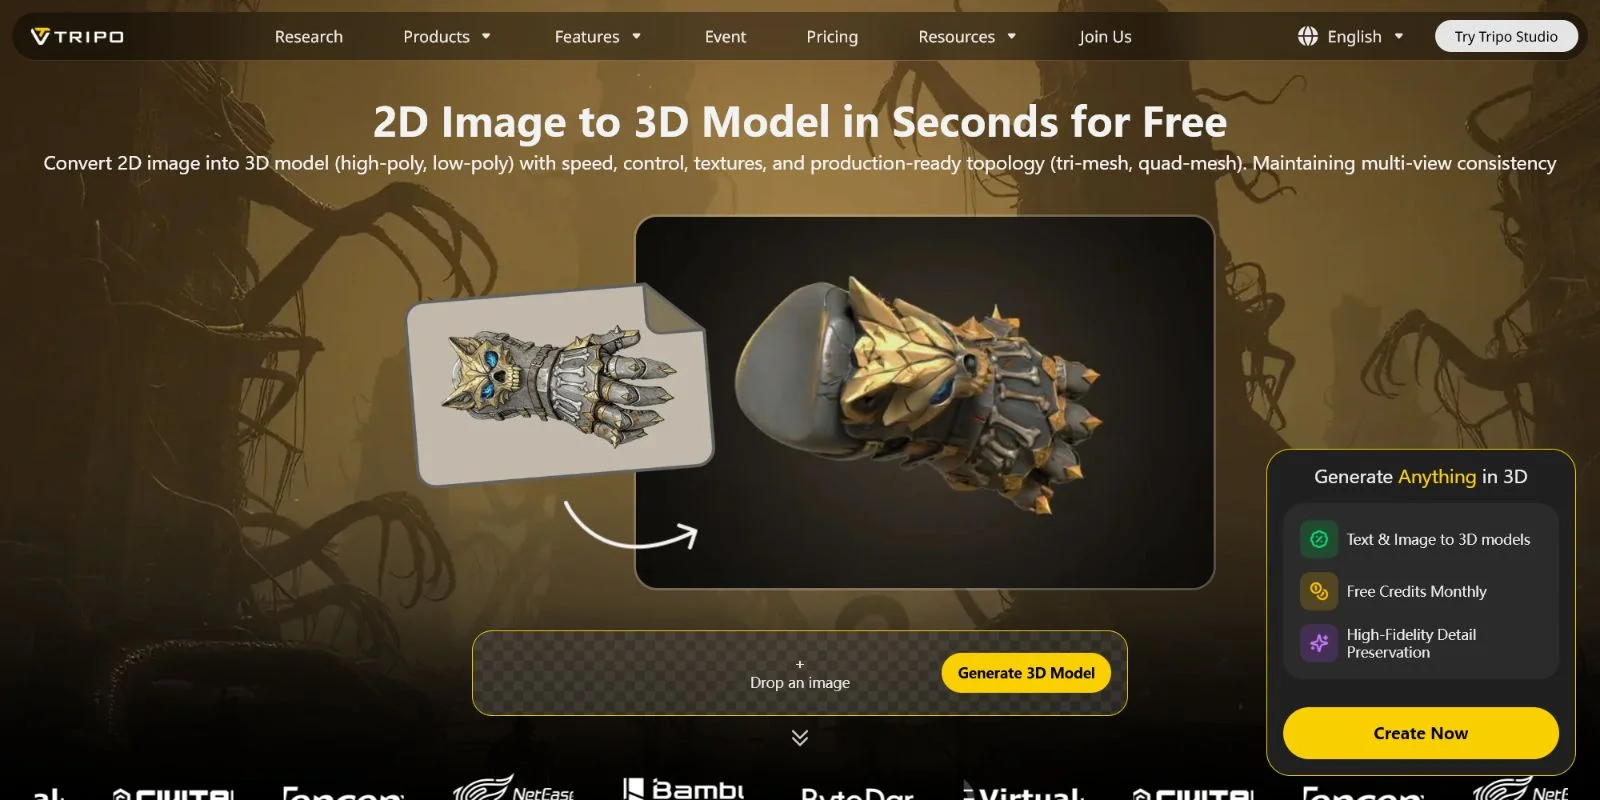
Traditional SVG-to-3D conversion methods mainly focus on extrusion — they take a flat outline and add thickness to create a simple 3D shape. This works well for logos, icons, and badges, but the result can still look like a flat design with depth added. AI 3D generation takes a different approach by interpreting the artwork’s meaning and creating a complete 3D model with geometry, materials, and surface details.
With Tripo AI, there are two simple ways to turn SVG artwork into a more advanced 3D asset:
Option 1: Image-to-3D from Your SVG
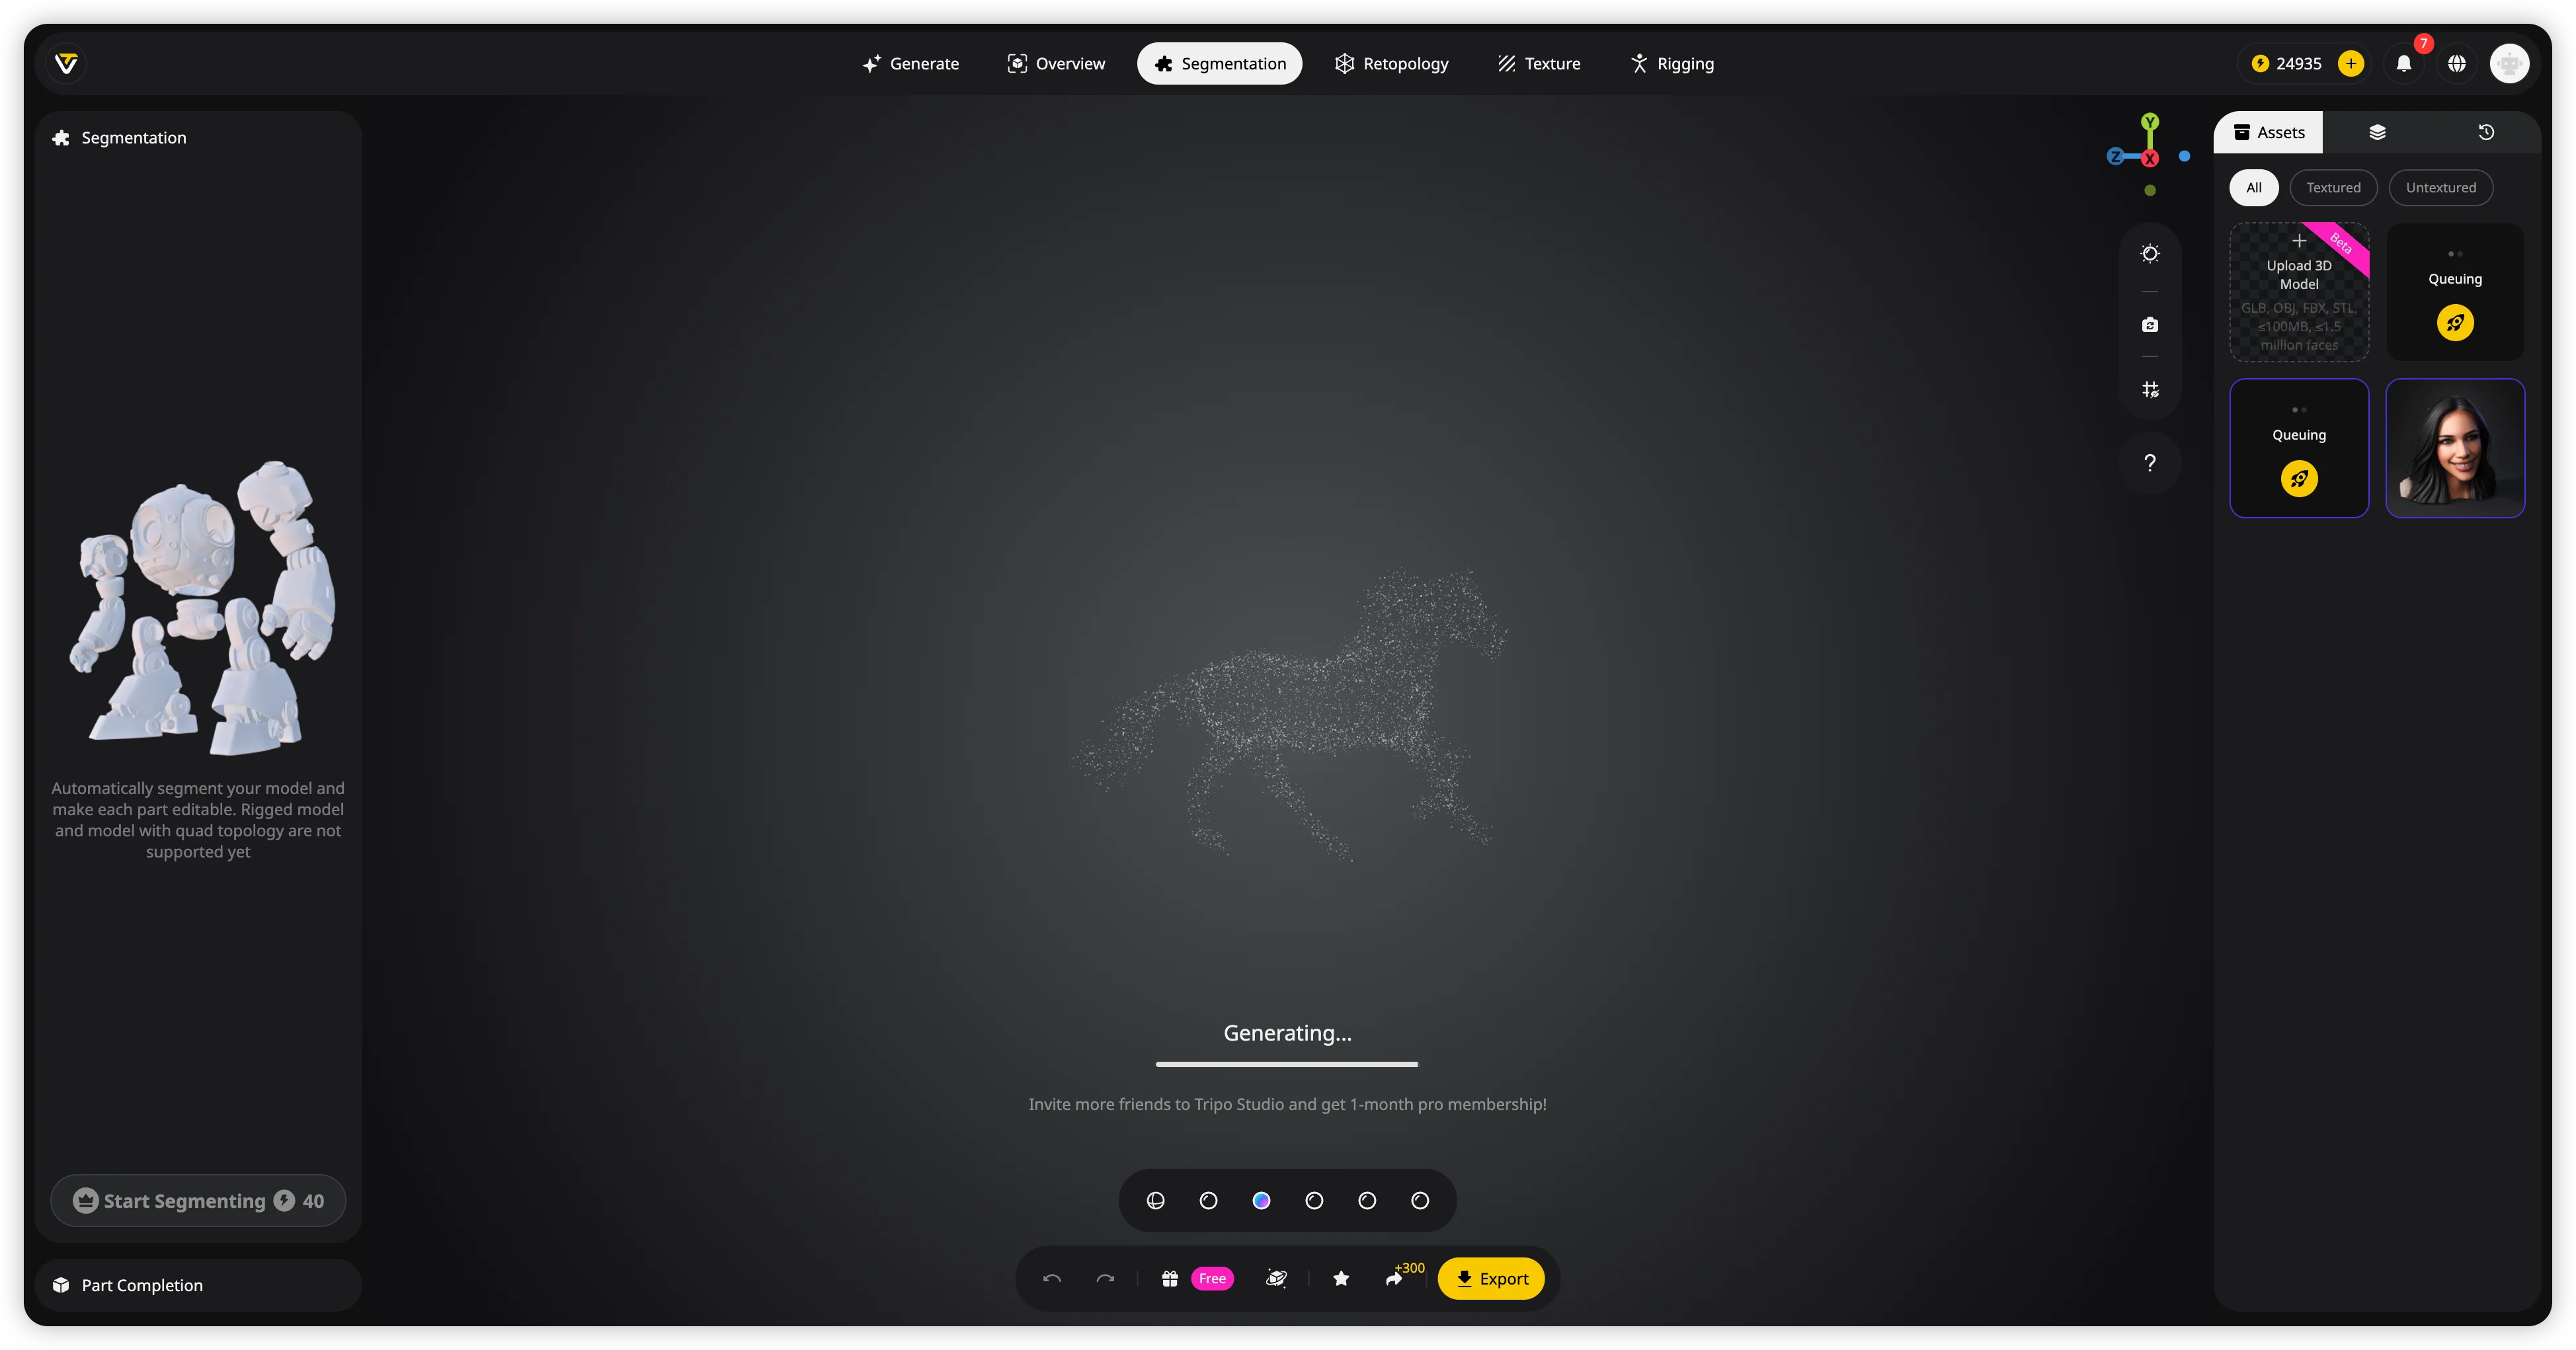
If you already have an SVG design, first export it as a PNG or JPG image (or take a clean screenshot). Then upload the image to Tripo AI Studio:
- Open Tripo AI Studio: https://studio.tripo3d.ai/
- Choose the Image-to-3D workflow.
- Upload your exported SVG image.
- Let AI generate a textured 3D model in seconds.
- Refine and export the final model.
This method works especially well for illustrated logos, characters, mascots, and artistic SVG designs where simple extrusion would lose important visual details.
Option 2: Text-to-3D from an SVG Concept
You can also skip the image conversion step and describe your SVG idea directly with a text prompt. For example:
“A stylized dragon logo, clean geometry, game-ready 3D model.”
Tripo AI can generate a complete 3D asset based on the description, giving you more freedom when the original SVG is only a concept or reference.
Generated models can be exported in formats including GLB, FBX, OBJ, STL, USD, and 3MF, making them suitable for different workflows such as web 3D, game engines, AR experiences, and 3D printing.
Useful features for this workflow include AI Texturing for automatic surface details, Auto-Rigging for character-based SVG designs, and Smart Mesh retopology for cleaner geometry.
AI generation is the best choice when your SVG is complex, artistic, or character-focused and you want more than a simple extruded shape. Instead of only adding depth, it helps transform a flat idea into a complete 3D asset.
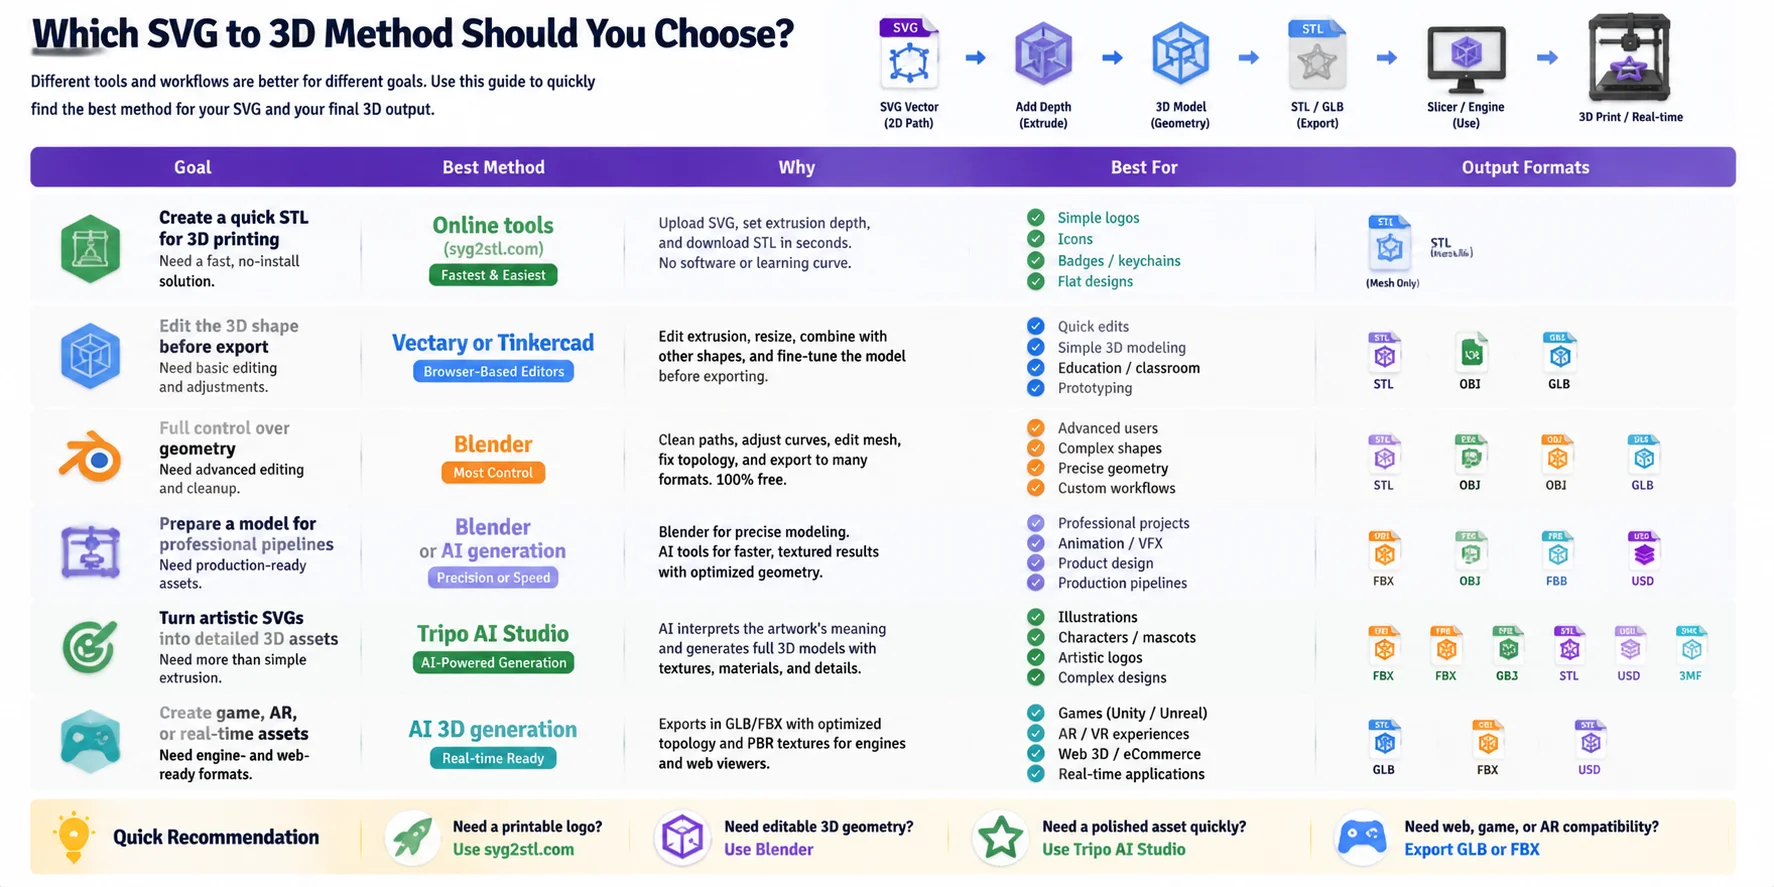
Which SVG to 3D Method Should You Choose?
The best SVG-to-3D method depends on what you want to create. A simple logo for 3D printing does not require the same workflow as a detailed game asset or production-ready 3D model. Use the table below to quickly choose the right approach.
| Goal | Best Method | Why | ||
|---|---|---|---|---|
| Create a quick STL for 3D printing | Online tools (svg2stl.com) | Fastest workflow. Upload SVG, add extrusion depth, and export STL without installing software. Best for simple logos, icons, and badges. | ||
| Edit the 3D shape before export | Vectary or Tinkercad | Browser-based editors let you modify the extrusion, adjust dimensions, and combine the SVG with other 3D objects. | ||
| Full control over geometry | Blender SVG workflow | Best free option for advanced users. You can clean paths, adjust curves, edit meshes, and export to STL, OBJ, or GLB. | ||
| Prepare a model for professional pipelines | Blender or AI generation | Blender gives precise modeling control, while AI tools can create complete textured assets faster. | ||
| Turn artistic SVGs into detailed 3D assets | Tripo AI Studio | AI can interpret the artwork’s meaning and generate a complete model with textures, materials, and optimized geometry. | ||
| "Create game | AR | or real-time assets" | AI 3D generation | Outputs such as GLB and FBX are ready for web viewers, engines, and interactive experiences. |
For most beginners, the easiest path is to start with online converters. They are ideal when you only need a simple extruded object. If you need more control over the final shape, move to Blender, where you can edit every part of the geometry.
For creative or complex SVG designs — especially characters, mascots, or illustrations — simple extrusion may make the result look flat. In these cases, an AI workflow can save time by generating a complete 3D asset instead of only adding thickness.
Quick recommendation:
- Need a printable logo → svg2stl.com
- Need editable 3D geometry → Blender
- Need a polished asset quickly → Tripo AI Studio
- Need web/game/AR compatibility → Export GLB or FBX from a full 3D workflow
Choosing the right method comes down to one question: Do you only need to add depth, or do you want to create a complete 3D model?
Tips for Better SVG-to-3D Results
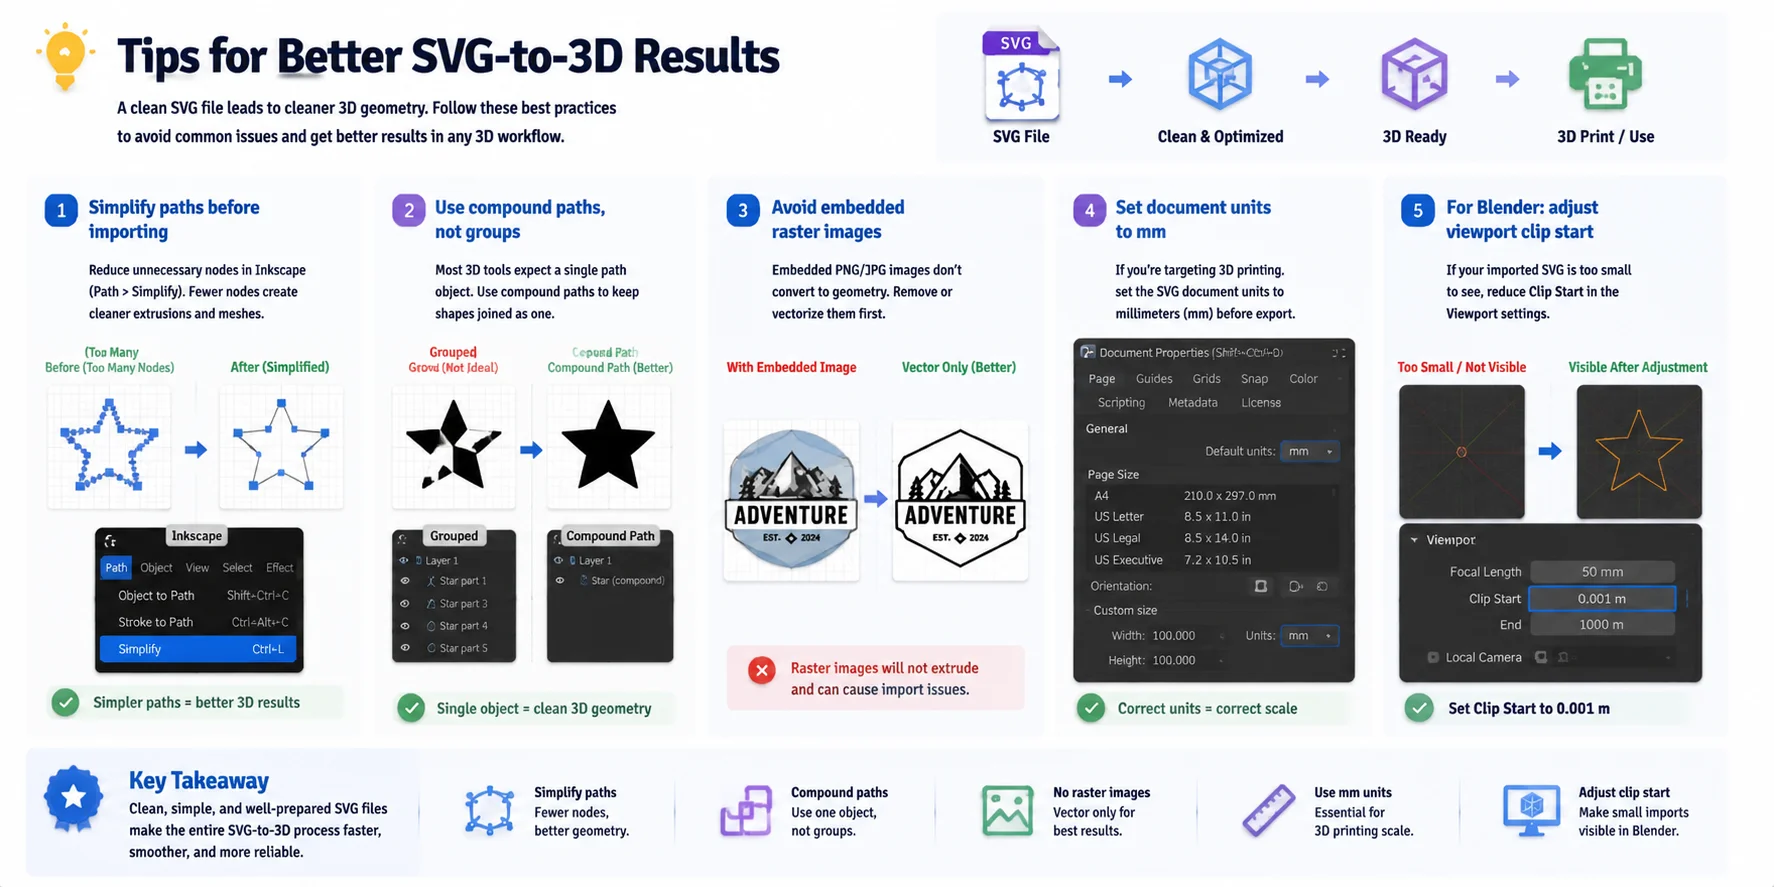
A clean SVG file produces a cleaner 3D model. Before converting your artwork, a few preparation steps can prevent broken geometry, missing shapes, and scaling problems during the 3D workflow.
- Simplify paths before importing Complex SVG files often contain thousands of unnecessary nodes that make conversion slower and create messy geometry. In Inkscape, use Path → Simplify to reduce node count while keeping the overall shape intact. Simpler paths usually produce better extrusion and cleaner meshes.
- Use compound paths instead of groups Many 3D tools work better when SVG artwork is stored as a single compound path rather than multiple grouped objects. Combine related shapes into one path before importing to avoid separated or missing geometry.
- Remove embedded raster images SVG files can contain embedded PNG or JPG images, but these are not useful for most SVG-to-3D workflows. Remove raster elements or convert them into clean vector paths before exporting.
- Set document units to millimeters for 3D printing If your final goal is 3D printing, set the SVG document units to mm in Inkscape before export. This helps maintain a more predictable scale when converting the design into a printable model.
- Adjust Blender visibility settings for tiny imports If an imported SVG appears invisible or extremely small in Blender, the model may simply be outside the viewport clipping range. Reduce the viewport Clip Start value to around 0.001 m so small imported curves become visible.
Following these preparation steps makes the transition from 2D vector artwork to 3D geometry smoother, whether you are using online converters, Blender, or AI-powered 3D tools.
Frequently Asked Questions
How do I convert an SVG to a 3D model for free?
You have two free options that require no software install. Upload your SVG to svg2stl.com for an instant STL, or open Tinkercad in your browser, import the SVG, set an extrusion height, and export. For more control, Blender is also free — use File > Import > SVG, then add depth in the Curve Properties panel.
How do I convert an SVG to a 3D model online?
Vectary and Tinkercad are the most capable browser-based options. Vectary lets you extrude paths and apply materials without installing anything. Tinkercad is simpler and exports directly to STL, which is useful if your goal is 3D printing.
How do I convert SVG to STL?
The fastest route is svg2stl.com — drag in your SVG, set an extrusion depth, and download the STL. In Blender, import the SVG as a Curve, extrude it, convert to Mesh, then export as STL via File > Export > STL. Both methods are free.
How do I import and convert SVG to 3D in Blender?
Go to File > Import > Scalable Vector Graphics (.svg). Blender creates a Curve object. In the Properties panel under Curve > Geometry, increase the Extrude value to add depth. Then go to Object > Convert > Mesh to make it a full 3D mesh you can sculpt, modify, and export.
Can I 3D print directly from an SVG file?
Not directly — 3D printers require a mesh format like STL or 3MF. You need to convert the SVG to a solid 3D shape first (using any method in this article), then export as STL. Most online tools like Tinkercad and svg2stl.com include an STL export step.
What is the difference between SVG to 3D extrusion and AI 3D generation?
Extrusion pushes the flat SVG outline along a depth axis, giving it thickness — the 3D shape looks exactly like the original 2D path. AI generation interprets the artwork's subject and creates a fully-formed 3D model with realistic proportions, texture, and volume, which is better for complex or organic shapes.
Does Tripo AI support SVG input?
Tripo AI does not read SVG files directly. The recommended workflow is to export your SVG as a PNG or screenshot it, then upload the image to Tripo AI Studio using the Image-to-3D feature. Tripo AI will generate a textured, production-ready 3D model from the image in seconds.
What 3D formats can I export after converting from SVG?
It depends on the tool. Blender supports OBJ, STL, GLB, FBX, and more. Online tools typically export STL or OBJ. Tripo AI exports GLB, USD, FBX, OBJ, STL, and 3MF — covering both 3D printing and real-time rendering use cases.
Conclusion
Converting SVG to 3D is straightforward once you choose the method that matches your goal. Browser-based tools are the fastest option for simple extrusions, Blender gives you the most control over geometry and export settings, and AI-powered workflows can transform artwork into fully realized 3D assets with textures and details.
Start with your SVG design, choose the workflow that fits your skill level, and export the format your project needs — whether that is STL for 3D printing, GLB for web and AR, or FBX for game engines.
Ready to turn your artwork into a complete 3D model?
Main CTA → Try Tripo AI Studio to transform any SVG artwork into a textured 3D model in seconds.
Secondary CTA → See Tripo AI Pricing for free and pro plans.