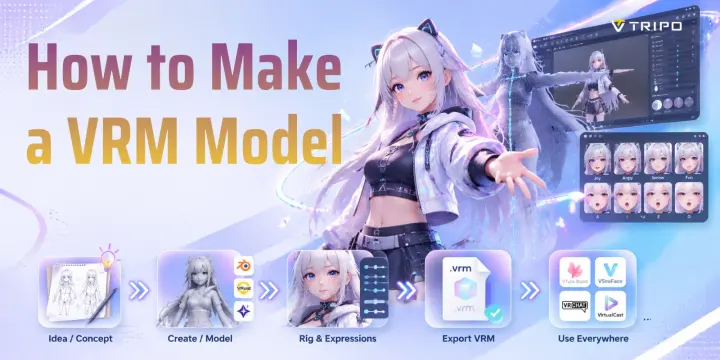
How to Make a VRM Model: 3 Methods From Beginner to Advanced
TL;DR
- VRM is a universal 3D avatar format for VTubing, virtual events, and social VR.
- You can create a VRM avatar with VRoid Studio, Blender + VRM Addon, or AI + UniVRM workflow.
- VRoid Studio offers a guided beginner workflow, while Blender supports deeper customization.
- AI tools can generate a base character, which still needs rigging, validation, and VRM-specific authoring.
- A usable VRM needs a valid humanoid setup and metadata; expressions and version-specific settings depend on the target application.
- Choose VRoid for a guided anime-style workflow, Blender for direct technical control, or an AI workflow when you want a generated starting asset.
A VRM model is a standardized 3D avatar file format designed for VTubing, virtual events, and social VR experiences. If you want to learn how to make a VRM model, you have three main options: customize a character with VRoid Studio, build a fully custom avatar with Blender, or use an AI-powered VRM model generator workflow to create a base model and convert it into VRM.
A key advantage of VRM is portability. A single .vrm file can store a 3D model, textures, materials, a humanoid skeleton, expressions, and license information. You can reuse the avatar in compatible applications, although supported VRM versions and features vary.
What Is a VRM Model?
VRM is a 3D humanoid avatar format based on glTF 2.0 and developed by the VRM Consortium. It was created to solve a common problem in virtual avatar creation: every platform used to require different file formats, rigs, and settings.
With VRM, creators can build one avatar and reuse it across different applications.
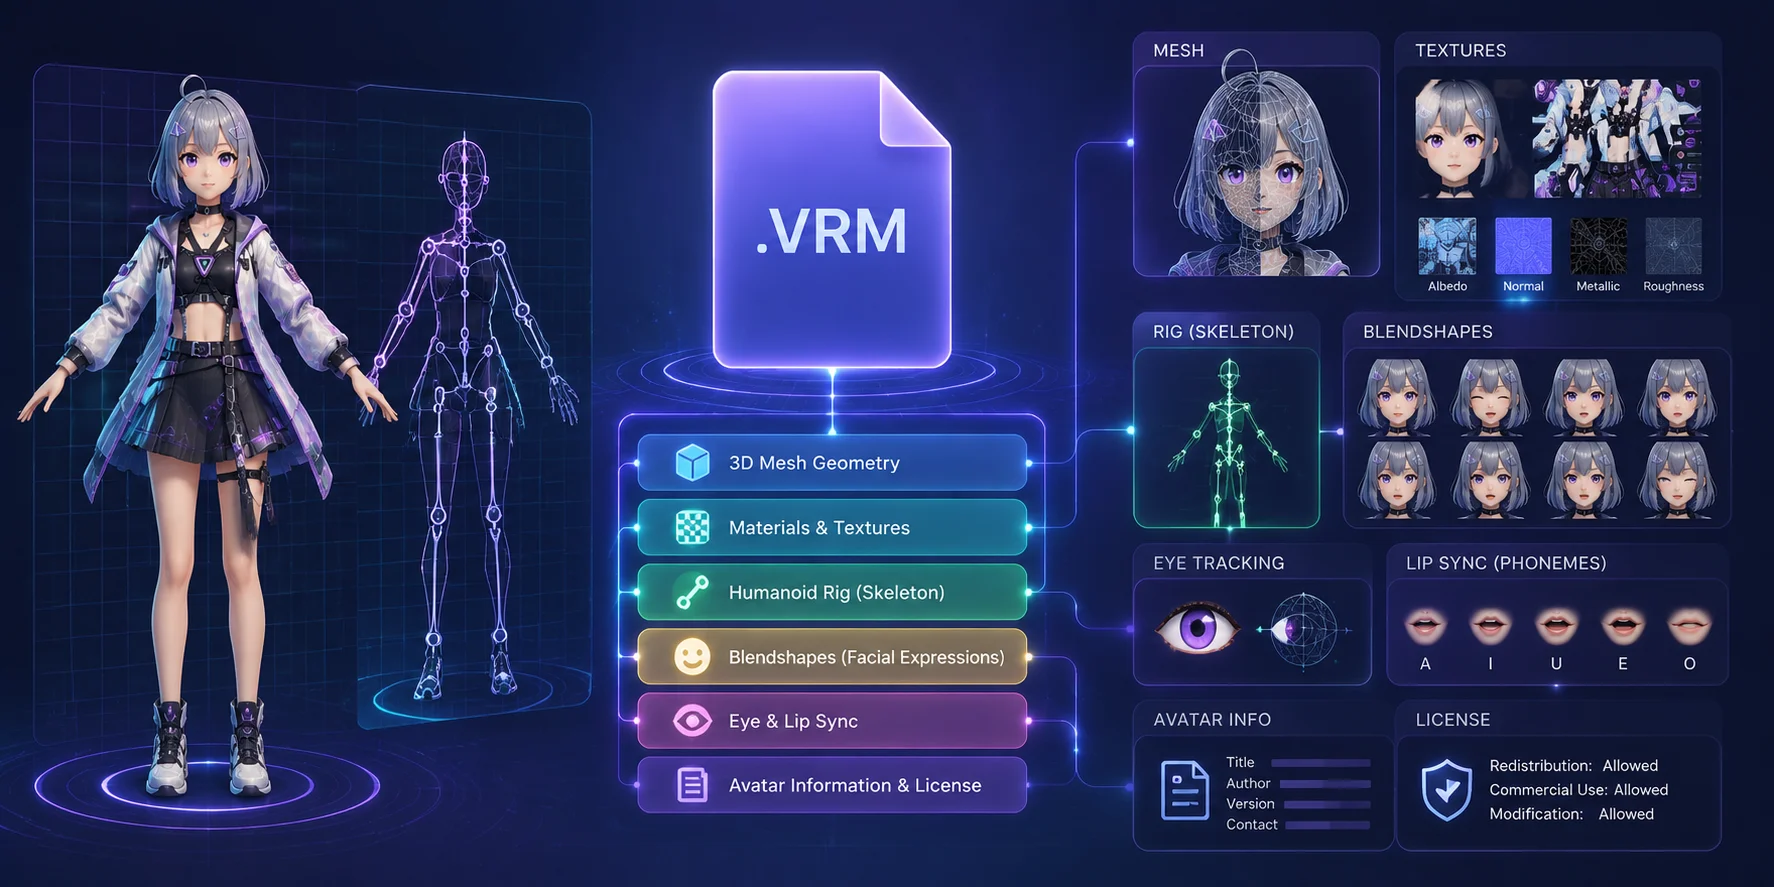
A VRM file stores:
- 3D mesh geometry
- Materials and textures
- Humanoid bone structure
- Facial expression data
- Eye tracking settings
- Lip-sync information
- Avatar license details
Technically, VRM is built on the .glb format. This means the model data and resources are packaged into one file instead of being separated into multiple folders.
VRM is commonly used for VTubing because compatible tracking software can control configured avatar expressions and movement in real time.
Application compatibility is version-specific. Confirm whether the target tool supports VRM 0.x, VRM 1.0, and the features your avatar uses before importing it.
However, VRChat does not directly support VRM files. To use a VRM avatar in VRChat, you usually need to convert the model through Unity and the VRChat SDK.
VRM 0.x vs VRM 1.0
Before creating your avatar, you need to understand VRM versions.
| Version | Key difference | When to use it |
|---|---|---|
| VRM 0.x | Older specification with legacy bone and expression naming. | Use it only when the target application or an existing pipeline requires 0.x. |
| VRM 1.0 | Current specification with revised humanoid requirements and expression presets. | Use it when the target application supports 1.0; current VRoid Studio exports VRM 1.0. |
VRM 0.x and VRM 1.0 use different humanoid and expression rules. Support also varies by application, so choose the version documented by your target tool instead of treating one version as universally safest.
Current VRoid Studio exports VRM 1.0, while UniVRM and the Blender VRM Add-on can support version-specific workflows. Validate the exported file in the application where you plan to use it.
VRM File Structure and Avatar Components Explained
Which Method Is Right for You?
There is no single best way to create a VRM avatar. The right method depends on your skills, time, and the style you want.
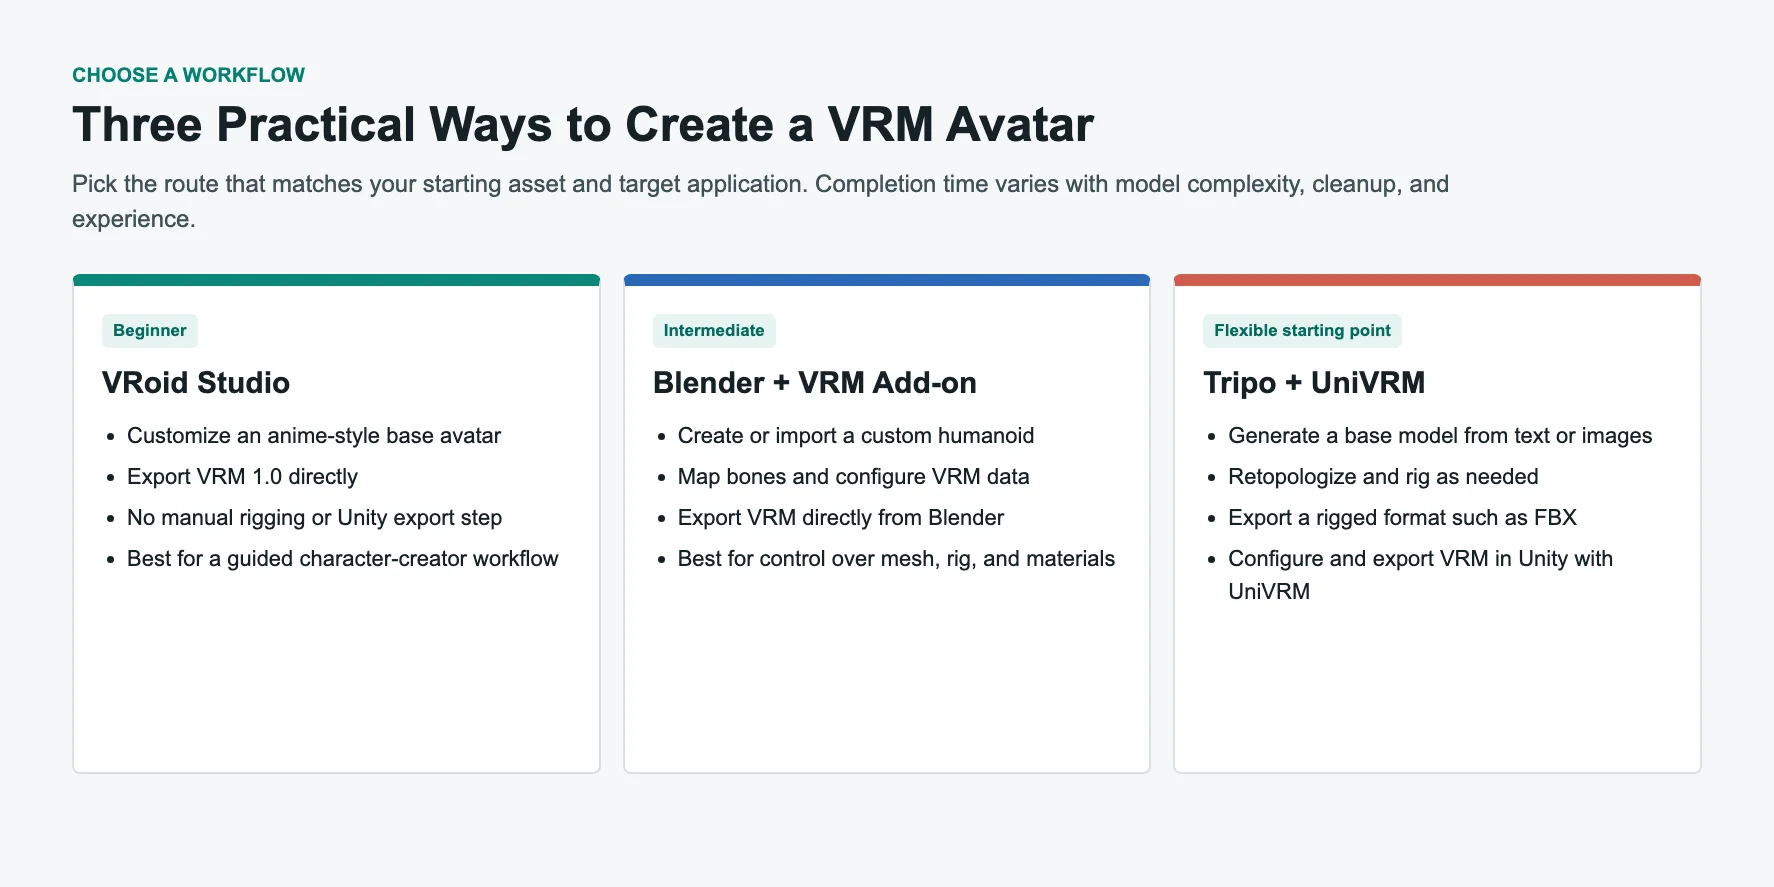
| Method | Starting level | Strength | Best fit |
|---|---|---|---|
| VRoid Studio | Beginner | Guided customization and direct VRM 1.0 export | Anime-style avatars and first-time creators |
| Blender + VRM Add-on | Intermediate | Full control over geometry, rig, materials, and VRM settings | Custom characters and technical control |
| Tripo + UniVRM | Beginner to intermediate | AI-generated base model followed by a dedicated VRM authoring step | Creators who need a custom starting asset without modeling from scratch |
Choose VRoid Studio if:
You want a guided first-avatar workflow with direct VRM export and without manual mesh modeling.
Choose Blender if:
You want complete control over your character design. Blender lets you create realistic humans, fantasy characters, creatures, and unique styles.
Choose AI generation if:
You have a character concept but prefer not to build and rig the starting model manually.
AI tools can now create a strong starting point, but you still need a VRM conversion workflow before the avatar works in VRM applications.
VRoid Studio vs Blender vs AI VRM Workflow Comparison
Method 1 — VRoid Studio (Beginner)
VRoid Studio provides a guided method for beginners who want to learn how to make a VRM file without first building a character mesh from scratch.
Instead of manually modeling polygons, VRoid uses sliders, presets, and texture tools. You can adjust your character’s appearance without understanding traditional 3D modeling.
This makes it a practical starting point for a step-by-step VRoid Studio tutorial.
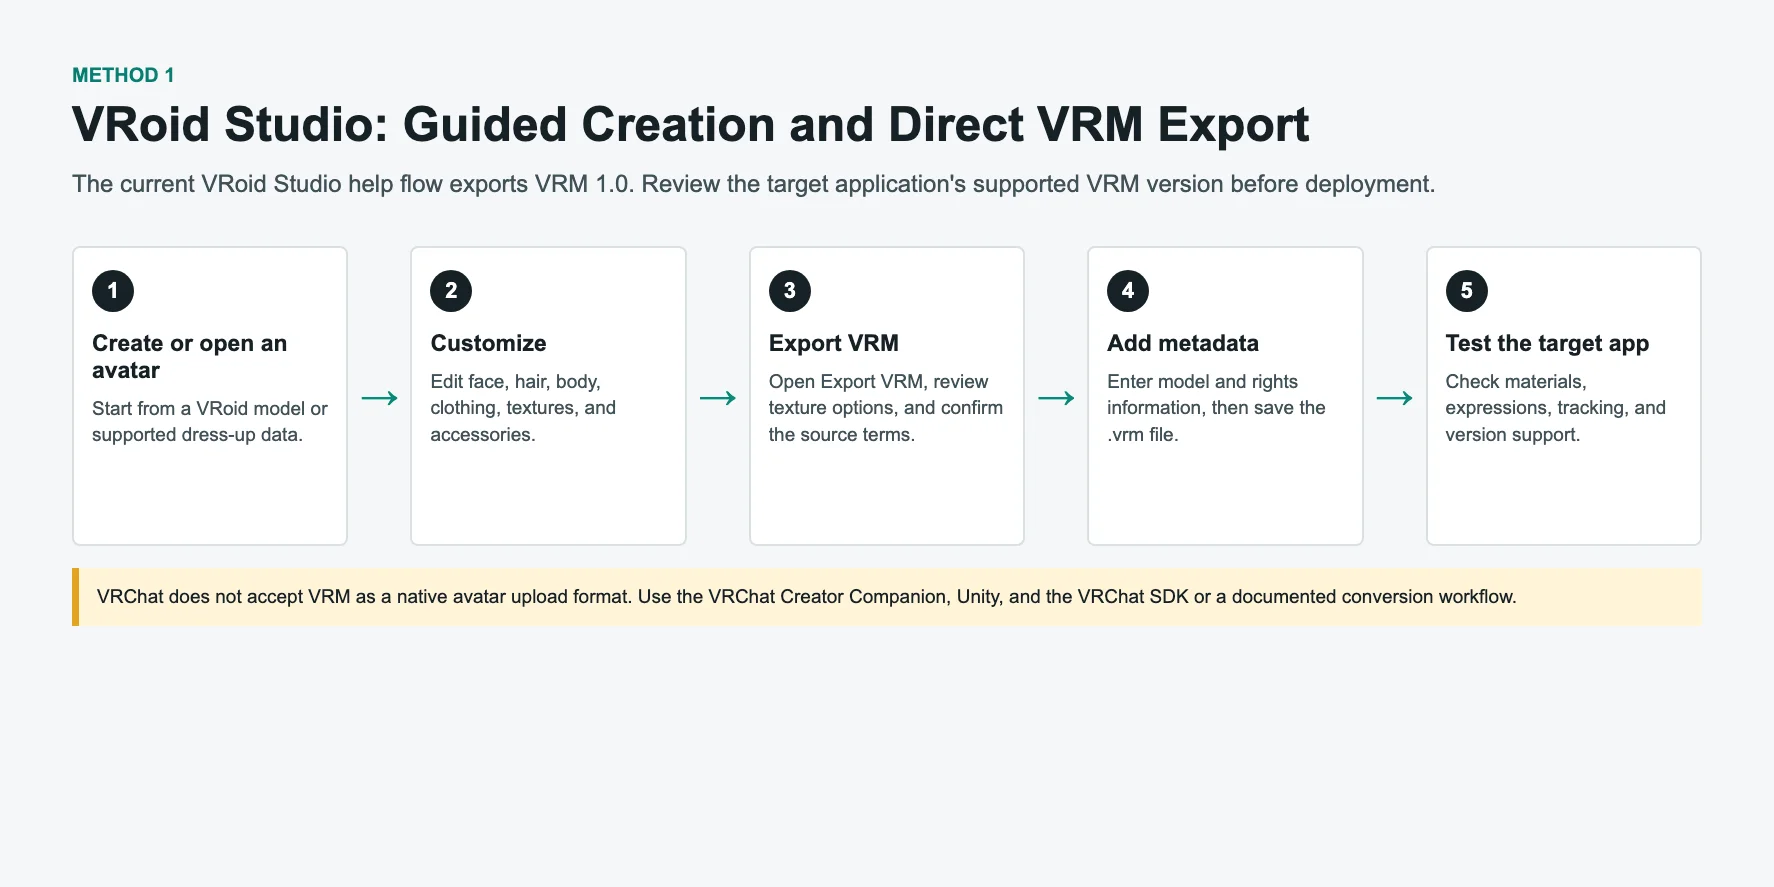
Step 1: Download VRoid Studio
Download VRoid Studio for Windows or macOS.
After installation:
- Open VRoid Studio.
- Select New Character.
- Choose a starting template.
The software gives you a complete humanoid base model that you can customize.
Step 2: Customize Your Avatar
VRoid Studio provides tools for:
Face Design
You can edit:
- Eye shape
- Eye color
- Face width
- Nose and mouth settings
Hair Creation
You can:
- Choose preset hairstyles
- Create custom hair strands
- Adjust hair color and shape
Body and Clothing
You can modify:
- Body proportions
- Skin tone
- Outfit style
- Accessories
You can also import custom textures and clothing assets created by other artists.
Step 3: Export Your VRM File
After finishing your avatar:
- Click the export option.
- Select Export as VRM.
- Enter avatar information.
- Add author and license details.
- Export.
VRoid Studio creates a .vrm file directly. Its current export help documents VRM 1.0 output.
This means you do not need:
- Unity
- Manual rigging
- Bone mapping
- Extra conversion steps
The exported avatar can then be tested in applications that support its VRM version and features.
Step 4: Test Your Avatar
Open your VRM file in a viewer or VTubing application.
You can test:
- Face tracking
- Eye movement
- Expressions
- Materials
- Performance
For a guided anime-style workflow, VRoid Studio provides a direct route from character customization to a testable VRM file.
However, VRoid has limitations. It mainly focuses on anime-style characters, and advanced users may want more freedom.
That is where Blender becomes useful.
VRoid Studio Tutorial: Creating and Exporting a VRM Avatar
Method 2 — Blender + VRM Addon
Blender provides direct control over geometry, rigging, materials, and VRM settings. It suits creators building an original character, a realistic avatar, or a production-specific VTuber model.
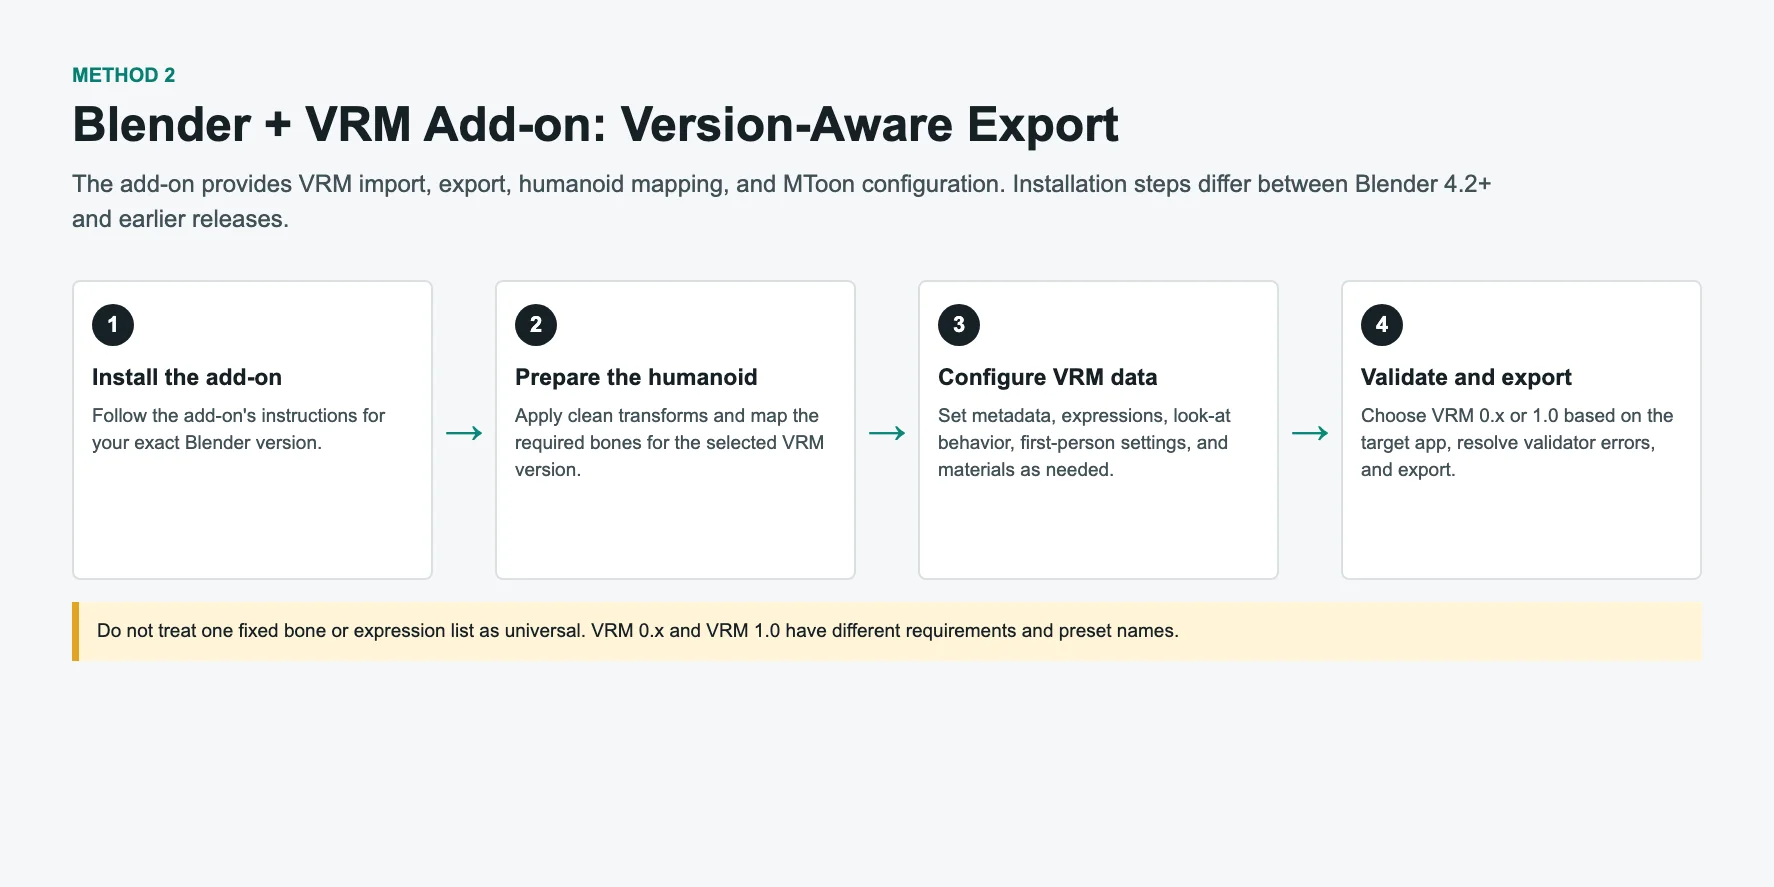
The complete blender to VRM workflow is:
Create Model → Add Humanoid Rig → Create Expressions → Configure VRM → Export
Unlike older workflows, you do not always need Unity. With the Blender VRM Addon, you can export VRM directly.
Step 1: Install Blender VRM Addon
Install the Blender VRM Add-on using the instructions for your Blender release. Blender 4.2 or later can use the extension workflow in Preferences; earlier supported versions use the add-on installation path documented by the project.
The addon adds VRM import and export features directly into Blender.
You will then see VRM options inside Blender’s export menu.
Step 2: Prepare Your Character Model
You can either:
- Model your character in Blender
- Import an existing 3D model
- Start with an AI-generated model
Before exporting, your character must have a humanoid structure.
Map the humanoid bones required by the VRM version you plan to export. For VRM 1.0, the following list covers the required main body and limb chains:
- Hips
- Spine
- Head
- UpperArm
- LowerArm
- Hand
- UpperLeg
- LowerLeg
- Foot
Both left and right sides must be mapped correctly.
Missing bones are one of the most common reasons VRM export fails.
Step 3: Set Up the T-Pose
Prepare a clean reference pose and transforms that pass the Blender VRM Add-on validator. A T-pose is a useful authoring pose, but follow the selected VRM version and exporter rather than relying on one universal pose-reset recipe.
Step 4: Add Facial Expressions
A VRM avatar needs facial controls for VTubing features.
In Blender, you create these using Shape Keys.
The recommended expressions include:
- Happy
- Angry
- Sad
- Relaxed
- Surprised
VRM 1.0 preset expressions are optional and use names such as happy, sad, and relaxed. Configure only the expressions and lip-sync presets needed by the target application.
Without blendshapes, your avatar may work as a 3D model but will have limited facial animation.
Step 5: Export Blender Model to VRM
When your model is ready:
- Open File → Export → VRM.
- Assign humanoid bones.
- Add avatar information.
- Set license details.
- Validate the model.
- Export the
.vrmfile.
Blender usually involves more manual setup than VRoid Studio, but it provides broader control over the finished asset.
Blender to VRM Pipeline: Modeling, Rigging, and Export
Method 3 — Generate with Tripo AI, Then Convert to VRM
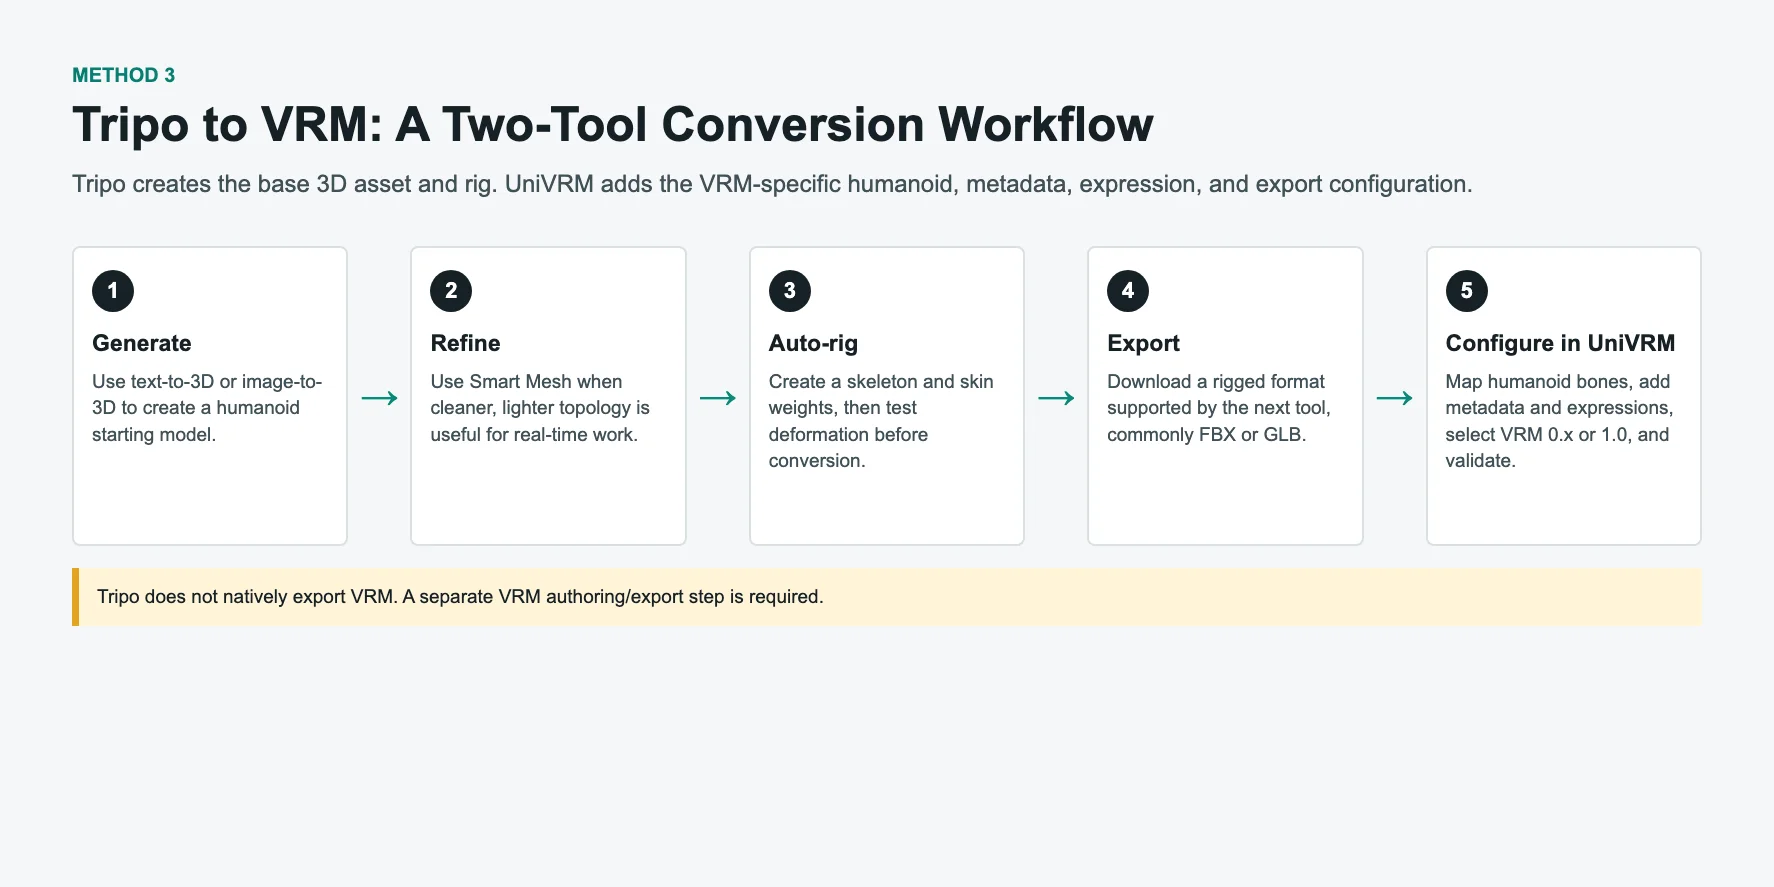
Text/Image → AI 3D Model → Smart Mesh → Auto Rig → FBX → Unity + UniVRM → VRM
Use Tripo AI to generate and rig a starting model, inspect the result, and then add the humanoid, expression, metadata, and export settings required by VRM.
Part A: Generate Your Character with Tripo AI
Step 1: Create a Base Character
Open Tripo AI Studio and start with Text-to-3D or the Image-to-3D workflow.
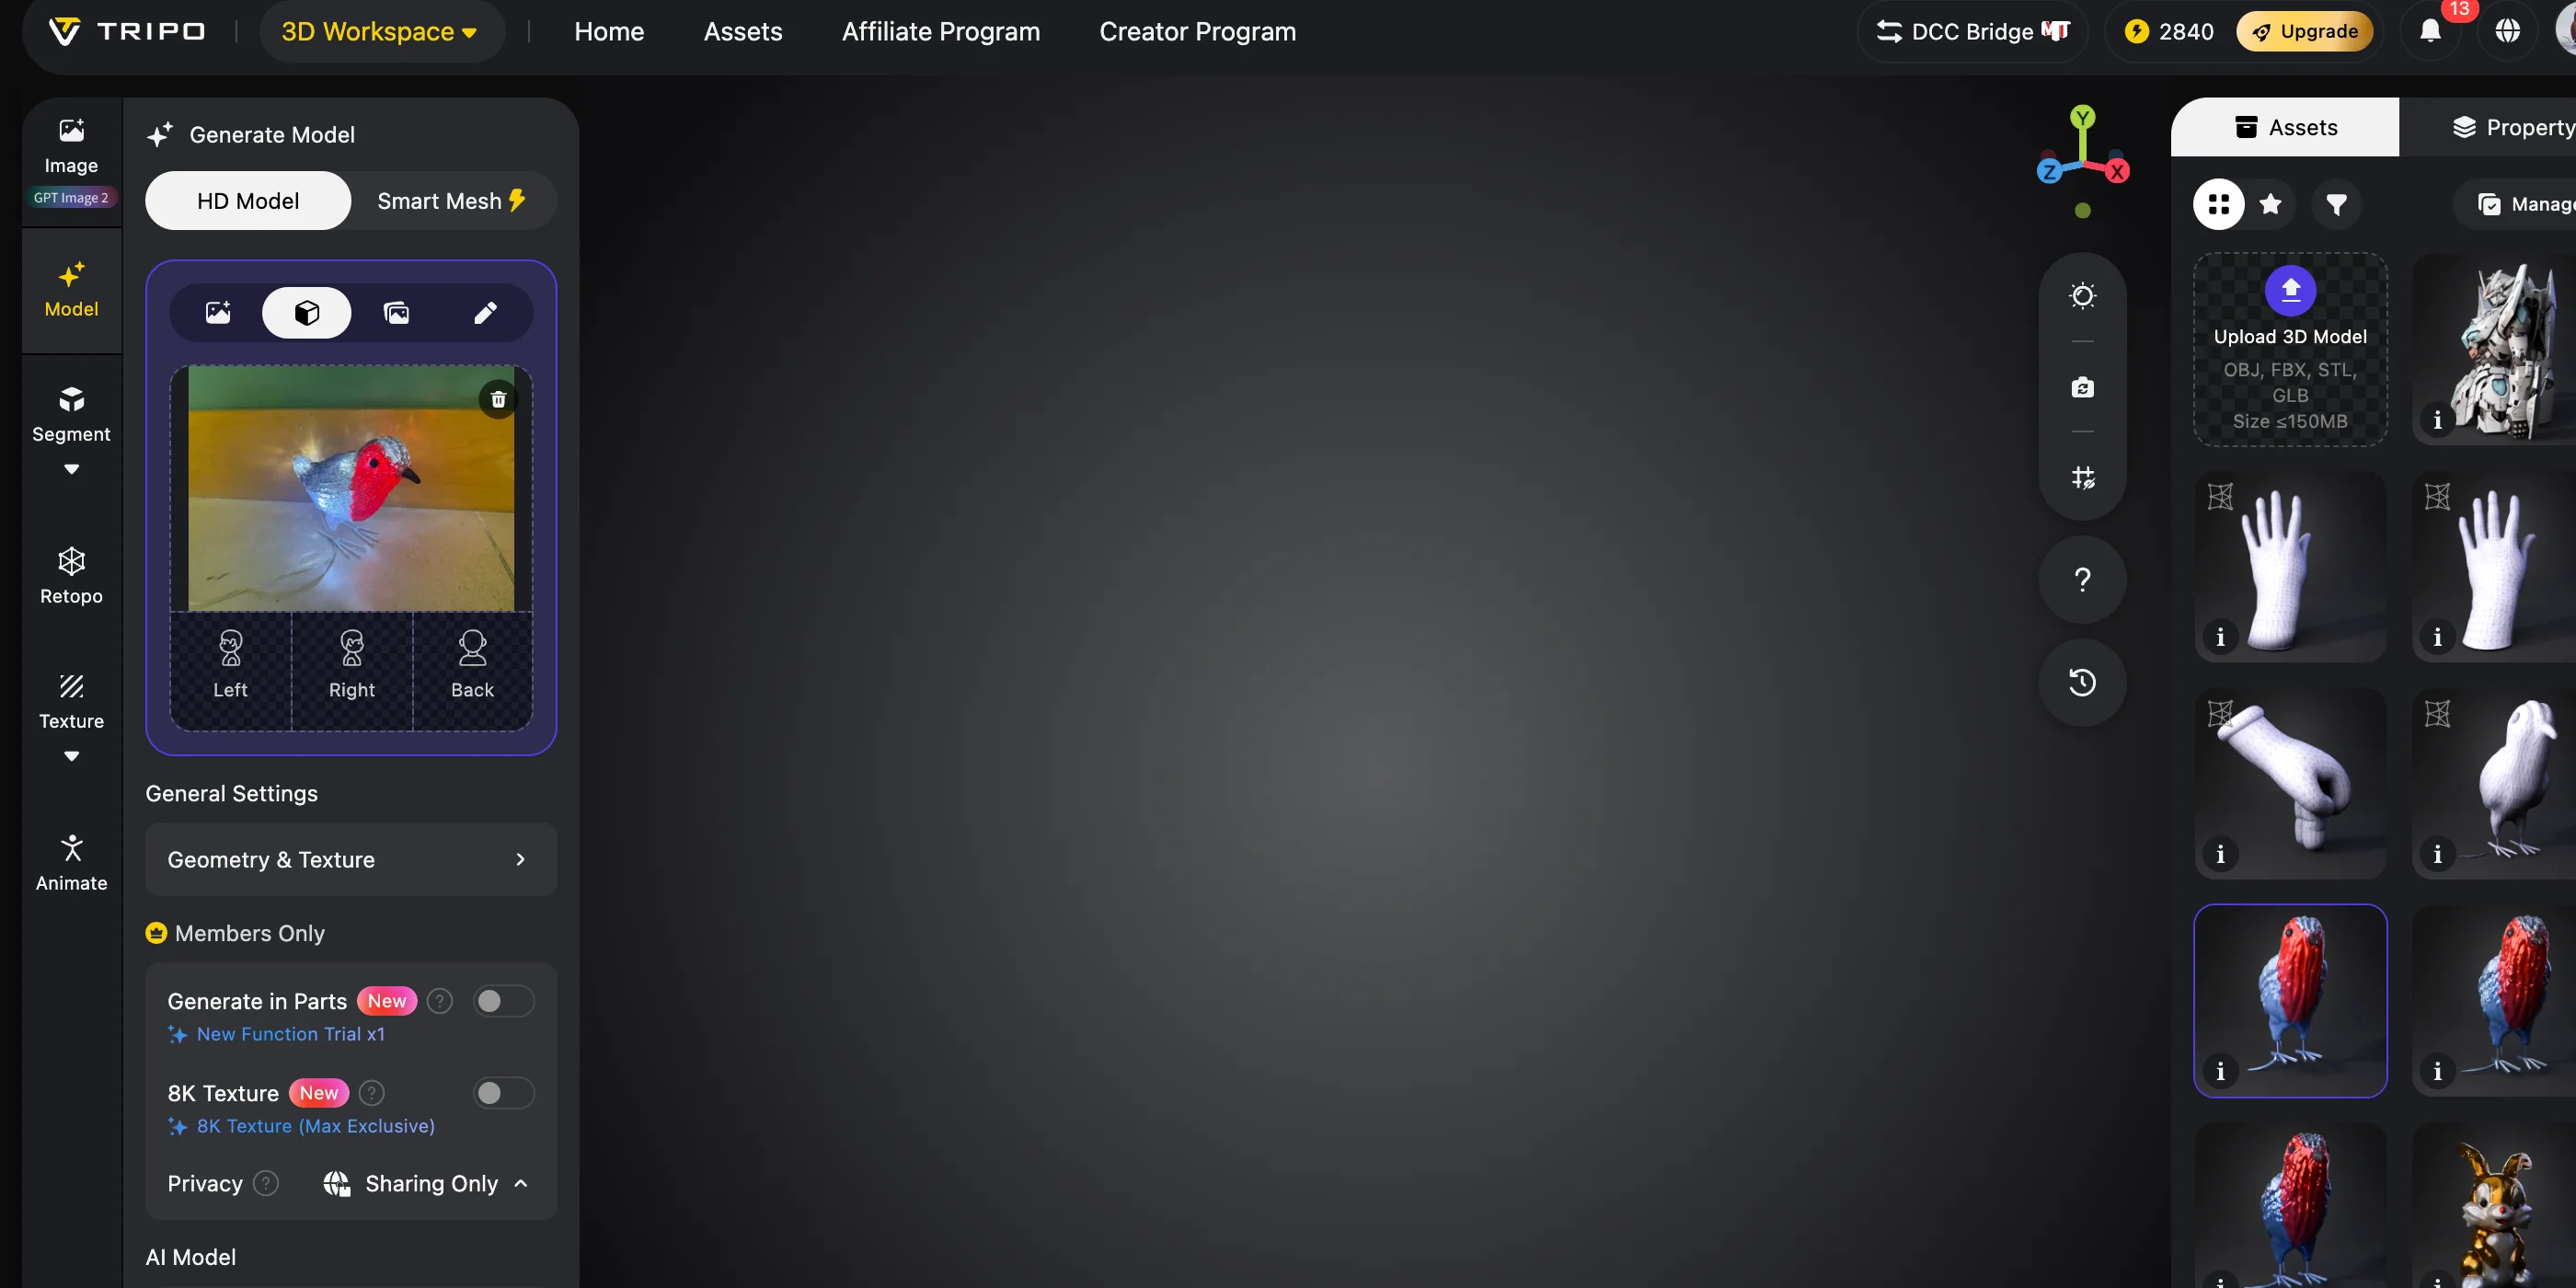
Describe or upload one full-body humanoid character with visible limbs, a clear art and clothing style, and a neutral rig-friendly pose. Multiple characters, hidden body parts, extreme poses, and complex accessories can make later rigging and cleanup harder.
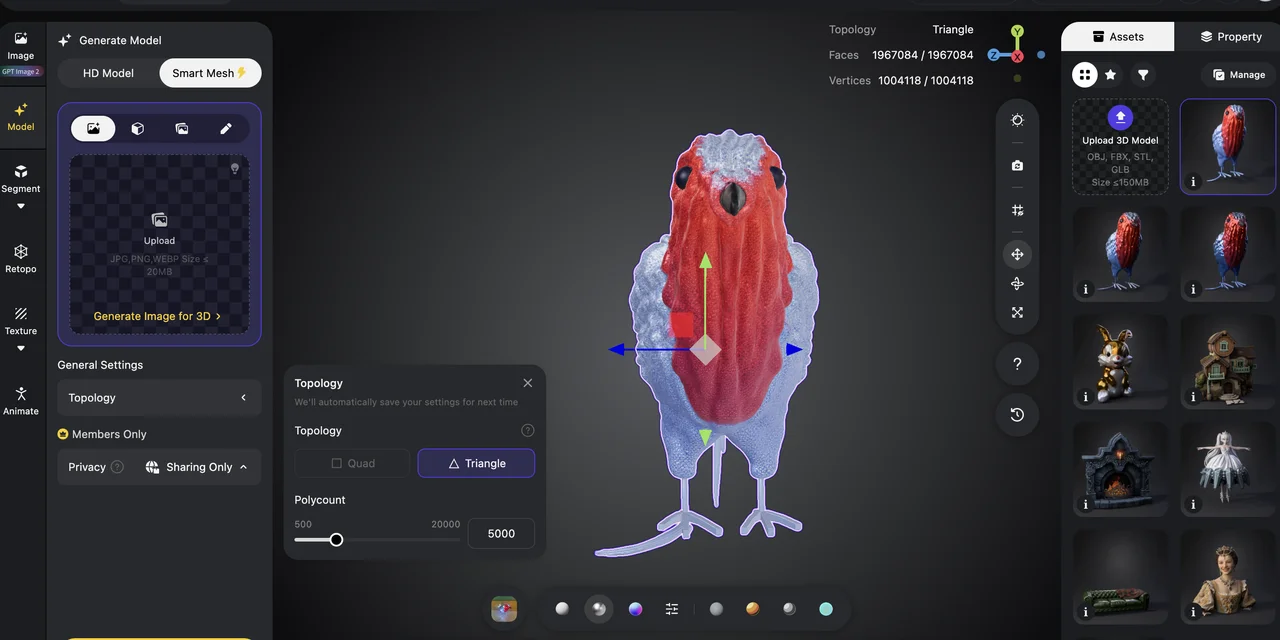
Step 2: Optimize the Mesh with Smart Mesh
Use Smart Mesh to prepare cleaner topology, choosing a polygon target for the target application, device, materials, textures, and deformation needs. Inspect common AI-model trouble spots such as hair, hands, clothing intersections, and small accessories.
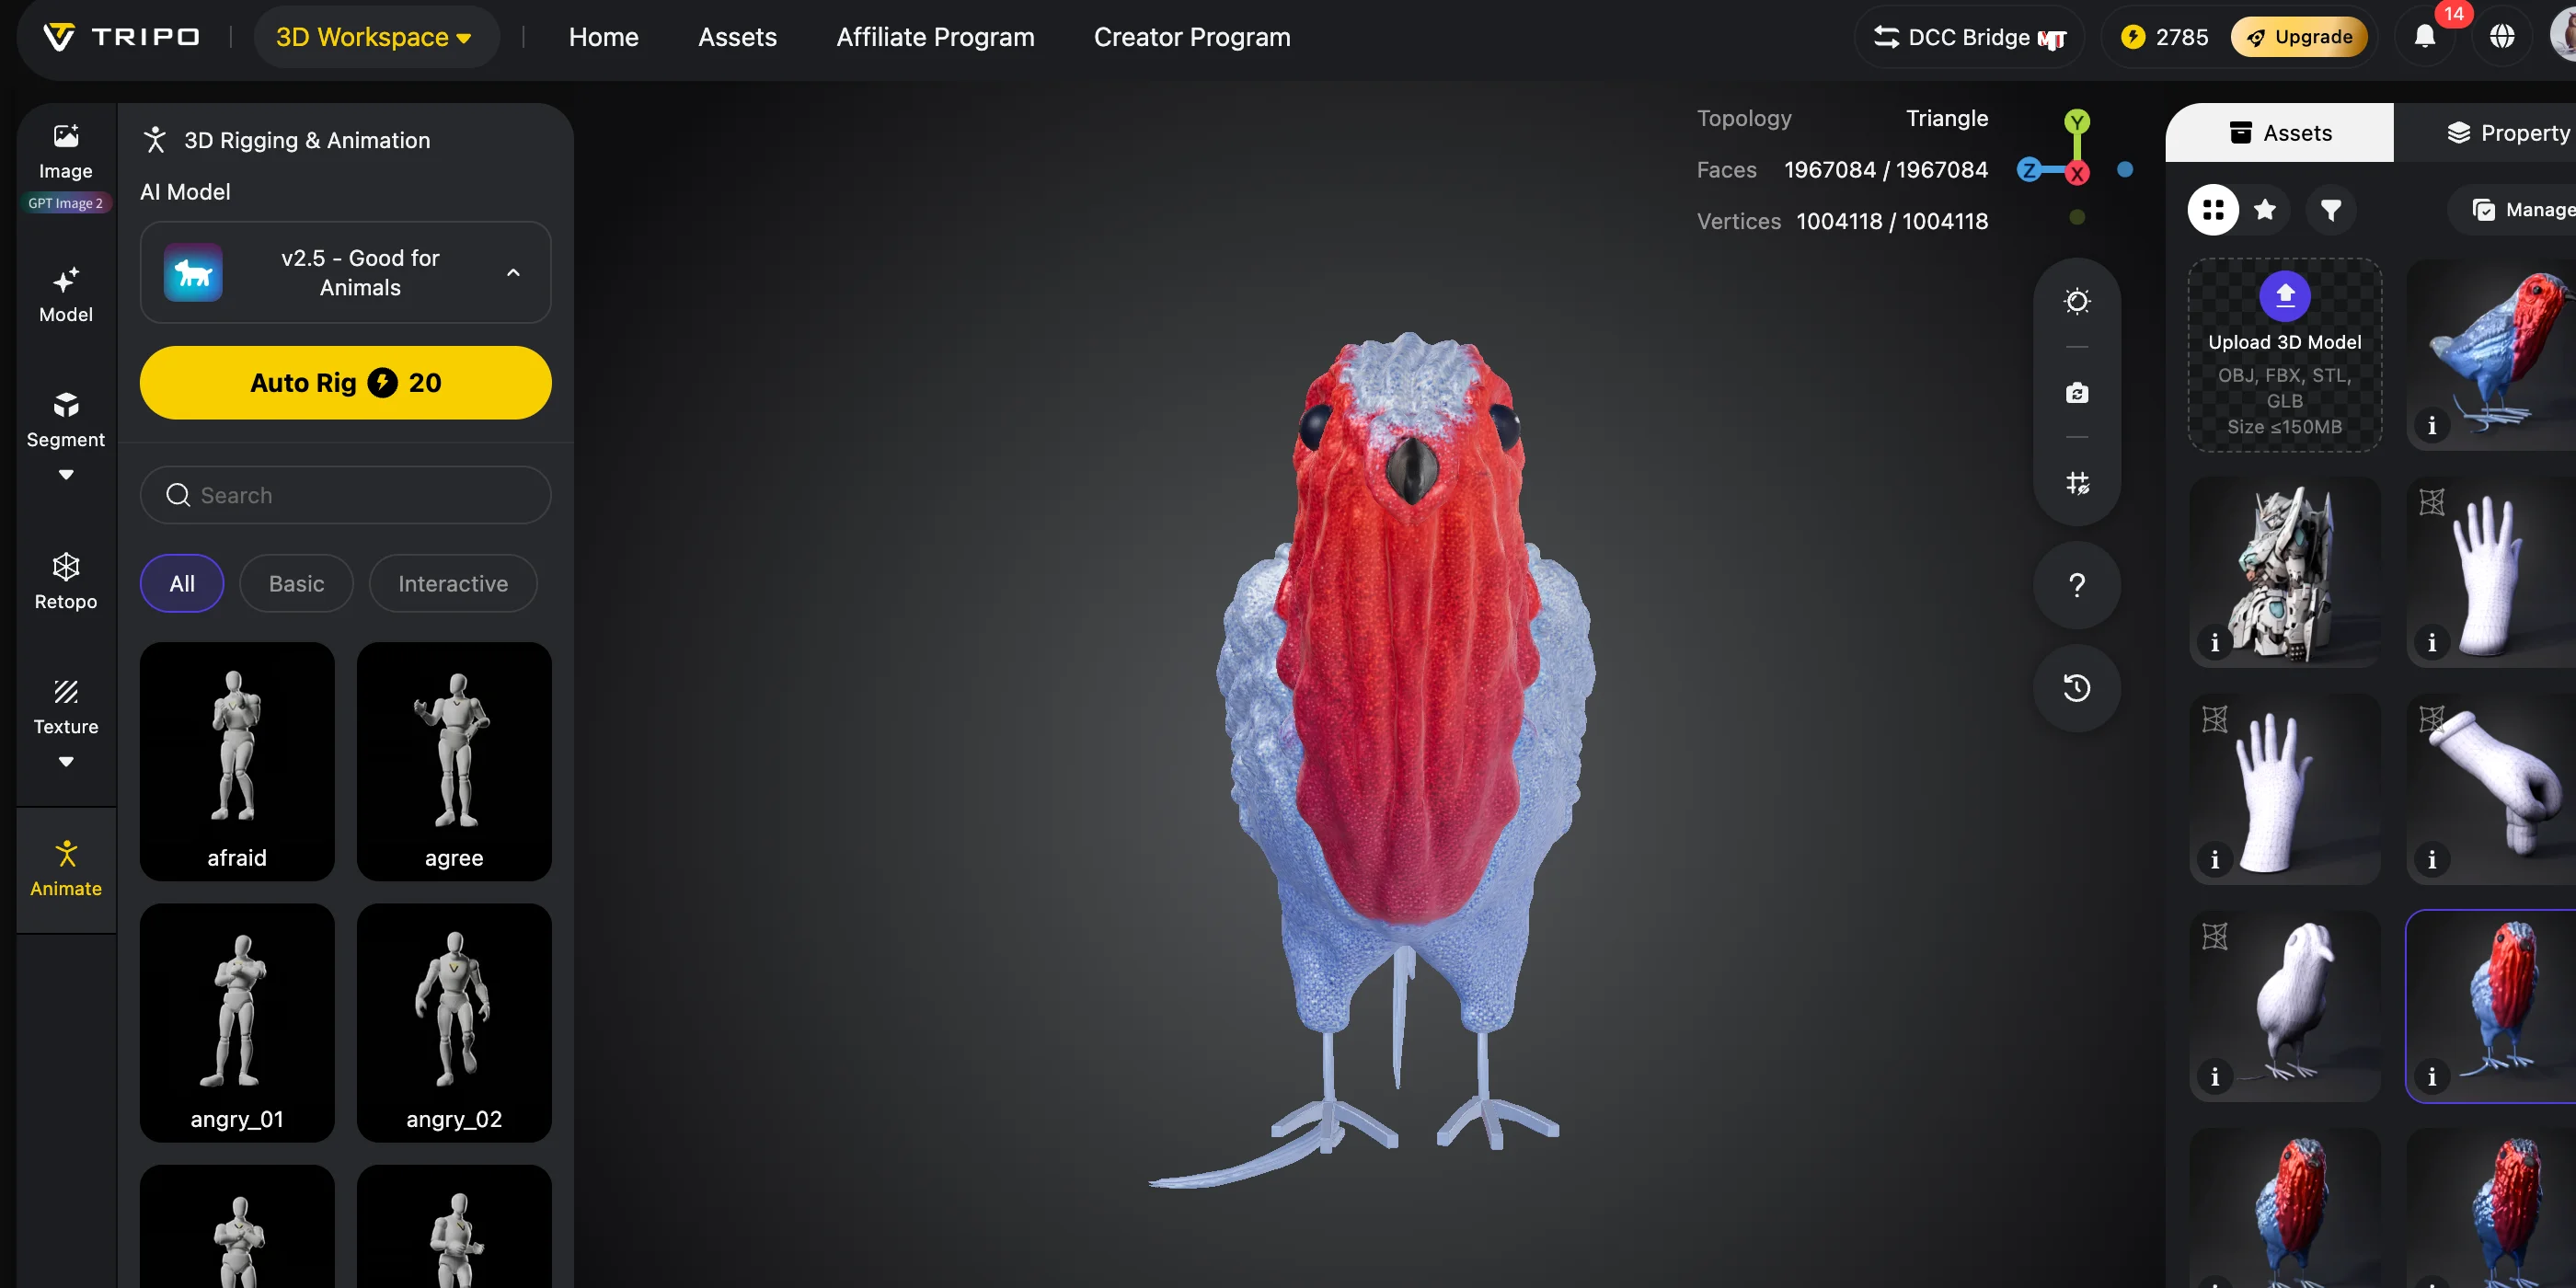
Step 3: Add Auto Rigging
Next, use Tripo Auto Rigging to create a skeleton and skin weights, then test the result before conversion.
Choose the humanoid rig option and a suitable reference pose. Test arm and leg movement, shoulder deformation, and skin weights, then correct bone-mapping or deformation issues before conversion.
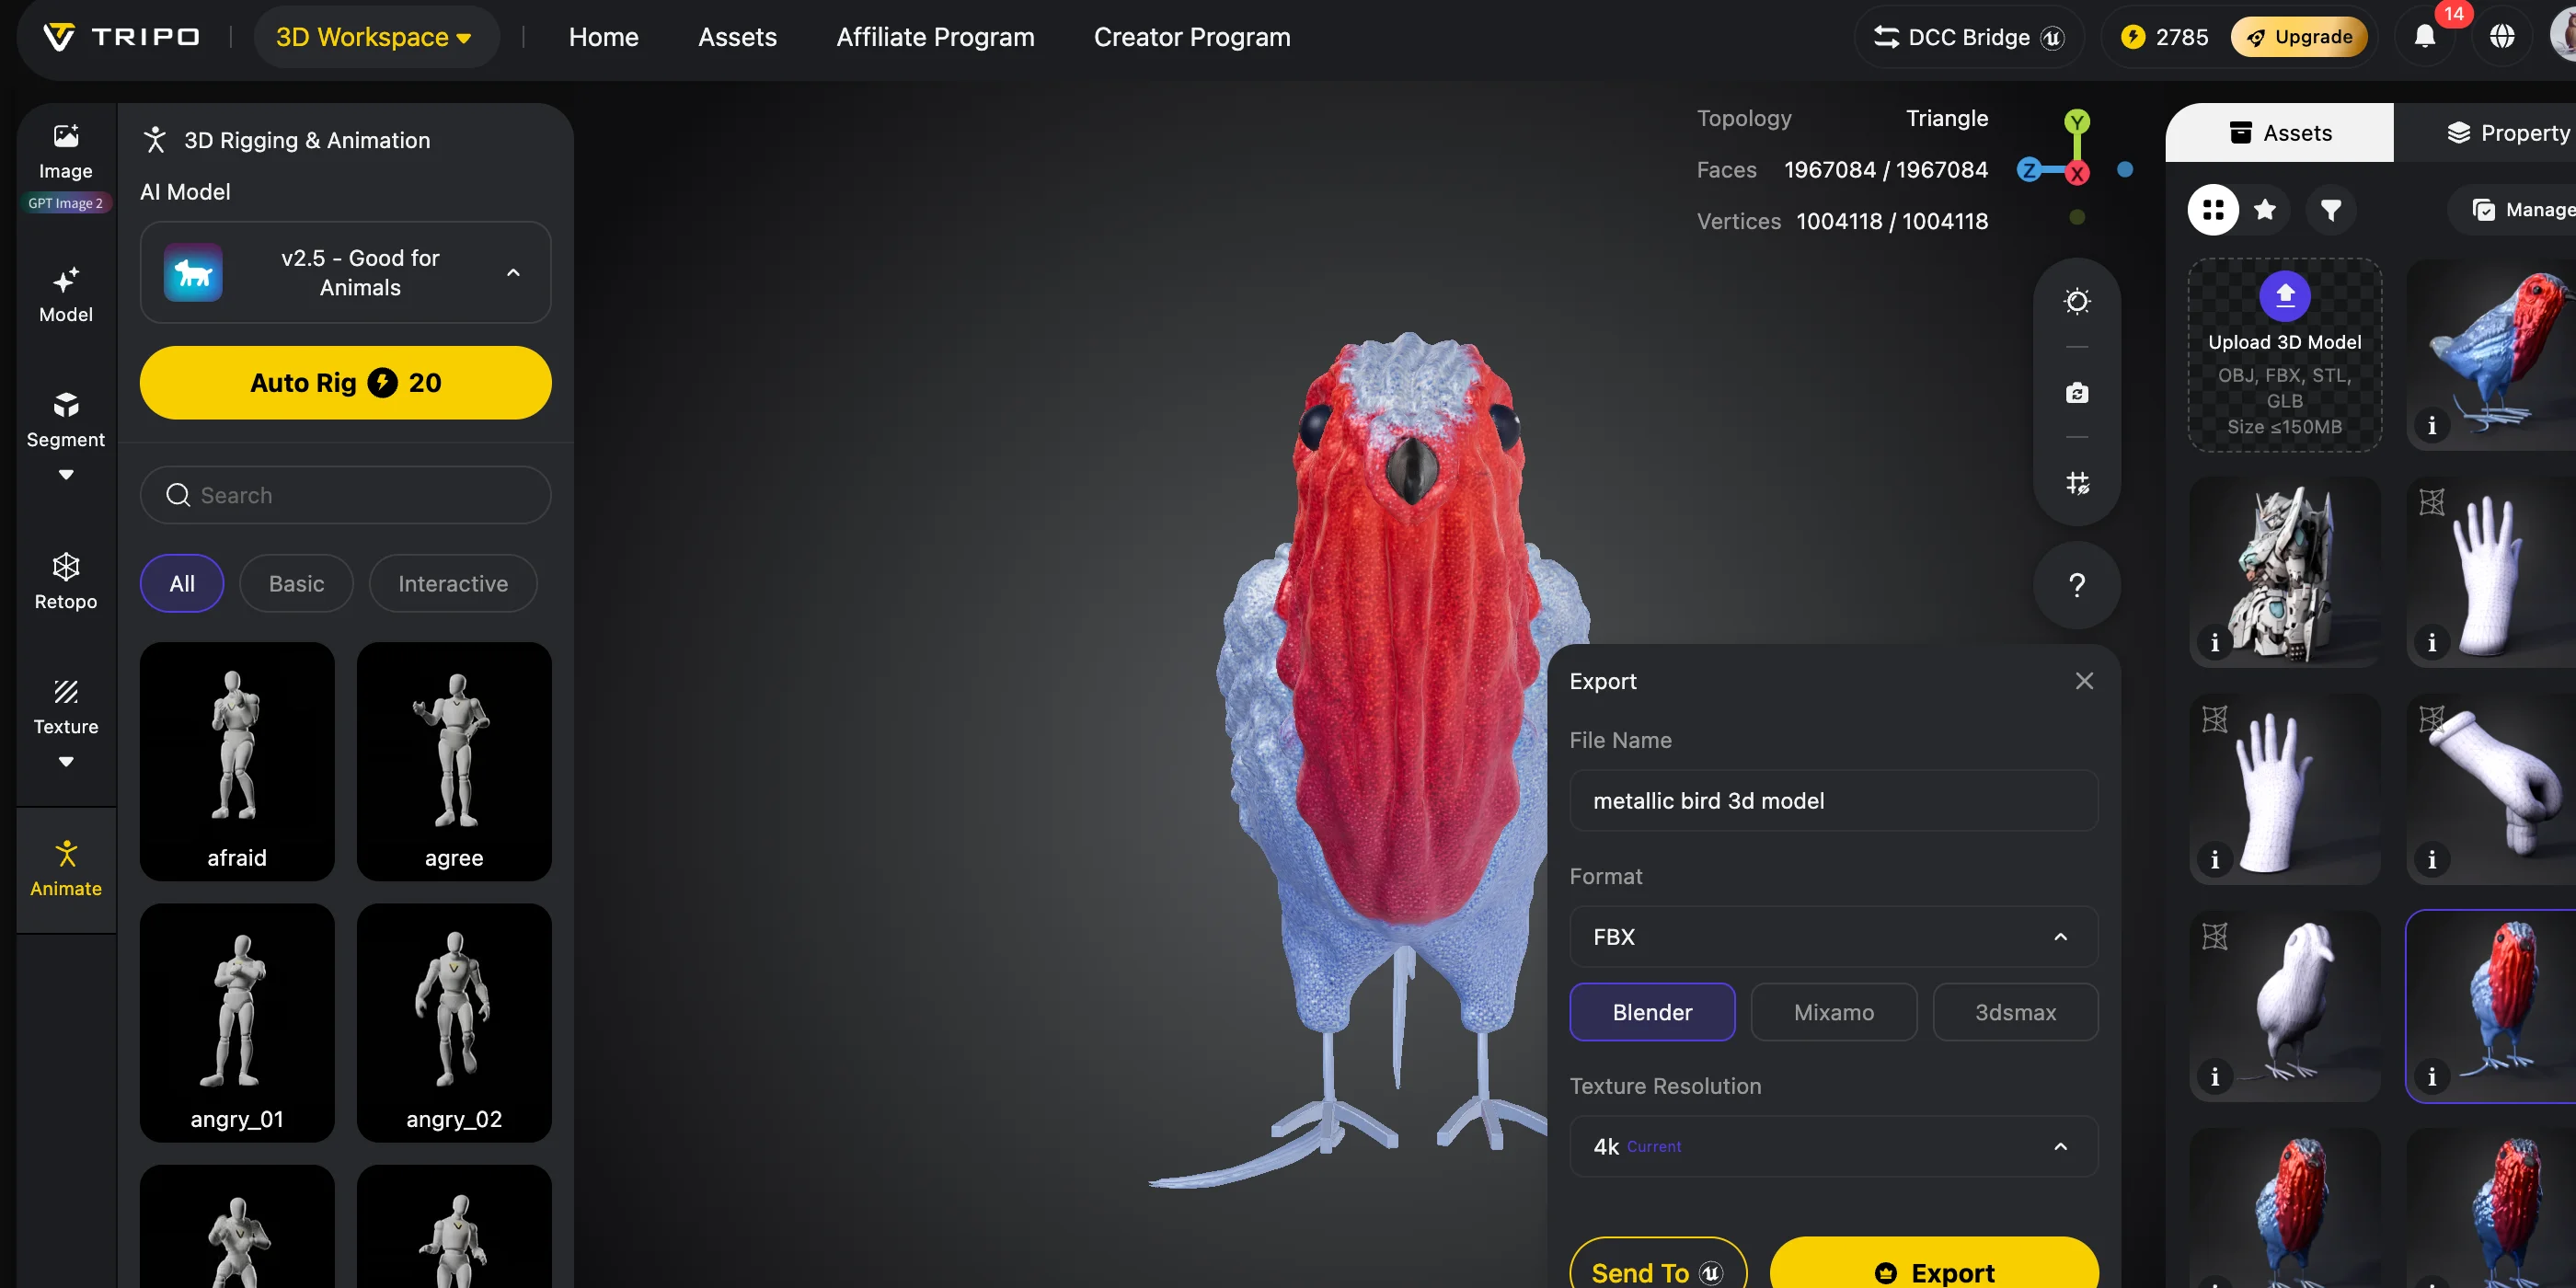
Step 4: Export as FBX
Export your AI-generated character as FBX.
FBX is a common interchange choice for bringing a rigged character into Unity because it can carry:
- Skeleton hierarchy
- Skin weights
- Animation information
For this Unity workflow, preserve the skeleton hierarchy and skin weights. Animation clips are optional unless your target pipeline needs them.
Other formats have limitations:
| Format | Useful for this workflow | Check before conversion |
|---|---|---|
| FBX | Common interchange format for a rigged model entering Unity. | Verify bone hierarchy, skin weights, scale, materials, and imported animation data. |
| GLB | Can preserve a compact glTF asset and is supported by UniVRM. | A plain GLB is not a VRM unless it contains the required VRM extensions. |
| OBJ | Useful for static geometry. | It does not carry a skinned humanoid rig, so additional rigging is required. |
Use the format that preserves the rig data required by your chosen conversion path; FBX is a common choice for the Unity workflow described below.
Part B: Convert FBX to VRM with Unity + UniVRM
After creating your model, the next step is converting it into a real VRM file.
This is one common workflow for people searching for how to convert a 3D model to VRM.
Step 5: Create a Unity Project
Install:
- Unity 2022.3 LTS or later for the latest UniVRM releases
- UniVRM package
Create a new 3D project and import UniVRM.
UniVRM adds VRM export features inside Unity.
Step 6: Import Your FBX Model
Drag your FBX file into the Unity Assets folder.
Select the model and set:
Rig → Humanoid
Then click Configure and check the bone mapping.
Use Unity Humanoid configuration and the selected UniVRM exporter to verify the bone mapping. The exact required set differs between VRM 0.x and VRM 1.0.
- Hips
- Spine
- Head
- Arms
- Legs
A correct humanoid setup is required before VRM export.
Step 7: Add VRM Metadata and Expressions
Before exporting, add VRM settings:
- Avatar name
- Author
- License information
These fields identify your model and are required by many VRM tools.
Configure expressions using the preset names for the version you will export. VRM 1.0 uses names such as happy, sad, relaxed, and lip-sync presets aa, ih, ou, ee, and oh.
Add:
- Happy
- Angry
- Sad
- Relaxed or another target-app expression
- Lip-sync vowels
This allows VTubing applications to animate your character naturally.
Step 8: Export Your VRM File
Finally:
- Open UniVRM export settings.
- Select the VRM 0.x or VRM 1.0 exporter required by your target application.
- Choose your avatar.
- Export.
Your .vrm file is now ready.
Before uploading or streaming, test it in a VRM viewer.
Check:
- Materials
- Expressions
- Eye tracking
- Bone movement
- File size
AI 3D Avatar to VRM Conversion Workflow
T-Pose, Bones, and Blendshapes: VRM Technical Requirements
Creating a VRM model is not only about making a good-looking character. The avatar also needs the correct technical setup.
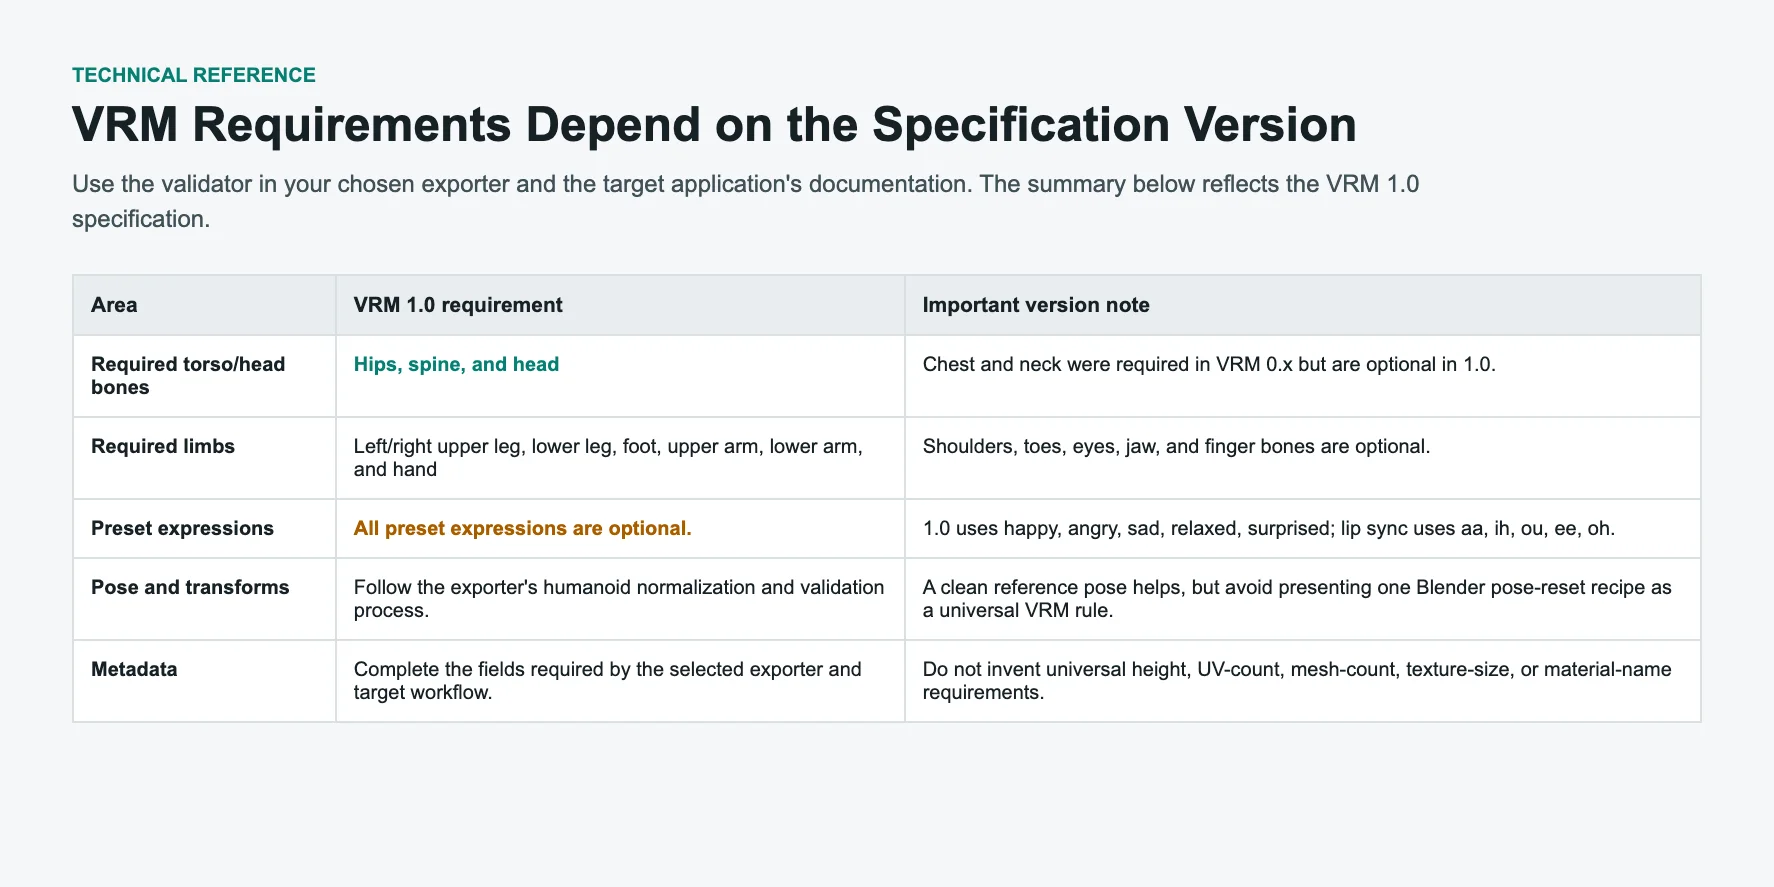
VRM Avatar Technical Requirements: Bones, T-Pose, and Blendshapes
Required Humanoid Bones
For VRM 1.0, the required bones are hips, spine, head, and the left/right upper leg, lower leg, foot, upper arm, lower arm, and hand bones. Chest and neck are optional in 1.0 but were required in 0.x.
- Hips
- Spine
- Head
- Left and right UpperArm
- Left and right LowerArm
- Left and right Hand
- Left and right UpperLeg
- Left and right LowerLeg
- Left and right Foot
A missing required bone or invalid parent-child mapping can fail validation. Use the exporter for your selected version as the final authority.
Facial Expression Requirements
For VTubing, your model should include facial expressions.
VRM 1.0 provides optional preset expressions including:
- Happy
- Angry
- Sad
- Relaxed
- Surprised
For speaking animation, add:
- aa
- ih
- ou
- ee
- oh
These phoneme shapes control mouth movement during lip-sync.
License Information
VRM stores usage information inside the file.
Before export, add:
- Model title
- Creator name
- License permissions
This helps other users and platforms understand how your avatar can be used.
Troubleshooting Common VRM Errors
Even with the correct workflow, VRM export problems can happen. Most errors come from missing bones, incorrect poses, or incomplete facial settings.
“Required human bone Hips is not assigned”
This means the humanoid rig is incomplete.
Fix it by opening the rig settings and assigning the correct pelvis/hip bone. Check that all required humanoid bones are mapped before exporting.
“Export failed: Model is not in T-Pose”
A pose or normalization error means the model does not satisfy the selected exporter. Return to the add-on or UniVRM validator, correct the reported transform or humanoid mapping issue, and export again.
Use the exporter error as the starting point:
Check the reference pose, transforms, and humanoid mapping in the selected exporter, then rerun validation before exporting again.
Facial Expressions Do Not Work
If your avatar cannot smile or lip-sync, check your blendshapes.
Check that the expressions expected by the target application are configured and bound to working morph targets or material changes.
For VRM 1.0, confirm the relevant presets such as happy, sad, and aa/ih/ou/ee/oh. VRM 0.x uses older preset names.
VRM File Is Too Large
Large avatars may load slowly.
Optimize your model by:
- Reducing texture size
- Removing unused materials
- Lowering polygon count
- Deleting unnecessary bones
VRM 1.0 Compatibility Problems
VRM version support is application-specific. A file may be valid but still use a version or feature that the target application does not support.
Check the current documentation for the target application, then export the supported version and retest instead of automatically downgrading every file to VRM 0.x.
How to Use Your VRM Model
After learning how to make a VRM model, you can use your avatar in different virtual environments.
VTubing
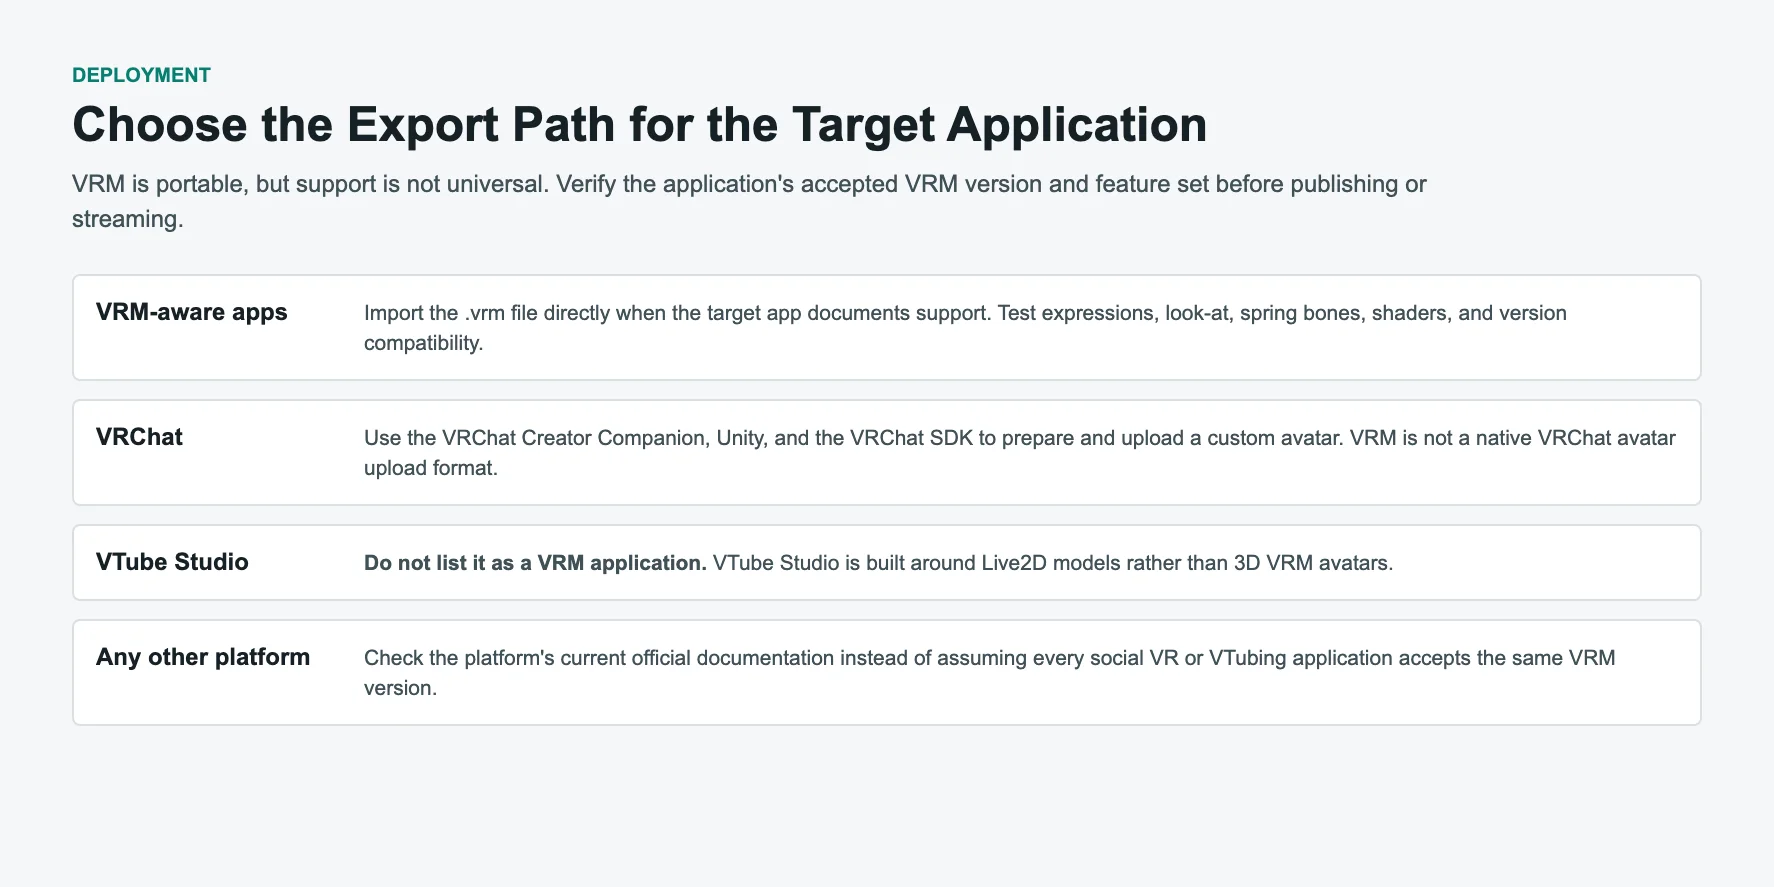
VRM-aware VTubing applications can load a supported .vrm file and use its configured tracking and expression data. Verify the accepted VRM version before importing.
Depending on the application and tracking setup, the avatar can respond to:
- Face movement
- Eye tracking
- Lip-sync
- Head movement
VRChat
VRChat does not directly support VRM files.
The usual workflow is:
VRM/FBX → Unity → VRChat SDK → Upload Avatar
The official VRChat custom-avatar workflow uses the Creator Companion, Unity, and the VRChat SDK. Configure the model as a Humanoid avatar, add a VRC Avatar Descriptor, validate it, and build or upload it through the SDK.
See our VRChat model generator guide for the full upload workflow
Other Virtual Platforms
Other platforms may support VRM directly, but accepted versions and features change. Confirm compatibility in the current official documentation for each platform.
After confirming version and feature support, you may be able to reuse the same avatar across multiple compatible services.
Where Can You Use a VRM Avatar?
Frequently Asked Questions
Q1: What is VRM format used for?
VRM is a standard format for virtual humans. It stores the model, textures, rig, expressions, and license information in one file for VTubing and social VR.
Q2: Can you make a VRM model in Blender?
Yes. The Blender VRM Add-on adds VRM import, export, humanoid mapping, and material configuration. Follow the installation steps for your Blender version and validate the model before export.
Q3: How do you convert a model to VRM?
Start with a humanoid model, then use a VRM authoring tool such as the Blender VRM Add-on or UniVRM. Map the required bones, configure expressions and metadata, choose the VRM version supported by the target application, export, and validate the resulting .vrm file.
Q4: Can AI create a VRM avatar?
Yes. AI tools can generate a base model, but the model still needs a suitable humanoid rig, expressions, metadata, and VRM export settings.
A typical path is: AI-generated base model → rigging and cleanup → Blender VRM Add-on or Unity + UniVRM → validation and VRM export.
Q5: Does VRoid Studio export VRM directly?
Yes. VRoid Studio exports VRM directly; its current official help documents VRM 1.0 export. Check that your target application accepts that version.
Q6: What bones are required for VRM?
The required bones depend on the VRM version. VRM 1.0 requires hips, spine, head, and the main left/right arm and leg chains; chest and neck are optional in 1.0 but were required in 0.x.
- Hips
- Spine
- Head
- Arms
- Hands
- Legs
- Feet
Missing required bones will cause export errors.
Q7: How long does it take to make a VRM model?
It depends on the starting asset, modeling and rigging experience, cleanup needs, expression setup, and target application. VRoid Studio reduces manual setup, while custom Blender and AI-conversion workflows may require additional validation and repair.
Q8: Can AI-generated models become VRM avatars?
Yes. AI models need proper rigging, expressions, and VRM conversion before they can work in VRM apps.
Q9: Where can I find free VRM models?
VRoid Hub includes downloadable character models, and creator marketplaces such as BOOTH include both free and paid VRM listings. Download availability and usage permissions vary by item.
Check the license and download conditions for each model before editing, redistributing, streaming, or using it commercially.
Q10: What is the easiest way to create a VRM avatar?
For beginners who want an anime-style avatar and direct VRM export, VRoid Studio is a guided option.
Use an AI-assisted workflow when you want a generated custom starting asset, and use Blender when you need direct control over modeling, rigging, materials, and VRM configuration.
Conclusion
Creating a VRM model is more manageable when the workflow matches your goal. Use VRoid Studio for guided anime-style character creation, Blender + VRM Add-on for direct asset control, or Tripo AI when you want a generated starting model that you can refine and convert. Validate the final .vrm file in the target application because version and feature support vary.
To create a custom starting character, generate a base model in Tripo AI Studio, refine and rig it, then complete the VRM-specific setup in Blender or Unity with UniVRM. Choose the export version required by your target application and validate the final avatar before use.