How to Use Tripo Smart Mesh P1.0: A Step-by-Step Tutorial
You sketch a character. You need it in your game by Friday. The usual path: generate a high-poly mesh, export it, open Blender, spend an hour retopologizing, optimize the polygon count, clean up the edge flow, export again, import into your engine, and discover the normals are broken.
Smart Mesh skips most of that. Upload your image, set a polygon count, hit generate. Two seconds later you have a clean low-poly mesh with sensible edge flow, ready to rig. Nothing to retopologize, nothing to fix on import.
It's built for game developers and anyone whose pipeline needs assets that drop straight into the engine and run in real time.
This tutorial walks through the full workflow, from opening the workspace to exporting a textured, engine-ready model, with two real production examples at the end.
What Smart Mesh Does
Smart Mesh generates structured low-poly topology directly from your input image. Instead of producing a dense, chaotic mesh that needs cleanup, it outputs clean geometry with organized edge flow and a polygon count you control. For the full background on the topology problem it was designed to solve, see the Smart Mesh P1.0 announcement.
The result is a mesh you can drop into Unity, Unreal, or a browser-based renderer without touching a mesh editor. For mobile NPCs, web game characters, and secondary props, the retopology step disappears.
Generation takes about 2 seconds. For teams iterating on large asset libraries, that speed compounds fast.
Who This Is For
Indie developers and small game studios building mobile or web games. If your pipeline involves mid-range NPCs, background characters, or props that need to stay under a polygon budget, Smart Mesh handles the geometry layer so you can focus on gameplay.
3D artists doing rapid prototyping. Smart Mesh works as the prototype layer. Generate a clean low-poly version first, validate the shape and proportions, then decide whether the asset needs a full HD pass.
Anyone who's been using the generate-then-retopo workflow. If your current process involves exporting an AI-generated mesh and cleaning it up in Blender before it's usable, Smart Mesh removes that step. As one user noted: "Saves me a step in doing a retopography."
How to Use Smart Mesh
Step 1: Open the Smart Mesh Workspace
Go to Tripo Studio. On the home screen, you'll see two generation options: High Detail Model and Smart Topology Mesh. Click Generate Smart Mesh → to enter the workspace.
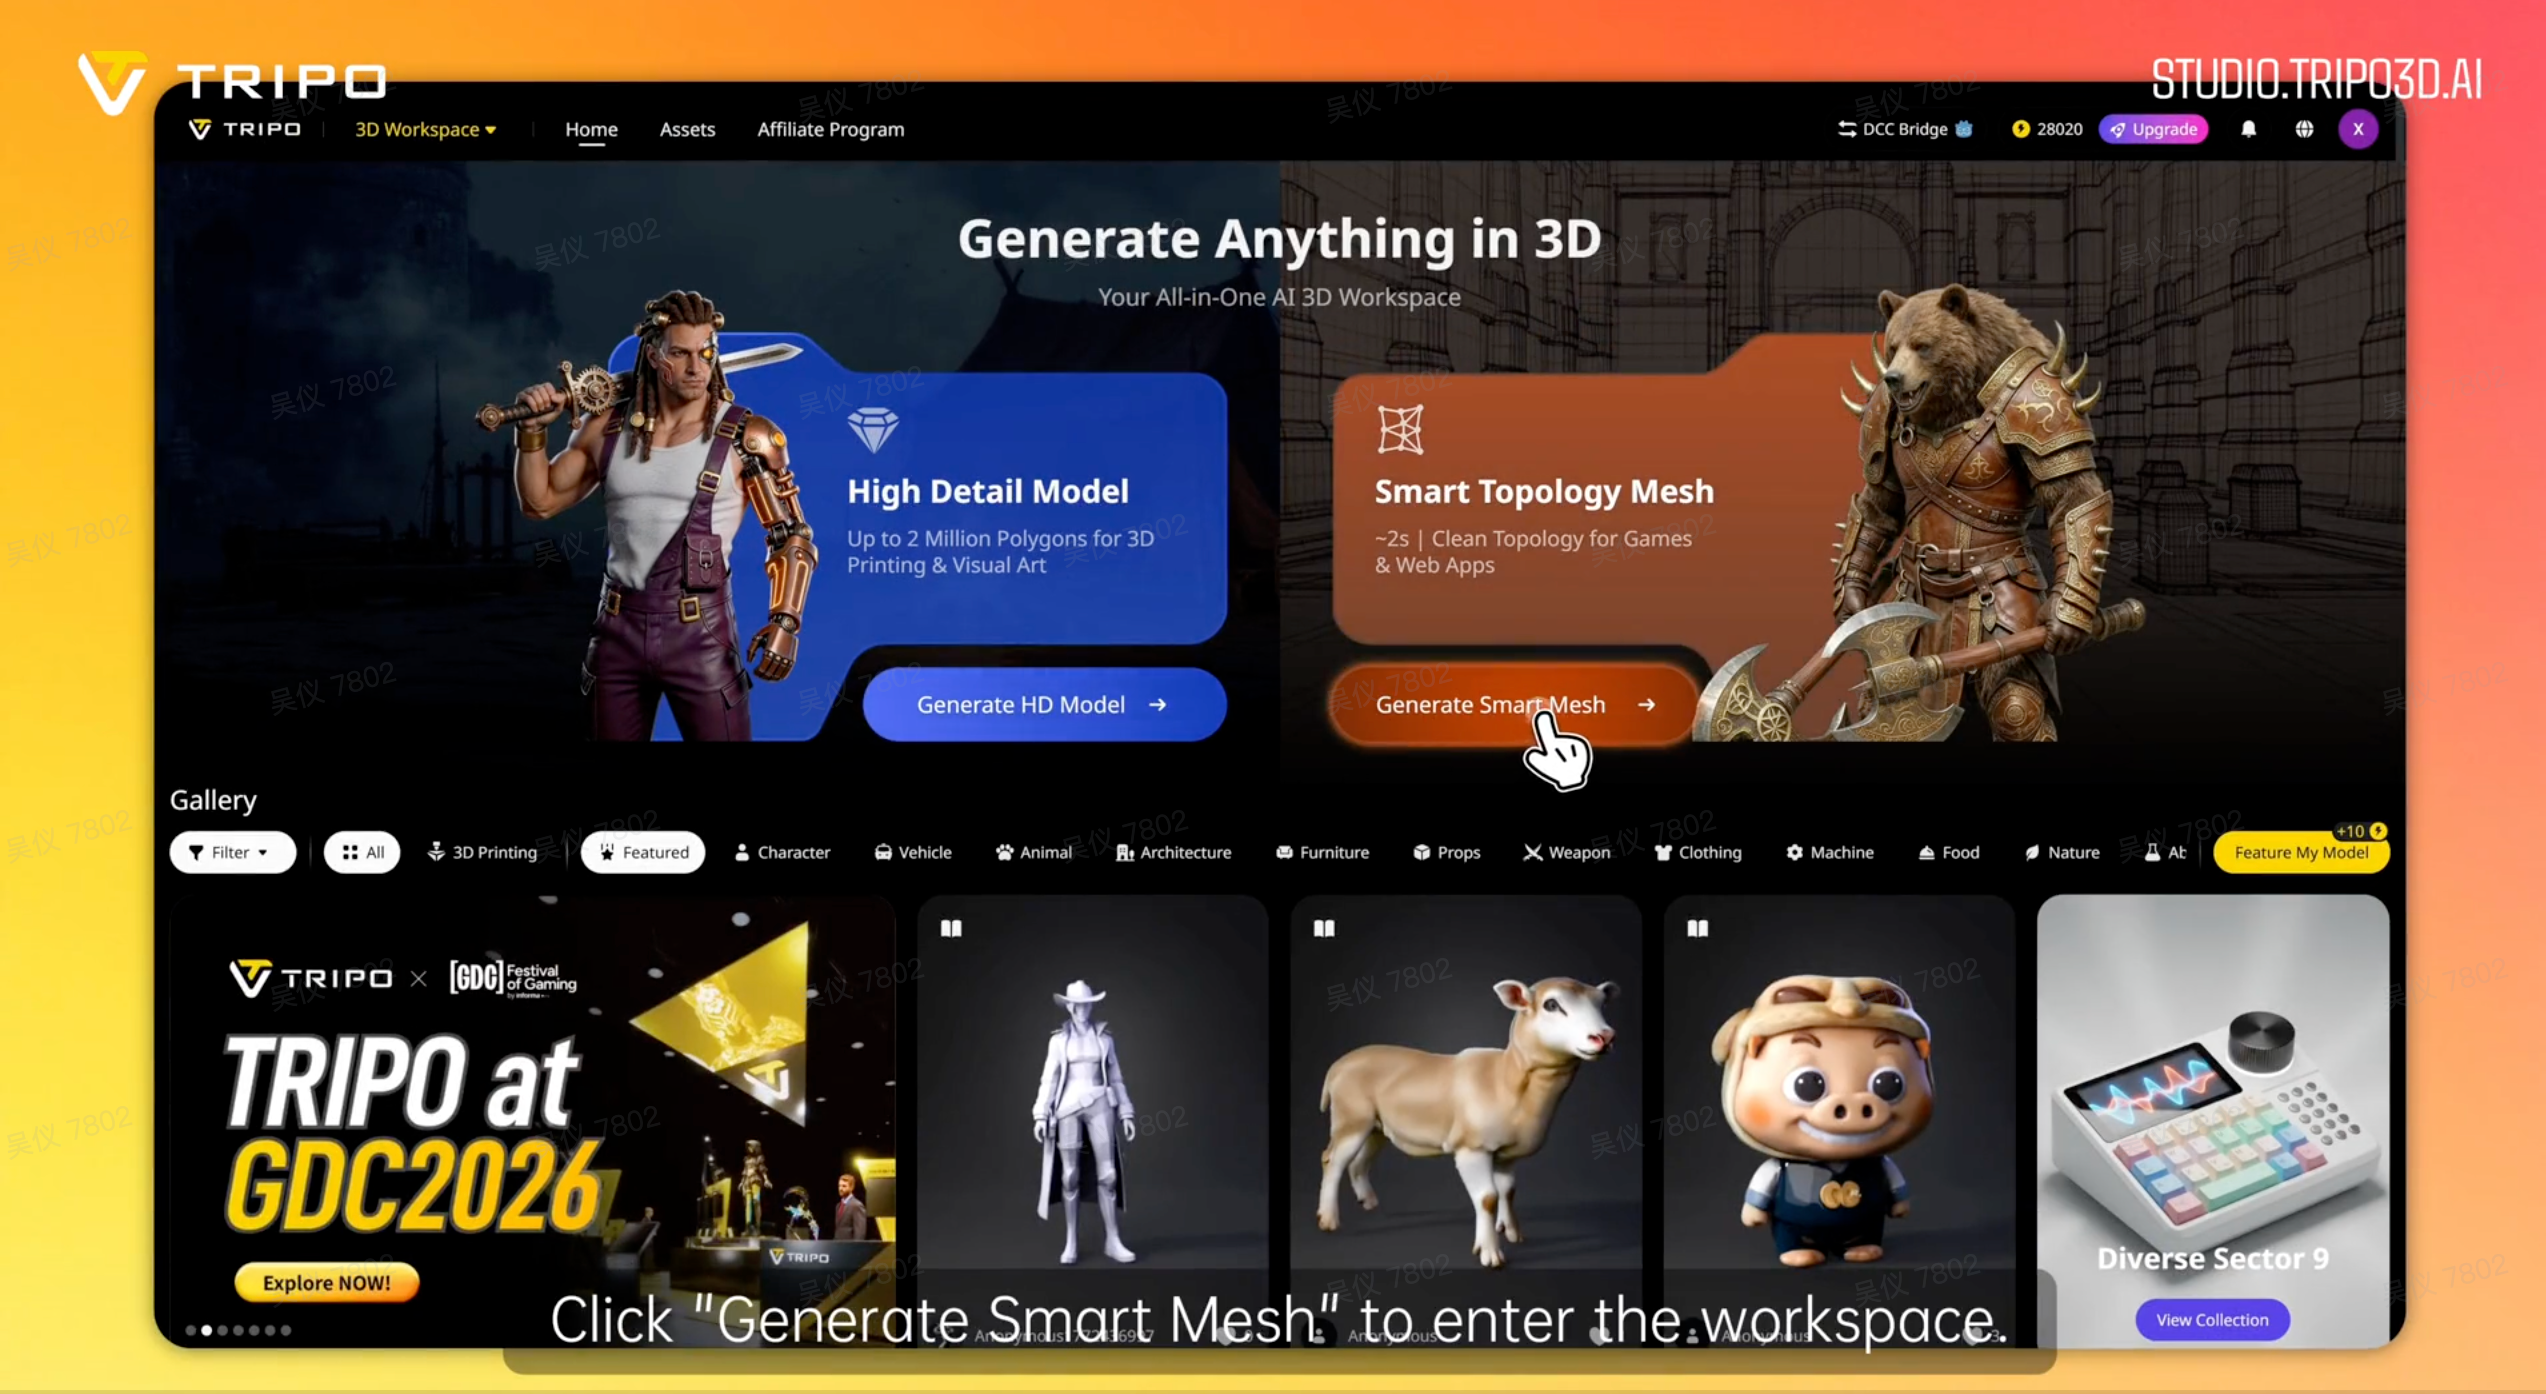
Click "Generate Smart Mesh" on the Tripo Studio home screen to open the workspace.
Step 2: Choose Your Input Method
Inside the workspace, the left panel shows the Generate Model panel with Smart Mesh selected. You have three input options:
- Single image: upload one reference image and let the AI infer the full 3D shape
- Multi-view: upload front, left, right, and back views for more accurate geometry
- Batch upload: upload up to 10 images at once to generate multiple models in one run
For a single character or prop, a single image works well. For assets where symmetry and silhouette accuracy matter (like a hero NPC), multi-view gives you tighter control.
Single image upload:
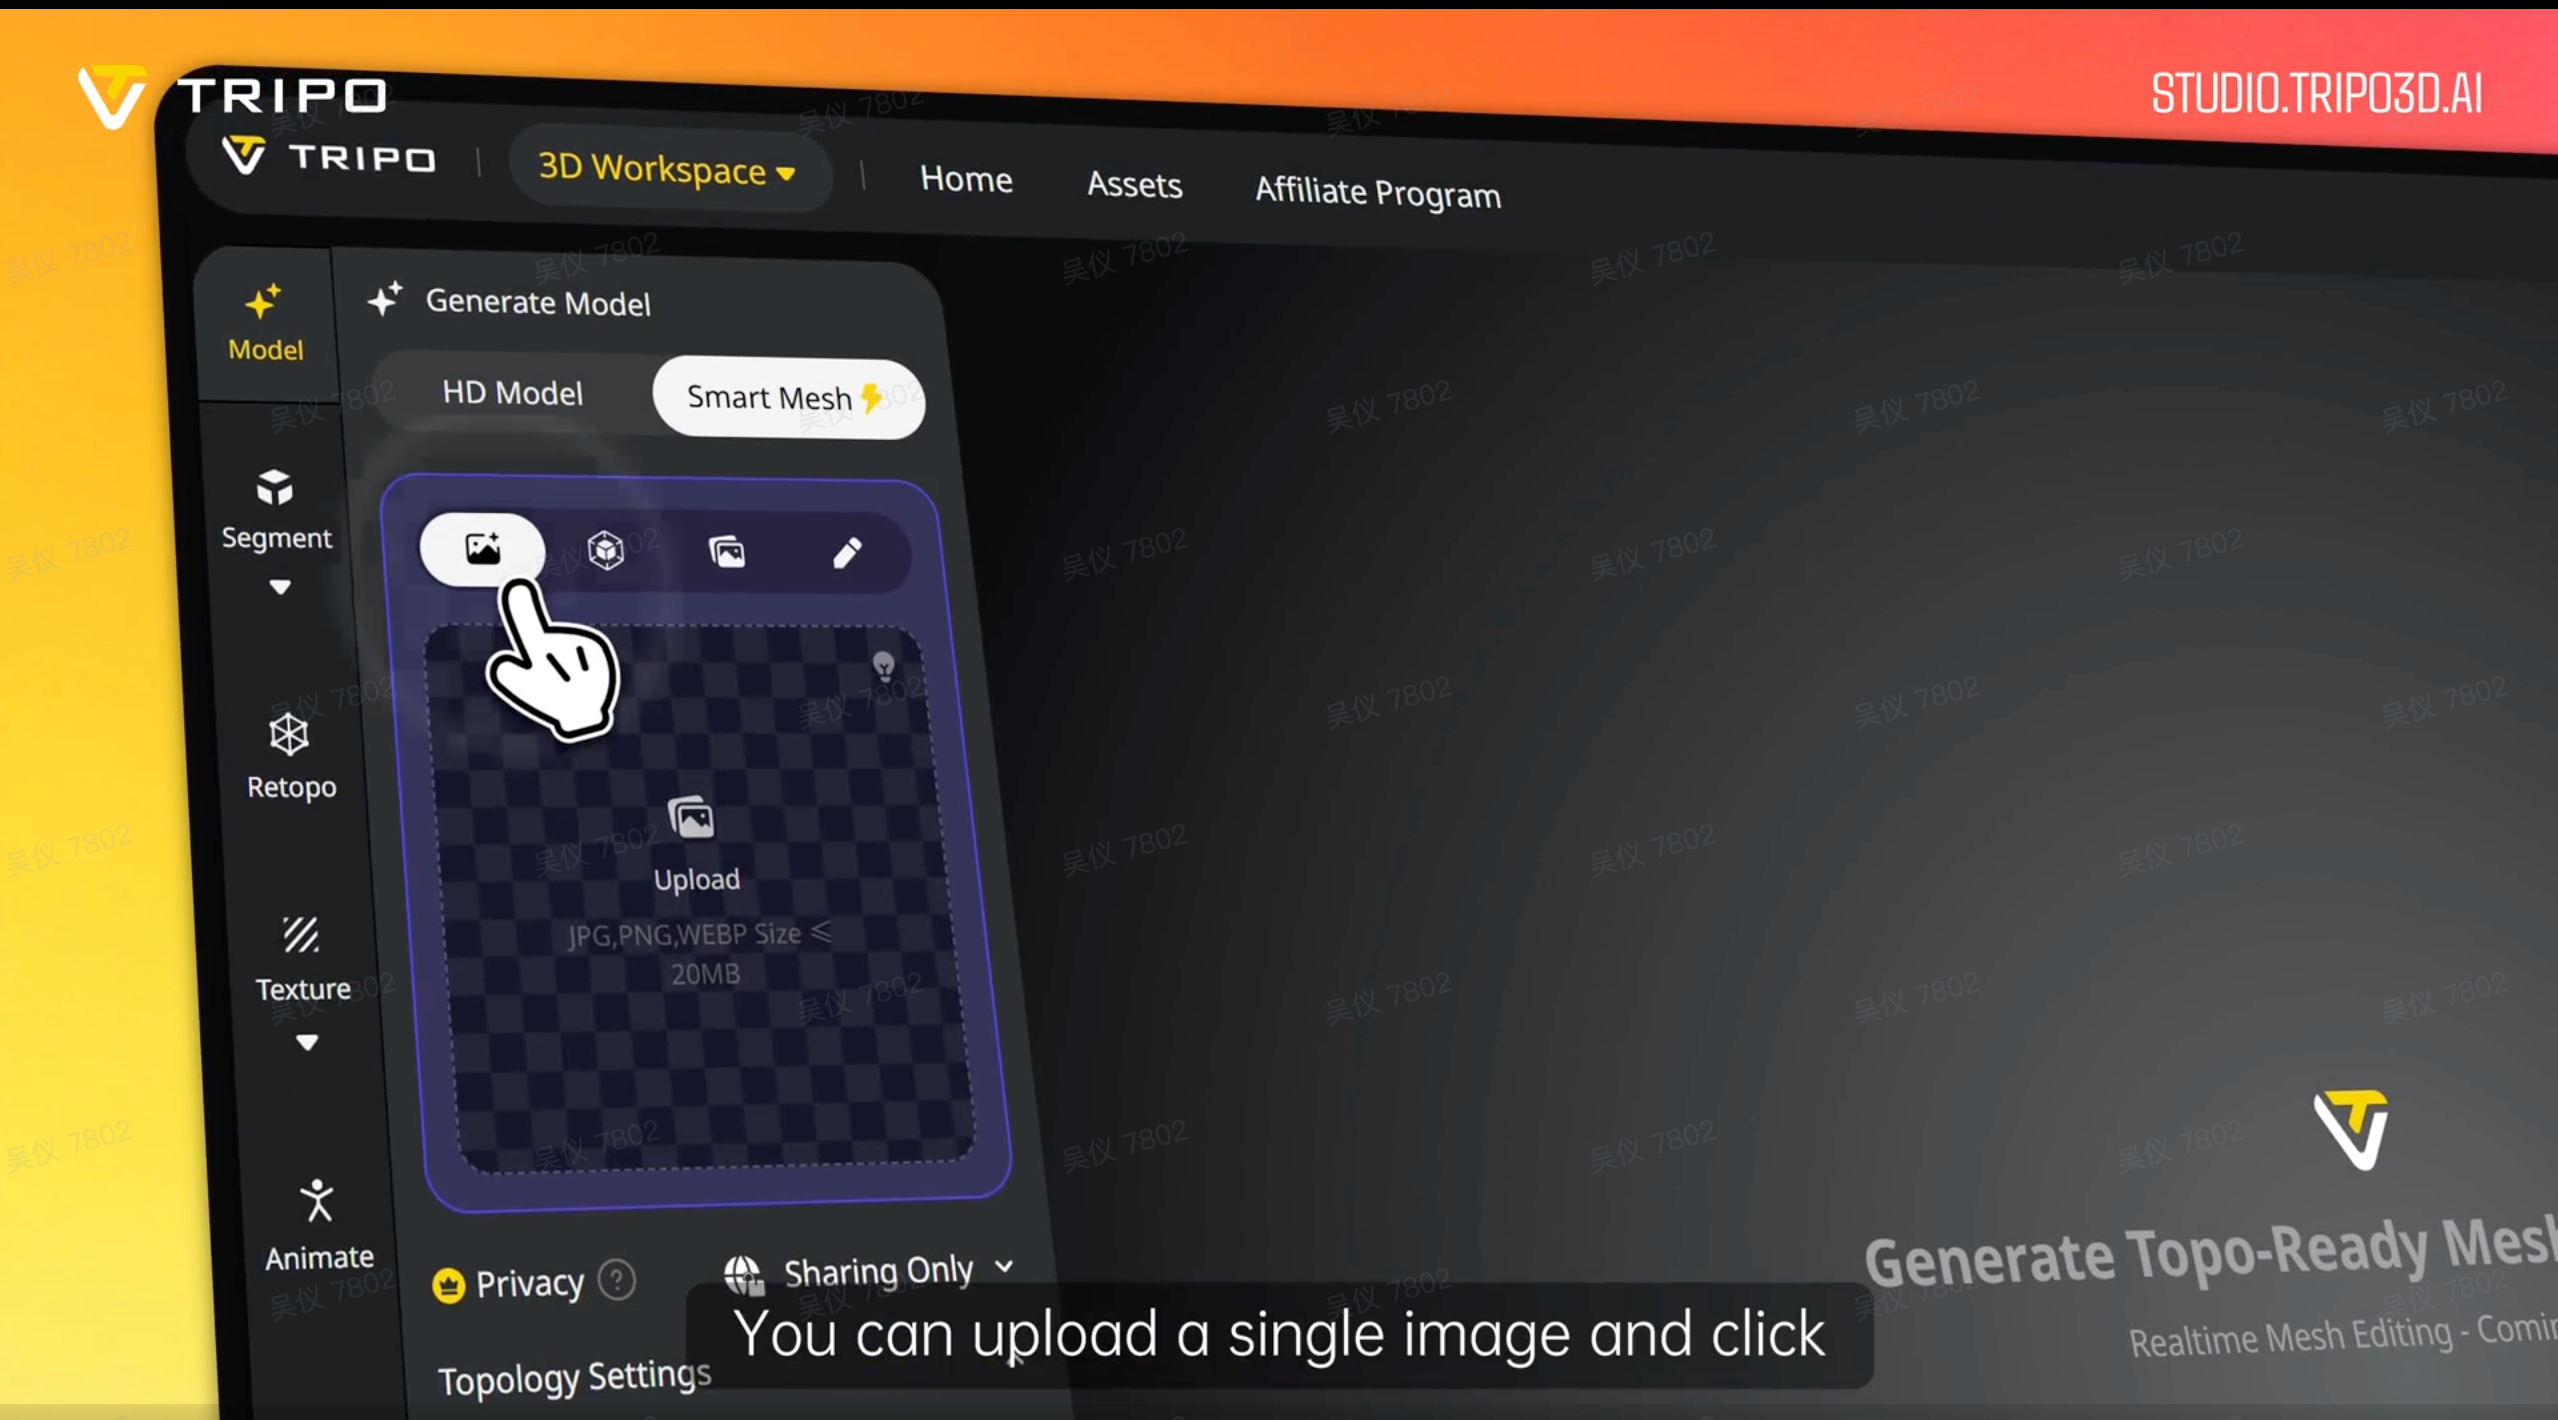
Upload a single image and click "Generate Multi-View" to let the AI infer the full 3D shape.
Multi-view upload:
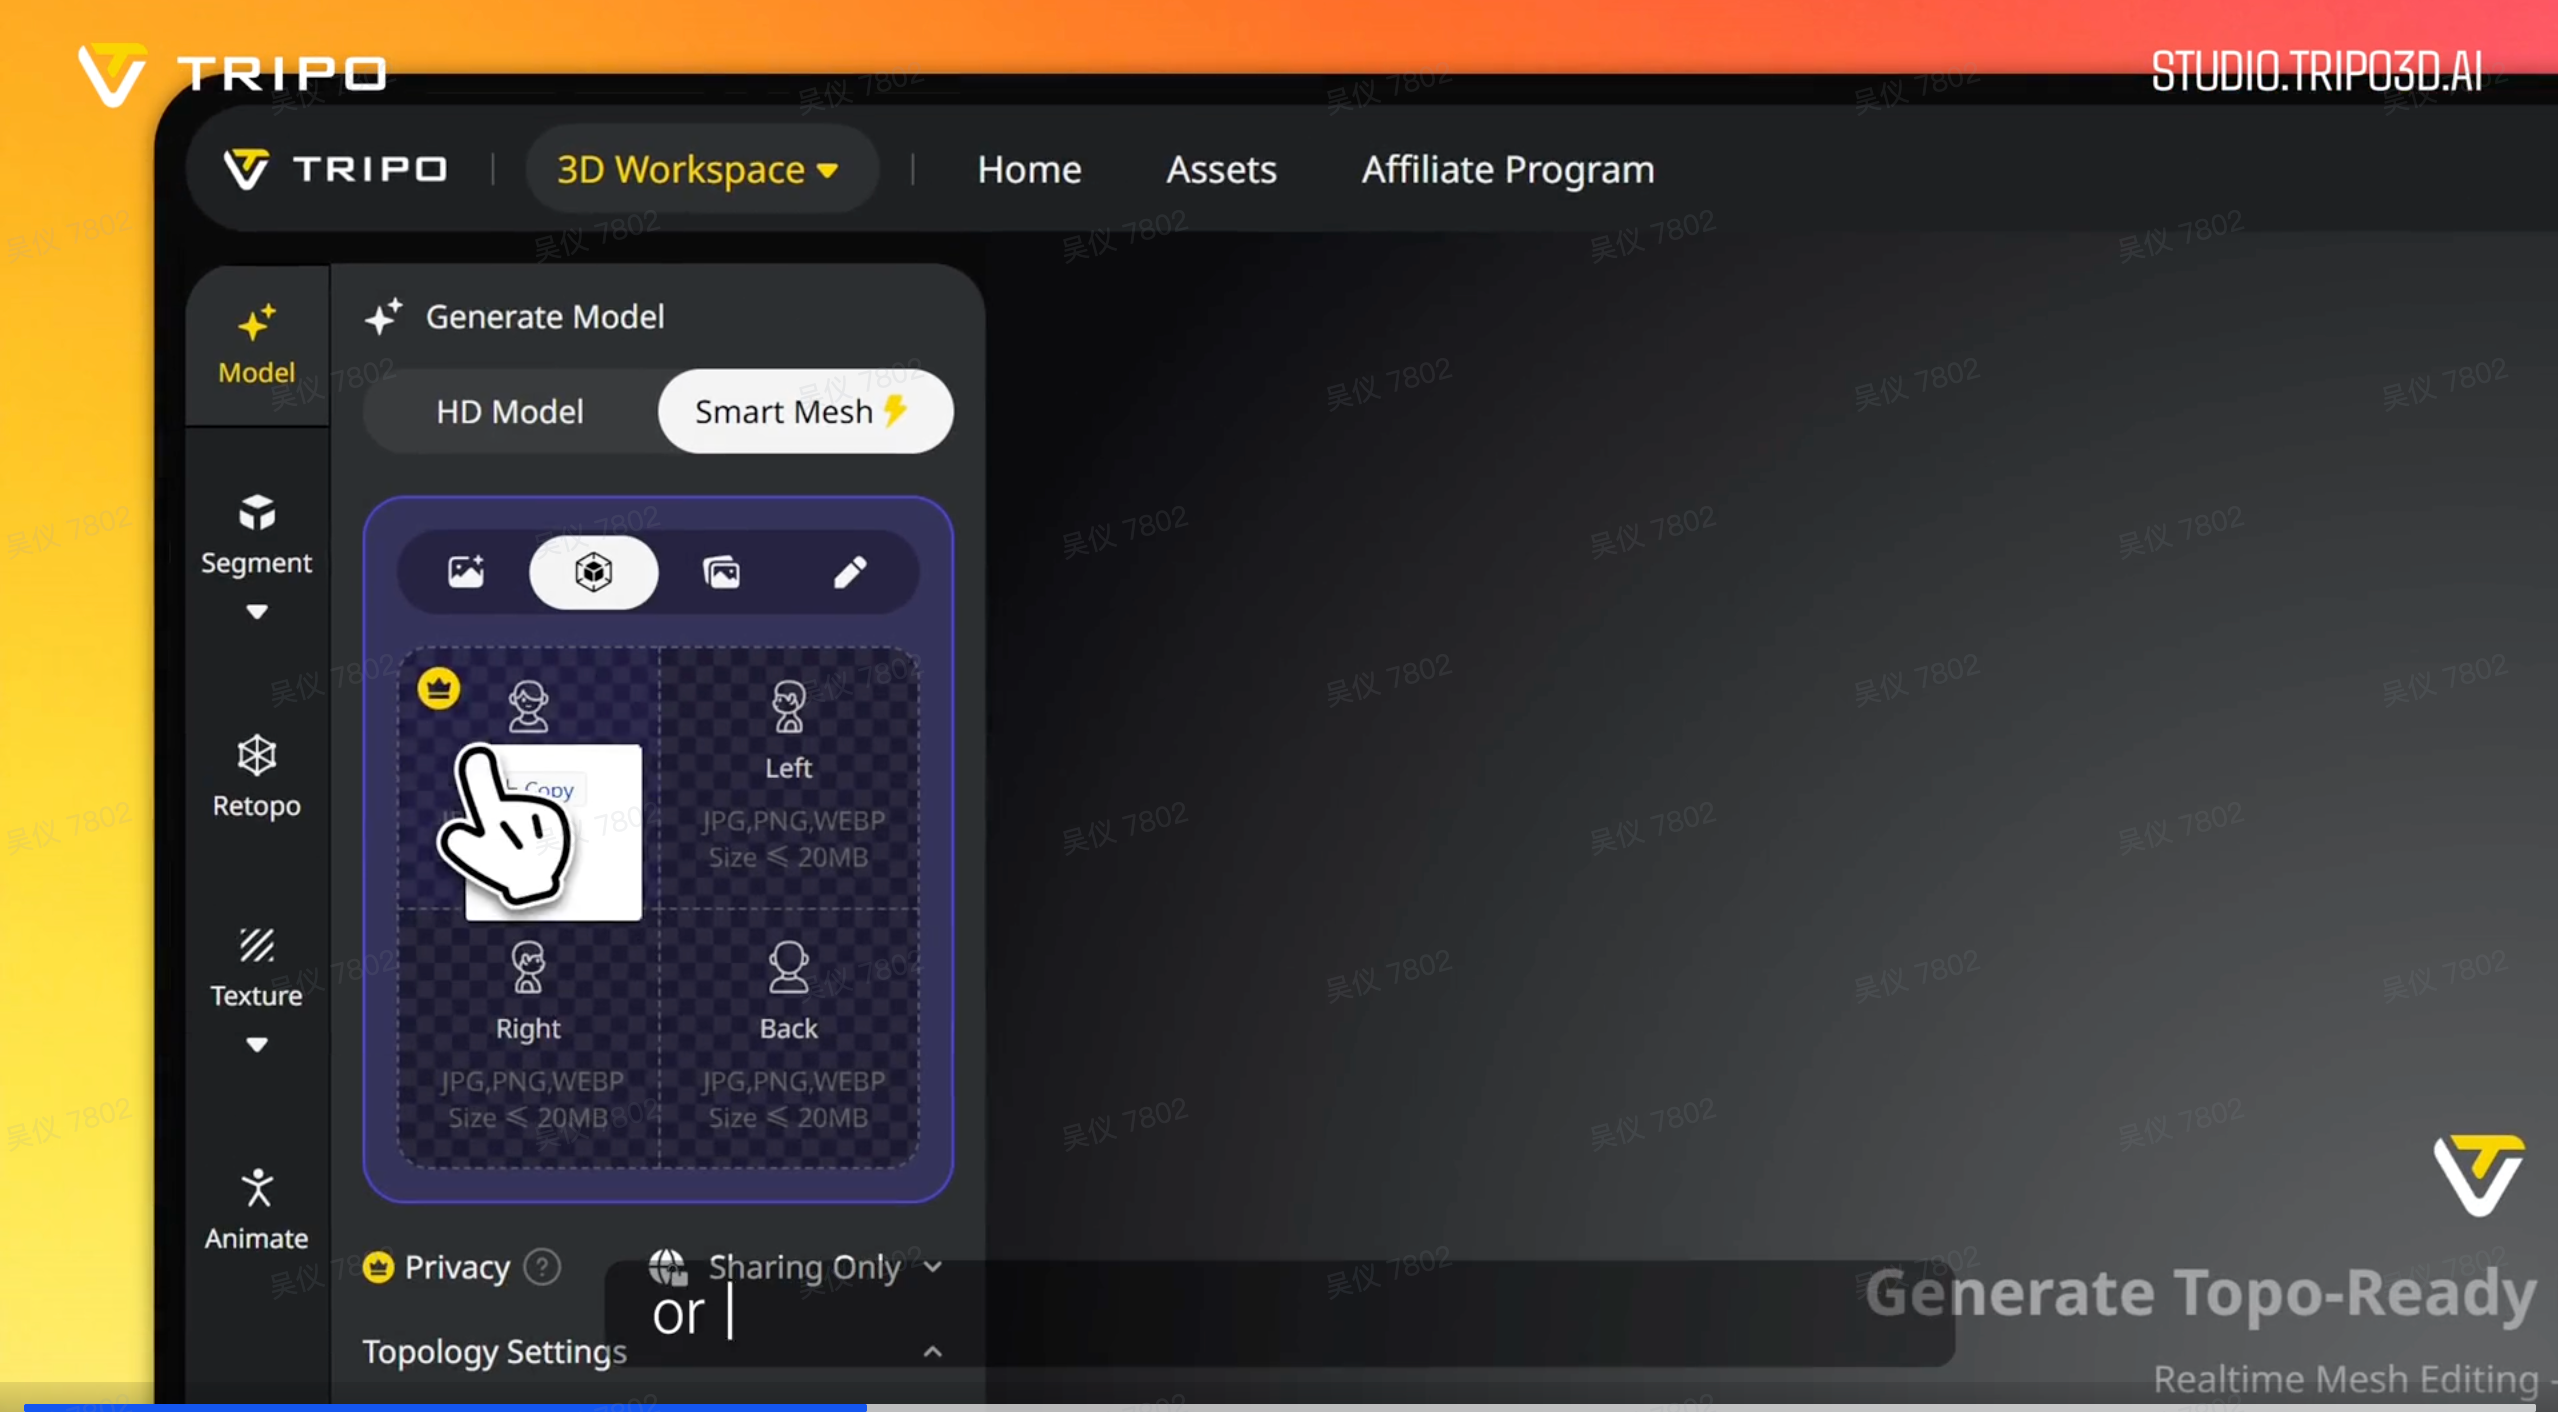
Upload front, left, right, and back views directly for more accurate geometry.
Batch upload (up to 10 images):
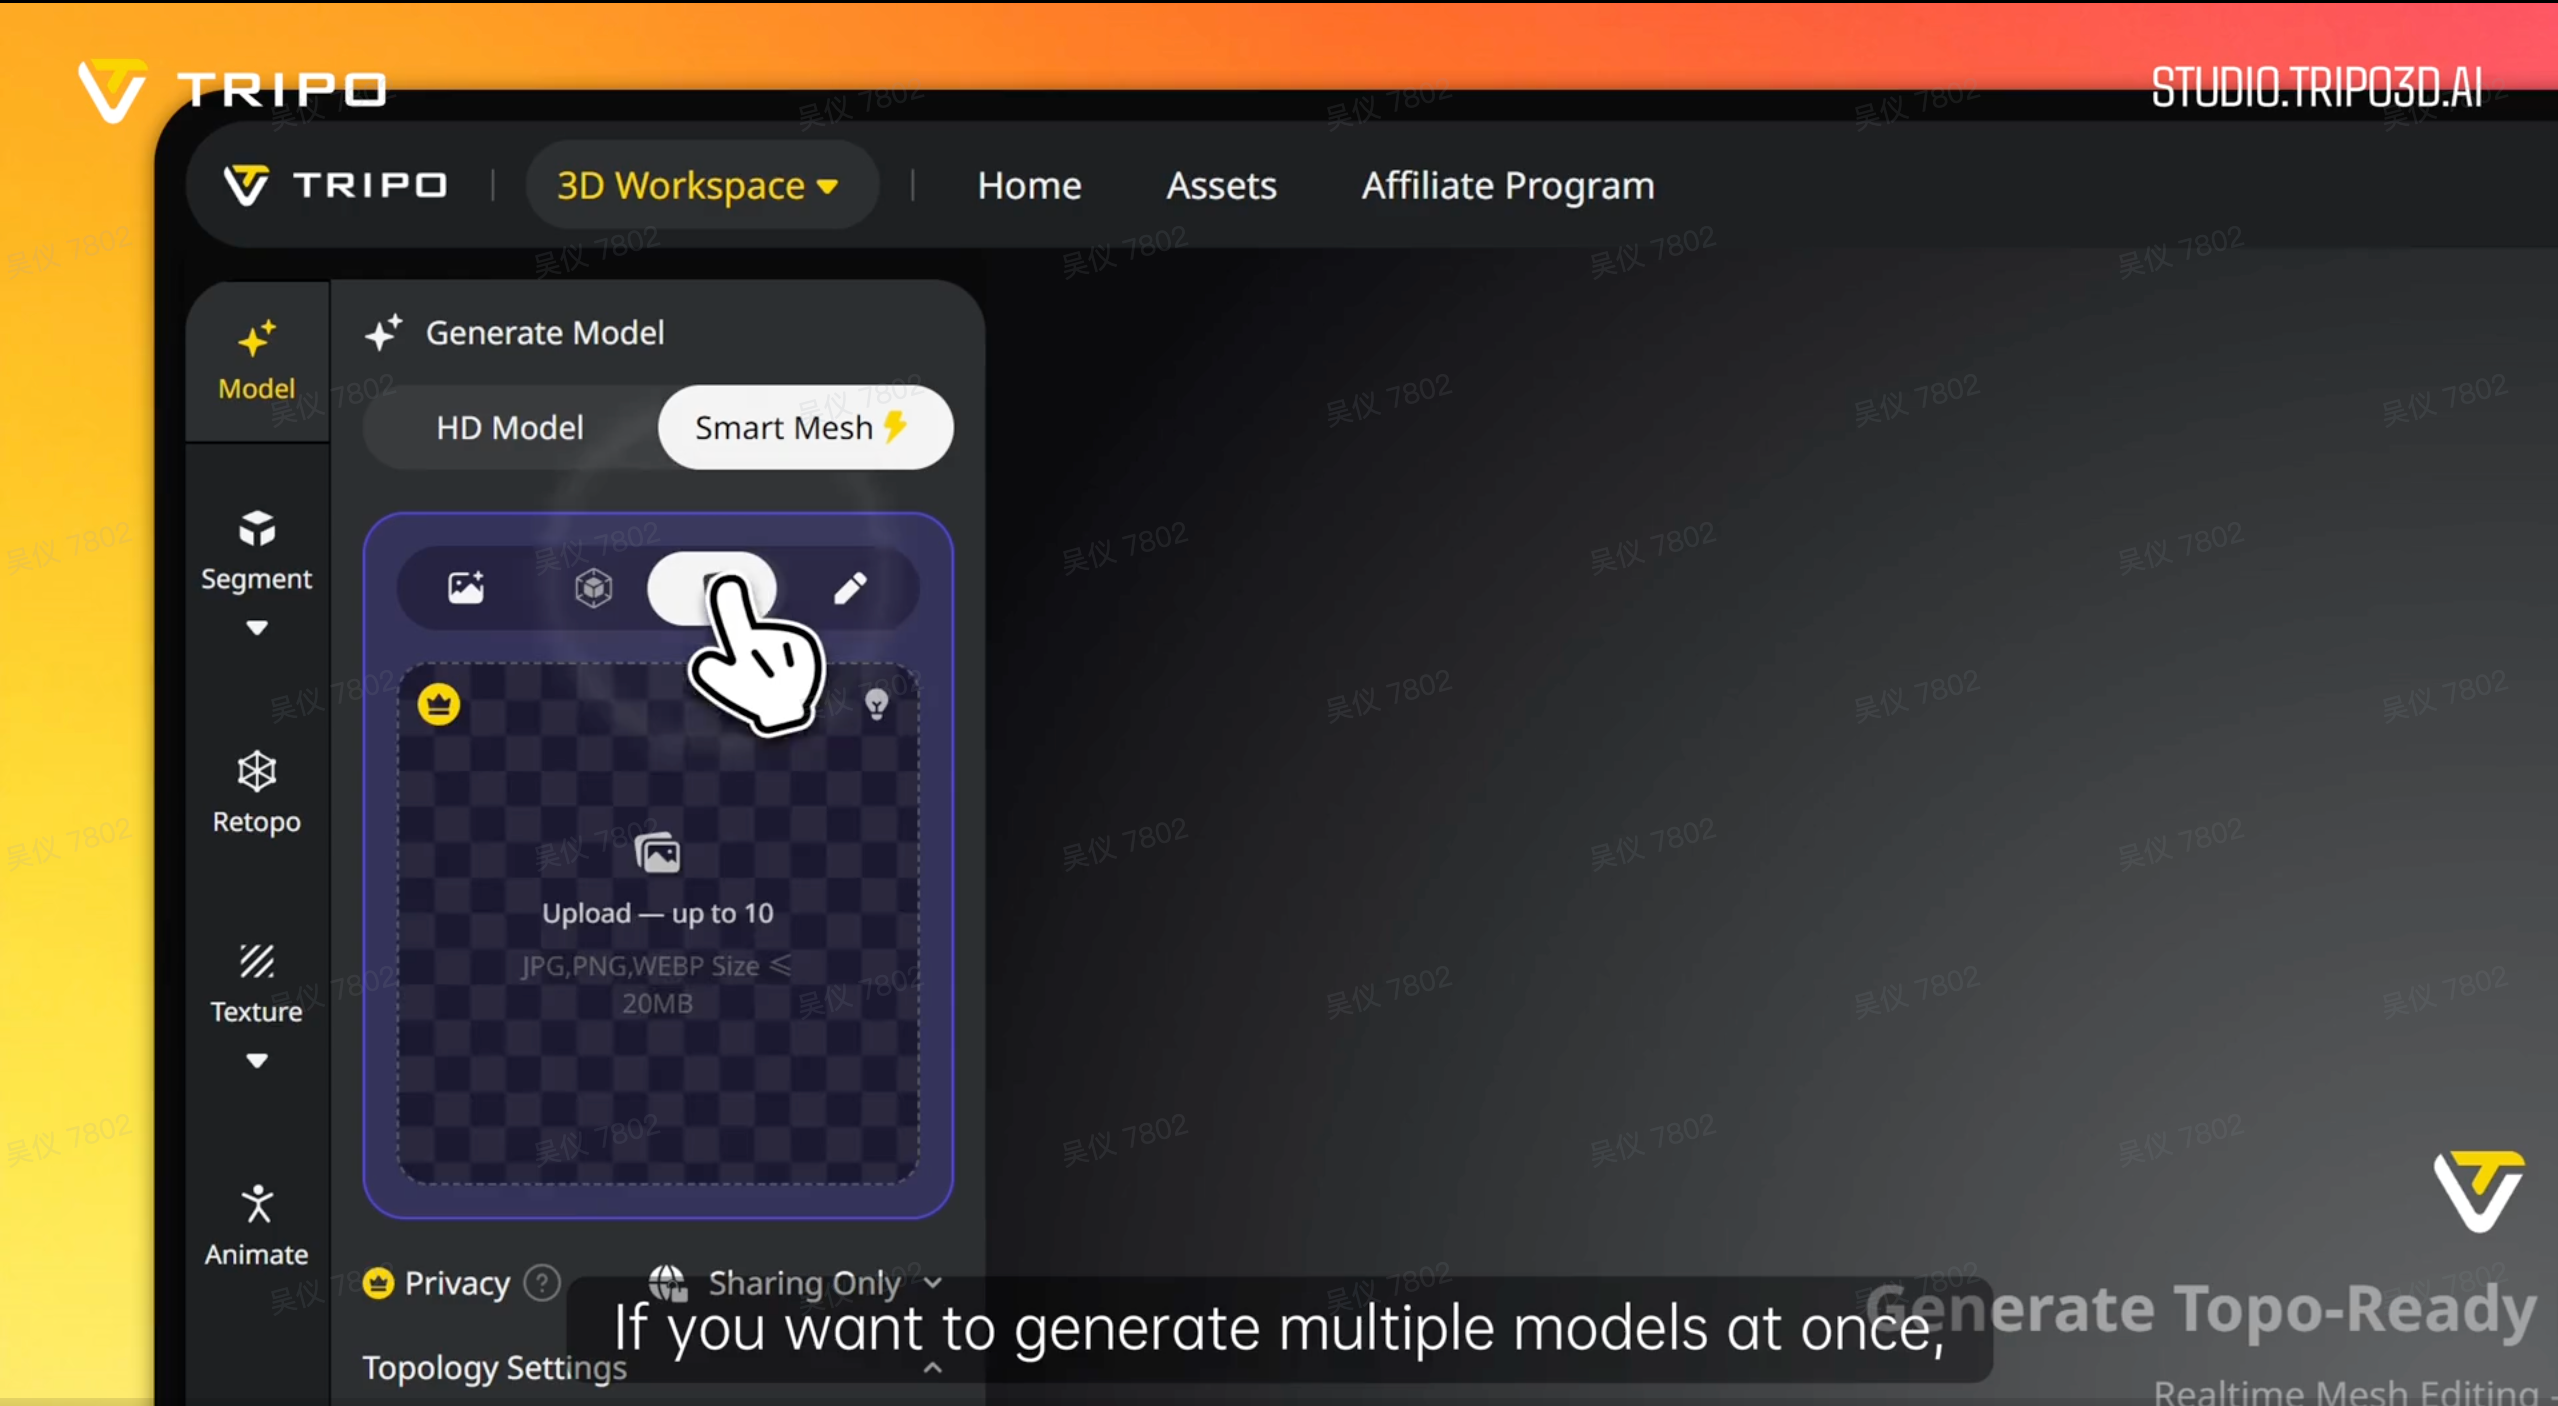
Use batch upload to generate up to 10 models at once.
Supported formats: JPG, PNG, WEBP, up to 20MB per file.
Step 3: Set Your Polygon Count
Before generating, open Topology Settings at the bottom of the panel. You'll see two controls:
- Topology type: Quad or Triangle. Choose Triangle for real-time game engines; Quad for assets that need further rigging or subdivision.
- Polycount slider: Drag to your target polygon count. For a mobile NPC, 8k–15k is a common range. For a web game character exported as GLB with DRACO compression, 20k polygons compresses to under 1MB and renders cleanly in a browser.
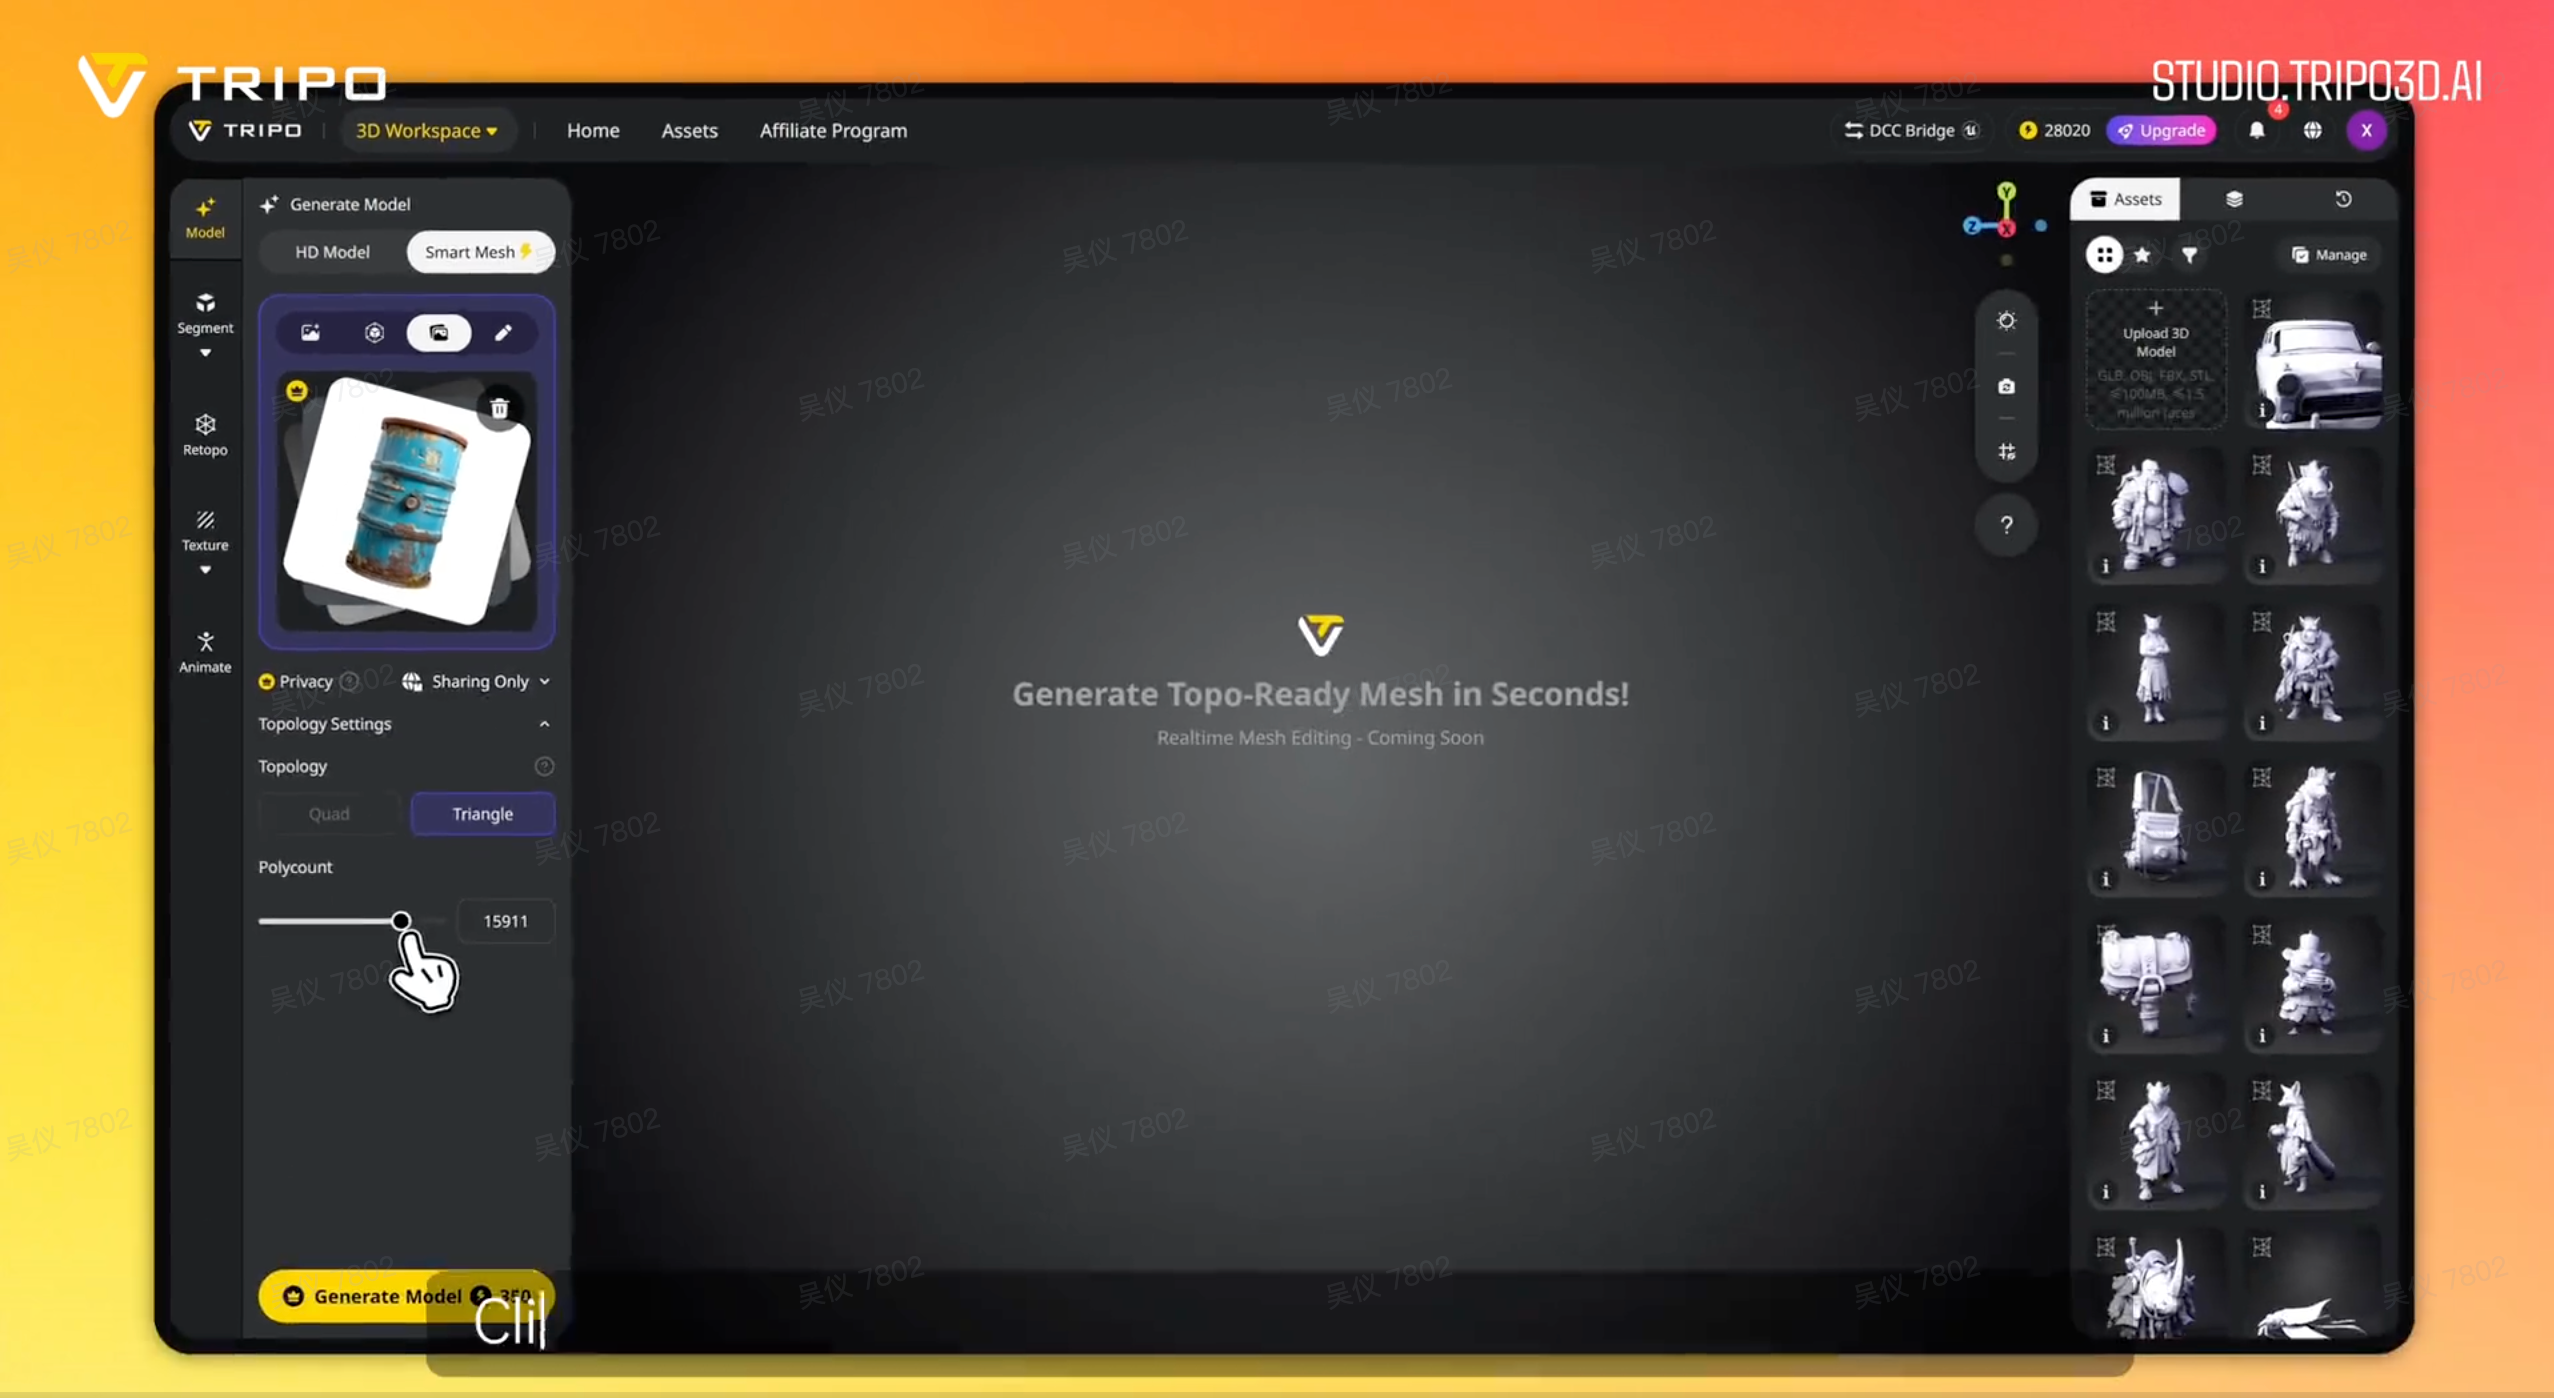
Set your topology type (Quad or Triangle) and drag the polycount slider to your target before generating.
Step 4: Generate Your Model
Click Generate Model. In about 2 seconds, your model appears in the viewport. You can rotate it, check the wireframe, and inspect the topology before moving forward.
If the shape needs adjustment, tweak the polycount or switch input methods and regenerate. At 2 seconds per run, iteration is fast.
Step 5: Add Textures (Optional)
If you need a textured asset, click Generate Textures in the Texture panel. You can enable 4K or 8K Texture for higher-resolution output. The texture generator uses your original reference image as the style guide.
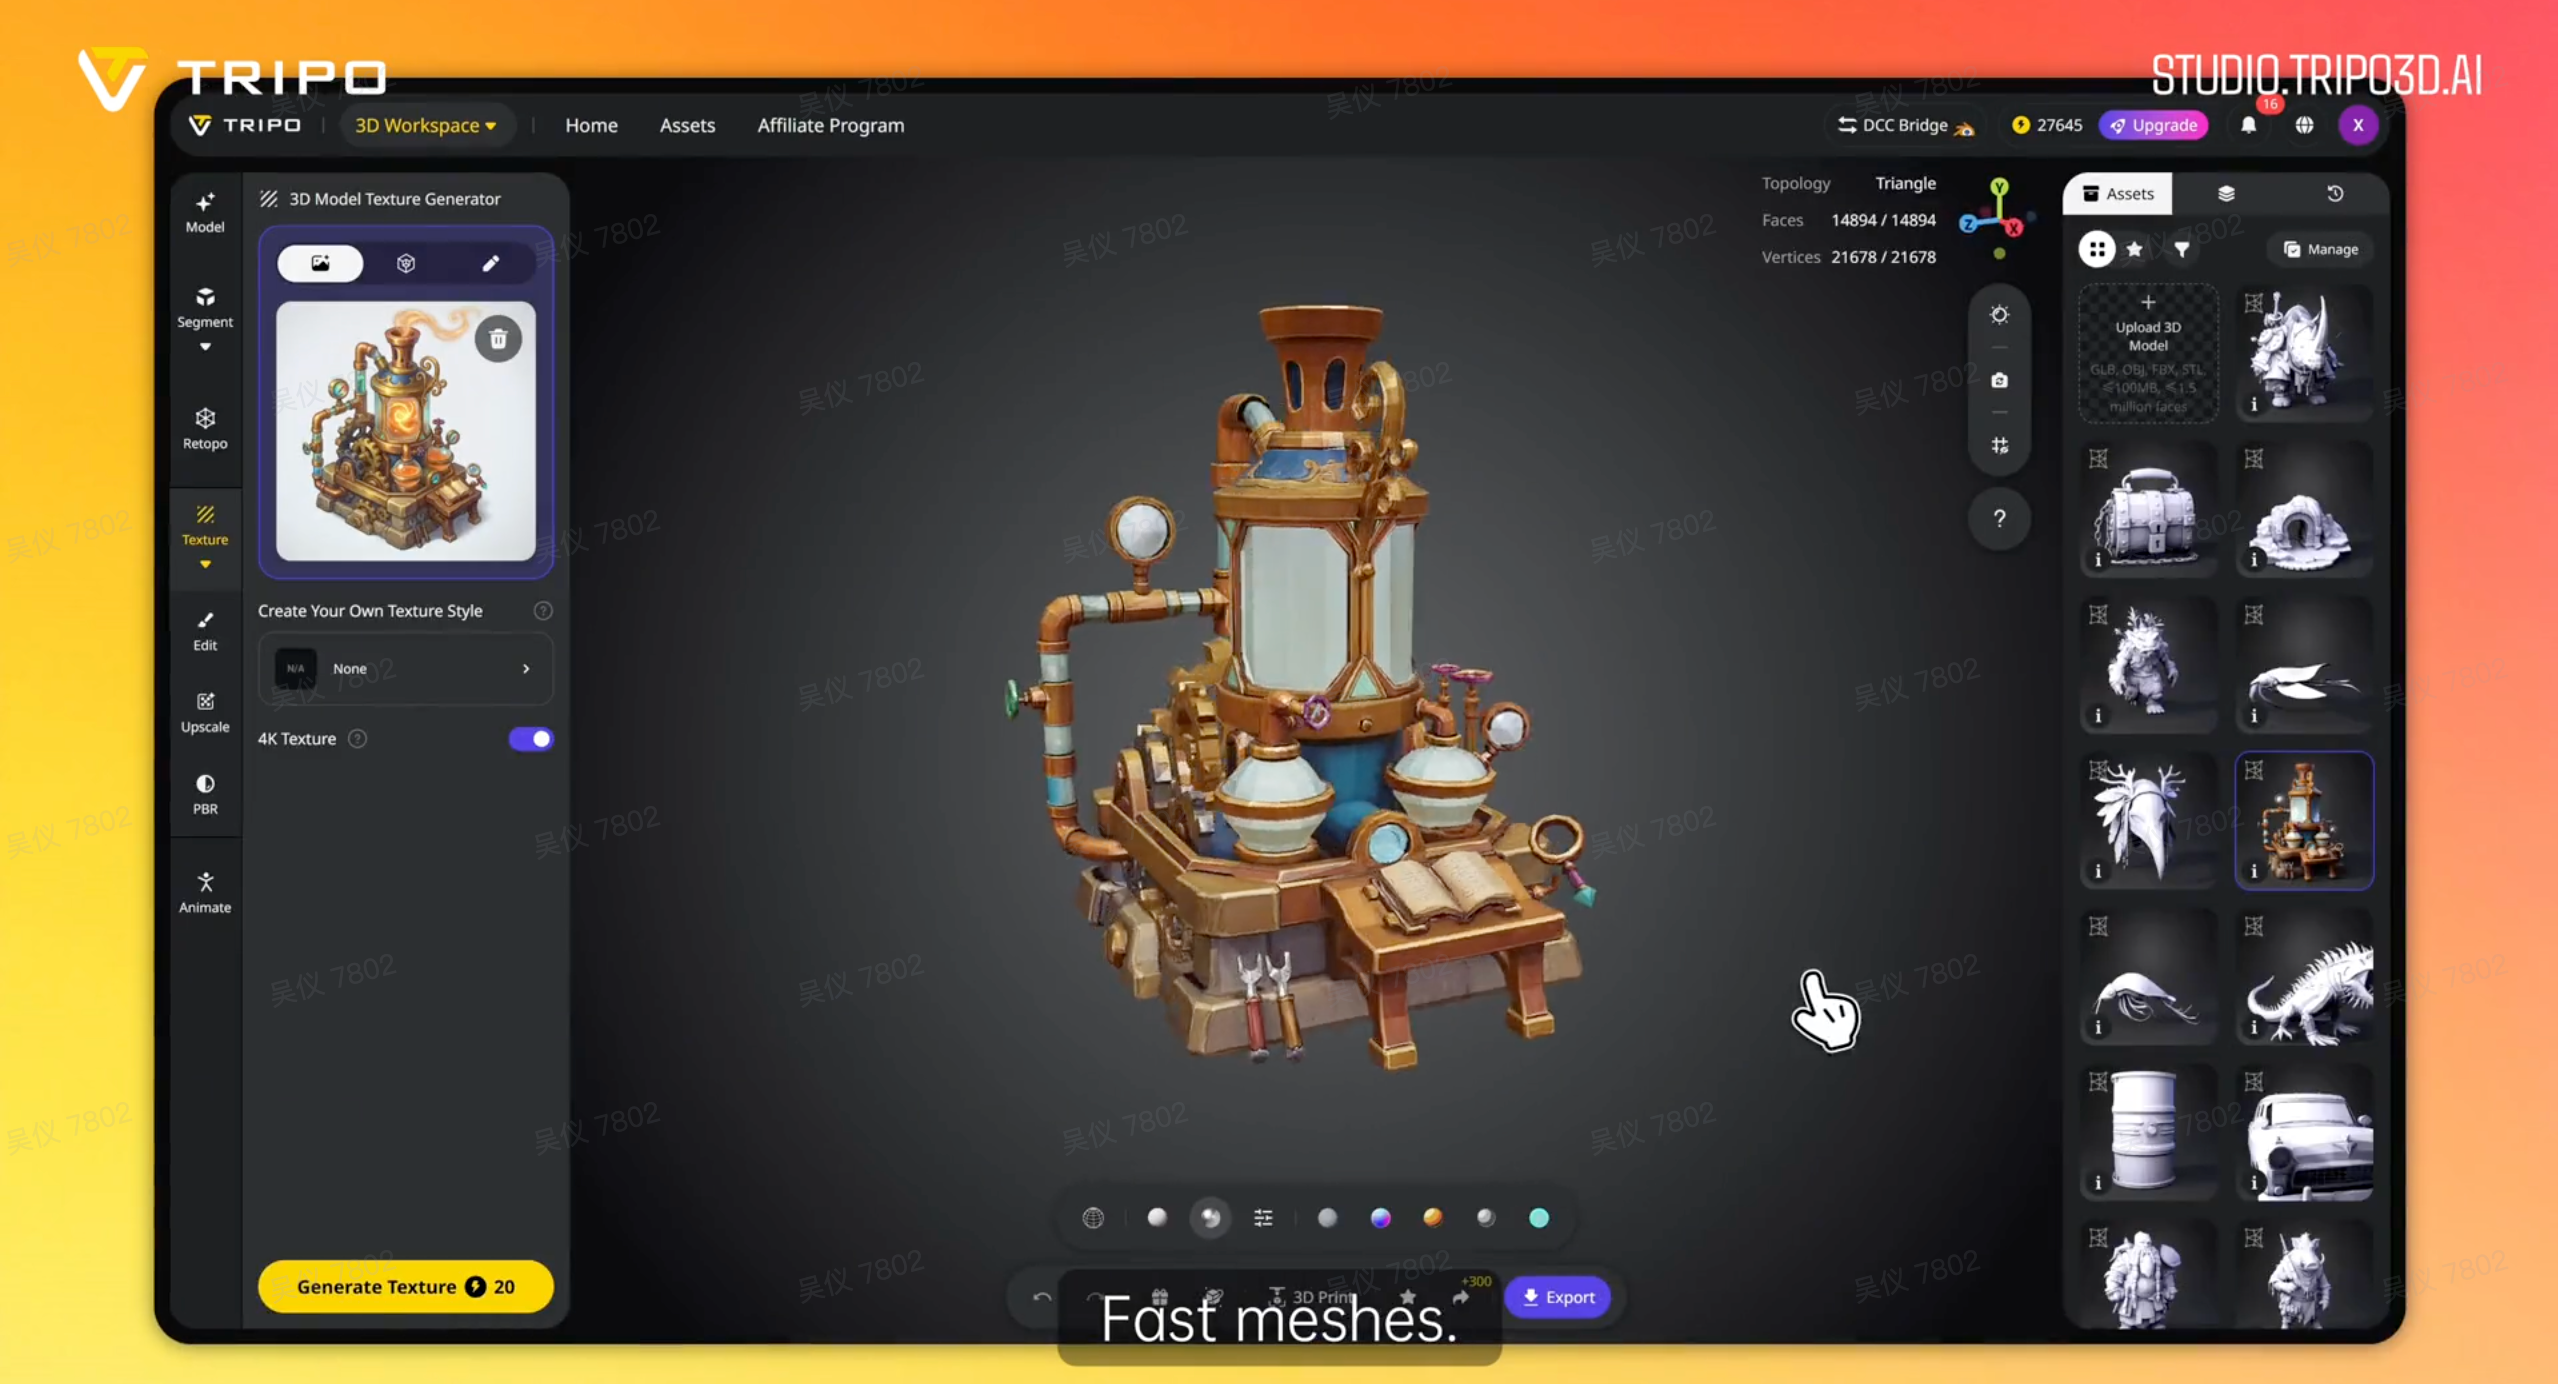
Click "Generate Textures" in the Texture panel to add 4K or 8K textures to your model.
Step 6: Export Your Asset
Click Export in the bottom toolbar. Smart Mesh supports GLB, OBJ, FBX, and STL. For game engines, GLB is the most portable format. For browser-based games, GLB with DRACO compression keeps file size under 1MB even at 20k polygons.
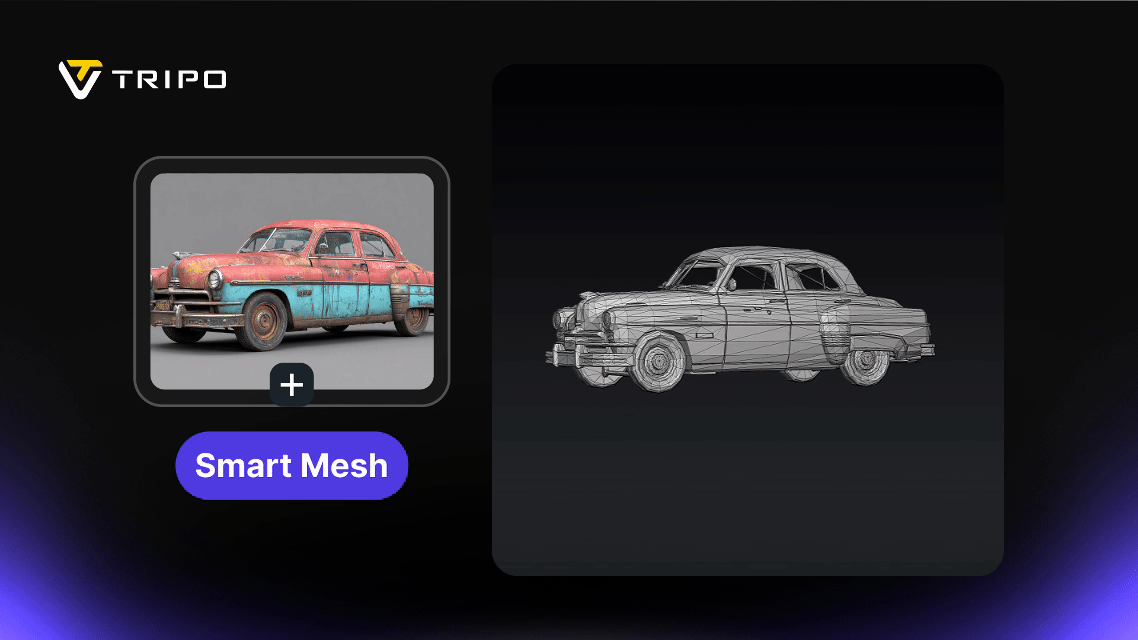
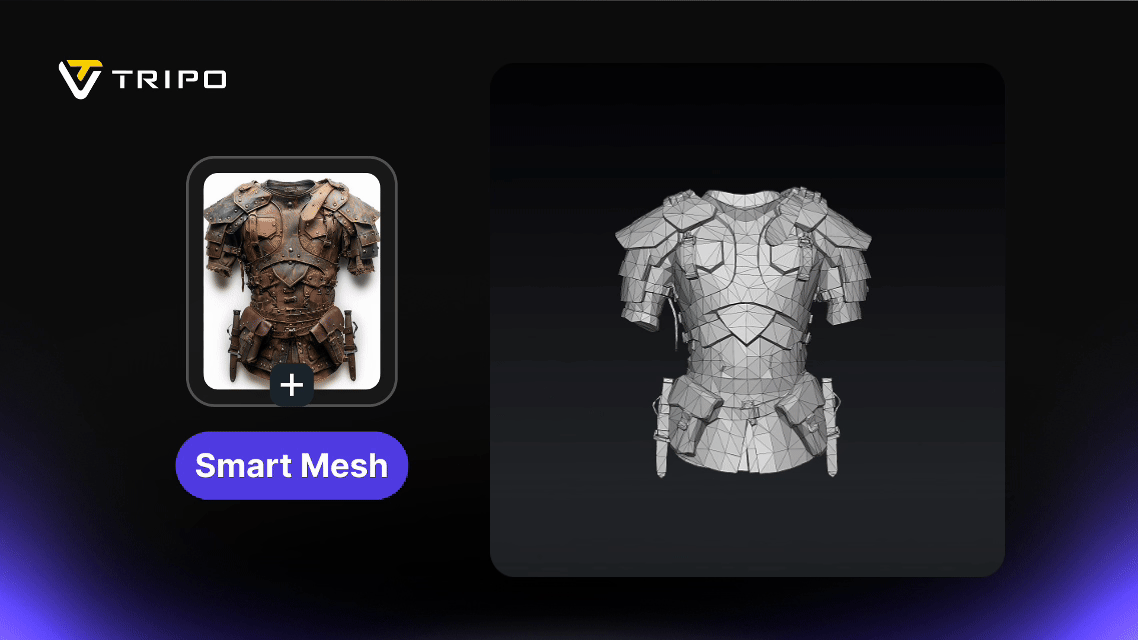
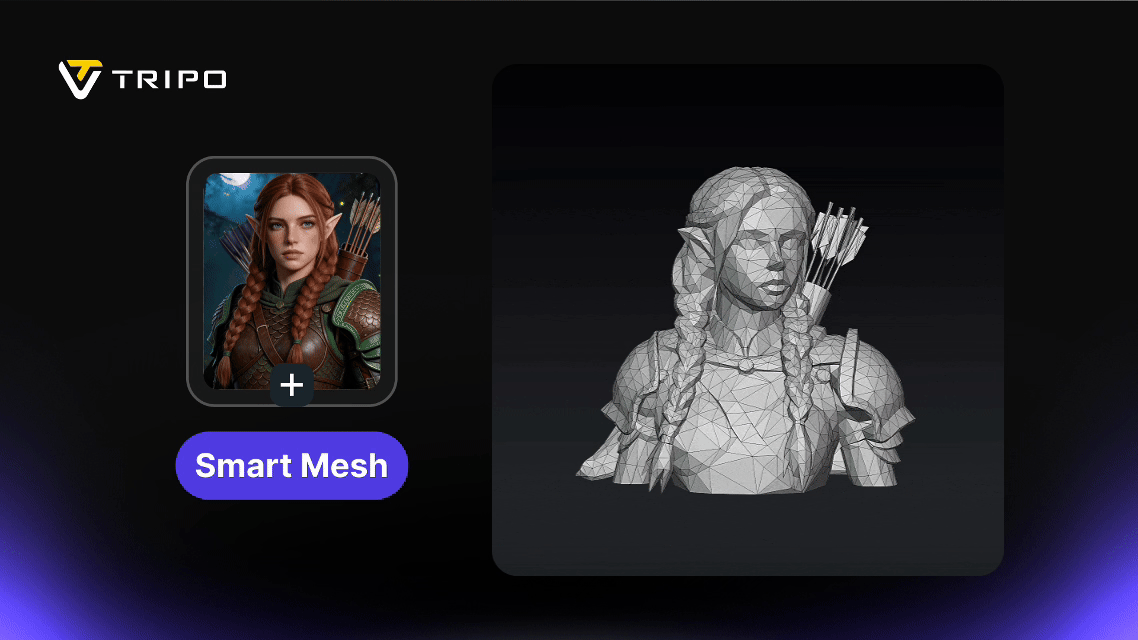
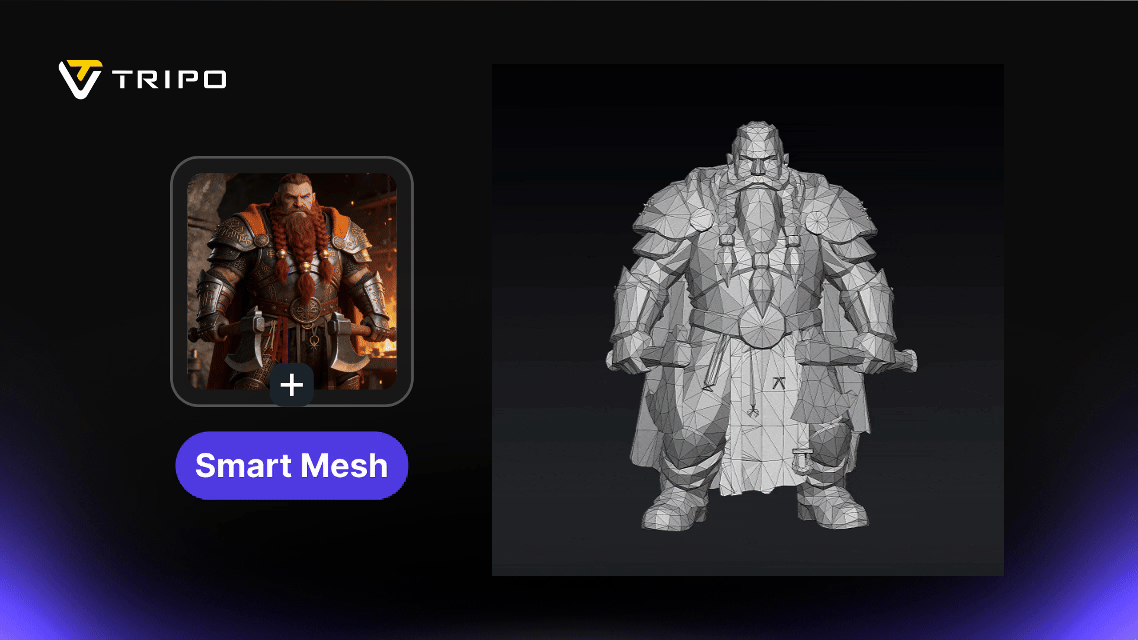
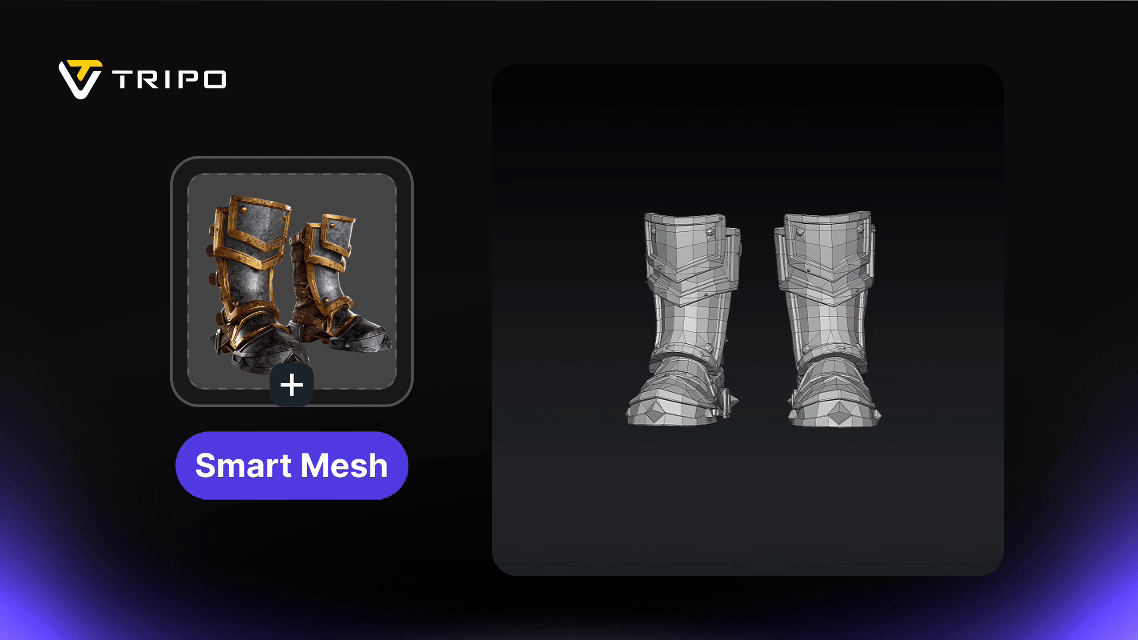
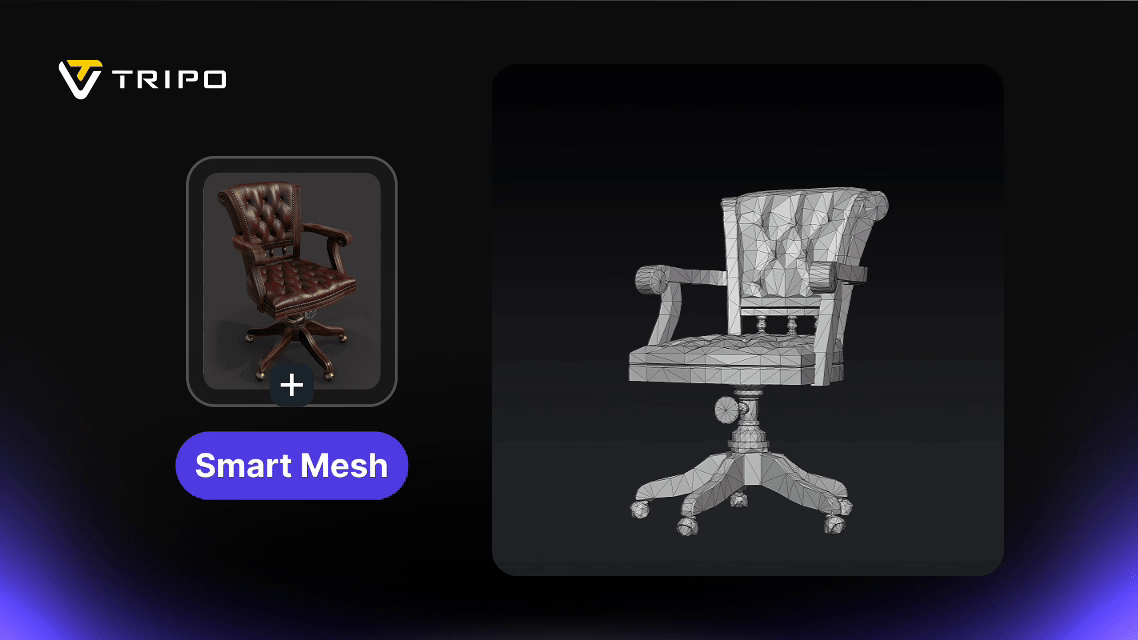
A few Smart Mesh outputs, shown in wireframe so you can see the clean, organized topology behind each result:
Real Workflows with Smart Mesh
| Use Case | Pipeline | Highlights |
|---|---|---|
| Browser game: batch ship assets | LLM style guide → 2D concept art → Smart Mesh (20k polygons) → GLB + DRACO | File size under 1MB, deploys directly to browser. Starting with 2D gives stronger art direction than text prompts. |
| Game NPC: full production pipeline | Concept → Smart Mesh → Rigging → Animation → Minor manual adjustments | Full pipeline from concept to in-game NPC. Clean topology supports rigging without cleanup. |
| Small team: rapid asset iteration | Sketch → AI concept art → Smart Mesh → Texture | "Generation speed outpaces sketching." Artists stay in control of the design direction. |
| VR scene: batch environment assets | Smart Mesh → VR engine | Batch-generate furniture and props optimized for VR performance budgets. |
Smart Mesh vs. HD Model: When to Use Which
Most teams end up using Smart Mesh and HD Model for different parts of the pipeline:
| Stage | Recommended Approach | Why |
|---|---|---|
| Prototyping / batch assets | Smart Mesh | Fast generation, clean topology, and you control the polygon count before you generate |
| Hero shots / high-detail models | HD Model + Auto Retopo | Higher visual quality for marketing renders and close-up shots |
| Final animated characters | HD Model + manual retopo | Manual retopo gives you the best edge flow for complex rigging and animation |
Use Smart Mesh when you need volume and speed. Use HD Model when the asset needs to hold up at close range or carry a full animation rig.
Get Started
Smart Mesh P1.0 is available now in Tripo Studio. Open the workspace, upload your concept image, set your polycount, and generate.
You get a clean, structured mesh in 2 seconds. No retopology pass. No Blender detour. Just export and use it.

.webp?x-oss-process=image%2Fresize%2Cw_720%2Fformat%2Cwebp%2Fquality%2Cq_80)