How to Rig a 3D Model: The Complete Guide for Beginners and Professionals
Creating rigged 3D models is a transformative process that breathes life into static digital sculptures. For artists, game developers, and animators, rigging is the crucial bridge between modeling and animation. This comprehensive guide will walk you through the entire process of rigging in Blender, from foundational concepts to advanced techniques that will elevate your 3D creations.
Skip the Modeling and Rigging Hassle with Tripo Studio
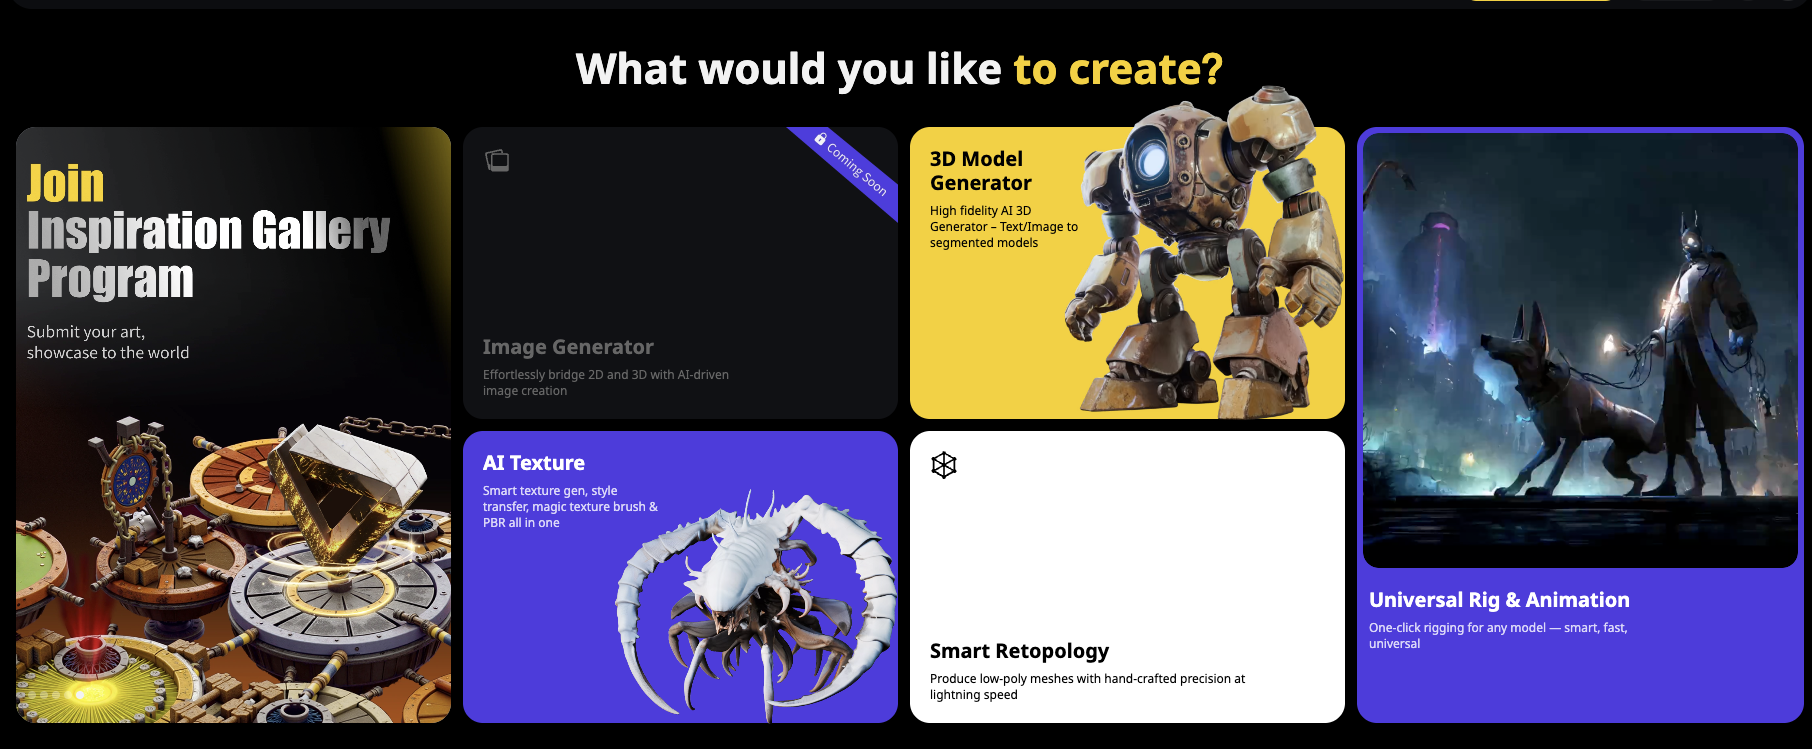
Before diving into manual rigging techniques, here's a game-changing alternative: you can skip both the modeling and rigging stages completely with Tripo AI.
As the leading AI 3D model generator in the industry, Tripo AI offers a complete end-to-end solution:
- Generate fully-detailed, custom 3D models from text descriptions or images
- Leverage our powerful image to 3D technology to convert concept art directly to 3D models
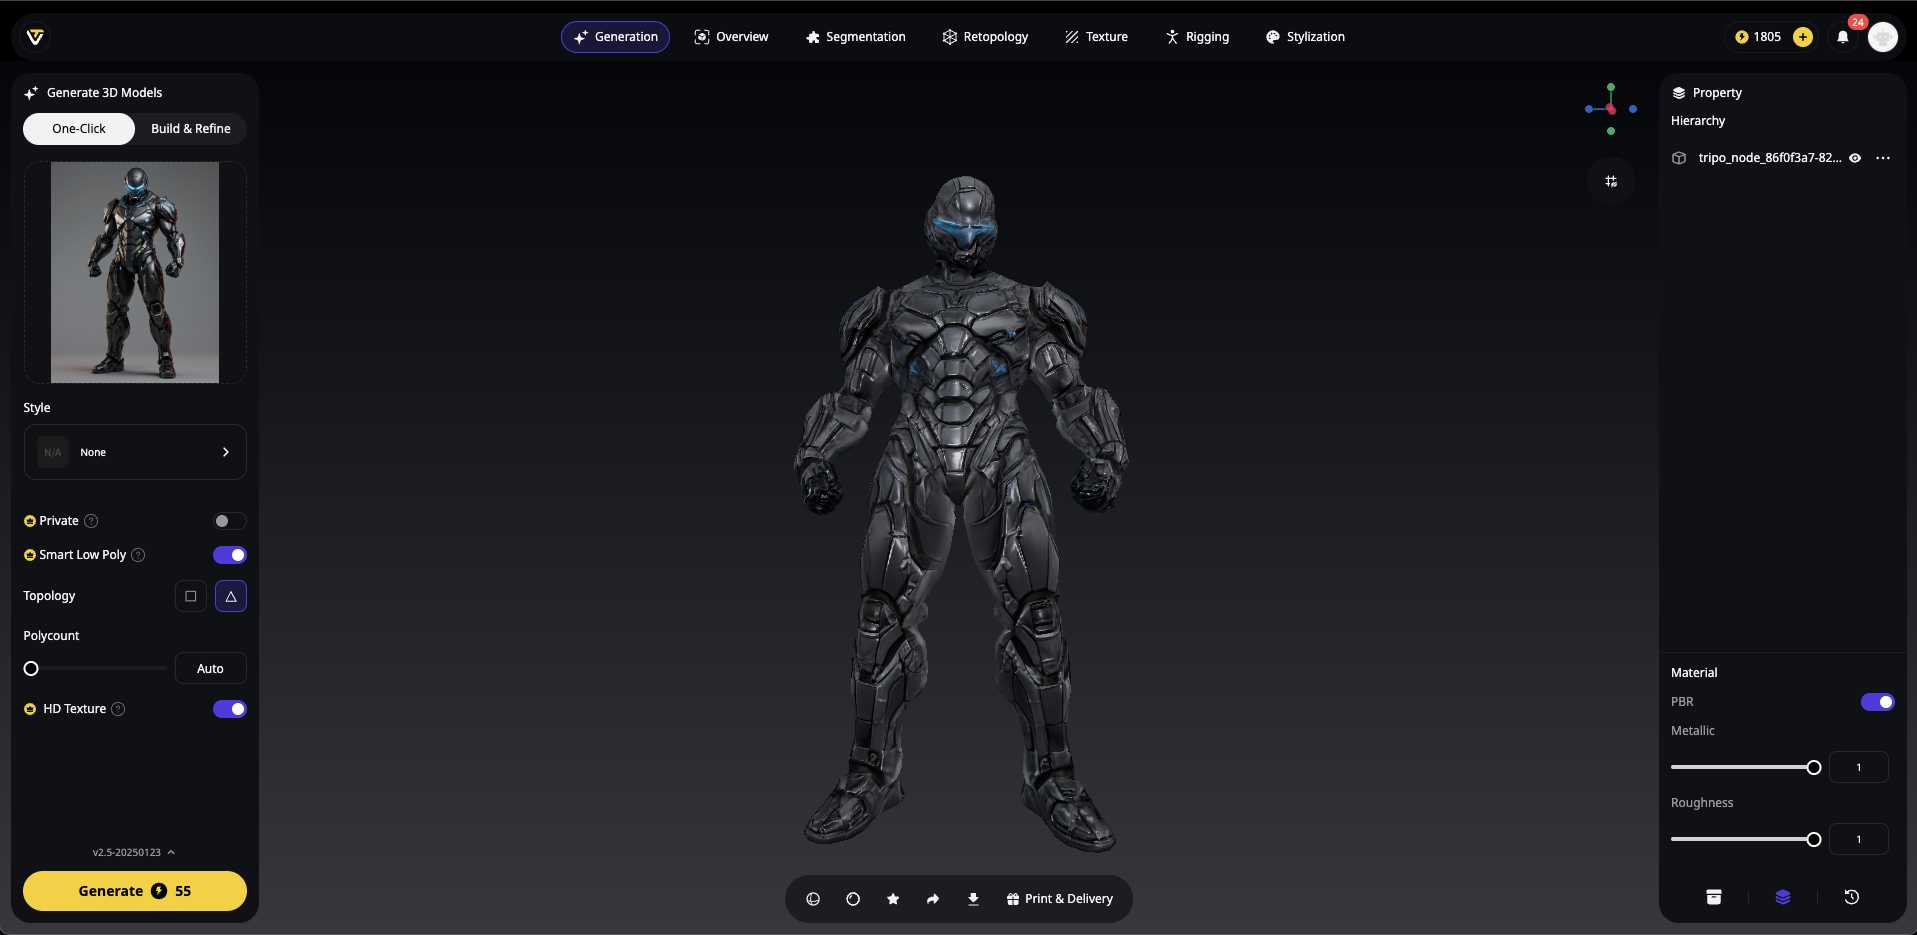
- Take advantage of our auto-rigging feature that automatically creates a functional skeleton
- Get animation-ready characters with rigging already in place
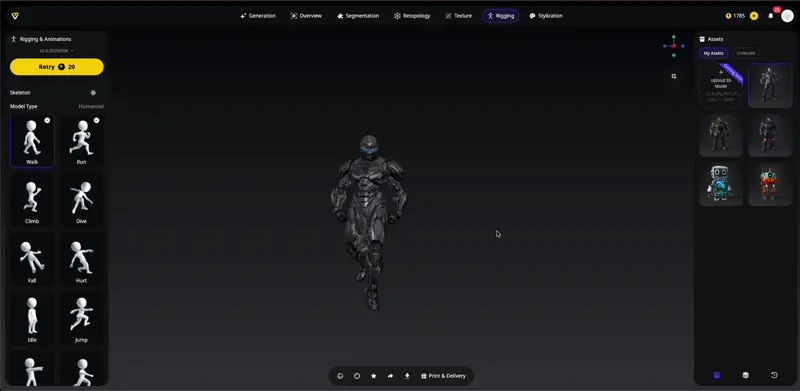
- Choose from multiple animation actions for your model
Why spend days on modeling and rigging when Tripo AI can handle both? Simply visit Tripo Studio, describe or upload an image of what you need, and within seconds, you'll have a fully rigged 3D model ready for animation. Import it into your preferred software and start animating immediately!
This all-in-one solution is revolutionary for:
- Game developers who need production-ready characters fast
- Animators who want to focus purely on character performance
- Content creators working with tight deadlines
- Small studios without dedicated modeling and rigging specialists
- Beginners who find technical rigging challenging
For those who still want to understand the rigging process or need to create custom rigs, the rest of this guide will walk you through manual rigging in Blender. But remember—when speed and efficiency matter, Tripo AI has you covered from concept to animated character!
Step-by-Step Guide to Rigging Your 3D Model in Blender

Whether you've created your model with Tripo AI's image to 3D technology or modeled it manually, these rigging steps will help you transform it into a fully animatable character. This beginner-friendly approach focuses on getting your character moving quickly.
Step 1: Prepare Your Model
Before adding any bones, ensure your model is properly prepared:
- Check your model's scale: Characters should be at a realistic height (around 1.8-2 meters tall for humans)
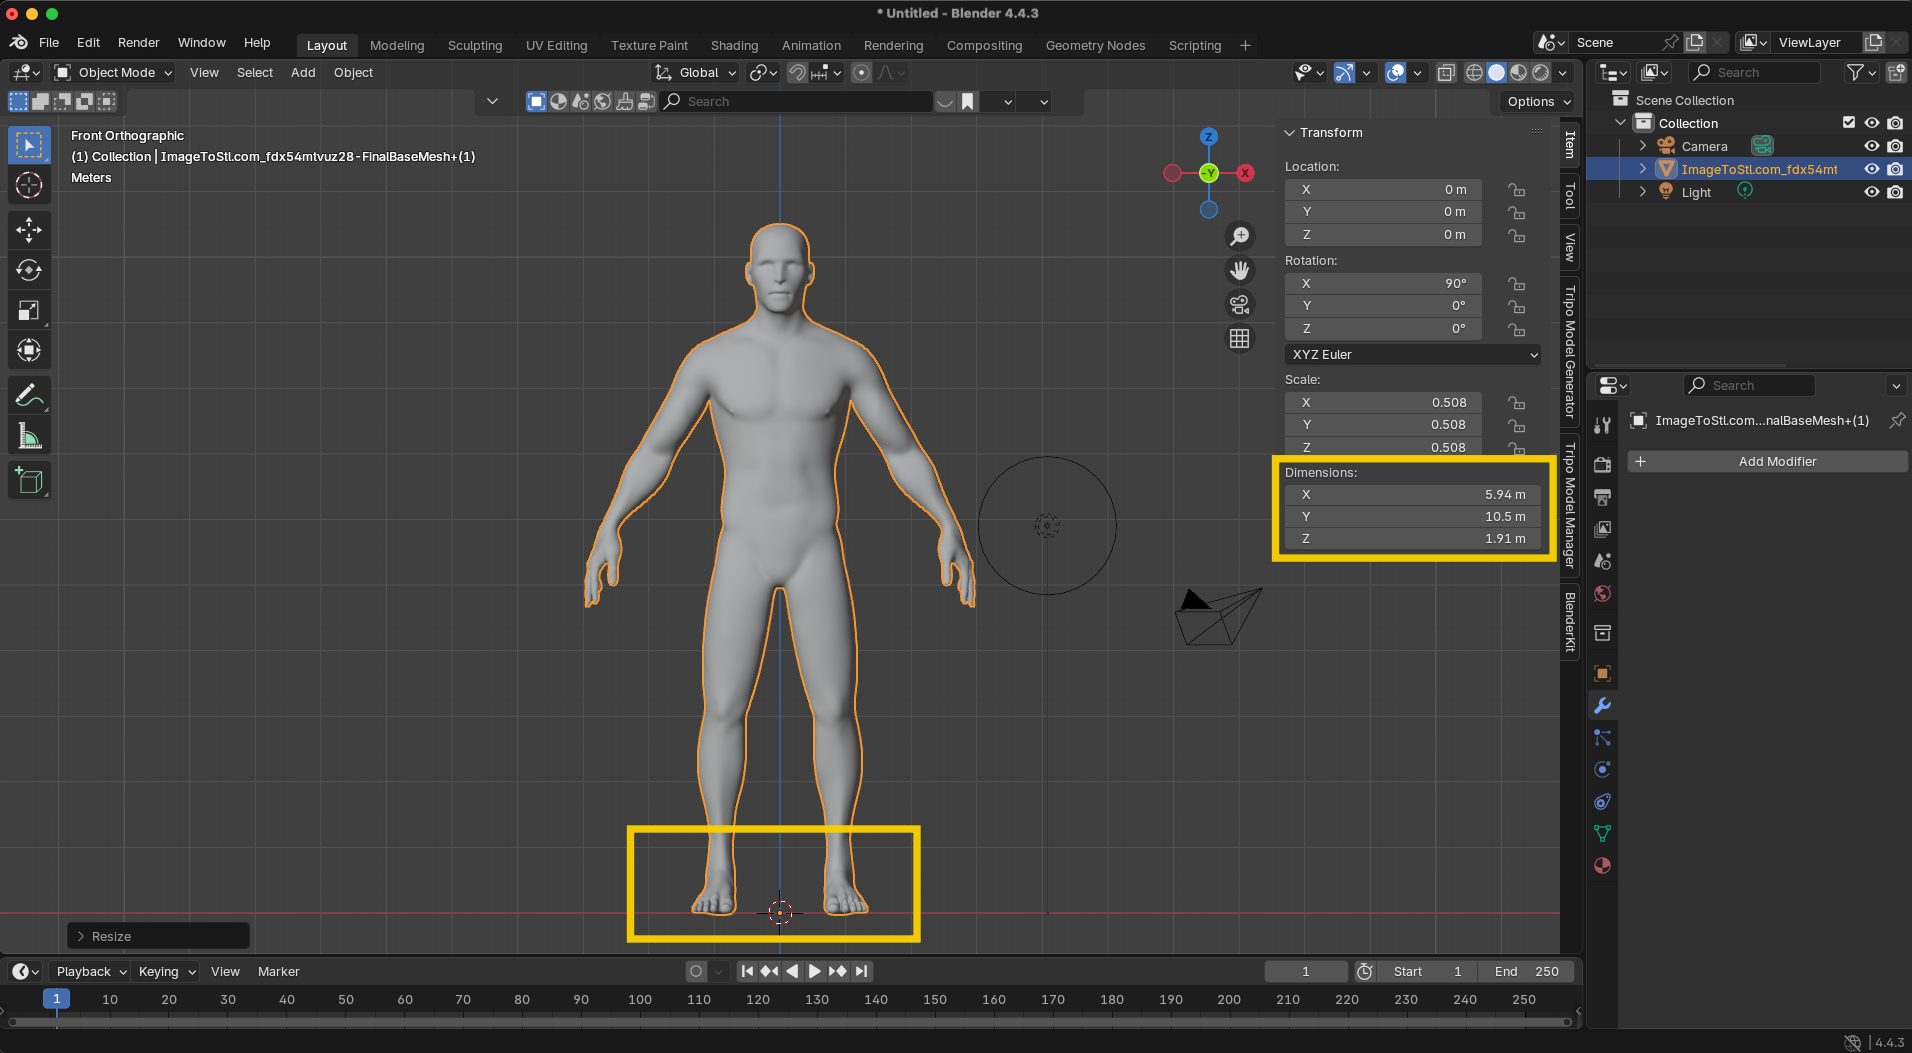
- Verify the object origin: Ideally positioned at the bottom center of your character
- Apply modifiers: While subdivision surface and mirror modifiers can remain active during rigging, make sure other modifiers are applied if needed
Pro Tip: To check your model's height, press N to open the sidebar, select the "Item" tab, and review its dimensions.
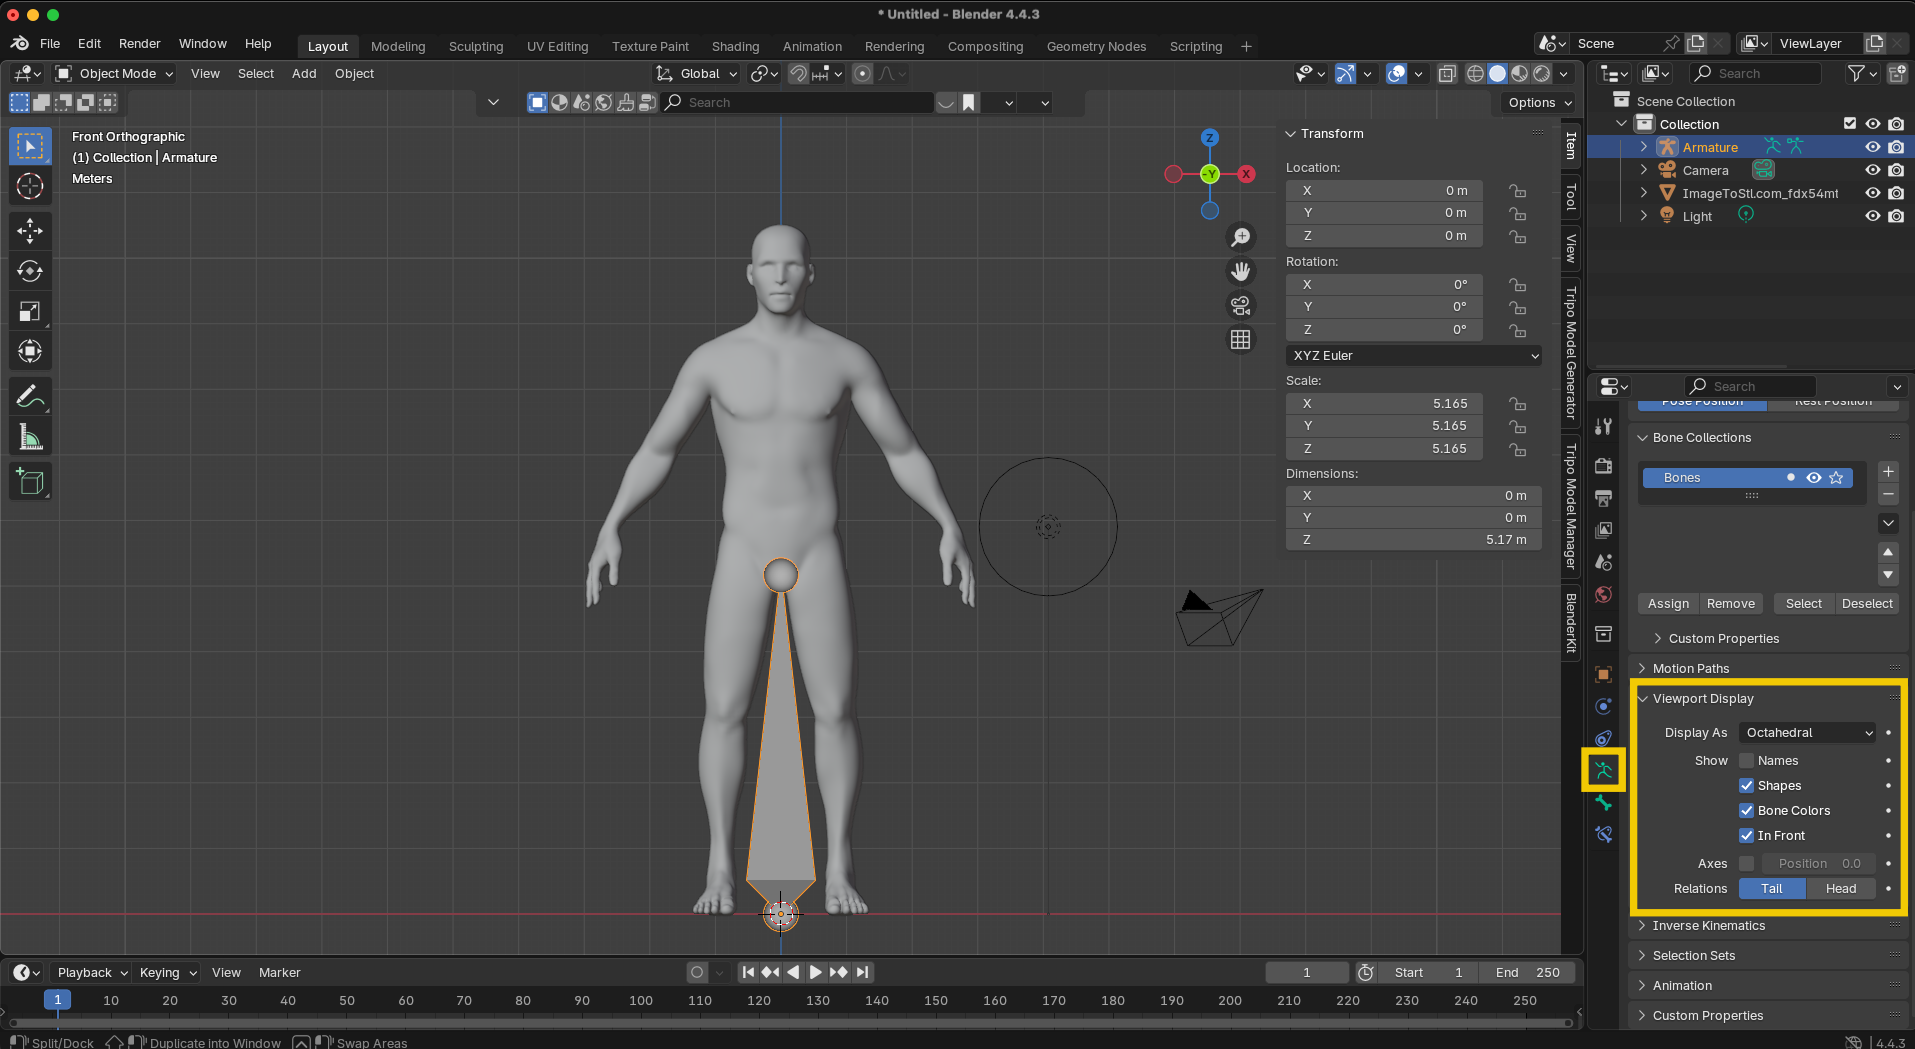
Step 2: Add an Armature
- Center the 3D cursor: Press Shift+S and select "Cursor to World Origin"
- Add the first bone: Press Shift+A > Armature
- Make bones visible: With the armature selected, go to Object Data Properties (bone icon) > Viewport Display > Check "In Front"
Step 3: Create the Spine and Head
- Enter Edit Mode: Press Tab or select Edit Mode from the dropdown menu
- Position the root bone: In Edit Mode, select the entire bone and:
- Scale it down (S key) to an appropriate size
- Move it (G key) to the base of your character's spine
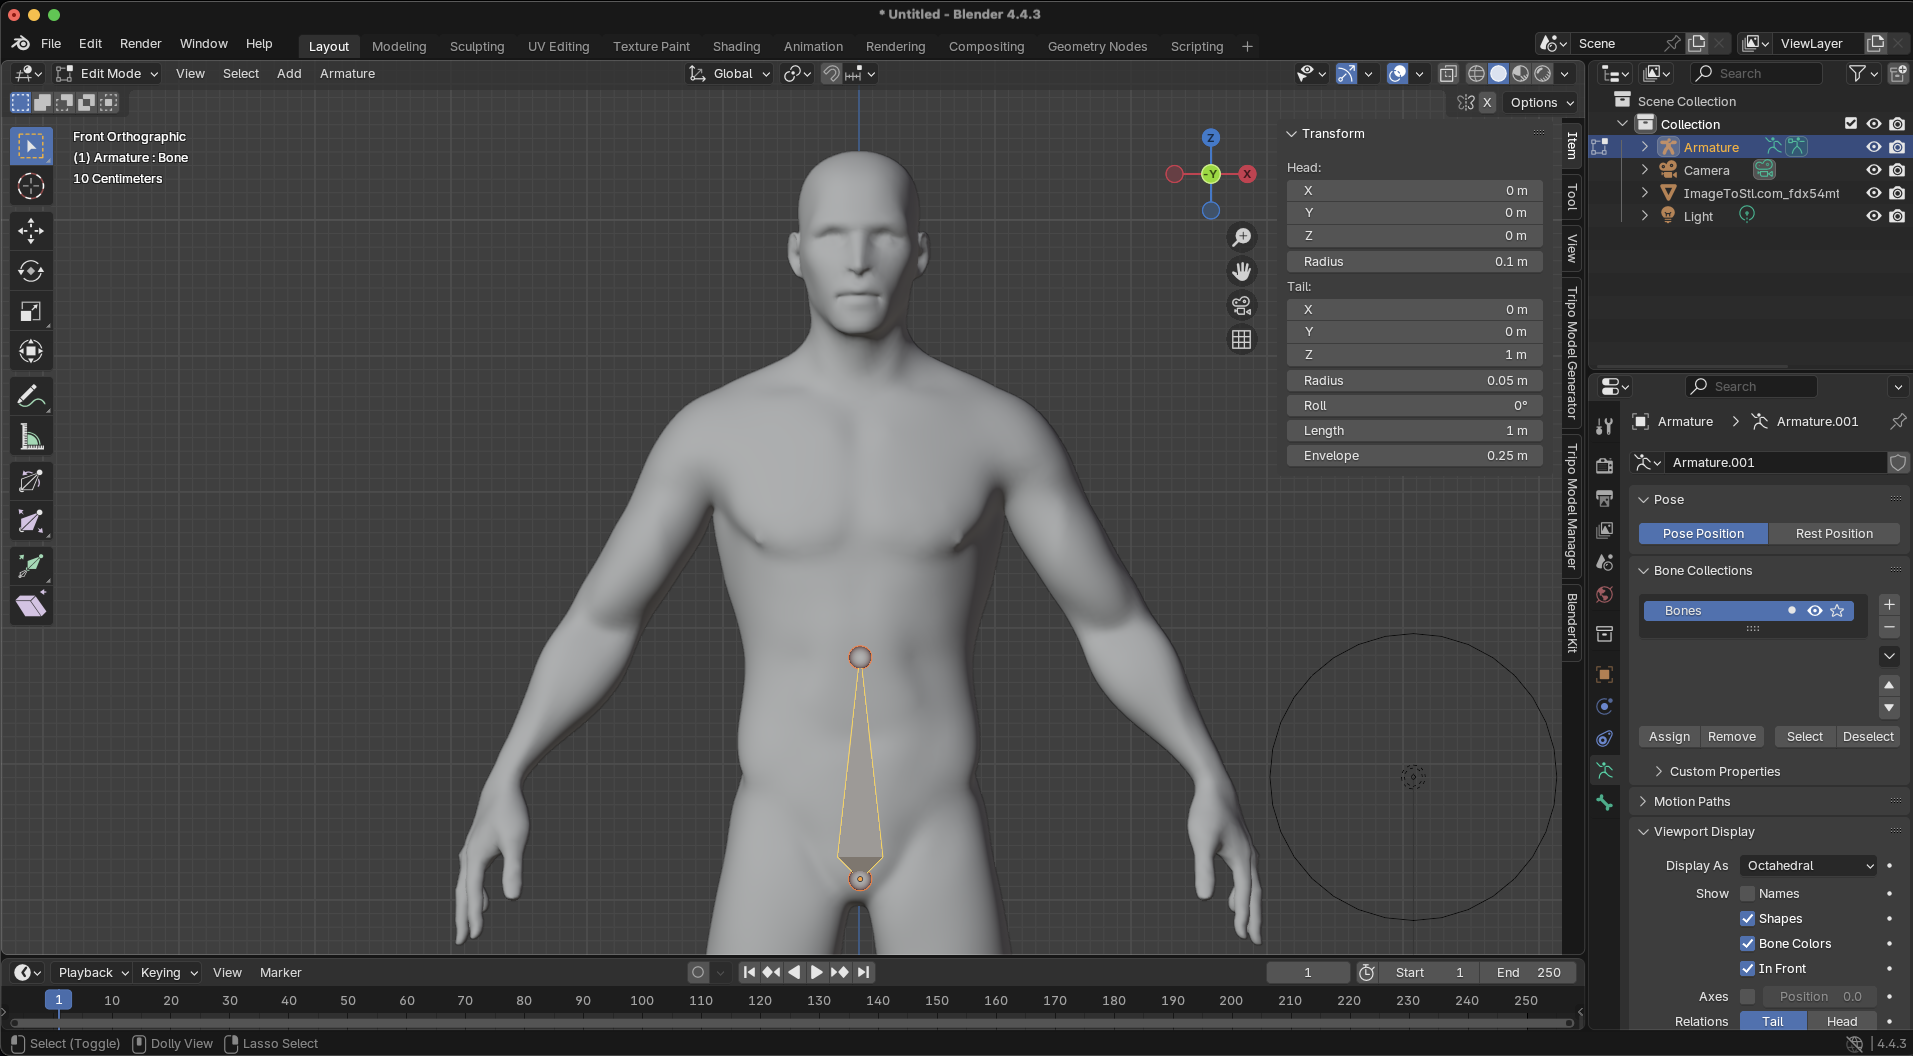
- Create the spine:
- Select the tail (upper point) of the root bone
- Press E to extrude and Z to constrain to vertical movement
- Position at the middle of the torso
- Press E again to extrude another spine bone to the upper chest
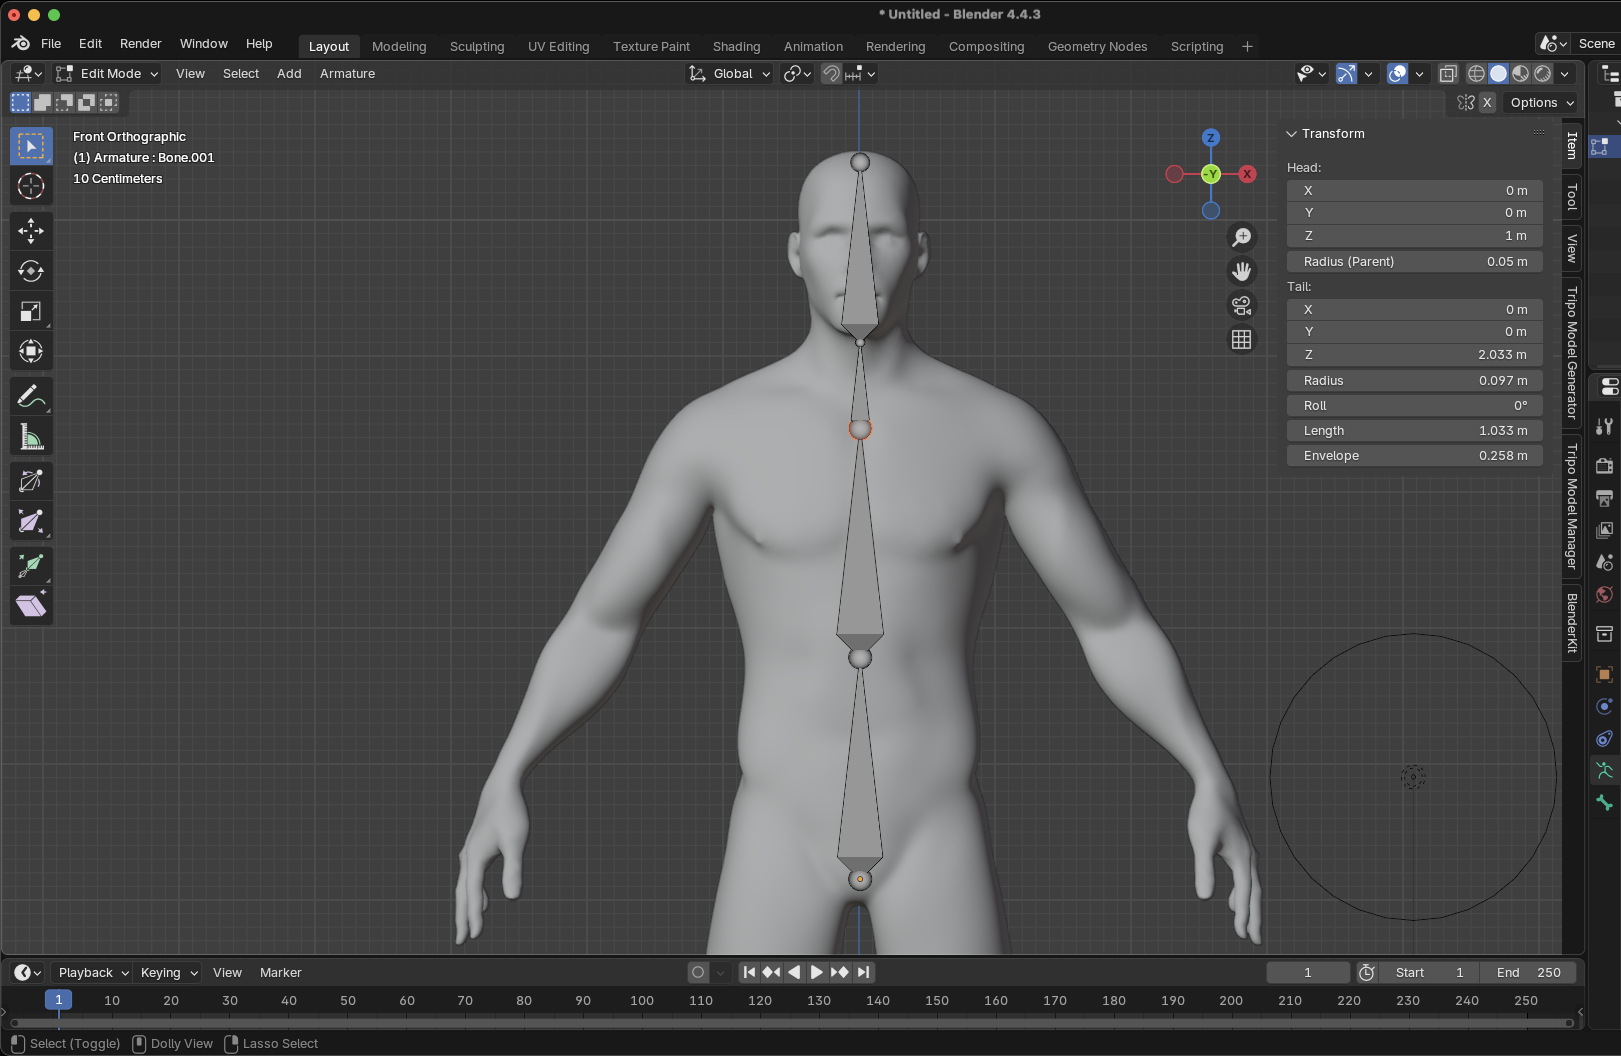
- Add neck and head:
- From the upper chest bone's tail, press E to extrude a neck bone
- Press E again to extrude the head bone to the top of your character's head
Step 4: Create the Arms
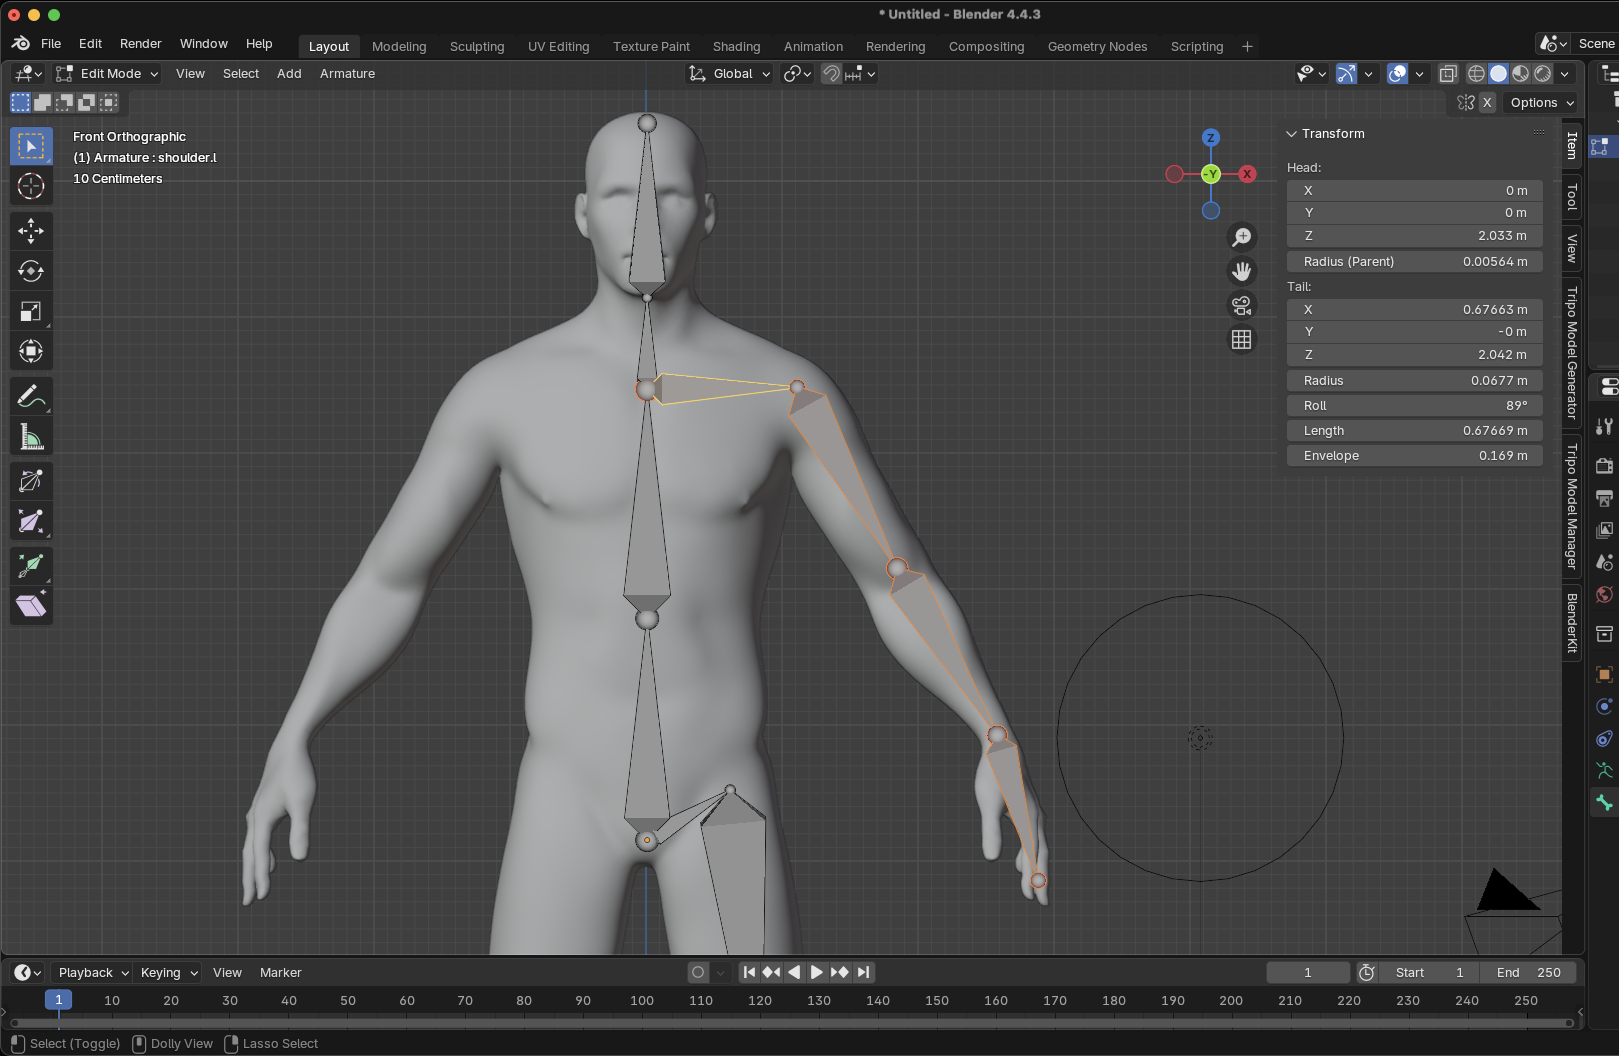
- Add clavicle/shoulder bones:
- Select the tail of the upper chest bone
- Press E to extrude outward horizontally
- Position at the shoulder joint
- Create the upper arm:
- With the shoulder tail selected, press E to extrude
- Position at the elbow joint
- Add forearm and hand:
- Press E to extrude from the elbow to the wrist
- Press E again to extrude the hand bone
- Name your bones properly:
- Select each arm bone
- Press F2 (or find the name field in Bone Properties)
- Use naming convention: "shoulder.L", "upper_arm.L", "forearm.L", "hand.L"
- The ".L" suffix is crucial for symmetry tools to work
Step 5: Create the Legs
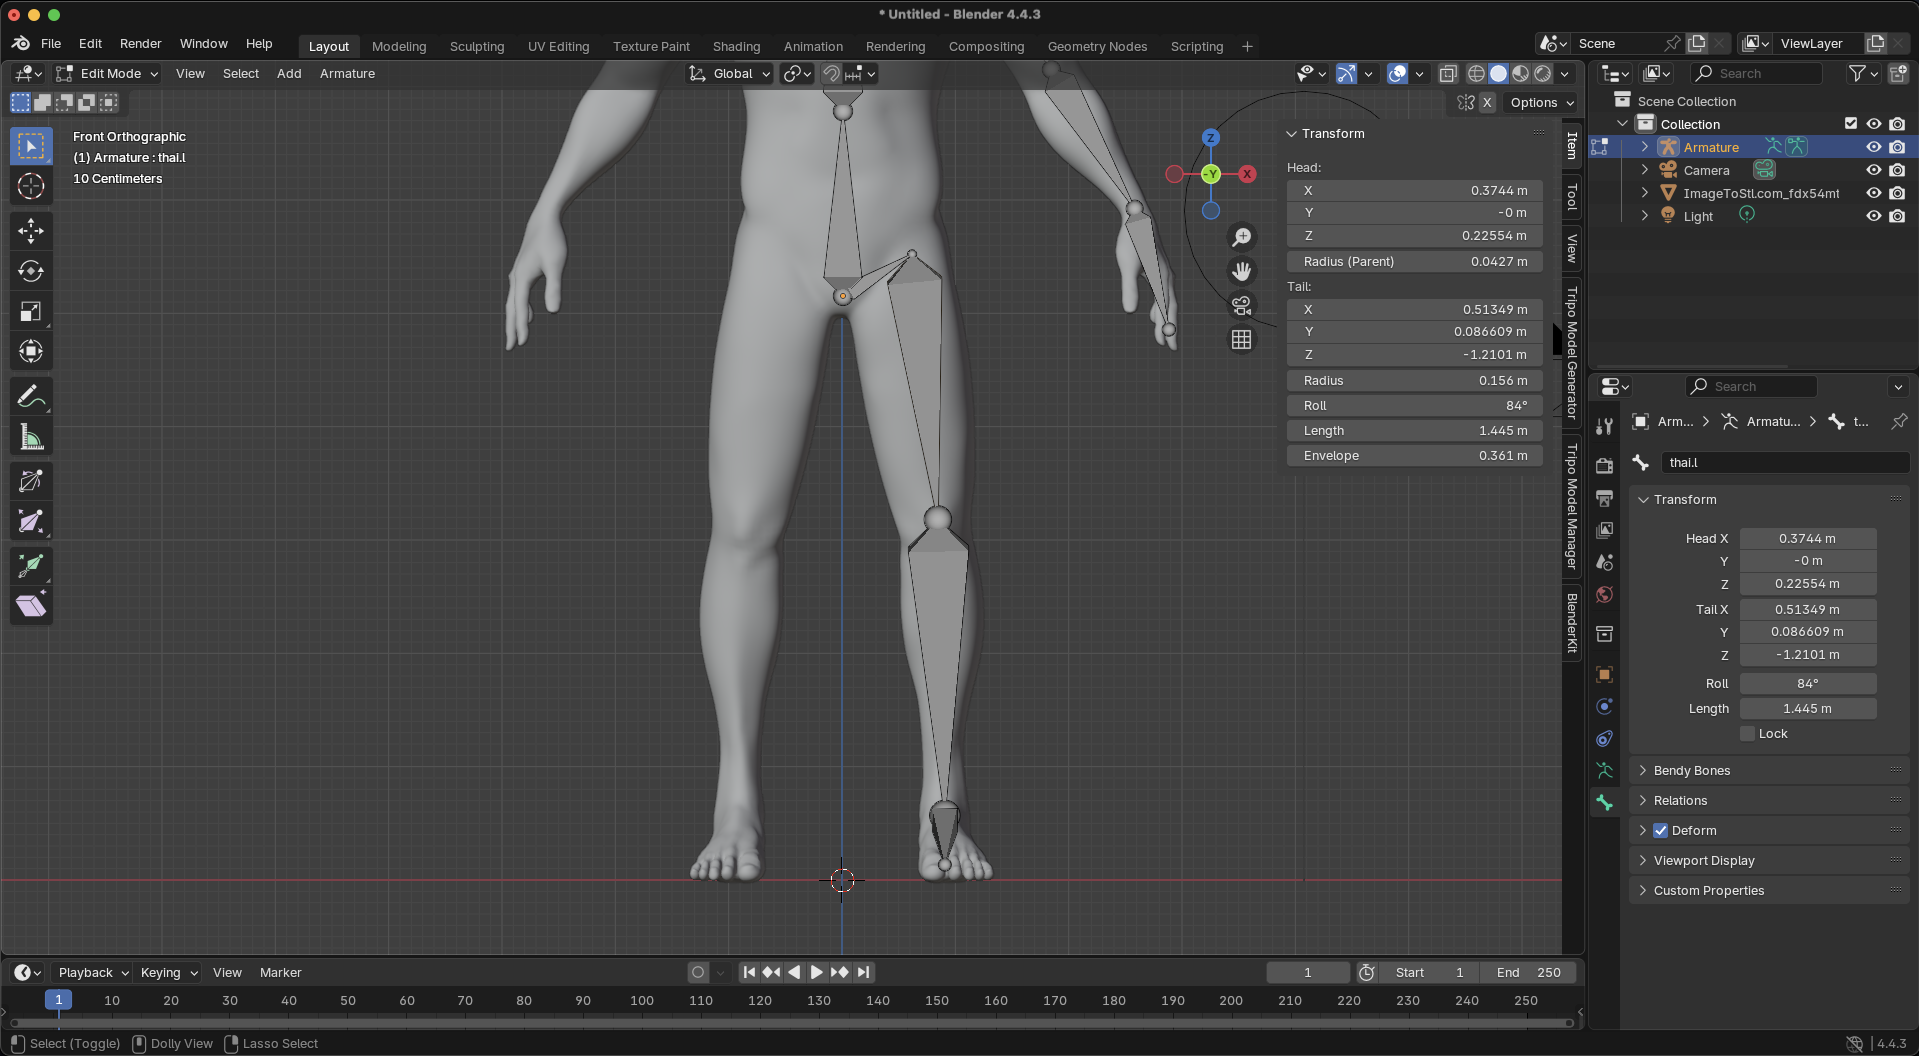
- Add hip bones:
- Select the tail of the root bone
- Press E to extrude outward for the hip
- Name it "hip.L"
- Create thigh, shin, and foot:
- Extrude from hip to knee (thigh)
- Extrude from knee to ankle (shin)
- Extrude from ankle for the foot
- Name these bones with the ".L" suffix
Step 6: Mirror to Complete the Skeleton
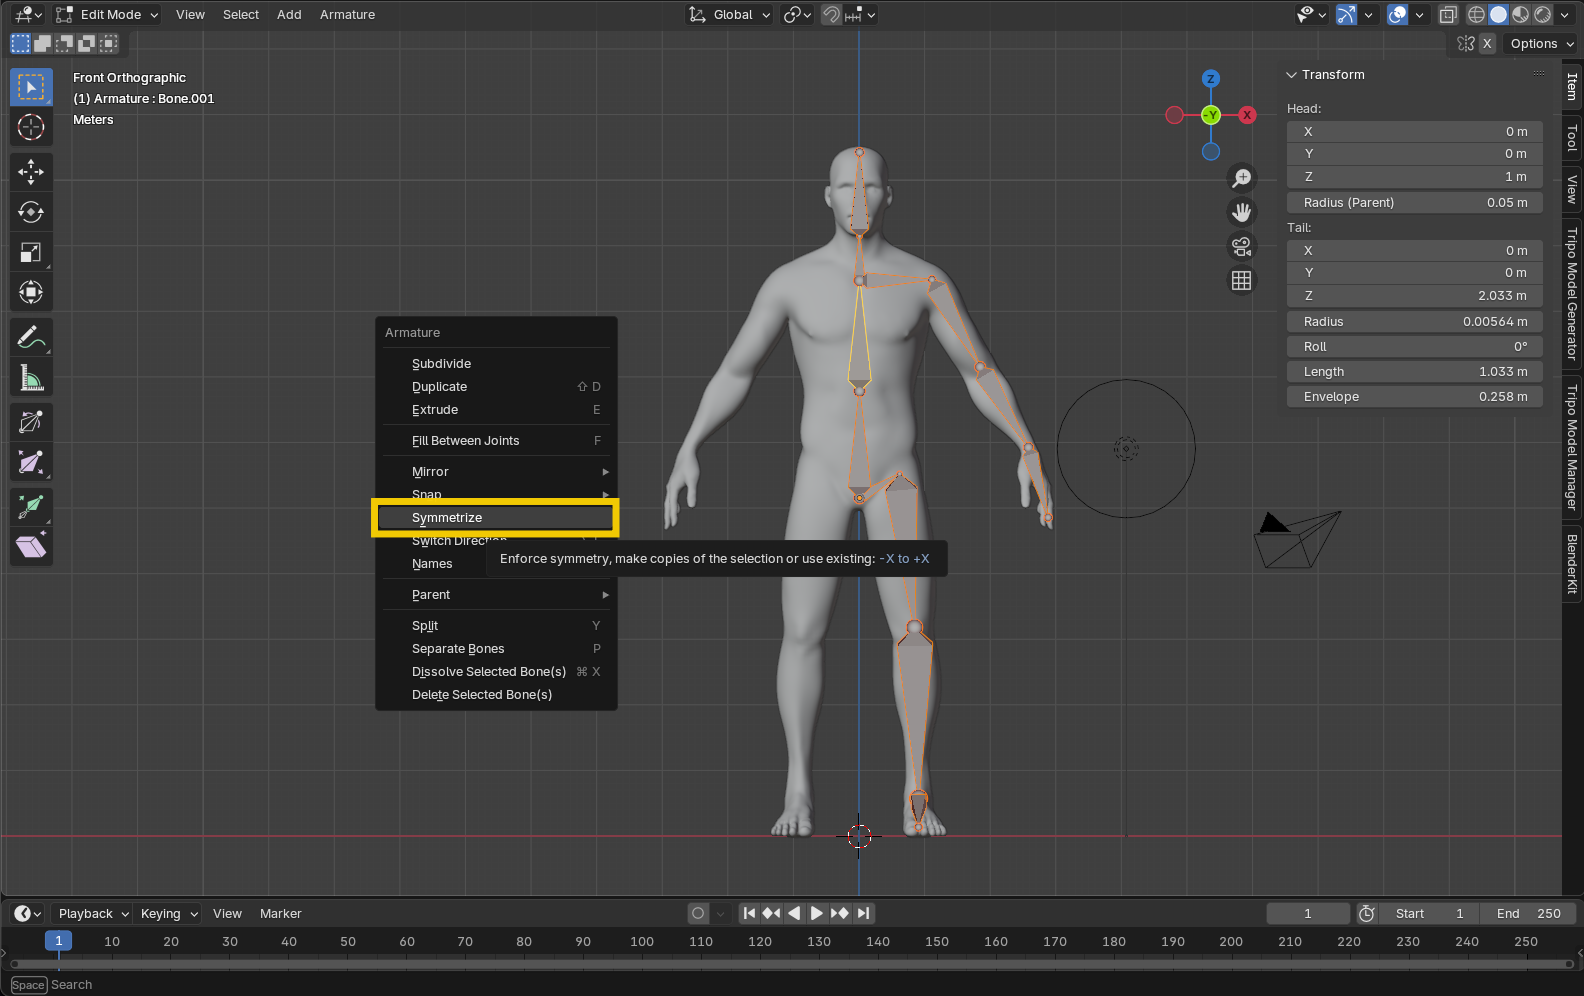
- Enable X-Axis Symmetry: Click the "X-Axis Mirror" button in the toolbar
- Mirror the bones: Select all bones with ".L" suffix and:
- Press Shift+Ctrl+S or go to Armature > Symmetrize
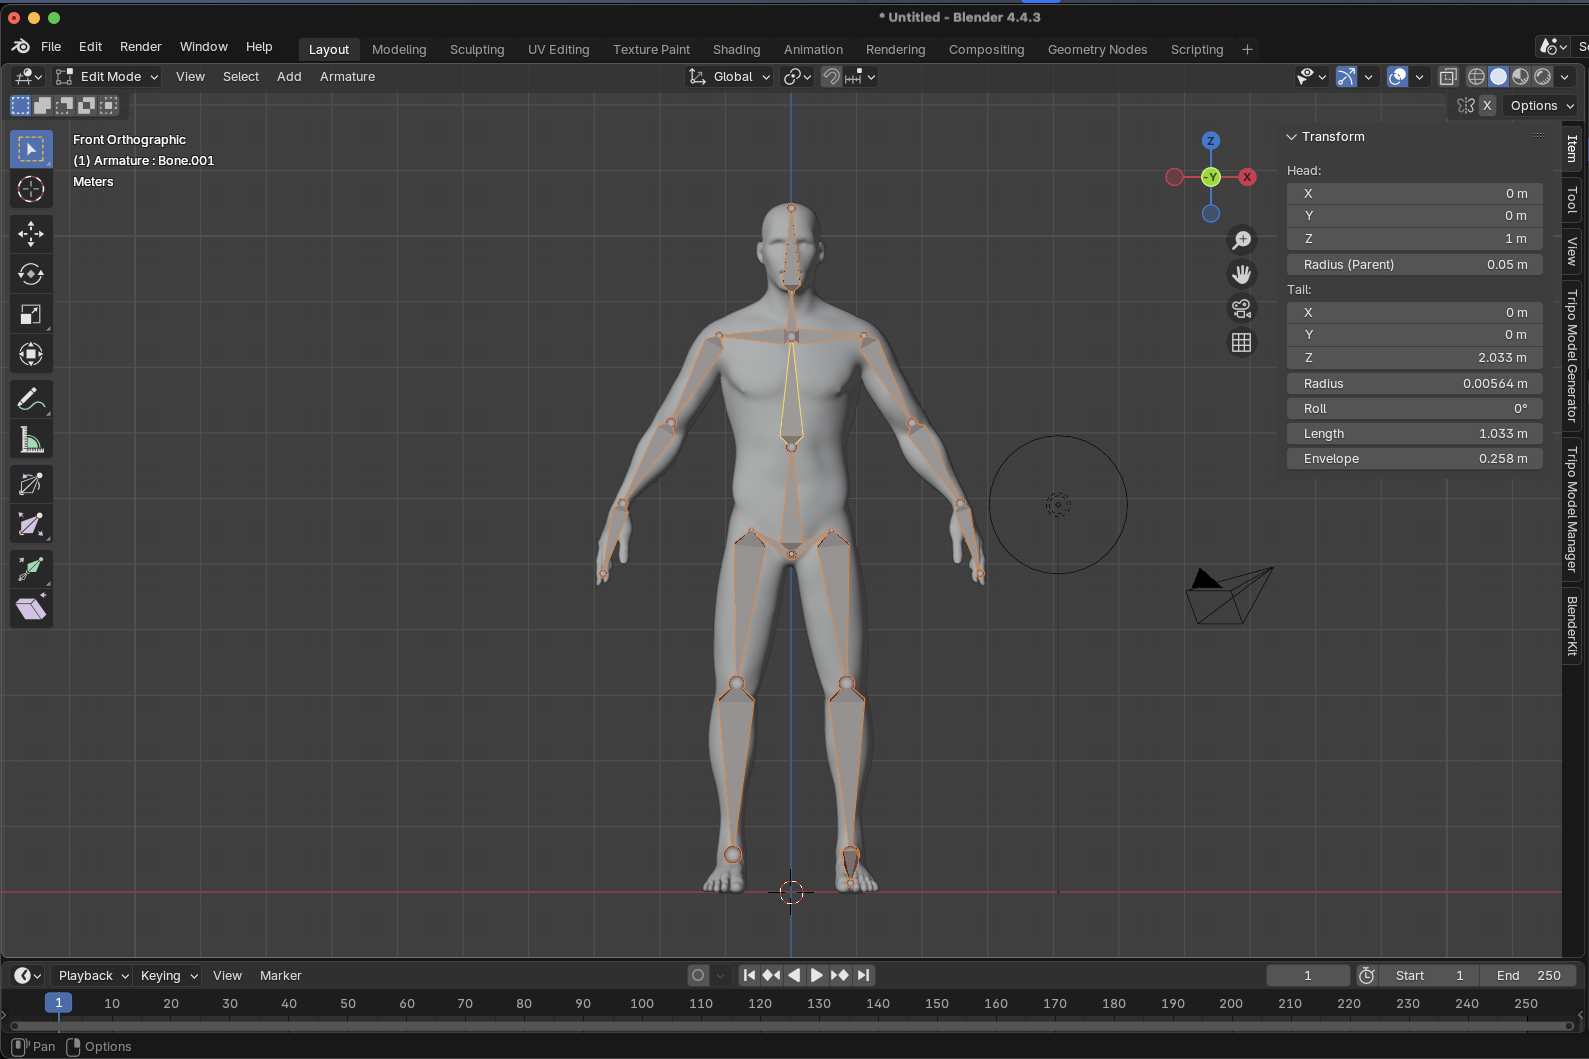
- Blender automatically creates matching ".R" bones
- Pro Tip: If symmetrization fails, double-check that all bones have proper ".L" suffixes.
Step 7: Parent the Mesh to the Armature
- Enter Object Mode: Press Tab to exit Edit Mode
- Select in proper order:
- First, select your character mesh
- Second, hold Shift and select the armature (making it the active object)
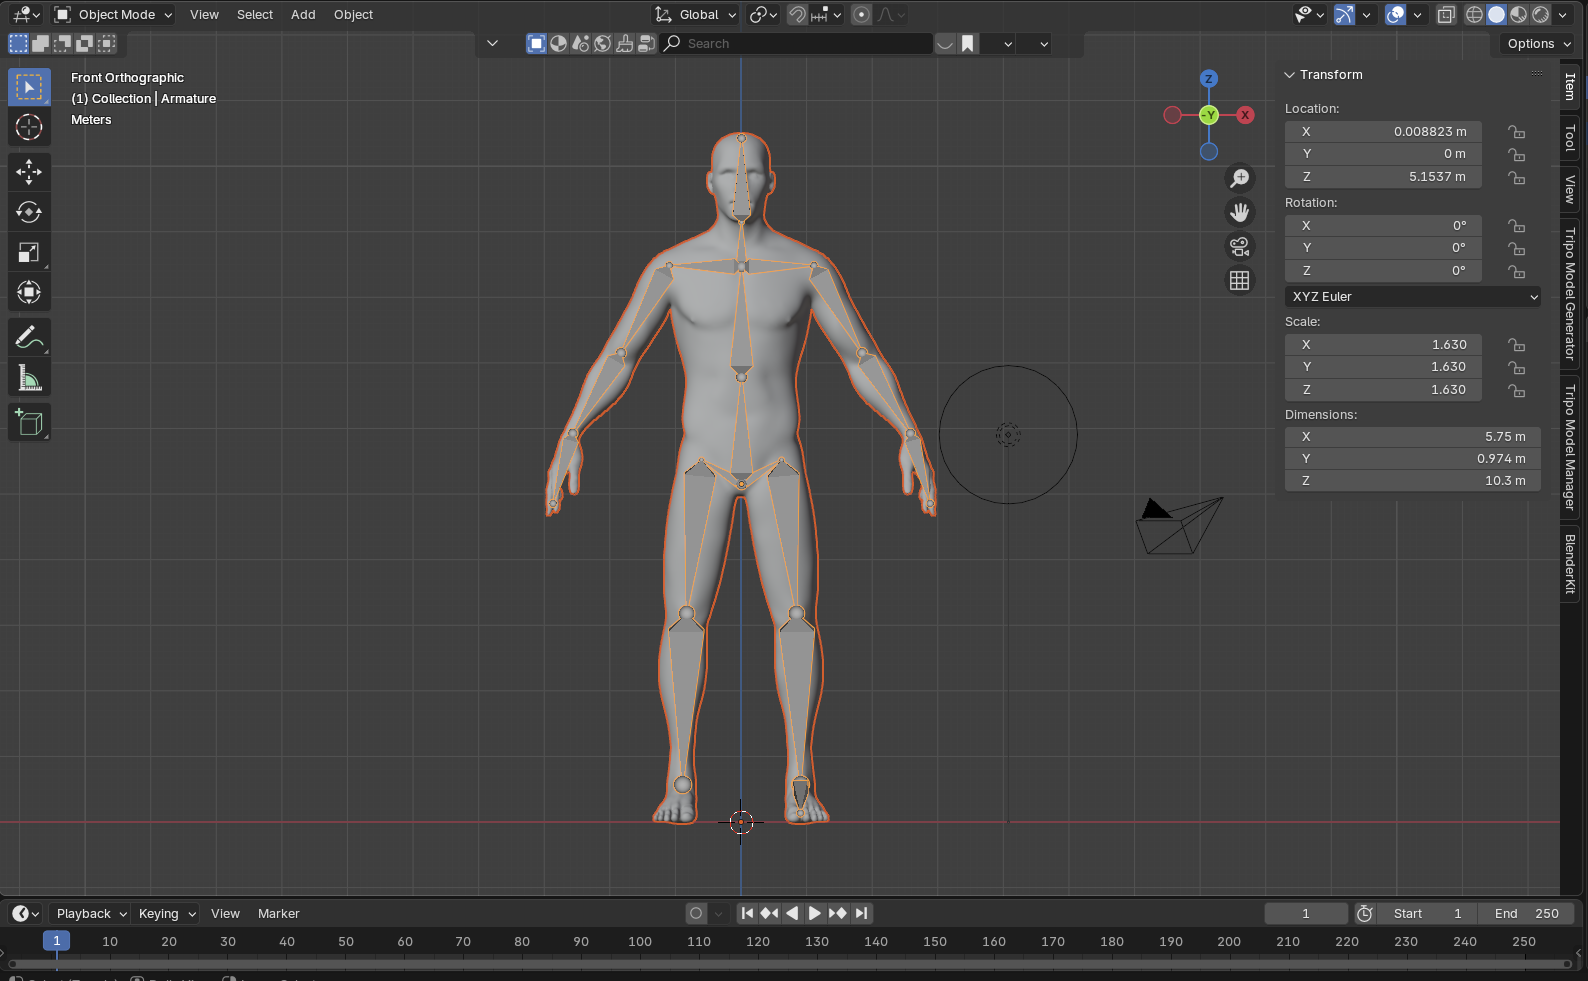
- Create the parent relationship: Press Ctrl+P
- Choose parenting type: Select "With Automatic Weights" from the menu
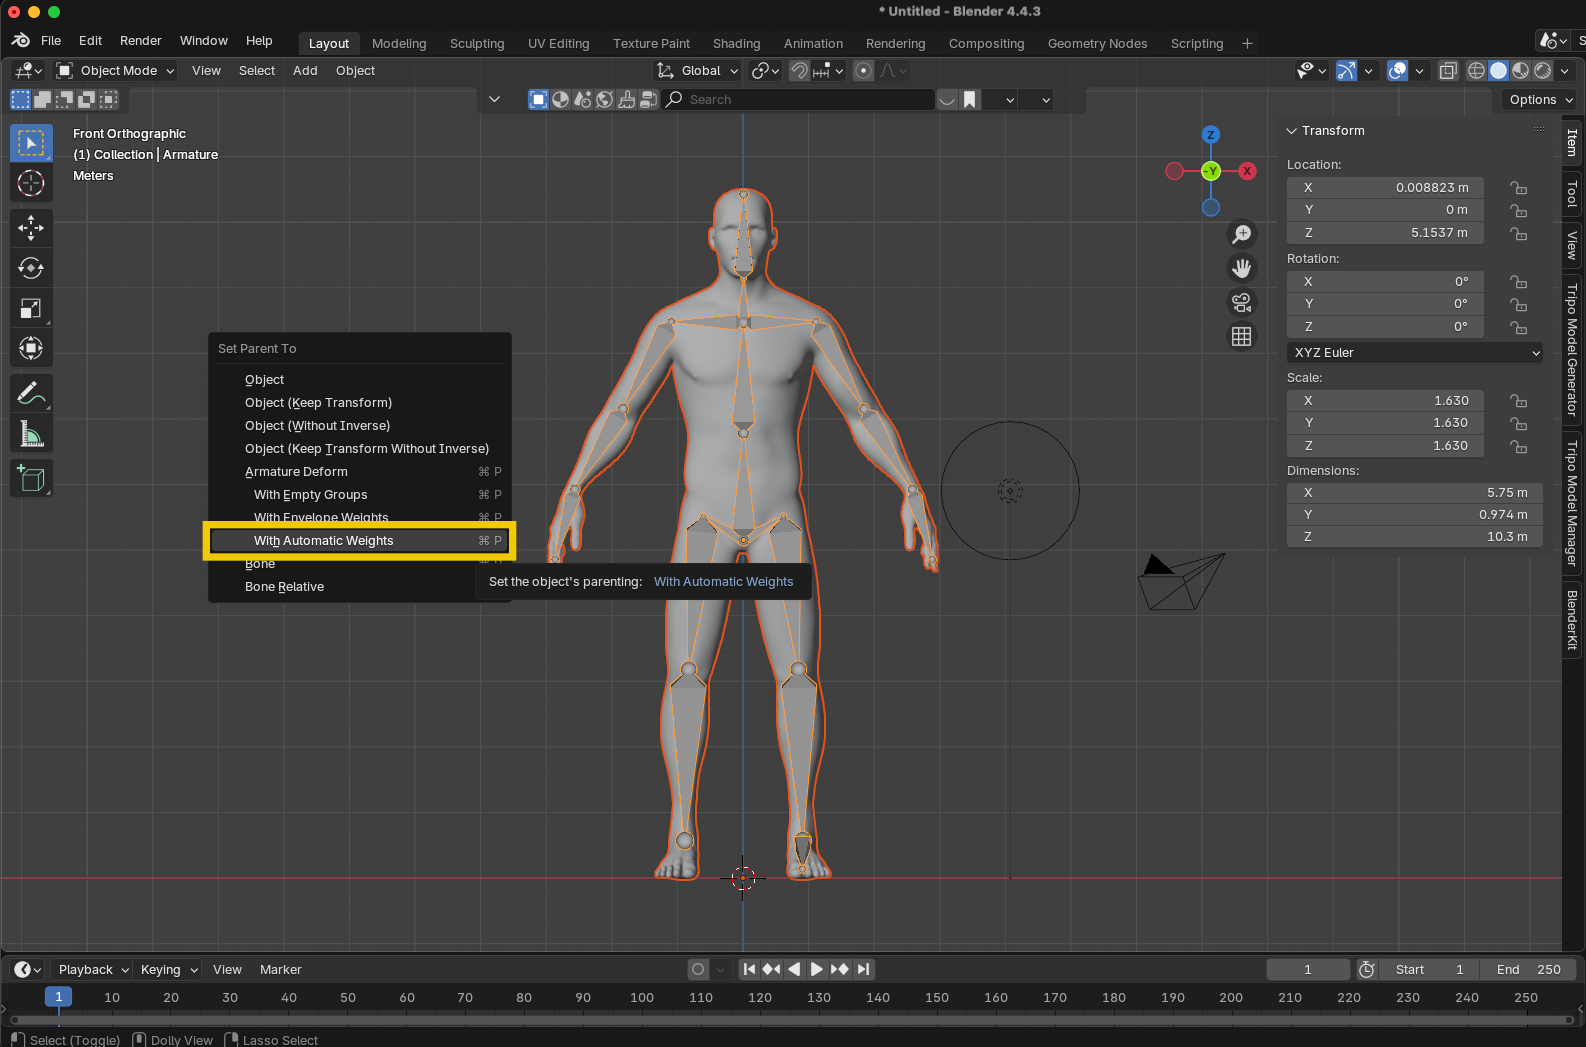
What happens behind the scenes:
- The mesh becomes a child of the armature in the scene hierarchy
- An Armature modifier is added to your mesh
- Vertex groups are created for each bone
- Weight values are automatically calculated based on proximity
Step 8: Test Your Rig
- Enter Pose Mode: With the armature selected, press Ctrl+Tab or select Pose Mode from the mode menu
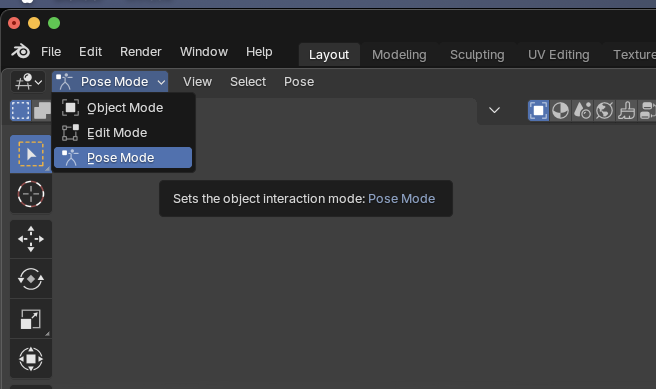
- Move your character:
- Select any bone
- Press R to rotate it
- Your mesh should deform following the bone's movement
- Fix the root bone (if needed):
- If moving the root bone doesn't move the entire character, enter Edit Mode
- Select all the "disconnected" bones
- Select the root bone last
- Press Ctrl+P and choose "Keep Offset"
Step 9: Fine-Tune Weight Painting (If Needed)
If you notice areas where the automatic weights don't deform correctly:
- Enter Weight Paint Mode:
- Select your mesh
- Enter Weight Paint Mode from the mode menu
- Select the problematic bone: Hold Ctrl and click on the bone
- Paint weights: Use the Add, Subtract, and Smooth brushes to adjust influence
- Test frequently: Toggle back to Pose Mode to check your adjustments
Taking Your Rig Further
This basic rigging approach creates a functional character you can pose and animate. For a more advanced setup, consider these improvements:
- Add IK constraints for easier limb control
- Set up control bones separate from deformation bones
- Create custom bone shapes for a clearer animation interface
- Use bone constraints for more complex behaviors
Remember that properly rigged 3D models need sufficient topology around joints to deform correctly. When using Tripo AI's image to 3D conversion, you can optimize these areas in Blender before rigging for best results.
Common Rigging Issues and Solutions
Streamlining Your Workflow: Using Tripo Studio for Model Creation
While rigging is crucial, it's only one part of the 3D pipeline. Tripo AI's image to 3D technology can dramatically improve your overall productivity:
- Need character variations? Instead of modeling each one manually, use Tripo AI to generate multiple character bases from different text prompts or reference images
- Working with a team? Share a consistent visual language by using Tripo AI to turn concept art directly into 3D models that are ready for rigging
- Iterating on designs? Generate multiple versions quickly with Tripo's AI 3D model generator rather than spending hours on manual edits
- Limited modeling skills? Focus on becoming a rigging specialist while letting Tripo AI handle the modeling phase
Tripo AI integrates seamlessly with Blender, allowing you to export models in formats that maintain clean topology—essential for successful rigging. This combination of AI-powered modeling and skilled rigging creates an unbeatable production pipeline.
Advanced Rigging Horizons
Leveraging Blender's Rigify System
Rigify is Blender's powerful auto-rigger that can save hours of work:
- Enable the Rigify add-on in Preferences

- Add a meta-rig (Add > Armature > Human)
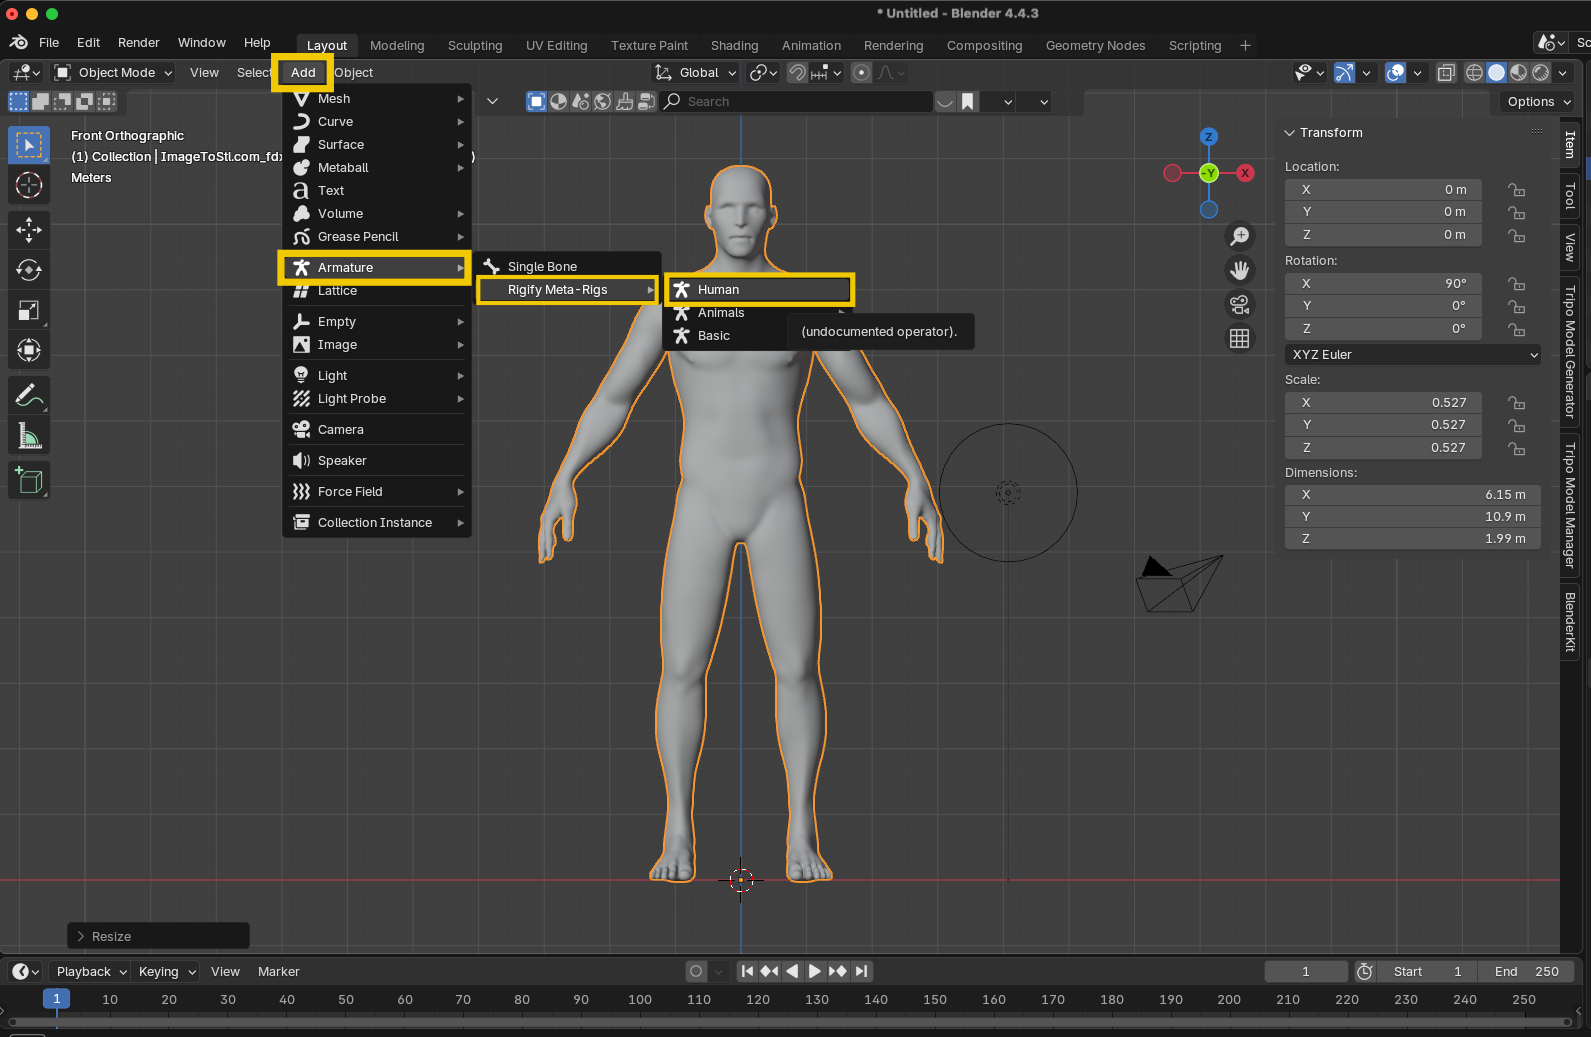
- Position it to match your character
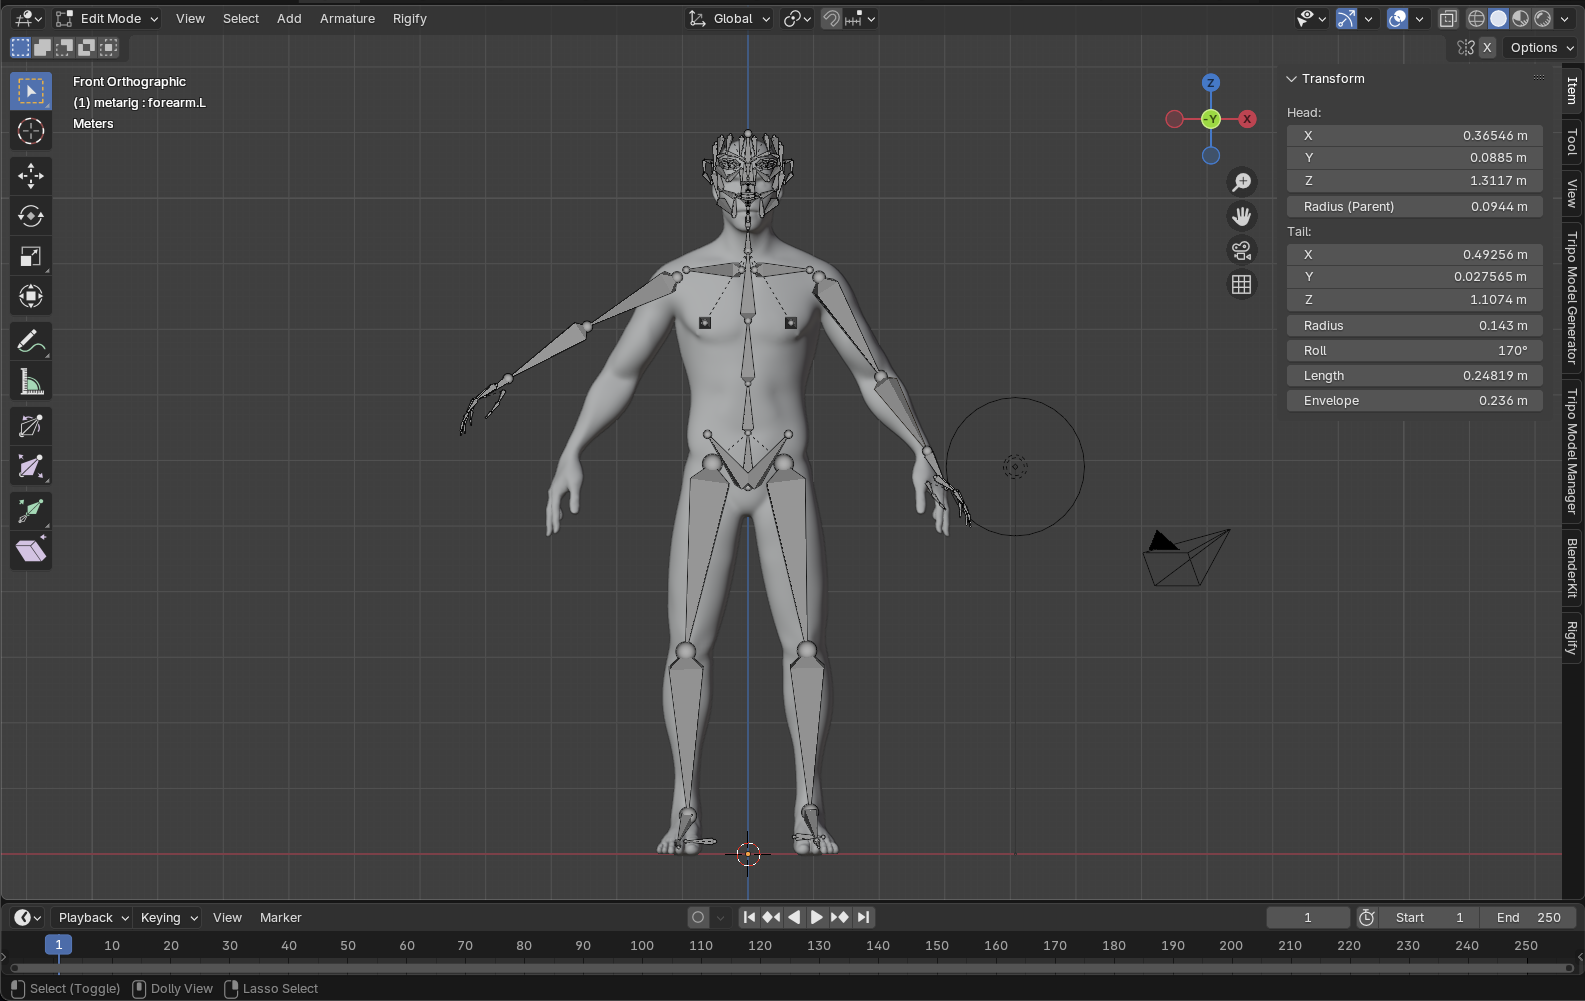
- Click "Generate Rig"
- While Rigify is powerful, understanding manual rigging first ensures you can customize and troubleshoot when needed.
Exploring Beyond Basic Rigging
With your foundation solid, explore these advanced concepts:
- Drivers: Connect properties for automated behaviors (e.g., muscles bulging when joints bend)
- Shape Keys: Create facial expressions and corrective shapes
- Specialized Constraints: For props, mechanical objects, and complex controls
Where to Find Free Rigged 3D Models to Study
Learning from existing rigs is invaluable. Here are excellent sources for free 3D model rigs:
- Blender Cloud: High-quality character rigs from Blender's open projects
- Blender Demo Files: Each version comes with sample rigged characters
- Sketchfab: Filter searches for rigged and downloadable models
- Mixamo: Adobe's service offers auto-rigging and free characters
- Blender Market: Some creators offer free or "pay what you want" rigs
Conclusion: The Perfect Pairing - Tripo AI and Your Rigging Skills
By combining the power of Tripo AI's image to 3D and AI 3D model generator capabilities with your rigging expertise, you create an unbeatable workflow:
- Generate base models instantly with Tripo AI from text descriptions or reference images
- Rig those models using the comprehensive techniques in this guide
- Animate your characters with confidence, knowing they have professional-quality deformations
This powerful combination allows you to focus on what matters most—bringing characters to life through animation—rather than getting bogged down in time-consuming modeling tasks.
Ready to revolutionize your 3D workflow? Visit Tripo Studio now and discover how our cutting-edge AI 3D model generator can transform your creative process from concept to rigged character in record time!