Best Normal Map Generators: Free Tools + How to Use Them
TL;DR
- Normal maps use RGB data to simulate surface depth and lighting detail without adding extra geometry. Understanding OpenGL vs DirectX conventions helps avoid inverted details caused by flipped green channels.
- NormalMap-Online is the fastest way to create a normal map from an image, while Blender and xNormal provide more control for high-poly baking workflows.
- Tripo AI simplifies the process by automatically exporting 3D models with complete PBR textures, including normal maps, so creators can skip manual baking for many projects.
A normal map generator converts a flat image or high-poly mesh into an RGB texture that controls how light interacts with a surface, creating realistic details without adding extra geometry. The best free options include NormalMap-Online for quick browser-based conversion, Materialize for complete PBR workflows, xNormal for professional baking, and Blender’s built-in bake tools. For AI-generated 3D models, solutions like Tripo AI can automatically generate normal maps during the export process.
The global 3D digital asset market is projected to reach $51.8 billion by 2029, highlighting the growing demand for efficient 3D content creation workflows. At the core of almost every game-ready asset is a normal map, which adds surface depth and realism under dynamic lighting. This guide explains how normal maps work, compares the best free generators, and covers two practical workflows: creating normal maps from images and baking them in Blender.
What Is a Normal Map?
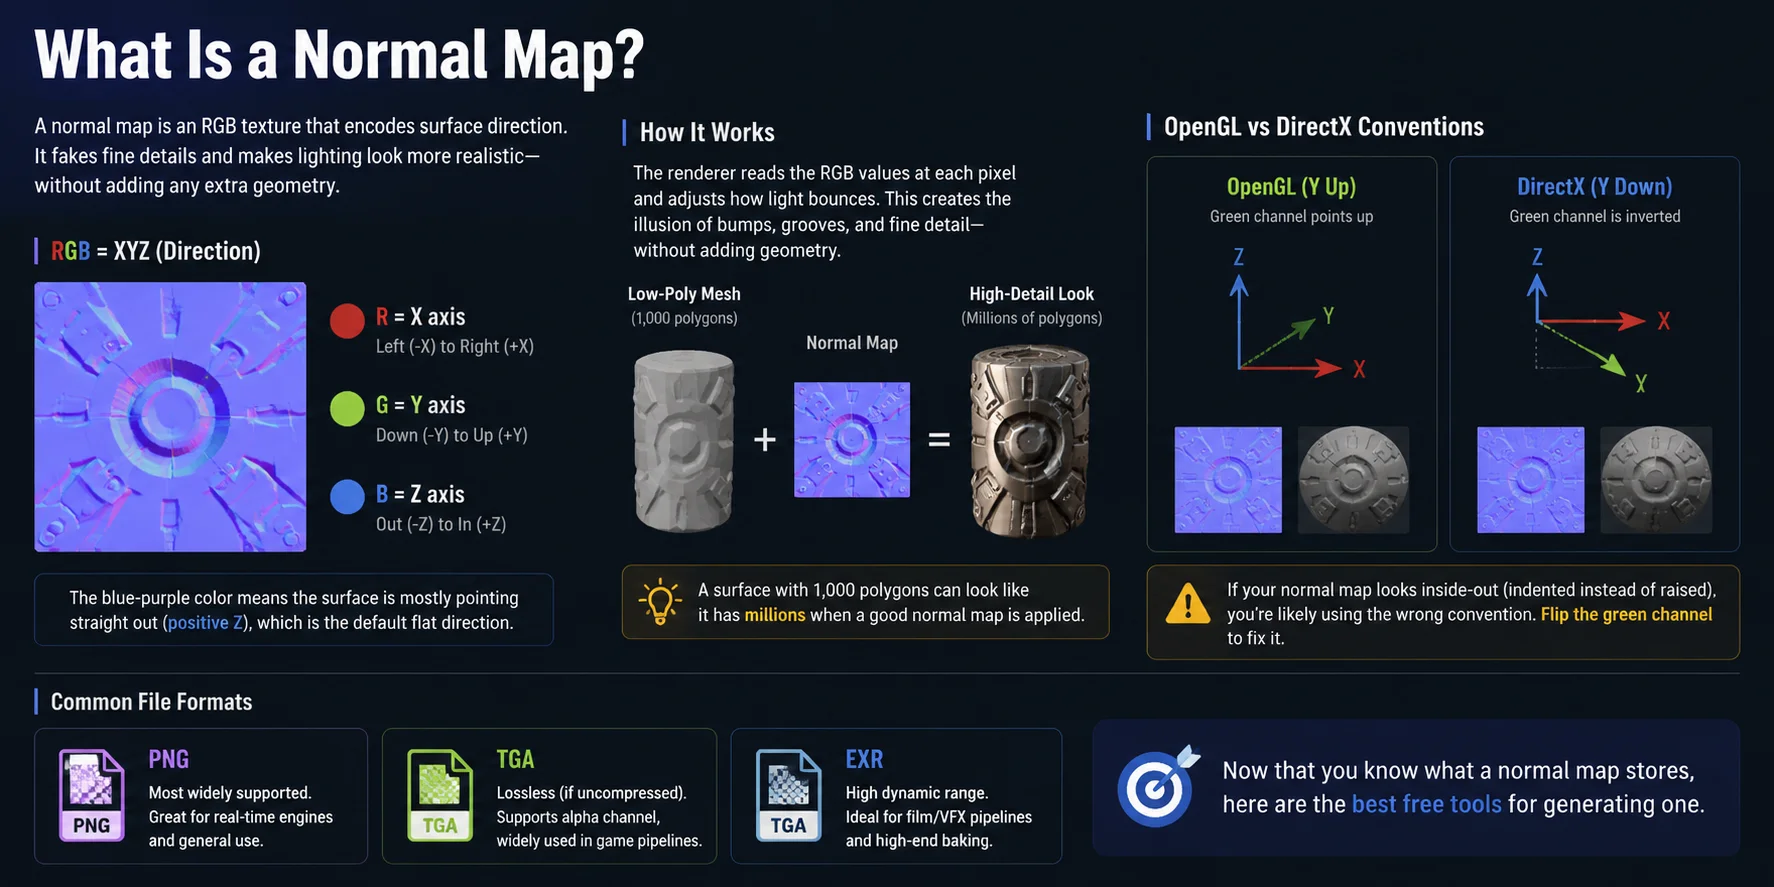
A normal map is an RGB texture that stores information about surface direction rather than color. Each pixel contains three channels: red represents the X axis, green represents the Y axis, and blue represents the Z axis. The familiar blue-purple appearance comes from the fact that most pixels point straight outward along the Z axis, which represents a flat surface facing the viewer.
When a renderer reads these RGB values, it changes how light interacts with each pixel, creating the illusion of bumps, scratches, and fine surface details without adding extra geometry. This allows a low-poly model with only 1,000 polygons to appear much more detailed when paired with a high-quality normal map.
There are two main normal map conventions: OpenGL and DirectX. OpenGL uses a positive Y direction, while DirectX flips the green channel by using an inverted Y axis. If details appear sunken or reversed, the issue is usually a mismatched convention — simply flip the green channel to correct it. PNG is the most common format, while TGA is preferred for lossless workflows and EXR is used for high-end film and VFX baking.
Now that you know what a normal map stores, here are the best free tools for generating one.
Best Free Normal Map Generators — Comparison Table
The best free normal map generator depends on whether you need a fast browser conversion, a complete PBR texture set, or a high-to-low bake. The table below compares the four free tools covered in this guide.
| Tool | Platform | Best For | Key Strengths / Limitations |
|---|---|---|---|
| NormalMap-Online | Browser | Quick normal map from image | No installation, live preview, and OpenGL/DirectX output; limited advanced controls. |
| Materialize | Windows | Creating a full PBR texture set from one image | Generates normal, height, AO, and smoothness maps locally; Windows-only. |
| xNormal | Windows | High-to-low-poly normal map baking | Precise cage and ray controls for game assets; older interface and a more technical setup. |
| Blender | Windows, macOS, Linux | Complete 3D baking workflows | Free, open source, and combines modeling, UVs, and baking; requires clean UVs and matched meshes. |
Quick pick: Use NormalMap-Online for the fastest free normal map generator online, Materialize for a complete PBR map set, xNormal for traditional high-to-low baking, or Blender for the most control in a cross-platform workflow.
How to Generate a Normal Map from an Image
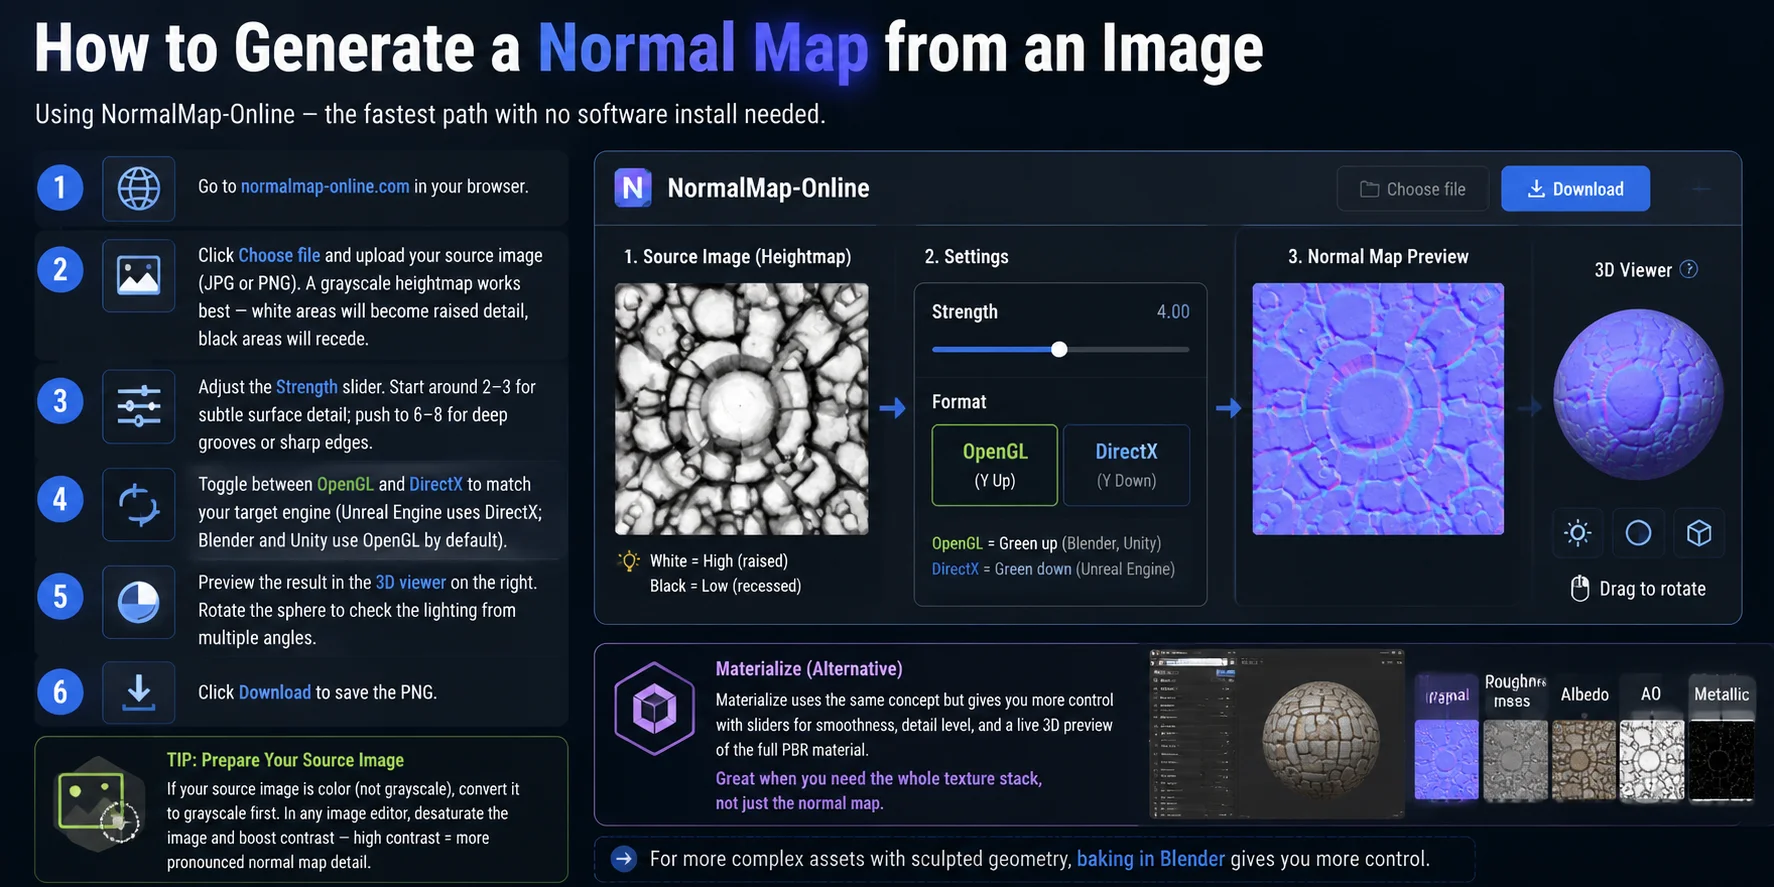
If you need to create a normal map from a flat image, the fastest method is using a browser-based generator like NormalMap-Online. It requires no installation and works well for textures, heightmaps, and simple surface details.
- Go to NormalMap-Online Open normalmap-online.com in your browser to access the free generator.
- Upload your source image Click Choose file and upload your JPG or PNG image. For the best results, use a grayscale heightmap: white areas represent raised details, while black areas represent recessed areas.
- Adjust the Strength slider Control how intense the surface details appear. A value around 2–3 works well for subtle textures such as fabric or fine scratches, while 6–8 creates stronger grooves and sharper surface changes.
- Choose the correct normal map format Switch between OpenGL and DirectX modes depending on your target engine. Unreal Engine commonly uses DirectX normal maps, while Blender and many Unity workflows use OpenGL-style maps.
- Preview the result Use the built-in 3D viewer to check how the normal map reacts to lighting. Rotate the sphere from different angles to make sure bumps appear correctly and are not inverted.
- Download the normal map Click Download to save the generated PNG file and import it into your 3D software or game engine.
For better results, prepare your source image before conversion. If the image is in color, convert it to grayscale first, then increase contrast to separate raised and recessed areas. Higher contrast creates stronger normal details, while softer contrast produces a more realistic surface.
Another option is Materialize, which uses the same image-to-normal-map concept but provides more advanced controls. It includes sliders for smoothness, detail intensity, and a live 3D preview of the complete PBR material workflow. Use Materialize when you need not only a normal map, but also a full texture set including roughness, metallic, and ambient occlusion maps.
For more complex assets with sculpted geometry, baking in Blender gives you more control.
How to Bake a Normal Map in Blender
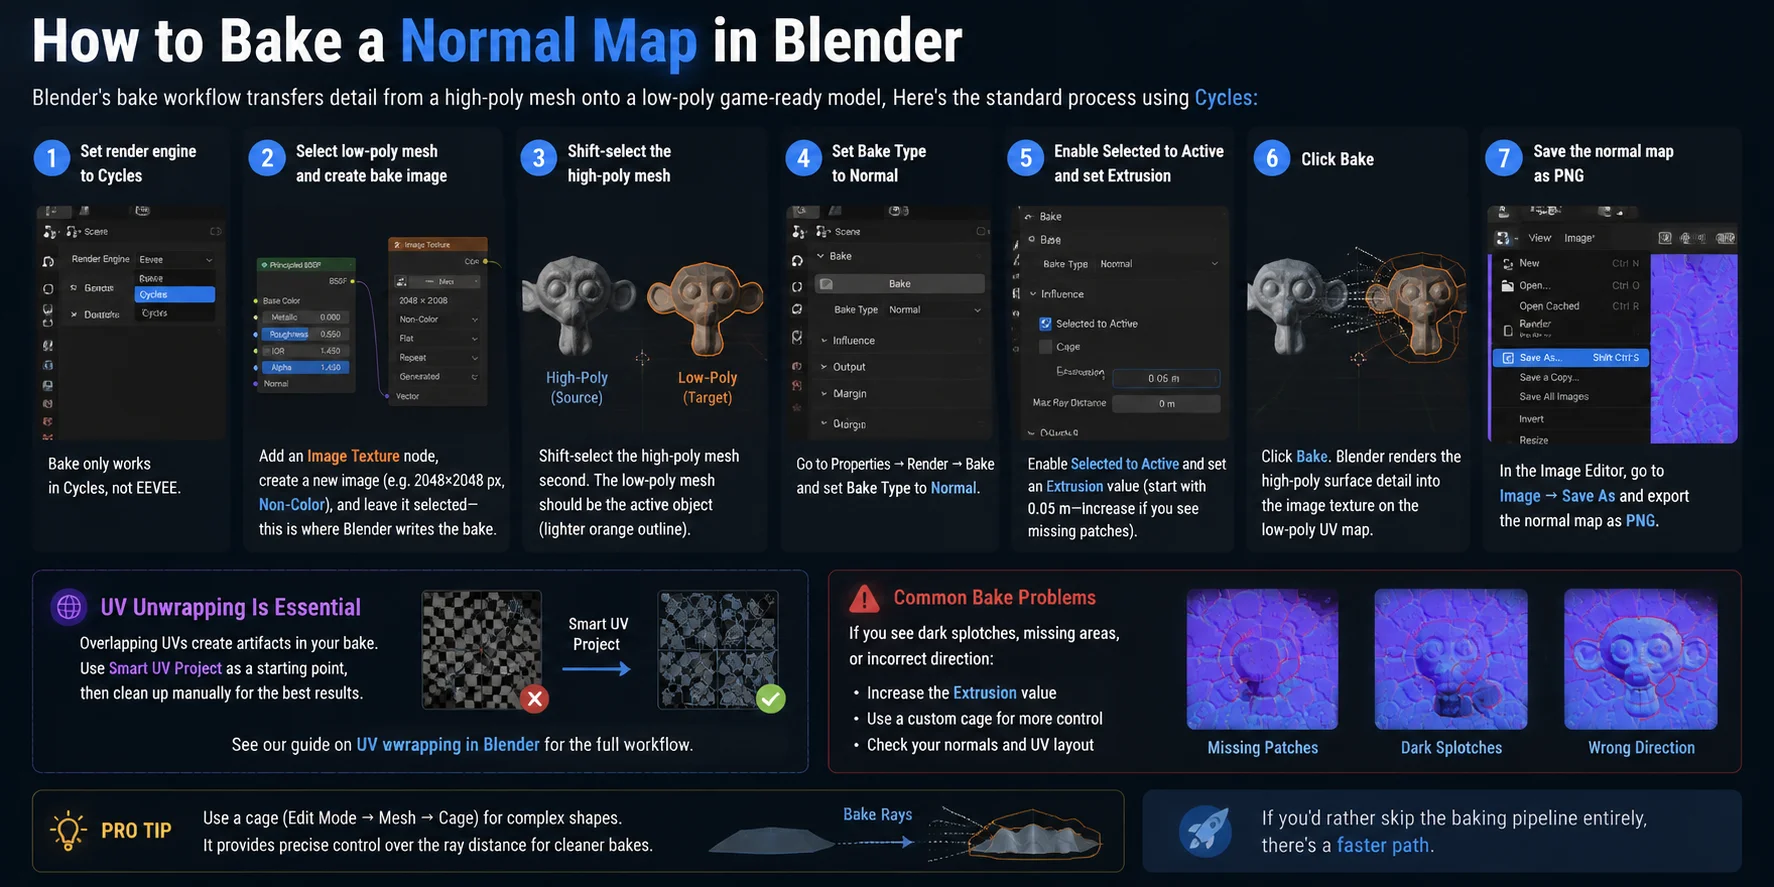
Yes, Blender can generate normal maps through its built-in baking workflow. Baking transfers high-poly surface details, such as sculpted wrinkles, scratches, and small geometry changes, onto a low-poly mesh using a texture. This allows game-ready models to keep a lightweight polygon count while preserving visual detail. The standard method uses Blender’s Cycles render engine.
- Switch to Cycles render engine Open the Render Properties panel and change the render engine to Cycles. Blender’s normal map baking feature works in Cycles, not EEVEE.
- Prepare the low-poly mesh and bake image Select your low-poly model. In the Shader Editor, add an Image Texture node and create a new image, such as 2048×2048 px. Set the image color space to Non-Color and keep this image node selected, because Blender will write the baked normal data into it.
- Select both meshes correctly Shift-select the high-poly mesh while keeping the low-poly mesh active. The active object should be the low-poly model, shown with the lighter orange outline, because the baked texture will be created for this mesh.
- Configure the bake settings Go to Properties → Render → Bake and set Bake Type to Normal. Enable Selected to Active so Blender transfers details from the high-poly model to the low-poly version.
- Adjust the bake distance Set the Extrusion value to control how far Blender searches for high-poly details. Start with around 0.05 m. If some details are missing, increase the value or use a cage for more accurate projection control.
- Start baking Click Bake and wait while Blender projects the high-poly surface information onto the low-poly UV map. The result will appear in the image texture created earlier.
- Save the normal map Open the Image Editor, select the baked image, then choose Image → Save As and export the normal map as a PNG file. You can now use it in Unity, Unreal Engine, or other 3D workflows.
Before baking, make sure your low-poly mesh has a clean UV layout. Overlapping UV islands often create unwanted artifacts, so UV unwrapping is an essential preparation step. Smart UV Project is a quick starting point, but manual cleanup usually gives better results for game assets. A proper UV workflow can also improve texture quality and reduce baking errors.
Common bake problems usually come from incorrect projection settings. Dark patches, distorted details, or reversed surface directions can often be fixed by increasing the Extrusion value, adjusting the cage distance, or enabling a custom cage for more precise control.
If you'd rather skip the baking pipeline entirely, there's a faster path.
Tripo AI: Get Normal Maps Automatically
For AI-generated 3D models, creating a normal map does not require a separate baking workflow. Every model exported from Tripo AI includes a complete PBR texture package with base color, normal map, roughness map, and metallic map bundled into the GLB or FBX file. The normal map is generated automatically from the model’s surface details, so you can move directly from generation to rendering or game integration.
Follow these steps to get a ready-to-use normal map from Tripo AI:
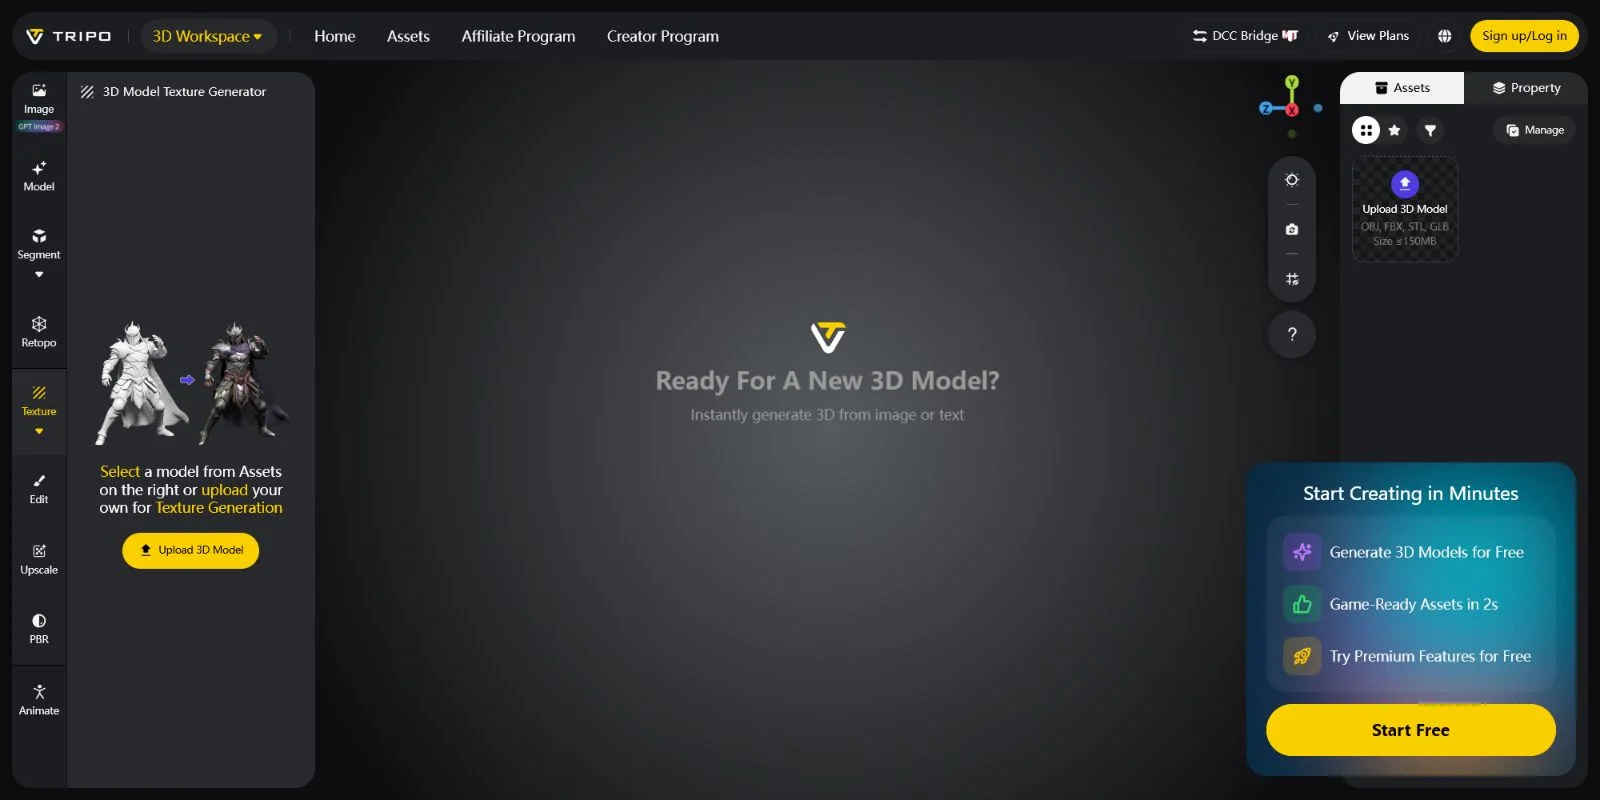
- Open Tripo AI Studio and sign in Go to Tripo AI Studio and create or access your account to start generating a 3D model.
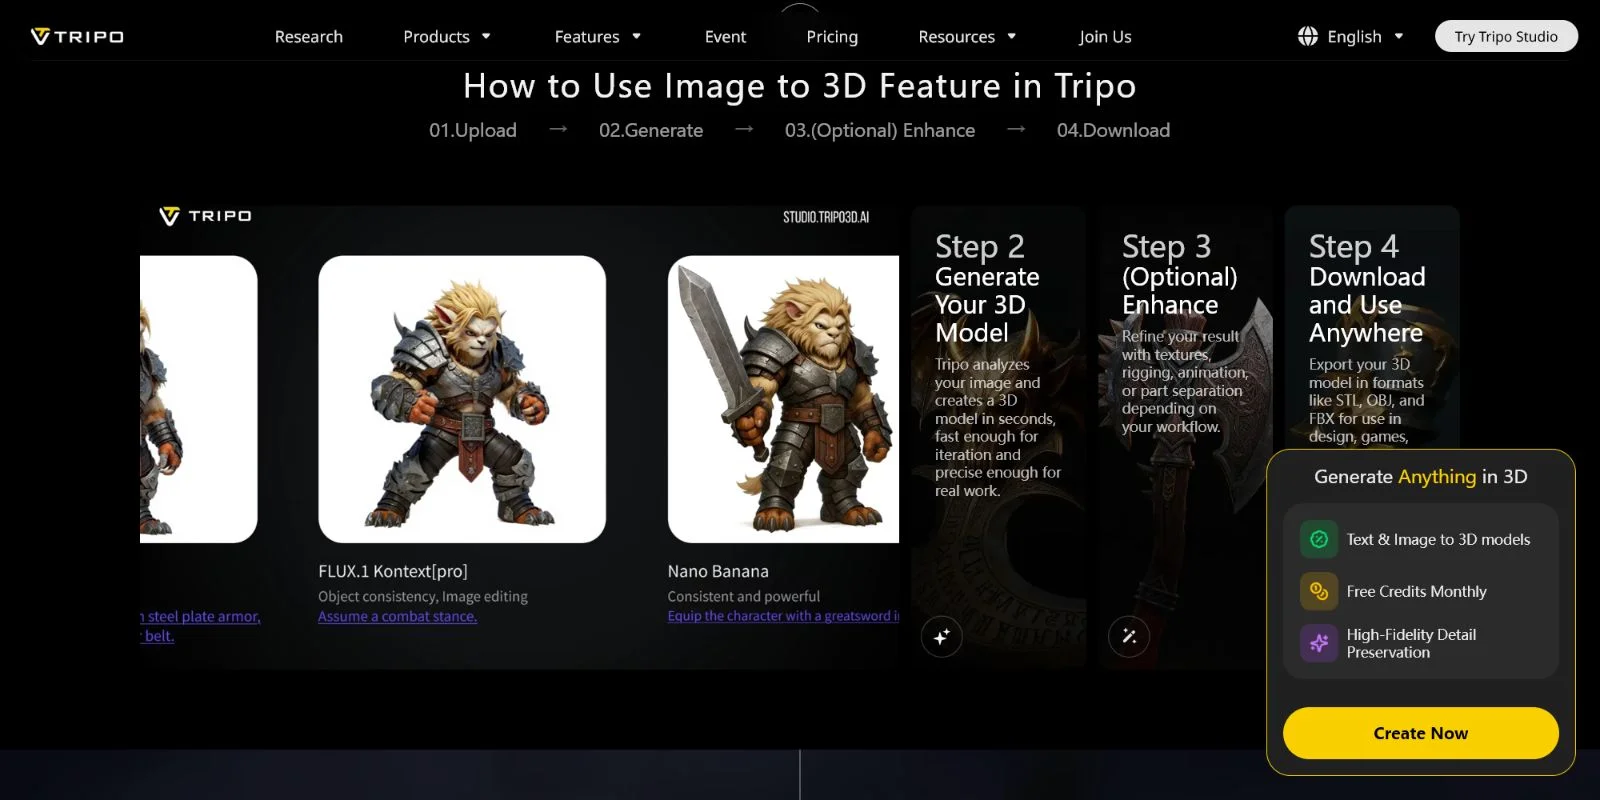
- Generate your 3D model Enter a text prompt describing your asset or upload a reference image for image-to-3D generation. Tripo AI creates the model along with its texture data.
- Preview the generated textures After generation finishes, open the model viewer and check the texture preview. The PBR materials, including the normal map, are already included in the generated asset.
- Export your model Click Export and choose the format that matches your workflow. Use GLB for web applications, real-time engines, and lightweight pipelines, or choose FBX for DCC software such as Blender, Maya, and Cinema 4D.
- Import the model into your software Open the exported file in Blender or your target engine. The normal map is already connected through the material system. In Blender, connect the Normal Map node to the Principled BSDF shader to activate the surface detail.
- Adjust normal intensity if needed Fine-tune the effect using Blender’s Normal Map node strength setting or your game engine’s material multiplier. This lets you increase or reduce the appearance of surface depth without modifying the mesh.
This automatic workflow is ideal for concept assets, prototypes, and background objects where manual baking would take unnecessary time. The generated normal map is calculated from the AI-created geometry, providing accurate PBR shading immediately after export. It is especially useful when you need many assets quickly and want to focus on design rather than technical preparation.
For hero assets that require carefully controlled micro-details, custom baking in Blender or xNormal still provides more artistic control. However, when speed and a complete ready-to-use asset pipeline matter, Tripo AI offers a faster solution.
No matter which method you use, these common questions come up again and again.
Frequently Asked Questions
How do I make a normal map from an image?
Upload your image to NormalMap-Online, adjust the Strength slider to control depth, select your convention (OpenGL or DirectX), and download the PNG. For a grayscale source, high-contrast images produce sharper results. The full step-by-step is in the "How to Generate from an Image" section above.
What is the best normal map generator?
For browser-based use with no install, NormalMap-Online is the fastest option. For a full PBR suite from a single image, Materialize. For baking from a high-poly mesh, xNormal or Blender. For AI-generated models with normals included automatically, Tripo AI. The right answer depends on your starting point.
Is there a free normal map generator?
Yes — NormalMap-Online, Materialize, xNormal, and Blender are all free. NormalMap-Online requires no download. Materialize and xNormal are free Windows desktop apps. Blender is free and open-source on all platforms.
Can Blender generate normal maps?
Yes. Use Blender's Cycles bake workflow: set Bake Type to Normal, select high-poly then low-poly (active), enable Selected to Active, set an Extrusion value, and click Bake. The result is an RGB normal map saved to the image texture node you created. See the full steps in the Blender section above.
What is the difference between OpenGL and DirectX normal maps?
The Y-axis (green channel) is flipped between the two. OpenGL normal maps have a bright green channel pointing up; DirectX maps invert it. Blender and Unity use OpenGL by default. Unreal Engine uses DirectX. If detail looks inverted (bumps appear as dents), flip the green channel — most tools have a toggle for this.
How is a normal map different from a bump map?
A bump map is a grayscale image that estimates surface height — it only encodes up and down. A normal map uses RGB to store the full surface direction (X, Y, Z), giving much more accurate results under dynamic lighting and from any viewing angle. Normal maps are the industry standard for real-time 3D.
Can I generate a normal map from a photo?
Yes. Upload any photo to NormalMap-Online or Materialize. Convert the photo to grayscale first for best results — brightness differences in the image become the height data the tool reads to generate the normal map.
What format should I save my normal map in?
PNG is the most widely supported format and works across Blender, Unity, and Unreal Engine. Use TGA if you need lossless alpha channel support. EXR is preferred for film/VFX pipelines that require high dynamic range precision. Avoid JPEG — lossy compression introduces color artifacts that corrupt normal map data.
What is the best free normal map generator for game textures?
For game-ready textures, xNormal is the dedicated baking choice — it handles cage-based baking and multi-object setups cleanly. For a quicker path, Blender's bake workflow keeps everything in one app. If you're generating the 3D model as well, Tripo AI exports game-ready GLB files with normal maps already included.
What is the difference between online and offline normal map generators?
Online generators (NormalMap-Online) run in a browser — no install, immediate access, but they require an internet connection and are limited to image-to-normal conversion. Offline tools (Materialize, xNormal, Blender) run locally, support larger files, offer more controls, and work without a connection. For production use, offline tools give you more precision; for quick one-offs, browser tools are faster.
Conclusion
Normal maps are the foundation of realistic surface detail in modern 3D workflows, but creating them no longer requires a complicated process. For fast image-to-normal-map conversions, NormalMap-Online provides a simple solution in minutes, while Blender and xNormal offer advanced control for detailed baking workflows. If you are creating 3D assets from scratch, Tripo AI Studio simplifies the process by exporting models with a complete PBR texture package, including the normal map.
Start creating AI-generated 3D models with ready-to-use textures in Tripo AI Studio: https://studio.tripo3d.ai/ Explore Tripo AI pricing to choose the plan that best matches your 3D creation workflow: https://www.tripo3d.ai/pricing