Modular 3D Assets for Games: An AI Workflow Guide
TL;DR
- Modular assets are reusable 3D pieces (walls, floors, props) you snap together to build big environments from a small kit.
- Everything depends on a shared grid and consistent pivots—get those right and pieces connect seamlessly.
- You can make a kit, buy one from a marketplace, or generate pieces with AI—each has a clear best use case.
- AI can create base meshes quickly; make them game-ready by refining topology, aligning scale and pivots, and validating them in your target engine.
- Watch draw calls: atlas textures, reuse materials, and batch meshes so a modular scene stays performant.
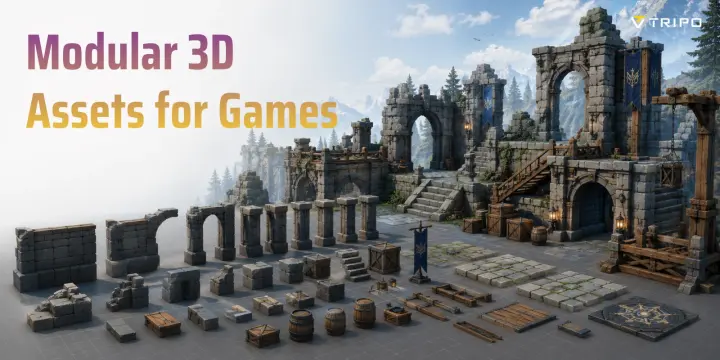
Modular 3D assets for games are reusable building blocks—walls, floors, corners, and props—designed to snap together on a shared grid so you can assemble large, varied environments from a small kit. You can model a kit yourself, download one from a marketplace, or generate game-ready pieces with an AI 3D tool. This guide covers all three, plus how to assemble and optimize them.
What Are Modular 3D Assets (and Why Use Them)?
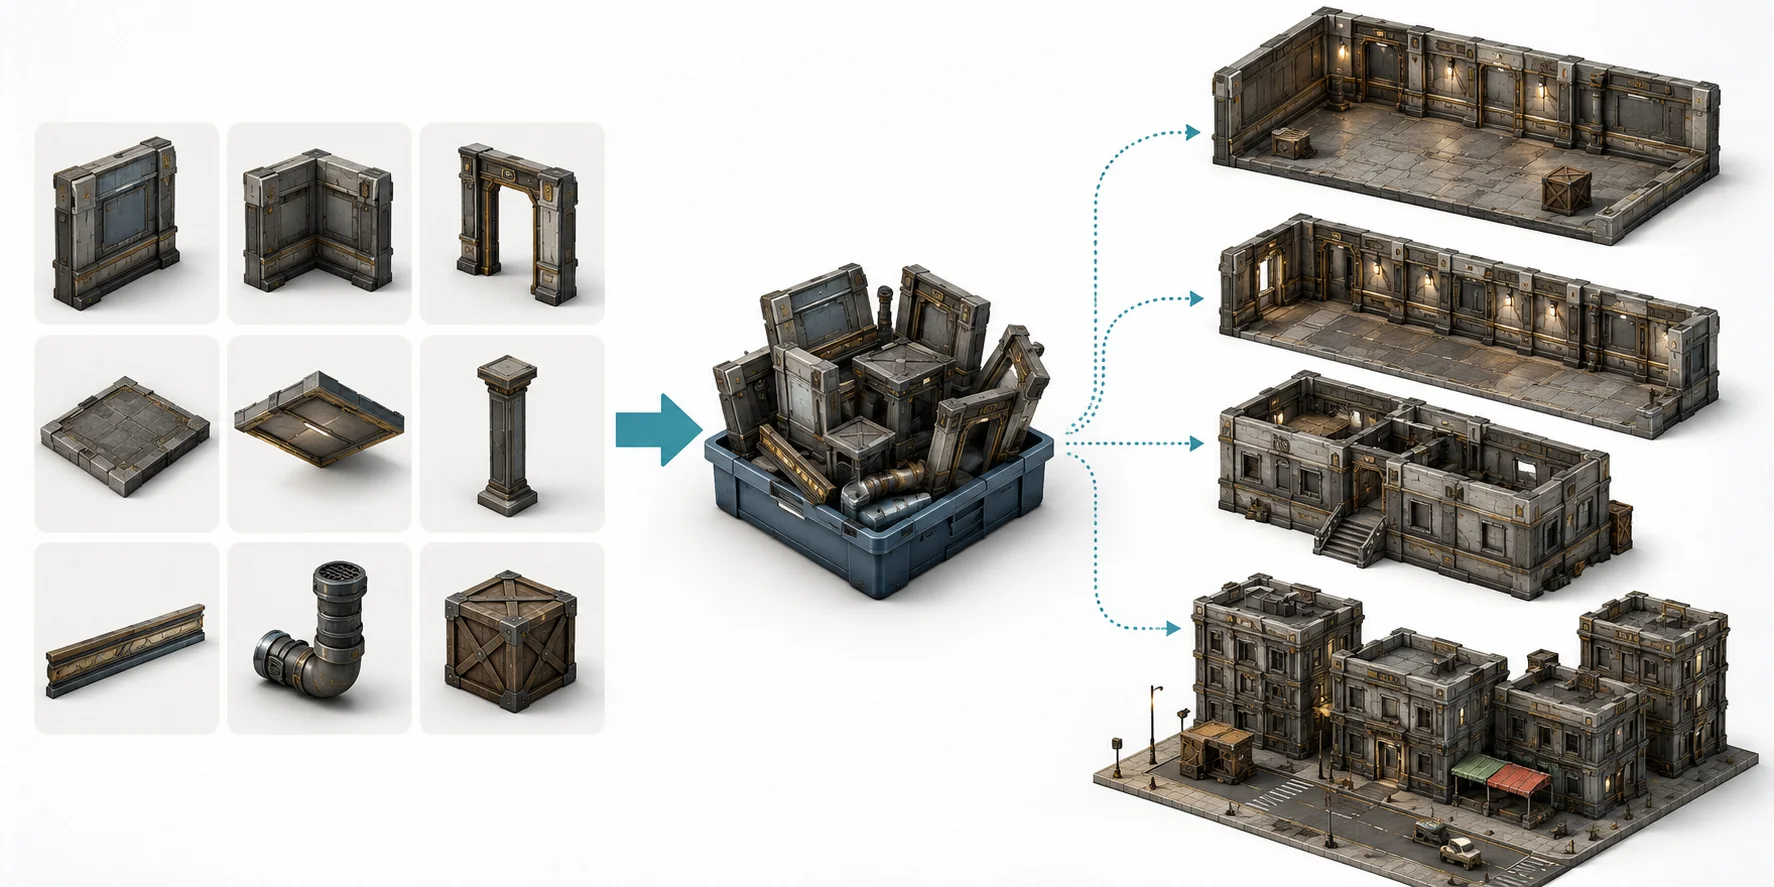
Modular 3D assets for games are standardized, reusable pieces that assemble into larger environments. A small kit of compatible walls, floors, corners, and props can create many layouts while preserving a consistent visual style.
This modular workflow is widely used because it saves production time and supports faster iteration. By reusing the same modular game assets, teams can avoid duplicating geometry, keep materials and proportions consistent, and rearrange existing pieces when a level changes. When meshes and materials are shared efficiently, modular kits can also reduce duplicated asset data.
What's Usually Included in a Modular Kit?
| Module Type | Typical Assets |
|---|---|
| Structure | Walls, floors, ceilings |
| Connectors | Inside/outside corners, trim pieces |
| Openings | Doors, windows, arches |
| Vertical | Pillars, stairs, railings |
| Props | Crates, pipes, vents, lights |
How Modular 3D Assets Build Large Game Worlds
The Core Rules That Make Modules Fit (Grid & Pivots)
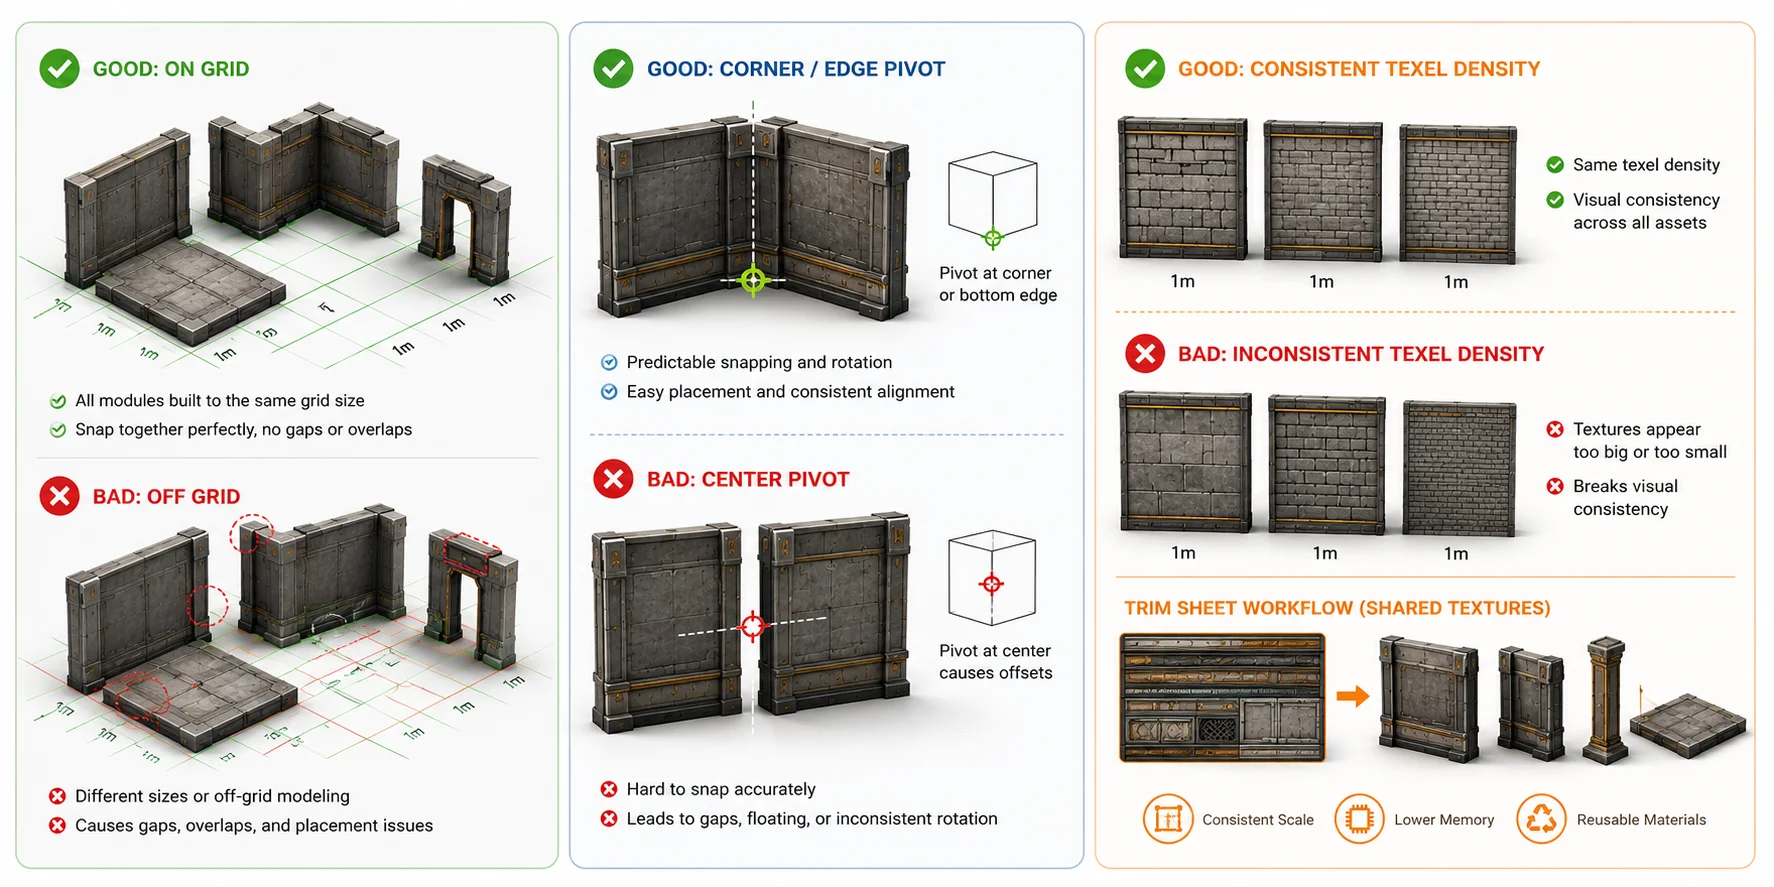
A successful modular environment is not just a collection of reusable meshes—it follows a set of design rules that ensure every piece fits together seamlessly. Most problems beginners encounter, such as visible gaps, overlapping geometry, or inconsistent textures, come from ignoring these fundamentals rather than from poor modeling. Whether you are creating modular 3D assets for games manually or building AI modular assets, consistent standards for grid size, pivots, and textures are what turn individual pieces into a professional modular kit.
Grid Snapping — Build Everything on the Same Grid
Grid snapping is the foundation of modular design. Every asset should be created using a shared measurement system—commonly 1 m, 2 m, or 4 m modules depending on the project's scale. For example, if a wall section is 2 meters wide, doorways, windows, floor tiles, and ceiling panels should all follow the same dimensions. This allows pieces to snap together perfectly inside engines like Unity or Unreal Engine without manual adjustments.
Working on a consistent grid also speeds up level design. Artists can build modular environment assets once and designers can assemble large maps simply by dragging, duplicating, and snapping pieces into place.
Pivot Points & Orientation — Make Every Piece Snap Correctly
Even perfectly sized modules will not align if their pivots are inconsistent. Most modular game assets place the pivot at a corner or along the bottom edge, making placement predictable when snapping to the grid. Every module should also use the same forward direction and vertical axis so that rotation behaves consistently.
A standardized pivot system eliminates tiny gaps, overlapping meshes, and misplaced pieces, making large environments much easier to assemble and edit.
Texture Density & Trim Sheets — Keep Everything Looking Consistent
Geometry is only half of modular design—materials need to match as well. All 3D modular assets should share a consistent texel density so that bricks, metal panels, or wood planks appear at the same scale across every module. Trim sheets are commonly used to let multiple assets reuse a single texture atlas, reducing memory usage while maintaining a unified look.
When these three principles work together, individual modules become game ready modular 3D models that are easy to reuse, optimize, and expand into large, visually consistent game worlds.
The Core Principles of Modular Asset Design
Three Ways to Get Modular Assets
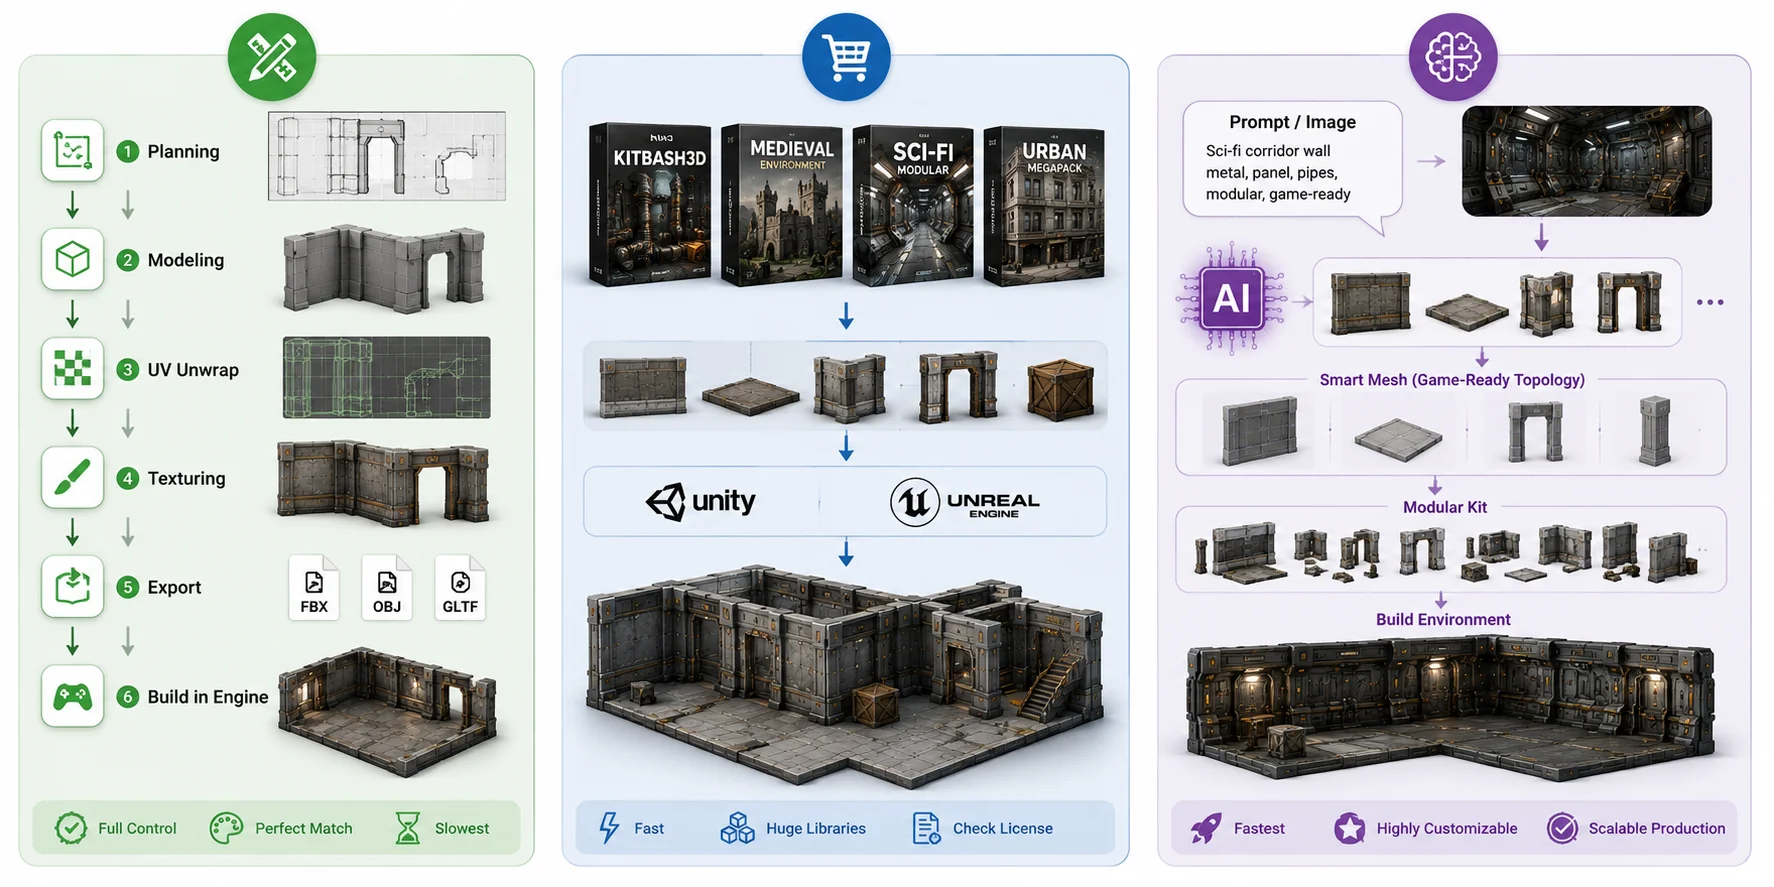
There are three common ways to build a library of modular 3D assets for games: create a custom kit, buy an asset pack, or use AI to accelerate base-mesh production. The right mix depends on budget, timeline, and customization needs.
Make Your Own Kit
Building your own kit gives you the most control. Plan the grid, model, unwrap, texture, and test the assets in-engine. It takes longer, but it is the best fit when a location needs a distinctive style or strict technical requirements.
Buy or Download from Marketplaces
If speed is your priority, ready-made modular game assets can dramatically shorten production time. Popular sources include KitBash3D, itch.io, Sketchfab, the Unity Asset Store, and Fab (formerly Unreal Engine Marketplace), with packs for fantasy, sci-fi, medieval, urban, and realistic themes. Free packs can help with prototypes and solo projects, while paid collections may offer more consistent art direction and support. Before using any asset, check the license for commercial use, modification, redistribution, attribution, and UGC terms.
Generate with AI
AI can speed up the creation of 3D modular assets by generating a base mesh from a text prompt or reference image. Treat that output as a starting point: refine topology, standardize scale and pivots, and test the piece against your modular grid before calling it a game ready modular 3D model.
In the next section, we will turn AI-generated base meshes into a reusable modular kit through topology, grid, texture, and engine-validation steps.
Three Ways to Create Modular 3D Assets
An AI Workflow for Modular Game Assets
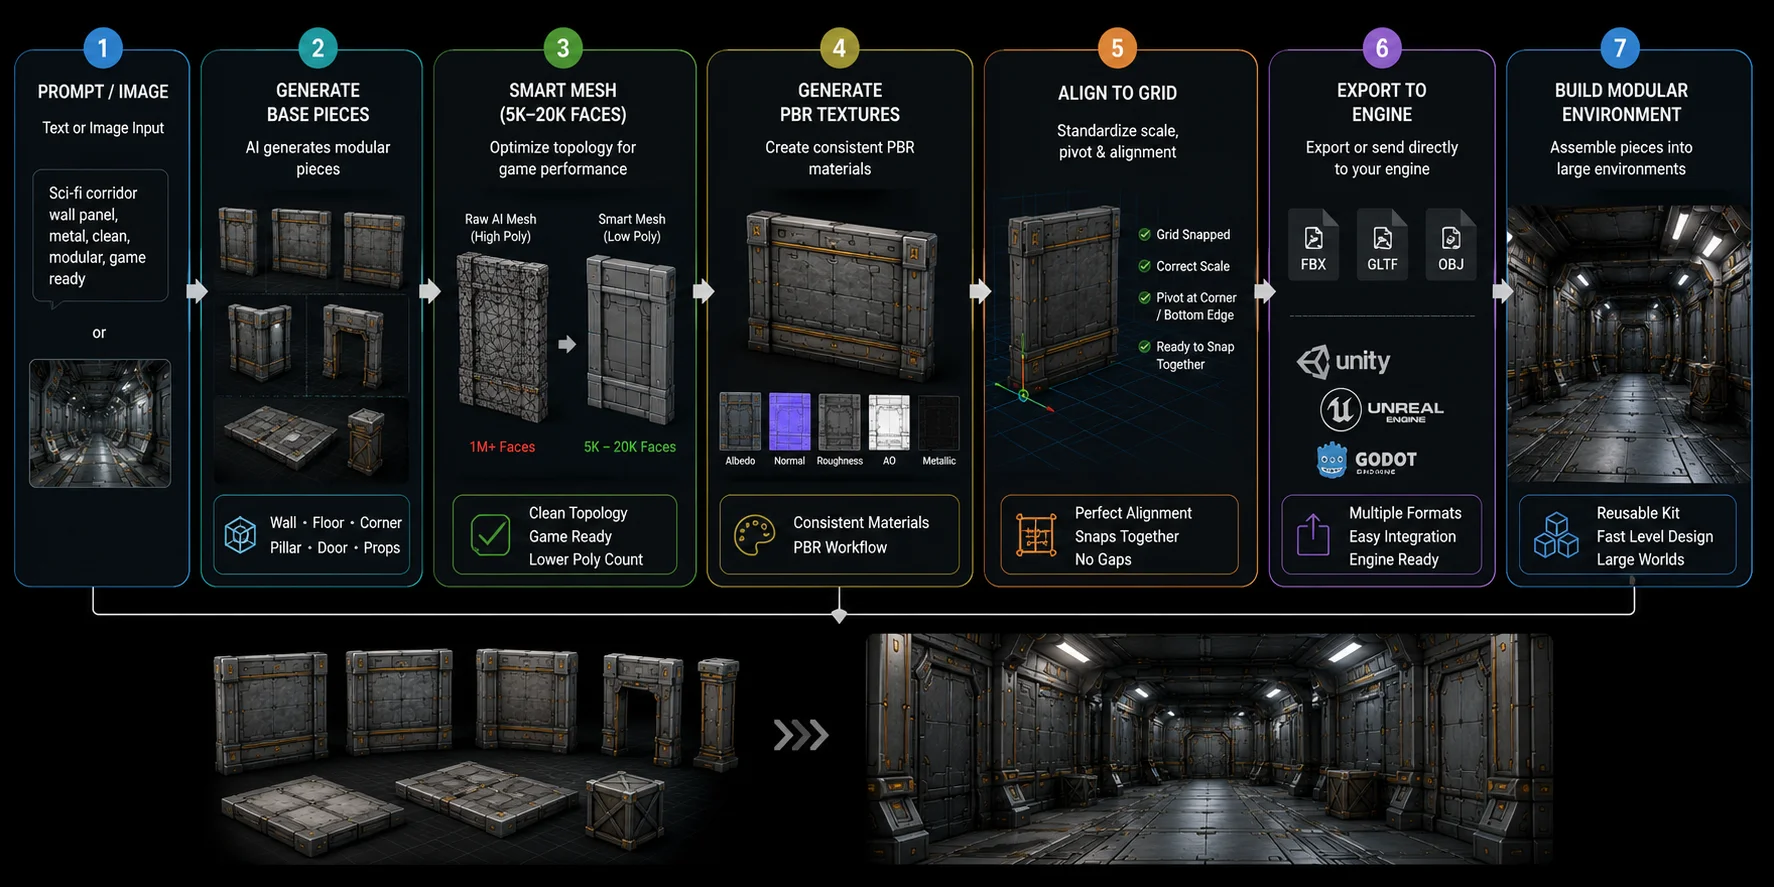
AI can speed up modular-asset production by creating base meshes that artists refine into reusable pieces. Treat it as the start of the workflow: topology, grid alignment, texture preparation, and engine testing still determine whether a kit is production-ready.
Generate the Base Pieces
Start by generating each module individually from a text prompt or reference image. Instead of asking AI for an entire building, create reusable pieces such as walls, corners, floor tiles, door frames, pillars, stairs, and small props. These individual 3D modular assets are much easier to edit, replace, and recombine into different environments than a single large mesh. Building a modular kit piece by piece also keeps every asset reusable across multiple levels.
Get Game-Ready Topology
Raw AI meshes are often far too dense for real-time rendering. A generated wall may contain hundreds of thousands—or even millions—of polygons, making it unsuitable for game environments. Before using the asset, convert it into game ready modular 3D models with clean topology and an appropriate polygon budget.
A practical workflow is:
Upload or Generate → Smart Mesh → 5K–20K Faces → Retry (if needed) → Generate Texture → Export to DCC
The Smart Mesh stage creates clean, optimized topology suitable for game engines while preserving the overall shape of the model. In Tripo's game-asset workflow, 5K–20K faces is a practical starting range; set the final budget according to screen size, target platform, reuse count, materials, and LOD strategy. Use Tripo Smart Mesh before continuing with texturing and engine integration.
Align to Your Grid
After optimization, import every module into your DCC or engine and standardize the kit. Snap each asset to your chosen grid size, apply a consistent scale, and place pivots at the corner or bottom edge for predictable placement. Testing several modules together early helps identify small gaps or alignment issues before they spread across an entire environment. These simple adjustments transform individual modular game assets into a cohesive production-ready kit.
Texture & Export to Your Engine
The final step is generating consistent PBR textures and exporting the finished assets. Keep texel density and material style uniform across the kit so walls, floors, trims, and props look cohesive. Export in formats such as FBX, GLB, or OBJ, then test the assets in Unity, Unreal Engine, Godot, or your preferred DCC application. Confirm normals, UVs, material slots, collision needs, and scale before using the kit in a production scene.
Run a Pre-Export QA Check
- Confirm module dimensions, pivots, forward direction, and scale against the chosen grid.
- Check normals, UVs, material slots, and texture consistency before importing the full kit.
- Create the collision and lightmap setup required by your engine workflow.
- Assemble a small test scene first to catch gaps, overlaps, and snap-size issues early.
AI Workflow for Creating Game-Ready Modular Assets
Assembling Modules in Unity and Unreal
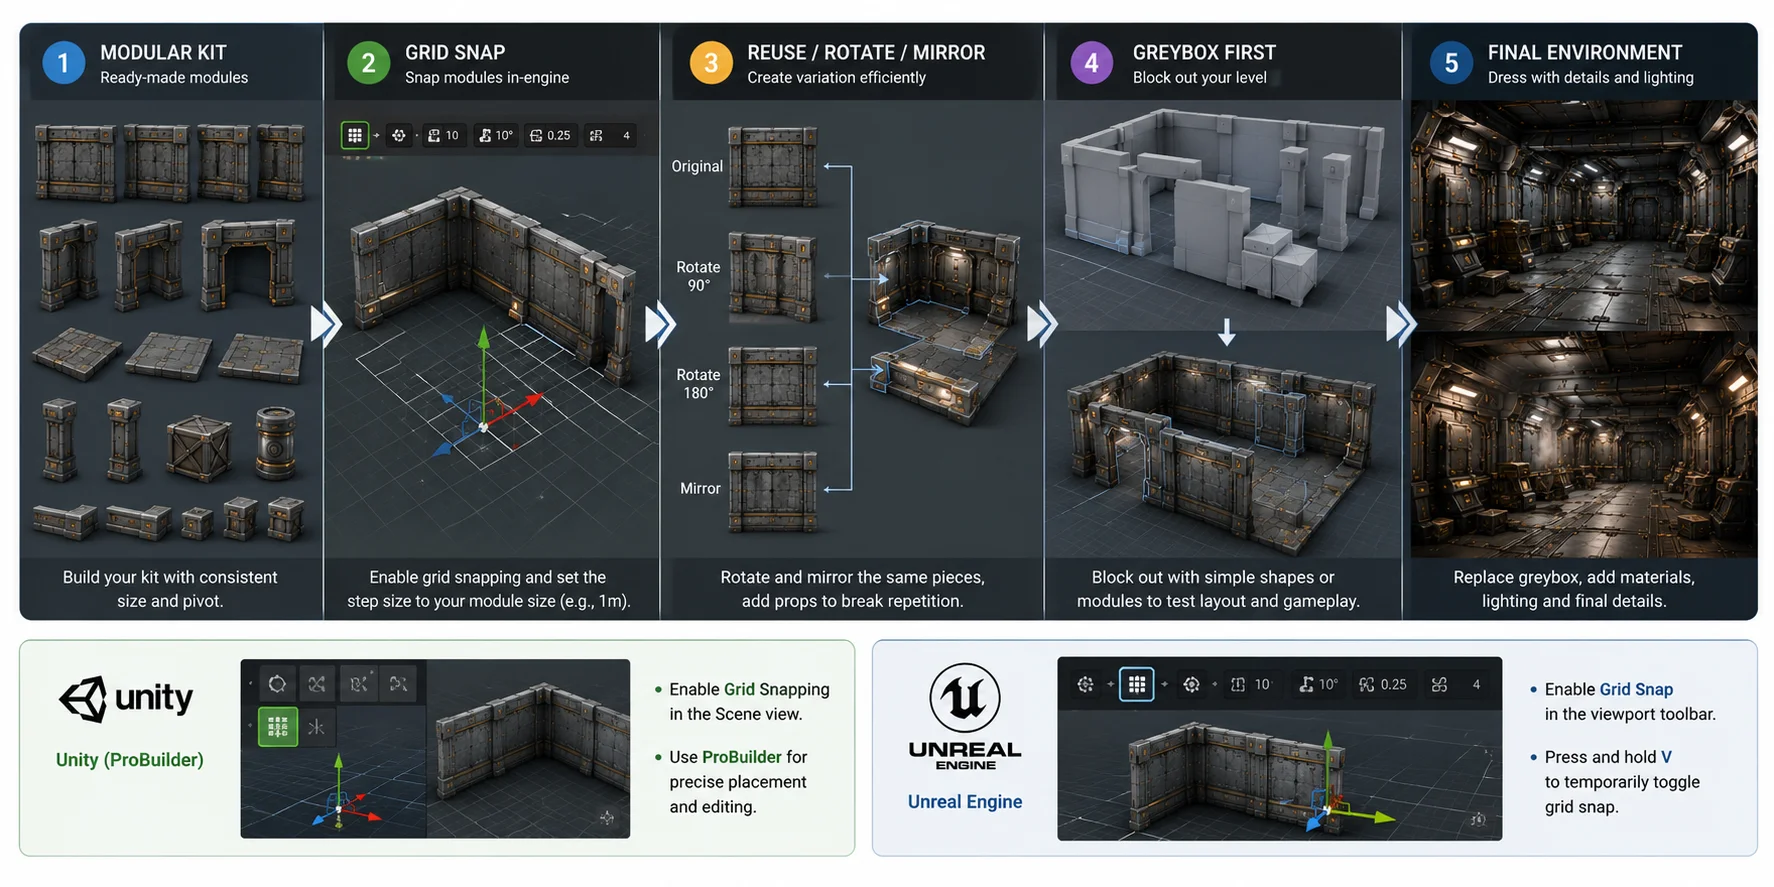
Once your modular 3D assets for games are ready, it's time to assemble them inside your engine. Both Unity and Unreal Engine provide built-in grid snapping tools that make modular level design faster and more accurate. Following a consistent workflow helps eliminate gaps, misalignment, and repetitive layouts.
Snap to Grid In-Engine
Enable grid snapping and set the snap size to match your module dimensions, such as 1 m, 2 m, or 4 m. This ensures modular game assets fit together without manual adjustments.
In Unity, use Grid Snapping or ProBuilder to place assets precisely. In Unreal Engine, enable Grid Snap in the viewport and choose the same grid size used during modeling.
Reuse, Rotate, and Mirror
Reuse is the biggest advantage of modular environment assets. Rotate, mirror, and combine the same wall, floor, or corner pieces to create new layouts while reducing visible repetition. Small props and decals can further add variation without increasing the number of unique assets.
Greybox First, Then Dress
Start with a simple greybox to test scale, layout, and gameplay before replacing placeholder blocks with game ready modular 3D models. This lets designers iterate quickly and avoids rebuilding finished assets when the level changes. Once the layout is finalized, add materials, lighting, and props to complete the environment.
Building a Modular Environment in Unity and Unreal
Keep It Performant — Optimizing a Modular Scene
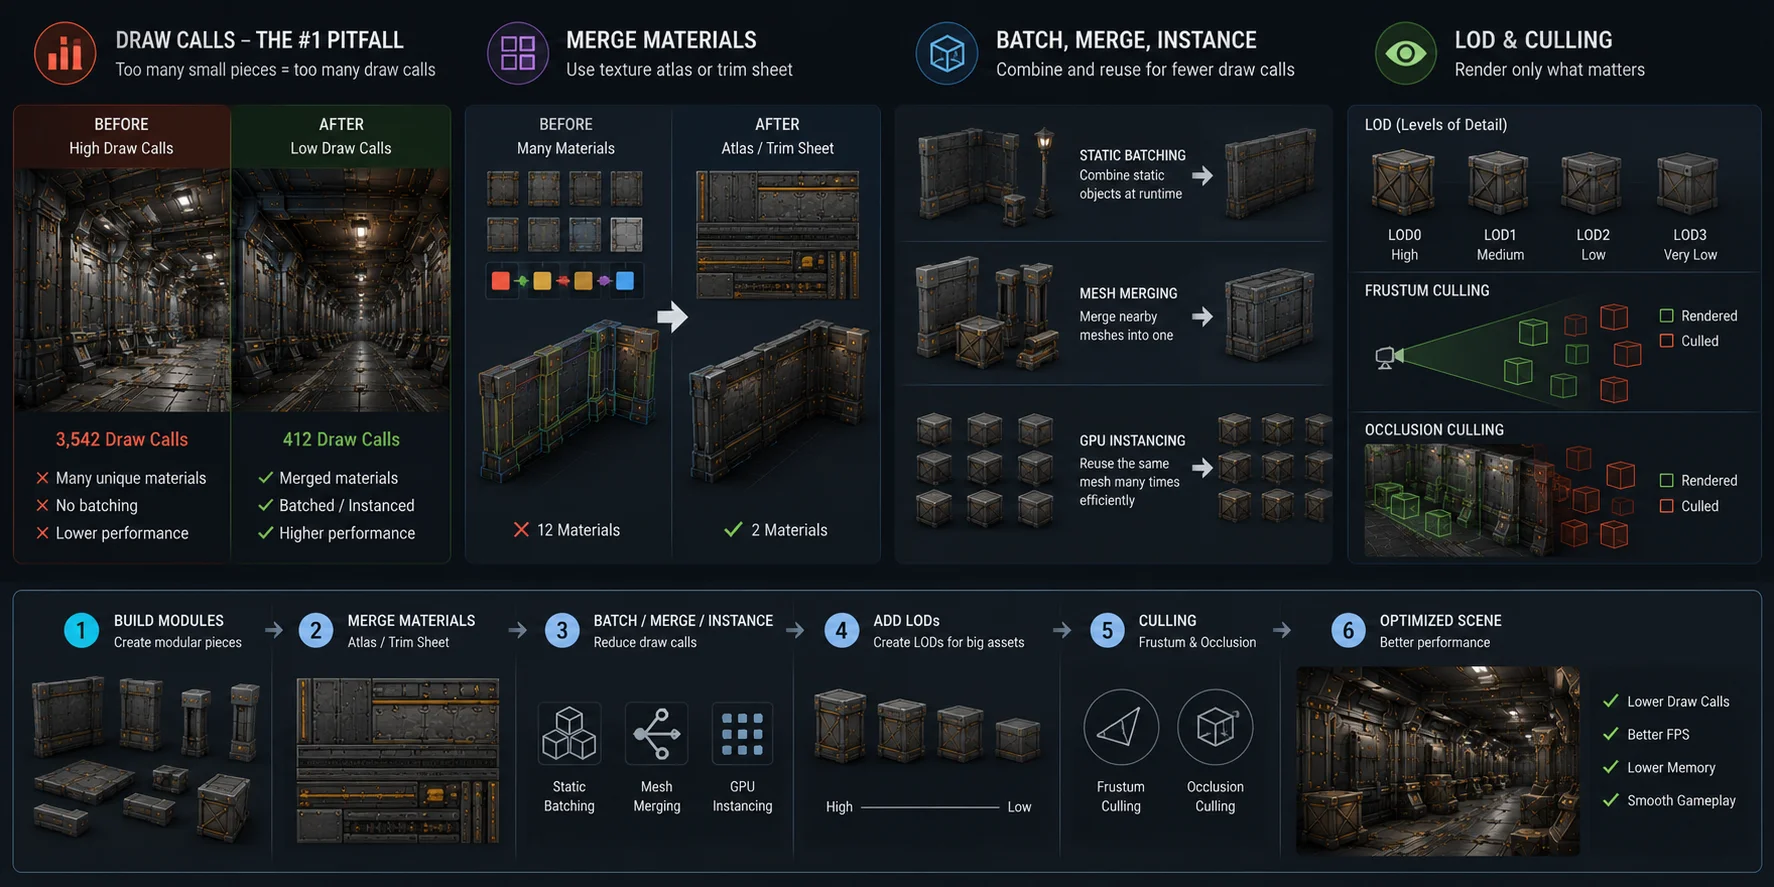
Modular design makes building levels faster, but it also introduces new performance challenges. The biggest one is draw calls. A scene built from hundreds of small modular 3D assets for games may look efficient, but if every wall, prop, and trim uses a different mesh or material, the engine must issue many separate draw calls. Good optimization keeps your modular workflow fast without sacrificing visual quality.
Reduce Draw Calls with Shared Materials
One useful optimization is reducing material variation. When appropriate, combine textures into a texture atlas or use trim sheets so multiple modular game assets share the same material. This can reduce draw calls and duplicated texture data, but validate the trade-off with a profiler on the target platform.
Batch, Merge, and Instance
Modern engines offer several ways to reduce rendering overhead. Use static batching for appropriate non-moving objects, merge meshes where that improves the scene, and use GPU instancing for repeated objects such as pillars, crates, or lights. Profile first, then choose the method that matches your materials, visibility, and platform constraints.
Use LODs and Culling
Not every object needs to be rendered at full detail all the time. Create LODs (Levels of Detail) so distant game ready modular 3D models automatically switch to lower-polygon versions. At the same time, enable frustum culling and occlusion culling so objects outside the camera view—or hidden behind walls—are not rendered at all. Together, these techniques can significantly improve frame rates in large environments.
Performance Checklist
- ✔ Use a texture atlas or trim sheet to reduce materials.
- ✔ Reuse materials across the entire modular kit.
- ✔ Apply static batching, mesh merging, or GPU instancing where appropriate.
- ✔ Generate LODs for medium and large assets.
- ✔ Profile the scene first, then validate batching, instancing, LOD, and culling changes on the target platform.
By combining these practices, you can keep large modular environments visually rich while maintaining smooth real-time performance.
Optimizing a Modular Game Scene for Better Performance
Modular Kits vs Unique Models — Which to Use?
Use modular kits for repeatable environments and unique models for landmarks, hero props, and focal spaces. Most projects combine both: reuse a core kit for speed, then add custom assets where visual identity matters most.
Modular Kits vs Unique Models
| Factor | Modular Kits | Unique Models |
|---|---|---|
| Cost | Lower through asset reuse | Higher due to one-off production |
| Production Time | Faster | Slower |
| Memory & Draw Calls | More efficient with shared materials | Higher if every asset is unique |
| Visual Uniqueness | Consistent but can become repetitive | Highest visual impact |
| Iteration Speed | Very fast to modify and expand | Changes require rebuilding assets |
| Best Use Cases | Large environments, open worlds, interiors | Hero props, landmarks, signature locations |
Rule of thumb: Use modular 3D assets for large, consistent environments, and reserve unique models for hero scenes and iconic objects that need to stand out.
When Modular Doesn't Work (Limits)
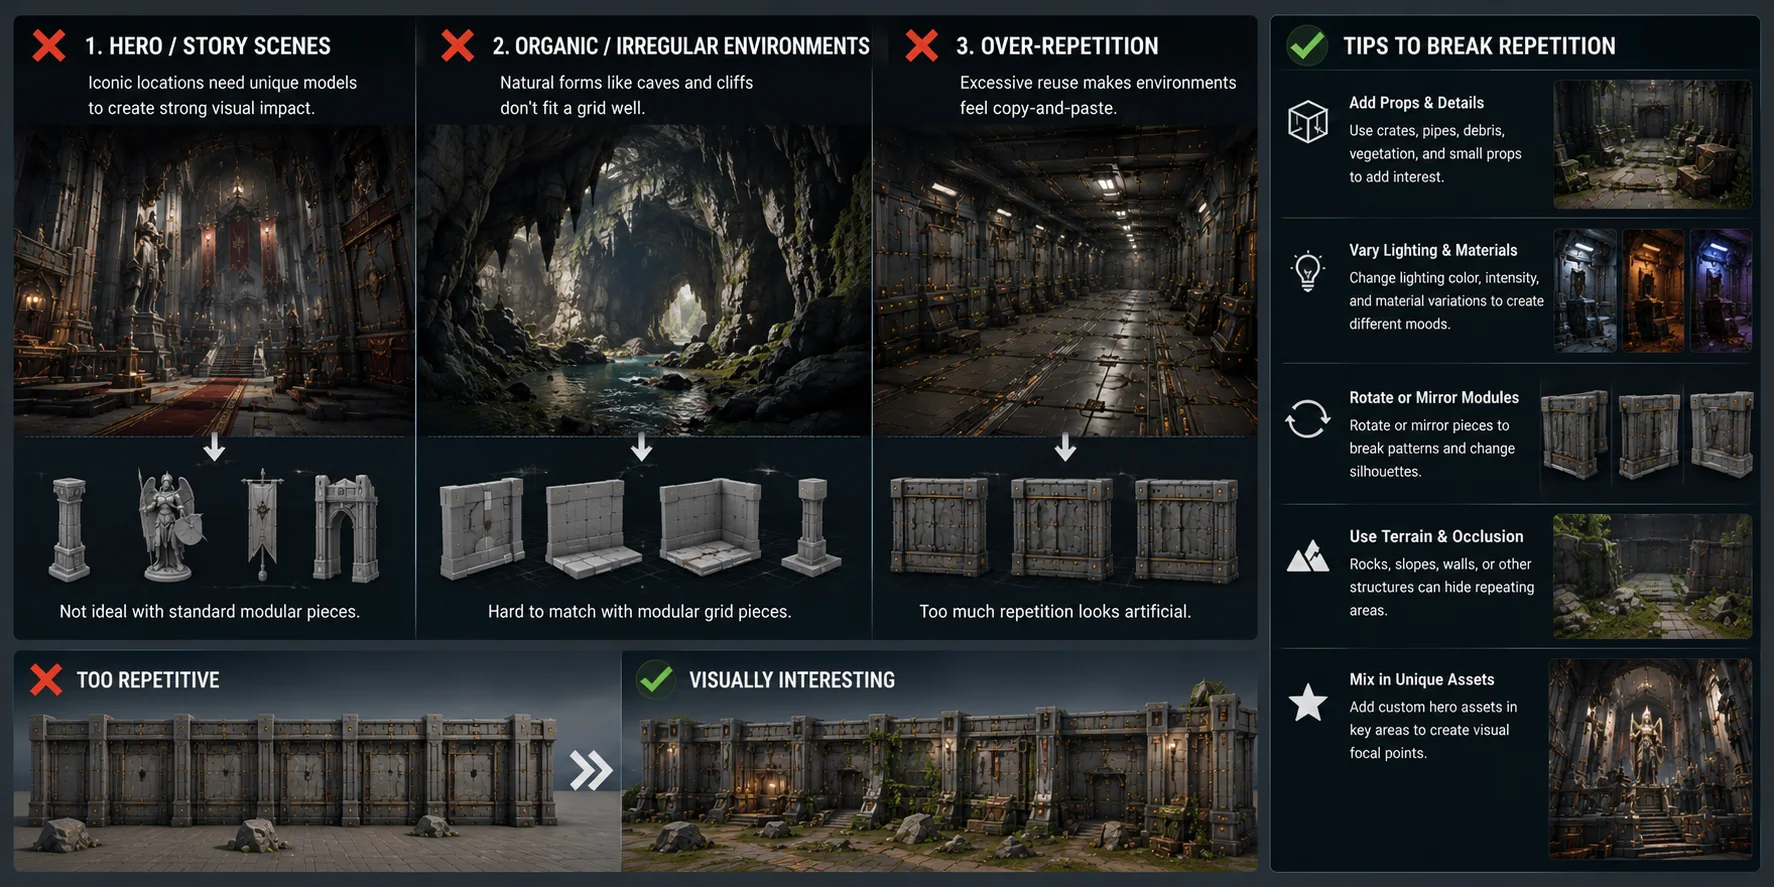
Modular 3D assets are efficient, but they are not ideal for every environment. Custom assets often work better when visual uniqueness matters more than reuse.
Hero locations, cinematic scenes, and iconic landmarks often require one-of-a-kind models that cannot be assembled from a standard modular kit. Likewise, highly organic environments—such as caves, cliffs, tree roots, or rocky terrain—rarely follow a regular grid, making modular environment assets difficult to use without extensive customization.
Another common issue is repetition. Reusing the same modular game assets too often can create an obvious "copy-and-paste" look that breaks immersion. Even well-designed kits need variation to keep environments feeling natural and believable.
Tips to Break Repetition
- Add props such as crates, pipes, vegetation, or debris to create visual variety.
- Vary lighting, decals, and material details between different areas.
- Rotate or mirror modules where appropriate to change silhouettes.
- Use terrain, rocks, or architectural features to hide repeating patterns.
- Mix a few custom hero assets into the modular kit for important locations.
Rule of thumb: Use modular assets for large, repeatable spaces, and reserve custom models for memorable landmarks, story moments, and highly organic environments.
Frequently Asked Questions
What are modular 3D assets in game development?
Modular 3D assets are reusable building blocks such as walls, floors, doors, corners, and props. Artists design the pieces around shared dimensions, pivots, and materials so they can create larger environments from a small kit. This approach supports faster iteration and a more consistent visual language across repeatable spaces.
How do I make modular 3D assets fit together without gaps?
Build every asset on the same grid, use consistent pivots, and keep the same scale, forward direction, and vertical axis. Before producing a full kit, assemble a small test area in your engine with several walls, corners, floors, and door pieces. That test catches gaps, overlaps, and snap-size mismatches while they are still inexpensive to fix.
Where can I find free modular 3D assets for games?
You can find free modular asset packs on itch.io, Sketchfab, the Unity Asset Store, and Fab. Check whether a pack permits commercial use, modification, redistribution, attribution, and UGC publishing before adding it to a project. Also inspect its scale, material count, texture resolution, LODs, and target-engine compatibility rather than judging only from preview images.
Can AI generate modular 3D assets for games?
Yes. AI can generate base meshes for modular pieces from text prompts or images, which can speed up early asset creation. Before using them in a game, refine the topology, set a project-appropriate face budget, align the scale and pivot, and test the result on the intended grid. Treat AI output as a starting point rather than an automatically finished production asset.
How do modular assets affect game performance (draw calls)?
Too many unique meshes and materials can increase draw calls, even in a modular scene. Shared materials, texture atlases, batching, GPU instancing, LODs, and culling can help when they match the scene and platform. Use the engine profiler to confirm which change improves the target build instead of assuming that fewer objects always means better performance.
Modular kits or unique models—which should a solo dev use?
Modular kits are usually the better starting point for a solo developer because they are faster to build, reuse, and revise. Use them for corridors, rooms, buildings, and other repeatable spaces, then reserve custom work for hero props and focal locations. A mixed approach usually gives the best balance between production speed and visual identity.
Conclusion
Modular 3D assets for games make it possible to build large, consistent environments from a small set of reusable pieces. By following solid modular design principles, optimizing for performance, and choosing the right workflow—whether building, buying, or generating with AI—you can create game-ready worlds much faster.
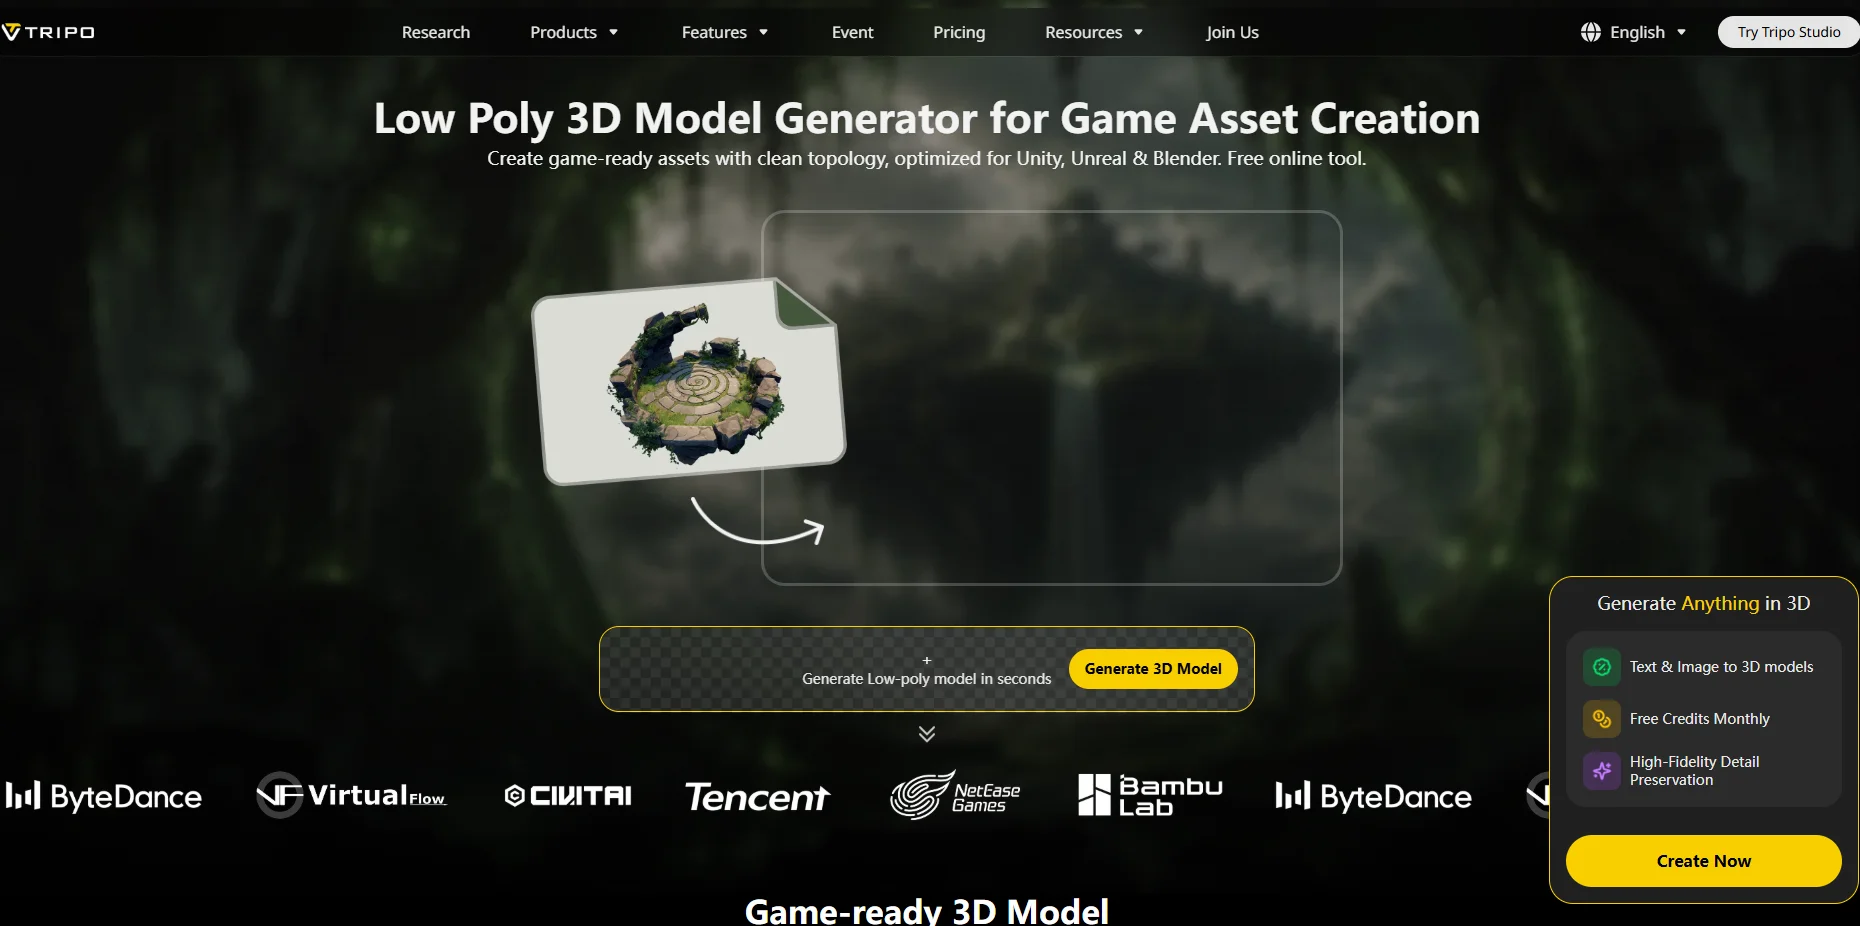
Want to create game-ready modular 3D models more efficiently? Try Tripo AI Studio to generate, refine, texture, and export base assets for your game-development pipeline.