How to Plan Retopology for a 3D Model: A Step-by-Step Guide
TL;DR
- Retopology planning is the foundation of a clean, production-ready 3D mesh. Before rebuilding topology, define your target polycount, identify deformation zones, and choose the right workflow — manual, automatic, or hybrid.
- For AI-generated models, automatic retopology is often the fastest solution because AI meshes usually contain dense geometry without intentional edge flow. Tools like Tripo AI can quickly generate cleaner topology while keeping the original details.
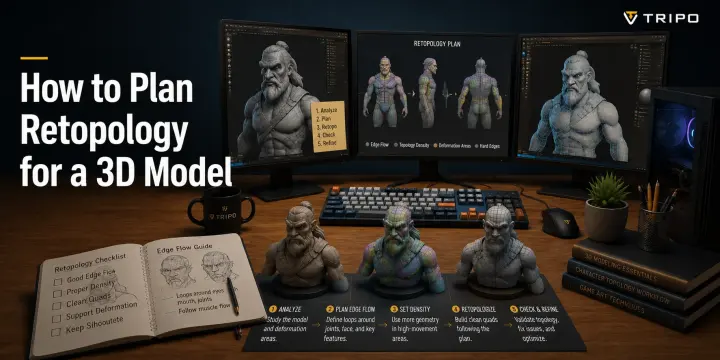
- A successful retopology workflow follows a simple process: analyze the model → set polygon goals → plan edge flow → choose a retopology method → review before UV and animation. Good planning prevents unnecessary rework and makes models easier to rig, animate, optimize, or export.
Introduction
Planning retopology starts before you move a single vertex. The first steps are deciding your target polygon count, identifying areas that need supporting edge loops, and choosing whether a manual, automatic, or hybrid workflow fits your project. Making these decisions early prevents unnecessary cleanup and saves significant time later.
Most retopology tutorials focus on tools and shortcuts, but the real challenge begins with preparation. Skipping the planning stage often leads to rebuilding the same mesh multiple times because the topology direction was unclear. This guide covers the full retopology planning process — from analyzing a high-poly model to choosing the right workflow — so you can build with a clear strategy instead of trial and error.
What Is Retopology — and Why the Planning Phase Matters
Retopology is the process of rebuilding a 3D mesh with a cleaner, optimized polygon structure while preserving the original model’s overall shape and details. Instead of changing what the object looks like, retopology changes how the geometry is organized — creating better edge flow, more efficient polygons, and a mesh that is easier to edit, animate, texture, and export.
High-poly sculpts from tools like ZBrush, Blender, or AI 3D generators are designed to capture surface detail, not production-ready topology. They often contain dense, irregular triangle patterns that make deformation difficult, create problems during UV unwrapping, and increase file size and performance costs in real-time engines. A detailed sculpt may look perfect, but without proper topology, it is rarely ready for games, animation, or interactive applications.
This is where the planning phase becomes critical. Before opening any retopology tool, you need to decide three things: how many polygons the final model needs, which areas require extra edge loops for movement or detail, and whether a manual, automatic, or hybrid workflow makes the most sense for your timeline. These choices determine the entire retopology process.
The planning stage matters even more for AI-generated meshes. AI models are usually created as dense, unstructured triangulated surfaces without intentional edge flow, which makes random cleanup inefficient and unpredictable. A clear plan helps you transform an AI-generated asset into a usable production mesh instead of repeatedly fixing problems later.
The planning phase breaks into three sequential decisions — and each one informs the next: polygon budget, topology requirements, and workflow selection.
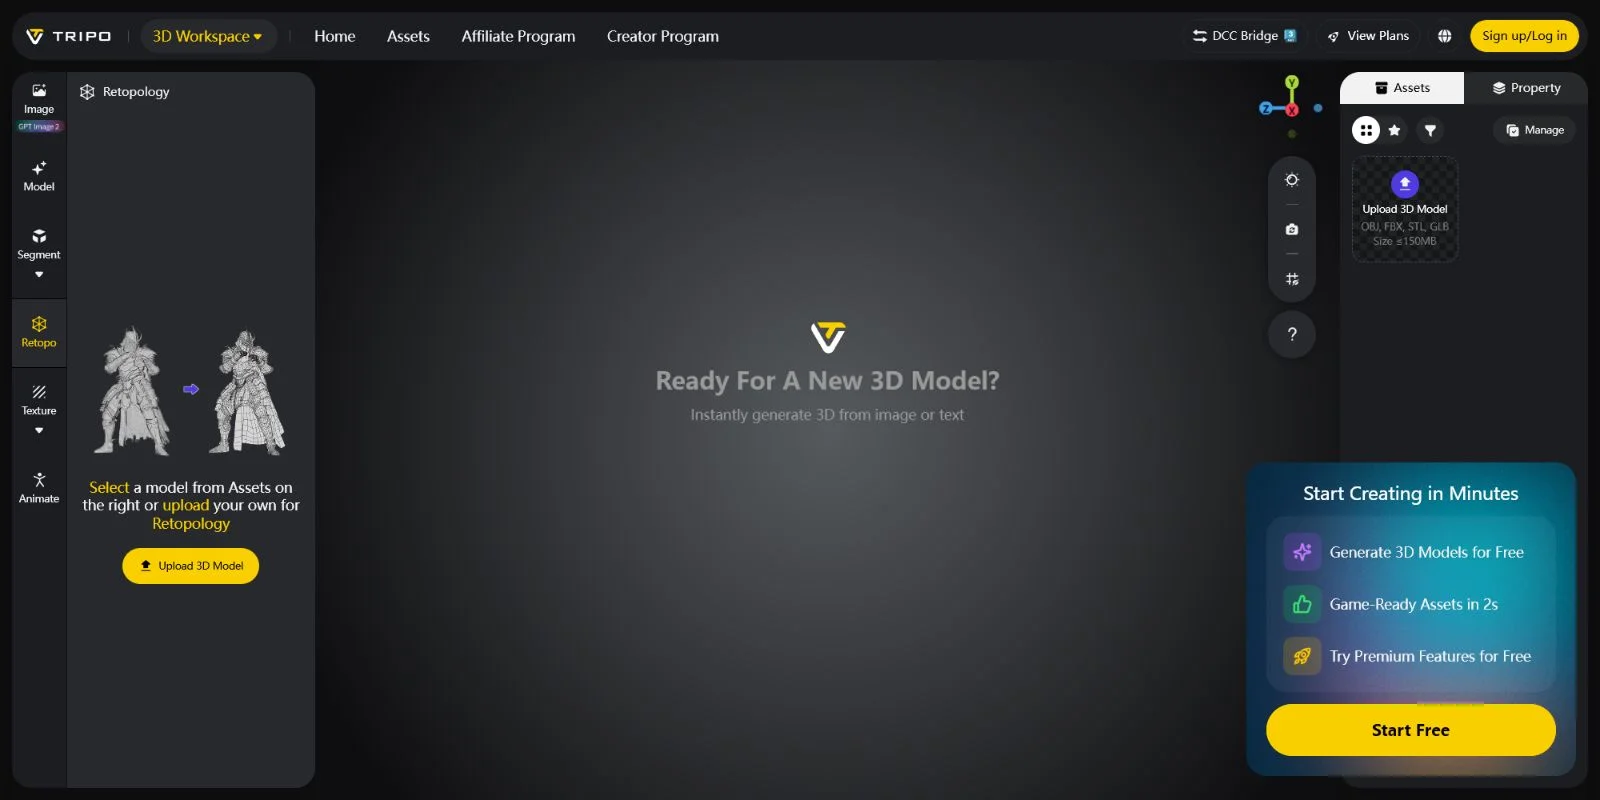
Step 1 — Assess Your Model and Set a Polycount Target
Before creating a single edge loop, the first question is not how to retopologize — it is why you are retopologizing. The final use case determines your polygon budget, and your polygon budget influences every decision that follows, including topology density, edge flow, and the amount of detail you preserve.
A game character designed for real-time rendering needs efficient geometry that can deform smoothly while maintaining performance. An environment prop usually requires fewer polygons because it does not need complex deformation. In contrast, 3D printing workflows can handle much denser meshes because the priority is preserving physical surface detail and ensuring the model is manifold rather than optimizing real-time performance. Film and VFX assets sit somewhere in between, often requiring high polygon counts for close-up shots where tiny details are visible.
A practical polycount target depends on your production goal:
| Use Case | Recommended Triangle Count | Main Priority |
|---|---|---|
| Real-time game hero character | 10,000–30,000 triangles | Clean deformation and efficient performance |
| Game environment prop | 2,000–8,000 triangles | Visual quality with low performance cost |
| 3D printing model | 500,000–2,000,000 triangles | Surface detail and watertight geometry |
| Film/VFX close-up asset | 50,000–200,000+ triangles | Maximum detail for high-resolution rendering |
Setting this target early prevents overbuilding. A character that only needs 20,000 triangles should not be rebuilt with film-quality density, while a cinematic asset should not be simplified so aggressively that important details disappear. Your polycount goal becomes the foundation for every retopology decision that comes next.
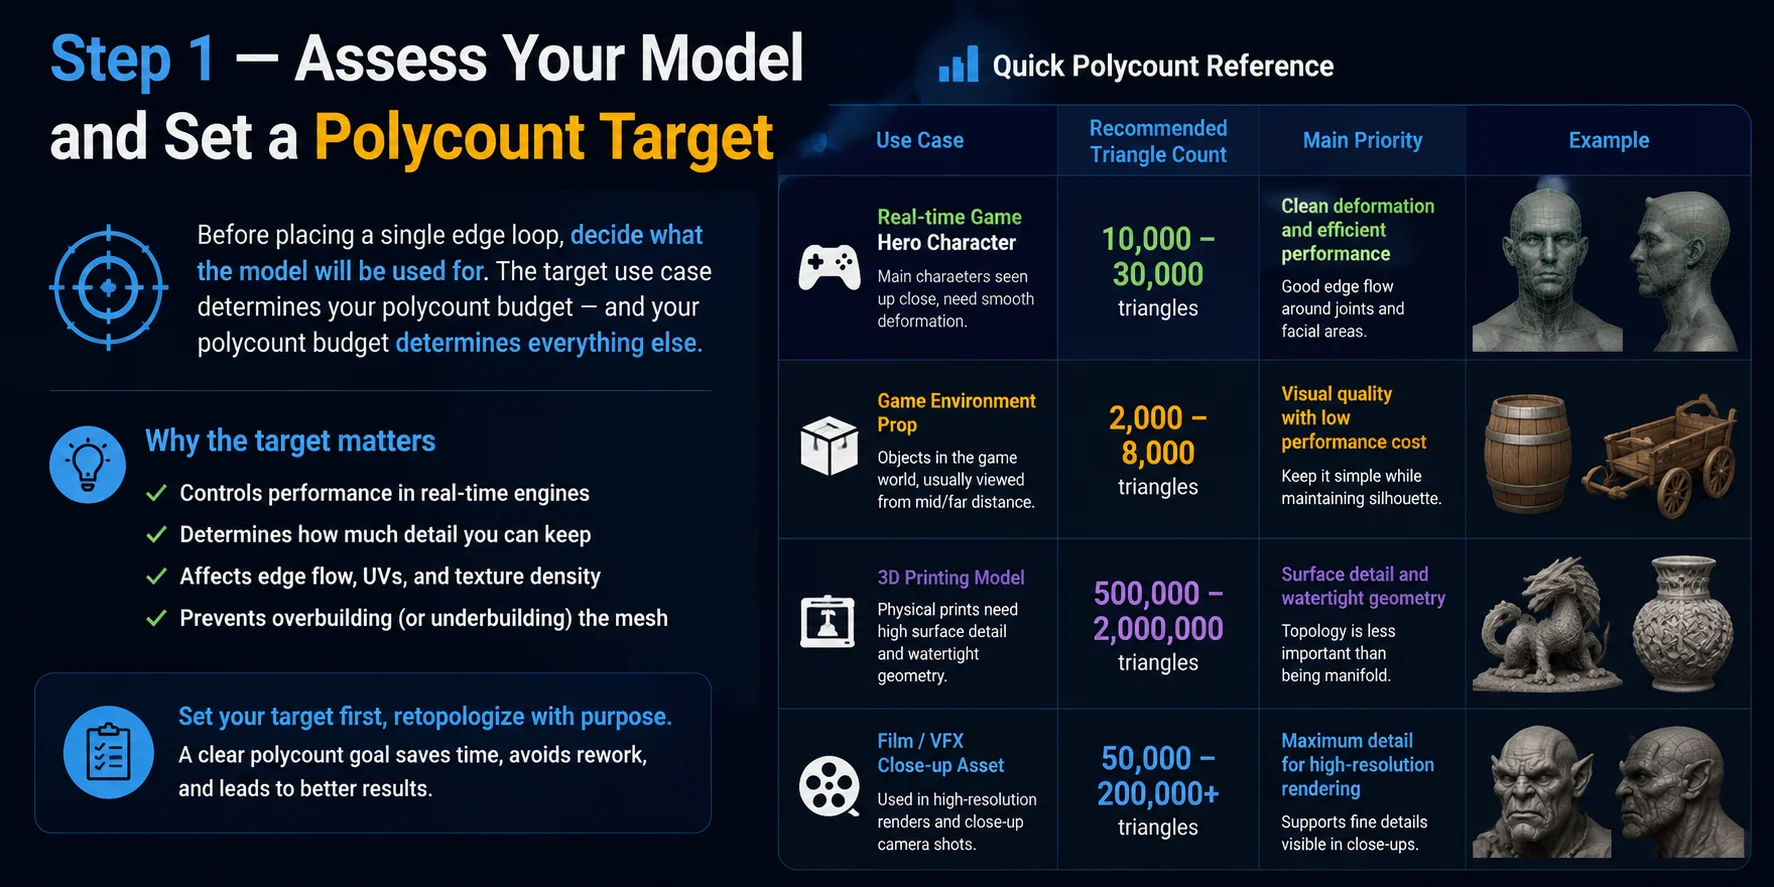
Step 2 — Identify Edge Flow Priorities Before You Start
Before creating any new topology, you need to understand where your mesh will move. Edge flow refers to the way polygon loops are arranged across a model’s surface so the geometry can bend, stretch, and deform naturally. The goal is not to add polygons everywhere — it is to place more geometry where movement happens and keep the mesh lightweight in areas that do not need flexibility.
For character models, certain areas always require higher topology density. Facial features such as the eyes, mouth, cheeks, and nasolabial folds need carefully planned loops because even small deformations can create visible problems during facial animation. Joint areas including shoulders, elbows, knees, wrists, and fingers also require additional edge loops to prevent pinching and collapsing when the model moves. Clothing folds, wrinkles, and any surface that will be animated should receive extra attention as well.
In contrast, many areas can use much simpler topology. Flat surfaces on hard-surface props, gently curved panels, background objects, and static mesh regions that never deform usually do not need dense loops. Adding unnecessary geometry in these areas only increases the polygon count without improving the final result.
You also need to plan where topology problems can safely exist. Poles — vertices where more or fewer than four edges meet — are a normal part of retopology and cannot always be avoided. However, they should be placed away from areas with heavy deformation or sharp curvature, where they can create unwanted stretching. N-gons (polygons with five or more sides) should never appear in areas that bend or animate because they can cause unpredictable deformation.
A simple planning trick can prevent major rework: before opening your retopology tool, take a screenshot of your high-poly model or print the reference image and mark deformation zones in red. For example, on a character’s wrist, you can sketch where circular edge loops should wrap around the joint and where extra density is needed for bending. This five-minute planning step creates a topology roadmap and saves hours of correction later.
Now that you know where dense topology belongs, the next step is choosing how you will build it.
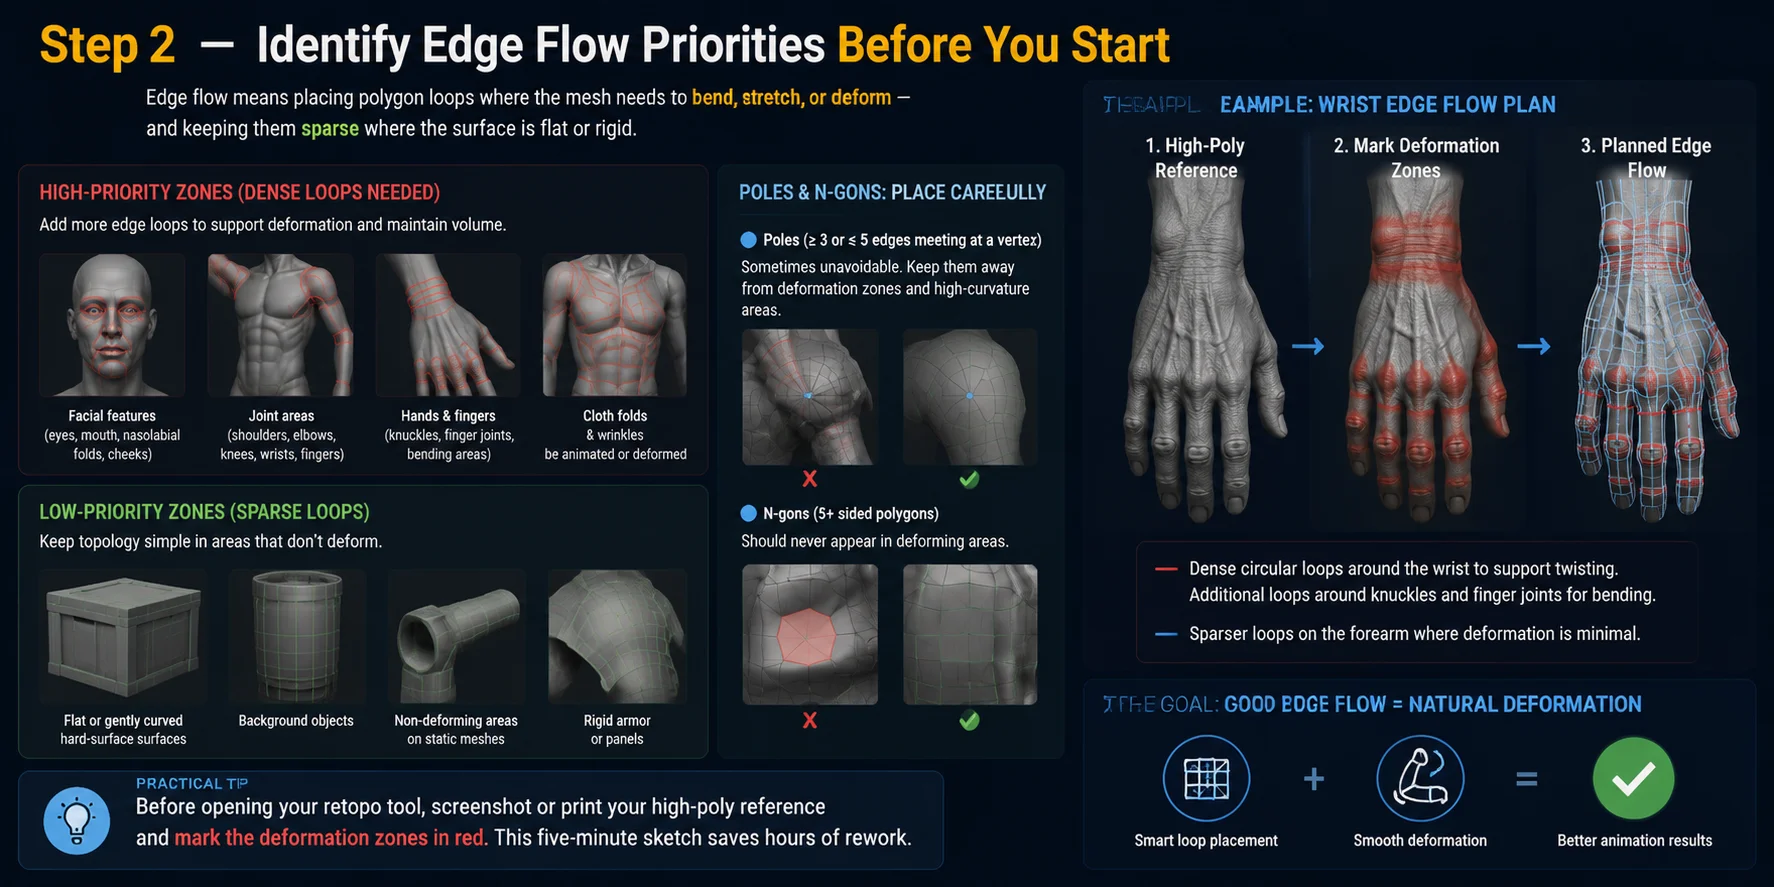
Step 3 — Choose Your Retopology Approach: Manual, Auto, or Hybrid
Once you know your target polycount and edge flow priorities, the next decision is choosing how you will rebuild the mesh. There are three main retopology approaches: manual, automatic, and hybrid. The right choice depends on the type of asset, the level of deformation required, and how much control you need over the final topology.
Manual retopology gives you complete control over every polygon. You place each edge loop by hand while snapping the new mesh onto the surface of the high-poly model. This approach takes the most time, but it produces the best results for assets where deformation quality matters. It is commonly used for hero characters, facial models, hands, and any area that requires precise animation. Popular tools include Blender’s RetopoFlow addon and Poly Build tool, Maya’s Quad Draw, and ZBrush workflows that combine ZRemesher with manual corrections.
Auto retopology uses algorithms or AI to automatically generate a cleaner mesh structure. It is much faster and works well for static environment assets, background objects, and models where perfect deformation is not the priority. It can also serve as a starting point before manual cleanup. Common options include ZBrush ZRemesher, Blender’s Quad Remesher addon, and the free Instant Meshes tool. For AI-generated models, tools like Tripo AI Retopology can quickly convert dense meshes into cleaner topology, with standard retopology using 5 credits and quad mesh output requiring an additional 5 credits.
Hybrid retopology combines the speed of automation with the control of manual editing. The typical workflow is to run an automatic retopology process first, create a clean base mesh, and then manually refine important areas such as faces, hands, joints, and deformation zones. For complex characters, this approach can reduce total retopology time by around 30–50% while still maintaining production-quality results.
For AI-generated models, auto or hybrid workflows are usually the most practical choice. AI meshes often contain dense, irregular triangle structures without intentional edge flow, making fully manual rebuilding inefficient. Running retopology directly in tools like Tripo AI Studio can produce a quad-based mesh within seconds, giving artists a clean foundation to refine when extra control is needed.
With your retopology approach decided, you can now plan the actual topology structure before starting the rebuild process.
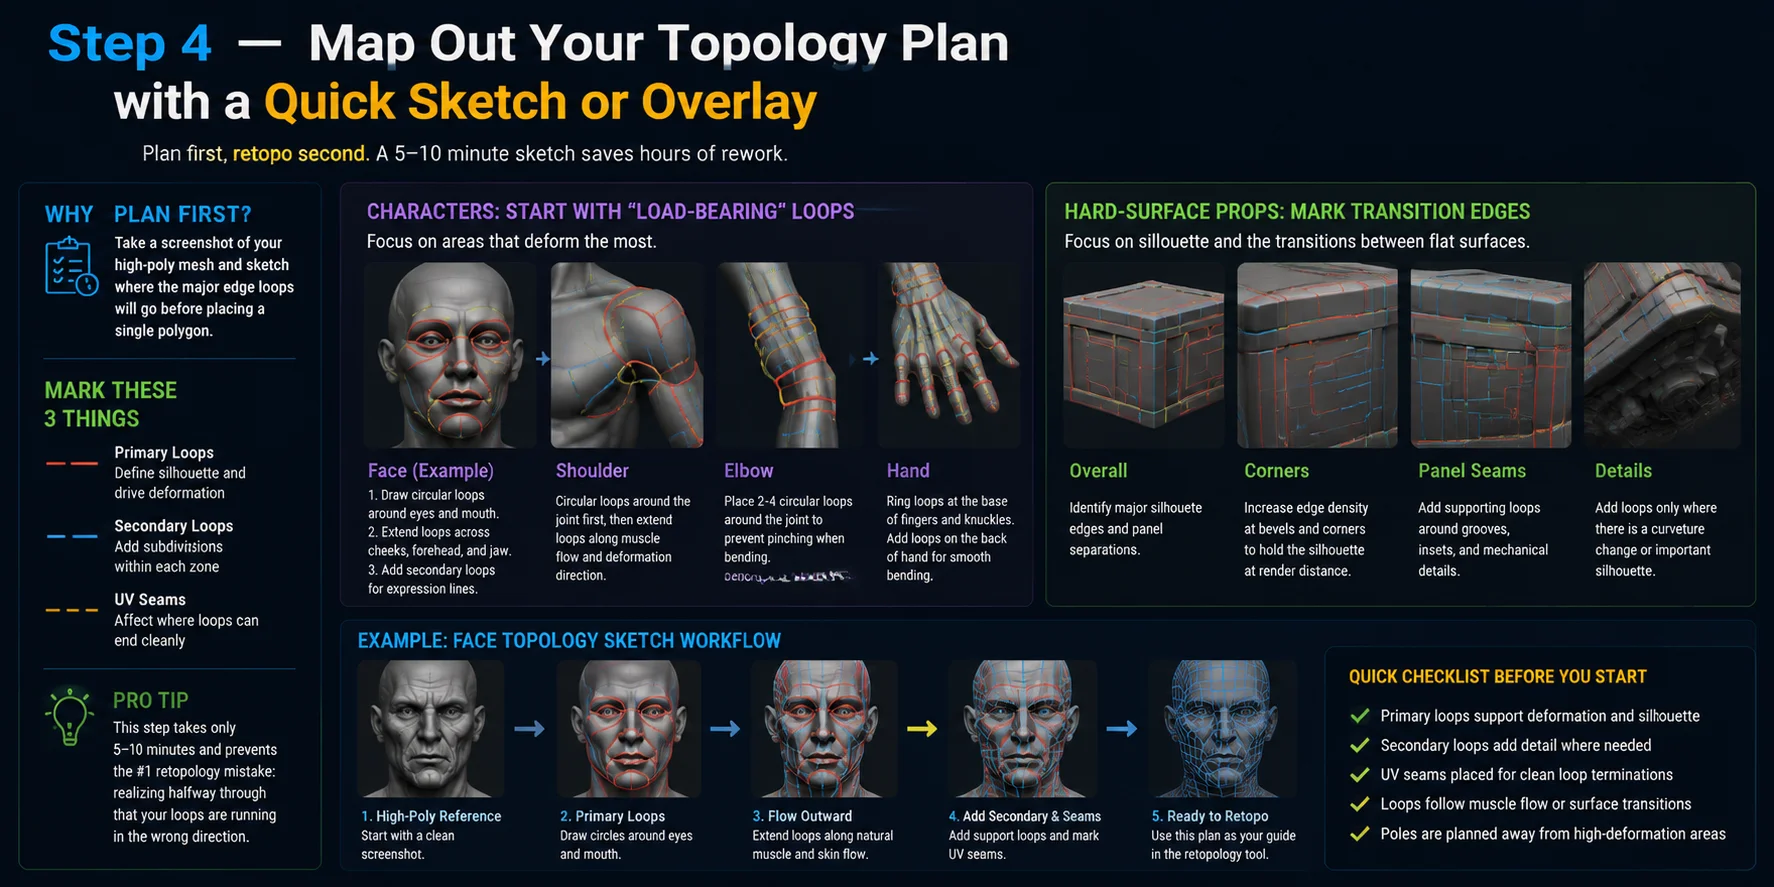
Step 4 — Map Out Your Topology Plan with a Quick Sketch or Overlay
Many artists make the mistake of opening their retopology tool immediately and starting to place polygons. However, the fastest workflows usually begin with a simple planning step. Before creating any geometry, take a screenshot of your high-poly model, open it in an image editor, or even print it out and sketch directly on the reference. The goal is not to create a perfect drawing — it is to create a roadmap showing where your main edge loops should flow.
During this sketching phase, mark three important elements: primary loops, secondary loops, and UV seam locations. Primary loops are the structural foundation of the mesh—they define the silhouette and support major deformation areas. Secondary loops add additional density where needed, such as facial details, wrinkles, or curved surfaces. UV seams should also be considered early because they influence where edge loops can end naturally without creating messy texture layouts.
For character models, start with the areas that carry the most deformation. For example, on a face, first draw circular loops around the eyes and mouth, then extend the topology outward across the cheeks, forehead, and jaw. These loops act as the “load-bearing structure” of the character, allowing expressions and facial movement to deform smoothly. The same approach applies to joints — plan the circular loops around shoulders, elbows, knees, and wrists before filling in surrounding areas.
For hard-surface props, the planning process is different. Focus on transition points between flat surfaces, bevels, and curved edges. These areas usually need higher topology density because they control how the object’s silhouette appears from the camera distance.
This entire planning step usually takes only 5–10 minutes, but it prevents one of the most common retopology failures: discovering halfway through the process that your edge loops are flowing in the wrong direction. A quick sketch gives you a clear topology strategy before you invest hours rebuilding the mesh.
Now you have a plan — and the next challenge is understanding how planning changes when working with AI-generated models.
How to Retopologize AI-Generated 3D Models
AI-generated 3D models create a unique retopology challenge. Unlike traditional high-poly sculpts made by artists, AI meshes are usually generated with dense geometry but without intentional edge flow. Tools like Tripo AI can produce highly detailed models with up to millions of polygons, which is excellent for preserving surface details, textures, and complex shapes. However, the polygon distribution is based on the reconstructed geometry itself — not on how the model will bend, deform, or animate.
This is why AI-generated meshes are often one of the best candidates for automatic retopology. With traditional sculpting, artists may spend hours creating carefully planned topology that should be preserved. AI-generated models usually do not have that advantage, so rebuilding the structure from scratch is often faster and more reliable than trying to manually fix every irregular triangle.
A practical workflow is to generate the detailed model first, then optimize the topology afterward. Tripo AI’s built-in Retopology feature allows you to set a target polygon count and generate a cleaner mesh in seconds. Standard retopology costs 5 credits, while adding guaranteed quad mesh output requires an additional 5 credits. For real-time applications, Smart Lowpoly optimization is available with an additional 30 credits, creating a lighter structure better suited for game engines. In some cases, using Smart Mesh during generation can eliminate the need for a separate retopology step because it creates a more structured, game-ready topology from the beginning.
A typical production workflow looks like this:
Generate your model in Tripo, an AI 3D platform by VAST → Create an HD Model for maximum detail → Apply Retopology with your target polycount → Export as GLB for general-purpose 3D use, USD for film and VFX pipelines, or FBX, OBJ, STL, and 3MF → Refine further in Blender or Maya if needed.
For animation and games, this workflow provides a strong balance between AI speed and production control. The generated high-detail version preserves the original quality, while the retopologized version becomes easier to rig, animate, and optimize.
For 3D printing, however, the approach is different. Retopology is usually unnecessary because slicers benefit from dense, accurate geometry rather than animation-friendly topology. In this case, export the HD Model directly as STL or 3MF to preserve the surface detail needed for physical printing.
Ready to optimize your AI-generated mesh? Try retopologizing your model in Tripo AI Studio.
Common Retopology Planning Mistakes to Avoid
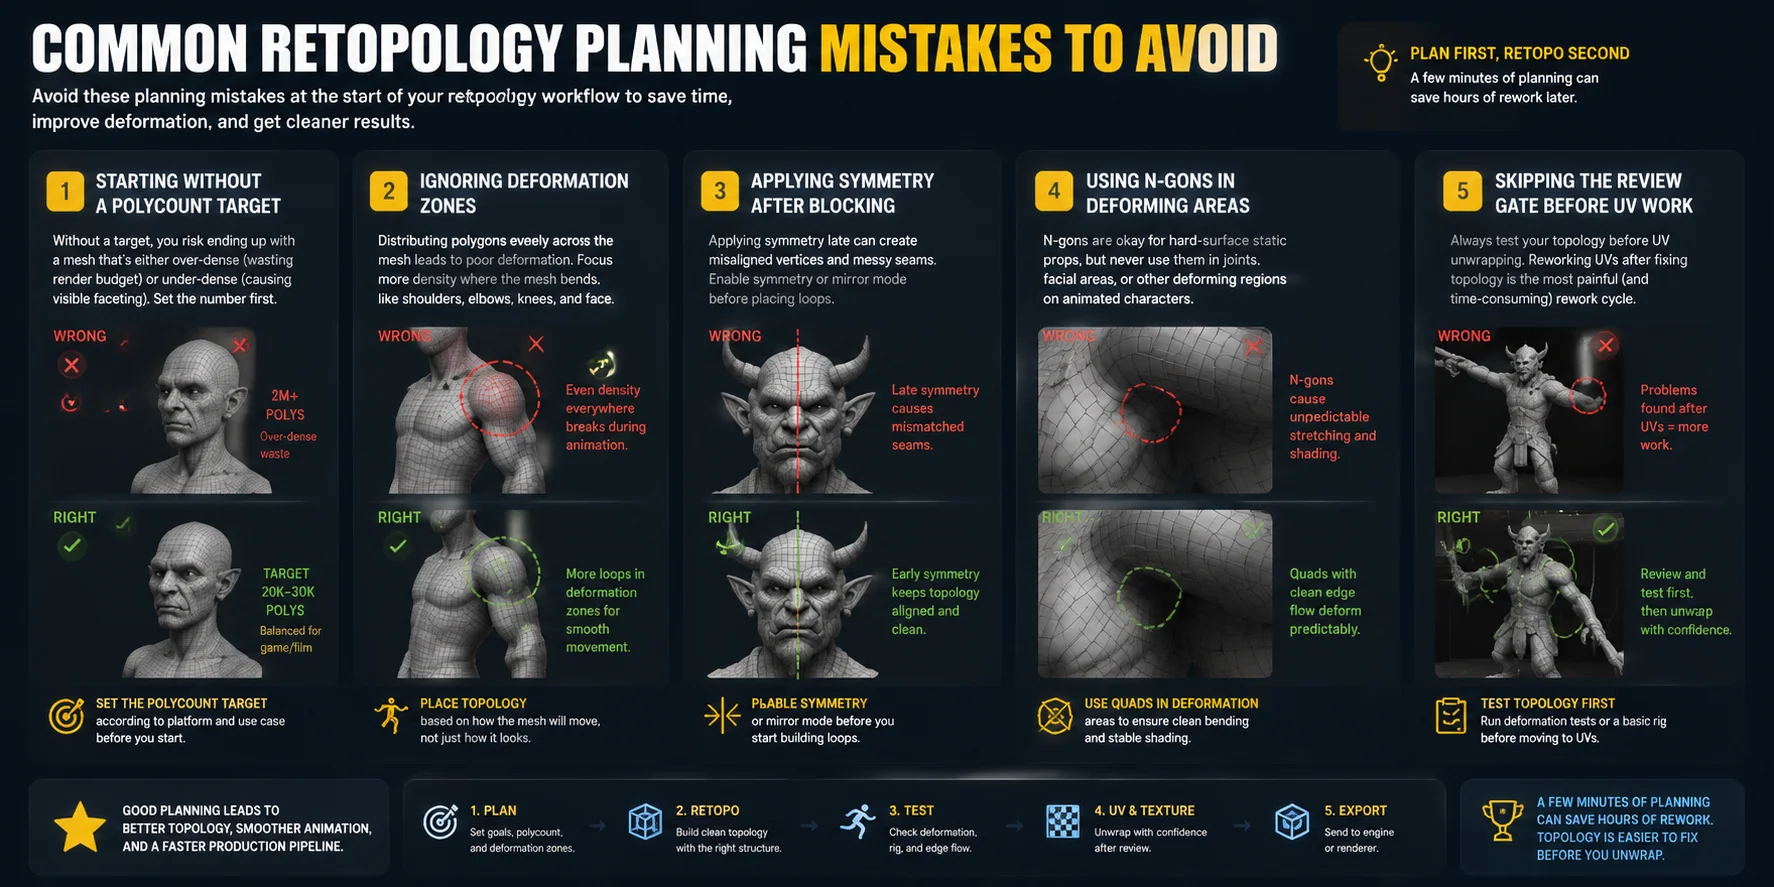
A good retopology result depends on the decisions you make before placing the first edge loop. Many topology problems are not caused by the retopology tool itself, but by poor planning at the beginning. Setting clear goals for polycount, deformation, and mesh structure can save hours of cleanup later.
Starting Without a Polycount Target
One of the most common mistakes is beginning retopology without knowing where the final model will be used. Without a target polygon count, artists often create meshes that are either far too dense for the intended platform or too simple to maintain visual quality. A game character, mobile asset, cinematic model, and 3D printing file all require different levels of detail. Decide the target polycount first, then build the topology around that requirement instead of reducing or adding geometry afterward.
Ignoring Deformation Zones
Not all areas of a model need the same polygon density. A frequent mistake is distributing polygons evenly across the entire surface, giving flat areas the same attention as joints and facial features. For animated characters, areas like shoulders, elbows, knees, hips, and the mouth require carefully planned edge loops because they need to bend and stretch. A shoulder with the same topology as a flat wall surface may look fine in a static pose but will quickly collapse or create unwanted deformation during animation.
Applying Symmetry Too Late
Symmetry is a powerful tool for speeding up character and object retopology, but it needs to be planned from the start. Enabling a mirror workflow before creating edge loops ensures that both sides remain perfectly aligned. Applying symmetry after manually building half of the mesh can introduce uneven vertices, incorrect seams, and extra cleanup work. Establish the symmetry setup before detailed topology placement begins.
Using N-gons in Deforming Areas
N-gons can be useful for certain hard-surface models, especially static objects that do not need to bend. However, they are risky in deformation areas such as character joints, facial expressions, or any region affected by animation. N-gons can create unpredictable stretching and shading issues when the mesh moves. For characters and animated assets, quads with clean edge flow are usually the safer choice.
Skipping the Review Gate Before UV Work
Starting UV unwrapping too early is another costly mistake. Once textures, materials, and UV layouts are created, changing the topology becomes much more complicated. Before moving into texturing, always test the mesh with basic poses, a simple rig, or deformation checks. Fixing topology problems before UV work is much faster than rebuilding textures after discovering that the mesh cannot animate correctly.
With these planning mistakes covered, let's round up the most common questions artists ask before starting a retopology project.
Frequently Asked Questions
Is retopology necessary for 3D printing?
Usually not. 3D printing reads the mesh geometry directly, so a high-poly sculpt with 2 million triangles is often exactly what your slicer needs. The key requirement is a watertight, manifold mesh — no holes, no overlapping faces, no non-manifold edges. If your mesh passes those checks, you can print it without retopology. Retopology only matters for printing if you need to reduce file size or simplify geometry for structural reasons.
How long does retopology take?
Manual retopology for a game-ready character head takes an experienced artist 4–8 hours. A full body can take 12–20 hours. Auto retopology tools (ZRemesher, Tripo AI Retopology) can generate a clean base mesh in seconds, reducing total time by 50–70% when combined with targeted manual correction at critical zones.
What is the difference between retopology and remeshing?
Remeshing evenly redistributes polygons across a surface without considering deformation or edge flow — useful for cleanup but not for production-ready characters. Retopology rebuilds the mesh with intentional edge loop placement designed for animation, UV mapping, and subdivision. Think of remeshing as "cleaner random," retopology as "intentional design."
Can AI do retopology automatically?
Yes. Tools like Tripo AI's Retopology feature and ZBrush's ZRemesher can generate clean quad meshes automatically from high-poly inputs. The result works well for static props and background assets. For hero characters, auto retopology gives you a strong starting point, but critical zones (face, hands, joints) usually need manual refinement to get production-quality edge flow.
Do you need to retopologize for animation?
Yes, if the mesh will deform. High-poly sculpts and AI-generated meshes use triangle-dominant topology that doesn't deform predictably at joints. Animation requires quad-dominant topology with loops running perpendicular to the direction of bending — particularly around the shoulders, elbows, knees, and face. Without proper retopology, you'll see pinching, stretching, and volume loss on every animated keyframe.
Conclusion
A strong retopology plan turns a complex mesh into a production-ready asset with less trial and error. When you're ready to move from planning to execution, let AI handle the technical work and speed up your workflow.
Ready to put your plan into action? Open Tripo AI Studio → and try one-click retopology on your next model. Want to explore available options? Check Tripo AI Pricing for credit plans and features.