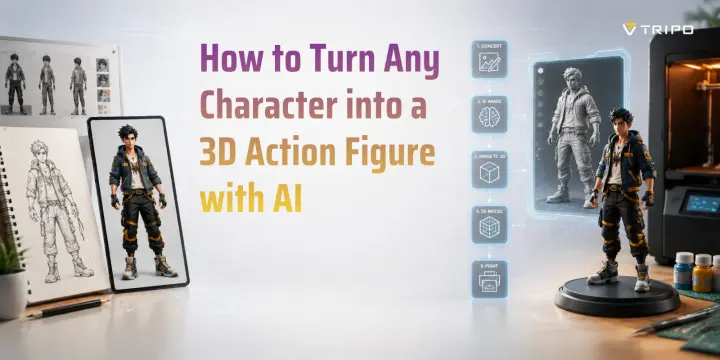
How to Turn Any Character into a 3D Action Figure with AI
TL;DR:
- AI action figure generators create character designs, but you need an image-to-3D tool to make a printable model.
- Use clear full-body images with simple poses and backgrounds for better 3D conversion.
- Tripo AI can turn a single image or a consistent set of reference views into a 3D starting model for editing, animation, or print preparation.
- Clean the mesh, check thickness and supports, then export as STL or 3MF for 3D printing.
- Resin printing typically captures finer surface details at small scales, while FDM can be practical for larger prototypes and display pieces.
- With AI, you can go from character idea to custom action figure faster than ever.
An AI action figure generator can help turn a character concept — based on a photo, sketch, or prompt you have permission to use — into a 3D model for rendering, animation, or print preparation. A practical workflow combines image generation for the character design with an image-to-3D platform such as Tripo AI to create an editable starting mesh.
Imagine designing a character in Midjourney and thinking, “I wish I could actually put this figure on my shelf.” A few years ago, that meant hiring a sculptor or learning complex 3D software. Today, you can use AI tools to create your own action figure with a simple workflow. This guide covers how to choose an AI generator, write better prompts, convert images into 3D models, clean the mesh, and export your final figure for printing.
What Is an AI Action Figure Generator?
2D AI Image Generator vs 3D Action Figure Generator
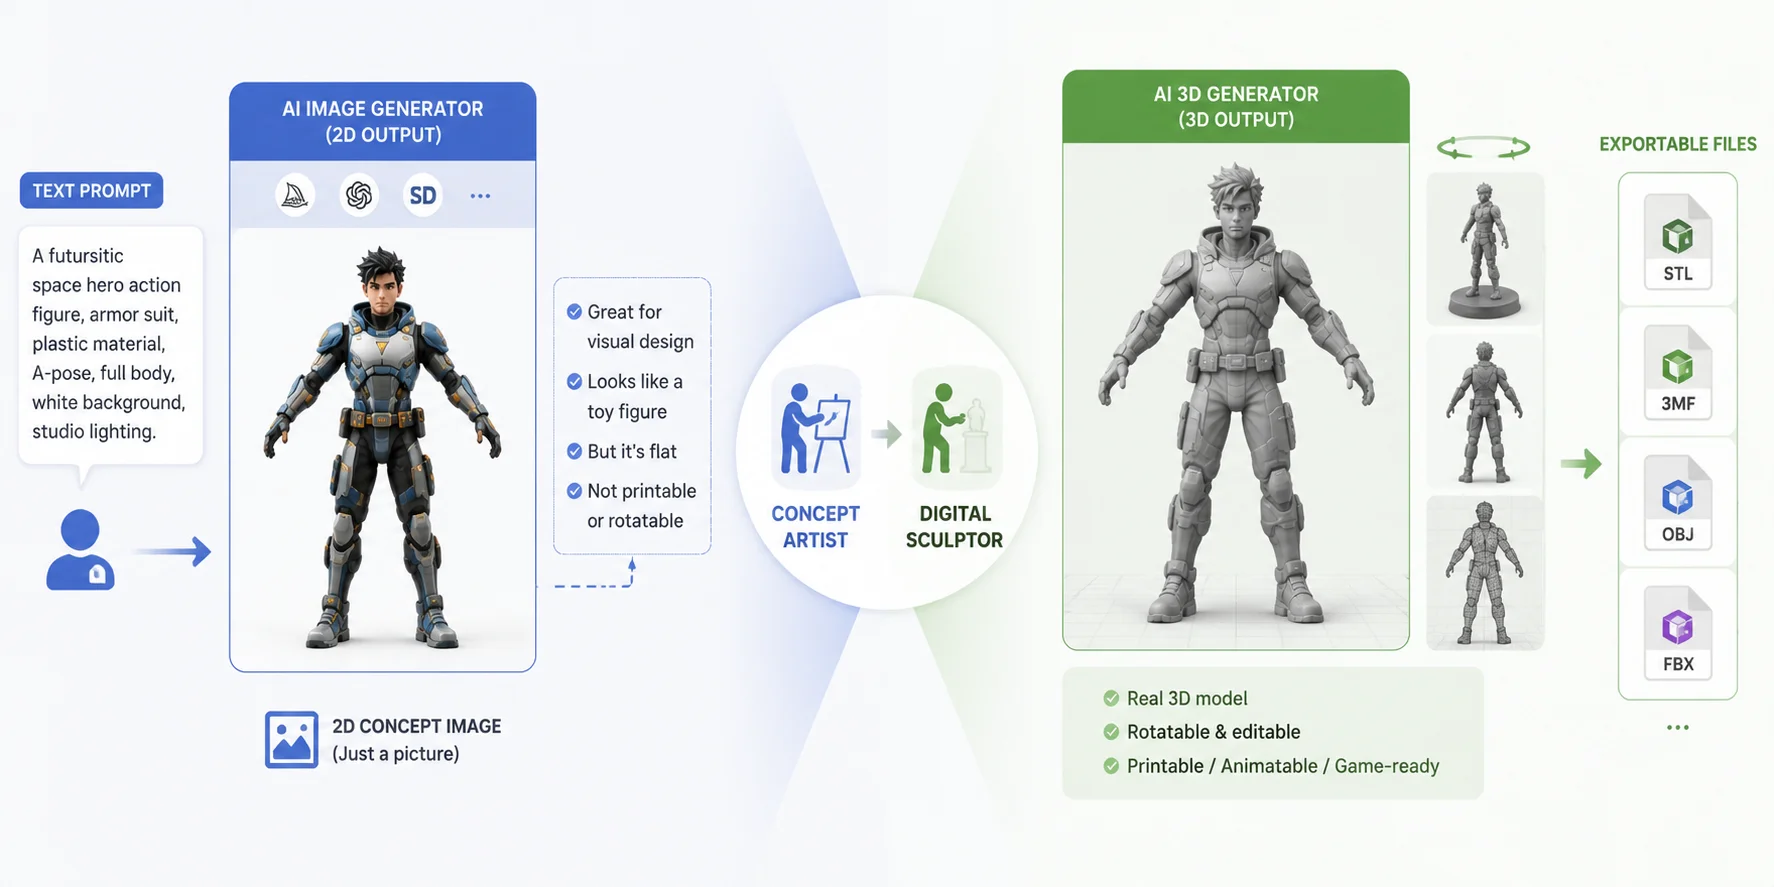
An AI action figure generator is a tool that uses artificial intelligence to create character designs with a toy-like appearance. These tools can turn a written description, a reference photo, or a simple idea into a visual character concept that looks like a collectible figure.
For example, you might type:
“A futuristic space explorer action figure with armor, a helmet, and a robotic backpack, made from glossy plastic.”
The AI can create a character image with exaggerated proportions, detailed clothing, and a polished toy-style finish. Common options for this first creative step include Midjourney, ChatGPT Images, and Stable Diffusion-based tools.
However, there is an important difference between AI image generation and AI 3D generation.
Most action figure generators online create a 2D image. They produce a beautiful render that looks like a figure sitting inside a toy package, but the result is still just a picture. You cannot rotate it, animate it, or send it directly to a 3D printer.
Think of the image generator as the concept artist. It designs the character’s appearance, colors, clothing, and style. A 3D tool is the sculptor. It builds the actual digital object with geometry, surfaces, and depth.
A complete AI action figure workflow usually has two stages:
- Generate the character imageCreate the style, pose, outfit, and personality.Adjust the design until you like the appearance.
- Convert the image into a 3D modelUse an image-to-3D model tool.Generate a downloadable mesh.Prepare it for animation, rendering, or printing.
A successful 3D action figure AI workflow depends on understanding this difference. A great-looking image is only the beginning. If you want a real collectible figure, you need a 3D mesh file such as STL, OBJ, or 3MF.
Step 1 — Generate Your Action Figure Image
Before creating a 3D model, you need a strong reference image. The quality of your final figure depends heavily on the image you provide.
Popular tools for this step include:
- Midjourney
- ChatGPT Images
- Stable Diffusion-based tools
The goal is not just to create a cool picture. You need an image that an AI 3D tool can understand.
A good action figure reference should show:
- The entire character body
- Clear arms and legs
- Simple lighting
- Visible clothing details
- Minimal background distractions
A common mistake is generating a dramatic movie-style pose. While a running superhero pose may look impressive, it creates problems during 3D conversion. When one arm covers the body or a weapon overlaps the face, the AI has less information about the character’s actual shape.
For the first image, choose accuracy over drama.
A front-facing pose, A-pose, or T-pose usually works best because the AI can see the full silhouette. If possible, create multiple views:
- Front view
- Side view
- Back view
When the image-to-3D workflow supports multiple views, consistent front, side, and back references can reveal surfaces hidden in a single image and reduce structural guesswork.
Prompt Template for Better Action Figure Images
Use this structure when creating your reference image:
Character description, action figure style, full body visible, front-facing pose, A-pose, plastic material, white background, studio lighting, collectible toy design
For example:
A cyberpunk robot warrior with glowing blue armor and mechanical details, action figure style, full body visible, front-facing A-pose, realistic plastic material, white background, studio lighting, collectible toy design.
This type of prompt gives the AI fewer creative distractions and produces a cleaner 3D reference.
Best Prompt Structure for AI Action Figure Generation
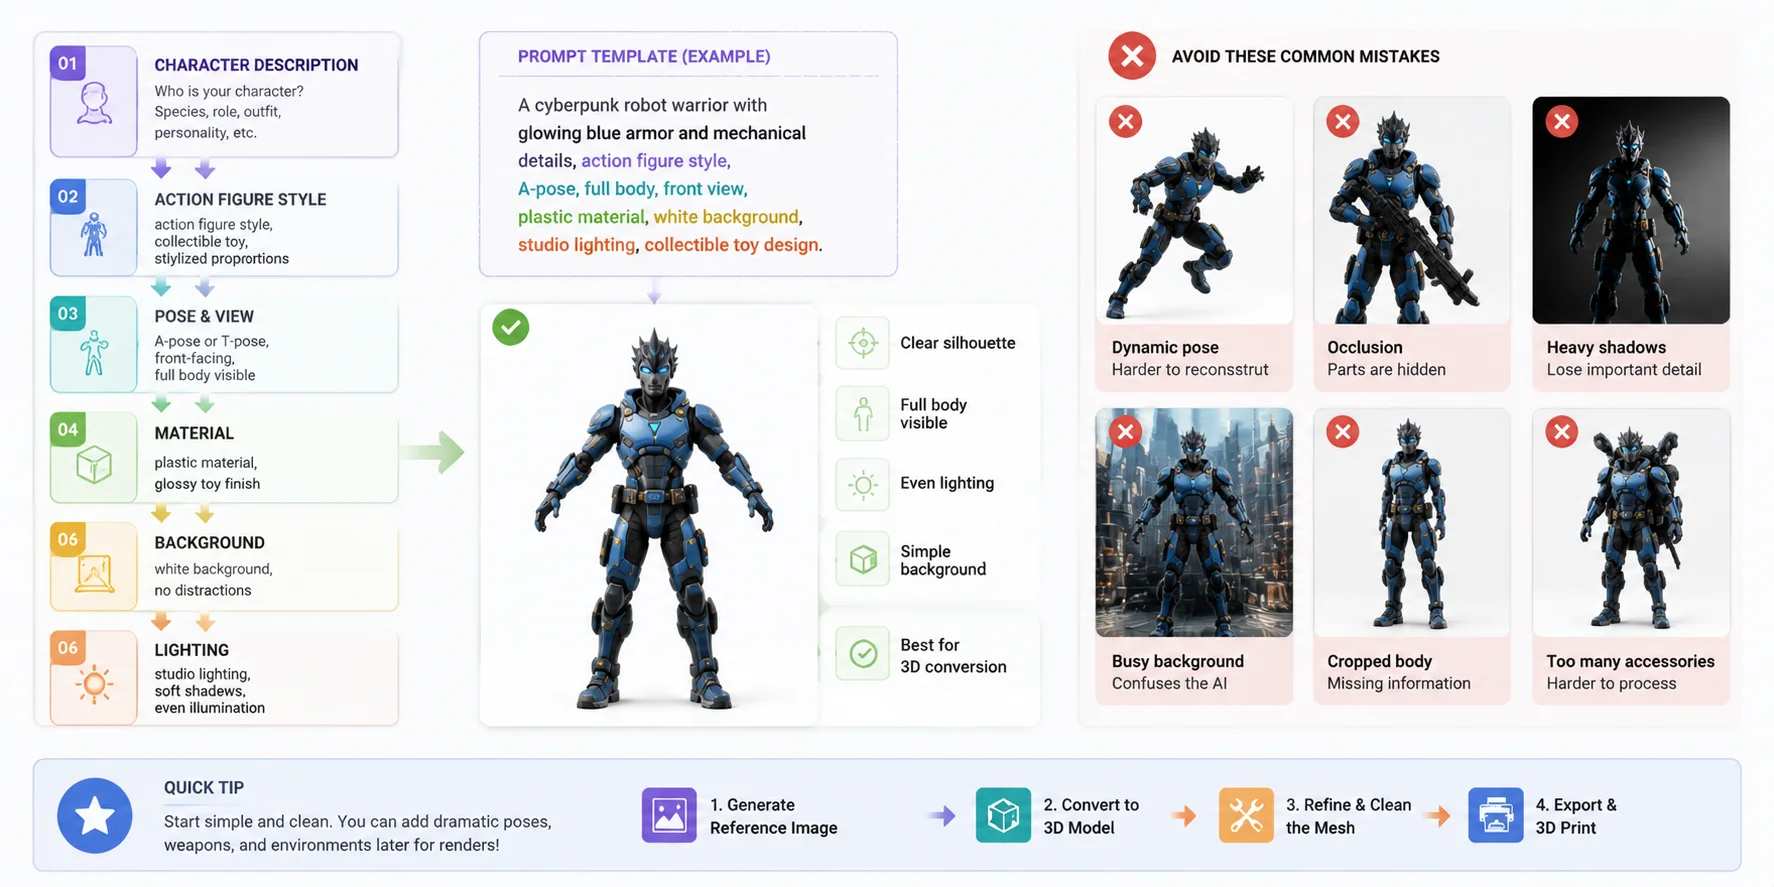
Avoid These Prompt Problems
Some image styles look impressive but make 3D conversion harder:
❌ Extreme camera angles
❌ Characters holding large objects in front of their body
❌ Heavy shadows
❌ Busy environments
❌ Cropped feet or missing hands
❌ Complex action poses
Remember: your first image is not the final poster. It is the blueprint for your 3D figure.
A simple, clear character image often provides a more useful starting point for 3D reconstruction than a highly occluded cinematic render.
Step 2 — Convert Your Image to a 3D Model with Tripo AI
After creating your character image, the next step is turning it into an actual 3D object.
This is where an AI-powered 3D modeling platform becomes important. Instead of manually sculpting every detail in Blender or ZBrush, you can use an image to 3D model workflow to generate the first version automatically.
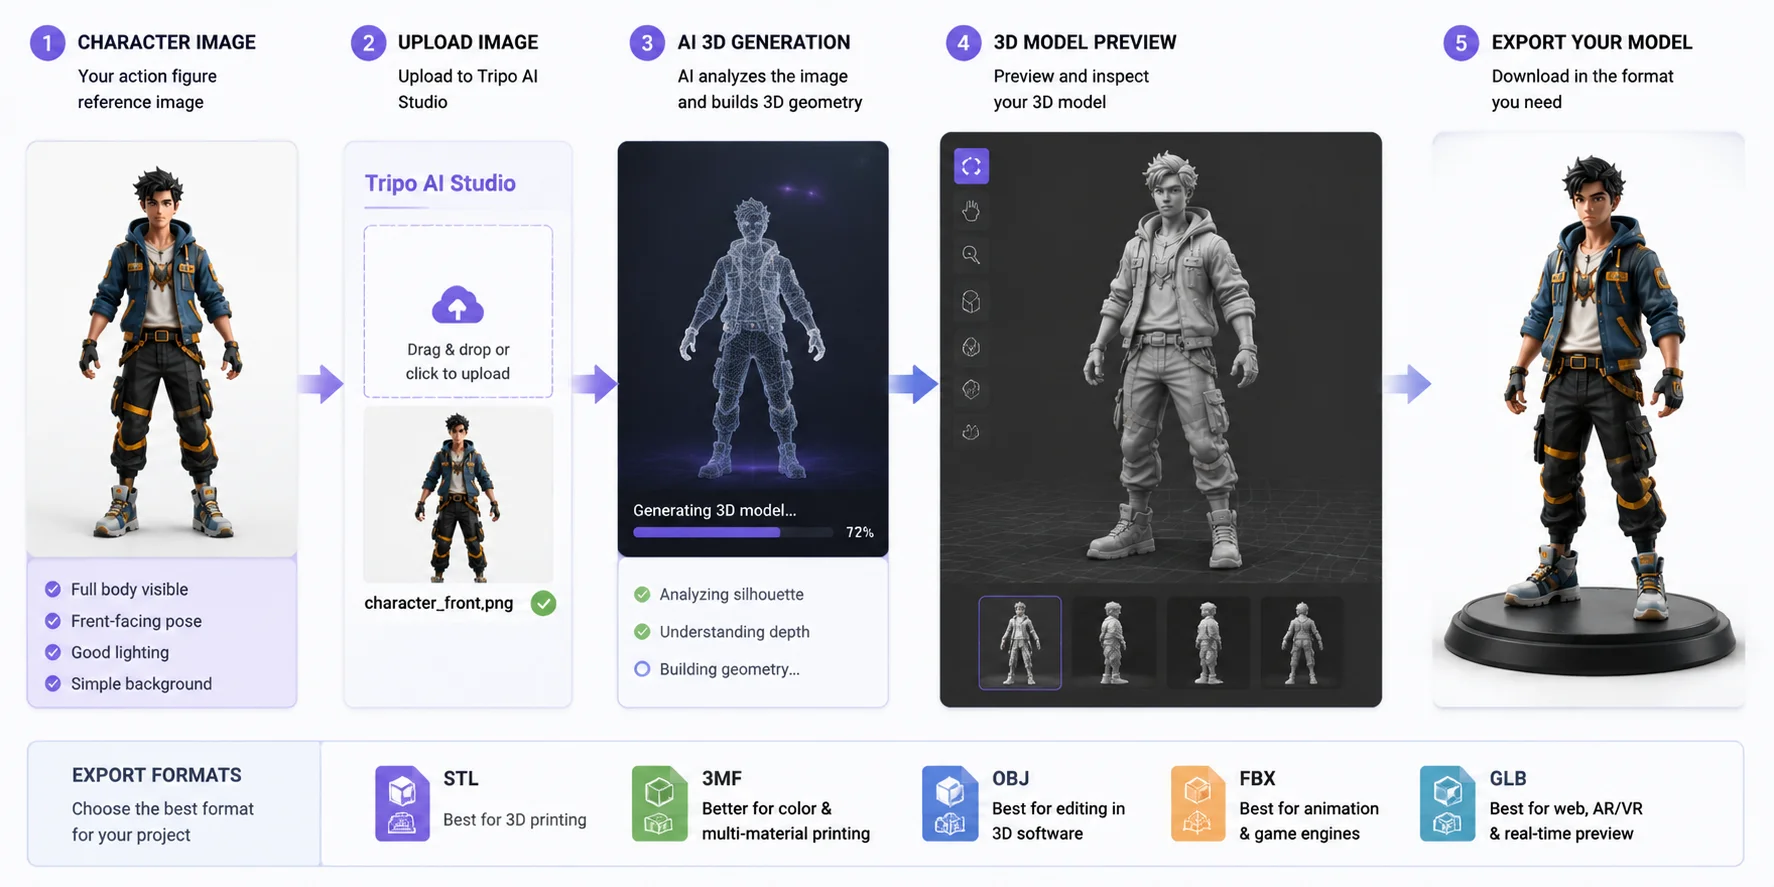
Tripo AI works as the bridge between your 2D concept and a 3D action figure workflow. Its Image-to-3D feature supports single-view and multi-view inputs and generates a textured 3D starting model that you can inspect, refine, and export.
The basic workflow looks like this:
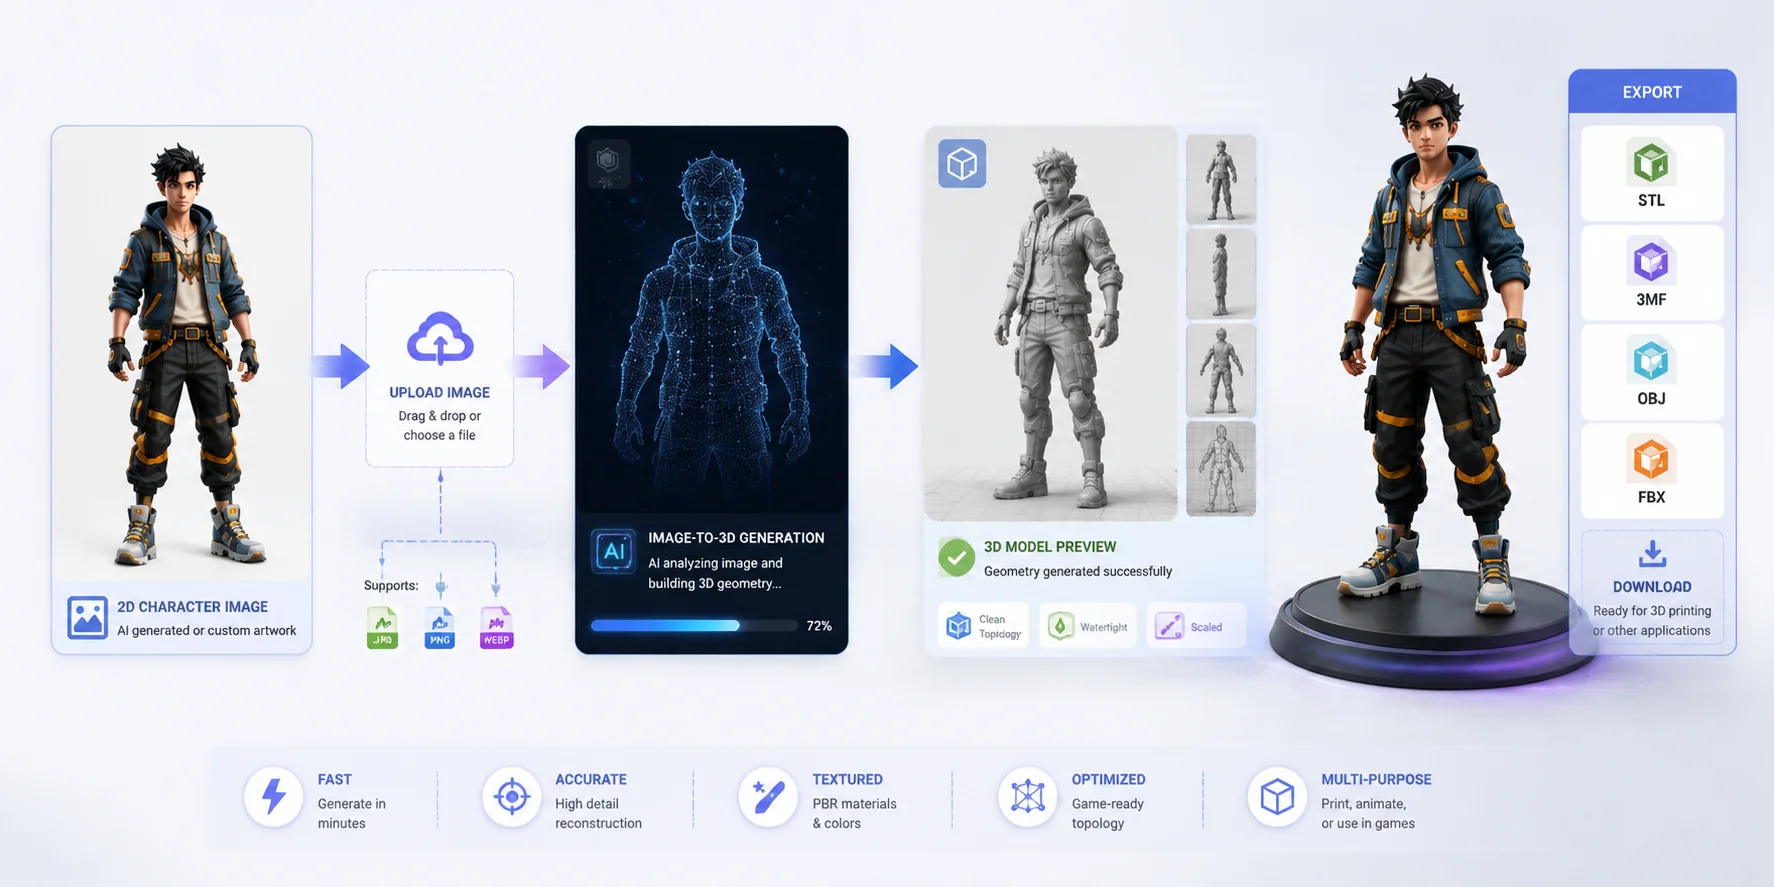
Character Image → Image-to-3D Generation → Mesh Review → Export → Print or Edit
Step-by-Step Workflow in Tripo AI Studio
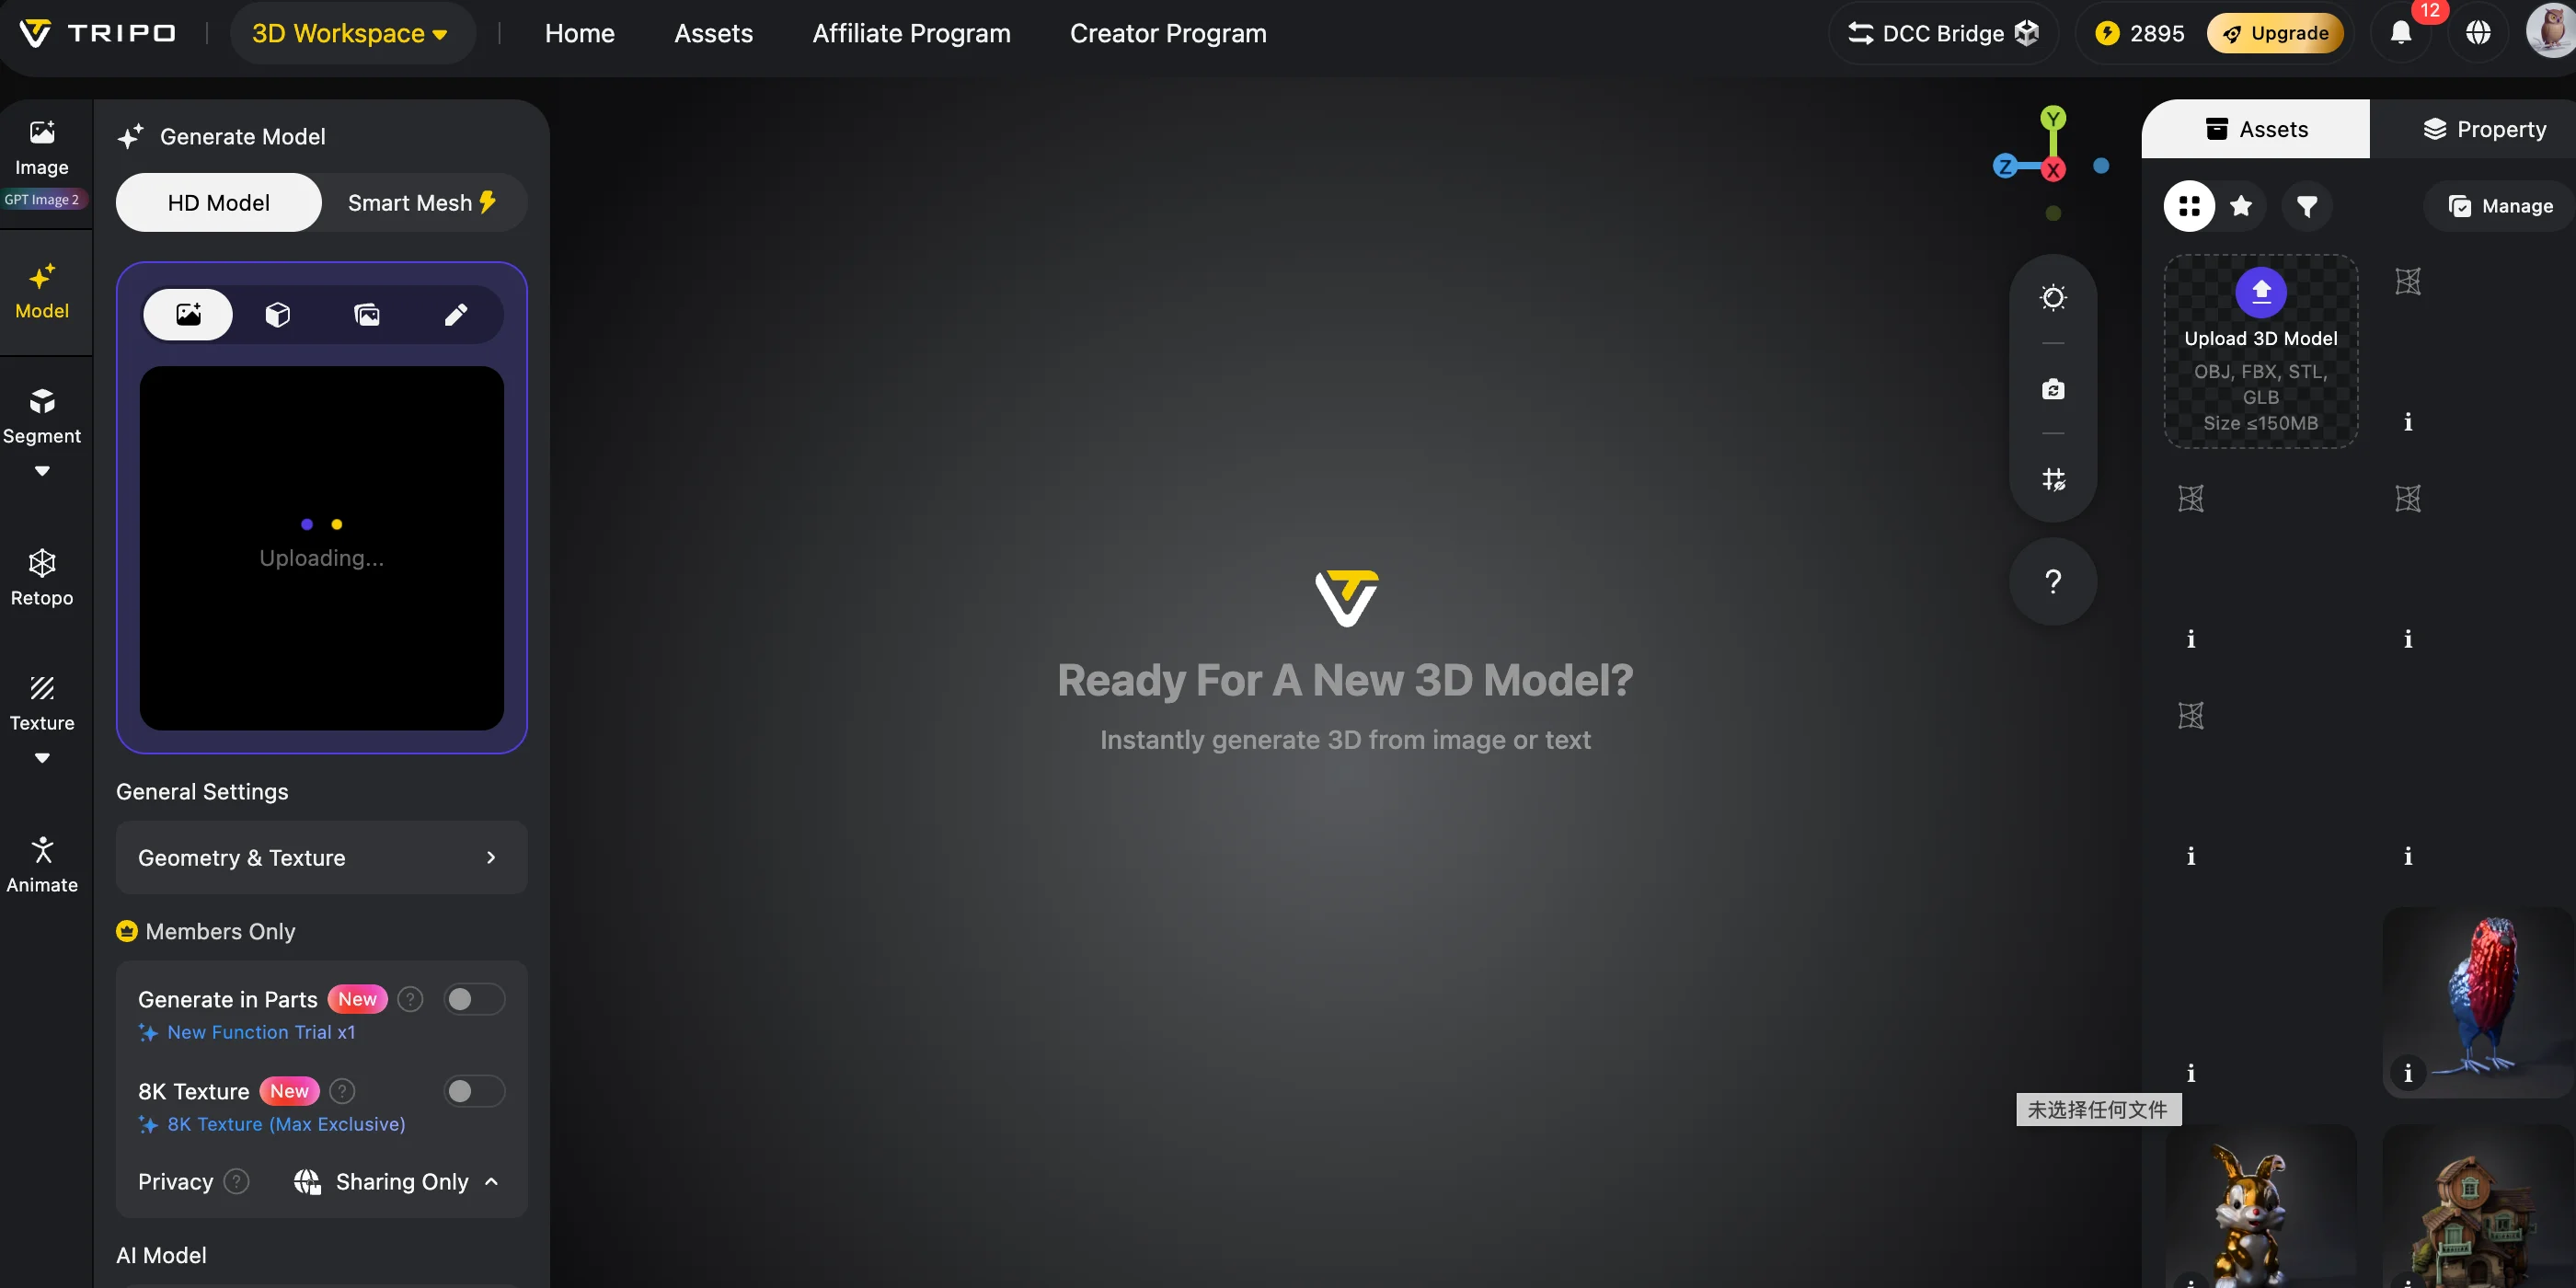
Upload Your Character Image
Start by uploading the action figure image you created earlier.
For the best results:
- Use a full-body image
- Keep the background simple
- Avoid overlapping objects
- Use clear lighting
A clean reference gives the system a clearer silhouette and fewer overlapping details to interpret.
Select Image-to-3D Generation
Choose the Image-to-3D option and let the AI process the image.
The system uses the visible reference information to estimate:
- Character silhouette
- Body proportions
- Surface details
- Clothing shapes
- Material appearance
Instead of creating a flat picture, the AI generates actual 3D geometry that you can rotate and inspect.
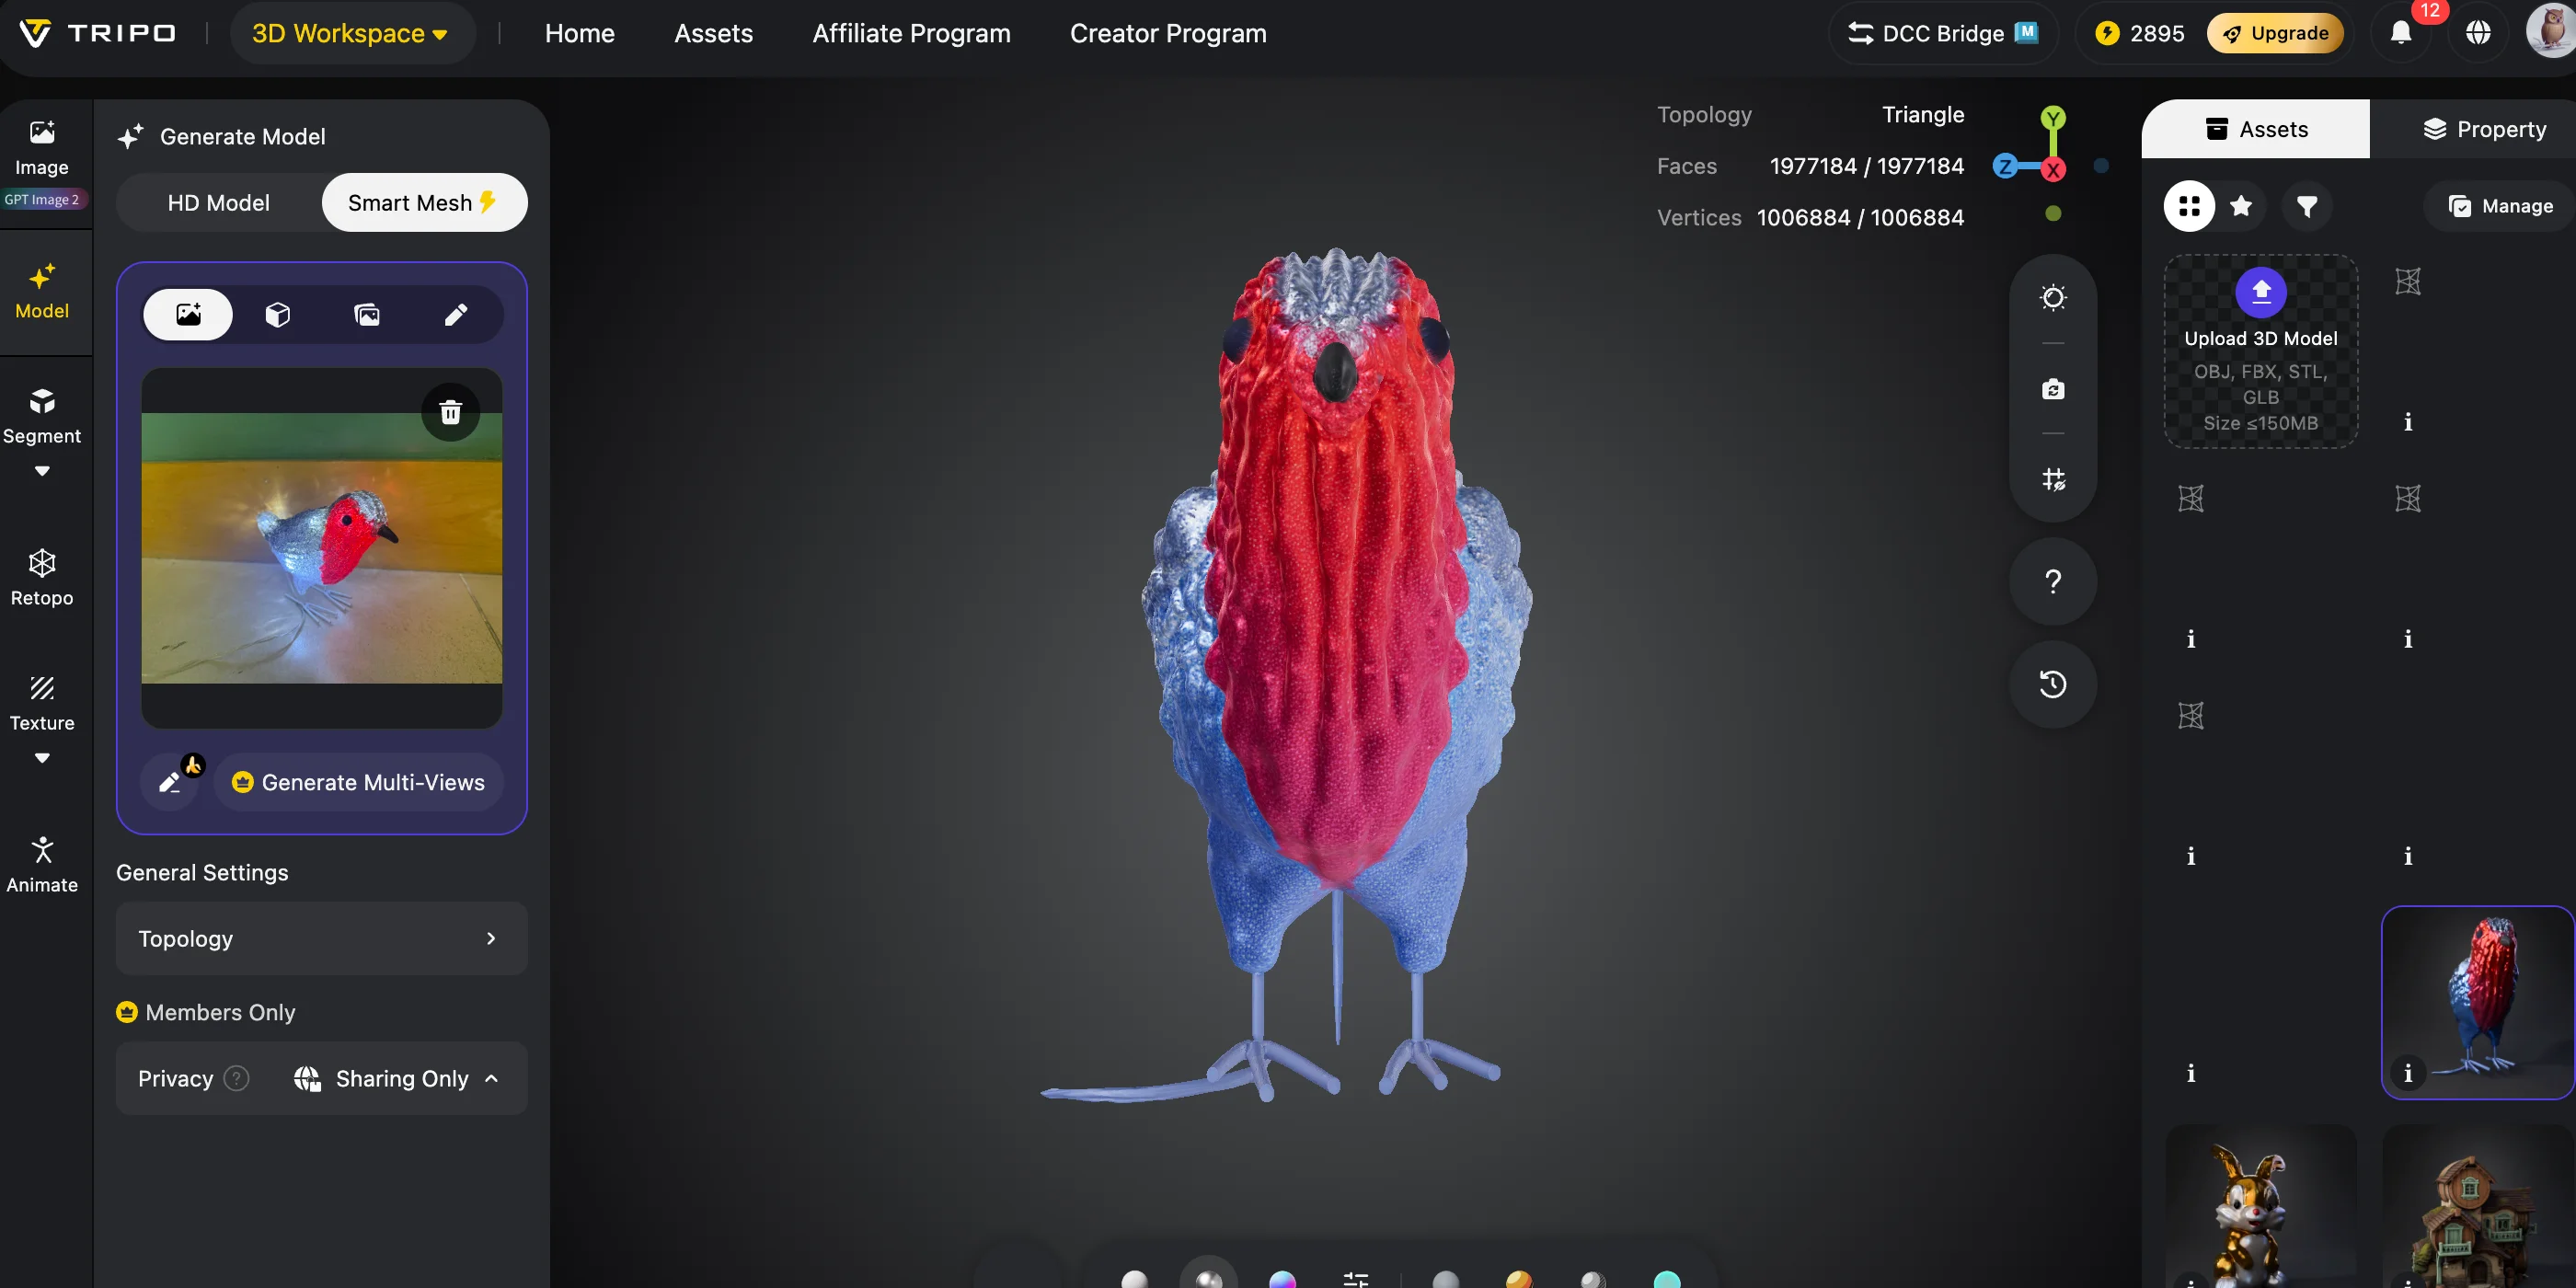
Review the Generated Mesh
After generation, check your model from different angles.
Look for:
- Missing fingers or accessories
- Incorrect body proportions
- Strange holes or floating parts
- Areas that need extra cleanup
AI generation is fast, but it is not magic. Complex designs may still need small adjustments before printing.
Export Your Model
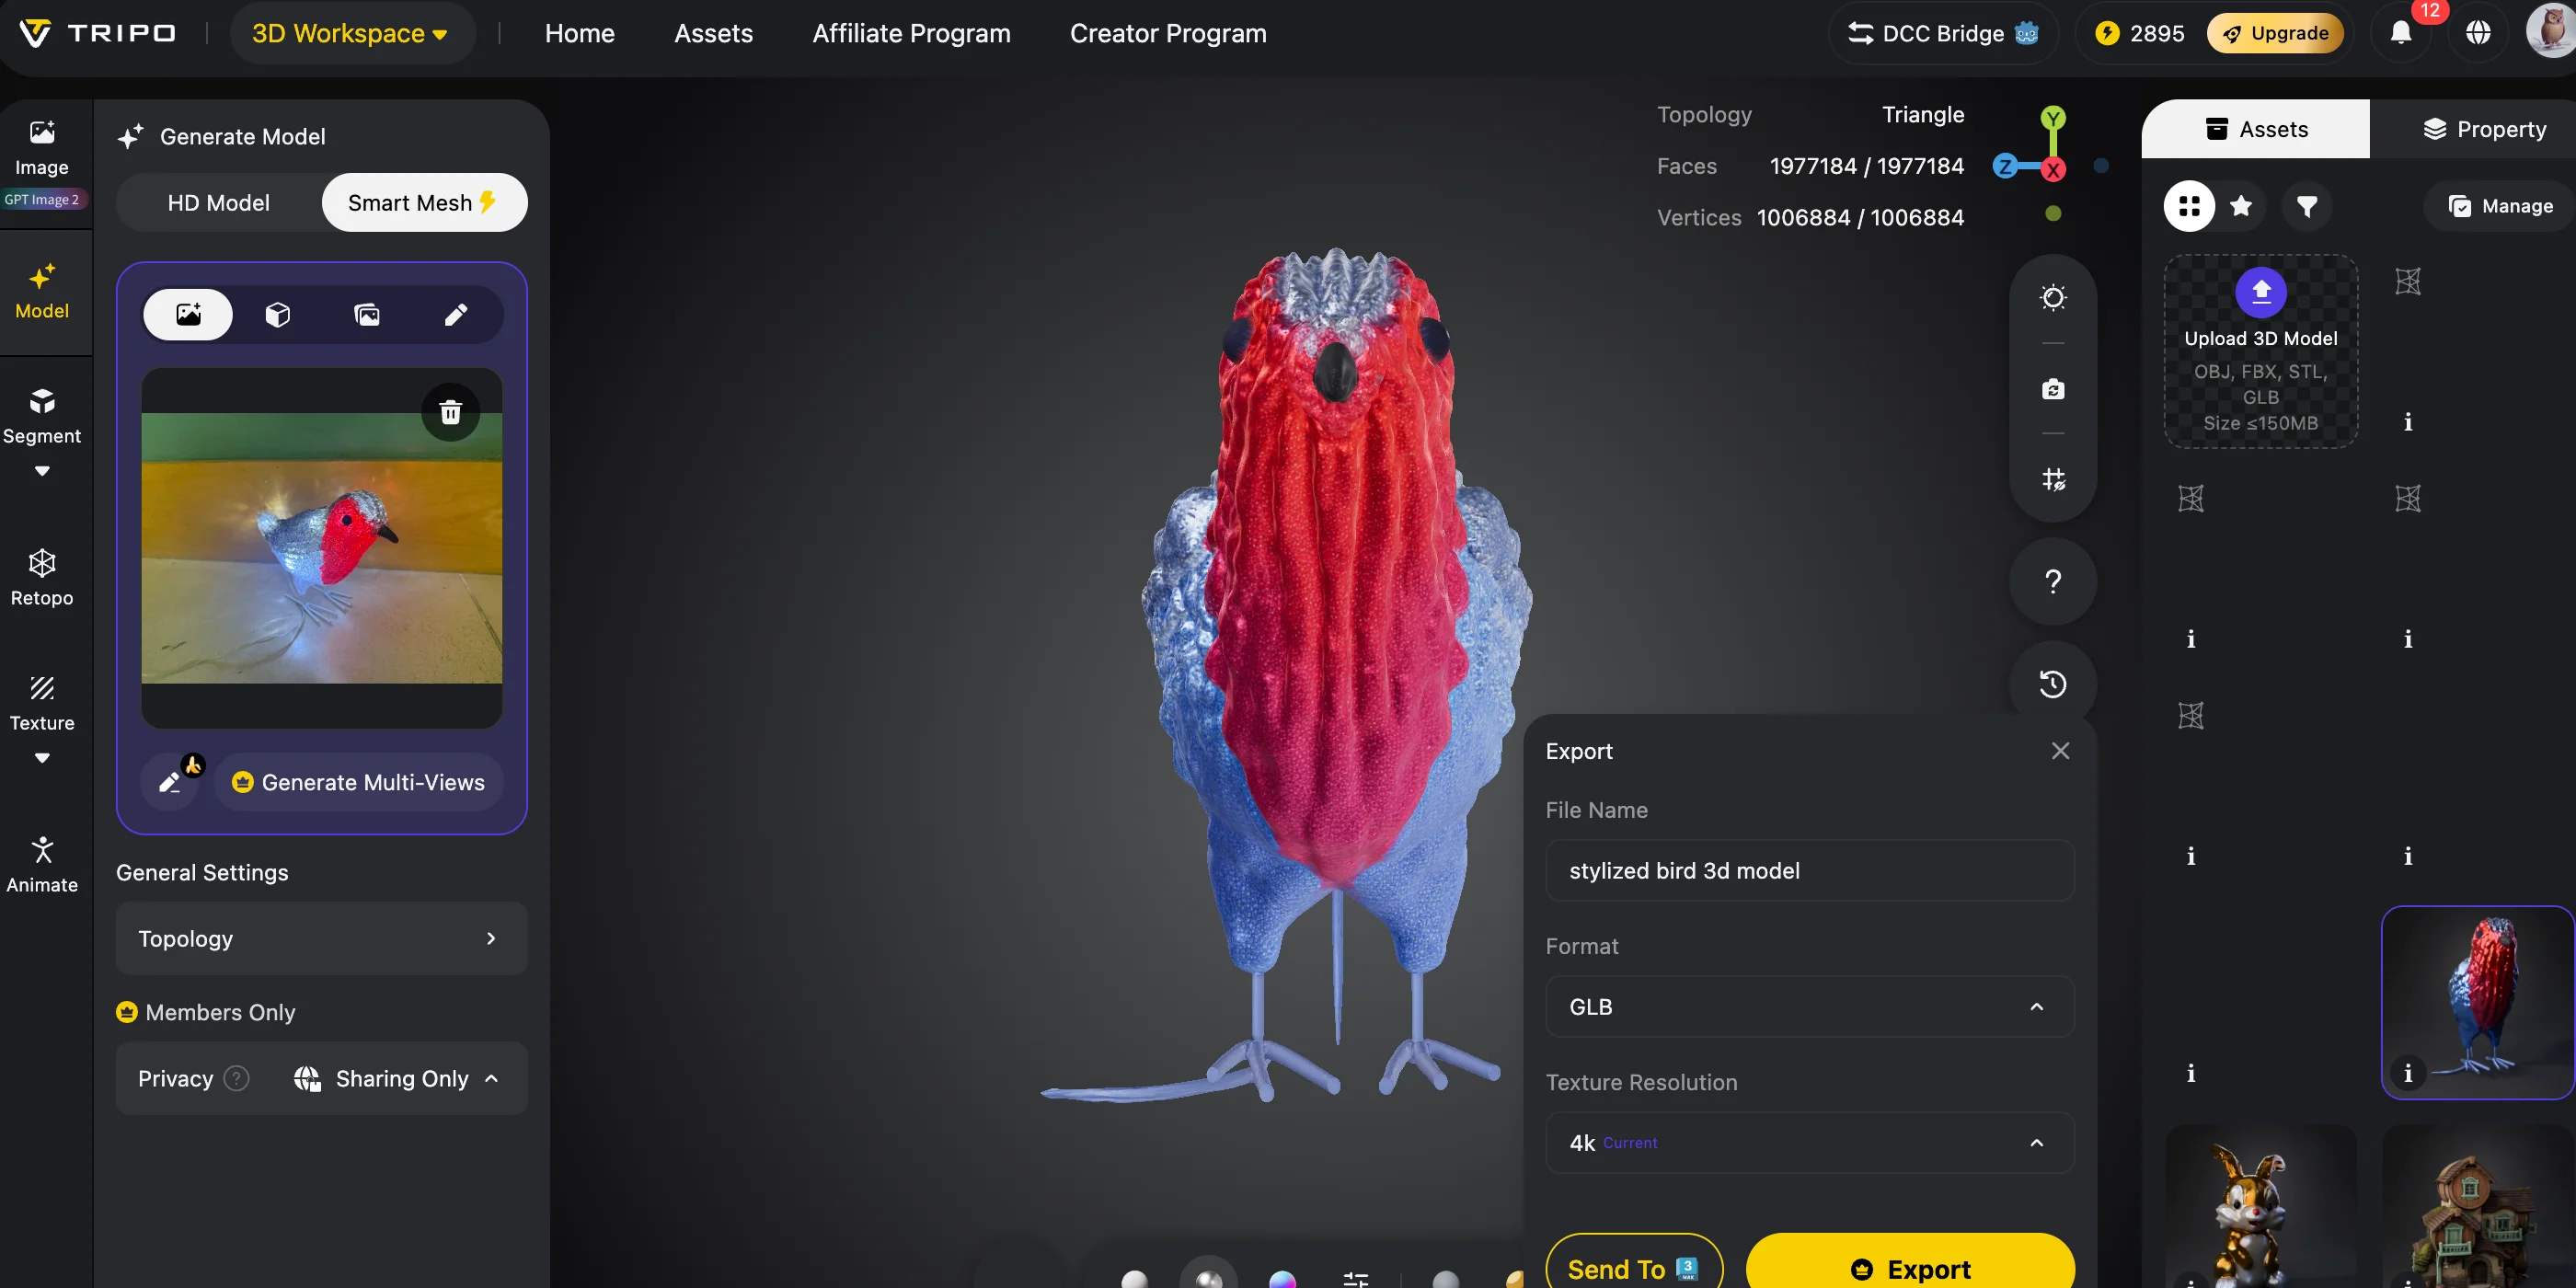
For action figure projects, common export formats include:
| Format | Best use |
|---|---|
| STL | Geometry-only export for slicers and 3D printing |
| 3MF | Additive-manufacturing workflows that may include materials, colors, textures, supports, or build metadata |
| OBJ | Continued mesh editing and material-based workflows |
| FBX | Rigged character, animation, and game workflows |
If you want to animate the character, Tripo AI’s Auto-Rigging feature can add a skeleton and skin weights. Current guidance recommends a T-pose humanoid or a standard standing quadruped; non-standard poses may rig incorrectly and should be tested before export.
For example, you could generate a T-pose superhero character, apply Auto Rig, and verify basic movement and deformation before using animations in a 3D application.
For printing-focused projects, prioritize sufficient geometric detail and verify that the final mesh is watertight and manifold. Smart Mesh or retopology can help reorganize topology for editing and real-time workflows, but they do not replace printability checks in a slicer.
Editorial Asset Required: Tripo AI Image-to-3D Result
Before publication, replace this note with a real Tripo AI Studio screenshot showing:
- Uploaded character image on one side
- Generated 3D model preview on the other side
- Rotation view or mesh preview
This helps readers understand the actual transformation from concept image to 3D figure.
AI Image to 3D Action Figure Workflow
Step 3 — Refine the 3D Mesh for Printing
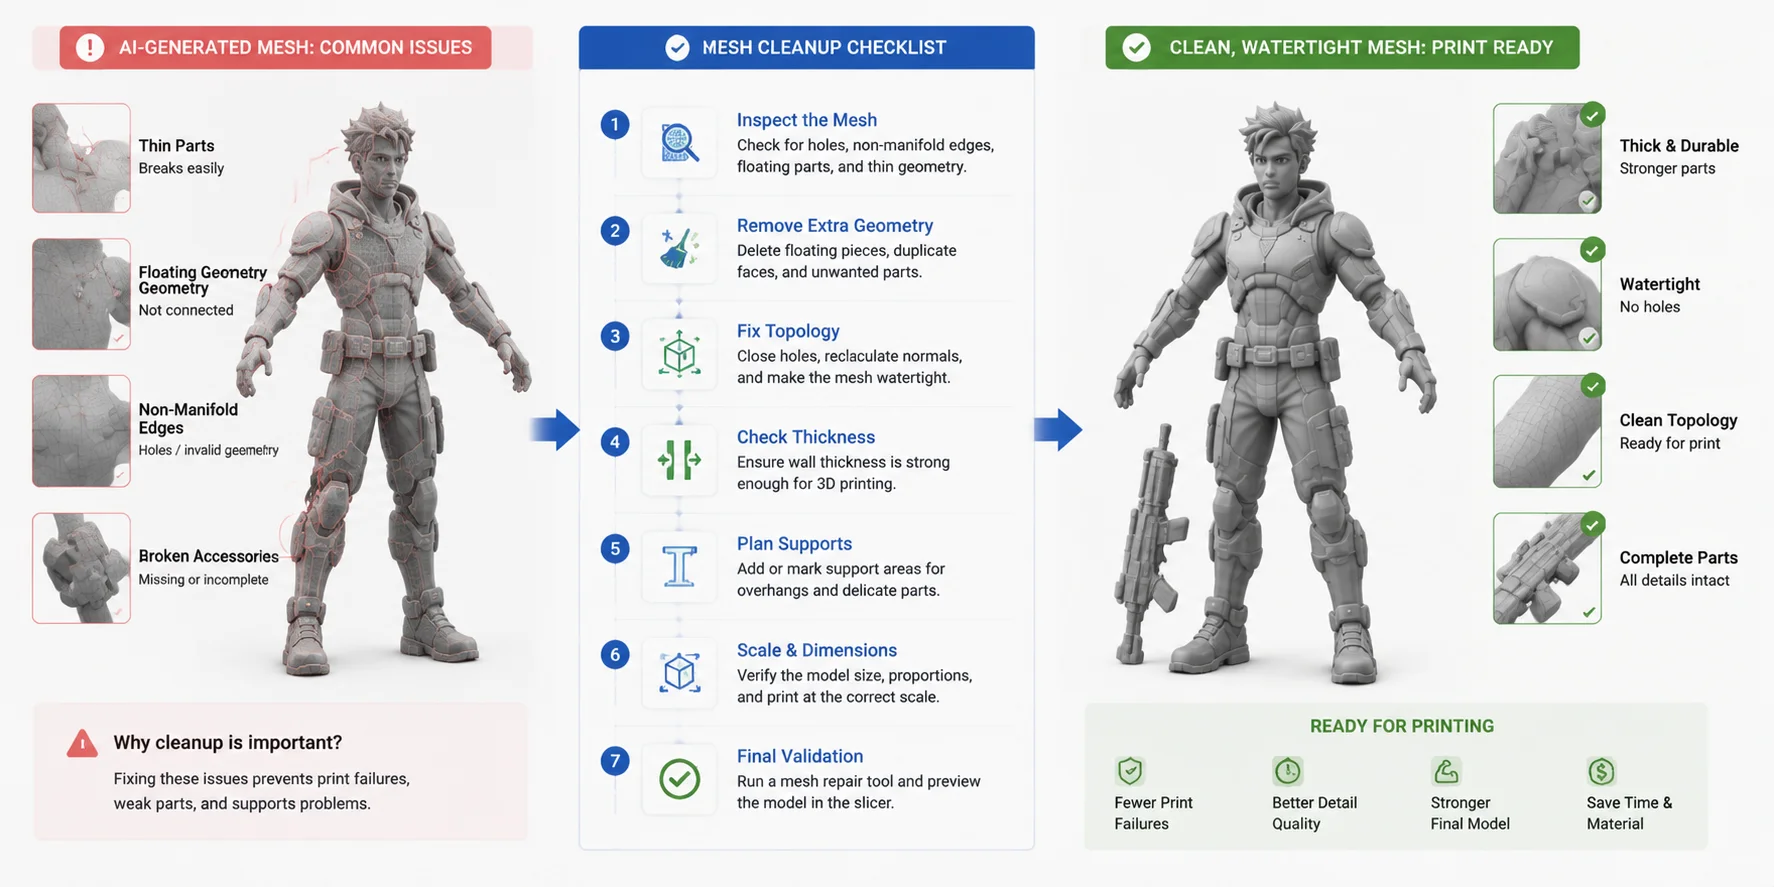
Your AI-generated model is a strong starting point, but you should still check the mesh before printing.
AI-generated models sometimes contain issues such as:
- Very thin parts
- Floating geometry
- Non-manifold edges
- Unconnected accessories
- Weak joints
These problems may not be obvious when viewing the model on screen, but they can cause failed prints.
For example, a sword, antenna, or small finger detail may look fine digitally but break during printing because the structure is too thin.
You can inspect and repair the mesh with tools such as:
- Blender
- PrusaSlicer repair tools
Before printing, check these areas:
3D Printing Checklist
✅ Wall thickness
- Use the printer, material, nozzle, and service provider’s design guide to choose a starting wall thickness.
- Run a small test at the intended scale because minimum feature size and structural strength vary by process, orientation, and material.
✅ Scale Common action figure sizes:
- 3.75-inch figure: about 9.5 cm tall
- 6-inch figure: about 15 cm tall
Choose your scale before slicing so details remain visible.
✅ Supports Check areas like:
- Raised arms
- Weapons
- Capes
- Large accessories
Resin printers can handle more detail, but they still need correct support placement.
✅ Mesh quality Look for:
- Holes
- Broken surfaces
- Separate floating pieces
Tripo AI’s Model Segmentation feature can separate a model into meaningful parts such as the head, body, limbs, and accessories for independent editing.
For an articulated figure, segmentation is only the starting point: you still need to design joints, clearances, tolerances, and assembly features for the selected print process.
Once the model passes these checks, you are ready for the final export and printing stage.
3D Action Figure Mesh Cleanup Checklist Before Printing
Step 4 — Export and Print Your Action Figure
Once your 3D model is clean and ready, the final step is turning your digital character into a physical figure. The export format you choose depends on how you plan to use the model.
For most action figure projects, STL is the standard choice because almost every slicer program supports it. STL stores the geometry of the object and works well for resin and FDM printing.
3MF is designed for additive-manufacturing workflows and can carry geometry plus manufacturing metadata such as materials, colors, textures, supports, and build information. Actual data support depends on the exporting application, slicer, and printer.
OBJ is useful when you want to continue editing the model in Blender or send it to a professional 3D artist or printing service.
After exporting, you can open your model in a slicer such as Cura, PrusaSlicer, OrcaSlicer, or resin printing software.
Before pressing print, decide which printer type fits your goal.
FDM vs Resin Printing for Action Figures
| Consideration | FDM | SLA / resin |
|---|---|---|
| Typical strength | Larger prototypes and display pieces | Small figures with fine surface detail |
| Surface detail | More visible layer lines; detail depends strongly on nozzle and layer settings | Typically finer details and smoother surfaces |
| Workflow trade-off | Filament handling and support removal | Resin handling, washing, curing, and support removal |
| Best choice depends on | Figure scale, required detail, material, printer profile, support strategy, budget, and post-processing capacity |
From Character Image to Exportable 3D Model
FDM can work well for larger display pieces and prototypes, especially when fine facial or surface detail is not the main priority. Equipment, material, and maintenance costs vary by printer and workflow.
For small collectible figures with fine facial features, armor patterns, or tiny accessories, SLA or resin printing typically resolves finer detail and smoother surfaces than FDM, although post-processing and material handling require additional care.
After printing, finishing creates the final look.
A simple finishing workflow:
- Remove supports carefully.
- Sand rough areas.
- Apply primer.
- Paint with acrylic colors.
- Add a clear coat for protection.
You can also skip owning a printer completely. Many professional 3D printing services accept STL or 3MF files and can produce your figure using high-quality resin printers.
The time required for the digital workflow varies with image preparation, generation retries, mesh repair, segmentation, and export settings. Printing, curing, support removal, assembly, and finishing should be planned as separate stages.
Tips for Better AI Action Figure Results
Creating a great AI-generated action figure is not only about choosing the right tool. Your input quality matters just as much.
Use these practical tips to improve your results:
Provide More Reference Angles
A single image can work, while a supported multi-view workflow can improve structural completeness when the reference views are consistent.
If possible, provide:
- Front view
- Side view
- Back view
Consistent additional views reveal hidden surfaces and can reduce the amount of structure the system must infer; inconsistent views can make the result worse.
Keep Accessories Simple
Large weapons, complicated backpacks, or detailed props can confuse the generation process.
A better approach:
- Generate the character body first.
- Add complex accessories later.
- Separate removable parts before designing articulation, then add process-specific joints, clearances, and tolerances.
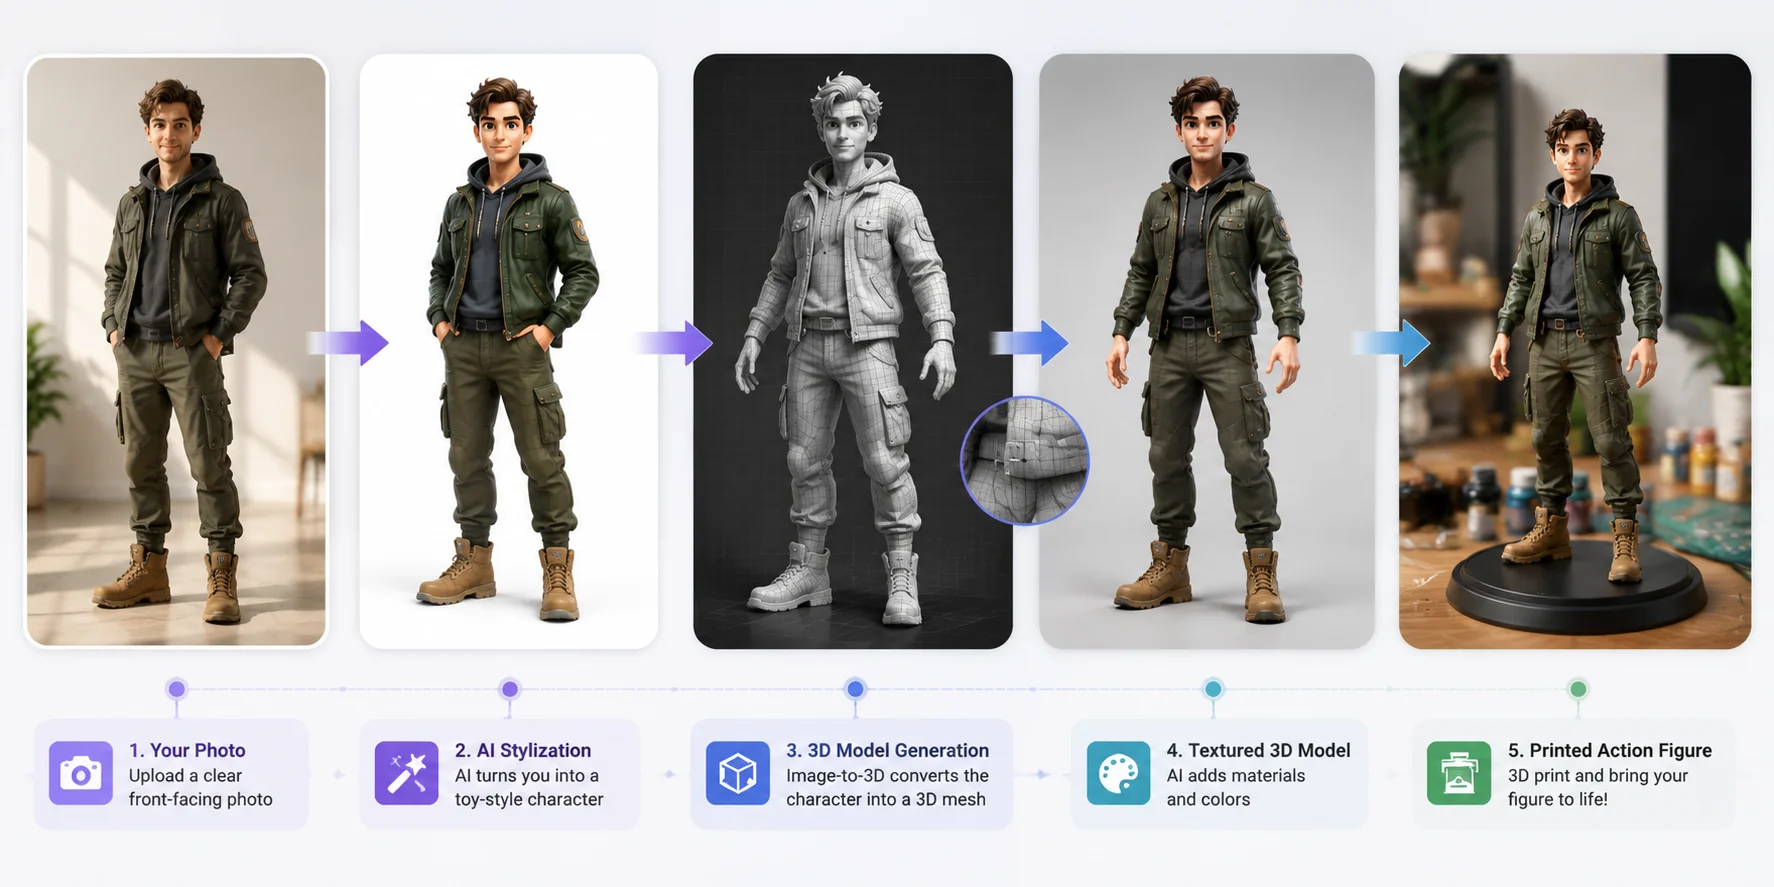
Create Your Own Action Figure from a Real Photo
Many people want to create your own action figure based on themselves, friends, or original characters.
For this workflow:
- Use a clear full-body photo.
- Avoid sunglasses, hats, or objects covering the body.
- Use even lighting.
- Add a style prompt after uploading.
For example:
“Turn this person into a collectible superhero action figure, realistic plastic material, detailed costume, toy design.”
This approach combines personal photos with AI stylization. Use your own photo or obtain the subject’s permission, and confirm that you have the necessary copyright, trademark, privacy, and likeness rights before generating or distributing the result.
Keep Lighting Consistent
Strong shadows can become confusing information during 3D reconstruction.
Better source images use:
- Soft studio lighting
- Neutral backgrounds
- Clear body outlines
The AI needs to understand the shape first. Style comes second.
Test Small Before Large Production
Before printing ten copies of your figure, create one test print.
Check:
- Overall scale
- Weak areas
- Detail visibility
- Support placement
A small prototype can save time and material.
Turn Yourself into a Custom AI Action Figure
Frequently Asked Questions
How do I make an AI 3D model figure?
Start by creating a character image with an image-generation tool such as Midjourney or ChatGPT Images. Use a clear full-body reference with a simple background and a front-facing pose. Then upload the image to Tripo AI Studio using the Image-to-3D feature to generate a downloadable 3D mesh. Export the model as STL or 3MF for printing.
How do I create a 3D action figure in ChatGPT?
ChatGPT’s image generation feature can help you create an action-figure-style image from a text description. Try prompts such as “collectible action figure, plastic material, full body, A-pose, white background.” However, the result is a 2D image, not a printable 3D file. To create a real figure, convert the image using a dedicated image-to-3D tool.
How do I make my own 3D action figure?
The easiest DIY workflow has three stages:
- Generate your character design.
- Convert the image into a 3D model.
- Export and print the final mesh.
An AI action figure generator can handle the design stage, while an image-to-3D platform creates the mesh. For small figures, SLA or resin printing often captures finer details than FDM, but the exported model still needs printability checks and support planning.
How do I make a 3D object in AI?
Upload a clear image or AI-generated character design into an AI 3D modeling platform. Tools like Tripo AI can transform the image into a textured 3D model that you can inspect and export. Depending on your goal, you can download formats such as GLB, OBJ, FBX, STL, or 3MF.
Is there a free AI action figure generator online?
Yes. Some image-generation tools offer free or limited-access options, and Tripo AI currently provides a free Image-to-3D entry point. Usage limits, downloads, and feature access can change, so review the current Tripo AI pricing page before starting a larger project.
Can I 3D print an action figure made with an AI generator?
Yes, but you need a 3D mesh file, not only an image. A generated picture must first go through an image-to-3D model process to create printable geometry. After exporting an STL or 3MF file, check the mesh in Blender or your slicer software for holes, non-manifold geometry, thin features, scale, and support requirements before printing.
What image style works best for an AI action figure generator?
The best results usually come from simple, clear images:
- Full-body character view
- Front-facing pose
- Plain background
- Soft lighting
- Visible hands and feet
Avoid heavy shadows, extreme camera angles, and overlapping objects. Clearer visible geometry gives the system more useful reference information, but you should still inspect hidden surfaces and small details in the generated mesh.
How is an action figure generator different from a general character creator?
A character creator usually focuses on making digital characters for a specific environment, such as a game engine or avatar platform. An action figure workflow focuses on creating a collectible-style image or portable 3D file for editing, rendering, or printing. Ownership and commercial-use rights depend on the source material, the service plan, and the applicable terms, so confirm those rights before distribution or sale.
Conclusion
AI action figure generators have evolved from simple image filters into complete creative workflows. With the right process, you can move from a character idea to a physical collectible by combining AI image generation, image-to-3D conversion, mesh cleanup, and 3D printing.
AI tools can reduce the amount of manual modeling needed for a first draft, but good results still depend on reference quality, mesh inspection, print preparation, and responsible use of source material. The next question is: which character will you create first?
Start creating your own AI-powered 3D figures with Tripo AI Studio and turn your ideas into printable models.
Explore available features and limits through Tripo AI plans and pricing before starting your next project.