GPT Image for 3D Printing: Step-by-Step Workflow
TL;DR
- ChatGPT can create images, but it cannot directly export printable STL files.
- The workflow is GPT Image → AI 3D generator → STL/3MF export.
- GPT Image creates a clean reference, while tools like Tripo AI generate the actual 3D mesh.
- OpenSCAD works for simple mechanical parts, but AI image-to-3D is better for organic designs.
- Use simple prompts with clear angles, plain backgrounds, and minimal shadows for better results.
- Export STL for standard printing or 3MF for color and multi-material workflows.
ChatGPT can generate detailed images, but it cannot directly export STL or OBJ files for 3D printing. The practical workflow is a two-step process: use GPT Image to create a clean reference image, then send that image to a dedicated AI 3D generator to create a print-ready mesh. This guide covers both steps, including the fastest path with Tripo AI’s built-in GPT Image integration.
The AI-driven image-to-3D generator market is expanding rapidly, growing from USD 327 million in 2025 to more than USD 2 billion by 2035, according to Precedence Research. The old approach — asking ChatGPT to write OpenSCAD code — worked well for simple geometric shapes but failed on organic designs like characters and figurines. The new workflow uses GPT Image 2 to generate a photorealistic reference, then passes it to a dedicated 3D AI tool to create an actual printable model. Here is the complete workflow.
Why ChatGPT Alone Can't Create 3D Printable Files
Many users searching for ChatGPT 3D printing ask the same question: “Can ChatGPT create a 3D printable file?” The answer is not directly.
ChatGPT and GPT-4o are language and vision models. They can generate text, code, and 2D images such as PNG or JPG files, but they do not output actual 3D mesh files like STL, OBJ, or 3MF. A 3D printer requires a mesh with complete geometry, closed surfaces, and printable thickness before slicing software can convert it into layers.
This means generating a concept image and generating a printable 3D model are two separate steps. GPT Image can create a detailed visual reference, but another AI system is needed to reconstruct the object’s shape in 3D.
The traditional workaround was the ChatGPT + OpenSCAD workflow. ChatGPT writes parametric OpenSCAD code, OpenSCAD compiles it, and the result can be exported as STL. This method is still useful for simple mechanical designs such as:
- brackets
- boxes
- spacers
- basic replacement parts
However, it struggles with organic designs like characters, animals, figurines, and curved products because these require complex surfaces that cannot easily be described through code.
The code route is still useful for precision mechanical parts. For anything organic or highly detailed, the image-to-3D route wins every time.
GPT Image changes the first step of this process. Modern image generation models can create cleaner, more realistic references with better lighting, materials, and object separation. Compared with older image-generation workflows, GPT Image produces references that are much easier for AI 3D systems to understand.
The bottleneck has moved from “creating a good image” to “turning that image into a usable mesh.” Dedicated AI 3D tools such as Tripo AI solve this second step by converting images into downloadable 3D assets.
ChatGPT vs AI 3D Generator: From Image to Printable 3D Model
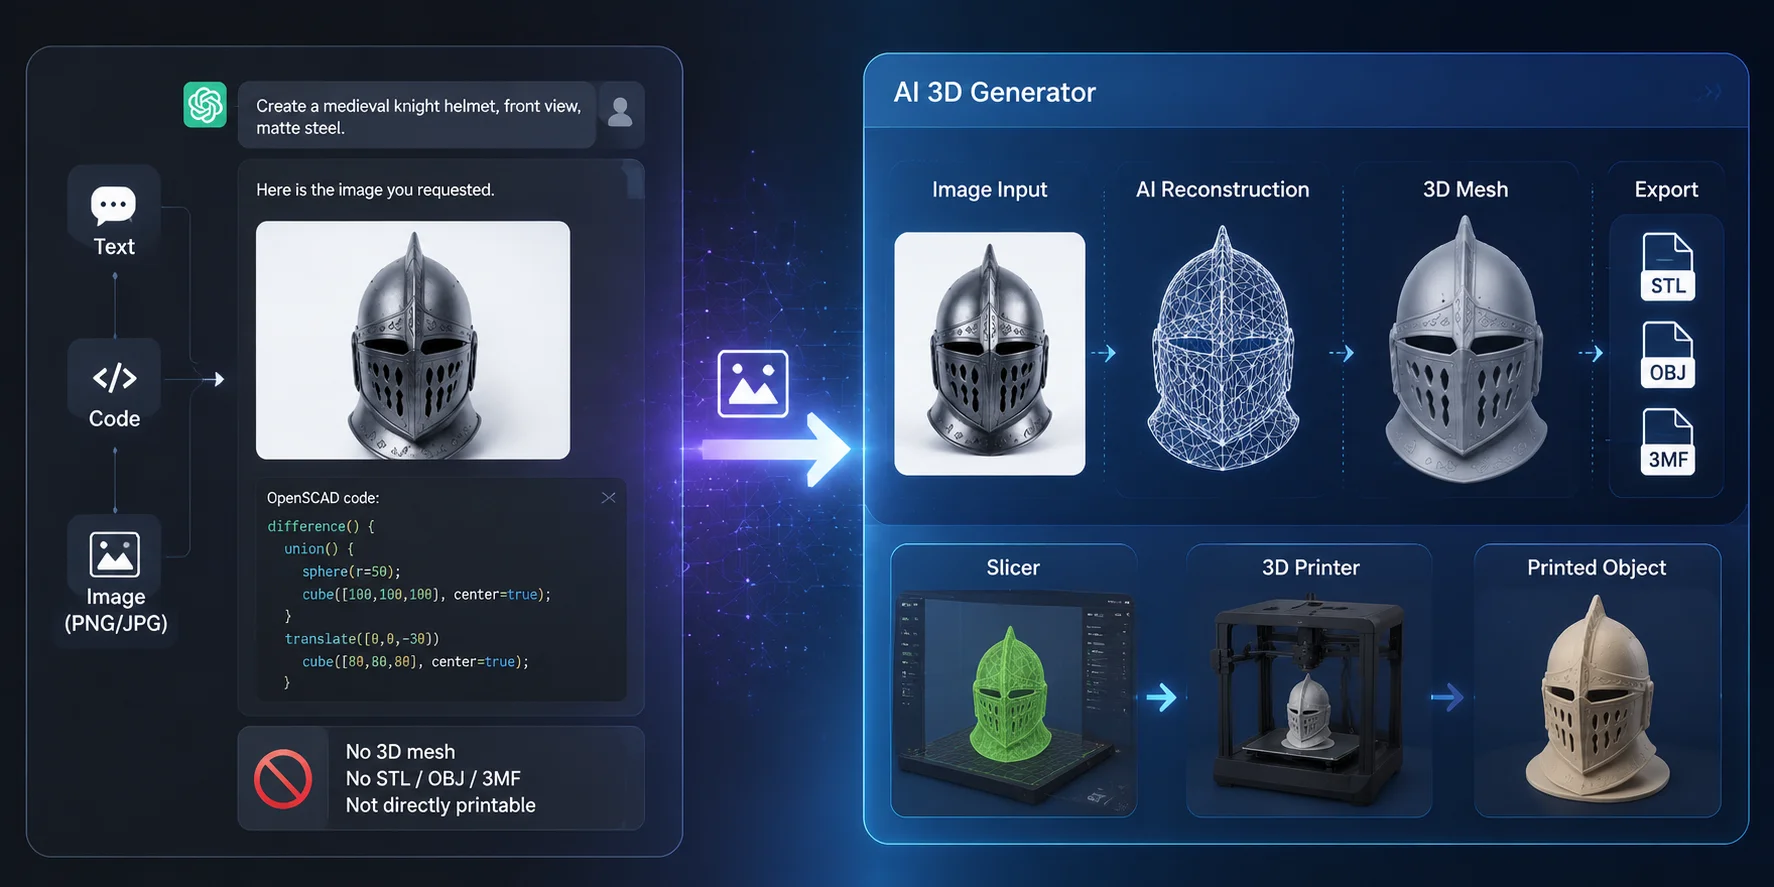
The Two-Step Workflow: GPT Image → 3D Print
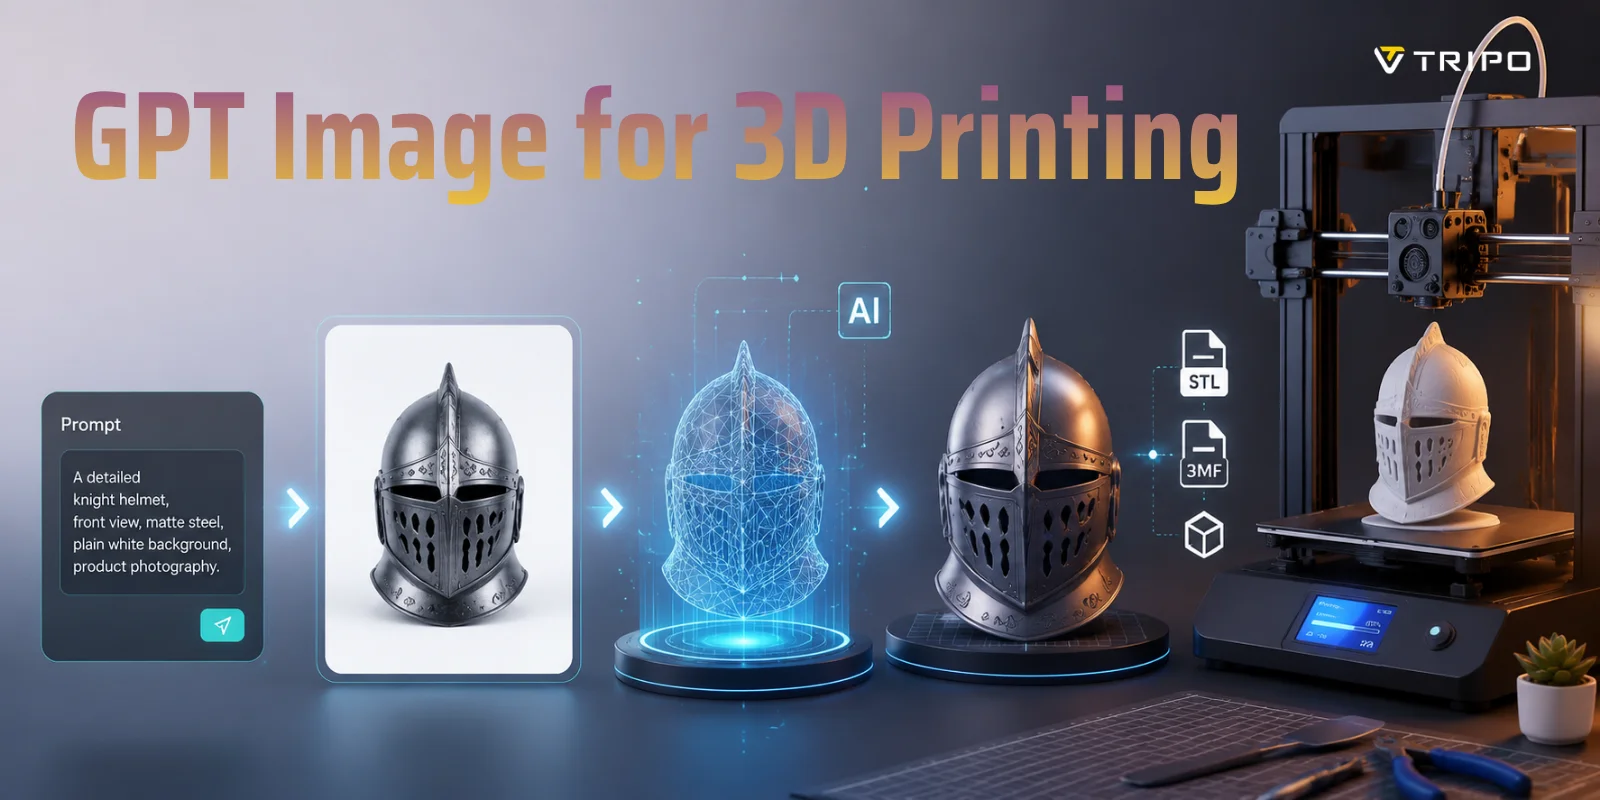
The modern GPT image for 3D printing workflow follows a simple pipeline:
Step 1: Generate a clean reference image with GPT Image ↓ Step 2: Convert the image into a printable 3D model with an AI 3D generator
This approach combines AI image generation with AI 3D reconstruction. GPT Image handles creative design, while the 3D generator creates geometry, topology, and export-ready files.
From writing a prompt to downloading an STL file, the complete process can often be completed in under ten minutes.
Part 1 — Generate Your Reference Image with GPT Image
The quality of your final AI image to 3D print result depends heavily on the reference image. A clean image gives the AI 3D model generator better information about shape, proportions, and surface details.
Open ChatGPT with GPT Image enabled
Start by opening ChatGPT and enabling GPT-4o image generation. The goal is not to create artwork — it is to create a clear 3D reference.
Think like a product photographer: simple, controlled, and easy to analyze.
Write a print-friendly prompt
A good prompt should include:
- subject description
- viewing angle
- background
- lighting
- material
Example:
“A medieval knight helmet, front-facing, plain white background, matte steel surface, even lighting, no shadows, product photography style.”
For 3D reconstruction, simple descriptions usually work better than cinematic ones.
A prompt like:
“A fantasy helmet glowing in a dark battlefield with dramatic lighting”
may look impressive but introduces unnecessary shadows, reflections, and background elements that can reduce 3D accuracy.
Review the generated image
Before converting the image into a model, check:
Good references should have:
- one main object
- clear silhouette
- full object visibility
- neutral background
- even lighting
Avoid:
- multiple objects
- heavy shadows
- lens effects
- extreme camera angles
- blurry details
The AI needs to understand the object’s structure, not interpret an artistic scene.
Download the image as PNG
Once the image looks suitable, save it as a PNG file. This file becomes the input for the next stage: converting the ChatGPT image to 3D model.
Part 2 — Convert the Image into a 3D Model and Export STL with Tripo AI
After creating the reference image, the next step is generating actual geometry.
A dedicated AI 3D generator analyzes the image, estimates depth, creates a mesh, and applies materials. This is the stage where normal image-generation tools cannot replace specialized 3D systems.
Open Tripo AI Studio and select Image to 3D
Upload your GPT-generated PNG image into** Tripo AI Studio’s** Image-to-3D workflow.
The system converts the image into a complete 3D asset instead of a flat picture.
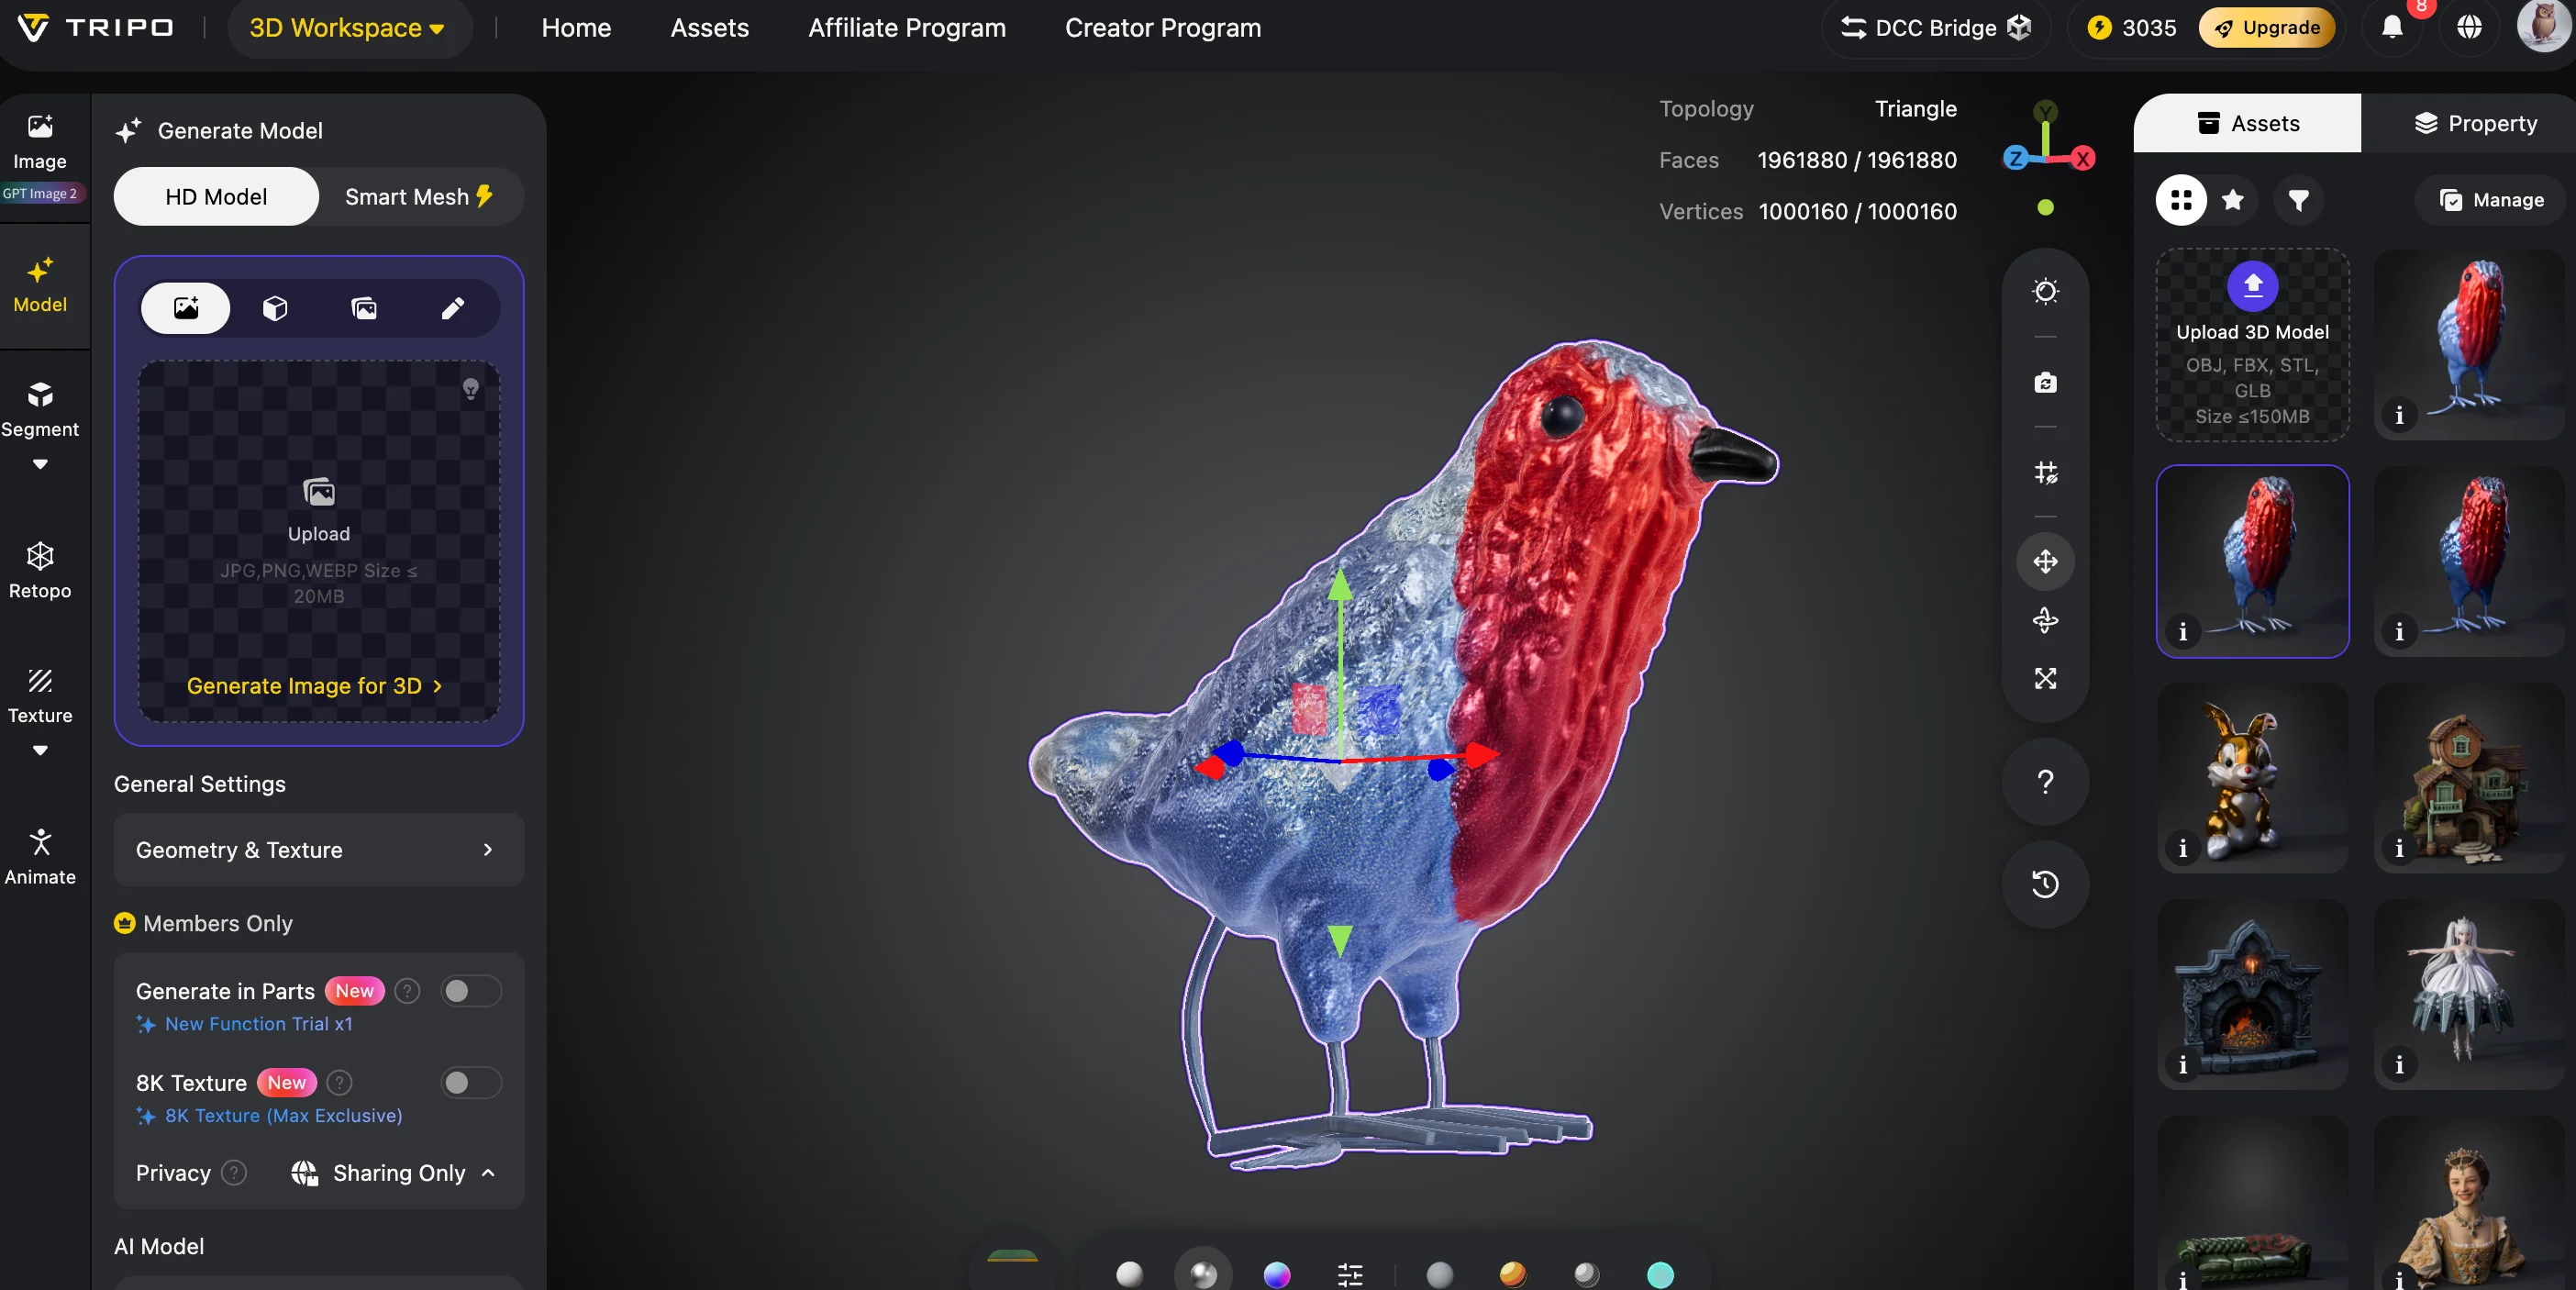
Choose the right generation mode
Tripo AI provides different options depending on your printing goal.
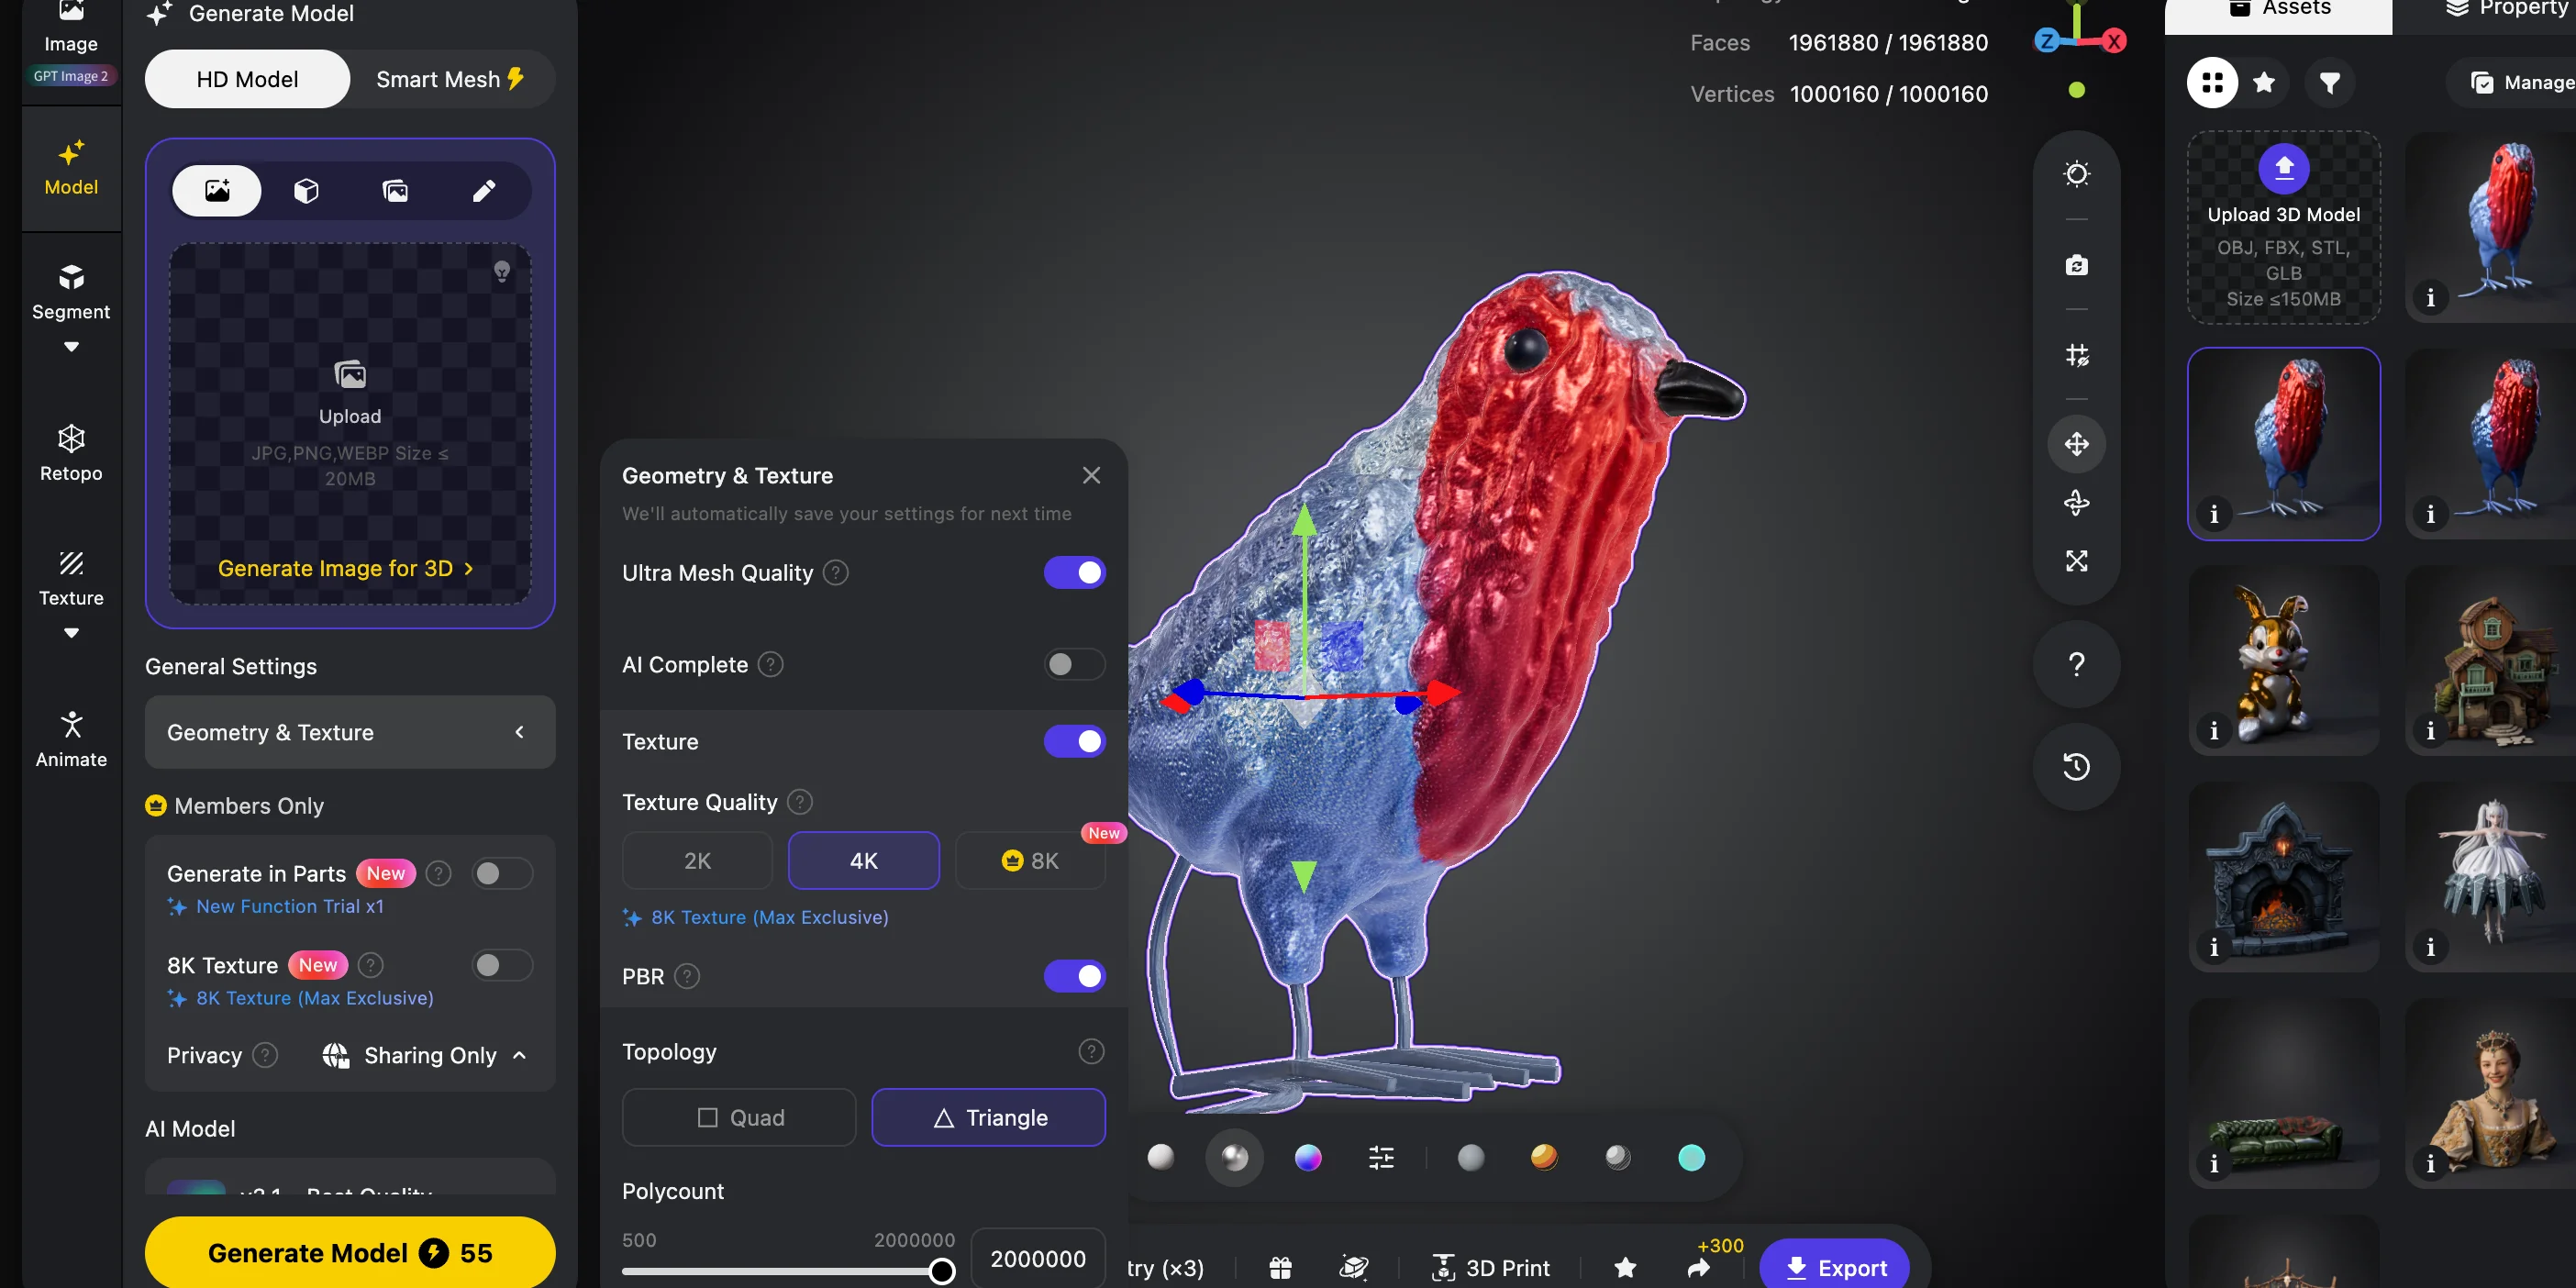
HD Model
HD Model is designed for projects that require high surface detail, such as figurines, characters, collectibles, and other organic shapes. It supports high-detail generation with up to around 2 million polygons, making it a better choice for resin printing, miniature models, and prints where small details such as facial features, textures, or sculpted surfaces need to be preserved.
Smart Mesh
Smart Mesh focuses on creating optimized geometry with cleaner topology and a lighter polygon count of around 5,000 faces. It is better suited for simpler objects, mechanical-style models, and workflows where easier editing, faster processing, or game-ready assets are more important than maximum surface detail.
For detailed statues, character models, or miniature prints, HD Model usually delivers better results because it preserves more visual information. For simpler objects or projects that need lightweight and editable geometry, Smart Mesh is often the more practical option.
Generate the 3D model
Click Generate 3D Model and wait for processing.
HD models may take longer because they contain more geometry and surface details.
Check the model before printing
Before export, inspect:
- shape accuracy
- surface quality
- missing details
- thin parts
- holes or broken areas
AI-generated models save significant modeling time, but a quick quality check helps avoid printing failures.
Export as STL or 3MF
Choose the format based on your printer workflow.
STL
Best for:
- standard FDM printing
- general-purpose slicing
STL stores geometry only and does not include color or texture information.
3MF
Best for:
- color printing
- multi-material workflows
- Bambu Lab and Prusa printers
3MF can preserve additional printing data and is often smaller than equivalent STL files.
Note: exporting v3.0+ models requires an active paid subscription.
The complete GPT image to STL workflow replaces many hours of traditional modeling for creative objects. Instead of manually sculpting a character or building complex surfaces, creators can generate an AI 3D model for 3D printing from an idea in minutes.
GPT Image → 3D Print Workflow: From Reference Image to STL File
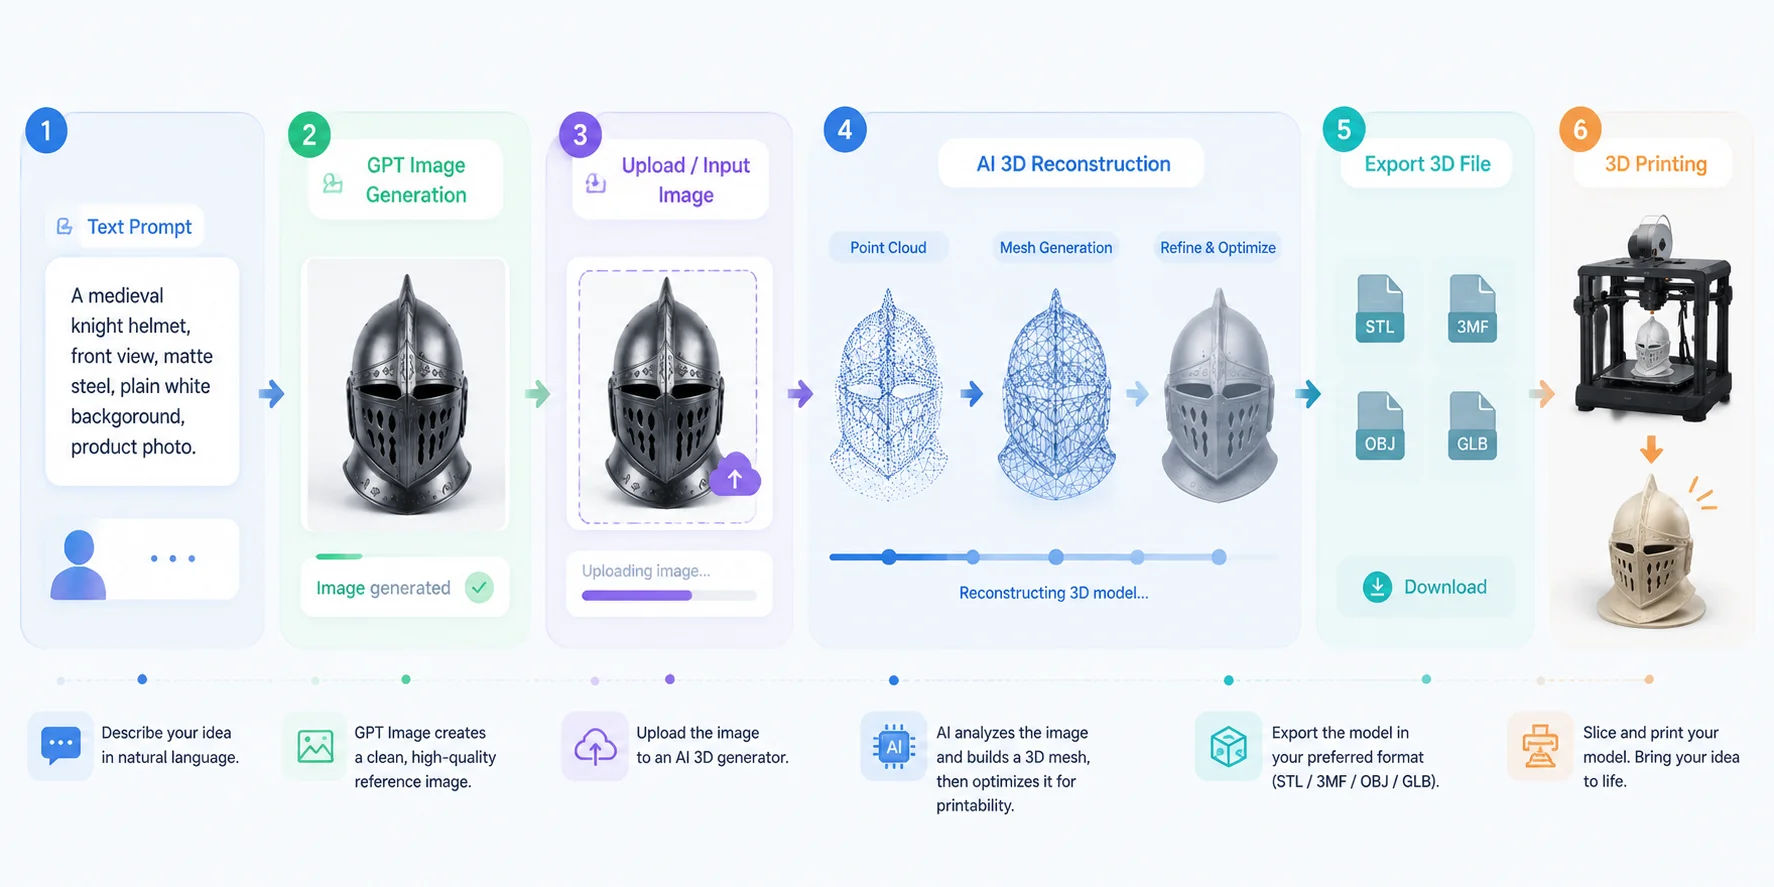
Using Tripo AI's Built-In GPT Image Integration
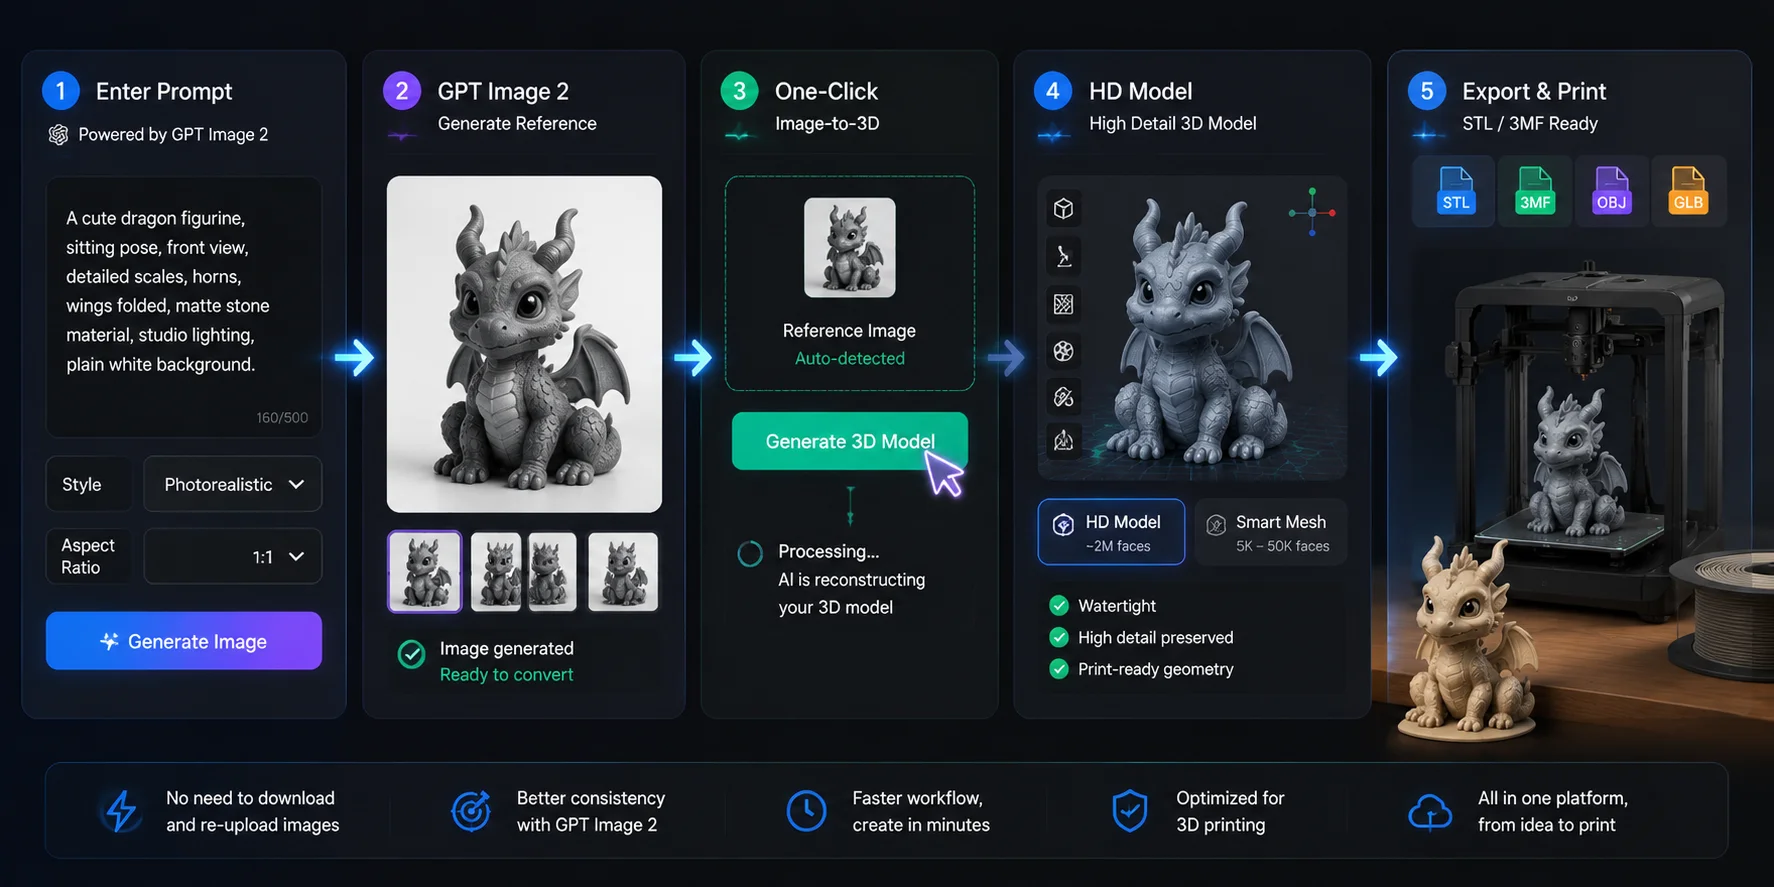
The two-step workflow already makes AI 3D printing much faster, but Tripo AI also offers a more streamlined approach by integrating GPT Image 2 directly into its Studio workflow.
Instead of generating an image in ChatGPT, downloading the file, and uploading it into a separate 3D generator, users can create the reference image and start 3D generation in the same interface.
The integrated workflow is:
Open Tripo Studio → Generate image with GPT Image 2 → Convert image to 3D → Export printable model
Users can enter a text prompt inside Tripo Studio’s image generation interface. GPT Image 2 creates a clean reference image, then the image-to-3D process can start immediately without manually moving files between platforms.
This matters because AI 3D creation usually requires multiple iterations. A first generation may not have the exact shape, proportions, or details needed for printing. With an integrated workflow, users can quickly adjust the prompt, regenerate the image, and create a new model without switching tools.
For example, when creating a custom figurine, users may need several attempts to refine:
- character proportions
- pose
- accessories
- surface details
- overall style
The faster iteration cycle makes the workflow more practical for real projects.
After image generation, **Tripo AI **can create a detailed 3D model with options such as HD Model for figurines and organic objects. The result can then be prepared for printing and exported in common formats such as STL or 3MF.
For creators who want the shortest path from an idea to a physical object, the integrated workflow simplifies the entire process:
Prompt → AI image → 3D model → Printable file
Tripo AI’s GPT Image 2 integration brings image generation and Image-to-3D conversion into the same workflow. Paid plans unlock access to all image generation models, while Free users have limited access to image generation features.
Open Tripo AI Studio and try the integrated flow.
Tripo AI GPT Image Integration: From Prompt to 3D Print Workflow
Getting Better Prints — Prompt Tips and Model Optimization
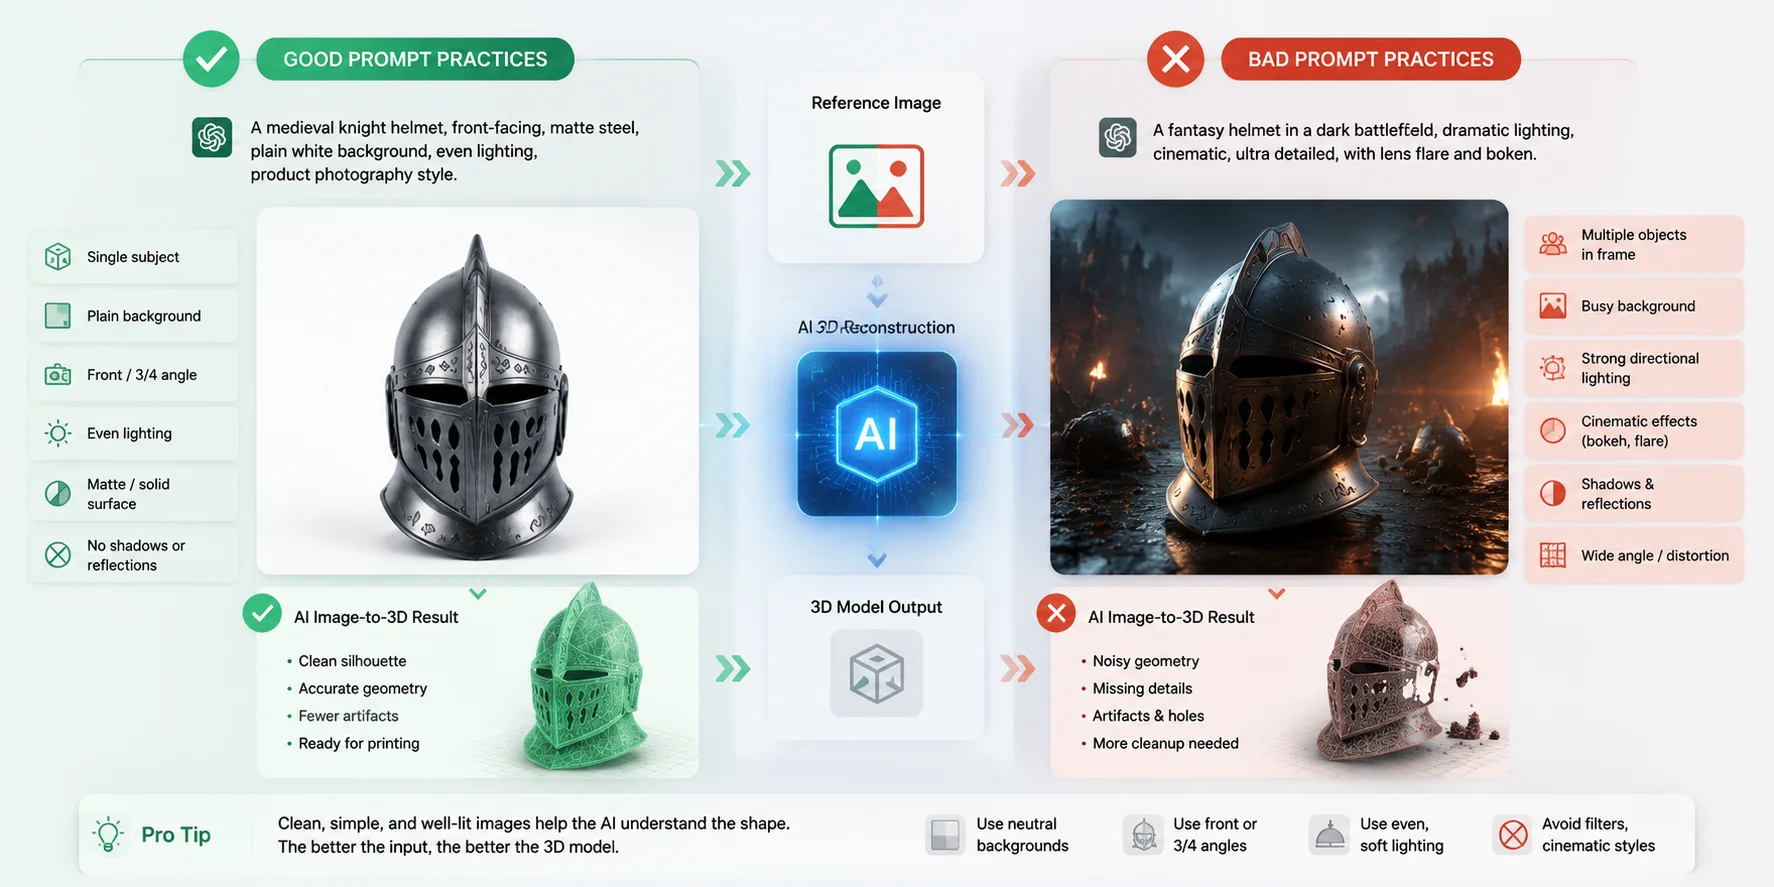
The quality of an AI image to 3D print workflow is determined long before the model reaches the slicer. The image prompt controls how clearly the AI understands the object’s shape, materials, and surface details. A good reference image does not need to look artistic — it needs to be easy for a 3D reconstruction model to analyze.
The most reliable prompts use a single subject, a clean background, and controlled lighting. Describe the object from a front-facing or three-quarter angle, and avoid unnecessary visual effects. For example, instead of asking for “a futuristic helmet in a dramatic sci-fi scene,” use a prompt like: “a futuristic helmet, front-facing, plain white background, matte surface, even lighting.” This gives the AI clearer information about the silhouette and structure.
Material descriptions also matter. Adding details such as “brushed aluminum,” “matte PLA-colored plastic,” or “smooth ceramic surface” provides useful visual cues. Even when exporting as STL, where textures are not included, surface information helps the AI understand how the object should be reconstructed.
However, some image styles create problems during conversion. Avoid prompts with multiple objects, busy backgrounds, strong directional lighting, or heavy reflections. Shadows can be especially problematic because the AI may interpret them as actual geometry. Cinematic effects such as film grain, bokeh, wide-angle lenses, and fisheye distortion may produce attractive images but often reduce 3D accuracy.
After generating the model, always perform a quick print-readiness check. Look for issues such as non-manifold geometry, holes in the mesh surface, disconnected parts, or extremely thin walls. For FDM printing, features below around 0.4 mm are often difficult to reproduce, while resin printers can handle much finer details, sometimes around 0.05 mm under ideal conditions.
If an HD Model creates a file that is too heavy for your slicer, use Tripo AI’s Smart Mesh workflow to reduce polygon count and create cleaner optimized geometry. Finally, choose the right export format: STL remains the standard choice for most FDM printers because it is supported by nearly every slicer, while 3MF is better for color printing and workflows with printers such as Bambu Lab or Prusa because it can preserve additional print data and color information.
GPT Image Prompt Tips for Better 3D Printing Results
Frequently Asked Questions
Can ChatGPT create a 3D printable file?
Not directly. ChatGPT can generate OpenSCAD code for simple geometric objects or create a reference image using GPT Image. To convert that image into a printable STL, upload it to a dedicated AI 3D generator such as Tripo AI.
How do I use ChatGPT to make a 3D print?
Generate a clean reference image with GPT Image, then upload it to Tripo AI Studio’s Image-to-3D workflow. Select HD Model for detailed objects or Smart Mesh for optimized geometry, then export the result as STL or 3MF.
Can ChatGPT actually make STL files?
No, not natively. ChatGPT can help create code-based STL files through OpenSCAD, but it cannot directly generate complex mesh files. For organic models, an AI image-to-3D workflow is more effective.
How do I turn an AI image into a 3D print?
Upload the AI-generated image to an image-to-3D tool such as Tripo AI Studio. Generate the model, check the mesh, and export it as STL for FDM printing or 3MF for color and multi-material workflows. The complete process can often take less than ten minutes.
Is there a free way to do this?
ChatGPT offers image generation access with usage limits on free plans. Tripo AI provides a free plan with 200 credits per month, which can support several model generations depending on the selected features. Exporting v3.0+ models requires a paid subscription.
What kind of 3D prints work best with this workflow?
AI image-to-3D workflows work best for organic designs such as figurines, characters, animals, toys, and decorative objects. For precise engineering parts like gears, brackets, and mechanical components, CAD-based modeling remains more reliable.
Conclusion
GPT Image has made the first step of 3D printing — creating a detailed reference image — faster and easier. Tripo AI completes the second step by converting that image into a printable 3D model that can be exported as STL or 3MF.
Ready to try it? Open Tripo AI Studio and generate your first print-ready model. Explore available plans and free credits at Tripo AI Pricing.