FDM 3D Printing: The Complete Guide to Filament Printing
TL;DR
- FDM 3D printing builds objects by extruding melted filament layer by layer.
- PLA is easiest for beginners, while PETG and ABS suit functional parts.
- Layer height, infill, supports, and speed strongly affect print quality.
- Common FDM issues include warping, stringing, weak layers, and poor adhesion.
- Tripo AI helps generate 3D models from text or images for further print preparation.
A beginner holding their first spool of filament often asks the same question: how does this plastic thread become a real object? That is the appeal of FDM, or Fused Deposition Modeling, the world’s most widely used desktop 3D printing technology. It is affordable, accessible, and practical for hobbyists, students, makers, engineers, and product teams. This guide explains how FDM printers work, which materials to choose, which print parameters matter most, where FDM is used, how to post-process finished parts, how to fix common printing problems, and which design rules help you avoid failed prints.
What Is FDM 3D Printing?
FDM stands for Fused Deposition Modeling. It is also known as FFF, or Fused Filament Fabrication, especially in the open-source maker community. In FDM 3D printing, a spool of thermoplastic filament is fed into a heated nozzle, melted, and extruded layer by layer to build a 3D object from the bottom up.
FDM is an additive manufacturing process because it adds material only where needed. This differs from subtractive manufacturing, such as CNC milling, where material is cut away from a solid block. It also differs from SLA, which cures liquid resin with light, and SLS, which fuses powder with a laser. In simple terms, FDM is the most common filament-based desktop printing method.
FDM was originally developed by Stratasys in the late 1980s. After key patents expired around 2009, desktop FDM printers became more accessible and helped fuel the RepRap maker movement, which promoted open-source, self-replicating 3D printer designs. Today, FDM remains the most affordable and accessible 3D printing method for hobbyists, educators, makers, and professionals.
How FDM 3D Printing Works
FDM printing follows a clear digital-to-physical workflow. The printer may look complex, but the process is straightforward when broken into steps.
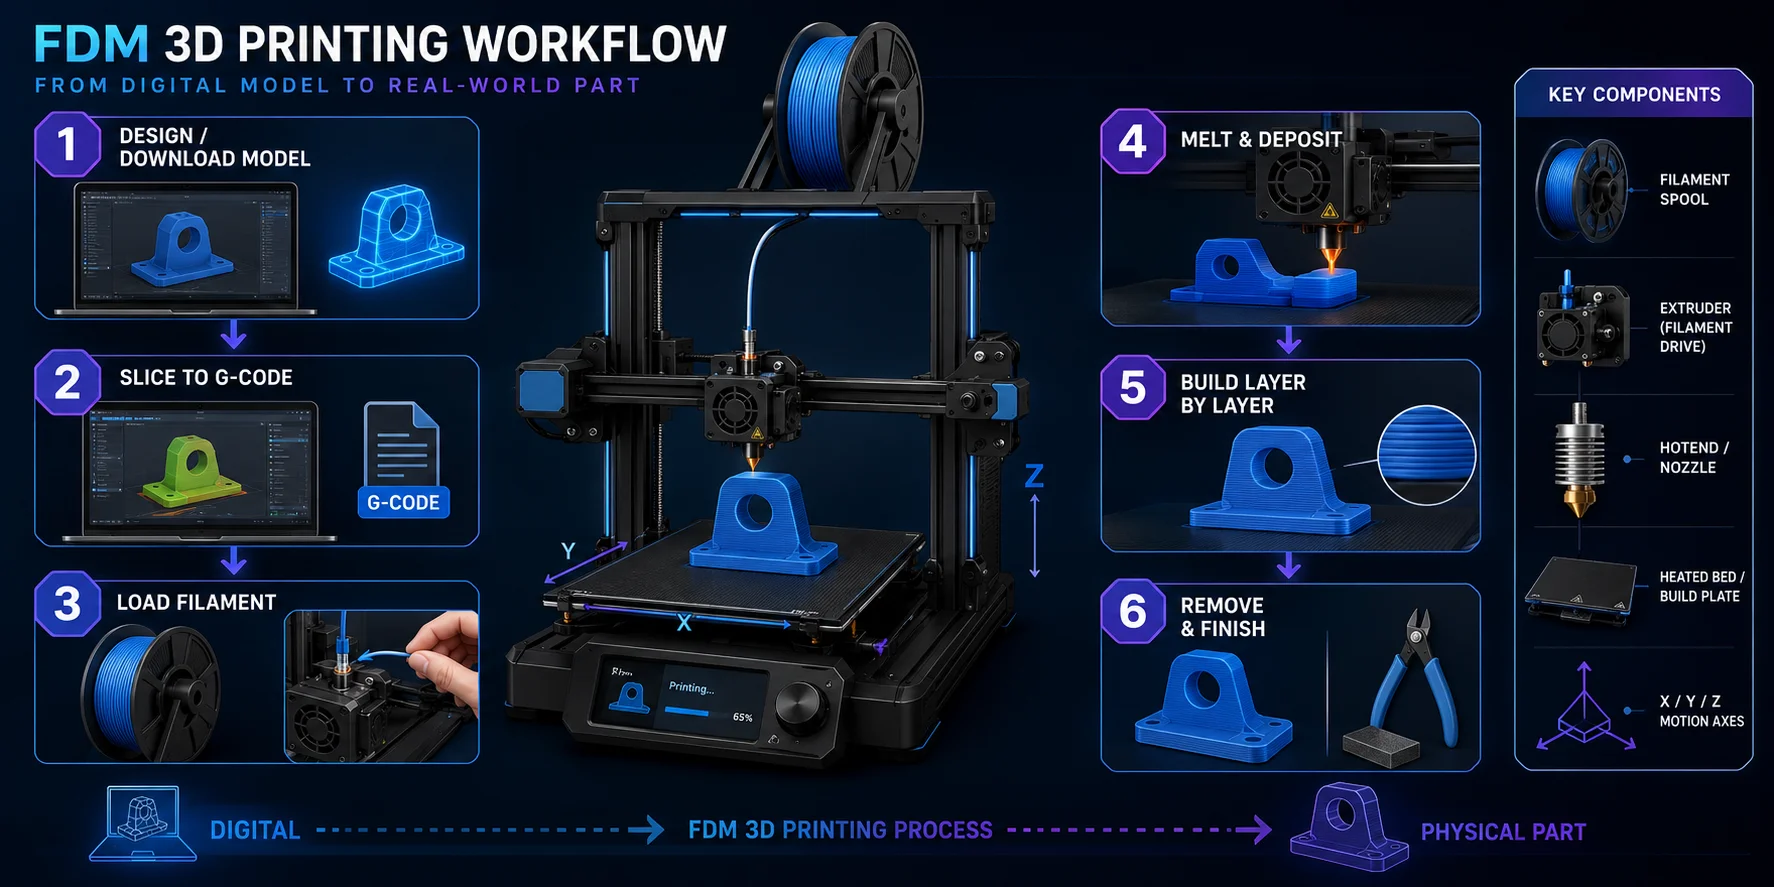
- Design or download a 3D model. Start with a digital model created in CAD or 3D software, or download one from a repository such as Thingiverse, Printables, or MyMiniFactory.
- Slice the model. Slicing software such as Cura, PrusaSlicer, or Bambu Studio converts the geometry into layer-by-layer toolpaths and generates G-code. G-code tells the printer where to move, how fast to move, and how much filament to extrude.
- Load filament into the extruder. A spool of filament, usually 1.75 mm in diameter, feeds into the extruder, which grips the material and pushes it toward the hotend.
- Melt and deposit the filament. The heated nozzle, or hotend, melts the filament and deposits it onto the build plate. The print head moves along the X and Y axes, while the build platform or printhead shifts along the Z axis after each layer.
- Build layer by layer. Successive layers fuse together as the molten plastic cools and bonds, gradually forming the object from the bottom up.
- Remove and finish the print. Once printing is complete, remove the part from the build plate and take off any supports.
Key hardware includes the extruder, hotend, nozzle, heated bed, build plate, and motion system. The heated bed improves first-layer adhesion, while Cartesian and CoreXY systems affect speed, stability, and precision.
FDM Materials: Filament Types and Properties
FDM printers use thermoplastic filament wound on spools, typically 1.75 mm or 2.85 mm in diameter. Each filament differs in print temperature, strength, flexibility, finish, and difficulty.
| Filament | Typical nozzle temperature | Key properties | Best for | Difficulty |
|---|---|---|---|---|
| PLA | 180–220°C | Easy to print, low warping, stiff, low heat resistance | Prototypes, classroom prints, decorative models | Easy |
| PETG | 220–250°C | Stronger than PLA, slightly flexible, good layer adhesion | Functional parts, brackets, containers | Easy–medium |
| ABS | 230–260°C | Heat-resistant, durable, acetone-smoothable, warps easily | Enclosures, durable prototypes | Medium |
| TPU | 210–240°C | Flexible, rubber-like, impact-resistant | Phone cases, gaskets, grips | Medium |
| Nylon / PA | 240–280°C | Tough, wear-resistant, moisture-sensitive | Gears, hinges, engineering parts | Hard |
| Carbon-fiber composites | 240–290°C | Stiff, lightweight, abrasive | Jigs, fixtures, structural prototypes | Hard |
PLA is the best first filament for most users. PETG is a good next step for stronger functional parts, while ABS, TPU, nylon, and composites require more careful printer setup.
Key Print Parameters
FDM print quality depends heavily on slicer settings. The four most important parameters are layer height, infill density, supports, and print speed.
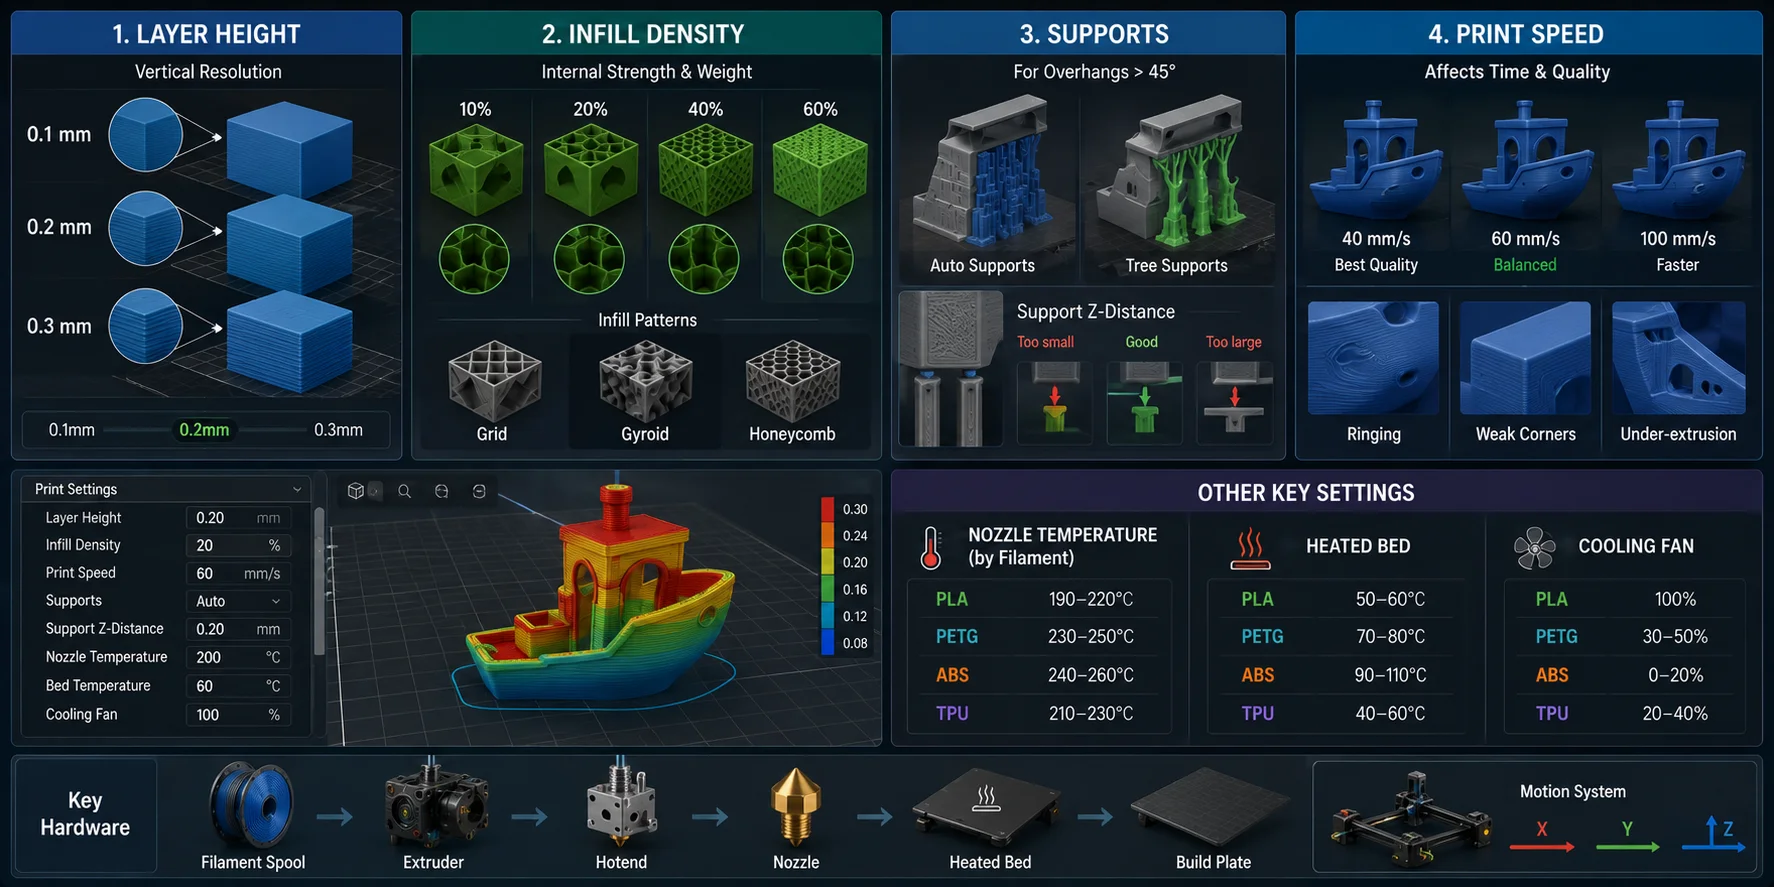
Layer height controls vertical resolution. A typical range is 0.1–0.3 mm. Beginners should start with 0.2 mm for a good balance between quality and speed. Use 0.1 mm for smoother detail, or 0.3 mm for fast rough prototypes with more visible layer lines.
Infill density controls how solid the inside of the part is. Use 10–20% for visual models and lightweight parts, 40–60% for functional or structural parts, and near-100% only when maximum strength or mass is required. Common infill patterns include grid, gyroid, and honeycomb.
Supports are often needed once an overhang exceeds about 45 degrees, but the practical limit depends on the material, cooling, layer height, and geometry. Beginners can start with automatic supports, then try tree supports to reduce material use and make removal easier. Support Z-distance affects how tightly supports attach to the model.
Print speed affects both print time and quality. Desktop FDM printers typically print reliably at 40–80 mm/s. Slower speeds improve adhesion and detail, while faster speeds reduce time but may cause ringing, weak corners, or under-extrusion.
Nozzle temperature depends on filament type. A heated bed helps reduce warping for PETG and ABS, while cooling fans are especially important for sharp PLA details.
Benefits and Advantages of FDM
FDM remains the default choice for many users because it balances affordability, material flexibility, and practical output better than most entry-level 3D printing methods.
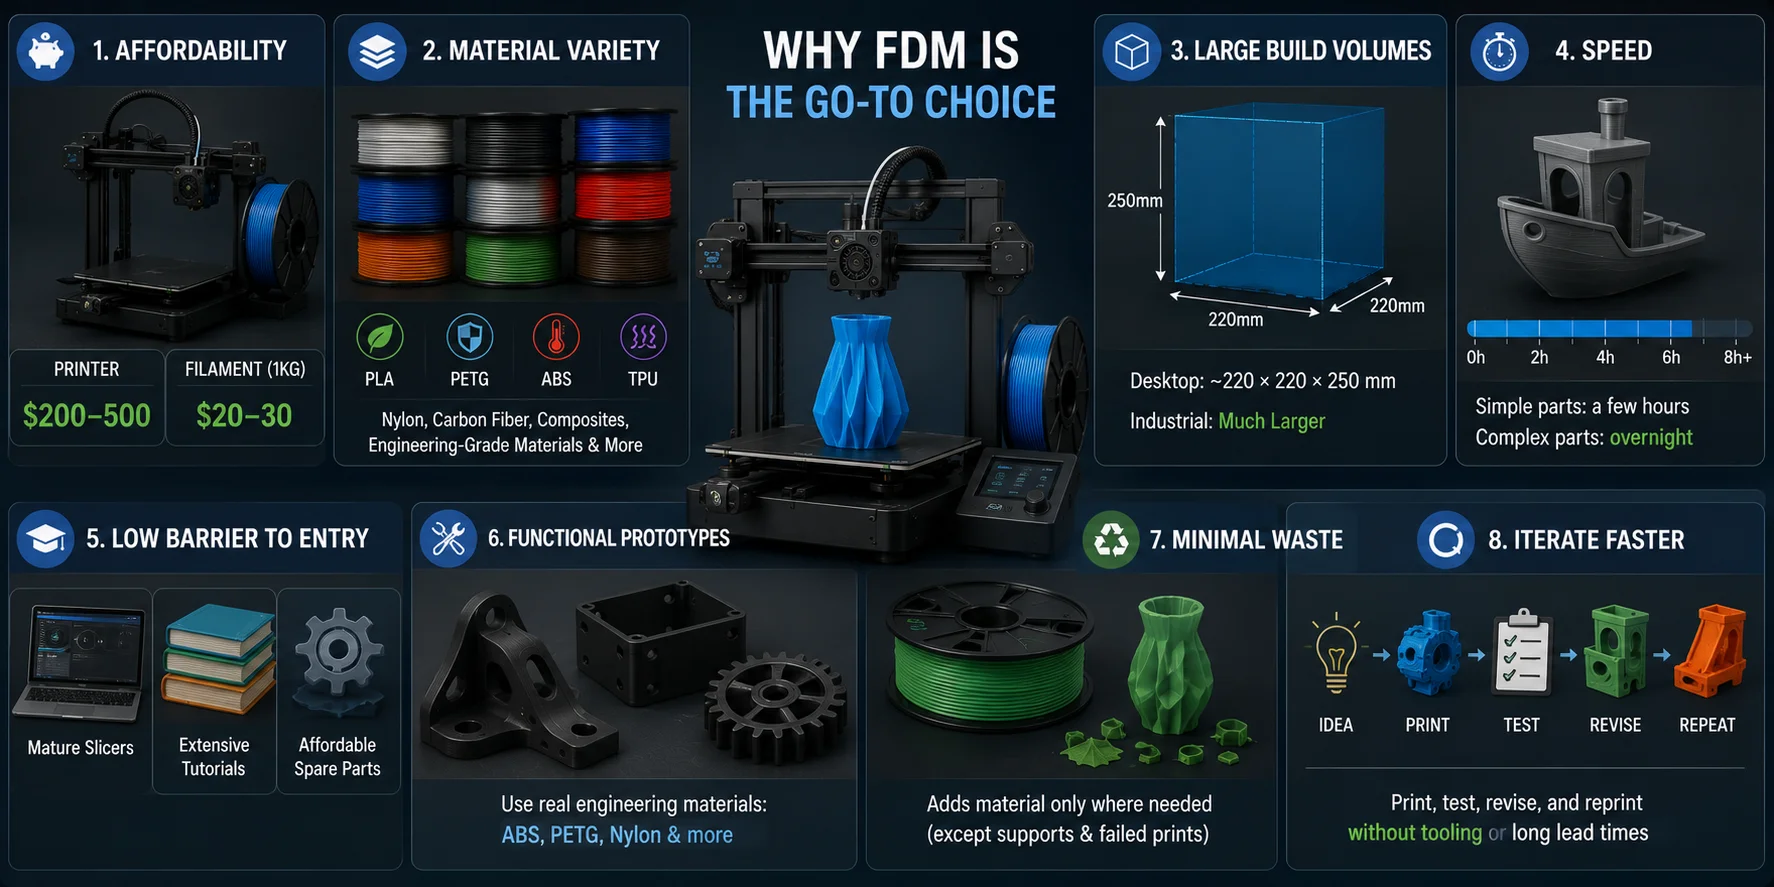
- Affordability: Desktop FDM printers commonly cost 20–30 per kg, making ongoing material costs manageable.
- Material variety: FDM supports dozens of thermoplastics, including PLA, PETG, ABS, TPU, nylon, carbon-fiber composites, and other engineering-grade options.
- Large build volumes: Many desktop machines offer build areas around 220 × 220 × 250 mm, while industrial systems support much larger parts.
- Speed: Simple parts can print in a few hours, and more complex geometries can often finish overnight.
- Low barrier to entry: FDM has mature slicers, extensive tutorials, affordable spare parts, and strong community support.
- Functional prototypes: FDM parts can be printed in final-use thermoplastics such as ABS, PETG, or nylon, making them useful for fit checks, brackets, enclosures, and working prototypes.
- Minimal waste: As an additive process, FDM deposits material only where needed, apart from supports and failed prints.
For iteration-heavy product design, FDM is often the go-to choice because teams can print, test, revise, and reprint without tooling costs or long manufacturing lead times.
FDM Print Quality: Common Issues and How to Fix Them
FDM printing is accessible, but it is not automatic. Most quality problems come from temperature, calibration, bed adhesion, cooling, or slicer settings. The good news is that most issues have clear symptoms and practical fixes.
| Issue | Symptom | How to fix it |
|---|---|---|
| Warping | Corners lift off the build plate, especially on large parts. | Use a heated bed, add a brim or raft, level the bed properly, and use an enclosure for ABS or nylon. |
| Stringing | Thin plastic threads appear between separate parts of the model. | Increase retraction distance or speed, lower nozzle temperature by about 5°C, and enable combing in the slicer. |
| Layer delamination | Printed layers split or separate from each other. | Increase print temperature, reduce part cooling, improve enclosure temperature, and check for under-extrusion. |
| Under-extrusion | Gaps, weak walls, missing lines, or fragile layers appear. | Check the nozzle for clogs, increase temperature, clean the filament path, and calibrate extruder steps. |
| Poor first-layer adhesion | The print does not stick, shifts, or fails early. | Re-level the bed, clean the plate with IPA, lower the Z offset, and use glue stick or hairspray if needed. |
| Over-extrusion / blobbing | Rough seams, bulges, blobs, or excess material appear on the surface. | Calibrate flow rate, lower nozzle temperature, and tune pressure advance or linear advance if supported. |
The first layer deserves special attention. If it is too high, the filament will not stick; if it is too low, the nozzle may scrape the bed or block extrusion. A clean build plate, correct Z offset, and steady extrusion solve many beginner failures before they happen.
Stringing is also common, especially with PETG and flexible materials. Retraction pulls filament back before travel moves, reducing unwanted threads, while a small temperature reduction can limit oozing without weakening layer bonding.
Desktop vs Industrial FDM Printers
Desktop and industrial FDM printers use the same layer-by-layer extrusion principle, but they differ greatly in cost, precision, materials, reliability, and production control.
| Category | Desktop FDM Printers | Industrial FDM Printers |
|---|---|---|
| Typical examples | Bambu Lab, Prusa, Creality | Stratasys F370 and comparable industrial extrusion systems |
| Price range | About $200–2,000 | About $10,000–100,000+ |
| Layer resolution | Commonly 0.1–0.3 mm | Typically offer tighter, machine-specific tolerances and controlled process conditions |
| Build volume | Up to about 300 × 300 × 400 mm on larger desktop models | Larger enclosed build chambers |
| Materials | PLA, PETG, ABS, TPU, basic composites | Ultem, PEEK, nylon, carbon-fiber composites |
| Best for | Hobby use, education, prototyping, low-volume parts | Certified materials, repeatable production, engineering applications |
Desktop FDM printers also benefit from strong communities, wide slicer support, and abundant troubleshooting resources. For prototyping and small-batch production, they are often the practical choice when the materials, tolerances, repeatability, and build size meet the project requirements. Industrial systems are worth considering when you need certified materials, soluble supports, controlled chamber conditions, documented process repeatability, or continuous production.
Applications and Industries
FDM is used across many fields because it is affordable, flexible, and fast enough for everyday iteration.
- Prototyping and product design: Designers use FDM to test form, fit, and function before investing in tooling or manufacturing. It is especially useful for checking dimensions, ergonomics, and assembly ideas early.
- Education: Schools and universities use FDM printers to teach design thinking, engineering, geometry, and digital fabrication. Students can move from digital concepts to physical models quickly.
- Healthcare: FDM can produce anatomical models for surgical planning, custom orthotics, prosthetic prototypes, and training aids. It should not be used for implantable medical parts without proper regulatory approval.
- Aerospace and automotive: Teams use FDM for jigs, fixtures, tooling aids, cable guides, lightweight non-structural parts, and mockups.
- Architecture: Architects print scale models, massing studies, landscape layouts, and concept forms for client presentations.
- Consumer goods: Makers print custom parts, replacement components, organizers, phone stands, hobby models, cosplay props, and household items.
These applications all start with the same foundation: a print-ready 3D model. The printer can only build what the file describes, so model quality matters before any filament is melted.
Post-Processing for FDM Prints
Raw FDM prints often need finishing, especially when they are used for display models, functional prototypes, or consumer-facing parts.
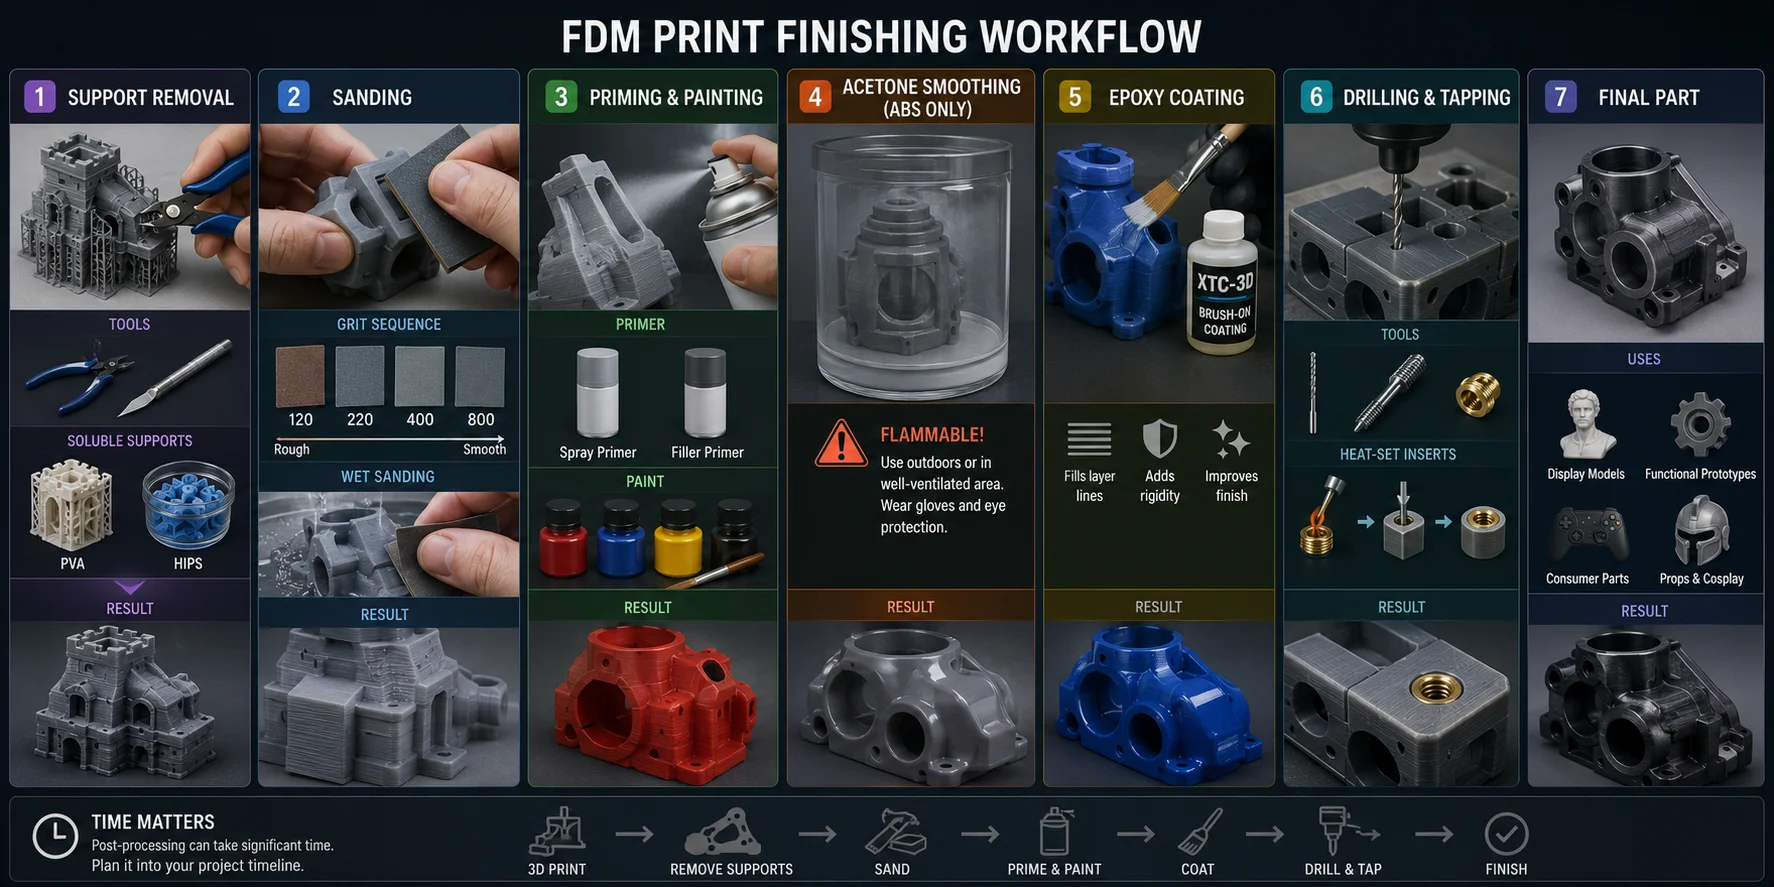
Support removal is usually the first step. Breakaway supports can be removed with pliers, flush cutters, or a hobby knife, while soluble supports such as PVA or HIPS dissolve in water or limonene.
Sanding reduces visible layer lines and prepares the surface for paint. Start with 120 grit for rough cleanup, then move to 400–800 grit for smoother surfaces; wet sanding works best for polished display parts.
Priming and painting improve appearance. Spray primer fills small layer lines, while filler primer helps cover deeper gaps before applying acrylic or enamel paint.
Acetone smoothing is mainly for ABS, not PLA. Acetone vapor slightly melts the surface for a glossy finish, but it is flammable and should only be used outdoors or in a well-ventilated area with proper safety precautions.
Epoxy coating fills layer lines and adds rigidity. Products like XTC-3D are useful for props, display models, and stronger surface finishes.
Drilling and tapping are useful for functional parts. FDM parts can be drilled, and heat-set brass inserts create more durable threads than screwing directly into plastic.
Post-processing can take significant time, so include it in project timelines, especially for consumer-facing parts.
Best Practices and Design Rules for FDM
Good FDM results start before slicing. Design decisions affect strength, accuracy, surface quality, and print reliability, so a few practical rules can prevent many failed prints from day one.
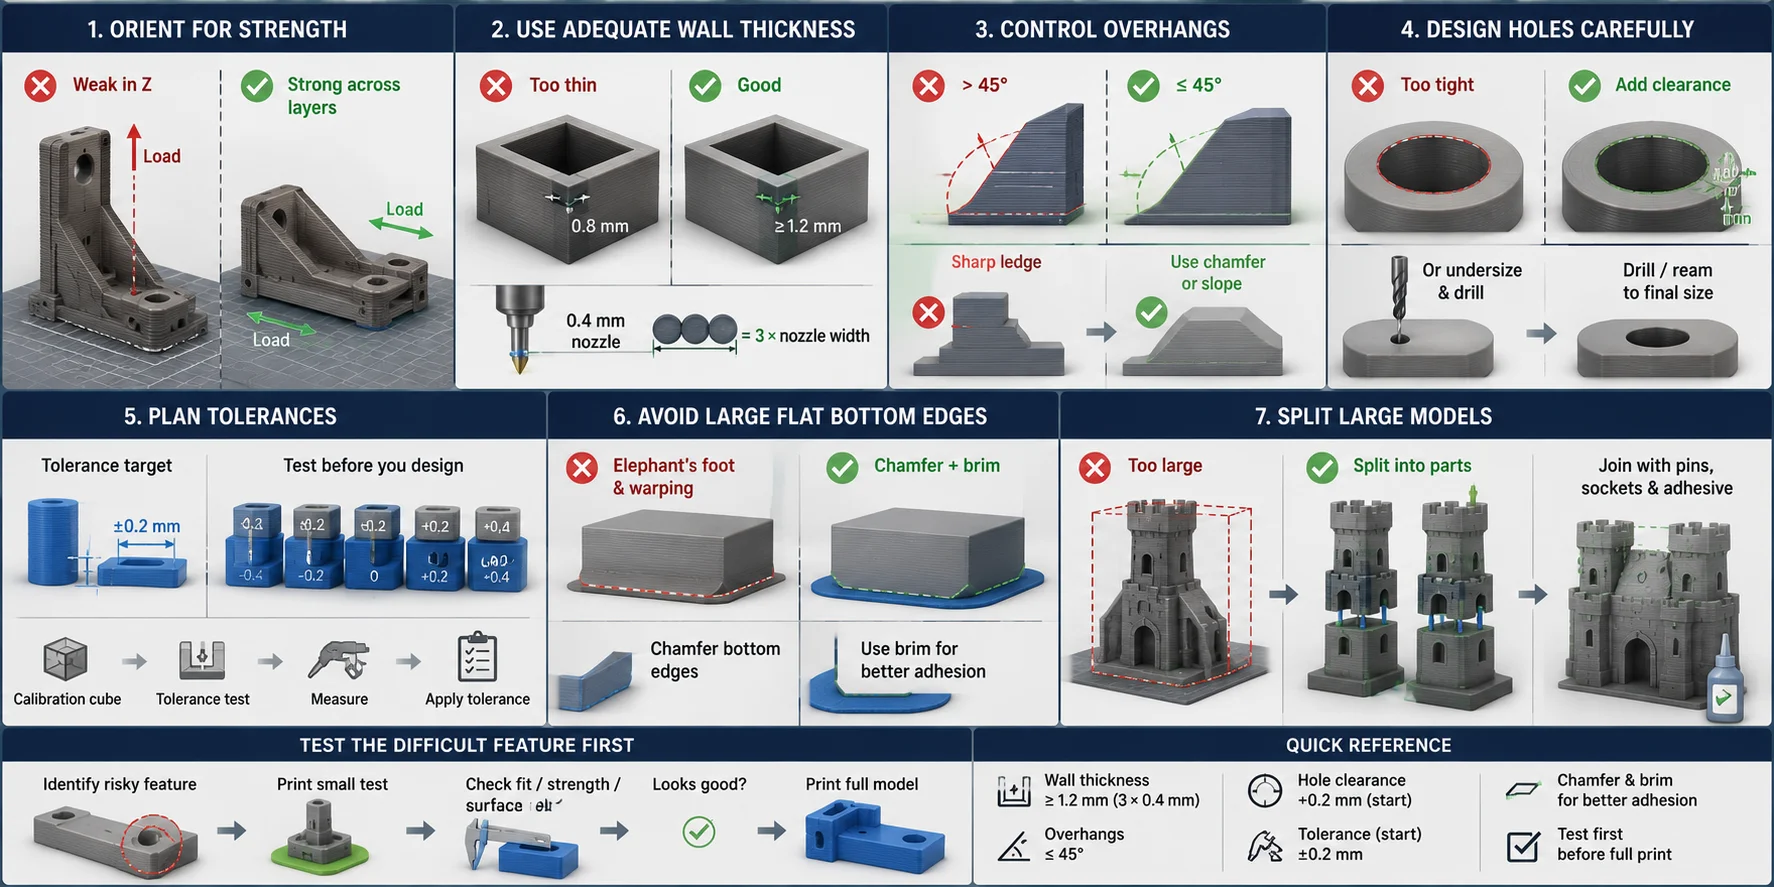
- Orient for strength: FDM parts are weakest between layers. Place the part so the main load direction is not pulling directly along the Z-axis layer lines; when possible, align stress across continuous filament paths.
- Use adequate wall thickness: For a standard 0.4 mm nozzle, use at least 1.2 mm wall thickness for structural parts. This equals three nozzle widths and improves rigidity, durability, and print consistency.
- Control overhangs: Use 45 degrees as a starting rule for unsupported overhangs, then validate it for the material, cooling, and geometry in your print profile. Chamfers or gradual slopes can reduce support material and improve surface quality.
- Design holes carefully: Printed holes often come out slightly small. Add about 0.2 mm clearance for fitted parts, or print holes slightly undersized and drill or ream them to the final dimension for better accuracy.
- Plan tolerances: For mating parts, budget around ±0.2 mm as a starting tolerance. Use calibration cubes or tolerance tests before designing tight assemblies, snap fits, or moving joints.
- Avoid large flat bottom edges: Large flat bases can suffer from elephant’s foot or warping. Chamfer bottom edges and use a brim to improve adhesion and reduce edge deformation.
- Split large models: If a model is larger than the build volume, split it into sections and join them with alignment pins, sockets, and adhesive.
Before committing to a full print, test the most difficult feature at small scale to confirm fit, strength, and surface quality.
From Digital Model to Physical Print: Where Tripo AI Fits
Every FDM print starts with a 3D model, and the quality of that model often determines whether the print succeeds or fails. Many beginners can operate a printer before they feel confident creating geometry from scratch in CAD. This gap between idea and a model ready for print preparation is where AI-generated 3D models can help.
Tripo AI is an AI-powered 3D model generator that lets users create 3D assets from text prompts or reference images, without starting from a blank modeling workspace. For FDM users, this can speed up early concept modeling, decorative objects, figurines, educational models, props, and product visualization.
Two workflows are especially useful. With the Tripo AI Text-to-3D model generator, you can describe a part, prop, or decorative object in plain language and generate a downloadable mesh. With Tripo AI Image-to-3D, you can upload a photo or sketch and convert it into a 3D model for further print preparation.
Like any source file, generated models still need validation before printing: check scale, wall thickness, manifold geometry, orientation, supports, and slicer settings in your print-preparation workflow. After those checks, export the model in a suitable format, slice it, and send it to an FDM printer. This can shorten the path from idea to physical object without replacing normal print-readiness review.
Frequently Asked Questions
What is FDM in 3D printing?
FDM stands for Fused Deposition Modeling, a process where thermoplastic filament is melted through a heated nozzle and deposited layer by layer to build a 3D object. It is also called FFF, or Fused Filament Fabrication. FDM is the most common desktop 3D printing method because of its low cost, ease of use, and wide material selection.
Are FDM and PLA the same?
No. FDM describes the printing technology, while PLA, or Polylactic Acid, is a filament material used in FDM printers. PLA is popular because it is easy to use and widely available, but many other materials, including ABS, PETG, TPU, nylon, and composites, can also be printed on FDM machines.
Which is better, SLA or FDM?
It depends on the use case. SLA produces smoother surfaces and finer details, making it preferred for jewelry, dental models, and high-resolution figurines. FDM is better for larger parts, functional prototypes, and everyday use because it is cheaper, faster for larger volumes, and supports a wider range of structural materials. Many makers use both.
What are the disadvantages of FDM 3D printing?
The main drawbacks are visible layer lines, limited resolution compared with SLA or SLS, anisotropic strength, and the need for support structures on overhangs. Warping, stringing, and first-layer adhesion problems are also common. Proper slicer settings, material choice, and printer calibration can reduce most of these issues.
What is the best FDM filament for beginners?
PLA is the go-to FDM filament for beginners. It prints at lower temperatures, usually around 180–220°C, requires no heated enclosure, is less prone to warping, and is available in many colors and finishes. Once comfortable with PLA, beginners typically move to PETG for stronger functional parts.
How does FDM 3D printing differ from SLS?
SLS, or Selective Laser Sintering, uses a laser to fuse powder, typically nylon, layer by layer. FDM uses filament and an extruder, costs far less, and is more accessible for desktop use. SLS parts can have more isotropic strength and do not need dedicated support structures, but their raw surfaces are often powdery or granular and may need post-processing. The machines and materials are also significantly more expensive.
Conclusion
FDM is a powerful, accessible technology for turning digital designs into physical objects, from simple prototypes to usable end-use parts. Mastering layer height, infill, supports, materials, and basic design rules makes the difference between a mediocre print and a great one.
Ready to generate a 3D model for your next print? Try Tripo AI Studio to create models from text or images, then validate and prepare them for your printer. Explore plans and pricing at Tripo AI Pricing. A small test print is a practical final check before committing to a full-size model.