The Complete 3D Character Checklist: Concept to Export
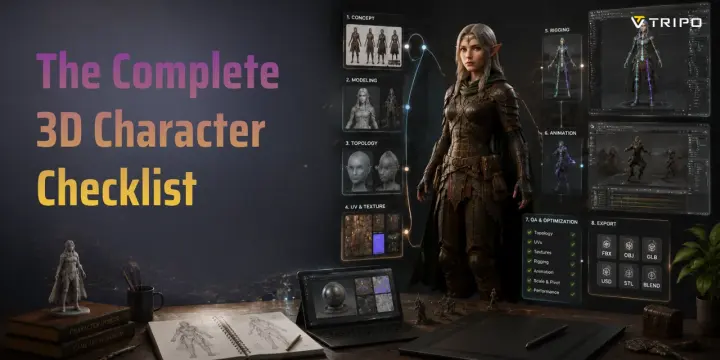
TL;DR:
- A complete 3D character workflow covers concept planning, modeling, UVs, texturing, rigging, animation, QA, and final export.
- A checklist helps prevent expensive rework by catching technical problems before they reach later production stages.
- Start with clear character goals, reference images, platform requirements, and polygon budgets before modeling.
- Clean topology with proper edge flow is essential for smooth deformation during rigging and animation.
- UV planning and PBR texturing ensure the character has consistent materials and professional visual quality.
- Proper rigging requires accurate bone placement, weight painting, deformation testing, and engine-compatible skeleton setup.
- Animation-ready characters should be tested with basic movement cycles, correct motion systems, and clean animation curves.
- Final QA checks should verify polygon count, textures, scale, pivot points, export formats, and engine compatibility.
- FBX is commonly used for game engines and animation, OBJ works well for static models, and GLTF/GLB is ideal for web and AR workflows.
- A reusable 3D character checklist helps beginners, indie developers, and production teams follow a reliable creation pipeline.
- AI tools like Tripo AI can accelerate the early modeling stage by generating a base mesh, allowing creators to focus on refinement, texturing, and rigging.
A 3D character checklist is a practical sequence of checks that takes a character from concept and reference gathering through modeling, UVs, texturing, rigging, animation, and export. Use it to define the target platform early, inspect technical requirements at each stage, and test the final asset in its intended engine, renderer, or print workflow.
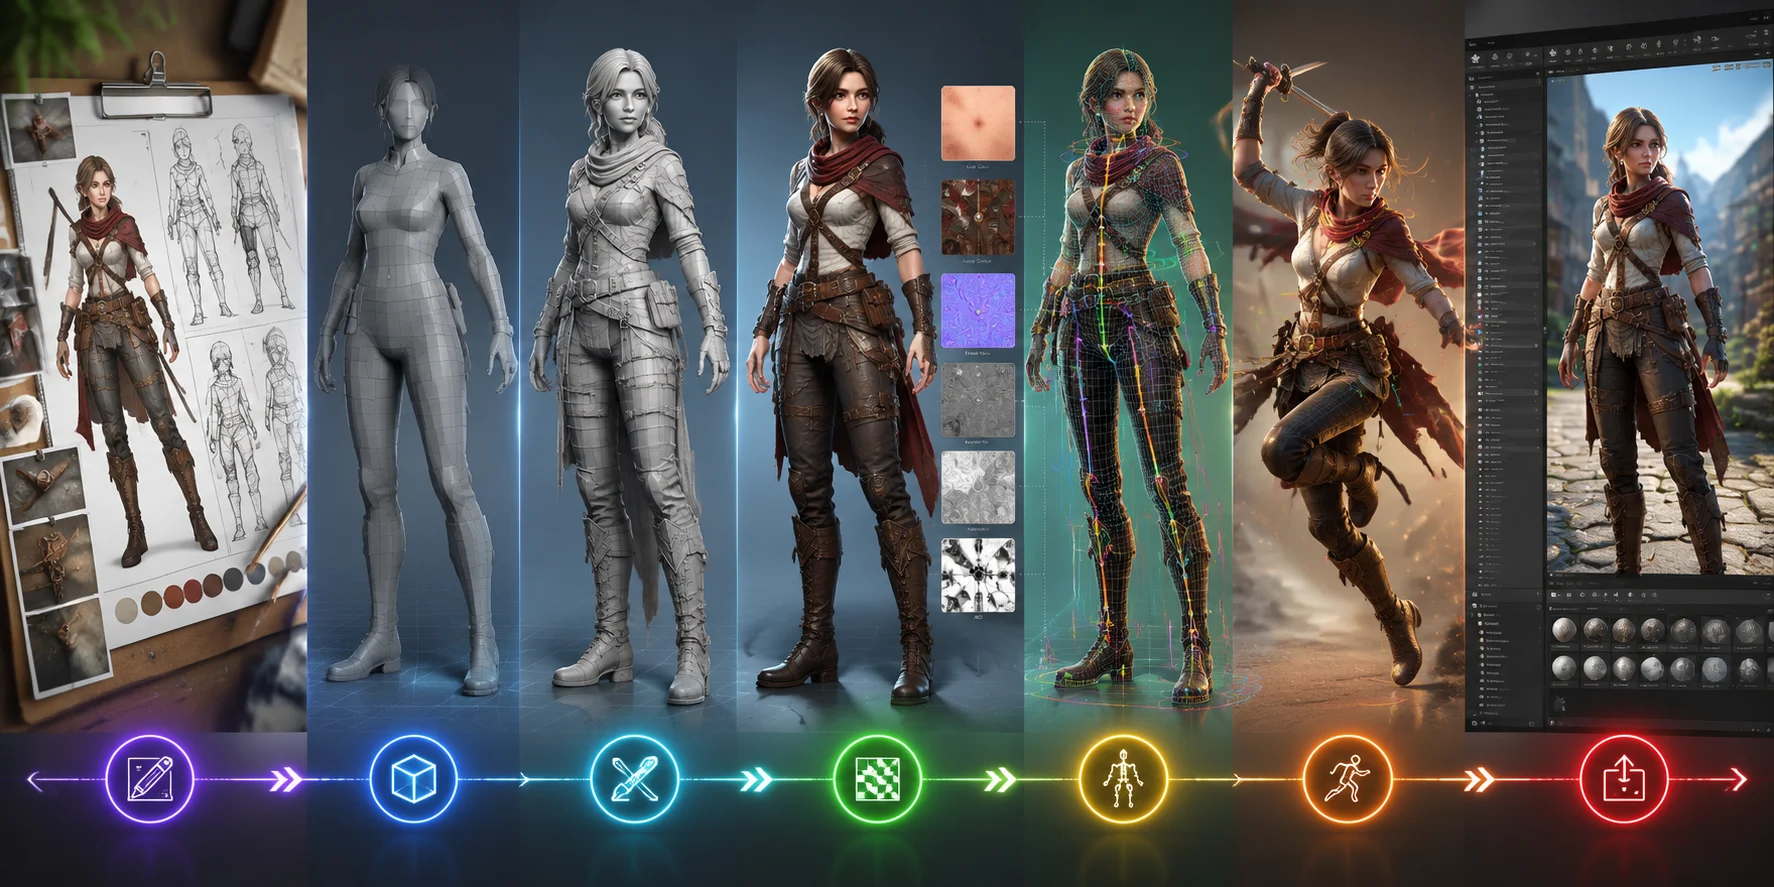
Complete 3D Character Production Pipeline
Why You Need a 3D Character Checklist
A professional 3D character workflow is not just about creating a visually impressive model. A character must also work correctly inside a complete production pipeline. It needs clean topology for deformation, optimized geometry for performance, proper UVs for texturing, a compatible skeleton for animation, and correct export settings for the target software.
Without a checklist, artists often focus on the visible parts first—such as sculpting details or painting textures—while ignoring technical requirements that become critical later. A model may look finished but fail when imported into a game engine, animated, or shared with another artist.
A structured checklist helps ensure that every important step is completed in the correct order.
The cost of skipping steps in 3D character production
Skipping early preparation often creates problems that become much more expensive to fix later.
For example, a character with poor topology may look fine in a static pose, but once it is rigged and animated, areas like shoulders, elbows, knees, and facial expressions can collapse or stretch unnaturally. Fixing these issues after skinning may require rebuilding edge loops, repainting weights, or even remodeling entire sections.
In professional pipelines, technical problems found after rigging or animation are often more time-consuming to resolve than issues caught during planning and modeling. A checklist makes those earlier reviews explicit.
A few examples:
- A character modeled without animation requirements may have incorrect edge flow around joints, causing mesh tearing during movement.
- A model created without a target polygon budget may become too heavy for a mobile game.
- Incorrect UV planning before texturing can create stretched textures that require repainting.
- Wrong export settings can make a finished character appear at the wrong scale inside Unity or Unreal Engine.
A checklist does not slow down the creative process—it prevents expensive interruptions.
How a checklist saves time across a full production pipeline
A 3D character is not created in isolated steps. Each stage affects the next one.
Concept decisions influence modeling.
Modeling decisions influence rigging.
Rigging requirements influence topology.
UV decisions influence texture quality.
Export settings influence engine compatibility.
Following a checklist creates a predictable workflow:
Concept → Blockout → Modeling → UV → Texturing → Rigging → Animation → Export → Testing
Instead of repeatedly going backward to repair mistakes, artists can move forward with confidence.
For teams, a checklist also improves communication. A character artist, technical artist, animator, and developer can all understand what has been completed and what still needs attention. For solo creators, it provides a reliable roadmap and reduces the chance of forgetting critical technical details.
Stage 1 — Concept & Reference Checklist
The first stage of character creation happens before opening any 3D software. Good preparation determines whether the final model will be easy or difficult to produce.
Many beginners start modeling immediately after having an idea. However, without references, technical goals, and platform requirements, the character often changes direction halfway through production.
A strong concept stage answers three questions:
- What is this character for?
- What should the final model look like?
- What technical requirements must it satisfy?
Use the following checklist before creating the first polygon.
✓ Define the character's role, style, and target platform (game, film, print)
Before modeling, decide where the character will be used.
A character designed for a mobile game has very different requirements from a cinematic film character or a collectible 3D print.
Define:
- Character purpose: playable hero, NPC, creature, mascot, collectible, or cinematic asset
- Visual style: realistic, stylized, cartoon, low-poly, anime, fantasy, sci-fi
- Target platform: mobile, PC/console, VR, film rendering, or 3D printing
The intended use determines polygon count, texture resolution, rig complexity, and export format.
For example:
- A mobile game character prioritizes performance and smaller textures.
- A AAA game character requires optimized topology, detailed materials, and animation support.
- A film character can use extremely high geometry because rendering happens offline.
- A 3D printable character requires watertight geometry rather than animation-friendly topology.
Defining the goal early prevents building the wrong type of asset.
✓ Gather reference images (front, side, 3/4 view) — minimum 3 angles
Reference images are the foundation of accurate character modeling.
At minimum, collect:
- Front view
- Side view
- Three-quarter view
These angles help establish:
- Body proportions
- Head-to-body ratio
- Clothing shape
- Silhouette
- Accessories placement
- Character personality
A three-quarter view is especially important because many design details are not visible from a simple front or side image.
For original characters, create a reference board containing:
- Facial features
- Clothing inspiration
- Material examples
- Color palette
- Pose references
- Similar character designs
The more visual information available before modeling, the fewer major changes are needed later.
✓ Decide polygon budget based on target platform (mobile: ~5k–15k, game: ~20k–80k, film/VFX: 100k+)
Polygon planning determines how detailed the character can be while maintaining performance.
Typical character budgets:
| Target | Recommended Polygon Range |
|---|---|
| Mobile games | ~5K–15K triangles |
| Indie/standard games | ~20K–80K triangles |
| AAA game characters | ~50K–150K+ triangles depending on role |
| Film/VFX characters | 100K+ polygons |
The correct budget depends on:
- Camera distance
- Number of characters on screen
- Platform performance
- Animation complexity
- Rendering requirements
A hero character seen close to the camera can use more geometry, while background NPCs need aggressive optimization.
Setting a polygon target before modeling prevents spending hours creating details that must later be removed.
✓ Confirm rigging requirements (biped, quadruped, facial rig, cloth sim?)
Rigging requirements should influence modeling decisions from the beginning.
Ask:
- Is the character humanoid or non-human?
- Does it need walking, running, fighting, or facial expressions?
- Will fingers need individual controls?
- Does clothing require simulation?
- Does the character need facial animation?
Different rigging requirements affect:
- Edge flow
- Mesh separation
- Bone placement
- Facial topology
- Clothing construction
For example, a character with facial animation needs additional topology around:
- Eyes
- Mouth
- Cheeks
- Jaw
A simple static character does not require the same level of preparation.
✓ Choose your modeling software (Blender, Maya, ZBrush, or Tripo AI for base mesh)
The modeling tool affects your workflow and production speed.
Common choices include:
Blender
- Free and powerful
- Suitable for modeling, sculpting, UVs, rigging, and export
- Popular among indie developers
Maya
- Widely used in professional animation and game studios
- Strong rigging and animation tools
ZBrush
- Best for high-detail sculpting
- Common for realistic characters and creatures
Tripo AI
- Useful for generating a starting character mesh from text or image references
- Reduces manual blocking and early modeling time
The right tool depends on whether you need full manual control or a faster starting point.
From Idea to Character Design
Where Tripo AI Can Help
Traditional character creation often begins with manually building the entire base mesh, which can take significant time before artists even reach detailing, UVs, or texturing.
AI-assisted workflows can shorten the concept-to-starting-model phase, but they do not remove the need for production checks.
With Tripo AI, creators can generate a 3D starting asset from a text prompt or image reference, then inspect and refine it for the intended workflow. Review topology, UVs, materials, scale, rigging requirements, and target-engine behavior before treating the asset as production-ready.
For character work, the practical value is a faster starting point for exploration and blockout. The later checklist stages still determine whether the asset is suitable for animation, rendering, or a game engine.
Stage 2 — Modeling Checklist
After concept preparation is complete, the next step is creating the actual 3D character mesh.
The goal of modeling is not only to create a good-looking shape. A production-ready character needs clean geometry that can deform correctly, support textures, and work inside the final pipeline.
A strong model balances:
- Visual quality
- Polygon efficiency
- Animation requirements
- Technical compatibility
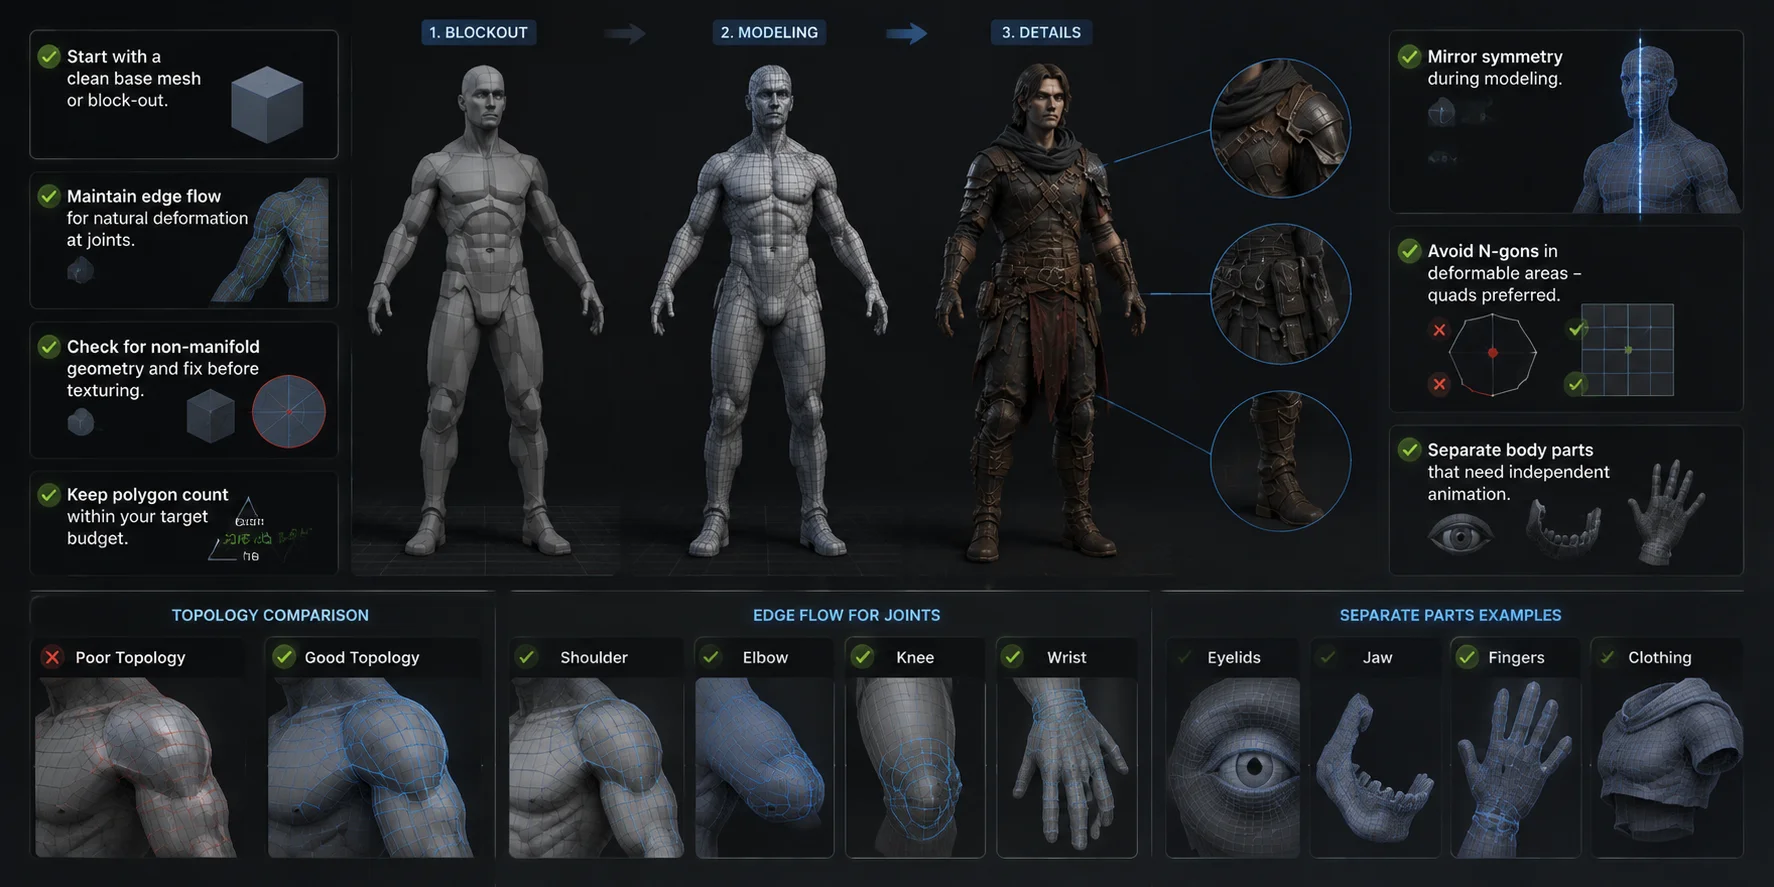
✓ Start with a clean base mesh or block-out
Always begin with a simple blockout before adding details.
The blockout stage focuses on:
- Overall silhouette
- Body proportions
- Pose
- Major shapes
Do not start with:
- Small accessories
- Skin details
- Clothing wrinkles
- Facial details
A strong silhouette creates a strong character.
During blockout, check:
- Is the character recognizable from a distance?
- Are proportions correct?
- Does the design match the reference?
Large changes are easy at this stage and expensive later.
✓ Maintain edge flow for natural deformation at joints (knees, elbows, shoulders)
Topology is one of the most important parts of a production character.
Good edge flow allows the mesh to bend naturally during animation.
Pay special attention to:
- Shoulders
- Elbows
- Knees
- Hips
- Neck
- Mouth and eyes
Poor topology often creates:
- Pinching
- Collapsed shapes
- Sharp deformation
- Broken silhouettes
For animated characters, edge loops should follow the natural movement of muscles and joints.
A static model can tolerate more shortcuts, but a character designed for animation needs deformation-friendly topology.
✓ Check for non-manifold geometry and fix before texturing
Non-manifold geometry can cause serious problems later.
Common issues include:
- Open edges
- Internal faces
- Incorrect holes
- Overlapping geometry
These problems can affect:
- UV unwrapping
- Normal calculation
- Rendering
- 3D printing
- Engine import
Always run a geometry check before moving into texturing.
Fixing topology problems early is much easier than repairing them after materials and rigging are complete.
✓ Keep polygon count within your target budget
Return to the polygon budget defined in Stage 1.
During modeling, regularly check:
- Current triangle count
- High-density areas
- Unnecessary details
Spend polygons where they matter:
High priority:
- Face
- Hands
- Silhouette areas
- Moving joints
Lower priority:
- Hidden surfaces
- Small accessories
- Areas never seen by the camera
Optimization should happen during modeling, not only at the end.
✓ Mirror symmetry during modeling, break symmetry for asymmetric details
Most characters begin with some level of symmetry.
Using mirror modeling helps:
- Speed up production
- Maintain consistent proportions
- Reduce mistakes
However, completely symmetrical characters often look artificial.
After the main structure is finished, add asymmetry:
- Different clothing details
- Hair variation
- Accessories
- Facial expression differences
- Small imperfections
This creates a more natural and believable character.
✓ Avoid N-gons in deformable areas — quads preferred
For animated characters, topology quality matters more than simply reducing polygon count.
While N-gons can sometimes be acceptable on flat, non-deforming surfaces, they should generally be avoided in areas that bend or stretch.
Use quad-based topology especially around:
- Shoulders
- Elbows
- Knees
- Fingers
- Facial areas
- Hips
Quads provide more predictable deformation because edge loops can follow natural movement patterns. They also make sculpting, subdivision, and weight painting easier.
Common problems caused by poor topology include:
- Shoulder collapsing when the arm raises
- Knee areas creating sharp folds
- Facial expressions looking unnatural
- Texture stretching during deformation
A clean quad-based mesh gives riggers and animators more control.
✓ Separate body parts that need independent animation (eyelids, jaw, fingers)
Not every part of a character should always be merged into one mesh.
Separate important elements when they require independent control.
Examples:
- Eyelids for blinking and facial expressions
- Jaw for speaking animation
- Fingers for detailed hand poses
- Hair cards for movement
- Clothing pieces for simulation
Separating these components makes rigging easier and gives animators more flexibility.
However, avoid unnecessary object separation. Too many individual meshes can create:
- Difficult material management
- More draw calls in games
- Complicated export structures
The goal is a balance between technical control and pipeline simplicity.
For animated characters, topology quality matters more than simply reducing polygon count.
While N-gons can sometimes be acceptable on flat, non-deforming surfaces, they should generally be avoided in areas that bend or stretch.
Use quad-based topology especially around:
- Shoulders
- Elbows
- Knees
- Fingers
- Facial areas
- Hips
Quads provide more predictable deformation because edge loops can follow natural movement patterns. They also make sculpting, subdivision, and weight painting easier.
Common problems caused by poor topology include:
- Shoulder collapsing when the arm raises
- Knee areas creating sharp folds
- Facial expressions looking unnatural
- Texture stretching during deformation
A clean quad-based mesh gives riggers and animators more control.
Not every part of a character should always be merged into one mesh.
Separate important elements when they require independent control.
Examples:
- Eyelids for blinking and facial expressions
- Jaw for speaking animation
- Fingers for detailed hand poses
- Hair cards for movement
- Clothing pieces for simulation
Separating these components makes rigging easier and gives animators more flexibility.
However, avoid unnecessary object separation. Too many individual meshes can create:
- Difficult material management
- More draw calls in games
- Complicated export structures
The goal is a balance between technical control and pipeline simplicity.
Good Topology vs Bad Topology
Stage 3 — UV Mapping & Texturing Checklist
After the model is complete, the next stage is preparing the character surface for materials.
UV mapping converts a 3D character surface into a 2D layout, allowing textures to be painted and applied correctly. A character can have excellent modeling and topology, but poor UVs or textures can still make the final result look unfinished.
The UV and texturing stage determines:
- Texture quality
- Material realism
- Rendering consistency
- Performance efficiency
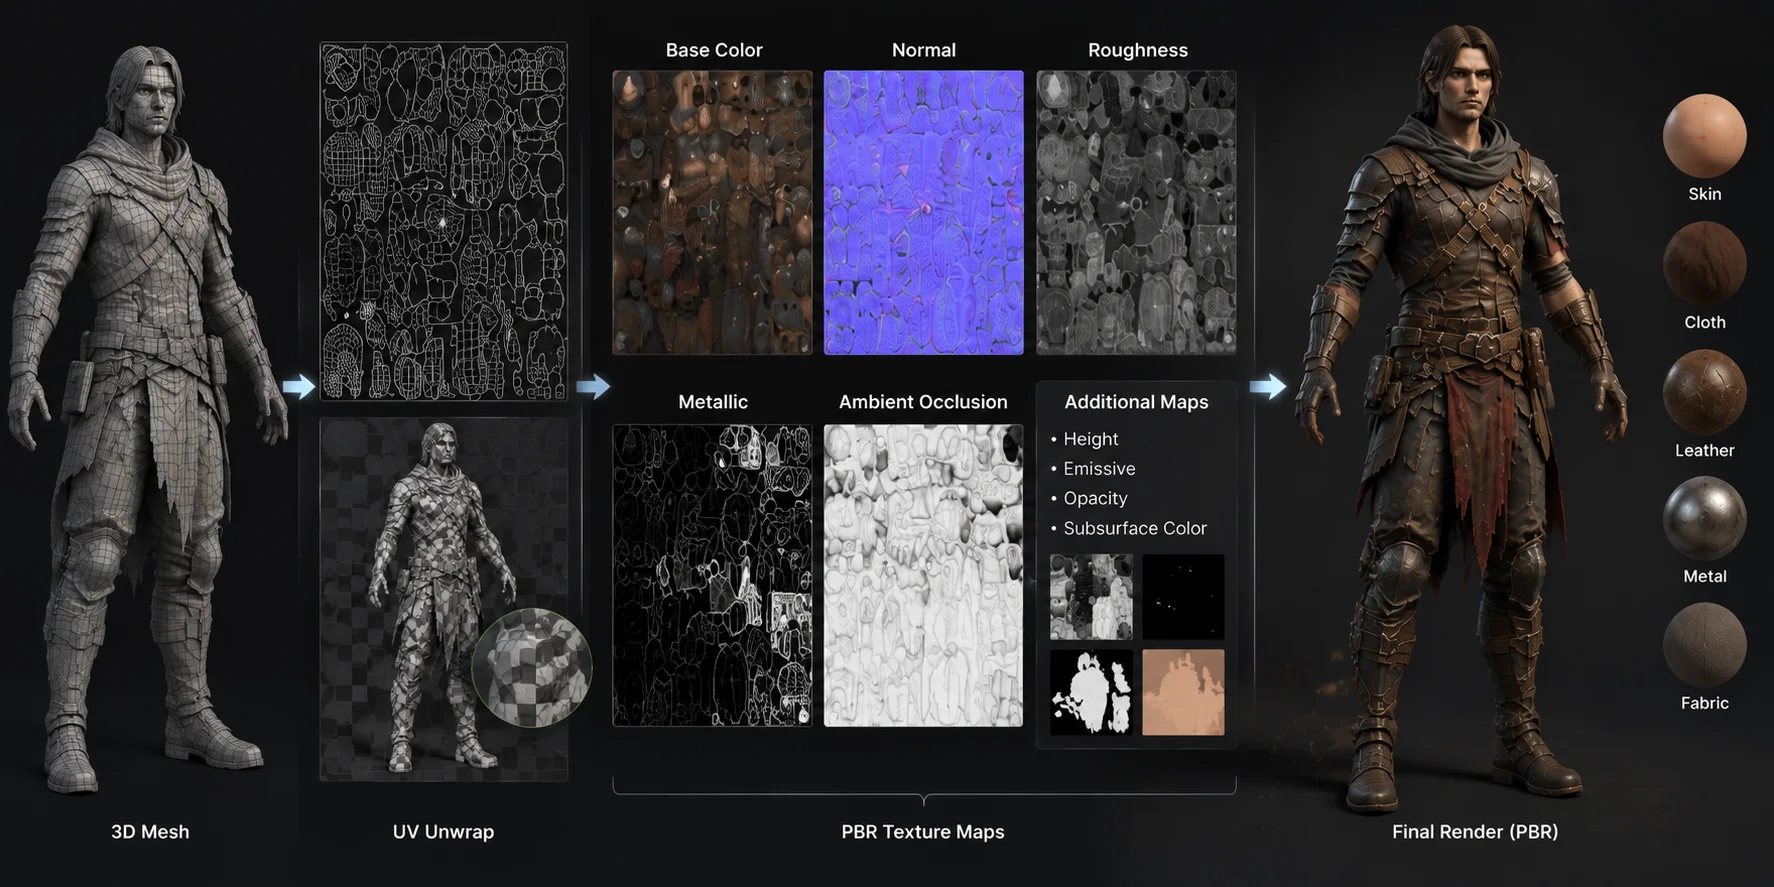
A professional character texture workflow usually follows:
UV Unwrap → Texture Painting → PBR Maps → Material Setup → Final Review
✓ Unwrap UVs with minimal distortion
UV unwrapping transforms a 3D model into a flat 2D texture layout. The goal is to preserve the shape of surfaces while minimizing stretching and distortion.
A good UV layout ensures:
- Skin details appear natural
- Clothing patterns remain accurate
- Textures maintain consistent quality
- Important areas receive enough resolution
Common UV problems include:
- Stretched skin textures
- Distorted clothing patterns
- Blurry details
- Uneven texture quality
Before starting texture painting, test the UV layout with a checker texture. If the checker squares become stretched or uneven, the UVs need adjustment.
Good UV preparation prevents major texture fixes later in production.
✓ Place seams in hidden or low-visibility areas
UV seams are necessary when flattening a 3D model, but their location affects the final appearance.
Good seam locations include:
- The back of the character
- Inside arms and legs
- Bottom of feet
- Clothing edges
- Hairline areas
Avoid placing seams in highly visible areas such as:
- The center of the face
- Front of the torso
- Important costume patterns
For realistic characters, facial UVs require extra care because even small distortions can make the character look unnatural.
Well-planned seams make texture painting cleaner and reduce visible breaks.
✓ Pack UV islands efficiently while protecting important detail
Efficient UV packing helps maximize texture resolution.
A good UV layout should:
- Reduce empty space
- Give more room to important areas
- Maintain consistent scale
- Avoid unnecessary overlaps
Use the available texture space efficiently, but do not chase a fixed packing percentage. Preserve consistent texel density, leave appropriate padding, and give priority areas such as the face enough resolution.
Poor UV packing wastes texture resolution. For example, if the face only occupies a small portion of the texture map while large empty areas remain unused, the character may lose important facial detail without any performance benefit.
For game characters, efficient UV packing improves visual quality while keeping texture sizes under control.
✓ Set consistent texel density across the character
Texel density describes how much texture resolution is assigned to each part of a model.
A professional character should maintain consistent texture detail across different areas.
Without proper texel density:
- The face may look sharper than the body
- Hands may appear blurry
- Clothing may have inconsistent detail quality
Important areas can receive higher texture density:
- Face
- Hands
- Accessories
- Character logos or symbols
Less visible areas can receive lower density:
- Hidden body parts
- Inner clothing surfaces
- Areas rarely seen by the camera
Balanced texel density creates a more polished and professional result.
✓ Create base color, roughness, metalness, normal, and ambient occlusion maps
Most modern character workflows use PBR (Physically Based Rendering) materials.
The essential texture maps include:
Base Color Map Controls the main surface colors, including skin, clothing, hair, and patterns.
Roughness Map Controls how reflective or matte a surface appears.
Examples:
- Skin usually has moderate roughness
- Fabric has higher roughness
- Polished materials have lower roughness
Metalness Map Defines metallic surfaces such as:
- Armor
- Weapons
- Mechanical accessories
Normal Map Adds surface details without increasing polygon count.
Common uses:
- Wrinkles
- Fabric patterns
- Small surface details
Ambient Occlusion Map Adds extra shadow information around:
- Clothing folds
- Object intersections
- Small surface gaps
A complete PBR texture setup ensures the character looks consistent across different rendering engines.
✓ Paint skin sub-surface scattering if targeting realistic renders
For realistic human characters, simple color textures are usually not enough.
Human skin has a sub-surface scattering effect, where light enters the surface and scatters underneath. This creates the soft, natural appearance seen in real skin.
Adding SSS helps improve:
- Facial realism
- Ear and nose translucency
- Skin softness
- Close-up rendering quality
This is especially important for:
- Film characters
- Realistic game characters
- Cinematic renders
Stylized characters may use simpler materials, but realistic characters benefit significantly from proper skin shading.
✓ Name all texture files consistently: characterbody partmap type_resolution
Consistent naming prevents confusion during production.
A clear naming system helps artists quickly identify textures and makes engine integration easier.
Examples:
- Knight_Body_BaseColor_2048.png
- Knight_Body_Normal_2048.png
- Knight_Armor_Roughness_2048.png
- Knight_Head_BaseColor_4096.png
Avoid unclear names such as:
- texture_final.png
- new_texture.png
- skin_test2.png
Professional naming becomes increasingly important when characters contain dozens of texture files or when multiple team members are working on the same project.
From Mesh to Final Material
Stage 4 — Rigging Checklist
Rigging turns a static 3D character into an animation-ready asset.
A character may look perfect in a neutral pose, but without proper rigging it can fail during walking, running, combat, facial animation, or other movements.
The rigging stage includes:
- Skeleton creation
- Bone hierarchy setup
- Skin weighting
- Deformation testing
- Animation preparation
A good rig allows animators to control the character naturally while maintaining visual quality.
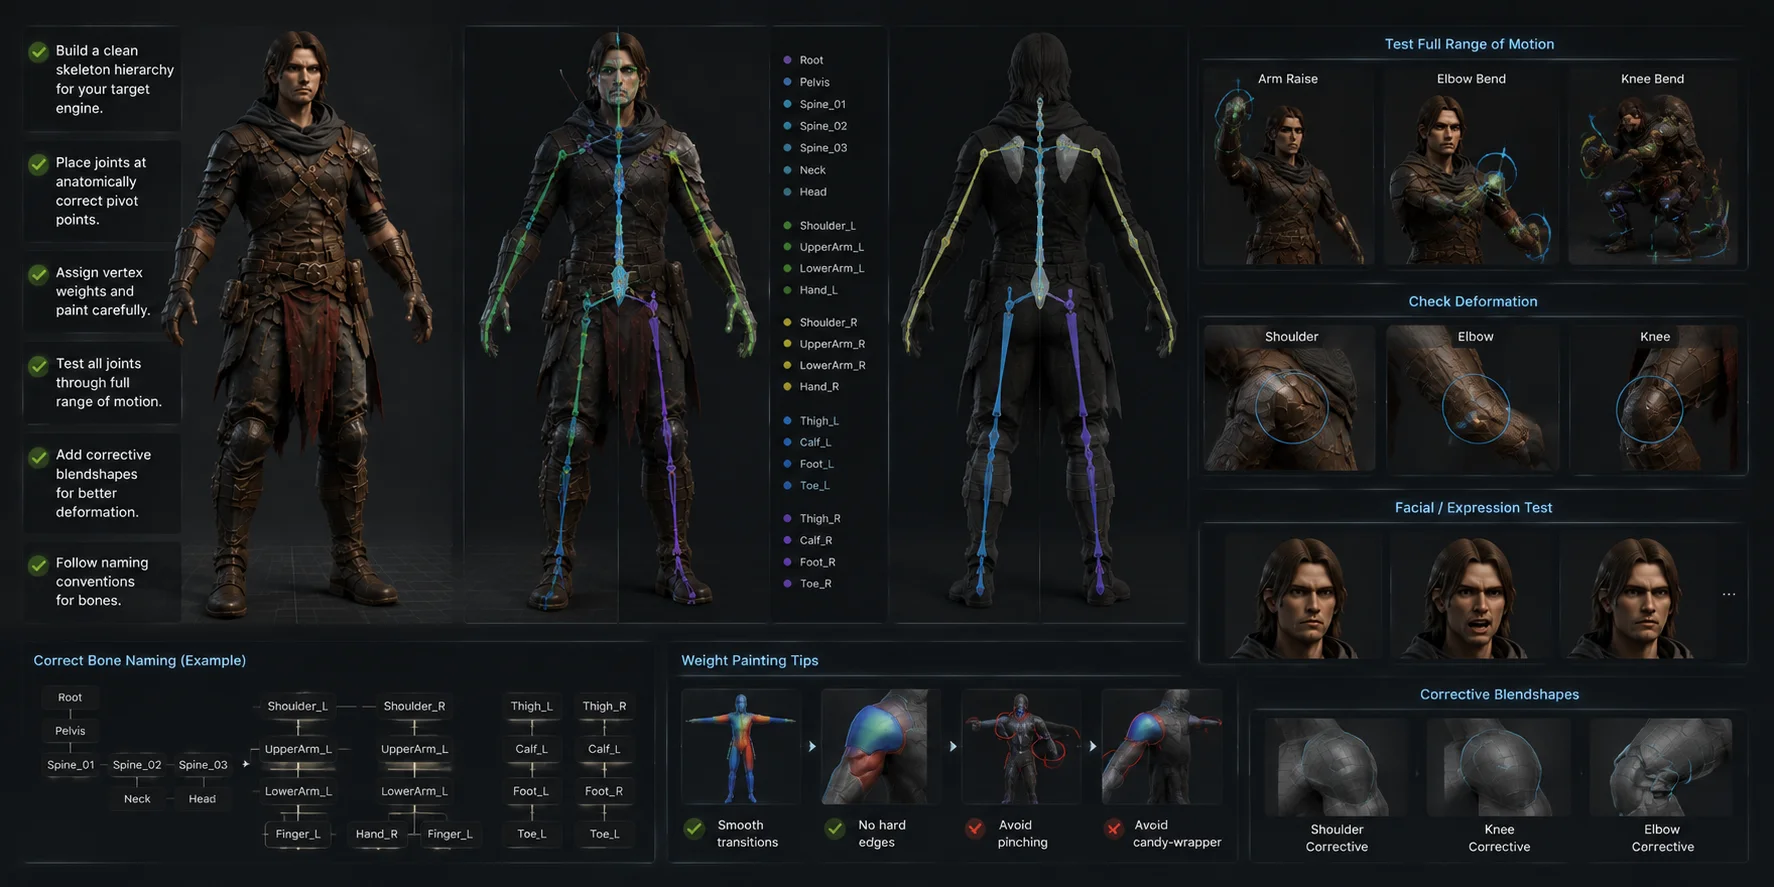
✓ Build a skeleton hierarchy appropriate for your target engine
The skeleton structure should match the requirements of the final platform.
Before creating bones, confirm whether the character will be used in:
- Unity
- Unreal Engine
- Blender animation
- Motion capture workflows
- Film pipelines
A typical humanoid skeleton includes:
- Root bone
- Spine chain
- Neck and head
- Arms and hands
- Legs and feet
- Facial controls
Using familiar skeleton structures improves compatibility with animation systems and makes retargeting easier.
Common examples include:
- Mixamo-compatible skeletons
- Unreal Engine mannequin-style skeletons
- Custom studio rigs
✓ Position joints at anatomically correct pivot points
Bone placement directly affects how the character moves.
Incorrect joint positions can create unnatural deformation.
Important areas include:
- Shoulder rotation points
- Elbow hinges
- Knee joints
- Hip placement
- Wrist rotation
For example, if an elbow joint is placed incorrectly, bending the arm may cause:
- Twisted forearms
- Unexpected stretching
- Broken silhouettes
Accurate joint placement creates more realistic movement and reduces correction work later.
✓ Assign vertex weights and test for skin penetration
Vertex weights determine how the mesh follows the skeleton during animation.
Each part of the character needs appropriate weight distribution.
Common issues include:
- Clothing passing through the body
- Collapsed fingers
- Shoulder deformation
- Facial distortion
A typical process is:
- Apply automatic weights or initial skinning
- Test important poses
- Adjust weight painting
- Repeat until deformation looks natural
Automatic tools can speed up the process, but professional characters usually require manual adjustments.
✓ Test all joints through their full range of motion
Never approve a rig after checking only the default pose.
Test extreme movements such as:
- Arms raised overhead
- Deep knee bends
- Walking cycles
- Fighting poses
- Facial expressions
Many topology and weighting problems only appear during extreme deformation.
Early testing prevents expensive fixes after animation production begins.
✓ Add corrective blend shapes for shoulder and knee deformation
Corrective blend shapes improve deformation in difficult areas.
They are commonly used for:
- Shoulder compression
- Knee bending
- Elbow twisting
- Facial expressions
These corrections are especially valuable for realistic or hero characters where animation quality is highly visible.
A professional rig often combines:
- Good topology
- Weight painting
- Corrective shapes
to achieve natural movement.
✓ Name all bones following target engine conventions (e.g., Mixamo, UE5 mannequin)
Consistent bone naming improves compatibility with other tools.
Use clear naming conventions based on the target pipeline.
Examples:
- Root
- Spine
- UpperArm_L
- LowerArm_L
- Hand_L
- Thigh_R
- Calf_R
- Foot_R
Proper naming helps with:
- Animation retargeting
- Engine import
- Motion capture integration
- Team collaboration
A technically correct rig can still cause problems if the bone structure is difficult for other tools to understand.
Skeleton Setup & Character Deformation
Stage 5 — Animation Checklist (If Applicable)
Not every 3D character requires animation, but for games, interactive applications, and cinematic projects, animation preparation is a critical stage.
A character that looks good in a static pose may still fail when moving. Animation reveals problems with:
- Topology
- Rigging
- Weight painting
- Bone placement
- Facial deformation
The animation stage ensures that the character performs correctly in the final environment.
✓ Set up a basic locomotion set: idle, walk, run
For most game characters, a basic locomotion system is the minimum animation requirement.
Essential animations usually include:
- Idle
- Walk
- Run
These animations create the foundation for gameplay movement.
Additional animations may include:
- Jump
- Attack
- Interaction
- Hit reaction
- Death
- Emotes
Before creating a large animation library, confirm the character's intended role.
For example:
- A playable hero needs a wide range of movement animations.
- A background NPC may only require idle and walking cycles.
- A cinematic character may prioritize facial animation and acting performance.
Starting with a core animation set helps maintain production efficiency.
✓ Ensure root motion or in-place motion based on engine requirements
Movement animation can be handled in two common ways:
Root Motion
The character's root bone moves forward during the animation.
Advantages:
- More realistic movement
- Better for cinematic animation
- Useful for complex actions
In-Place Animation
The character stays in the same position while the engine controls movement.
Advantages:
- Easier gameplay control
- Common for many game systems
- Better for responsive player movement
Different engines handle movement differently.
For example:
- Unity projects often combine animation clips with gameplay-controlled movement.
- Unreal Engine frequently supports root motion workflows for certain character actions.
Choose the method before exporting animations to avoid rebuilding the system later.
✓ Check animation curves for popping or linear interpolation artifacts
Animation quality depends not only on poses but also on motion curves.
Poor animation curves can create:
- Mechanical movement
- Sudden stops
- Popping between poses
- Unnatural acceleration
Review:
- Rotation curves
- Translation curves
- Facial animation curves
- Timing between keyframes
Smooth interpolation usually creates more natural movement.
For example, a character lifting an arm should accelerate and slow down naturally instead of moving at a constant speed like a robot.
✓ Test animations at target frame rate (24fps film / 30fps or 60fps game)
Animation timing should be tested at the final playback frame rate.
Common standards include:
- 24 FPS for film and cinematic rendering
- 30 FPS for many games and interactive applications
- 60 FPS for performance-focused games
Frame rate affects:
- Motion smoothness
- Animation timing
- Game performance
An animation that looks good at one frame rate may feel different at another.
Always preview animations in the target environment before final approval.
✓ Export animation clips with descriptive names (Idle_01, Run_Forward, etc.)
Clear animation naming improves asset management.
Use descriptive names that explain:
- Action type
- Direction
- Variation
- Character state
Examples:
- Idle_Default
- Walk_Forward
- Run_Forward
- Jump_Start
- Attack_Sword_01
Avoid unclear names such as:
- Animation001
- Test_Final
- New_Run
Good naming becomes especially important when characters have dozens or hundreds of animation clips.
Stage 6 — Final QA & Export Checklist
The final stage is where the character moves from a working file into the production pipeline.
Many problems happen during export, not during modeling.
A character may be complete inside Blender or Maya but fail after entering:
- Unity
- Unreal Engine
- Web viewers
- AR applications
- Rendering pipelines
Final quality assurance ensures the delivered asset works correctly.
✓ Run a final polygon count audit against your budget
Before export, check the final geometry.
Verify:
- Total triangle count
- Number of meshes
- Level of detail requirements
- Hidden unnecessary geometry
Compare the final result with the original polygon budget.
Typical examples:
- Mobile characters: around 5K–15K triangles
- Standard game characters: around 20K–80K triangles
- High-end characters: significantly higher depending on requirements
Do not optimize blindly. Remove unnecessary geometry while preserving:
- Silhouette
- Animation quality
- Important visual details
✓ Verify all textures are embedded or correctly referenced
Missing textures are one of the most common export problems.
Before delivery, check:
- Texture file locations
- Material connections
- Normal maps
- PBR settings
- Export references
Common issues include:
- Character appears gray in engine
- Materials become incorrect
- Normal maps look inverted
- Textures cannot be found
For team projects, keep texture folders organized and ensure the exported file can be opened on another machine.
✓ Export in the correct format: FBX for engines, OBJ for static/print, GLTF for web/AR
Choosing the correct file format is essential because different formats support different features.
FBX
Best for:
- Unity
- Unreal Engine
- Character animation
- Rigged models
Advantages:
- Supports skeletons
- Supports animation clips
- Widely used in game pipelines
OBJ
Best for:
- Static models
- 3D printing workflows
- Simple geometry transfer
Advantages:
- Simple and widely supported
- Easy to exchange between modeling tools
Limitations:
- No skeleton support
- Limited animation capability
GLTF / GLB
Best for:
- Web 3D
- AR experiences
- Real-time viewing
Advantages:
- Modern real-time format
- Supports PBR materials
- Efficient for online delivery
The correct export format depends on where the character will be used.
✓ Confirm units, scale, and transforms in the target project
Incorrect scale is one of the most common import problems.
A character exported with the wrong units may appear:
- Extremely tiny like an ant
- Huge like a giant
- Incorrect compared with other assets
Before export:
- Apply correct units
- Confirm scene scale
- Apply transforms when required
For Blender users, forgetting to apply transforms is a frequent cause of incorrect scale, rotation, or animation behavior.
✓ Confirm the character's pivot point is at the floor center of mass
The pivot point affects how the character behaves after import.
For most game characters:
- Pivot should be located at the feet
- Centered horizontally
- Aligned with the character's standing position
A correct pivot helps with:
- Placement in scenes
- Character spawning
- Rotation
- Movement systems
Incorrect pivot placement can make a character appear to float or rotate around the wrong point.
✓ Test import in the target game engine or render engine
Never assume an export works correctly.
Always test inside the final environment.
Check:
- Materials
- Scale
- Skeleton
- Animations
- Lighting response
- Performance
For game assets, test directly in:
- Unity
- Unreal Engine
- Godot
For rendering assets, test in the intended renderer.
The final environment is the only place where compatibility can be confirmed.
✓ Archive source files separately from export files
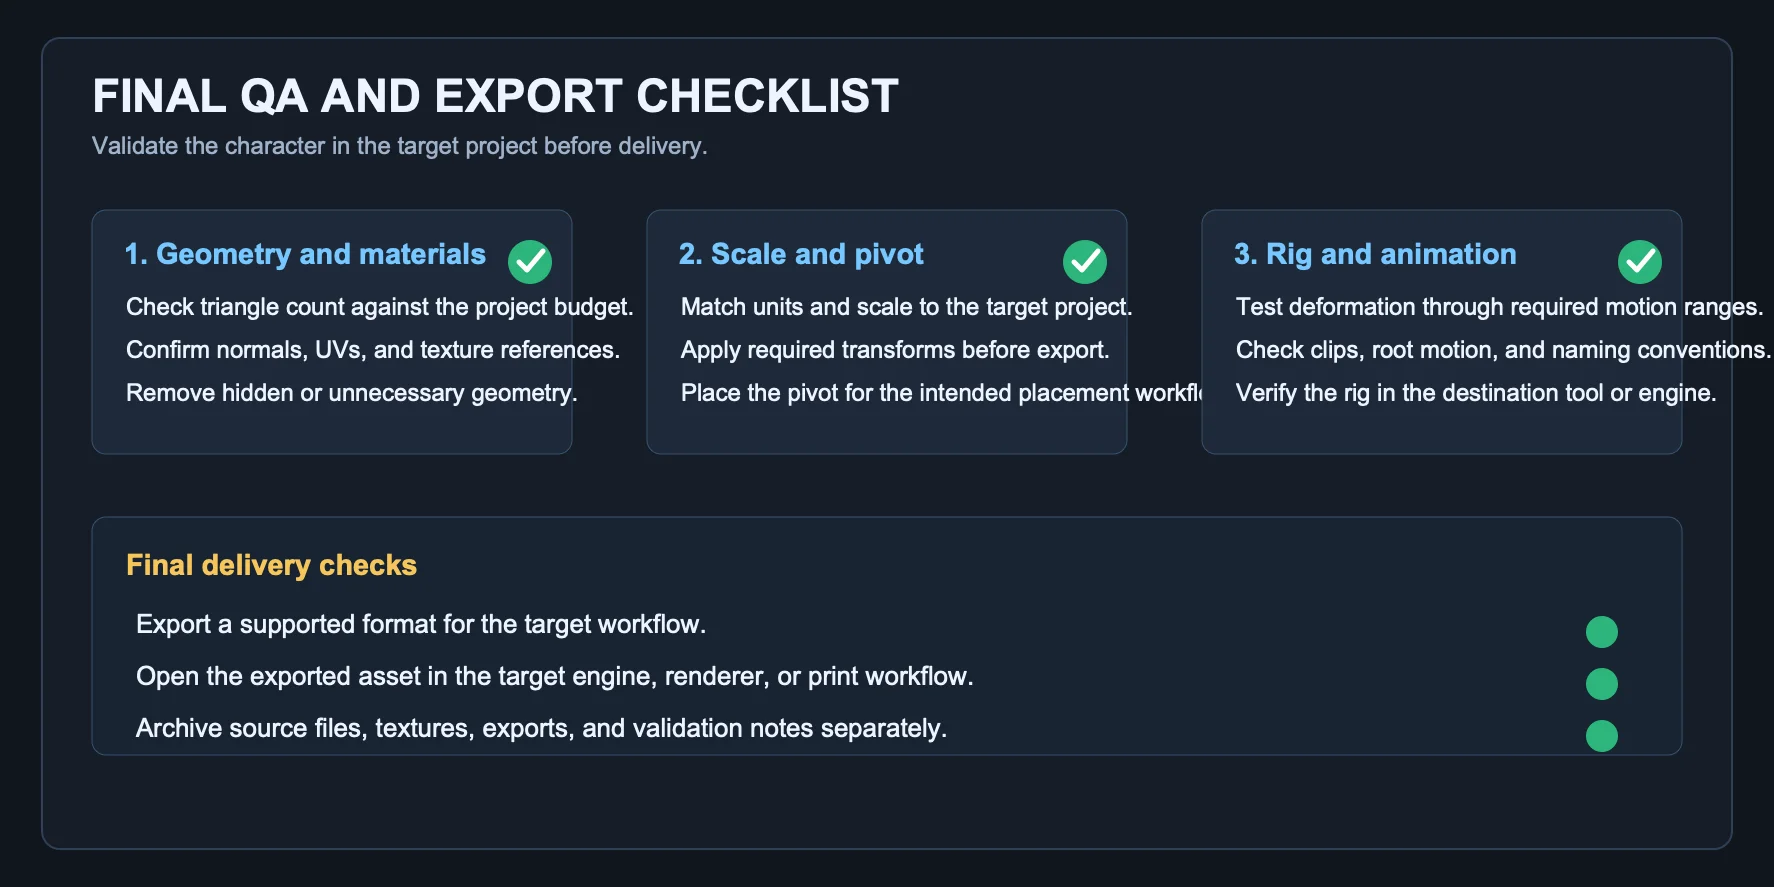
Keep original production files separate from delivery files.
Maintain:
Source files:
- Blender files
- Maya files
- ZBrush files
- Substance files
- Original textures
Export files:
- FBX
- OBJ
- GLB
- Engine-ready packages
This separation prevents accidental overwriting and makes future updates easier.
A well-organized archive allows teams to return to the character months or years later without rebuilding the entire workflow.
3D Character Export Pipeline
Free 3D Character Checklist Template
The following checklist can be copied directly into your project documentation. Use it as a printable production guide before creating or delivering any 3D character.
Stage 1 — Concept & Reference
✓ Define the character's role, style, and target platform (game, film, print)
✓ Gather reference images from front, side, and 3/4 views
✓ Decide polygon budget based on target platform
✓ Confirm rigging requirements (biped, quadruped, facial rig, cloth simulation)
✓ Choose modeling software and workflow
Stage 2 — Modeling
✓ Start with a clean base mesh or block-out
✓ Maintain edge flow for natural deformation around joints
✓ Check for non-manifold geometry
✓ Keep polygon count within the target budget
✓ Use mirror symmetry during modeling
✓ Avoid N-gons in deformable areas
✓ Separate parts requiring independent animation control
Stage 3 — UV Mapping & Texturing
✓ Create UVs with minimal distortion
✓ Place seams in hidden areas
✓ Pack UV islands efficiently
✓ Maintain consistent texel density
✓ Create base color, roughness, metalness, normal, and ambient occlusion maps
✓ Add skin sub-surface scattering for realistic rendering
✓ Use consistent texture naming conventions
Stage 4 — Rigging
✓ Build a skeleton suitable for the target engine
✓ Position joints at correct anatomical locations
✓ Assign vertex weights and test deformation
✓ Test all joints through full motion ranges
✓ Add corrective blend shapes when needed
✓ Follow consistent bone naming conventions
Stage 5 — Animation
✓ Create basic locomotion animations
✓ Decide between root motion and in-place movement
✓ Check animation curves
✓ Test at target frame rate
✓ Export clearly named animation clips
Stage 6 — Final QA & Export
✓ Audit final polygon count
✓ Verify texture references
✓ Export using the correct format
✓ Confirm scale and transforms
✓ Check pivot placement
✓ Test inside the target engine
✓ Archive source and export files separately
Common Mistakes the Checklist Helps You Avoid
A 3D character checklist is valuable because it prevents predictable production problems. Many technical issues are not obvious when a model is still in the modeling stage. They usually appear later during texturing, rigging, animation, or engine integration—when fixes become much more expensive.
The following mistakes are among the most common problems this checklist helps avoid.
Skipping UV layout before texturing → stretching artifacts
One of the most common mistakes is starting texture painting before creating a proper UV layout.
A model may look fine in the viewport, but once textures are applied, problems appear:
- Skin details become stretched
- Clothing patterns become distorted
- Logos or symbols appear warped
- Texture resolution becomes inconsistent
For example, painting a character's face without planning facial UVs can lead to stretched eyes, uneven skin details, or blurry facial features.
A proper workflow is:
Model → UV unwrap → Check distortion → Texture painting
Completing UV preparation first prevents hours of repainting and texture corrections.
Poor joint placement → skin penetration during animation
A character can have excellent modeling and textures but still fail during animation if the skeleton is incorrectly positioned.
Common problems include:
- Elbows bending unnaturally
- Knees collapsing
- Shoulders creating strange deformation
- Clothing intersecting with the body
For example, if a shoulder joint is placed too far from the actual anatomical rotation point, raising the arm may create a stretched or broken-looking shoulder area.
Testing joint positions before final rigging ensures smoother deformation and reduces weight-painting work.
Wrong export scale → character appears as an ant or a giant in-engine
Scale problems are one of the most common issues when moving characters between different software.
A character created in Blender may appear:
- Extremely small in Unity
- Huge in Unreal Engine
- Incorrect compared with other assets
This usually happens because of:
- Different unit systems
- Unapplied transforms
- Incorrect export settings
Before exporting, always verify:
- Scene units
- Object scale
- Applied transforms
- Engine import settings
A correctly scaled character should match the expected height and proportions immediately after import.
Forgetting to apply transforms before export
This is a common Blender workflow mistake.
Objects may appear correct inside Blender but behave incorrectly after export.
Unapplied transforms can cause:
- Wrong scale
- Incorrect rotation
- Animation issues
- Unexpected pivot behavior
Before exporting, check that:
- Location is correct
- Rotation is applied
- Scale is applied
This simple step prevents many FBX and engine import problems
How Tripo AI Fits Into the Workflow
Traditional 3D character creation requires artists to build the entire character from the beginning:
Concept → Blockout → Base Mesh → Modeling → Detail → UV → Texture → Rig → Export
The early modeling stage can take significant time, especially for creators who need to produce multiple characters.
AI-assisted workflows provide a faster starting point by reducing the amount of manual base modeling required.
Tripo AI supports text-to-3D and image-to-3D generation. Treat the generated result as a starting asset, then continue with the production checks required by your target platform and project.
AI-Assisted Character Workflow: Generate → Review → Refine → Validate → Export
Generate a 3D starting asset from a text prompt or image reference
Instead of manually creating the first version of a character from a blank scene, AI generation can provide a starting model based on a creative idea.
This is useful for:
- Indie game developers creating prototypes
- Designers exploring multiple character concepts
- Artists who want to focus on refinement rather than initial blocking
The generated model can serve as a foundation for further work, including:
- Topology adjustments
- Texture refinement
- Rigging preparation
- Engine optimization
The biggest benefit is reducing the time spent creating basic forms.
Export to a supported format after validation
Tripo supports exports including GLB, FBX, and OBJ. Choose the format that fits the downstream tool, then test the exported asset in that target environment.
Export compatibility is important because different projects require different formats.
Common choices include:
FBX
- Game engines
- Rigged characters
- Animation workflows
OBJ
- Static models
- General 3D editing
- Simple asset exchange
The ability to move generated characters into existing workflows allows artists to continue using familiar tools for final production steps.
Spend your time on detailing and rigging, not blocking out shapes
The value of AI character generation is not replacing the entire creative process.
Instead, it shifts the artist's focus toward higher-value tasks.
Instead of spending most of the production time creating:
- Basic body proportions
- Simple shapes
- Initial character structure
Artists can spend more time on:
- Character personality
- Materials
- Animation quality
- Gameplay integration
- Final polish
For many creators, the ideal workflow becomes:
AI-generated base mesh → Artist refinement → UV/texturing → Rigging → Engine integration
This combines AI speed with human creative control.
Frequently Asked Questions
What is a 3D character creation checklist?
A 3D character creation checklist is a step-by-step guide that covers the essential stages of building a character, including concept planning, modeling, UV mapping, texturing, rigging, animation, and export. It helps artists avoid technical problems and ensures the character is ready for its intended use, such as games, film, or 3D printing.
What are the steps in a checklist for making a 3D character?
The main steps include defining the character concept, creating references, building the model, preparing topology, creating UVs, applying textures, rigging the character, testing animation, and exporting the final asset. Following these stages in order reduces rework and improves production efficiency.
What are the essential steps to create a 3D character for games?
A game-ready character workflow usually includes concept design, optimized modeling, animation-friendly topology, UV mapping, PBR texturing, rigging, animation setup, performance optimization, and engine testing. The character must be visually detailed while staying within the target platform's technical limits.
What is a 3D character checklist for beginners with no prior experience?
Beginners should focus on learning the complete workflow rather than trying to perfect every detail immediately. Start with references, simple modeling, basic topology, UVs, materials, and export testing before moving into advanced rigging and animation.
A clear checklist helps beginners understand how each stage connects and prevents them from skipping important technical steps.
What is a 3D character checklist for indie game developers on a budget?
Indie developers should prioritize efficient workflows, optimized geometry, reusable assets, and tools that reduce production time. The checklist should focus on creating characters that are visually strong while meeting engine requirements for performance.
Using AI-assisted tools for base mesh creation can help small teams spend more time on gameplay, animation, and final polish instead of repetitive modeling tasks.
Conclusion
A successful 3D character is not created by modeling alone—it is the result of a complete workflow where every stage supports the next. From concept planning and topology to UVs, rigging, animation, and export testing, a checklist helps prevent costly mistakes and keeps production moving efficiently.
For creators who want to reduce the time spent on early modeling, AI-generated base meshes provide a faster starting point. Generate your character foundation, refine the details, and move through the pipeline with a cleaner workflow.
Start your next character concept with Tripo AI, then use this checklist to review, refine, and validate the asset for its final use.
