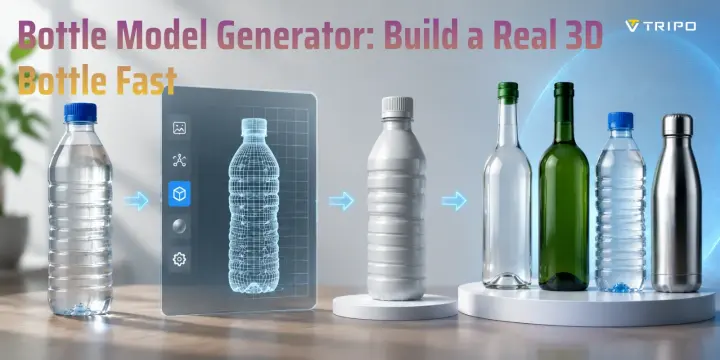
Bottle Model Generator: Build a Real 3D Bottle Fast
TL;DR
- A bottle model generator creates real 3D bottle models from photos, prompts, or dimensions.
- Use Image-to-3D for existing bottles, Text-to-3D for new designs, and parametric tools for precise measurements.
- Check geometry, materials, labels, and wall thickness before exporting.
- Choose GLB for web/AR, FBX for animation, and STL/3MF for 3D printing.
- AI makes bottle creation faster, but final adjustments improve professional results.
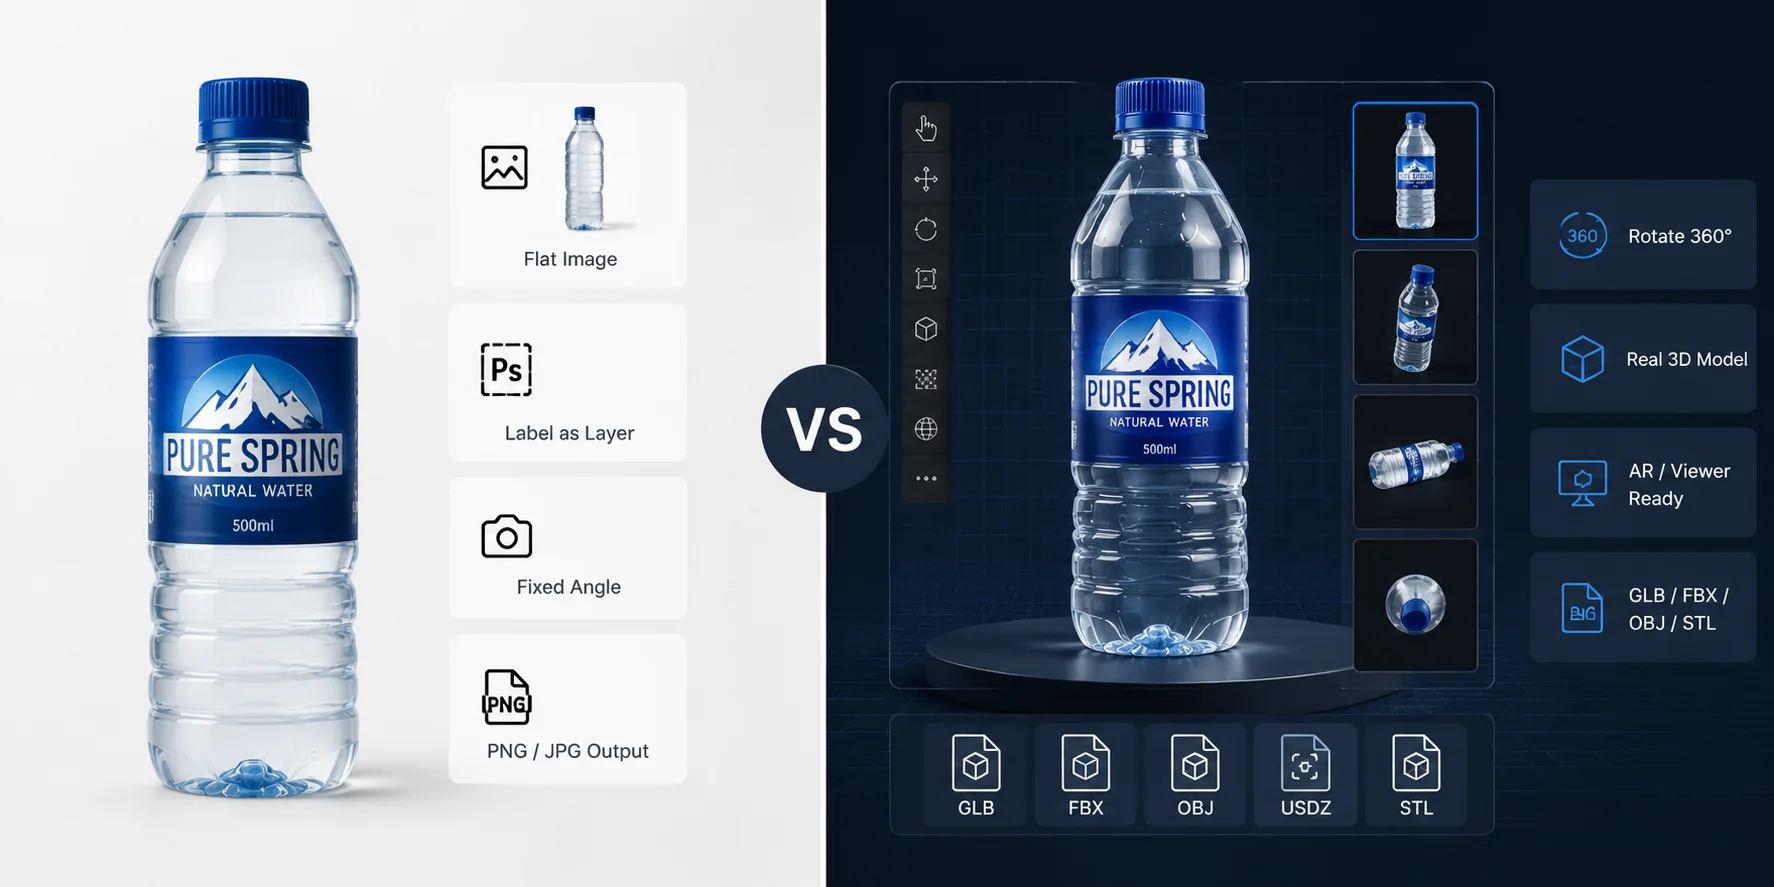
A bottle model generator turns a reference photo, text prompt, or set of dimensions into a real 3D bottle model — an actual mesh with volume and surfaces that you can rotate, edit, render, export, or print. This is different from a bottle mockup generator, which only places a label on a pre-made image and outputs a flat picture.
The demand for 3D assets is growing as ecommerce, product design, AR experiences, and digital manufacturing become more common. If you search for a bottle model generator online, you may find many mockup templates before finding a tool that creates real 3D geometry. In this guide, you will learn how to create a bottle model, improve materials, add labels, choose export formats, and prepare your design for different workflows.
What Is a Bottle Model Generator?
A bottle model generator is a tool that creates a 3D bottle mesh from an image, text description, or specific measurements. Instead of giving you only a product image, it creates a digital object that you can view from any angle.
This difference matters.
A bottle mockup generator is mainly for marketing images. It lets you place artwork on a bottle picture, but you cannot freely change the shape, lighting, camera angle, or use the result in a 3D pipeline.
A real bottle 3D model generator tool creates geometry that you can use for:
- Ecommerce 3D viewers
- Product presentations
- AR applications
- Game assets
- 3D printing projects
- Packaging prototypes
There are three common ways to generate a bottle model.
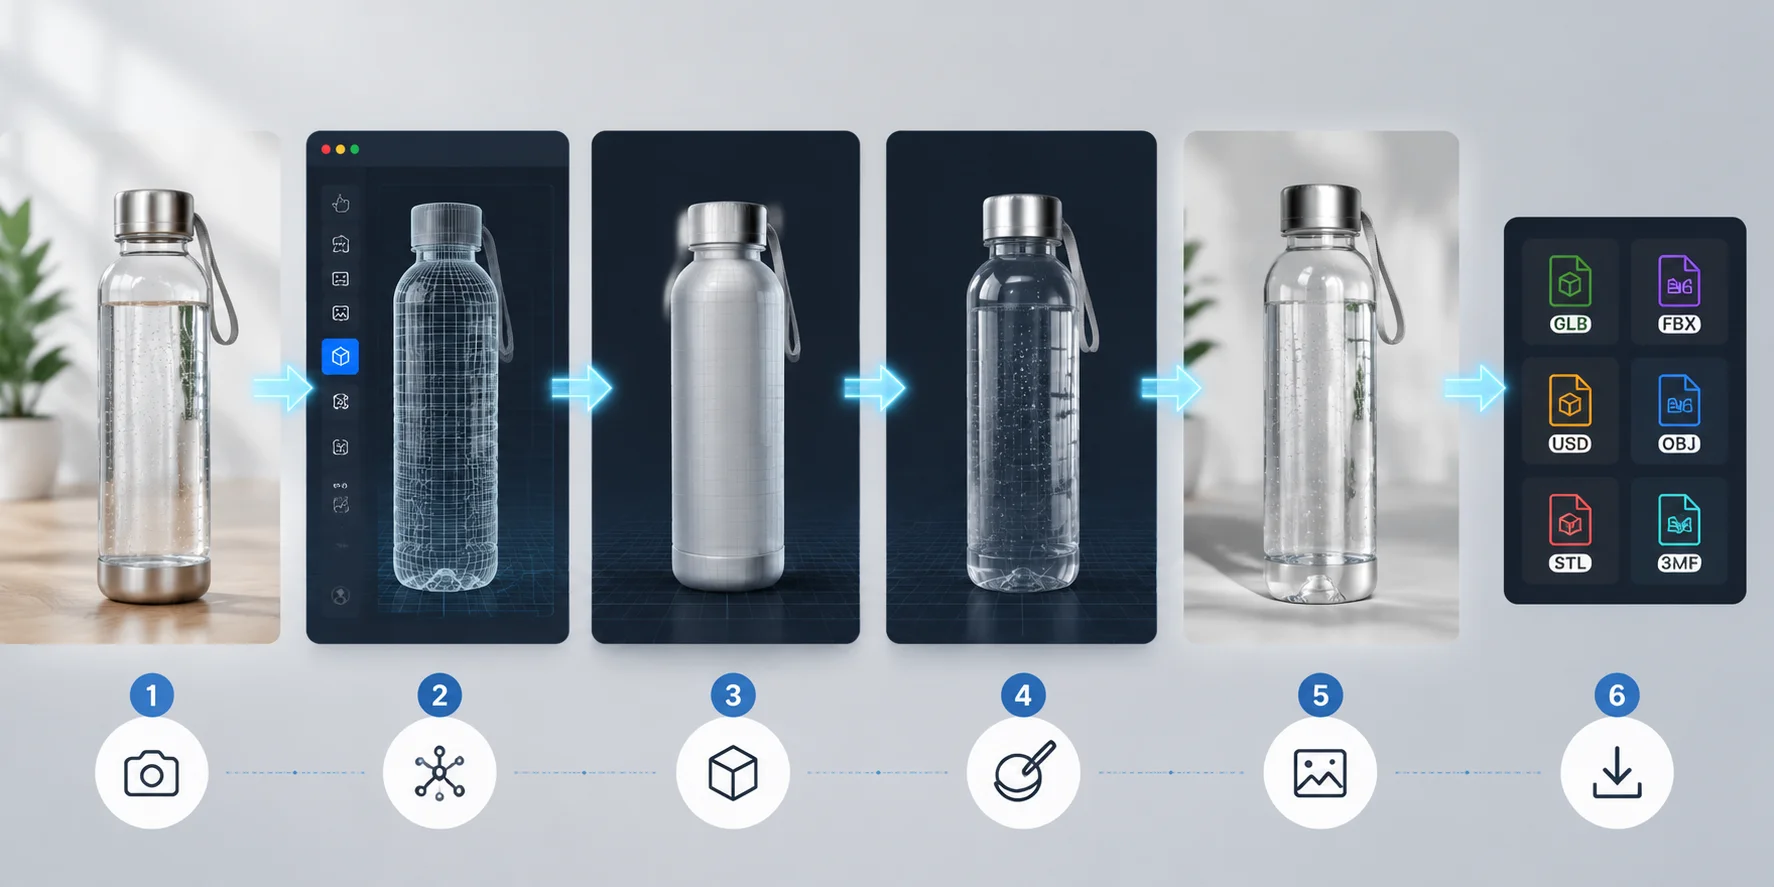
Photo-based generation works best when the bottle already exists. You upload a clear image, and the AI reconstructs the shape. This is useful for water bottles, perfume bottles, cosmetic packaging, and beverage containers.
Prompt-based generation helps when the bottle is only an idea. An AI bottle design generator can create new concepts from descriptions such as “a modern glass perfume bottle with a rounded body and metal cap.”
Dimension-based generation is useful when measurements are important. A parametric bottle model generator lets you define height, diameter, neck size, and other values. This approach is better for designs that need specific dimensions, such as a 750 ml wine bottle.
Bottle Mockup vs 3D Bottle Model: What’s the Difference?
How to Generate a 3D Bottle Model from a Photo or Prompt
Bottles are one of the easiest objects for AI 3D generation because most bottles are rotationally symmetric. A single side view often reveals enough information for the AI to understand the full shape.
Compared with characters or vehicles, bottles have fewer hidden areas. The main challenge is usually not the body shape but the details, materials, and final use.
Follow these steps:
Prepare a clean reference image
For the best results:
- Keep the entire bottle visible
- Use a simple background
- Avoid strong reflections
- Use a straight front or side view
- Make sure the label does not hide the bottle shape
A phone photo is usually enough. Avoid angled images with heavy perspective because they can distort the bottle proportions.
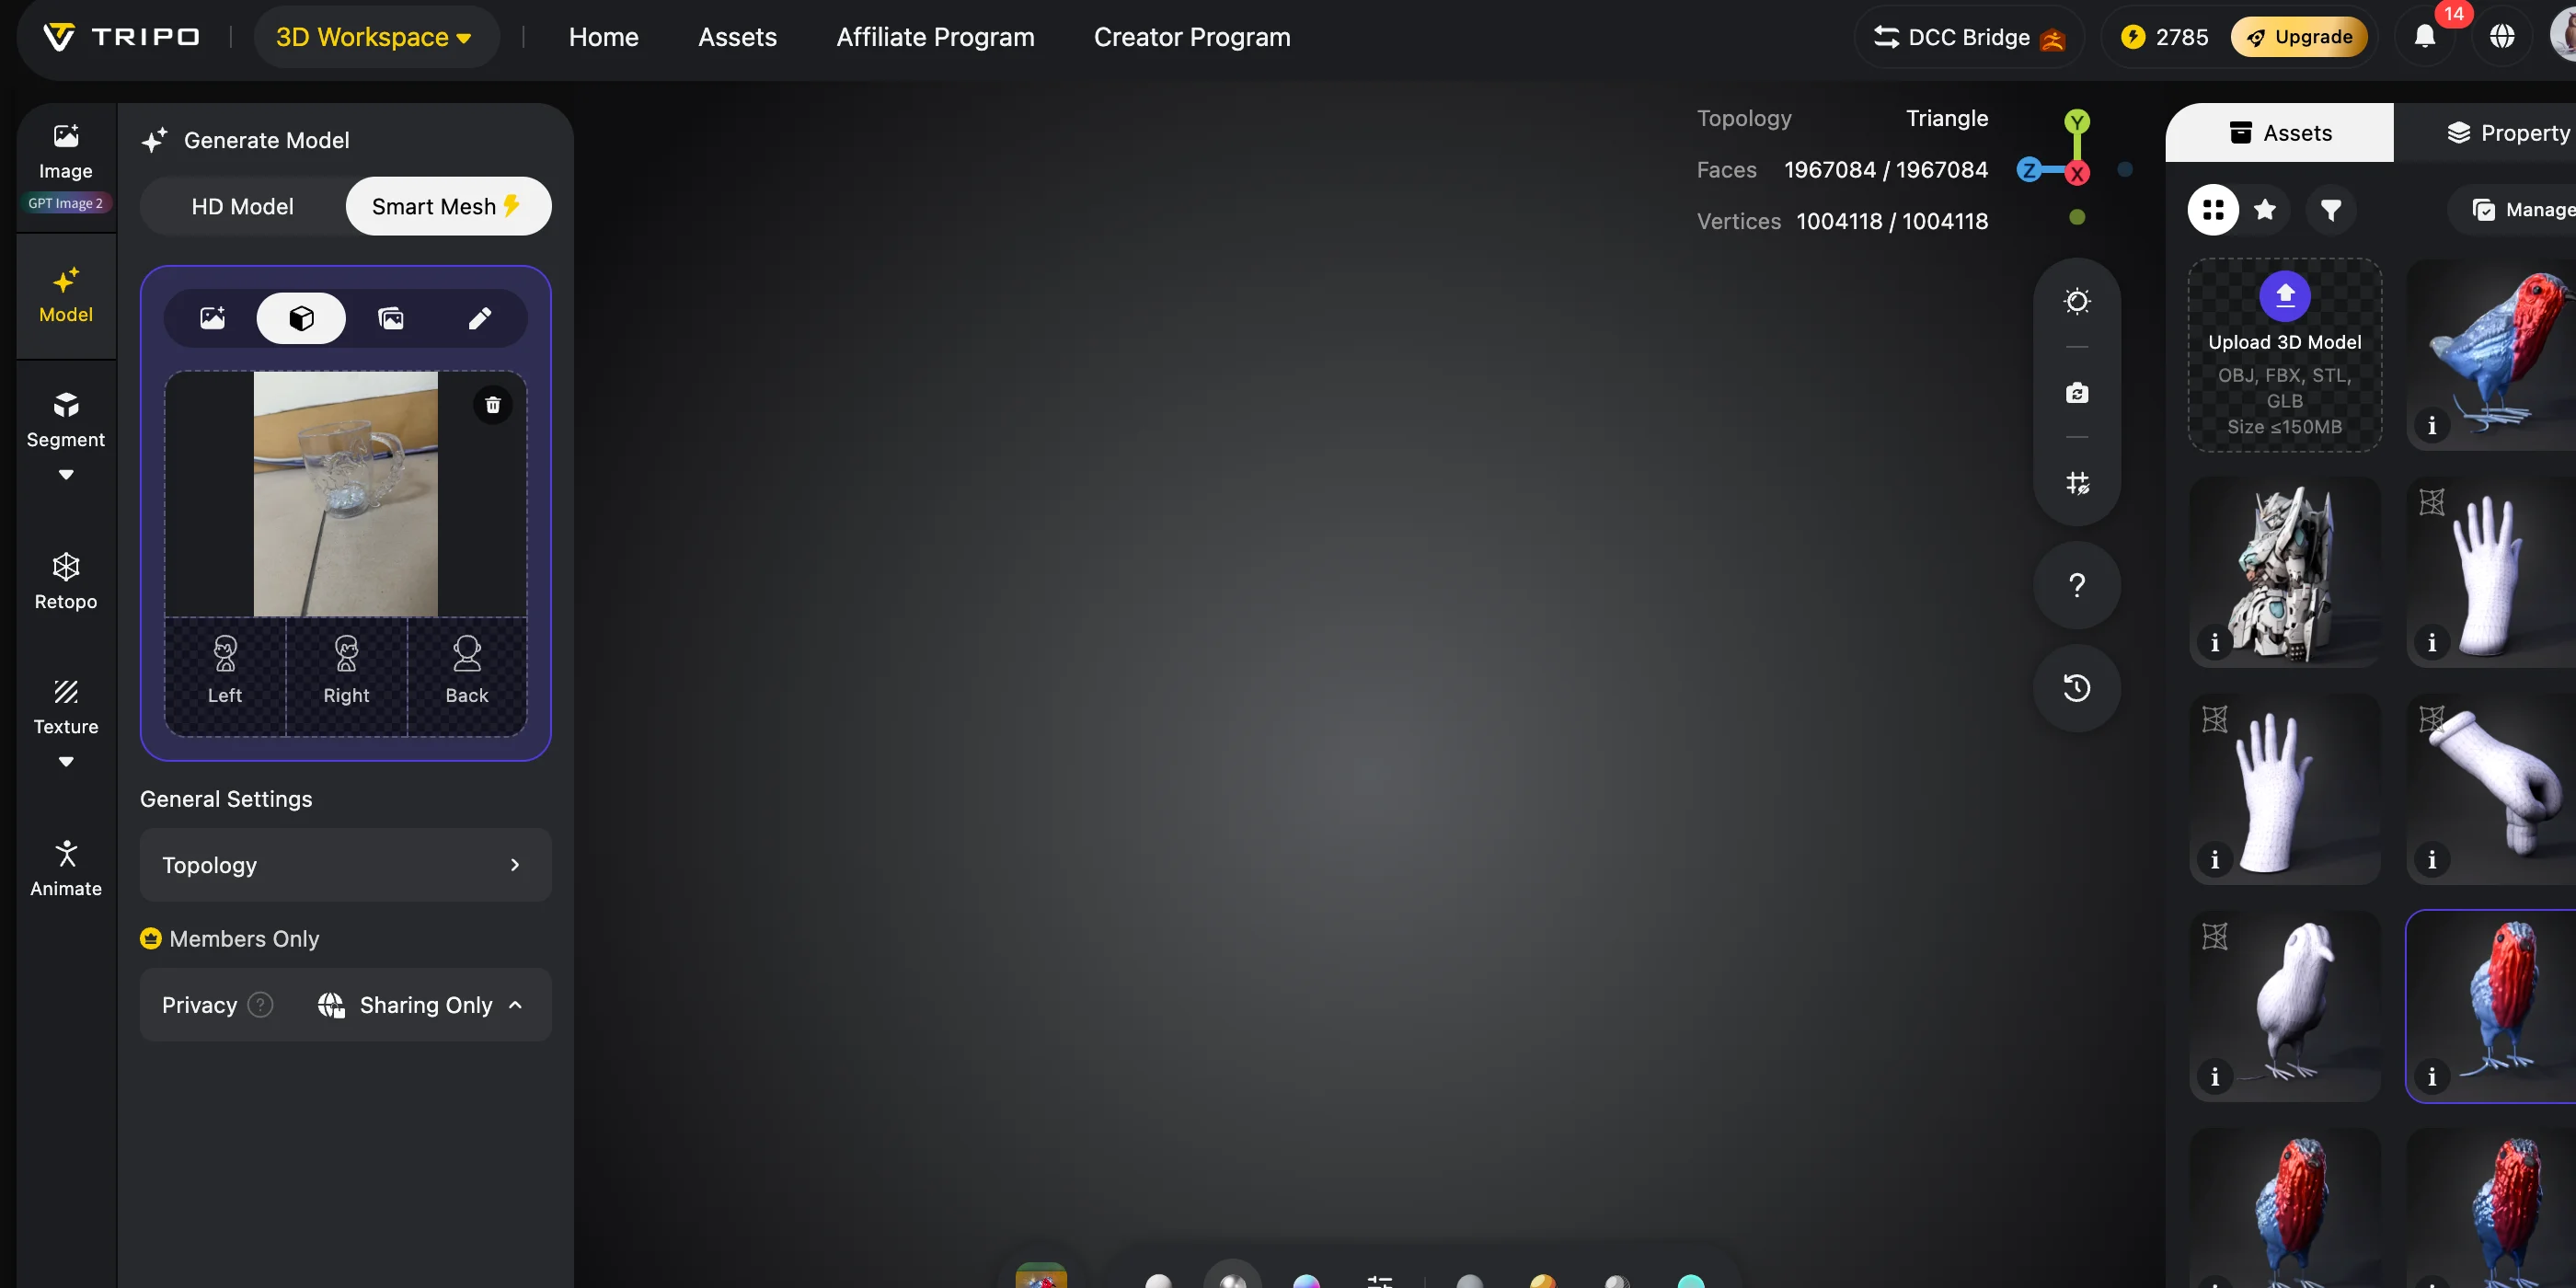
Generate the bottle model
Open an AI 3D platform such as Tripo AI Studio and choose an image-to-3D workflow.
Because one clear image already defines the main profile, an image-to-3D converter is often faster than manually modeling the bottle shape.
If you are designing a new bottle concept, use text instead. A detailed text-to-3D prompt can describe:
- Bottle style
- Body shape
- Neck length
- Cap design
- Material appearance
For example:
“Create a reusable stainless steel water bottle with a slim cylindrical body, curved shoulders, and a matte black cap.”
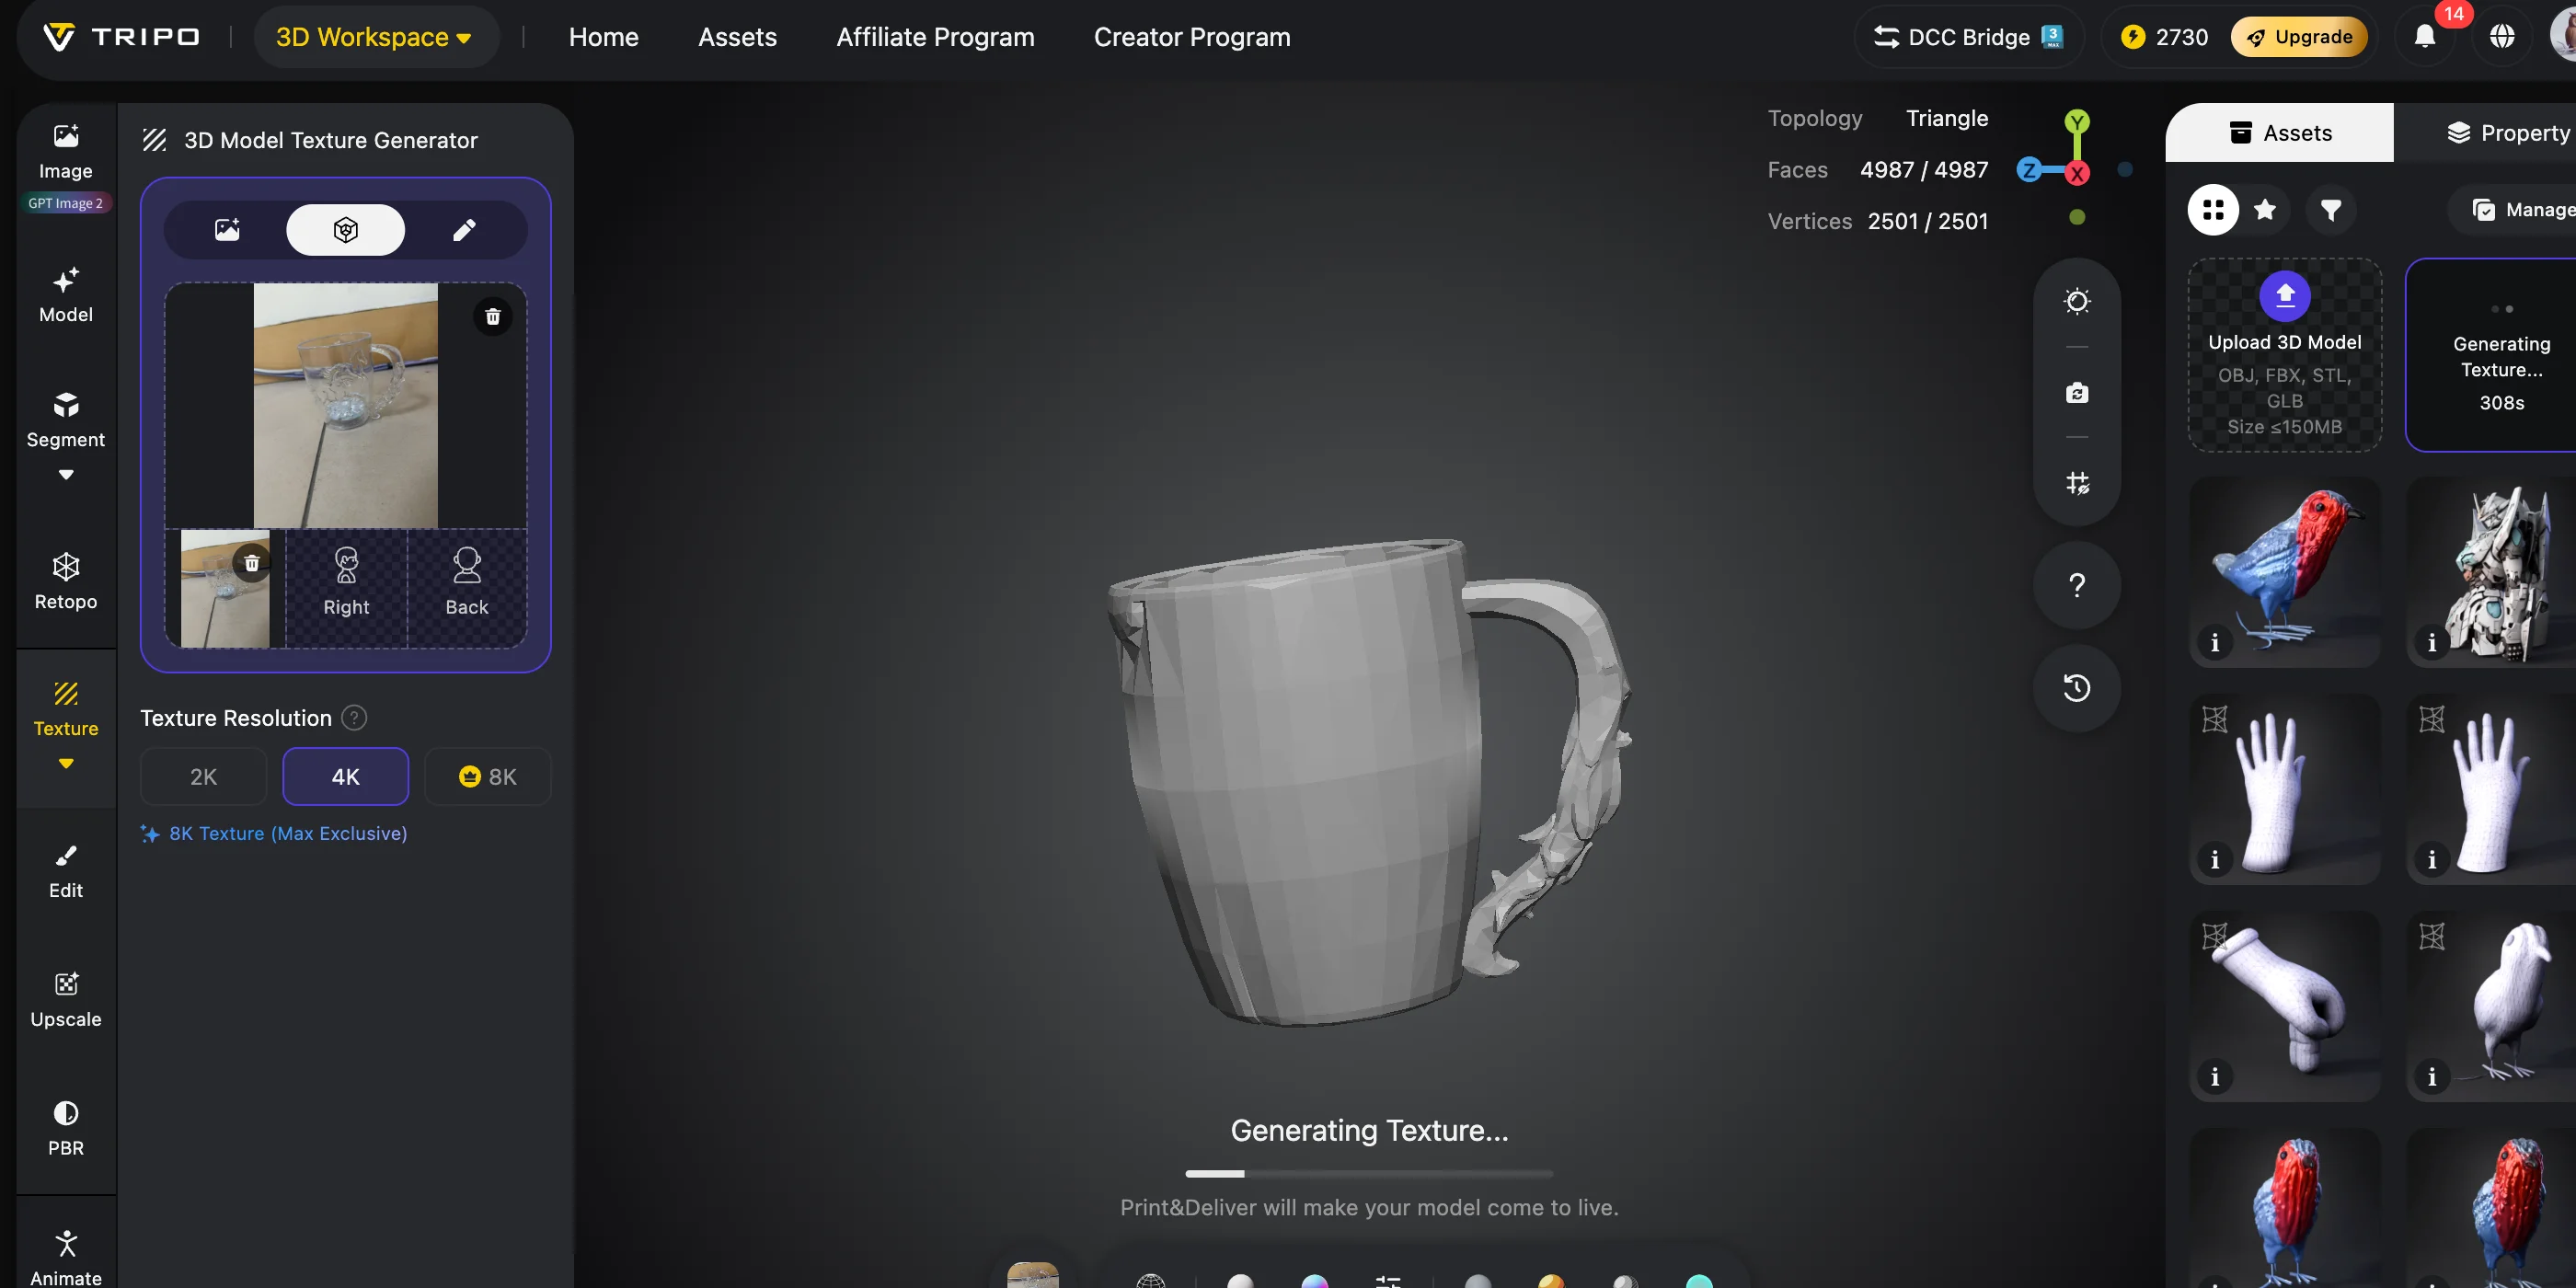
Check the silhouette first
Do not focus on textures immediately.
Look at:
- The body proportions
- Shoulder curves
- Neck connection
- Bottom shape
A realistic texture cannot fix incorrect geometry. Make sure the bottle shape works before adding details.
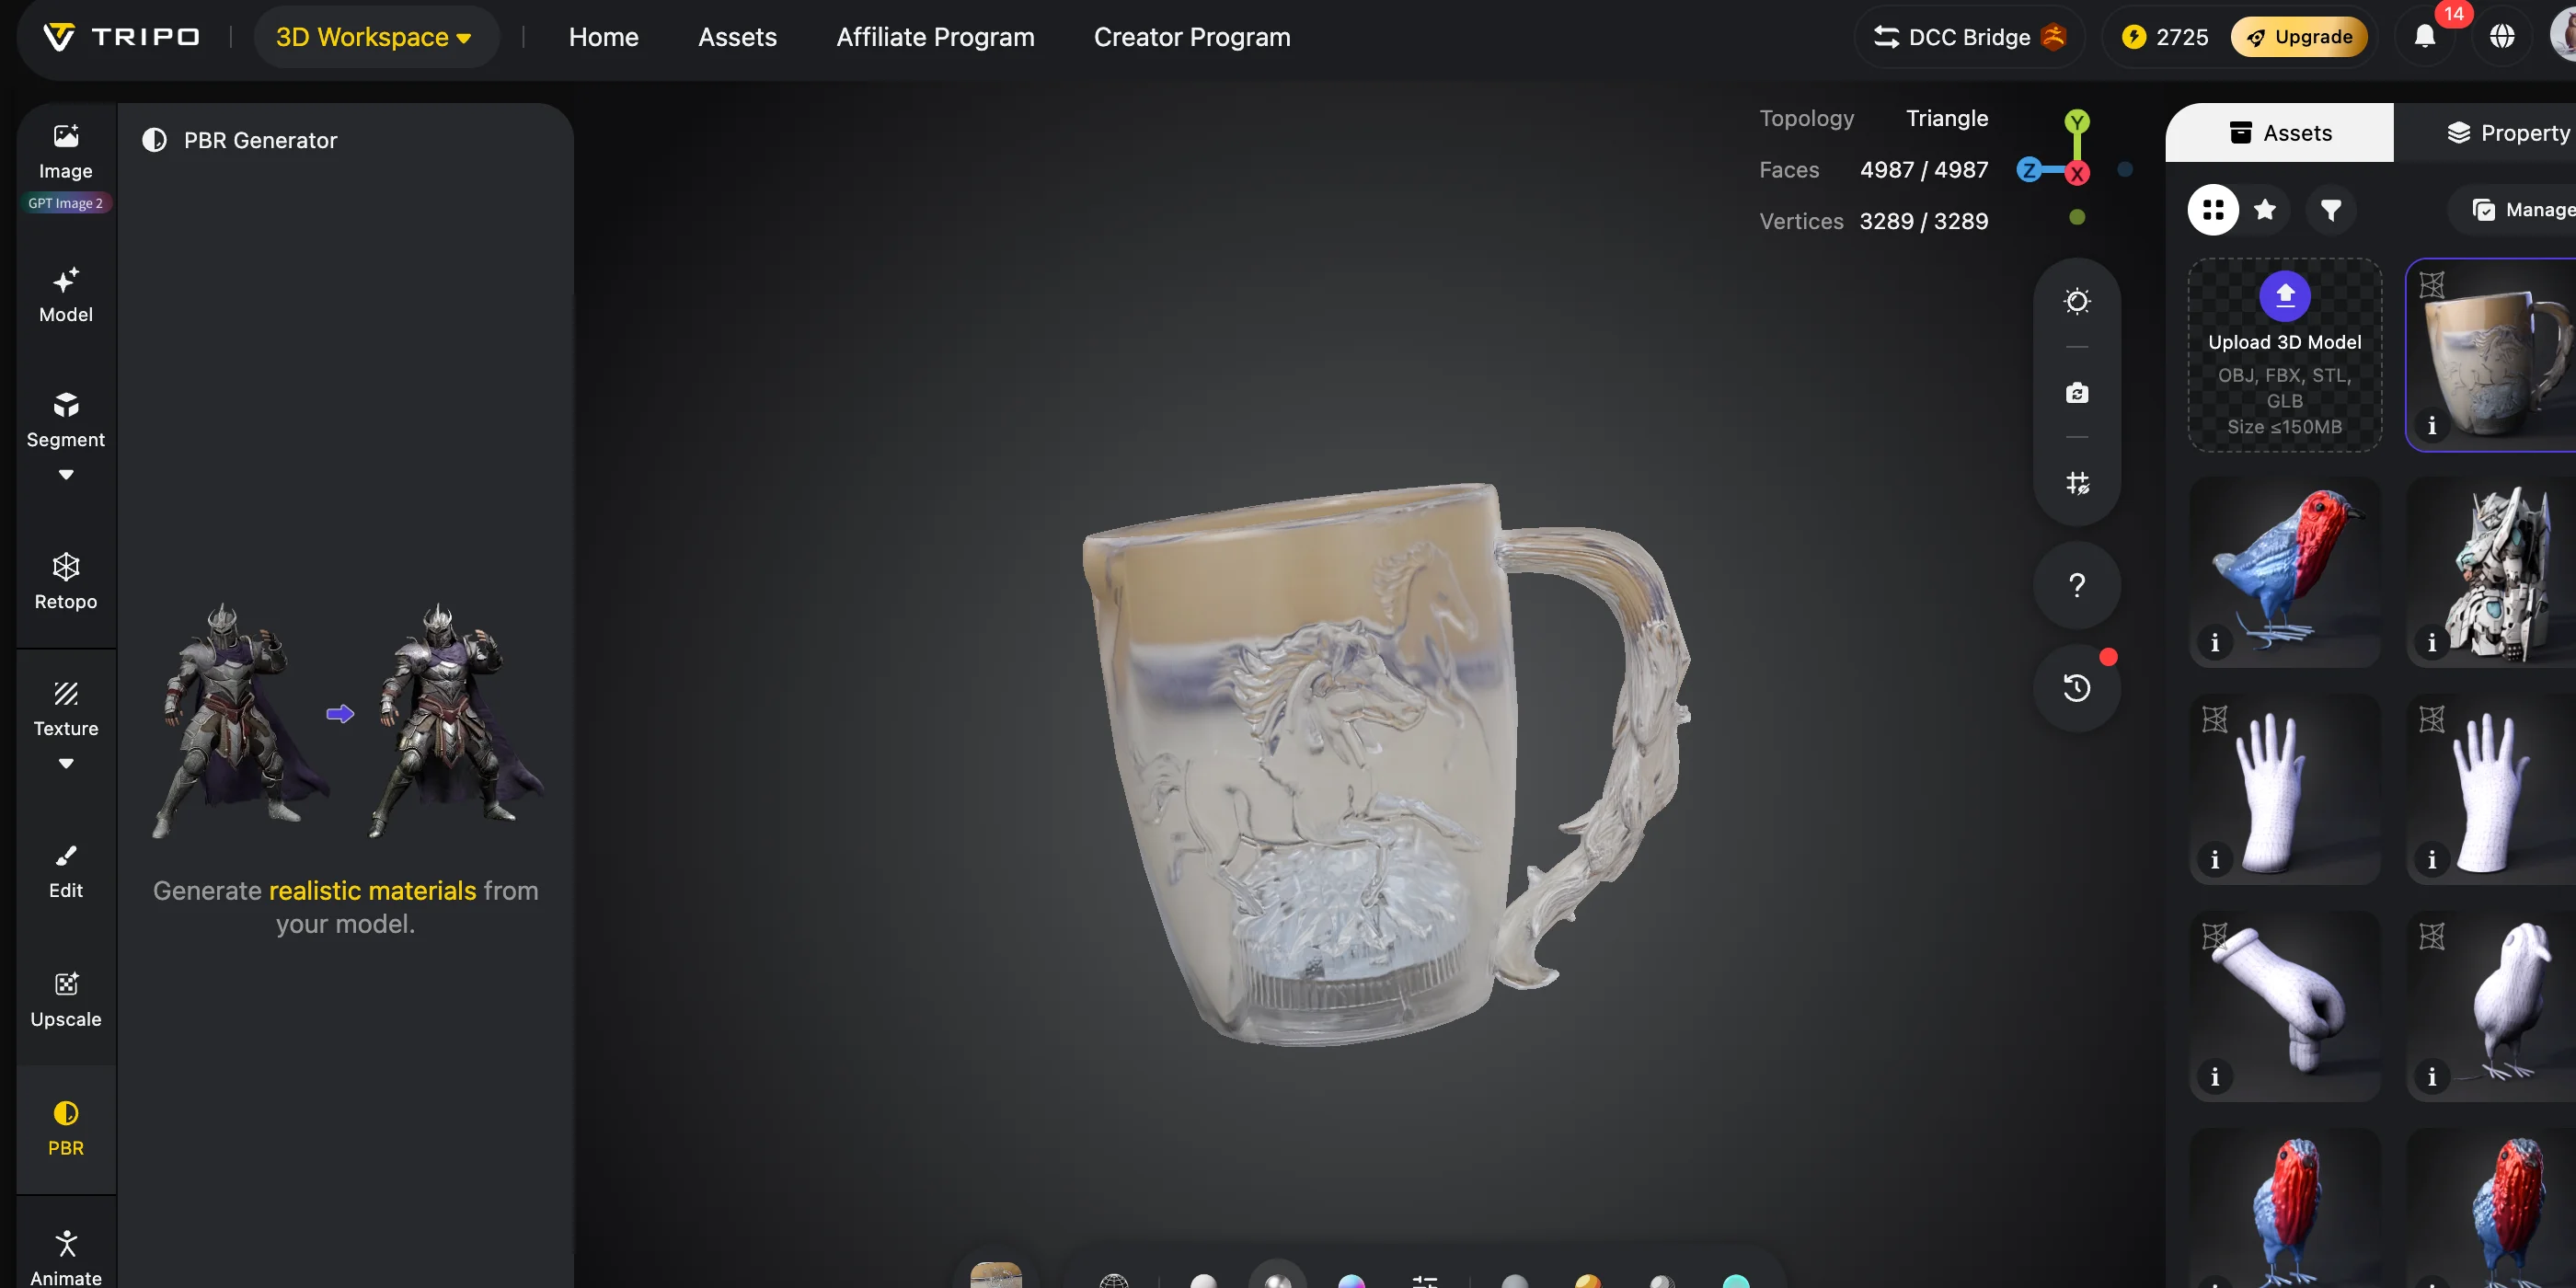
Add materials and export
After the shape is correct, add glass, plastic, metal, or liquid materials. Then export the model based on your final goal.
You can start creating your own bottle model with Tripo AI Studio.
How to Generate a 3D Bottle Model from Photo or Prompt
Getting the Neck, Threads, and Wall Thickness Right
AI can create the overall bottle shape well, but small mechanical parts need more attention.
The neck, screw threads, and cap connection often look correct visually but may not have accurate engineering details. For ecommerce or product visualization, this is usually fine. However, if you need a real cap to fit, you should rebuild the neck using exact measurements.
Your workflow depends on the goal:
- Rendering: keep the generated geometry and focus on appearance.
- Product design: adjust important areas with real dimensions.
- 3D printing: check wall thickness and mesh quality before export.
A generated bottle is often only a surface or solid shape. Before you generate bottle STL from dimensions or prepare a printable model, make sure:
- The mesh is closed
- The bottom is flat
- The neck opening is correct
- The wall thickness is suitable
AI Generated Bottle Model Quality Checklist
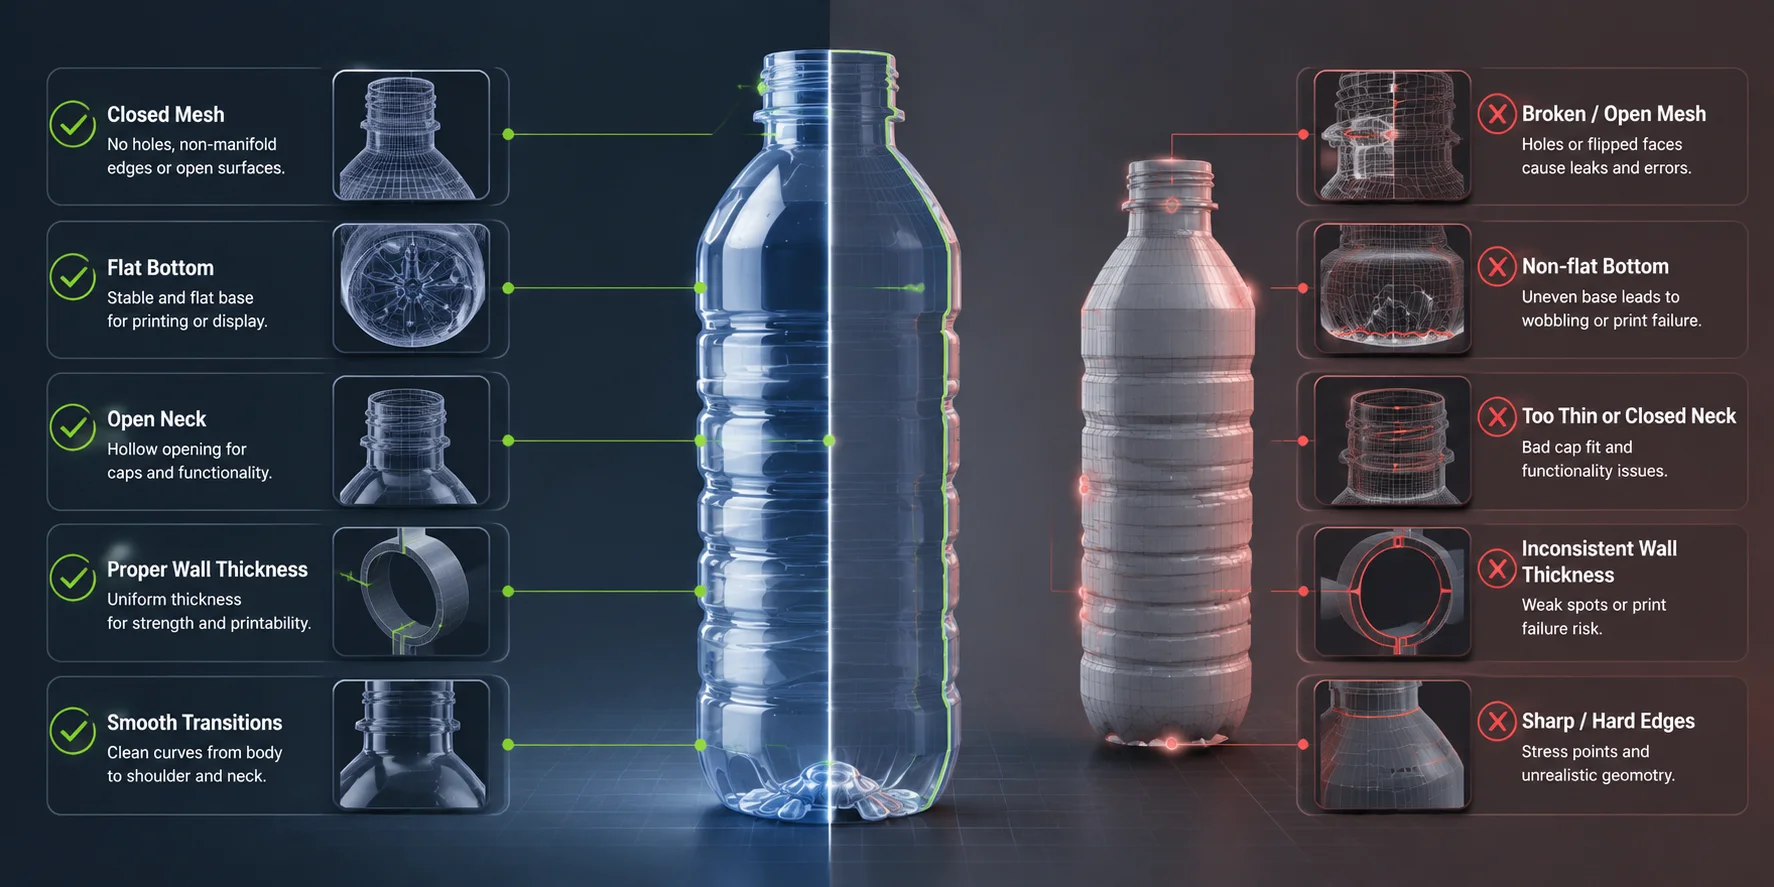
For high-detail projects, a high-detail model pass can help preserve smooth curves.
Remember that printed bottles are usually not suitable for storing drinks. FDM prints contain small gaps between layers that can collect moisture and bacteria. Use printed bottles mainly for prototypes and display pieces.
How to Set Up Transparent Glass and Liquid Materials
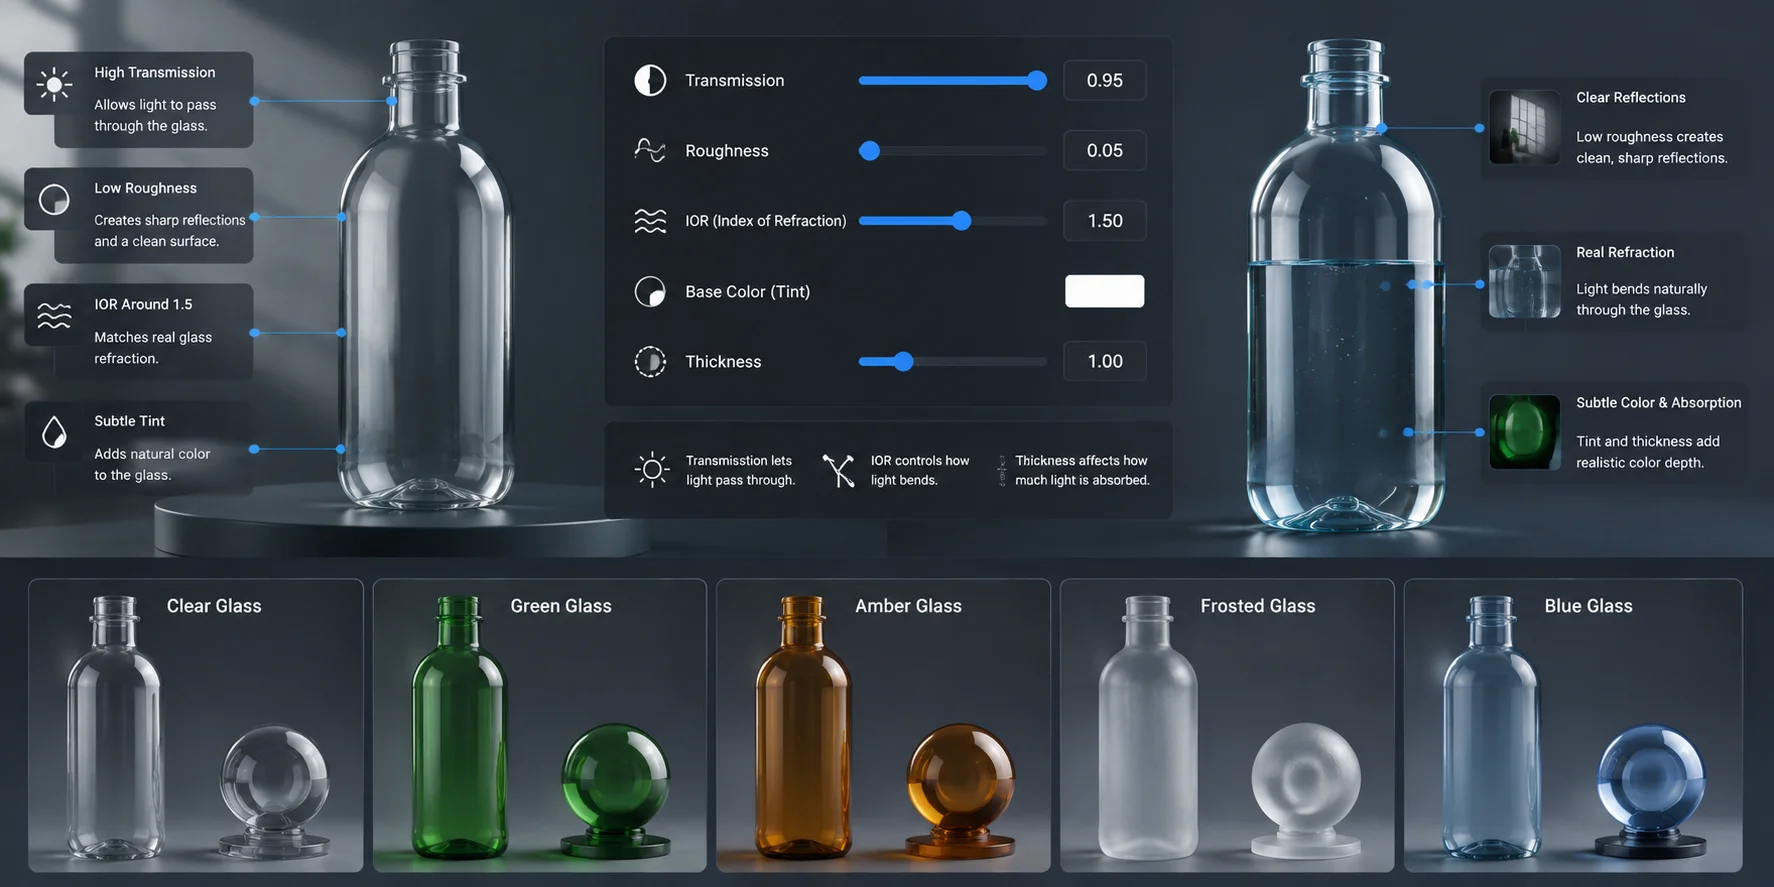
Creating a realistic glass bottle is not only about generating the right shape. Transparency is a material property, not geometry. A bottle model generator creates the bottle surface, but you still need to tell your renderer that the surface should behave like glass.
For a realistic glass material, focus on a few settings you will see in most 3D tools:
- Low roughness to create clear reflections
- High transmission or transparency to let light pass through
- Index of refraction (IOR) around 1.5 to match real glass behavior
- A light color tint for green or amber bottles
| Surface | What to Set | Why |
|---|---|---|
| Clear glass | Low roughness, high transmission, IOR ≈ 1.5 | Creates realistic reflections and refraction |
| Green glass | Add a subtle green tint | Matches beverage and wine bottles |
| Amber glass | Add a warm brown tint | Creates a darker glass appearance |
| Frosted glass | Increase roughness | Produces a blurred surface effect |
| Liquid | Separate inner object with slight overlap | Prevents incorrect refraction |
How AI Bottle Models Become Realistic Glass
The liquid inside the bottle creates another common problem. The single most common mistake is leaving an air gap between the liquid and the glass. When light passes through glass, air, and liquid separately, the extra refraction layers can make the liquid look cloudy or incorrect — for example, wine may turn into a “grey mush” instead of a clear liquid.
A better approach is to create the liquid as a separate solid object that slightly overlaps the inner bottle wall. This creates a cleaner transition between the glass and liquid surfaces.
You should also test the bottle in the final platform. A high-quality offline render can show realistic glass reflections, but real-time viewers, ecommerce pages, and AR apps often simplify transparency for better performance. A bottle that looks like real glass in a render may appear like flat plastic in another environment.
Putting a Label on a 3D Bottle Model
On a bottle mockup, a label is simply a graphic layer placed on a 2D image. On a real 3D bottle model, the label becomes a UV mapping problem. UV mapping means converting a flat image into coordinates that fit correctly onto a 3D surface.
How to Add Labels to a 3D Bottle Model
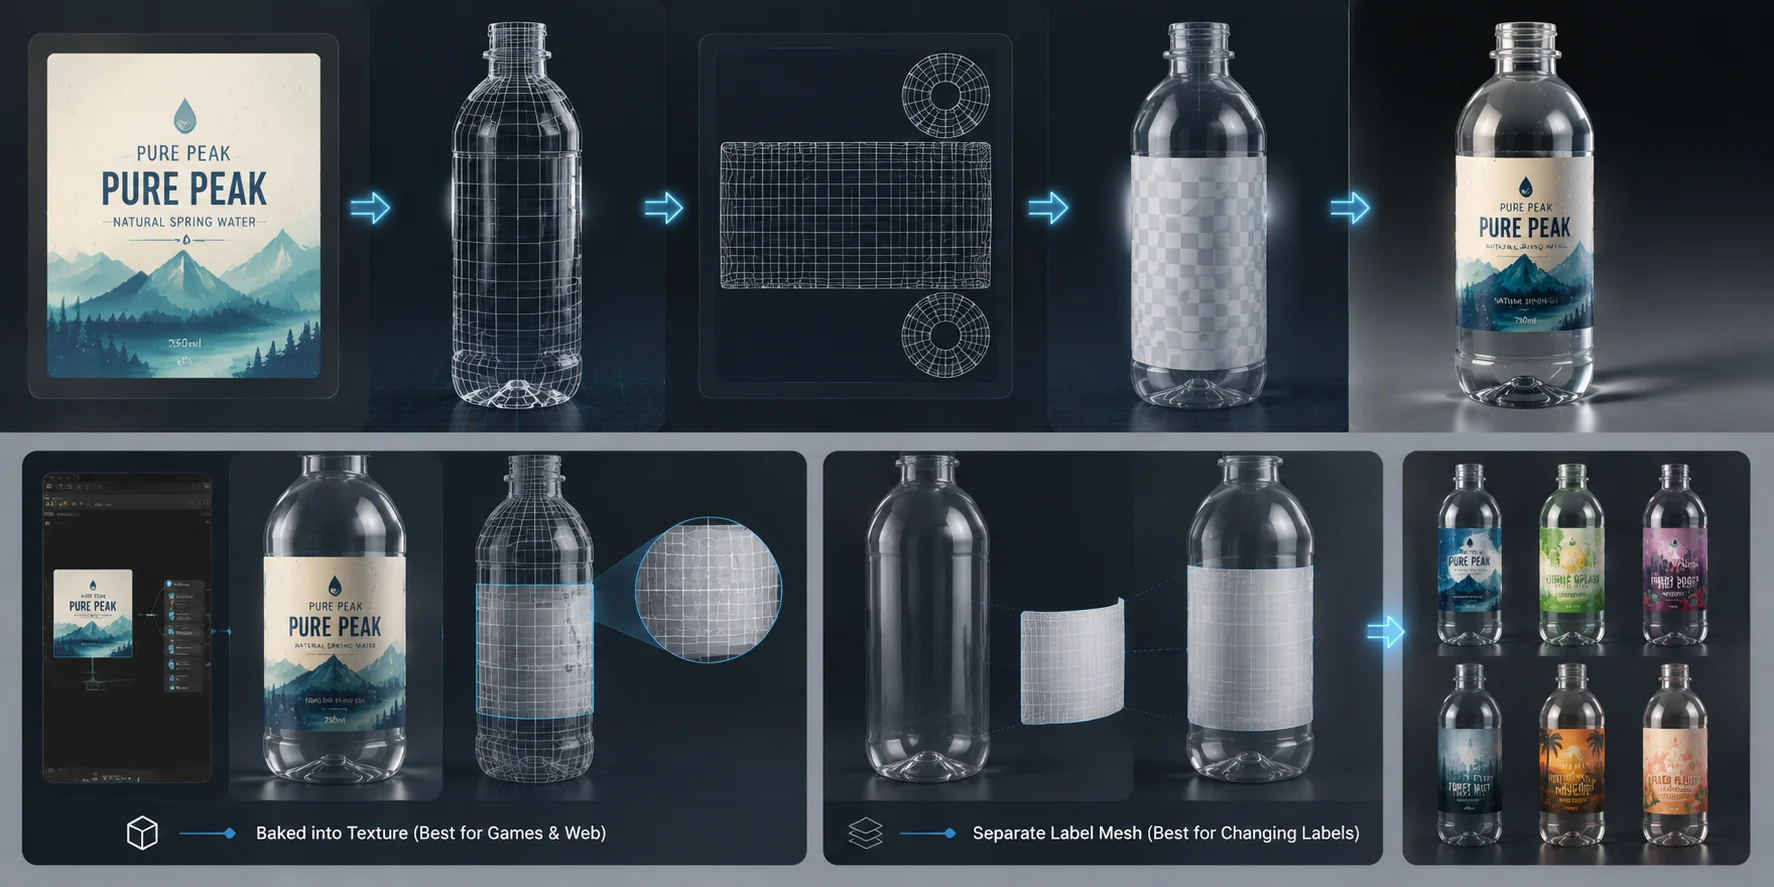
Bottles are easier than many other objects because their main body is usually cylindrical. A straight label design can wrap around a cylinder with very little distortion. Problems usually appear where the bottle starts to curve, such as the shoulders or narrow neck area.
For example, a beverage company may create one bottle model and release six different flavors. Instead of rebuilding the bottle every time, the team can keep the same geometry and replace only the label.
There are two common ways to add labels:
- Bake the label into the texture map
This method combines the label with the bottle texture.
Best for:
- Web product viewers
- Games
- AR experiences
- Lightweight assets
The advantage is a smaller file because everything is stored together.
- Use a separate label mesh
This creates a thin 3D label surface slightly above the bottle.
Best for:
- Packaging presentations
- Product reviews
- Multiple SKU versions
A separate mesh makes it easier to swap labels without changing the main bottle texture.
One detail many beginners miss is image quality. Keep your label artwork at high resolution before applying it. A small logo that looks sharp on a flat image can become blurry when wrapped around a curved bottle surface.
Once the bottle shape is complete, an AI texturing pass can help create realistic glass, plastic, and cap materials while allowing you to keep the label as a separate design layer.
Which Export Format Should You Use for a 3D Bottle?
The best export format depends on where your bottle will be used. Choose the format based on your destination, not simply because one format is popular.
| Format | Best for a Bottle | Watch Out For |
|---|---|---|
| GLB | Web viewers, AR, game engines | Some advanced editing features may be limited |
| USD | VFX, animation, collaborative scene workflows | Support varies between tools |
| FBX | Games and animation software | File structure can vary between programs |
| OBJ | General editing and basic 3D printing | Materials may require separate files |
| STL | 3D printing | Stores geometry only, not labels or glass materials |
| 3MF | Modern 3D printing workflows | Not supported by every tool yet |
Choosing the Right Export Format for a Bottle Model
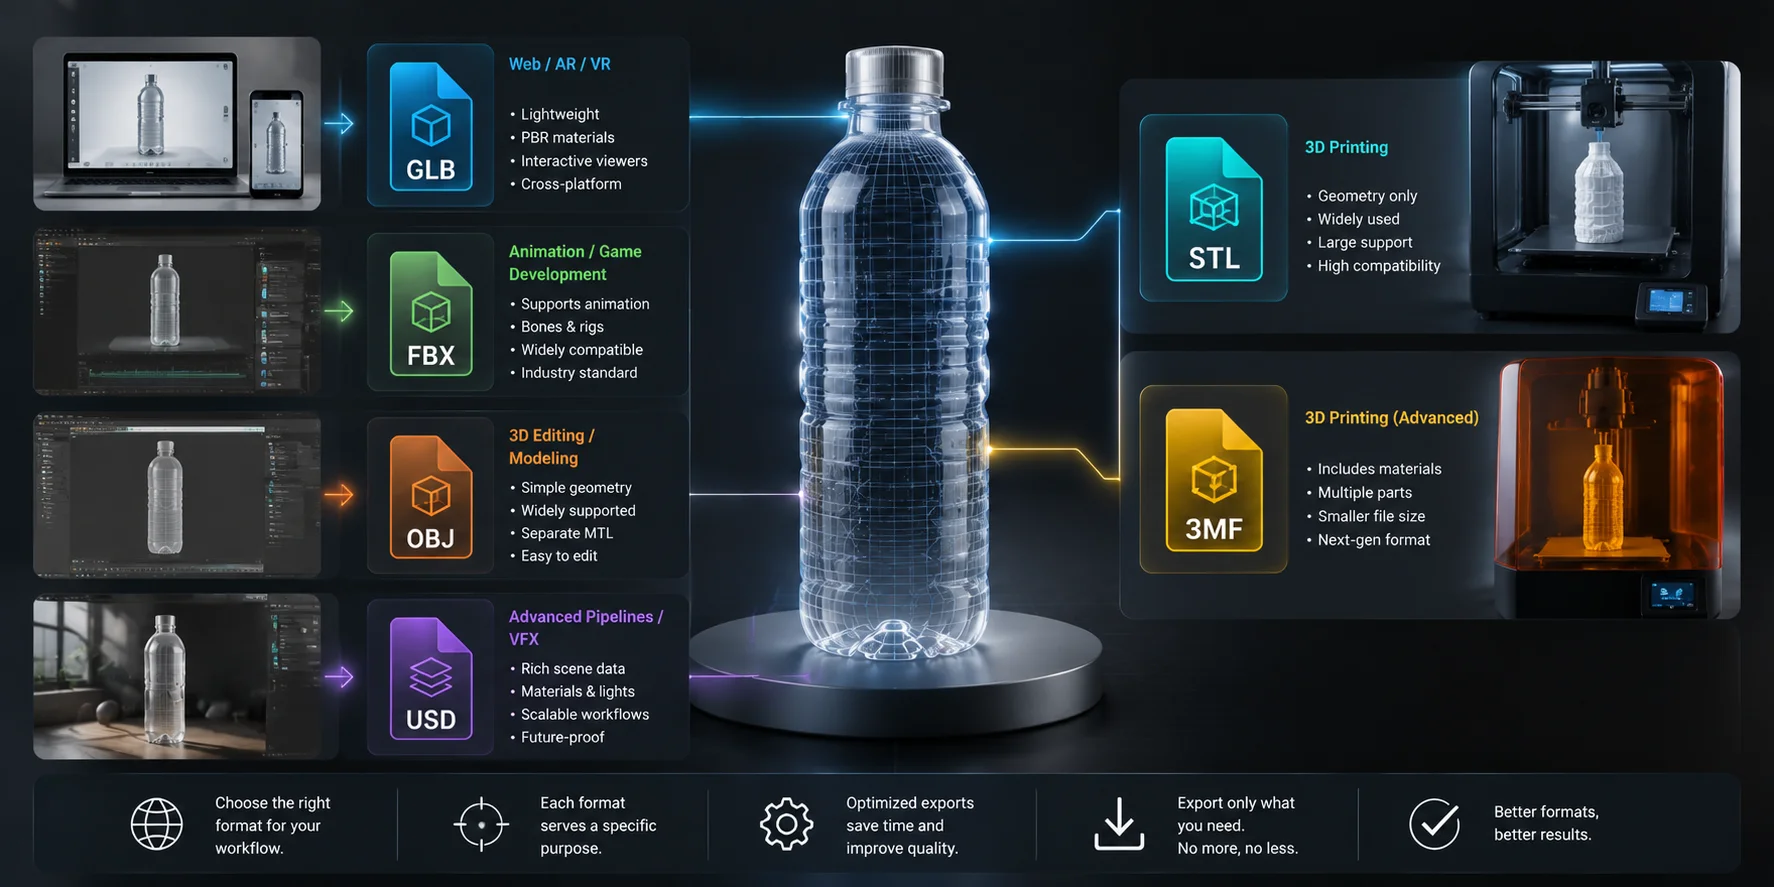
For ecommerce or online product viewers, GLB is usually the best choice because it can store the model, textures, and materials in one file.
For animation or game development, FBX remains widely supported.
For printing, STL is still common, but it only saves the shape. If you export a beautifully textured water bottle model as STL, the label and glass color will disappear. If color information matters, 3MF is often a better option.
If a client sends you an OBJ and your slicer needs 3MF, a quick 3D file conversion can help you move between workflows without rebuilding the model.
Understanding the right material settings, label workflow, and export format will help you turn an AI-generated bottle into a usable 3D asset. Next, let's look at the most common questions people ask about bottle model generators.
Frequently Asked Questions
What is a bottle model generator used for?
It creates 3D bottle assets for product design, ecommerce, AR, games, and printing by converting images, prompts, or measurements into geometry.
What's the difference between a bottle mockup generator and a 3D bottle model generator?
A mockup generator creates a flat product image. A 3D bottle generator creates an editable model that you can rotate, modify, render, and export.
Can I generate a 3D bottle model from a single photo?
Yes. A clear side-view photo often works well because bottles usually have simple symmetrical shapes. Better lighting and fewer reflections can improve the result.
Is there a free bottle model generator?
Some AI 3D generation tools offer free access with limited usage. Advanced features, higher-quality models, and certain export options may require a subscription plan that supports those capabilities.
How do I generate a bottle model from exact dimensions?
Yes. A parametric workflow lets you define dimensions such as height, diameter, and neck size. This approach works better when your bottle design needs precise proportions.
Can I 3D print a generated bottle model?
Yes, but check the mesh, wall thickness, and opening before printing. Generated bottles are usually better for prototypes and decoration rather than food-safe containers.
Which file format should I export a bottle model in?
Use GLB for web and AR, FBX for animation, and STL or 3MF for printing. Choose the format based on where the model will be used.
How do I make the glass look transparent?
Transparency comes from material settings, not only the bottle shape. Use high transmission, low roughness, and a glass IOR around 1.5 to create a more realistic glass appearance.
Can I put my own label design on the model?
Yes. You can apply a label through a texture map or use a separate label mesh when you need to create multiple product versions.
Do I need any 3D modelling experience to use a bottle model generator?
No. AI tools help beginners create bottle models without advanced modeling skills. Basic knowledge of materials, topology, and export formats can help improve the final result.
Conclusion
A bottle is one of the most beginner-friendly objects for AI 3D generation because its shape is simple and predictable. The hardest parts are usually not creating the bottle itself, but improving the materials, labels, details, and export settings.
Ready to create your own bottle? Open Tripo AI Studio and start with a single bottle image.
If you plan to create more models regularly, check Tripo AI pricing to choose the right plan for your workflow.