How to Fix Holes in a 3D Model: 3 Easy Methods
TL;DR
- Search intent is how-to / troubleshooting: the reader has a mesh with holes and needs a concrete repair workflow — fast.
- SERP is dominated by tool-specific tutorials (Meshmixer, Blender, Netfabb) and YouTube; no single article covers all three methods plus causes in one place.
- Meshmixer is the most-searched method (🔴 lead with it); Blender is implicit in the audience; online auto-repair closes the loop for beginners.
- PAA covers causes (Q3), detection, and both manual and auto methods — all four must be answered explicitly.
- Fan-out confirms a 3D-scan sub-audience and a "fix without losing detail" concern — both addressed in FAQ.
- Tripo AI angle: AI-generated models from Tripo are watertight by default — primary CTA frames Tripo as the upstream fix.
- Two CTAs: Tripo AI Studio (primary) and Tripo AI Pricing (secondary).
You may have a 3D model that looks perfectly fine in your viewport, but your slicer reports errors, your render engine shows unexpected artifacts, or your print fails completely. In most cases, the problem comes from holes or open boundaries in the mesh. If you are looking for how to fix holes in 3d model, the key is understanding that 3D printers and many rendering workflows require a closed, continuous surface.
This guide explains what causes holes, how to detect them, and three reliable ways to repair them using Meshmixer, Blender, and online auto-repair tools. You will also learn why a printable model needs to be watertight — meaning every edge is connected to exactly two faces, with no gaps, loose boundaries, or disconnected geometry. Holes break this closed-surface structure and can prevent a model from being sliced, rendered, or manufactured correctly.
What Causes Holes in 3D Models?
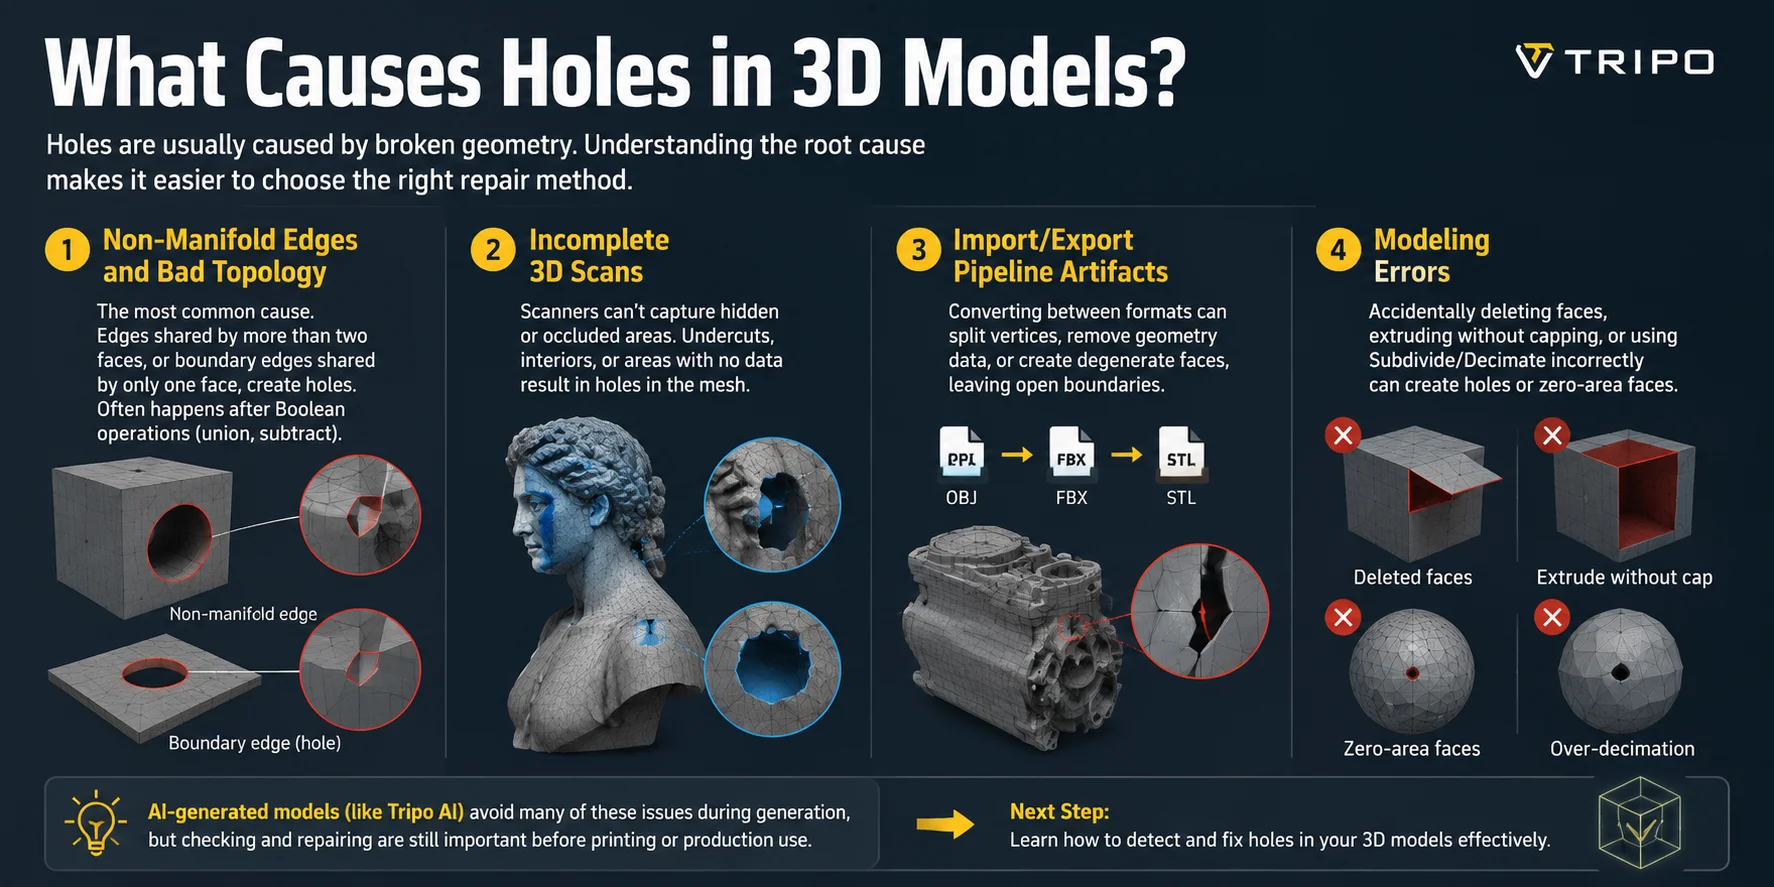
Holes in 3D models usually come from broken geometry rather than a problem with the slicer or rendering software. Understanding the cause makes it easier to choose the right repair method. The four most common sources are topology problems, incomplete scans, file conversion issues, and modeling mistakes.
1. Non-Manifold Edges and Bad Topology
This is the most common cause of holes in 3D models. A non-manifold edge occurs when an edge is connected to more than two faces, or when an edge belongs to only one face, creating an open boundary. These problems often appear after Boolean operations such as union or subtract, where overlapping surfaces can leave behind disconnected edges or incomplete geometry.
2. Incomplete 3D Scans
3D scanning workflows often create holes because scanners cannot capture every surface area. Hidden regions such as undercuts, deep corners, or internal spaces may receive no scan data, leaving gaps when the software reconstructs the mesh. This is especially common in photogrammetry and structured-light scanning projects.
3. Import/Export Pipeline Artifacts
Converting models between formats can introduce unexpected mesh issues. For example, moving from OBJ to STL or FBX to OBJ may split shared vertices, remove certain geometry information, or create degenerate faces. These small changes can result in open boundaries that were not visible in the original file.
4. Modeling Errors
Manual modeling mistakes are another frequent source of holes. Accidentally deleting a face, extruding geometry without closing the surface, or applying operations like Subdivide or Decimate incorrectly can create missing faces or zero-area polygons.
AI-generated models can avoid many of these issues during the initial generation process, but mesh checking and repair are still important before printing or production use. Once you know where holes come from, the next step is learning how to detect and fix them efficiently.
How to Detect Holes in a 3D Model
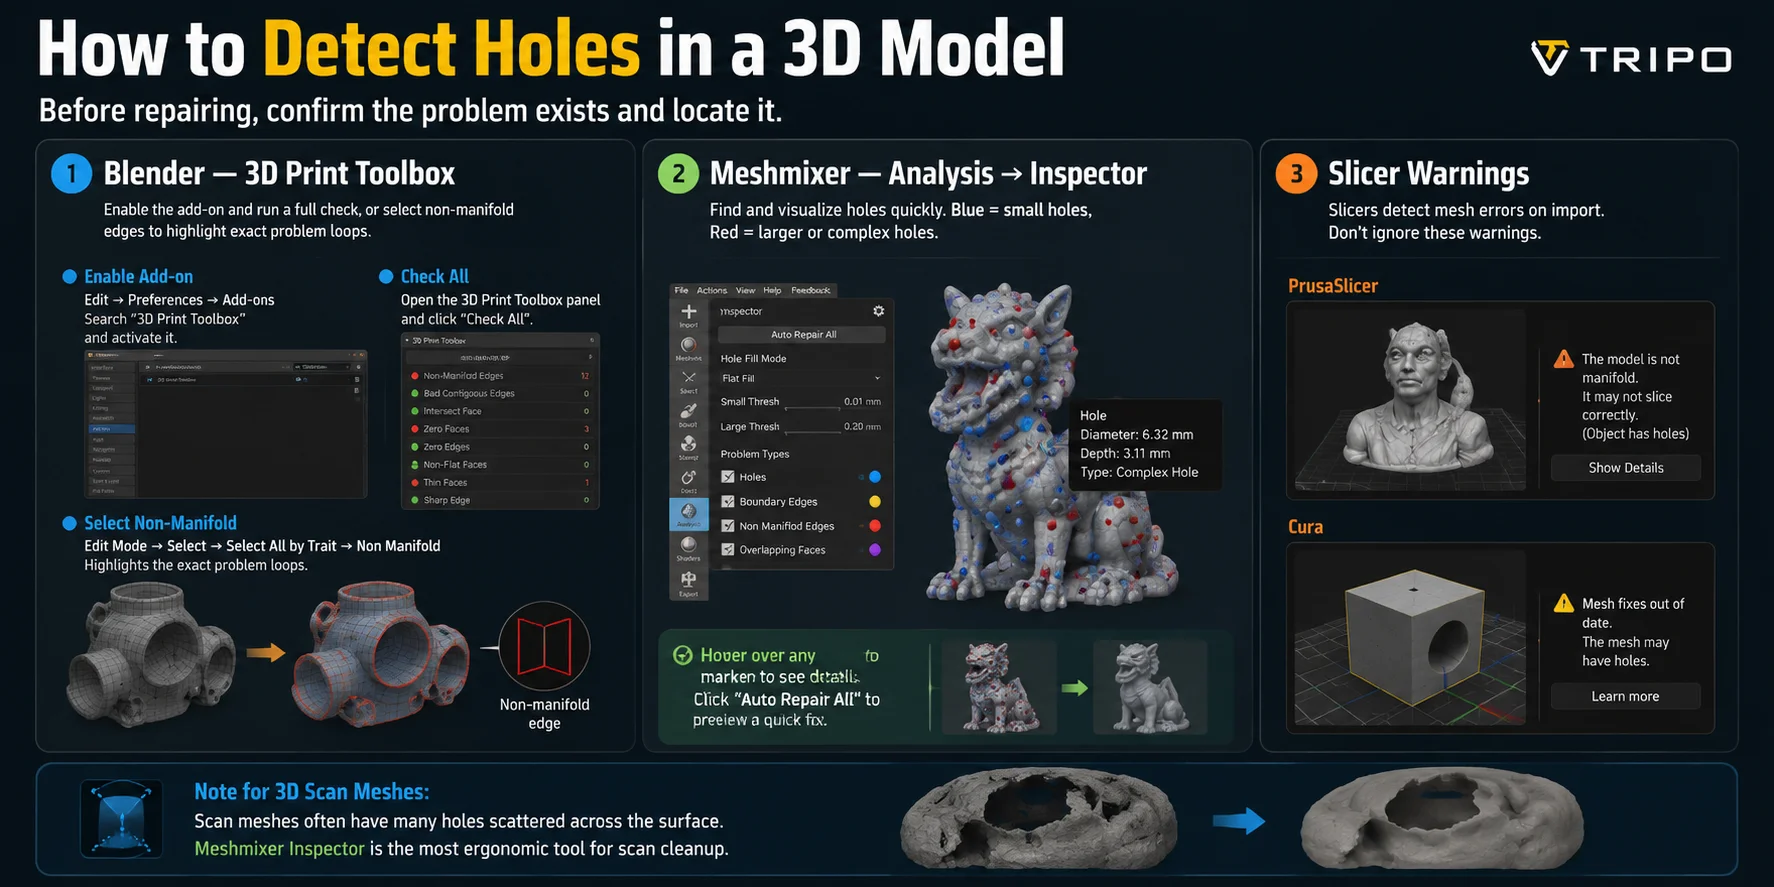
Before repairing a hole, the first step is confirming that the problem exists and identifying exactly where the mesh is broken. Different tools provide different ways to detect open boundaries, non-manifold geometry, and other issues that can prevent successful printing or rendering.
Blender — 3D Print Toolbox
Blender includes a built-in 3D Print Toolbox that can quickly analyze mesh problems. Enable it through Edit → Preferences → Add-ons, then search for “3D Print Toolbox” and activate the add-on. In the 3D Print Toolbox panel, click “Check All” to scan the model for issues such as non-manifold edges, open boundaries, and zero-area faces.
For more direct control, switch to Edit Mode and use Select → Select All by Trait → Non Manifold. Blender will highlight the exact edges and loops causing the problem, making it easier to locate holes manually.
Meshmixer — Analysis → Inspector
Meshmixer’s Inspector tool is one of the most user-friendly options for finding holes, especially on scanned models. Open Analysis → Inspector or press I to launch it. Meshmixer marks problems with colored spheres: blue markers usually indicate smaller holes, while red markers represent larger or more complex issues. You can hover over each marker to identify the problem and click “Auto Repair All” to preview an automatic fix.
Slicer Warnings
Your slicer can also detect holes before printing. Tools like PrusaSlicer and Cura automatically check imported models and may display warnings such as “This model is not manifold” or “Mesh may have holes.” These messages should not be ignored because they reveal geometry problems before you start printing.
For 3D scan meshes, detection is especially important because holes are often scattered across the entire surface. In these cases, Meshmixer Inspector is often the most practical choice for quickly locating and repairing multiple gaps.
Method Comparison: Meshmixer vs. Blender vs. Online Auto-Repair
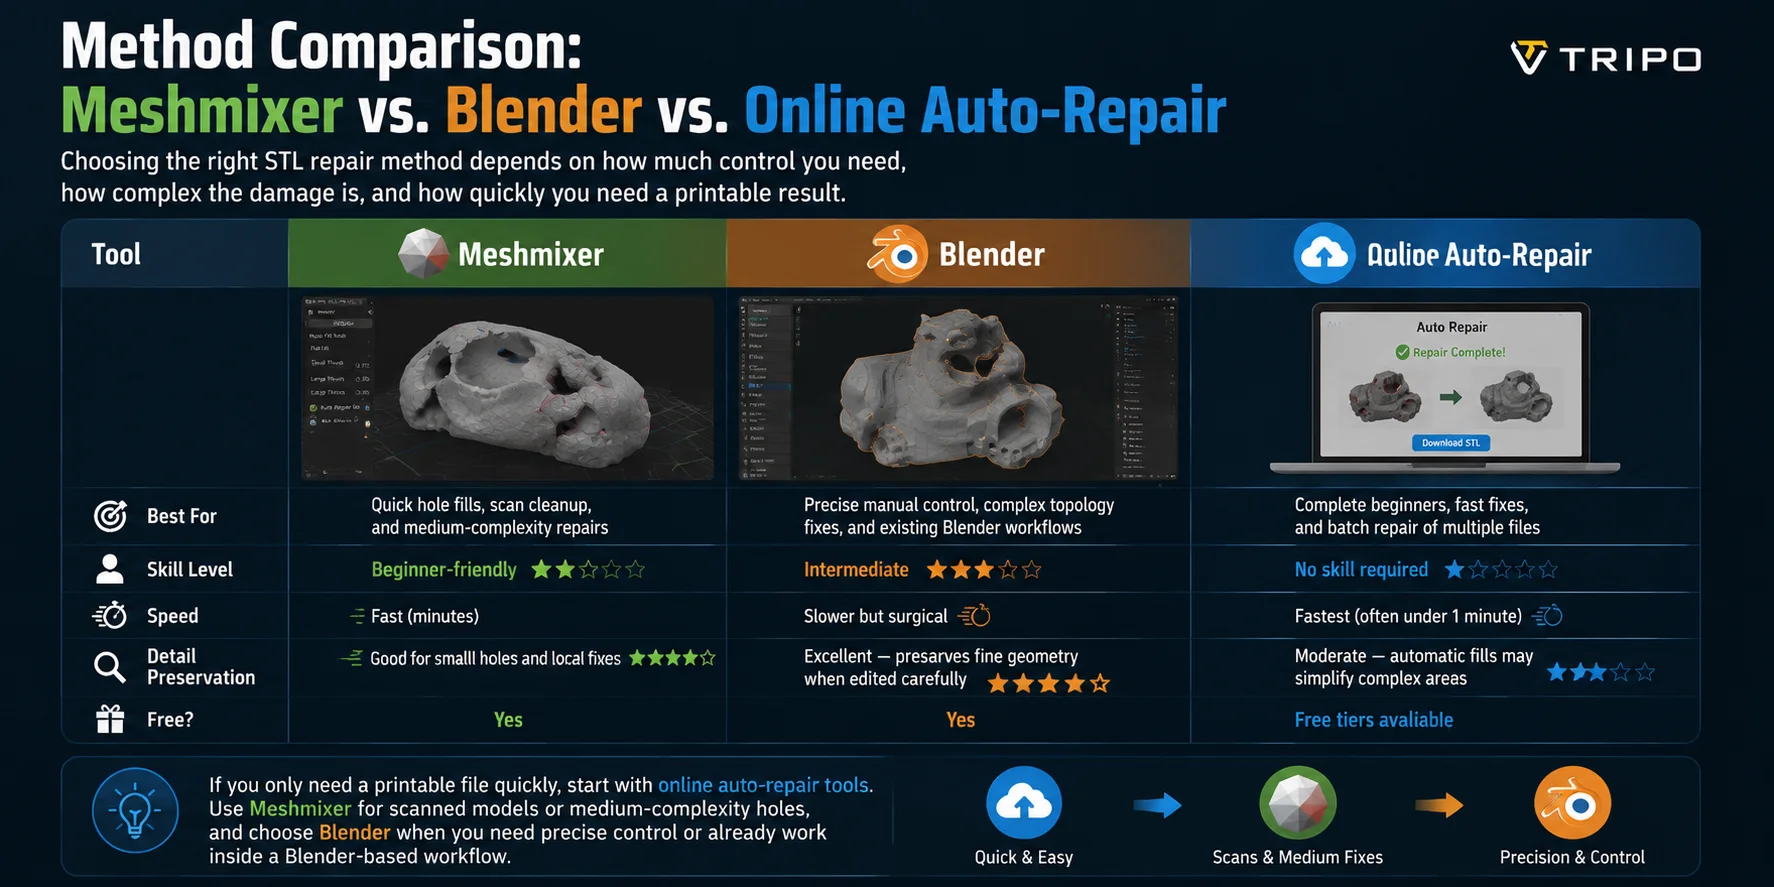
Choosing the right STL repair method depends on how much control you need, how complex the damage is, and how quickly you need a printable result.
| Tool | Best For | Skill Level | Speed | Detail Preservation | Free? |
|---|---|---|---|---|---|
| Meshmixer | Quick hole fills, scan cleanup, and medium-complexity repairs | Beginner-friendly | Fast (minutes) | Good for small holes and local fixes | Yes |
| Blender | Precise manual control, complex topology fixes, and existing Blender workflows | Intermediate | Slower but surgical | Excellent — preserves fine geometry when edited carefully | Yes |
| Netfabb / Online Auto-Repair | Complete beginners, fast fixes, and batch repair of multiple files | No skill required | Fastest (often under 1 minute) | Moderate — automatic fills may simplify complex areas | Free tiers available |
If you only need a printable file quickly, start with online auto-repair tools. Use Meshmixer for scanned models or medium-complexity holes, and choose Blender when you need precise control or already work inside a Blender-based workflow.
Method 1: Fix Holes in Meshmixer (Step-by-Step)
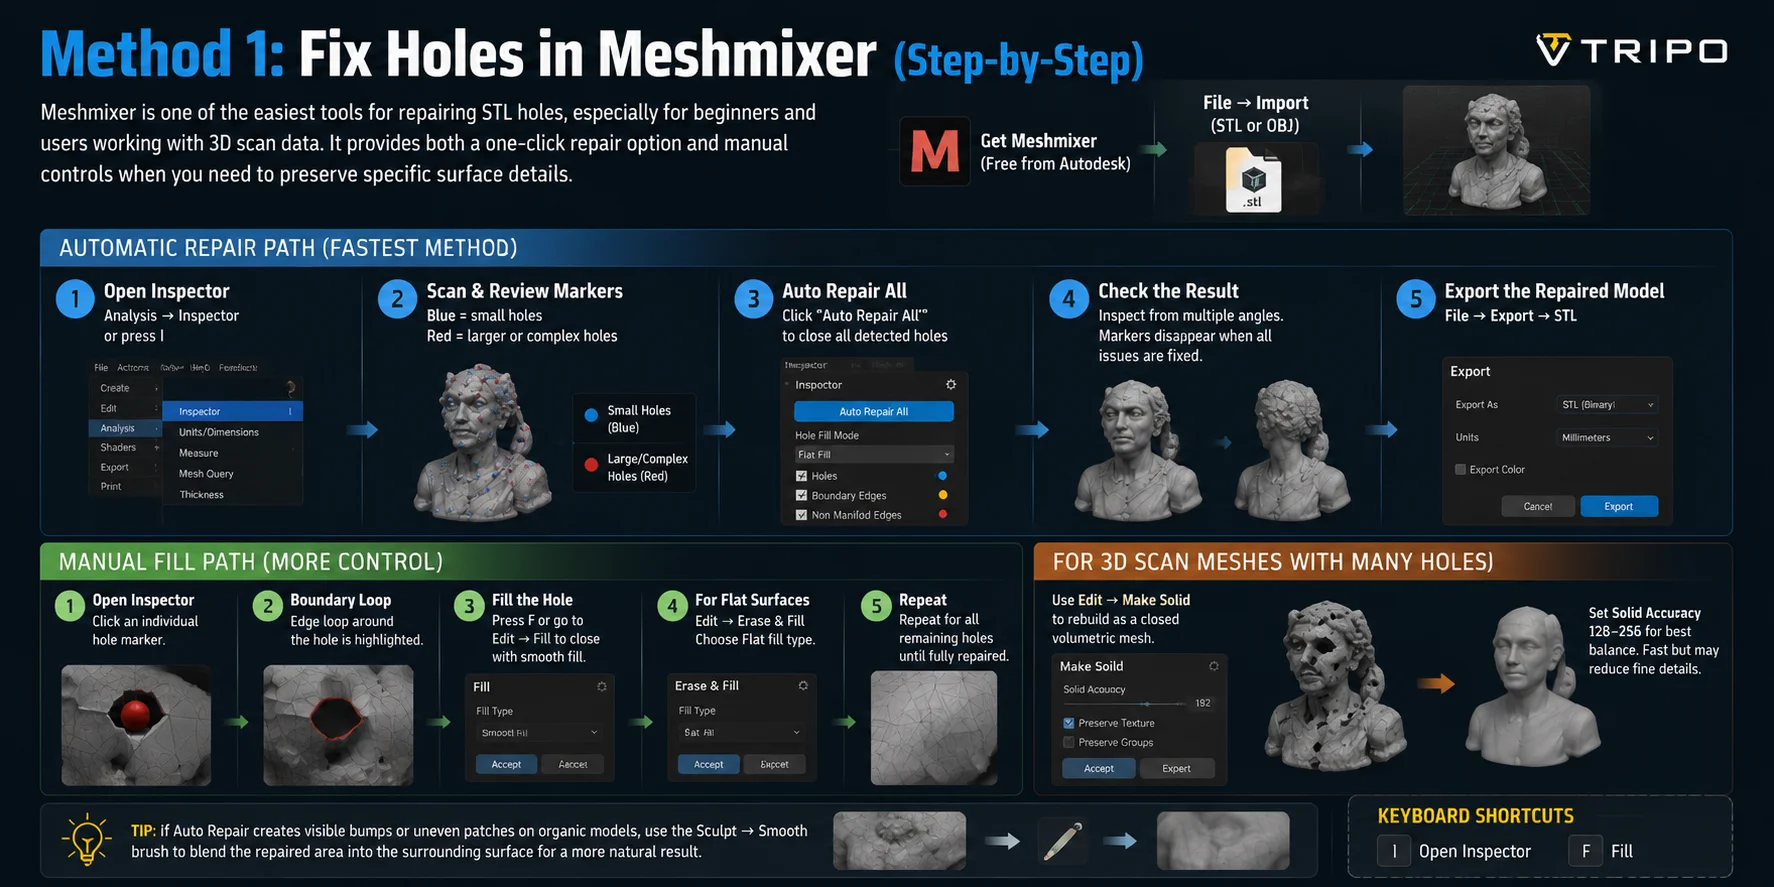
Meshmixer is one of the easiest tools for repairing STL holes, especially for beginners and users working with 3D scan data. It provides both a one-click repair option and manual controls when you need to preserve specific surface details.
Before starting, download Meshmixer for free from Autodesk and open your model. Import your STL or OBJ file by going to File → Import.
Automatic Repair Path (Fastest Method)
- Open the repair tool by selecting Analysis → Inspector or pressing I on your keyboard.
- Meshmixer will scan the model and display colored markers on problem areas. Blue markers usually indicate small holes, while red markers represent larger or more complex issues.
- Click Auto Repair All to automatically close all detected holes.
- Check the repaired model from different angles. When all issues are fixed, the Inspector markers will disappear.
- Export the repaired file through File → Export and choose STL as the output format.
Manual Fill Path (More Control)
- Open Inspector and click on an individual hole marker instead of using Auto Repair All.
- Meshmixer will highlight the boundary edge loop around the hole.
- Press F or select Edit → Fill to close the opening using the default smooth fill option.
- If you need a flatter surface, choose Edit → Erase & Fill and select the Flat fill type.
- Repeat the process for each remaining hole until the mesh is fully repaired.
For 3D Scan Meshes with Many Holes
When repairing scanned models with dozens of gaps, filling each hole manually can be inefficient. A faster approach is using Edit → Make Solid. Set Solid Accuracy between 128–256 to rebuild the object as a closed volumetric mesh. This works well for heavily damaged scans, but it can reduce fine surface details, so only use it when speed matters more than preserving every detail.
Tip: If Auto Repair creates visible bumps or uneven patches on organic models, use the Sculpt → Smooth brush to blend the repaired area into the surrounding surface for a more natural result.
Method 2: Fix Holes in Blender
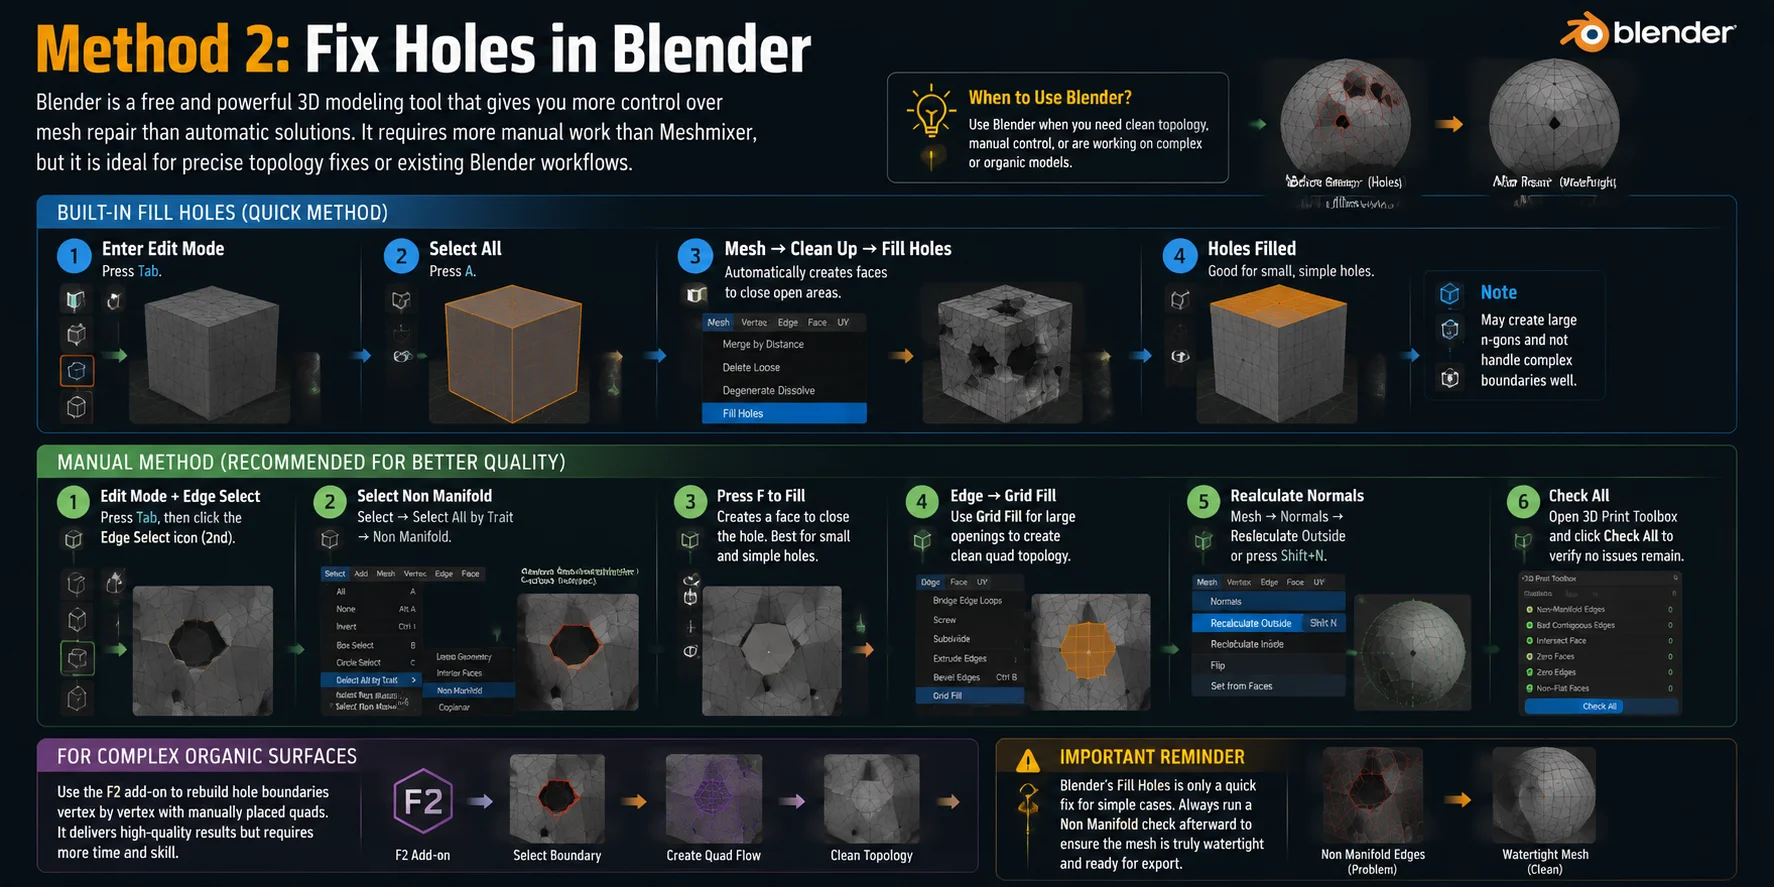
Blender is a free and powerful 3D modeling tool that gives you more control over mesh repair than automatic solutions. While it requires more manual work than Meshmixer, it is a strong choice when you need precise topology fixes or already use Blender in your workflow.
Built-in Fill Holes (Quick Method)
For simple models with small openings, Blender’s automatic repair tool can close holes quickly:
- Enter Edit Mode by pressing Tab.
- Select the entire mesh with A.
- Go to Mesh → Clean Up → Fill Holes.
- Blender will automatically create faces to close open areas.
This method works well for basic repairs, but it may create large n-gons and does not always handle complex hole boundaries cleanly.
Manual Method (Recommended for Better Quality)
For more control and cleaner topology:
- Enter Edit Mode and switch to Edge Select mode.
- Select open boundaries by going to Select → Select All by Trait → Non Manifold. Blender will highlight edges that represent holes or mesh problems.
- Press F to fill the selected boundary with a new face. This works best for small, simple holes.
- For larger openings, use Edge → Grid Fill to create a structured quad patch that follows the surrounding surface more naturally.
- Recalculate face direction by selecting Mesh → Normals → Recalculate Outside or pressing Shift+N. This ensures all normals point outward correctly.
- Open 3D Print Toolbox and select Check All to verify that no non-manifold issues remain.
For complex organic surfaces, advanced users can use the F2 add-on to rebuild hole boundaries vertex by vertex with manually placed quads. This produces high-quality results but requires significantly more time and skill.
Blender’s Fill Holes function is only a starting point, not a complete repair solution. Always run a Non Manifold check afterward to confirm the mesh is truly clean and ready for export.
Method 3: Online Auto-Repair Tools
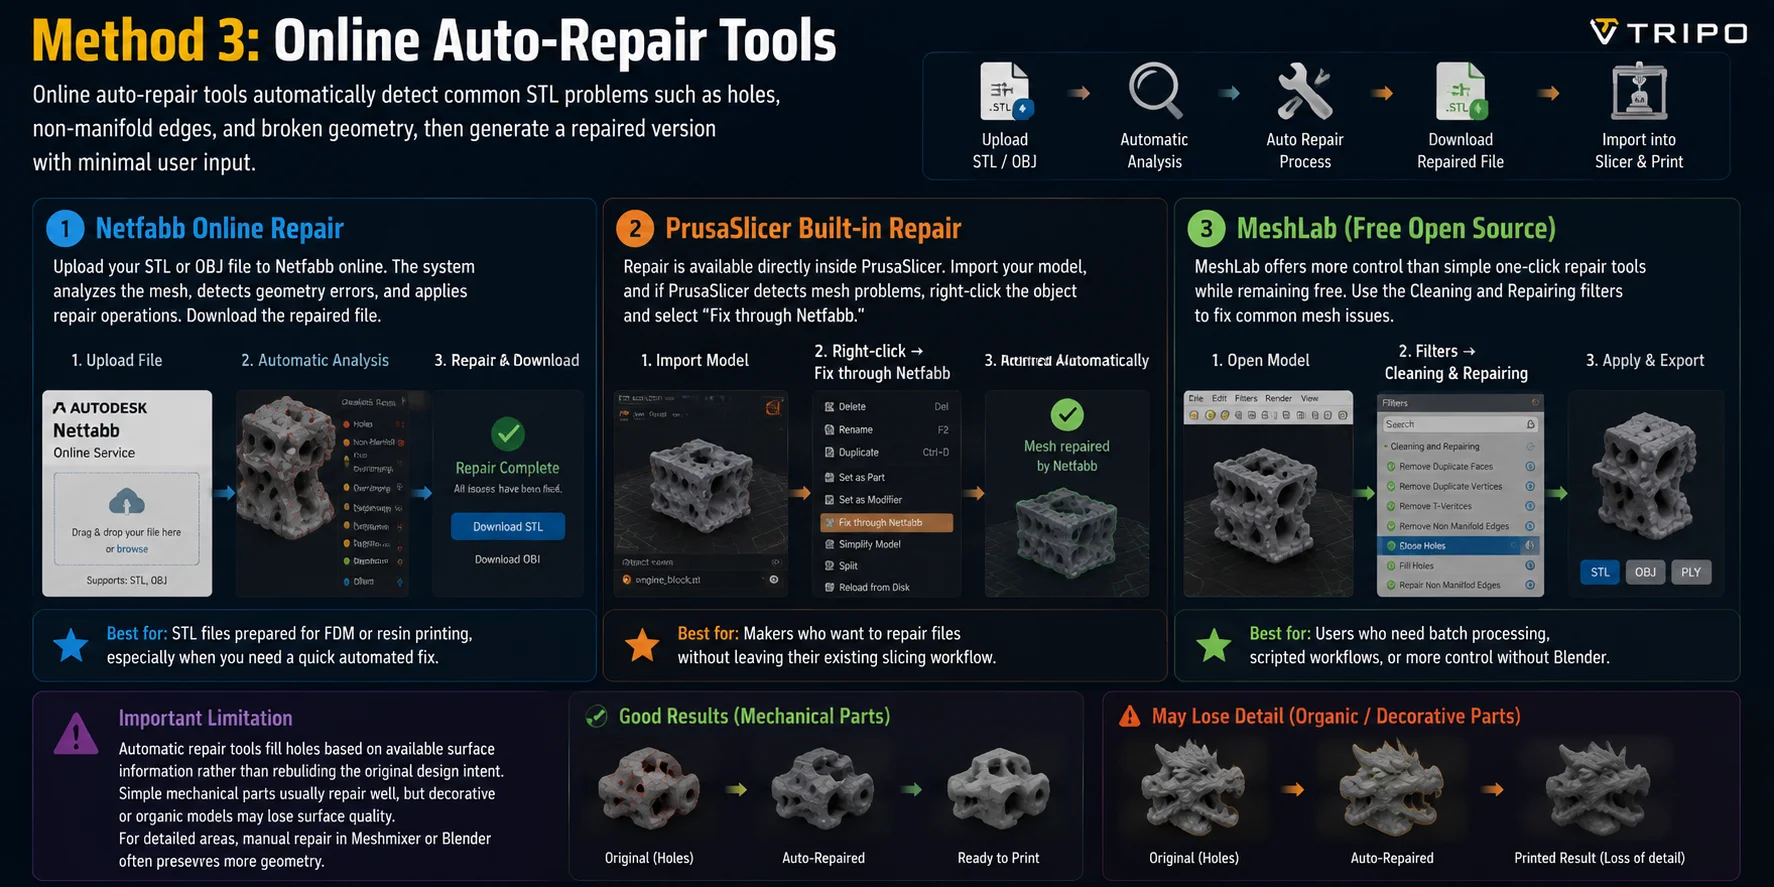
For beginners or anyone who wants a printable file without opening a modeling application, online auto-repair tools provide the fastest workflow. They automatically detect common STL problems such as holes, non-manifold edges, and broken geometry, then generate a repaired version with minimal user input.
Netfabb Online Repair
Netfabb provides a simple browser-based repair workflow. Upload your STL or OBJ file to the Netfabb online service, and the system will automatically analyze the mesh, detect geometry errors, and apply repair operations. After processing, download the repaired file and import it into your slicer.
Best for: STL files prepared for FDM or resin printing, especially when you need a quick automated fix.
PrusaSlicer Built-in Repair
For users already working in PrusaSlicer, repair is available directly inside the slicing workflow. Import your model, and if PrusaSlicer detects mesh problems, right-click the object and select “Fix through Netfabb.” The repair runs automatically in the background and replaces the damaged mesh with a corrected version.
Best for: Makers who want to repair files without leaving their existing slicing workflow.
MeshLab (Free Open Source)
MeshLab offers more control than simple one-click repair tools while remaining free. Open your model and use Filters → Cleaning and Repairing to access options such as Remove Duplicate Faces, Remove T-Vertices, and Close Holes.
Best for: Users who need batch processing, scripted workflows, or more control without moving into Blender.
The main limitation of automatic repair is that it fills holes based on available surface information rather than rebuilding the original design intent. Simple mechanical parts usually repair well, but decorative or organic models may lose surface quality. For detailed areas, manual repair in Meshmixer or Blender often preserves more geometry.
Start with Cleaner Geometry: The Tripo AI Approach
Repair tools are useful, but they are ultimately reactive — they fix geometry problems after they appear. A more efficient approach is to start with cleaner geometry from the beginning. Tripo AI generates 3D models with watertight, manifold-ready topology by default, automatically closing surface boundaries during the generation process so users are less likely to encounter common hole issues found in scans or manually created meshes.

In rare cases, extremely detailed areas may still require minor cleanup, but the same Meshmixer or Blender repair methods can be applied. The advantage is that Tripo AI models typically start from a much cleaner foundation, reducing the amount of manual repair work needed.
Generate your own print-ready 3D models with Tripo AI Studio.

Frequently Asked Questions
How do I fill a hole in a 3D model?
The fastest method is Meshmixer's Inspector tool: open Inspector (Analysis → Inspector), click "Auto Repair All," and export the fixed file. For more control, select the open boundary edge loop in Blender and press F to fill it, then recalculate normals with Shift+N. Online tools like Netfabb handle the repair automatically with no software install required.
How do you fix a broken 3D model?
"Broken" usually means non-manifold geometry — holes, flipped normals, or self-intersecting faces. Start with an auto-repair tool (Netfabb or PrusaSlicer's built-in fix) for a quick pass, then check the result in Meshmixer Inspector or Blender's 3D Print Toolbox to confirm all errors are resolved. For severe damage, rebuilding the problem area manually in Blender gives the best geometric quality.
What causes holes in 3D models?
The four main causes are non-manifold edges from bad Boolean operations, incomplete scan coverage leaving occluded areas unfilled, import/export pipeline artifacts that strip shared vertex data, and accidental face deletion during manual modeling. 3D scan data is especially prone to holes because scanners cannot capture surfaces they cannot see.
Can Meshmixer fix holes automatically?
Yes. Meshmixer's Inspector tool (Analysis → Inspector) detects all holes and boundary errors, and the "Auto Repair All" button fills them in a single click. For most STL files the auto-repair produces a clean, watertight result in under a minute. Complex or large holes may benefit from manual selection and flat-fill for a better surface match.
How do I fix holes in a 3D scan?
For scan data, Meshmixer's Edit → Make Solid is often the most efficient approach when the model has many scattered holes — it converts the mesh to a volumetric solid and closes all boundaries at once. For scans with only a few holes, Inspector's Auto Repair All works well. After repair, use the Smooth brush in Sculpt mode to blend the filled areas into the surrounding surface.
How do I repair a 3D model for printing?
Import the model into PrusaSlicer or Cura — both flag mesh errors automatically. If errors appear, run the model through Netfabb online repair or use Meshmixer's Auto Repair All. Then verify the result in your slicer's layer preview, checking that no layers are missing and the bounding box matches your intended dimensions.
What is a non-manifold edge and why does it matter?
A non-manifold edge is one shared by more or fewer than exactly two faces. Slicers and 3D printers require every edge to be shared by exactly two faces — this is the definition of a closed, solid mesh. Non-manifold edges create ambiguous interior regions that slicers cannot resolve into printable toolpaths.
Can I fix holes in a 3D model without losing detail?
Manual methods in Blender (Grid Fill, F2 add-on) and Meshmixer's smooth fill preserve surrounding detail better than flat auto-fill patches. For organic or highly detailed surfaces, manual vertex-by-vertex fill using Blender's F2 add-on gives the best result. Avoid Meshmixer's Make Solid for detail-sensitive work — it simplifies the entire mesh, not just the hole.
What is the best free tool to fix holes in a 3D model?
For beginners, Netfabb online repair requires no software and handles most cases in under a minute. For scan data or complex meshes, Meshmixer (free from Autodesk) offers the best combination of auto-repair and manual control. Blender (free, open-source) is the best choice if you need precise topology control or are already in that workflow.
How do I check if my 3D model has holes?
In Blender, enable the 3D Print Toolbox add-on and click "Check All" — it highlights non-manifold edges and open boundaries. In Meshmixer, open Inspector (Analysis → Inspector) and colored markers appear at every problem location. Most slicers (PrusaSlicer, Cura) also display a mesh-error warning on import if the model has holes or non-manifold geometry.
Conclusion
Holes in 3D models are one of the most common geometry problems, usually caused by bad topology, scan gaps, or export issues. The repair methods covered in this guide are all free and can fix most files in under 10 minutes. For the fastest solution, use Meshmixer’s Auto Repair All; for precise manual control, use Blender’s Non Manifold selection and editing tools; for a no-install workflow, use Netfabb online repair.
If you start with 3D model generation instead of repairing existing files, Tripo AI provides a cleaner foundation with watertight, manifold-ready geometry by default, reducing the chance of hole problems before printing begins. Generate print-ready 3D models at Tripo AI Studio. Explore full features and available plans at Tripo AI Pricing.