Best Workflow for AI 3D Models: A Step-by-Step Guide

TL;DR
- The best workflow for AI 3D models is not one magic step. It usually follows a clear path: prepare the input, generate the model, inspect the mesh, refine geometry and textures, then export for the target platform.
- Text-to-3D works well when you need fast ideation from a written concept. Image-to-3D is better when you already have a product photo, sketch, character design, or AI-generated reference image.
- Tripo AI is useful at the generation stage because it supports text-to-3D, image-to-3D, multi-view generation, Smart Low-Poly v2, HD Model, texture generation, retopology, rigging, animation, and multi-format export in one workspace.
- Blender, Maya, Unity, Unreal Engine, and other downstream tools still matter. The goal is to choose the right tool for each stage instead of forcing one tool to solve every production problem.
- A smooth AI 3D workflow comes from matching the model to the final use case: game asset, product visualization, 3D printing, animation, AR, Web3D, or concept validation.
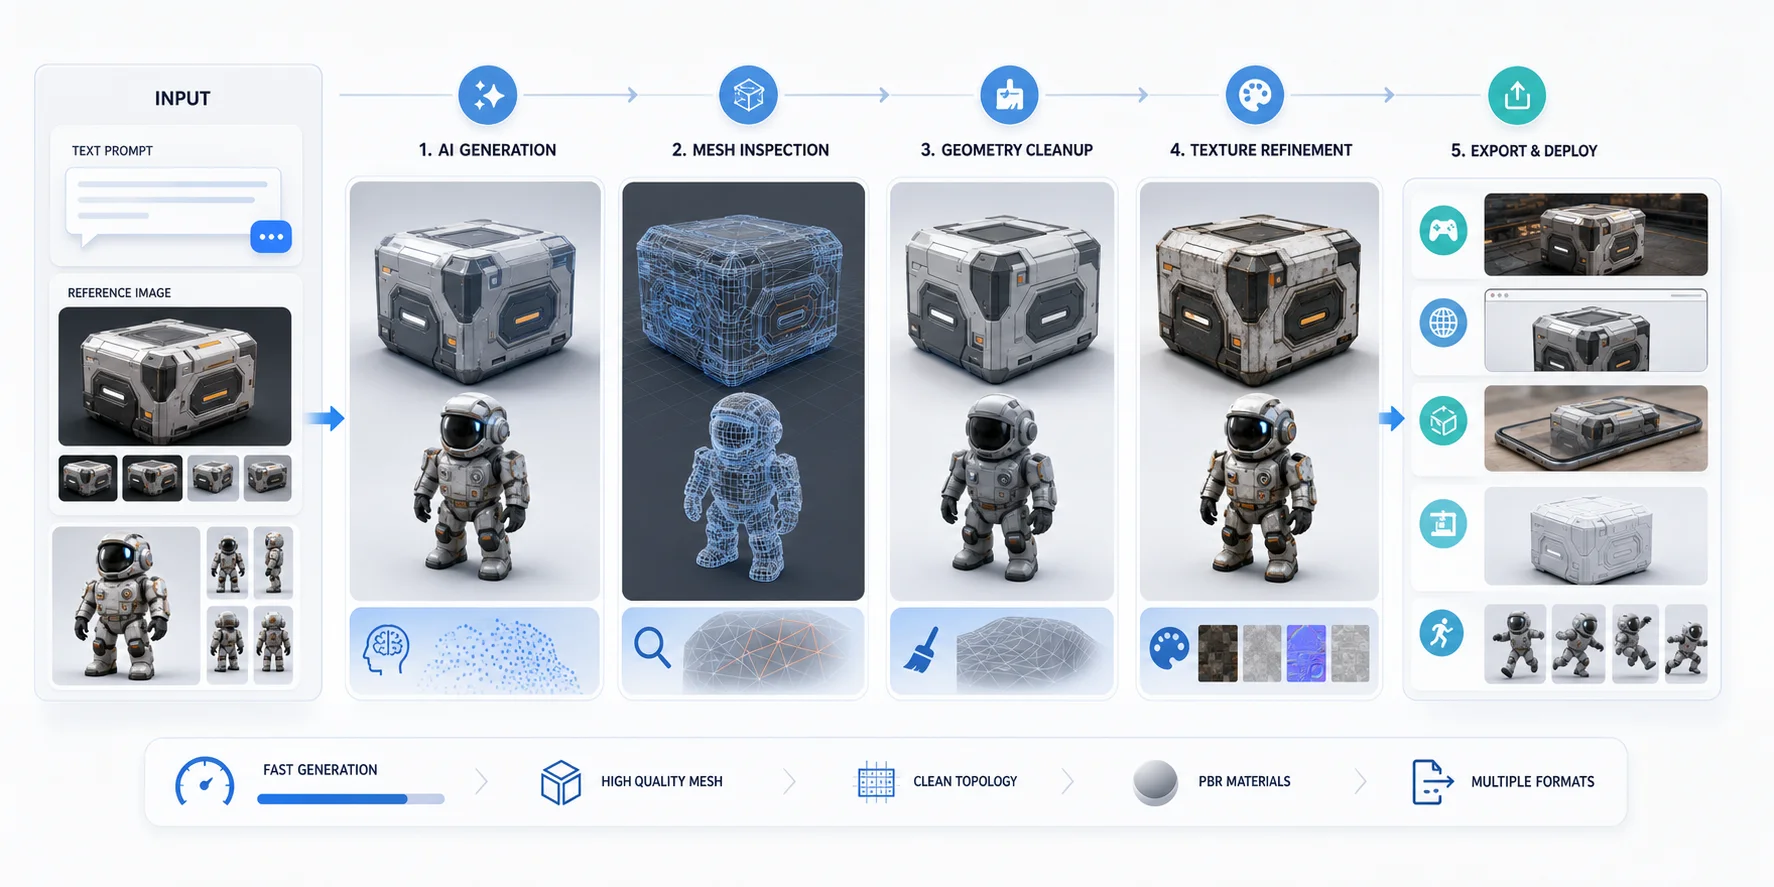
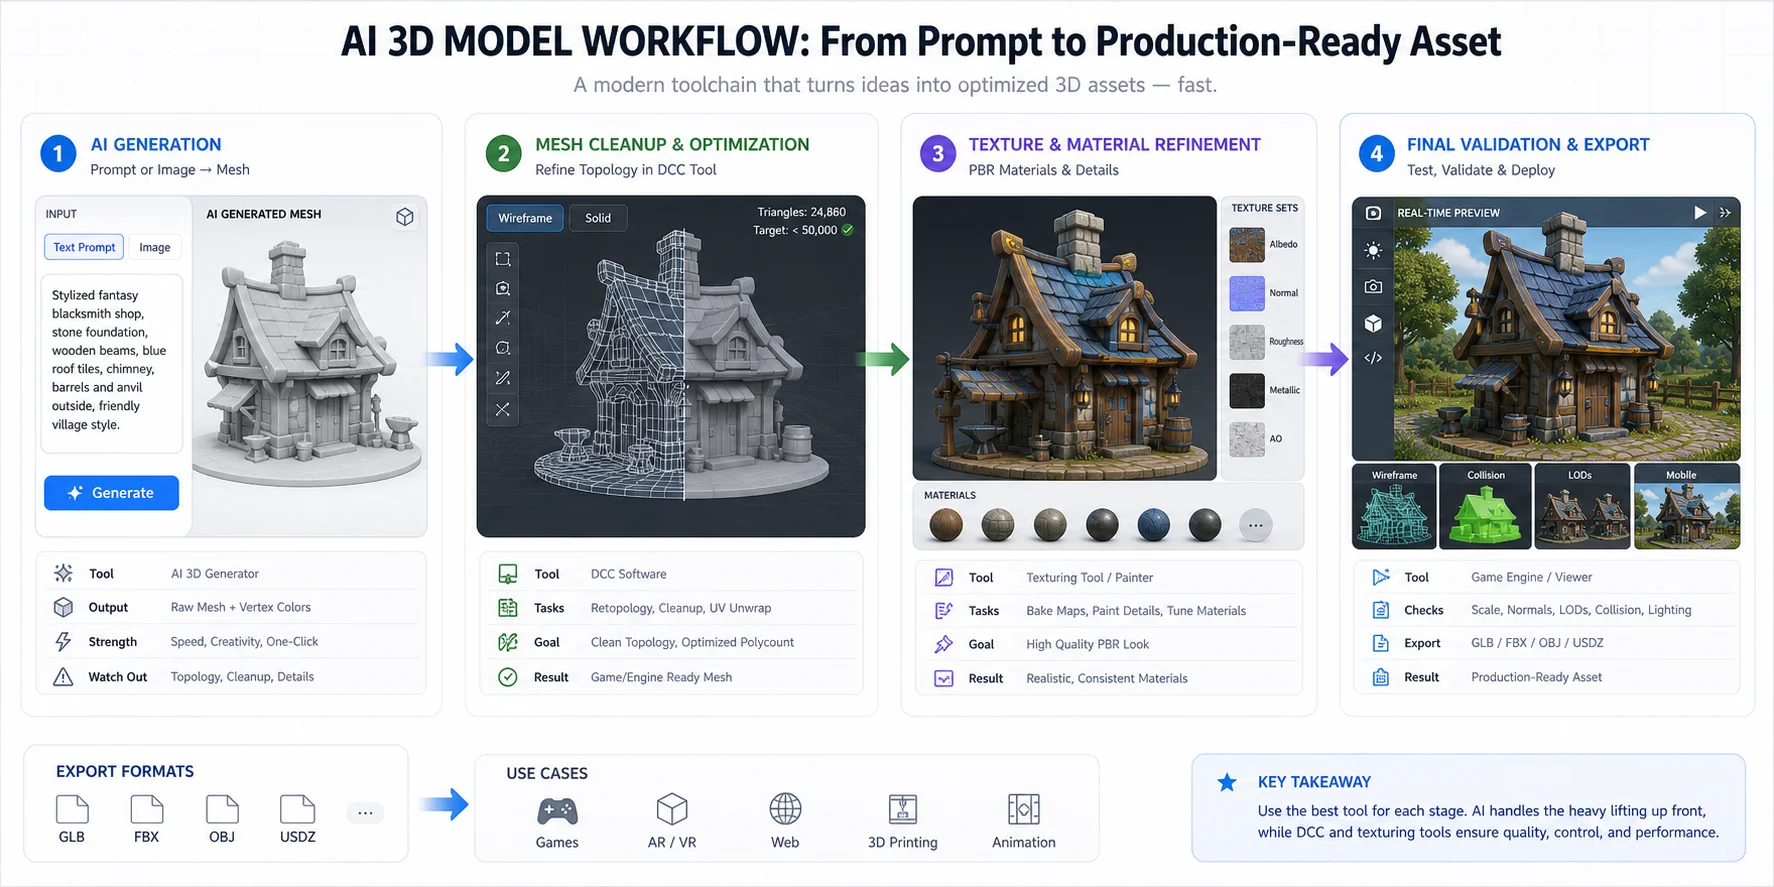
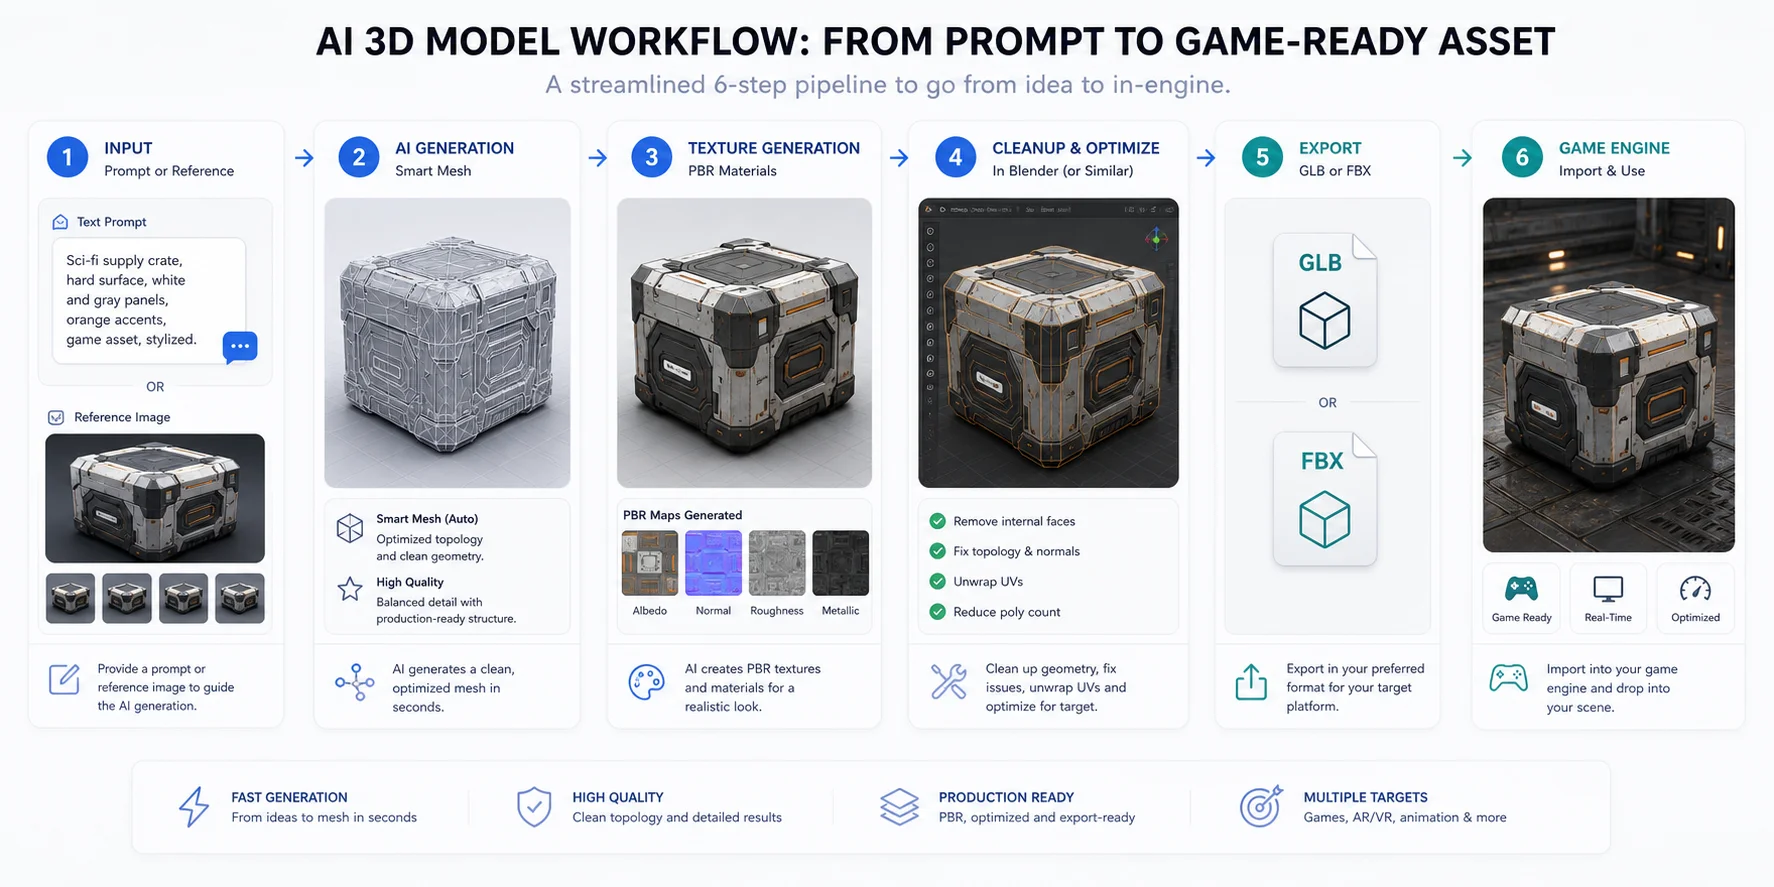
The best workflow for AI 3D models starts with a clear input, uses an AI 3D model generator to create the first mesh, then refines the result based on the final use case before export. A practical workflow looks like this: input preparation -> AI generation -> mesh inspection -> cleanup and optimization -> texture or material work -> export.
This matters because AI 3D generation is fast, but speed alone does not make an asset production-ready. A model for a mobile game, a product render, a 3D print, and an animated character may all begin from the same prompt or image, but they need different polygon counts, texture settings, topology choices, and file formats.
In this guide, we will walk through a practical AI 3D model workflow, compare tools for different stages, and show where Tripo AI can help reduce the amount of manual setup between idea and usable 3D asset.
What Does an AI 3D Model Workflow Actually Look Like?
An AI 3D model workflow is the process of turning a text description or visual reference into a usable 3D asset. The exact steps depend on the project, but most workflows include four core stages.
Stage 1: Input preparation
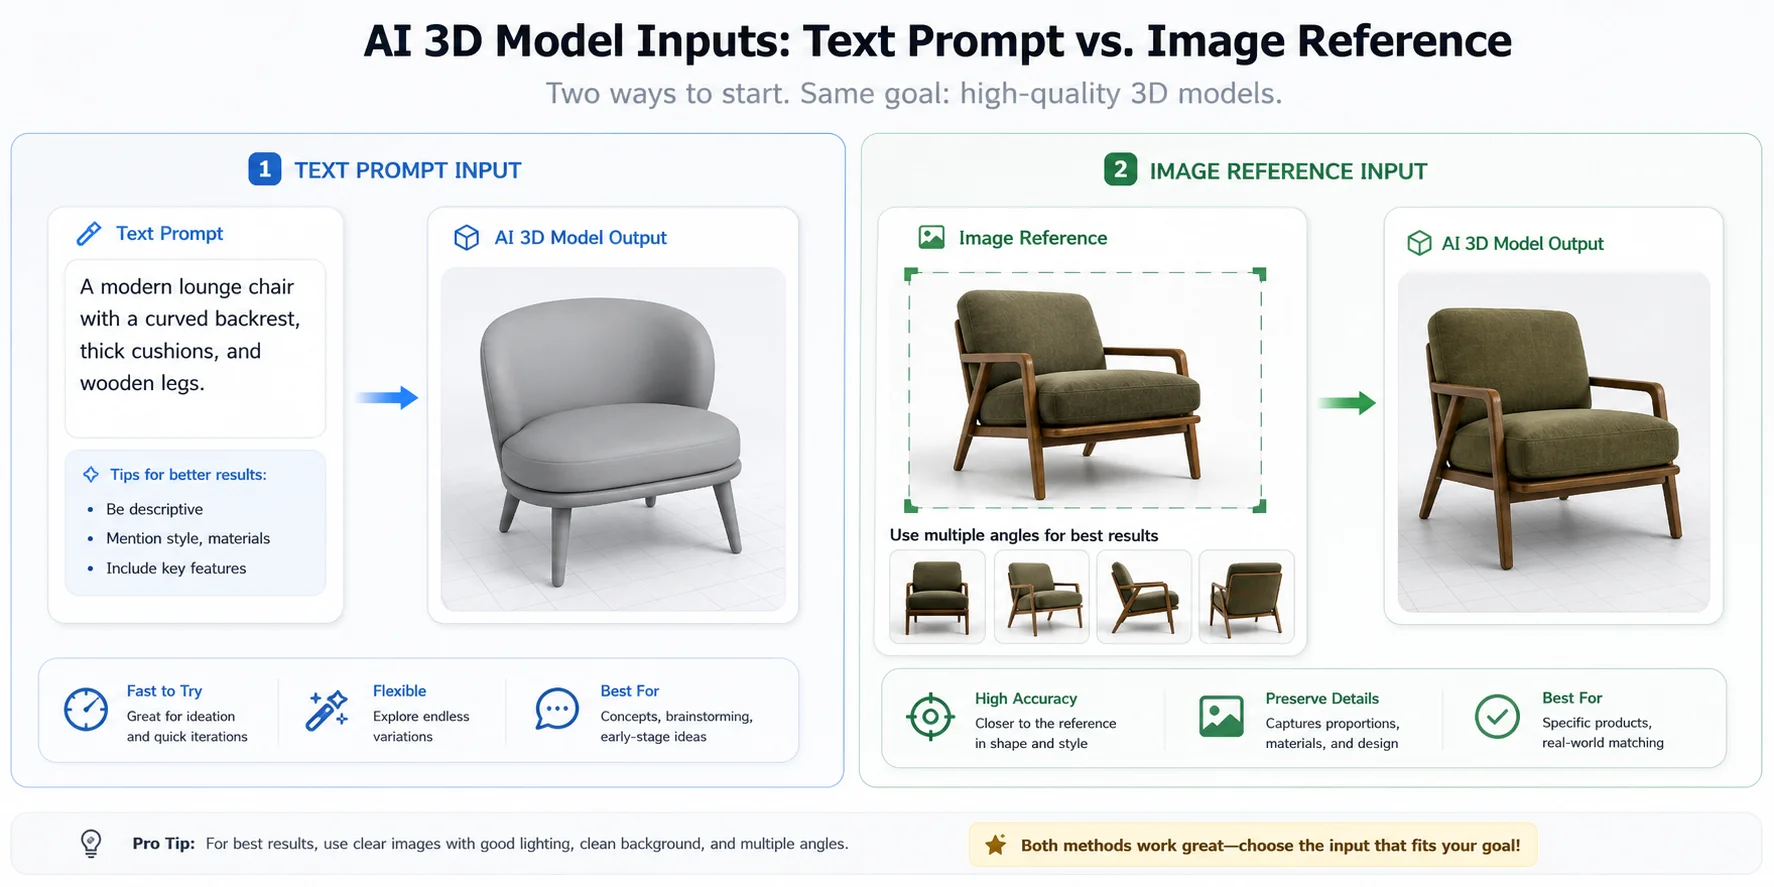
Your input gives the AI system its starting point. For text-to-3D, the input is a prompt that describes the object, shape, style, materials, and intended use. For image-to-3D, the input is a reference image such as a product photo, concept sketch, generated illustration, or character design.
For image inputs, use a clean image with a clear subject, strong silhouette, simple background, and minimal occlusion. A front-facing product photo on a plain background usually gives the AI model a better signal than a busy lifestyle image with multiple objects. If the background is distracting, remove it before generation. If the subject is too small or blurry, crop or upscale it first.
For text prompts, be specific about the object and the production goal. "A low-poly wooden treasure chest for a mobile fantasy game" is more useful than "a treasure chest" because it tells the generator what kind of geometry and style you need.
Stage 2: AI generation
The generation stage turns the prompt or image into a mesh with texture information. This is where tools such as Tripo AI, Meshy, Rodin, and other AI 3D generators are most useful.
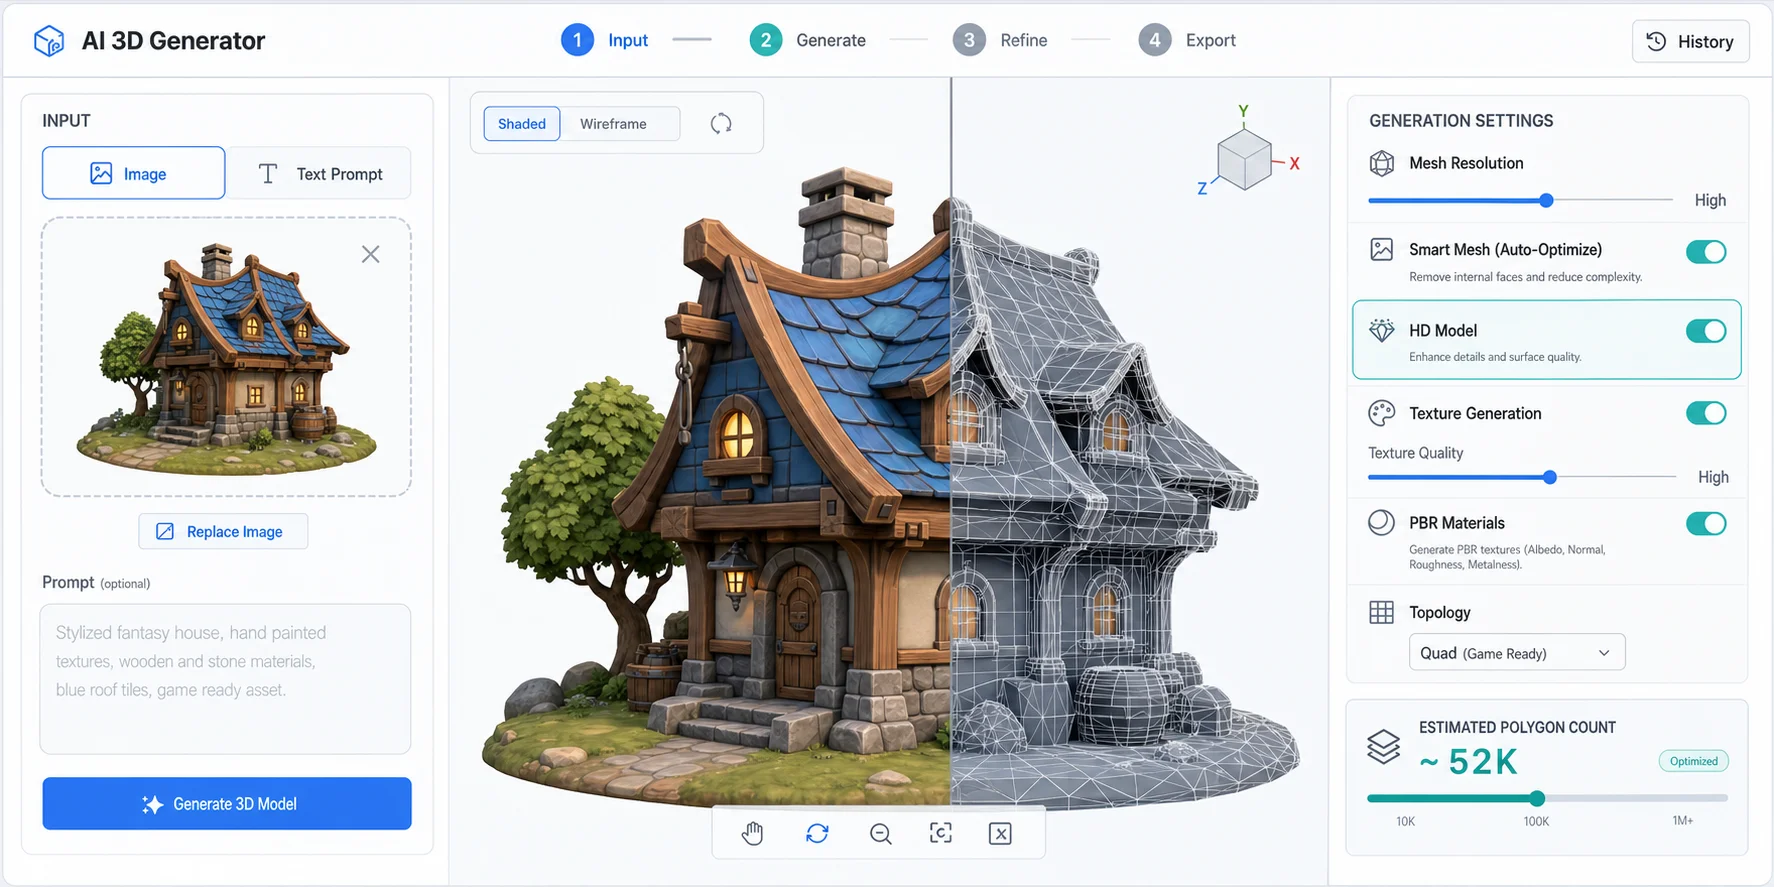
In Tripo AI, users can generate 3D models from text prompts, single images, or multiple reference views. For quick concept testing, Smart Low-Poly v2 can help create lightweight models fast. For higher visual detail, HD Model is better suited to product visualization, character concepts, and presentation assets.
At this stage, the goal is not only to get a nice preview. You also need to judge whether the generated model can survive the next stage of the pipeline.
Stage 3: Mesh cleanup and optimization
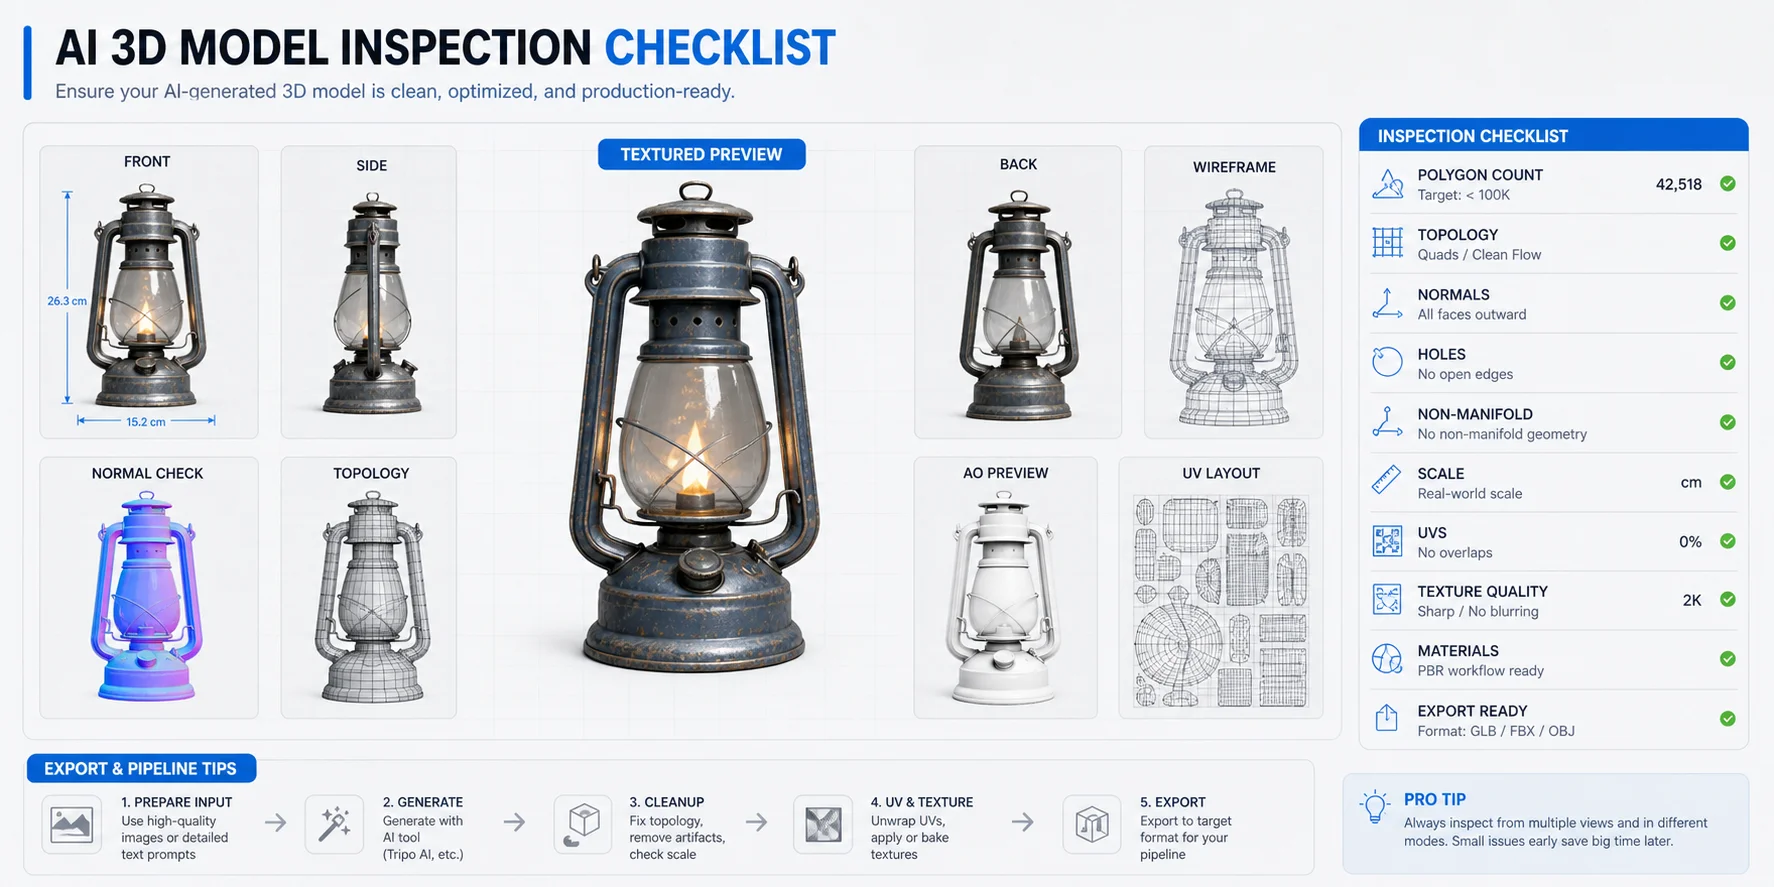
AI-generated models may need mesh cleanup before they are used in production. Common checks include polygon count, topology type, surface noise, holes, overlapping parts, normals, and scale.
For games, AR, Web3D, and mobile experiences, polygon count matters because heavy geometry can hurt performance. A lower-poly mesh with clean topology is often more useful than a visually dense mesh that is hard to animate or load in real time. For high-end rendering or 3D printing, you may accept more detail, but you still need to inspect the mesh carefully.
In Tripo Studio, retopology settings can help users choose triangle or quad topology and adjust polygon count. For more advanced cleanup, Blender remains useful for modifiers such as Decimate, manual retopology, normal correction, UV checks, and final inspection.
Stage 4: Export to the target format
Export is not an afterthought. A model that looks good in a browser preview can still fail if the format does not match the next tool.
Use GLB for many web, AR, and real-time preview workflows. Use FBX when you need compatibility with game engines and animation software. Use OBJ for broad editing compatibility. Use STL or 3MF for 3D printing workflows. Use USD when your pipeline needs Universal Scene Description.
The current Tripo Studio export panel lists USD, FBX, OBJ, STL, GLB, and 3MF as direct export options. Tripo's API conversion documentation also describes conversion from generated GLB models into formats such as GLTF, USDZ, FBX, OBJ, STL, and 3MF, with some limitations for rigged models and geometry-only formats. In practice, treat USDZ as an API or downstream conversion format unless it appears in your current Studio export panel.
Choosing the Right Tool for Each Stage
The best AI 3D model workflow usually combines tools instead of expecting one platform to do everything perfectly. The generation tool helps you move fast. A DCC tool such as Blender helps you inspect and refine. A game engine or renderer helps you validate the final asset in context.
| Tool | Best for | Output formats or downstream fit | Speed / workflow notes |
|---|---|---|---|
| Tripo AI | Text-to-3D, image-to-3D, High-Precision Model, Smart Mesh, texture/PBR workflows, retopology, rigging, animation, and export | Current Tripo Studio export panel lists USD, FBX, OBJ, STL, GLB, and 3MF; Tripo's API conversion docs include GLTF, USDZ, FBX, OBJ, STL, and 3MF options | Useful when you want generation and post-processing controls in one workspace |
| Meshy | Text-to-3D, image-to-3D, AI texturing, and quick asset drafts | Meshy's export-format docs list GLB, FBX, OBJ, STL, USDZ, and 3MF among major export formats; Meshy help docs also mention .blend for continued Blender editing | Useful for fast drafts; plan limits and download rights should be checked before production use |
| Hyper3D Rodin | Text/image-to-3D generation with refinement controls, multi-image workflows, low-poly and higher-detail options depending on plan | Hyper3D/Rodin product and API pages describe exports such as GLB/GLTF, FBX, OBJ, STL, and USDZ, with API availability depending on workflow and plan | Useful when the project prioritizes controllable generation and detailed visual output |
| Blender | Mesh cleanup, decimation, retopology, UVs, normals, material fixes, rig checks, and final inspection | Blender is commonly used as the DCC cleanup stage before re-exporting to formats such as GLB/glTF, FBX, OBJ, STL, and USD | Manual work, but gives the most control over cleanup and inspection |
| Unity / Unreal Engine | Real-time validation, lighting, material setup, animation tests, collision checks, and performance review | Unity documentation recommends FBX where possible for production model import; Unreal's FBX pipeline supports static meshes, skeletal meshes, animations, morph targets, materials, and textures | Best used as the final validation stage for game or real-time assets |
The key point is simple: use AI for fast creation, use cleanup tools for reliability, and use the target platform to test whether the asset actually works.
Step-by-Step: Building Your AI 3D Workflow
Step 1 - Prepare your input
Start by deciding whether text-to-3D or image-to-3D is the better starting point.
Use text-to-3D when you have a concept but no image yet. This is useful for early ideation, props, stylized objects, simple characters, or design exploration. A good prompt should include the subject, style, materials, viewpoint, level of detail, and intended use.
Example prompt:
"A low-poly sci-fi supply crate for a mobile game, hard-surface design, clean silhouette, metallic panels, orange warning labels, optimized for real-time rendering."
Use image-to-3D when you already have a visual reference. This can be a product photo, AI-generated character image, sketch, or concept art. Before uploading, crop the image around the object, remove background distractions, and avoid references where important parts are hidden.
If the model needs more accurate structure, use multiple views when available. Front, side, and back references can give the generator more information than a single image.
Step 2 - Generate with Tripo AI
Open Tripo and choose the generation mode that matches your input: text, image, or multi-view. Upload the reference or enter the prompt, then choose settings based on the goal.
For fast drafts, low-poly assets, Web3D, AR, and game prototypes, Smart Low-Poly v2 is a good starting point because it is designed for lighter, cleaner topology. For high-detail product visuals, character concepts, or 3D printing exploration, HD Model can preserve more visual detail.
If you need textures, keep texture generation enabled. If you only need a white model for later sculpting, retopology, or printing preparation, you may prefer to generate geometry first and handle materials later.
After generation, rotate the model and inspect it from all angles. Check the front, side, back, underside, and any thin details. A model may look convincing from the original camera view while still needing changes elsewhere.
Step 3 - Download and import to Blender
Once you have a useful draft, export it in a format that matches your next step. GLB is often convenient for moving textured assets into Blender or web workflows. FBX is common for game and animation pipelines. OBJ is useful for broad compatibility.
Import the model into Blender and check the basics:
- Is the scale reasonable?
- Are the textures linked correctly?
- Are normals facing the right direction?
- Are there holes, floating fragments, or strange intersections?
- Is the polygon count appropriate for the target use?
- Does the asset still read clearly without the original reference image?
If textures appear missing after import, check whether the chosen format embeds textures or expects external texture files. GLB is often easier for simple transfer because it can package geometry and textures together.
Step 4 - Clean up geometry
For production use, the mesh usually needs at least a quick cleanup pass.
For game assets, set a target polygon count early. A small prop for a mobile scene may need a much lighter mesh than a hero asset for a cinematic render. Use Blender's Decimate modifier when the model is too heavy, but inspect the result afterward because aggressive reduction can damage silhouettes or create shading artifacts.
For editable animation workflows, quad topology may be easier to work with than triangle-heavy geometry. Tripo Studio provides topology options, and Blender can help with deeper retopology when you need manual control.
For 3D printing, check whether the model is watertight, solid, and scaled correctly. Thin details may look good on screen but break during printing. In that case, simplify fragile parts or prepare a separate print-focused version.
Step 5 - Re-export for your use case
The final export should match the destination.
For game engines, export GLB or FBX depending on your pipeline, then test the asset in Unity or Unreal Engine with real lighting and materials. For web and AR previews, GLB is often a strong choice because it is compact and widely supported. For 3D printing, export STL or 3MF after checking the mesh. For general editing, OBJ can work well when you need compatibility across many tools.
If the asset includes rigging or animation, confirm that skeleton and animation data are included in the export settings. In Tripo Studio, export settings can include options such as skeleton data, animation count, and pivot placement. A bottom-center pivot is useful when the model needs to stand on a floor or be placed precisely in an engine.
Where Tripo AI Closes the Gap
Many AI 3D workflows become frustrating because each stage lives in a different tool. A creator may generate a model in one platform, clean it in another, retexture it somewhere else, then convert the file before it can be tested.
Tripo AI helps close that gap by covering more of the pipeline in one workspace.
Pain point 1: Generation speed
Some workflows take several minutes or require multiple setup steps before the first useful result appears. Tripo is designed for fast generation from text, image, or multi-view inputs, which helps creators test more ideas before spending time on manual cleanup.
This is especially useful for early production decisions. If you are building a set of game props, product mockups, or character concepts, you can generate several directions quickly, then choose the strongest candidate for refinement.
Pain point 2: Mesh quality and topology control
A beautiful preview is not enough if the mesh is too heavy, messy, or hard to use. Tripo Studio includes generation and retopology controls such as High-Precision Model, Smart Mesh, Quad Face, Triangle, Smart Low-Poly v2, and polygon-count control. These settings help users generate or refine a model that is closer to the final target before moving into deeper cleanup.
For game and real-time workflows, Smart Mesh, Smart Low-Poly v2, and polygon-count controls help when the priority is a cleaner, lighter asset. For product visualization or high-detail concepts, High-Precision Model and higher texture-resolution settings can provide a better starting point for visual quality.
Pain point 3: Format and workflow support
Format mismatch is a common source of wasted time. A model may need GLB for web, FBX for a game engine, OBJ for editing, STL or 3MF for printing, or USD for a more specialized pipeline.
Tripo supports several common export formats, reducing the need for extra conversion steps. It also supports downstream workflow needs such as retopology, texture generation, PBR material generation, rigging, animation, preview settings, sharing, and export controls.
Common Mistakes in AI 3D Workflows and How to Fix Them
Mistake 1: Using a cluttered or low-resolution reference image
A weak input often creates a weak model. If the subject is small, blurred, hidden, or mixed into the background, the generator has less useful information.
Fix it by using a clear image with a single main subject, high contrast, a clean background, and enough resolution for the object to be understood. Crop the subject and remove visual noise before uploading when needed.
Mistake 2: Skipping mesh optimization
AI-generated models can be visually impressive but too heavy for real-time use. This is a problem for games, AR, VR, Web3D, and mobile projects.
Fix it by setting a target polygon count, using Smart Low-Poly v2 or retopology controls, and checking the result in Blender or the target engine. A model should be judged in its final context, not only in the generation preview.
Mistake 3: Exporting in the wrong format
Choosing the wrong format can break textures, lose animation data, or create unnecessary conversion work.
Fix it by choosing the format based on the destination. Use GLB for web-friendly textured assets, FBX for many game and animation pipelines, OBJ for broad editing compatibility, STL or 3MF for 3D printing, and USD when your workflow requires it.
Mistake 4: Treating the first result as final
AI 3D tools are strongest when they speed up iteration. They should not remove the review step.
Fix it by rotating the model, checking silhouettes, testing materials, verifying scale, and importing the asset into the tool where it will actually be used. If the model is for a game, put it in the game engine. If it is for product visualization, test lighting and materials. If it is for printing, inspect wall thickness and small details.
Frequently Asked Questions
What is the best free AI 3D model generator?
The best free AI 3D model generator depends on your asset type, output needs, and current plan limits. Tripo AI can be used as a starting point for text-to-3D and image-to-3D tests, while other tools may fit different workflows. Check each product's current plan and export limits before choosing a tool.
What is the best AI 3D model workflow on Reddit?
A practical AI 3D workflow is to generate a first model, inspect and clean the mesh in Blender, then export it for the target platform. This approach treats AI generation as the beginning of the pipeline rather than the entire production process.
How does Tripo AI compare to Rodin AI?
Tripo AI and Rodin AI both support AI-based 3D model generation, but their current workflows, input options, output formats, and plan limits should be compared using the latest official product pages. Choose between them based on the asset type and downstream tools you need.
What is the optimal process for using AI to create 3D models?
The optimal process is to define the use case first, prepare a strong text or image input, generate the model, inspect the mesh, optimize geometry, refine textures, and export in the correct format. The final asset should be tested in the target tool, such as Blender, Unity, Unreal Engine, a web viewer, or a 3D printing slicer.
How do you integrate AI into a 3D modeling pipeline?
Use AI at the stage where it saves the most time: concept generation, image-to-3D conversion, base mesh creation, or texture generation. Keep DCC tools such as Blender in the pipeline for cleanup, scale checks, UVs, normals, and final validation.
What are the best AI 3D model generators for beginners?
Beginner-friendly AI 3D model generators should make it easy to start from a text prompt or image and export a usable file. Tripo AI is a strong option for beginners because it supports a guided workflow from generation to export, while also offering more advanced controls as users need better topology, textures, rigging, or animation.
Can AI generate 3D models from text descriptions?
Yes. Text-to-3D tools can generate 3D models from written prompts. The best results usually come from prompts that describe the object, style, material, level of detail, and final use case instead of only naming the object.
Text-to-3D vs image-to-3D: which workflow is better?
Text-to-3D is better when you want to explore ideas quickly without a reference image. Image-to-3D is better when you already have a product photo, sketch, concept art, or AI-generated image that should guide the model's shape and appearance.
What are good free AI 3D model generation tools and workflows for hobbyists?
Hobbyists can start with a free or trial AI 3D generator, create a model from text or image, then use Blender for cleanup and format conversion. A simple hobby workflow is: prepare a clean image, generate the model in Tripo AI, inspect it in the browser, export GLB or OBJ, clean it in Blender, then re-export for a game, web viewer, or 3D print.
Conclusion
The best workflow for AI 3D models is a staged process: prepare the input, generate the model, inspect the mesh, refine geometry and textures, then export for the final destination. AI makes the first draft much faster, but production-ready assets still need clear use-case decisions and quality checks.
Tripo AI fits well into this workflow because it supports multiple creation paths, including text-to-3D, image-to-3D, multi-view generation, Smart Low-Poly v2, HD Model, texture generation, retopology, rigging, animation, and export. Instead of treating AI generation as a shortcut around the pipeline, use it as a faster starting point for a better pipeline.
If you want to build AI 3D models faster, start with a clear prompt or image, generate a draft in Tripo AI, then refine and export the asset based on where it will actually be used.