3D Animation: What It Is, How It Works, and How to Get Started in 2026
TL;DR:
- 3D animation uses digital models to create movement in a three-dimensional space.
- Keyframes, interpolation, and transforms are the core concepts behind 3D motion.
- The 3D animation pipeline includes modeling, rigging, animation, lighting, rendering, and post-processing.
- Popular types include character animation, motion capture, procedural animation, simulations, and visualization.
- Beginners can start by creating a model, adding a rig, setting keyframes, and rendering an animation.
3D animation is the process of creating movement with digital 3D models in a three-dimensional space. It is widely used in movies, video games, advertising, and architectural visualization to bring characters, objects, and environments to life.
In this guide, we’ll explain how 3D animation works, explore the main production stages, introduce popular 3D animation software, and show how beginners can get started in 2026.
Introduction
What Is 3D Animation? (Definition & Core Concepts)
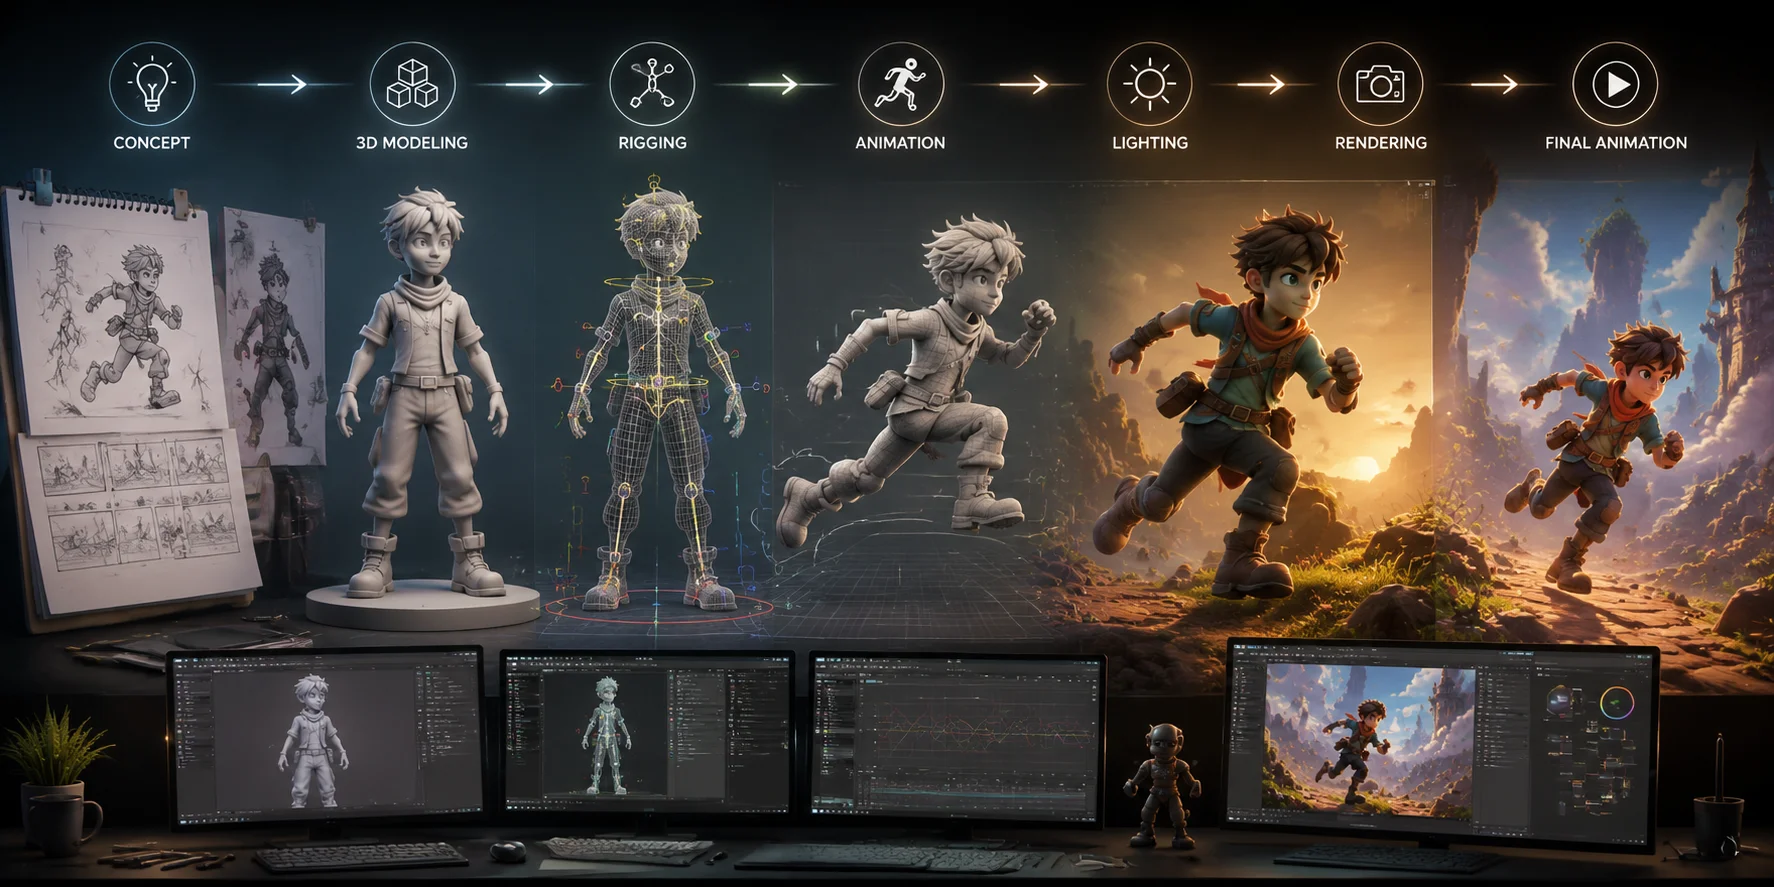
3D animation is the technique of making digital objects move inside a three-dimensional space. A 3D model exists with width, height, and depth, meaning it can be viewed and animated from any angle. Animators control how these models move over time by changing their position, rotation, shape, and interaction with the environment.
The main difference between 3D animation and 2D animation is the way movement is created.
In 2D animation, artists work with flat images placed on a two-dimensional plane. Each drawing represents a visual frame, and movement is created by changing those drawings over time.
In 3D animation, artists create a digital object first, then control its movement using virtual cameras, skeleton systems, and animation data. The computer can calculate smooth transitions between different poses, making complex movements much faster to produce.
A simple way to understand 3D animation is to compare it with stop-motion animation. Traditional stop-motion artists move a physical object slightly, take a photo, move it again, and repeat the process hundreds of times. 3D animation follows a similar idea, but the computer handles the movement calculations inside a digital environment.
Instead of manually moving an object for every frame, animators define important moments and let the software generate the motion between them.
3D Space Animation Explained
Keyframes: Defining Start and End Positions
Keyframes are the foundation of almost all 3D animation.
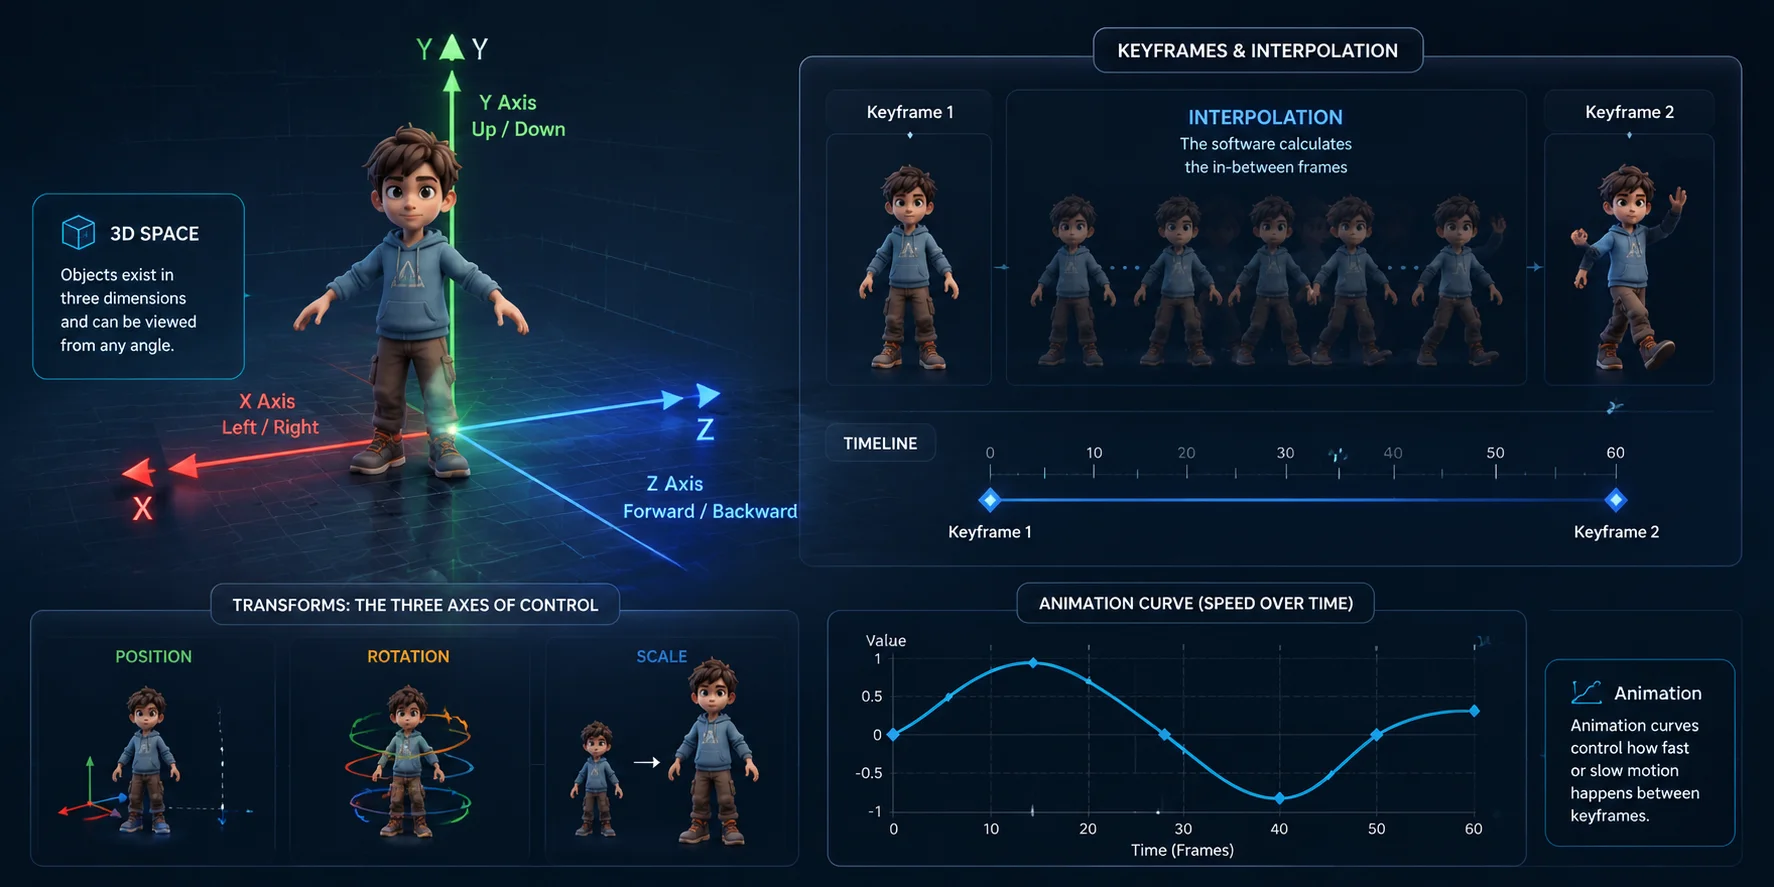
A keyframe is a specific point in time where an animator defines the exact state of an object or character. This can include its position, rotation, scale, facial expression, or body pose.
For example, imagine animating a character waving:
- Frame 1: The character's arm is down.
- Frame 15: The arm moves upward.
- Frame 30: The character's hand completes the wave.
These important poses are keyframes. They work like important snapshots that tell the animation software where the object should be at specific moments.
The animator does not need to manually create every single frame between these points. Instead, the software calculates the movement automatically.
This is one of the biggest advantages of 3D animation compared with traditional frame-by-frame animation.
Interpolation: How Software Creates Movement Between Keyframes
Interpolation is the process where animation software fills in the movement between keyframes.
For example, if a ball is placed at the left side of the screen at frame 1 and the right side at frame 60, the software automatically calculates the frames in between to create smooth movement.
Without interpolation, animators would need to manually position the object in every frame. Modern 3D animation software can generate thousands of intermediate frames instantly, allowing artists to focus on timing, creativity, and performance.
However, interpolation is not only about moving from point A to point B. Animators can adjust animation curves to control acceleration, speed, and emotion.
A character slowly lifting an arm and suddenly throwing a punch use different interpolation curves. The movement path may be identical, but the feeling is completely different.
This is why professional animators spend significant time adjusting curves and timing rather than only creating keyframes.
Transforms: Position, Rotation, and Scale — The Three Axes of Control
Every object in a 3D scene is controlled through three basic transformations:
Position
Position determines where an object exists in the 3D world.
Unlike 2D animation, where objects usually move horizontally or vertically, 3D animation uses three axes:
- X-axis: left and right movement
- Y-axis: up and down movement
- Z-axis: forward and backward movement
For example, moving a character forward while walking requires changing its position along the Z-axis.
Rotation
Rotation controls how an object turns around its own axis.
Animators use rotation to create movements such as:
- Turning a character's head
- Opening a door
- Rotating a vehicle wheel
- Changing a camera angle
Scale
Scale controls the size of an object.
Although scaling is less commonly used for realistic character animation, it is important for effects such as:
- Growing or shrinking objects
- Cartoon-style squash and stretch
- Creating visual effects
Together, position, rotation, and scale provide the basic controls for animating almost everything inside a 3D scene.
How Does 3D Animation Work? The Full Pipeline
Full Animation Pipeline
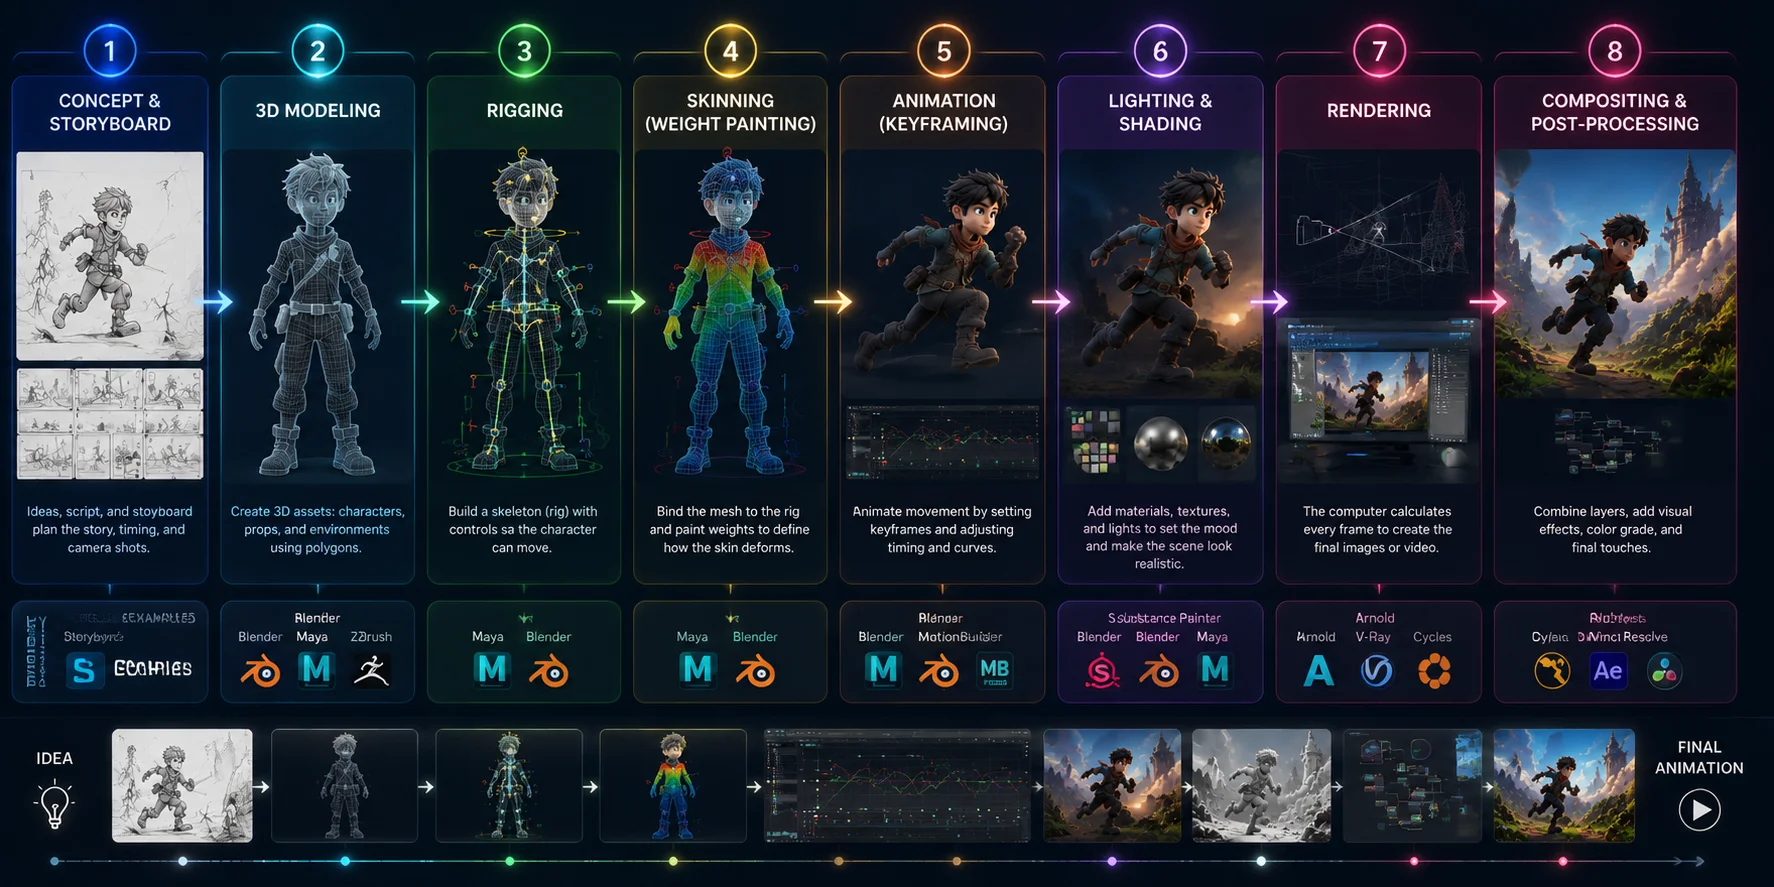
Creating a finished 3D animation requires several connected stages. Professional studios divide production into specialized departments, while smaller creators often handle multiple steps themselves.
The complete workflow usually follows this path:
Concept → Modeling → Rigging → Skinning → Animation → Lighting → Rendering → Post-Production
Each stage builds on the previous one. A strong animation depends not only on good movement but also on a clean model, proper rigging, realistic materials, and efficient rendering.
Stage 1 — Concept & Storyboard
Every 3D animation begins with an idea.
Before creating any digital model, artists define the story, characters, environment, and movement goals. This stage usually includes scripts, concept art, and storyboards.
A storyboard works like a visual blueprint. It shows:
- Camera angles
- Character positions
- Important actions
- Scene timing
- Emotional moments
For example, before animating a character jumping, an animator needs to understand:
- Why is the character jumping?
- How high should it jump?
- What emotion should the movement express?
- How should the camera capture the action?
Good planning reduces expensive changes later in production.
Stage 2 — 3D Modeling
3D modeling is the process of creating the digital objects used in animation.
A 3D model is made from a mesh consisting of:
- Vertices (points)
- Edges (lines connecting points)
- Faces (surfaces forming the object)
Artists create models for characters, environments, vehicles, creatures, and props.
For example, a character model may include:
- A body mesh
- Facial features
- Clothing
- Accessories
- Hair
The quality of the model directly affects animation. A character with poor topology may deform incorrectly when moving, causing issues such as stretched faces or unnatural joints.
For professional animation, models are usually created with animation in mind from the beginning. Areas like shoulders, elbows, knees, and facial expressions require carefully designed topology.
Stage 3 — Rigging
Rigging is the process of creating a digital skeleton inside a 3D model.
A rig works like a virtual human skeleton. Instead of moving thousands of individual vertices manually, animators control bones that influence the model.
A character rig usually includes:
- Spine controls
- Arm and leg bones
- Hand controls
- Facial controls
- Animation handles
For example, when an animator rotates a character's arm bone, the rig moves the connected mesh automatically.
Rigging is one of the most technical stages of 3D animation because the skeleton must behave naturally. A poorly built rig can make even a high-quality model difficult to animate.
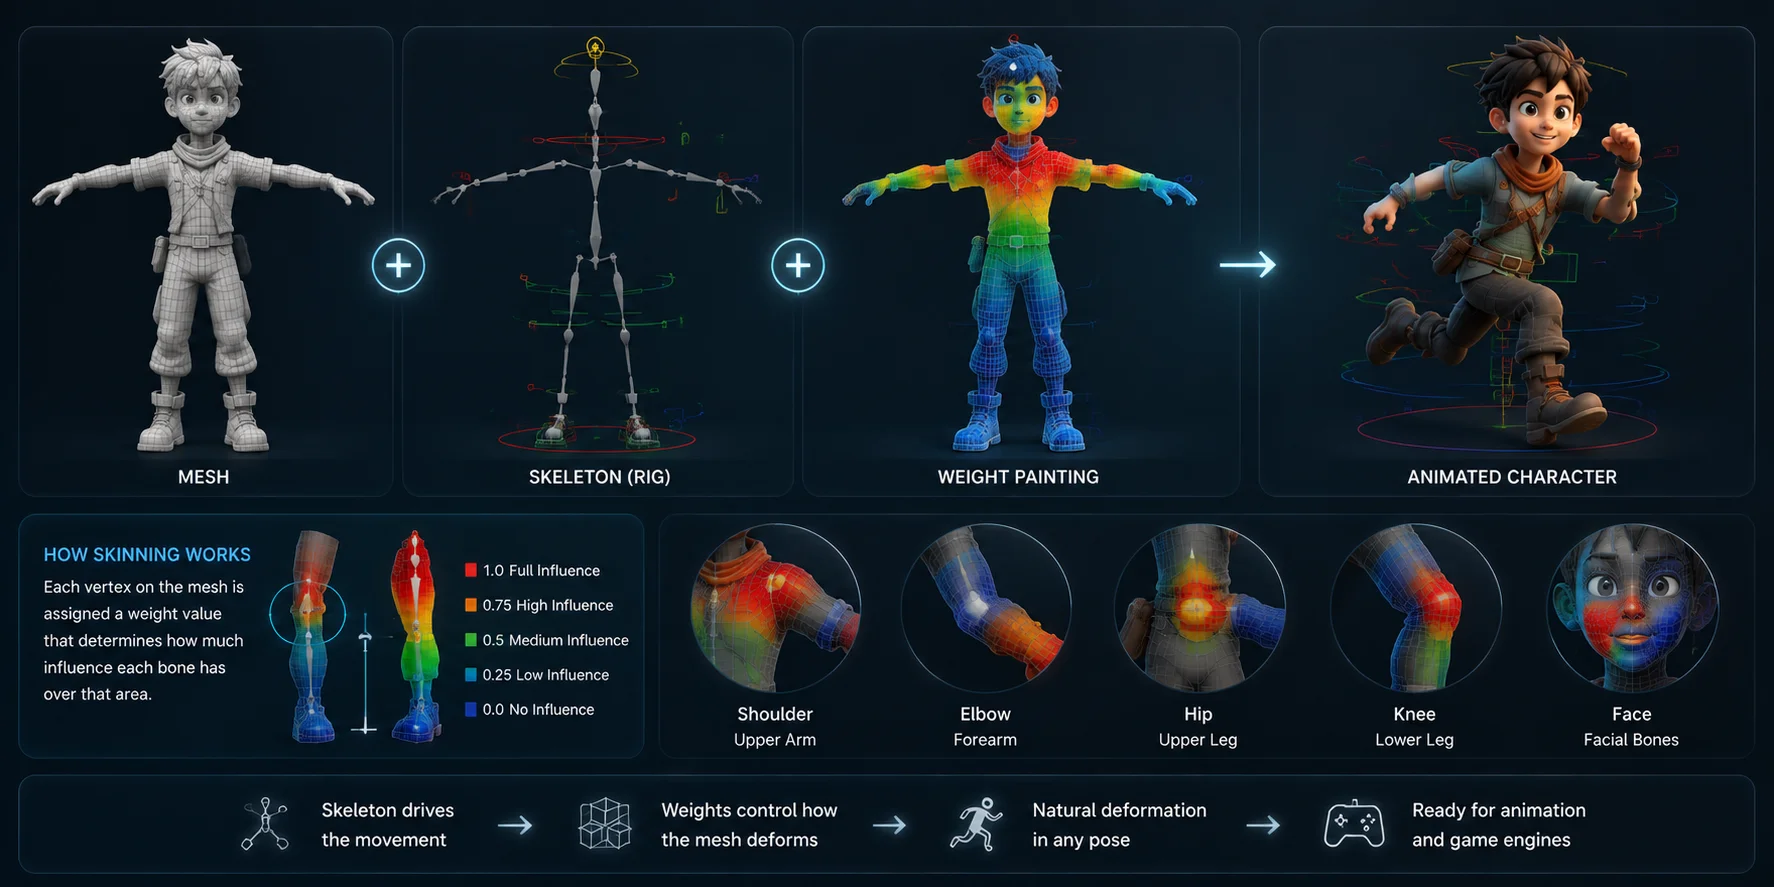
Stage 4 — Skinning (Weight Painting)
Skinning connects the 3D model's mesh to the rig.
During this process, artists assign weights that determine how much influence each bone has over different parts of the model.
For example:
- A shoulder bone should mainly control the upper arm area.
- A knee bone should affect the lower leg.
- Facial bones should influence specific areas of the face.
This process is also called weight painting because artists often visually paint influence values onto the model.
Good skinning creates natural deformation. Poor skinning can cause problems such as:
- Elbows bending incorrectly
- Clothing stretching unnaturally
- Faces collapsing during expressions
Professional character animation relies heavily on accurate skin weights.
How a 3D Character Gets Animated
Stage 5 — Animation (Keyframing)
Once the model is rigged and ready, animators create movement.
They set keyframes to define important poses and adjust timing to create realistic motion.
Character animation usually follows principles developed from traditional animation, including:
- Timing
- Anticipation
- Follow-through
- Squash and stretch
- Weight and balance
A realistic walk cycle, for example, requires careful control of:
- Foot placement
- Hip movement
- Arm swinging
- Body balance
- Contact with the ground
Even with advanced software, creating believable movement still requires artistic judgment.
Stage 6 — Lighting & Shading
After animation is created, artists add materials, textures, and lighting.
Shading defines how objects appear, including:
- Color
- Roughness
- Reflection
- Transparency
- Surface details
Lighting creates the mood and realism of the scene.
A simple character model can look completely different depending on lighting choices:
- Soft lighting creates a friendly animated style.
- Strong contrast creates a dramatic cinematic look.
- Realistic environment lighting improves immersion.
In modern workflows, physically based rendering (PBR) materials are commonly used because they simulate real-world surface behavior.
Stage 7 — Rendering
Rendering is the process of converting the 3D scene into final images or video frames.
The computer calculates:
- Object geometry
- Materials
- Lighting
- Shadows
- Reflections
- Effects
There are two major rendering approaches:
Real-Time Rendering
Real-time rendering is mainly used in:
- Video games
- Interactive applications
- Virtual reality
Game engines such as Unity and Unreal Engine calculate frames quickly so users can interact with the environment instantly.
Offline Rendering
Offline rendering is used in:
- Movies
- High-end animation
- Visual effects
Each frame can take seconds or hours to calculate because studios prioritize maximum quality over speed.
Stage 8 — Compositing & Post-Processing
The final stage combines rendered images with additional effects.
Compositing artists add:
- Visual effects
- Color correction
- Background elements
- Motion blur
- Atmospheric effects
For example, a spaceship scene may combine:
- A rendered 3D spacecraft
- Digital explosions
- Smoke effects
- Background stars
- Final color grading
Post-processing gives the final animation its finished cinematic appearance.
How AI Is Changing the 3D Animation Pipeline
Traditional 3D animation requires significant time investment, especially during modeling, rigging, and preparation stages.
For beginners and small teams, creating an animation-ready character can be one of the biggest challenges because building a clean model and setting up a working rig requires specialized skills.
AI-powered 3D generation tools are changing this workflow by reducing the time needed for early production stages.
For example, Tripo AI can help compress parts of the traditional pipeline:
Text or image input → AI-generated 3D model → optional rigging for supported character assets → animation and export workflow
Instead of spending weeks creating a character model and preparing it for movement, creators can generate a usable 3D asset and move directly into animation adjustments.
This does not replace an animator’s creative or technical judgment. It can shorten early asset-preparation work, but creators should still check topology, skin weights, motion quality, and export settings before using an asset in a production workflow.
The biggest advantage is accessibility: more creators can experiment with 3D animation without needing years of modeling and technical rigging experience before making their first project.
Types of 3D Animation
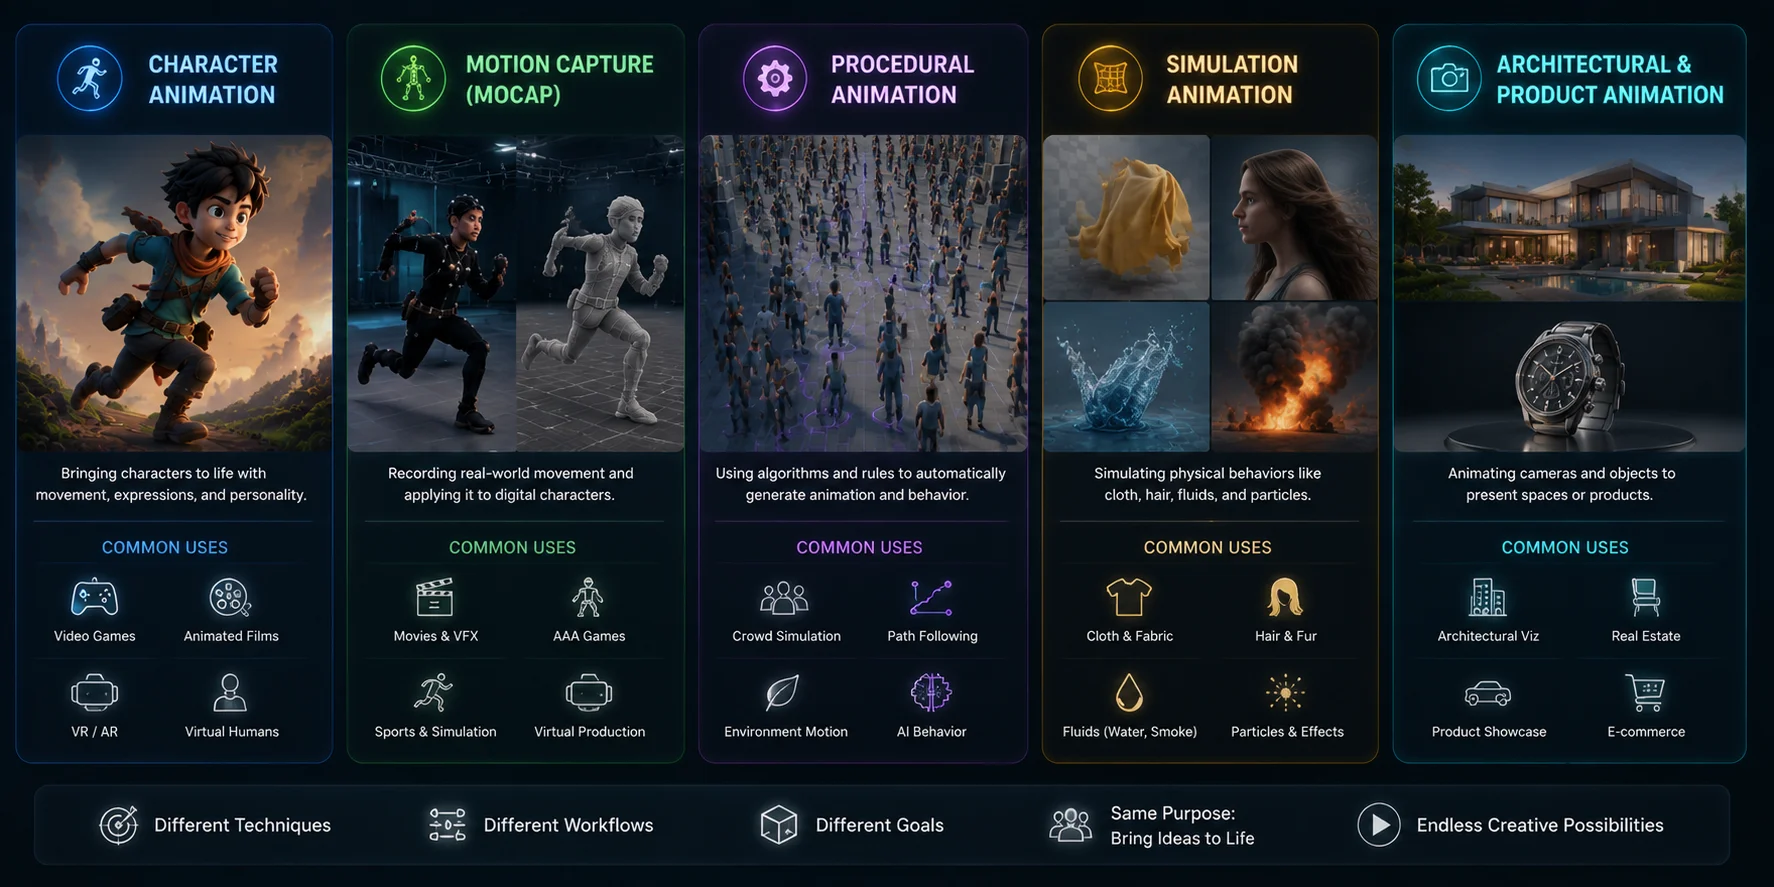
3D animation is not limited to character movement. Different industries use different animation techniques depending on the goal, from creating realistic human performances to generating complex physical effects. Understanding the main types of 3D animation helps beginners choose the right workflow and software for their projects.
Character Animation
Character animation is one of the most recognizable forms of 3D animation. It focuses on creating movement and expressions for digital characters, including humans, animals, creatures, and fictional figures.
In games and animated films, character animators control everything from simple movements like walking and jumping to complex performances involving facial expressions and emotions.
A typical character animation workflow includes:
- Creating or importing a 3D character model
- Building a rig and skeleton system
- Setting keyframes for poses and actions
- Adjusting timing and movement curves
- Refining details such as facial expressions and body language
Good character animation is not only about making a model move. The animator must communicate personality, emotion, and weight through movement. A slow walk can show sadness or exhaustion, while fast and energetic movements can suggest excitement or confidence.
Character animation is widely used in:
- Video games
- Animated movies
- Virtual influencers
- VR experiences
- Digital assistants
- Educational content
Motion Capture (Mocap)
Motion capture, often called mocap, is a technique that records real human movement and transfers it to a digital character.
Instead of manually animating every movement, performers wear tracking equipment or use cameras that capture their body movements. The recorded data is then applied to a 3D character rig.
The basic motion capture process includes:
- A performer acts out the movement.
- Sensors or cameras record body position data.
- The captured motion is cleaned and adjusted.
- The animation data is applied to a digital character.
Motion capture is commonly used for realistic character animation in:
- AAA video games
- Hollywood movies
- Sports simulations
- Virtual reality applications
For example, many realistic game characters use mocap because it captures natural details that are difficult to animate manually, such as balance, body weight shifts, and subtle gestures.
However, motion capture also has limitations. Raw mocap data often requires cleanup because real-world movement may not perfectly match a fictional character. Animators still need to adjust timing, exaggerate actions, and correct unnatural poses.
Procedural Animation
Procedural animation uses algorithms and rules to automatically generate movement.
Unlike traditional keyframe animation, where artists manually define each important pose, procedural systems calculate movement based on programmed behaviors or physical rules.
Examples include:
- Automatically generating walking patterns
- Creating realistic crowd movement
- Simulating object reactions
- Generating environmental motion
Procedural animation is especially useful when creating large amounts of animation data.
For example, a game developer may need hundreds of characters walking through a city. Instead of manually animating every person, procedural systems can generate variations automatically.
Procedural animation is commonly used in:
- Open-world games
- Simulation games
- Visual effects
- Generative environments
Tools like Houdini are popular for procedural workflows because they allow artists to create complex systems that can generate thousands of variations.
Simulations: Cloth, Hair, Fluid, and Particle Animation
Simulation-based animation uses computer algorithms to reproduce real-world physical behavior.
Instead of manually animating every movement, artists define physical properties, and the software calculates how objects should react.
Common simulation types include:
Cloth Simulation
Cloth simulation creates realistic fabric movement.
Examples:
- A character's clothing moving while running
- A flag waving in the wind
- A curtain reacting to movement
The software calculates how fabric bends, folds, and reacts to forces.
Hair Simulation
Hair simulation creates natural movement for digital hair.
It controls:
- Hair strands
- Wind interaction
- Character movement
- Collisions with objects
This is important for realistic characters in films and games.
Fluid Simulation
Fluid simulation recreates liquids and gases.
Examples:
- Water flowing
- Smoke effects
- Fire
- Explosions
Particle Simulation
Particle systems create thousands of small elements.
They are used for:
- Rain
- Snow
- Dust
- Sparks
- Magic effects
Simulation animation is essential for visual effects because manually creating these details would be extremely time-consuming.
Architectural and Product Visualization Fly-Throughs
Not all 3D animation focuses on characters. Many businesses use camera-based 3D animation to showcase spaces and products.
Architectural visualization animation creates virtual tours of buildings before construction begins.
Common examples include:
- Walking through a future house
- Exploring a real estate project
- Showing interior design concepts
- Presenting urban planning projects
Product visualization uses similar techniques to demonstrate products digitally.
Examples:
- A smartphone rotating in 360 degrees
- A car driving through a virtual environment
- Furniture placed inside a digital room
These animations help customers understand products before they are physically produced.
Industries using architectural and product animation include:
- Real estate
- Automotive
- Consumer electronics
- Manufacturing
- E-commerce
Types of 3D Animation
Best 3D Animation Software in 2026
Choosing the right 3D animation software depends on your experience level, budget, and project goals.
Professional studios often use industry-standard tools such as Maya and Houdini, while beginners usually start with free software like Blender.
In recent years, AI-powered browser tools have also become popular because they remove the need for complex installation and technical setup.
Here is a comparison of the most popular 3D animation software:
Blender: The Best Free 3D Animation Software for Beginners
Blender is the most recommended starting point for beginners because it provides a complete professional 3D pipeline at no cost.
It includes tools for:
- 3D modeling
- Rigging
- Character animation
- Sculpting
- Lighting
- Rendering
- Video editing
- Visual effects
For someone learning 3D animation from zero, Blender offers everything needed to create a complete project without buying expensive software.
However, Blender also has a steep learning curve. Its large feature set can feel overwhelming at first, and beginners usually need time to understand modeling, materials, and animation workflows.
Despite this, Blender has one of the largest learning communities, with thousands of tutorials, free assets, and online resources.
For most beginners in 2026, Blender remains the best free option to learn the fundamentals of 3D animation.
Maya: The Industry Standard for Character Animation
Maya, developed by Autodesk, is one of the most widely used 3D animation tools in professional studios.
It is especially popular for:
- Character animation
- Film production
- AAA game development
- Rigging workflows
Many large animation and game studios use Maya because of its powerful animation tools and advanced character systems.
Its advantages include:
- Professional rigging tools
- Advanced animation controls
- Strong industry adoption
- Extensive production features
The main disadvantage is the cost and complexity. Maya is designed for professional workflows, so beginners may find it harder to learn compared with Blender.
For artists aiming for careers in film or AAA game studios, Maya remains one of the most valuable skills to learn.
3ds Max: Game Assets and Architectural Visualization
3ds Max is another Autodesk tool commonly used in game development and visualization industries.
It is especially strong for:
- Environment modeling
- Game asset creation
- Architectural visualization
- Product rendering
Many architectural designers use 3ds Max because of its powerful modeling tools and compatibility with visualization workflows.
Compared with Maya, 3ds Max is less focused on character animation but remains an important tool for creating environments and objects.
Cinema 4D: Motion Graphics and Easier Learning
Cinema 4D is widely used in advertising, motion graphics, and commercial animation.
Its strengths include:
- Beginner-friendly interface
- Fast workflow
- Strong motion graphics tools
- Excellent integration with design software
Many marketing agencies and creative studios use Cinema 4D to create:
- Product animations
- Brand videos
- Abstract motion graphics
- Social media content
Compared with Maya, Cinema 4D is often considered easier to learn, especially for designers coming from 2D graphics backgrounds.
Houdini: Procedural Animation and Visual Effects
Houdini is a specialized 3D animation tool focused on procedural workflows and visual effects.
It is commonly used for:
- Destruction effects
- Fire and smoke
- Large environments
- Complex simulations
Unlike traditional animation software, Houdini allows artists to build systems that automatically generate effects.
For example, instead of manually breaking a building apart, artists can create rules that determine how the structure collapses.
Houdini is extremely powerful but has one of the steepest learning curves in the industry. It is mainly used by VFX professionals and technical artists.
Browser-Based AI Motion-Capture Tools
AI animation tools are making 3D animation more accessible by reducing technical barriers.
Some browser-based services offer AI-assisted motion capture from video. Check each provider’s current documentation for supported inputs, export formats, pricing, and usage terms before choosing a workflow.
Their main advantage is AI-powered motion capture.
Users can upload video footage of human movement, and the system converts it into animation data that can be applied to 3D characters.
These tools are useful for:
- Indie game developers
- Beginners
- Quick animation prototypes
- Virtual characters
These services can be useful for no-install experiments, but detailed cleanup and final polishing still require a suitable DCC or animation tool.
However, professional production still usually requires traditional software like Blender or Maya for detailed editing and final polishing.
3D Animation Software Landscape
How to Make a 3D Animation — Step by Step for Beginners
Creating a 3D animation may look complicated at first because professional productions involve many specialized roles. However, beginners can create simple animations by following the same basic workflow used by professionals.
The key is to start small. You do not need to create a full animated movie on your first project. A simple character walk cycle, object movement, or camera animation is enough to understand the fundamentals.
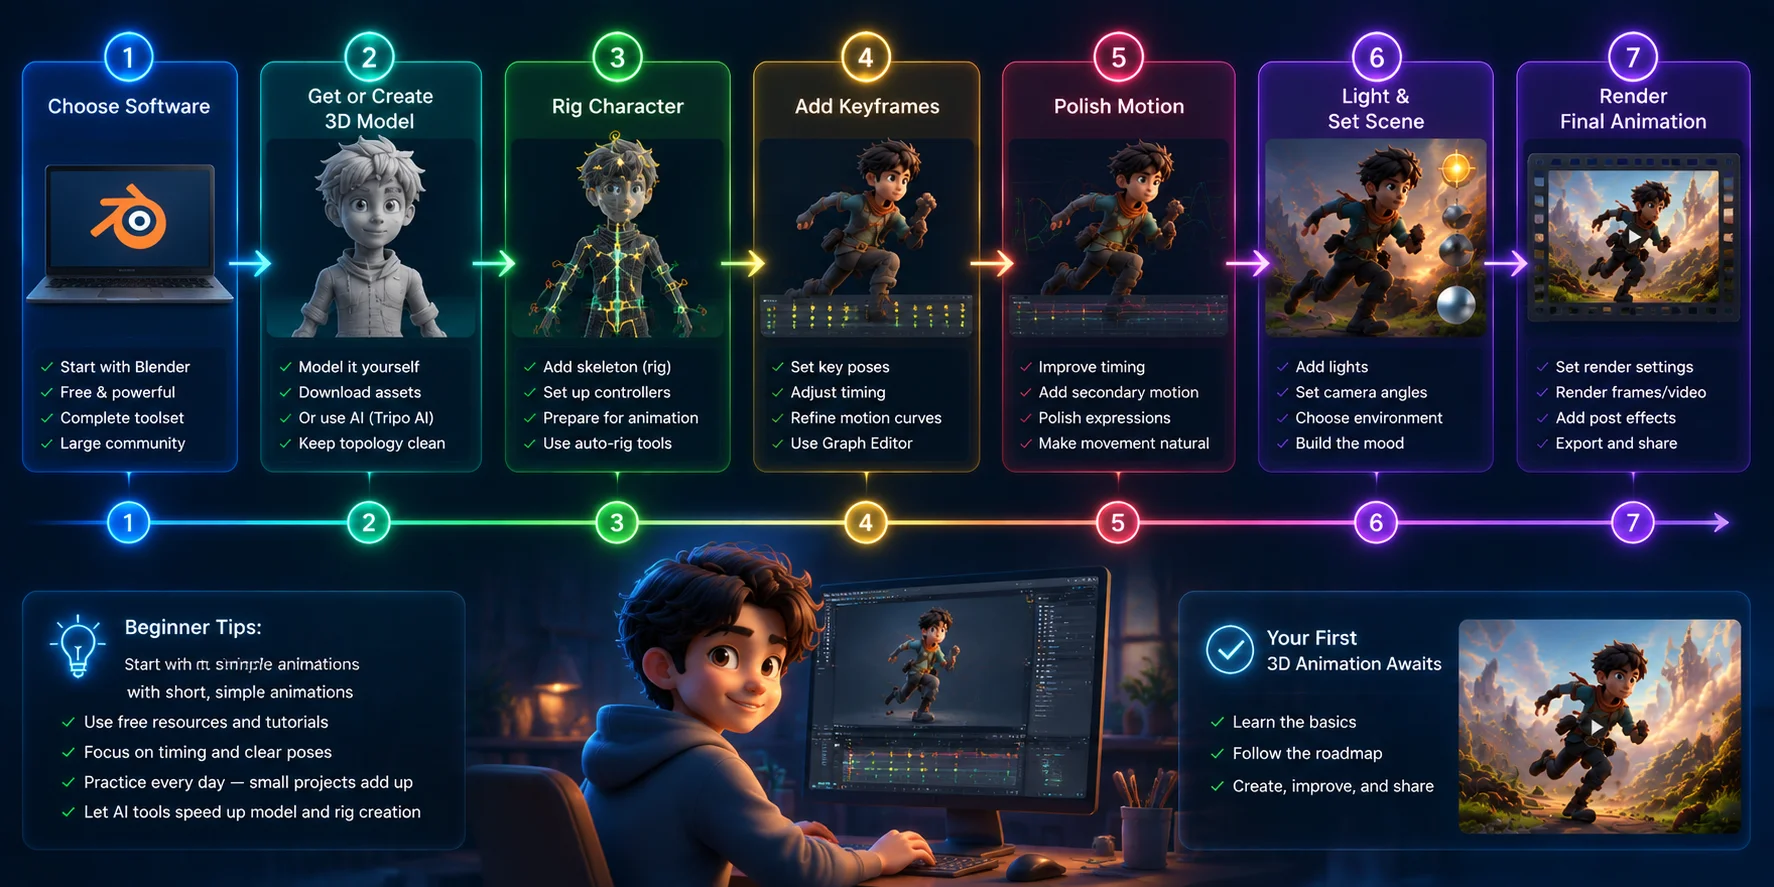
Here is a beginner-friendly 3D animation workflow:
Step 1: Choose Your Software and Install It
The first step is choosing a 3D animation tool.
For most beginners, Blender is the best place to start because it is free, powerful, and includes the complete animation pipeline.
With Blender, you can:
- Create or edit 3D models
- Build character rigs
- Set keyframes
- Add materials and lighting
- Render animations
A beginner does not need to learn every Blender feature immediately. Focus on the basics:
- Understanding the 3D viewport
- Moving objects
- Creating keyframes
- Using the timeline
- Exporting a simple animation
Once you understand these concepts, you can explore more advanced topics like rigging, simulations, and visual effects.
Step 2: Find or Create a 3D Model
Every animation needs something to animate.
You can get a 3D model in several ways:
Option 1: Download Existing Assets
Many websites provide free or paid 3D models.
This is a good choice when you want to practice animation without spending time modeling.
Common asset sources include:
- Character models
- Game-ready props
- Environment objects
- Animation-ready rigs
Option 2: Create Your Own Model
Learning 3D modeling gives you full control, but it requires additional skills.
A character model usually involves:
- Sculpting or polygon modeling
- Creating clean topology
- Adding textures
- Preparing the model for rigging
For beginners, creating a high-quality character from scratch can take weeks or months.
Option 3: Generate a Model with AI
AI-powered 3D generation tools provide a faster way to get animation-ready assets.
For example, Tripo AI can generate 3D models from text descriptions or images, allowing creators to move from an idea to a usable asset much faster.
A typical AI-assisted workflow looks like:
Text/Image Prompt → AI 3D Model → Rigging → Animation → Export
This is especially useful for:
- Indie game developers
- Solo creators
- Rapid prototyping
- Beginners learning animation
Instead of spending most of the time building a model, creators can focus more on animation and storytelling.
Step 3: Rig the Model
Before a character can move naturally, it needs a rig.
A rig is a digital skeleton that controls the model.
For beginners using Blender, there are several options:
Blender Rigify
Rigify is a built-in Blender addon that helps create character rigs more easily.
The workflow is:
- Import the character model
- Add a Rigify armature
- Adjust the bones
- Generate the control rig
- Start animating
Use a Pre-Rigged Character
Many beginner-friendly models already include skeletons and controls.
This allows you to skip the technical rigging process and start creating animation immediately.
For game development workflows, pre-rigged FBX characters are commonly imported into engines like Unity or Unreal Engine.
Step 4: Set Your First Keyframes
The easiest way to understand animation is to create a simple movement.
Try animating an object moving from one position to another.
For example:
- Frame 1: Character standing still
- Frame 30: Character raising an arm
The software automatically creates the movement between these keyframes.
A simple beginner exercise:
Create a waving animation
- Move to frame 1.
- Set the starting pose.
- Insert a keyframe.
- Move to frame 30.
- Change the arm position.
- Insert another keyframe.
- Preview the animation.
You have now created your first 3D animation.
The goal at this stage is not perfection. It is understanding timing, movement, and how keyframes work.
Step 5: Adjust Animation Curves for Smooth Motion
A beginner animation often looks robotic because the movement happens at a constant speed.
Professional animators improve motion by adjusting animation curves.
The graph editor in software like Blender allows you to control:
- Acceleration
- Deceleration
- Timing
- Movement intensity
For example:
A realistic jump is not just:
- Start position
- End position
It includes:
- Slow preparation
- Fast upward movement
- Brief pause
- Smooth landing
Animation curves help create these natural changes.
This step is often what separates basic animation from professional-looking movement.
Step 6: Add Lighting and Set Up a Camera
Once the animation works, the next step is presentation.
Lighting and camera setup can dramatically change how an animation feels.
Basic lighting includes:
Key Light
The main light source that defines the subject.
Fill Light
A softer light that reduces harsh shadows.
Rim Light
A light behind the object that separates it from the background.
The camera controls how viewers experience the animation.
You can create:
- Close-up character shots
- Cinematic camera movements
- Product showcase rotations
- Wide environmental views
Even a simple animation can look much better with good lighting and camera placement.
Step 7: Render and Export
The final step is converting your 3D scene into a finished video or usable animation file.
Rendering calculates:
- Final images
- Lighting
- Materials
- Shadows
- Effects
For beginners, common export options include:
- MP4 video
- PNG image sequences
- FBX animation files
- GLB/glTF for web and real-time applications
The right format depends on your goal:
- YouTube or social media → video export
- Game engines → FBX or GLB
- Web experiences → glTF/GLB
- Further editing → image sequences
After rendering, you can edit the final video, add sound, and publish your animation.
Beginner 3D Animation Roadmap
3D Animation Careers and Skill Development
3D animation has become an important skill across entertainment, technology, and digital media industries. As games, virtual production, AR/VR, and digital content continue growing, demand for skilled 3D artists remains strong.
Career paths and compensation vary by location, employer, contract type, specialization, and experience. Review current local job listings and salary data before making a career decision.
Early-Career 3D Animation Roles
Early-career roles often focus on building reliable production habits, a focused reel, and experience with feedback-driven workflows.
Junior artists usually work on:
- Basic character animation
- Asset preparation
- Scene adjustments
- Animation cleanup
- Supporting senior artists
Many beginners enter the industry through:
- Animation schools
- Online courses
- Personal portfolios
- Game projects
- Freelance work
A strong portfolio is often more important than a formal degree because studios want to see actual animation skills.
Senior and Lead Animation Roles
Senior and lead roles typically combine strong animation craft with review, mentoring, and production-planning responsibilities.
Compensation for senior roles varies substantially across regions, studios, and employment arrangements, so verify current local data rather than relying on a single broad range.
Senior roles often involve:
- Creating complex character performances
- Guiding animation teams
- Reviewing animation quality
- Developing production workflows
Specialized skills such as facial animation, motion capture cleanup, and technical animation can increase earning potential.
Freelance 3D Animation Work
Freelance 3D animators often charge by project or hourly rate.
Freelance project terms are usually shaped by:
Scope, deliverables, revision rounds, and usage rights should be agreed in writing before work begins.
depending on:
- Experience level
- Animation complexity
- Industry specialization
- Client requirements
Freelancers may work on:
- Game characters
- Product animations
- Advertising videos
- Architectural visualization
- Virtual reality projects
AI tools can help with asset preparation and iteration, but freelancers should set expectations for review, cleanup, licensing, and final delivery.
Industries Hiring 3D Animators
3D animation skills are used in many industries:
Video Games
Game studios hire animators for:
- Character movement
- Combat animations
- Creature animation
- Cinematic sequences
Film and VFX
Animation artists create:
- Digital characters
- Visual effects
- Virtual environments
- Motion graphics
Advertising and Marketing
Brands use 3D animation for:
- Product demonstrations
- Commercial videos
- Social media content
AR and VR
Immersive technologies require animated:
- Virtual characters
- Interactive objects
- Digital environments
Medical and Scientific Visualization
3D animation helps explain:
- Human anatomy
- Medical procedures
- Scientific concepts
3D Animation Industry Applications
Where Can I Animate 3D for Free?
Many beginners search for free 3D animation tools because professional software can be expensive. Fortunately, several powerful options are available without a large budget.
Blender
Blender is a free, open-source 3D creation suite with animation and rigging tools.
It provides:
- Modeling tools
- Rigging systems
- Keyframe animation
- Rendering
- Visual effects
Unlike many free tools, Blender has no time limit and is powerful enough for professional projects.
For many learners, Blender is a practical starting point because its core tools are available without a subscription.
DeepMotion Animate 3D
DeepMotion is a browser-based AI animation platform that converts video footage into 3D motion capture data.
Users can:
- Upload a human movement video.
- Let AI analyze the motion.
- Apply the generated animation to a 3D character.
It is useful for beginners who want realistic movement without manually creating every keyframe.
Mixamo (Adobe)
Mixamo provides free character rigging and animation resources.
It is especially useful for game developers because users can:
- Upload a character
- Automatically create a rig
- Apply ready-made animations
Common uses include:
- Walking cycles
- Running animations
- Fighting movements
- Idle poses
Mixamo is one of the easiest ways for beginners to experiment with character animation.
Tripo AI
Creating animation requires a model first, and this is where many beginners get stuck.
Tripo AI helps solve the first step by generating 3D models that can become starting points for animation workflows.
A beginner-friendly workflow can be:
Generate a 3D character → Export the model → Rig or animate in Blender → Create the final animation
This allows creators to spend less time building assets and more time learning animation itself.
Frequently Asked Questions About 3D Animation
How do I make my own 3D animation?
To make your own 3D animation, start with a tool such as Blender and learn the basics of modeling, rigging, keyframes, and rendering. You can create your own model, use an existing asset with the right license, or use an AI tool such as Tripo AI to generate a 3D model starting point. Then add or verify a rig, set keyframes, refine the curves, light the scene, and render the final result.
Do 3D animators get paid well?
Compensation varies by location, employer, contract type, specialization, and experience. Review current local job listings and reliable salary sources for the specific role you are considering; a portfolio and relevant production skills are central to career progression.
Where can I animate 3D for free?
Blender is a free, open-source option for creating complete 3D animations. Browser-based motion-capture and auto-rigging services can be useful for experiments, but check each provider’s current pricing, supported formats, and terms. Tripo AI can generate 3D model starting points from text or images for an animation workflow.
What is 3D animation?
3D animation is a technique that creates movement using digital objects inside a three-dimensional environment. It combines 3D models, rigs, keyframes, lighting, cameras, and rendering to produce animated scenes. Unlike 2D animation, 3D animation allows objects and characters to move naturally through depth, making it suitable for games, movies, product visualization, and interactive experiences.
What software is used for 3D animation?
Common 3D animation tools include Blender, Maya, 3ds Max, Cinema 4D, Houdini, and MotionBuilder. The right choice depends on your workflow: Blender offers a broad free toolset, while other tools are often selected for character animation, motion graphics, simulations, or motion-capture editing.
Conclusion
3D animation combines modeling, rigging, movement, lighting, and rendering into a complete process for bringing digital ideas to life. While traditional animation workflows can be complex, modern software and AI tools are making 3D animation more accessible for beginners, independent creators, and small teams.
The easiest way to start is to learn the fundamentals in Blender, experiment with simple animations, and use AI tools to speed up asset creation. With the right workflow, creating an animated 3D character no longer requires a large studio or years of technical experience.
Ready to create your first animated 3D character? Explore Tripo AI to generate a 3D model starting point, then review the model and continue your animation workflow in the tool that fits your project.
