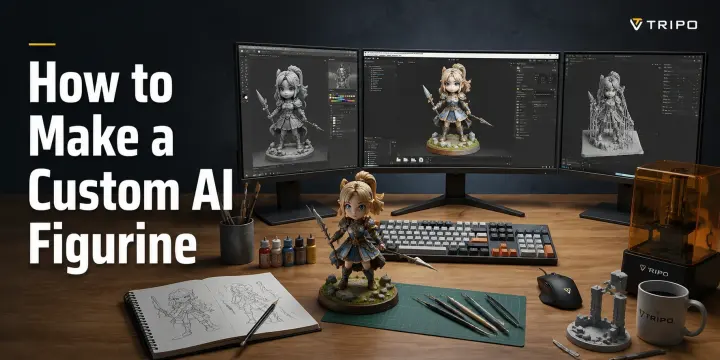
How to Make a Custom AI Figurine (Step-by-Step)
TL;DR
- Creating a custom 3D figurine no longer requires professional modeling skills. With AI 3D tools, hobbyists and collectors can go from a simple reference photo to a printable character model through a workflow of image input → AI generation → refinement → export → 3D printing.
- The process starts with choosing the right reference images. Clear photos with visible details, consistent lighting, and recognizable features help AI generate more accurate 3D results. A single image can work, while multiple angles usually improve shape accuracy.
- AI generation handles the most difficult modeling steps automatically by creating the initial 3D structure, textures, and details. Tripo AI provides an image-to-3D workflow that turns a reference image into a textured 3D model in seconds, making it a practical starting point for custom figurines.
- After generation, refinement is the key step for improving the final result. Users can adjust proportions, optimize geometry, improve textures, and prepare the model for different uses such as display pieces, collectibles, or 3D printing.
- The final model can be exported in formats such as STL for printing, GLB for digital viewing, or FBX/OBJ for further editing. Whether you are making a personalized gift, a collector figure, or a one-of-a-kind character, AI tools make the complete figurine workflow accessible without prior 3D modeling experience.
You can make a custom 3D figurine with AI in four steps: upload a reference photo, let an AI tool generate a 3D mesh, refine the texture and geometry, then export an STL or 3MF file ready for printing or ordering. No 3D modeling experience is required, making personalized figurines accessible to beginners, collectors, and hobbyists.
The viral AI action-figure trend — including the popular ChatGPT “Barbie box” style images — showed how easily anyone could create a digital character concept. But those images are only the beginning. This guide goes further by showing how to turn an AI idea into a real printable or display-ready 3D figurine. We’ll cover the complete workflow: choosing photos, generating the model, refining details, and preparing the final export.
What Is an AI Figurine Maker?
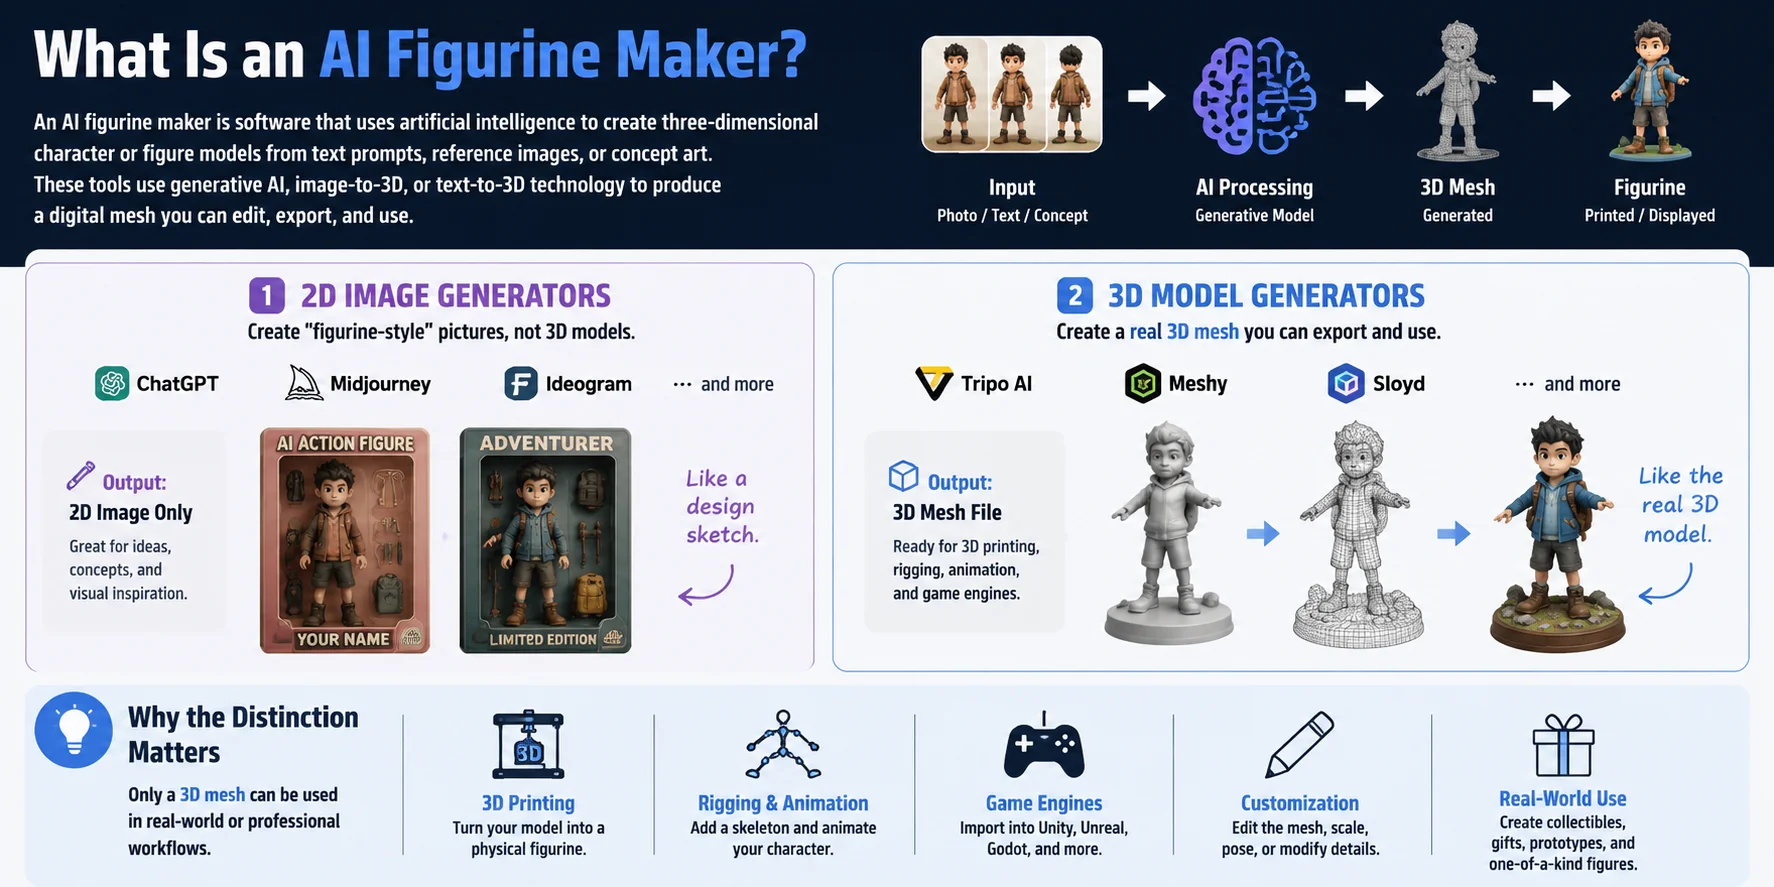
An AI figurine maker is a tool that uses artificial intelligence to create three-dimensional character models from simple inputs such as text prompts, reference images, or concept artwork. Instead of manually sculpting every detail, these tools use generative AI, image-to-3D, or text-to-3D technology to produce a digital mesh that can become a physical figurine.
There are two different types of AI figurine tools, and the difference matters. The first type creates 2D figurine-style images — tools like ChatGPT image generation or Midjourney can design a character that looks like a collectible figure, but the result is only a picture. Think of it as a design sketch. The second type creates a real 3D model file — tools like Tripo AI and other AI 3D generators produce actual mesh geometry that can be exported, edited, printed, rigged, or imported into game engines.
A 2D AI image can show what your figurine might look like, but only a true 3D mesh becomes the actual model you can hold, animate, or use in a digital workflow. For anyone creating a custom collectible, the key question is not just “Can AI make a figurine image?” but “Can AI create a usable 3D model?”
What You Need Before You Start
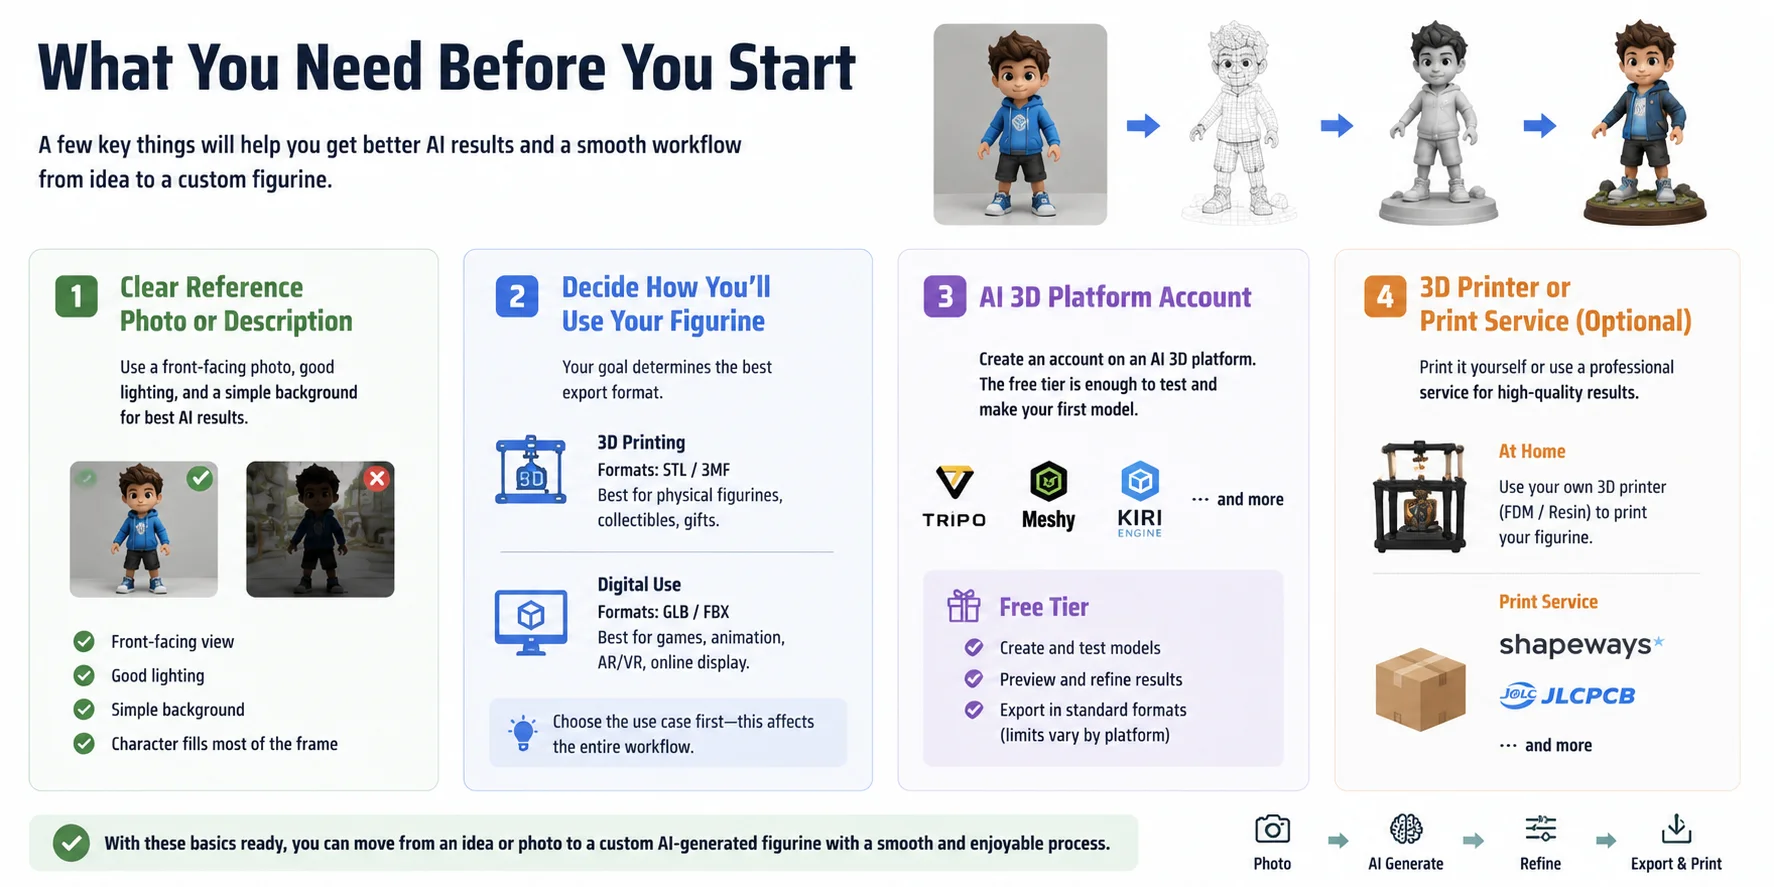
Before creating a custom AI figurine, prepare a few things to make the generation process smoother and avoid problems later. Start with a clear reference photo or character description. For the best AI results, use images with a front-facing view, good lighting, and a simple background so the model can focus on the subject’s shape and details.
Next, decide what you want to do with the final figurine. If your goal is 3D printing, you will usually need formats like STL or 3MF. If you want to use the model digitally for games, animation, AR, or online viewing, formats such as GLB or FBX are usually more suitable. Your intended use determines the best export workflow.
You will also need an account on an AI 3D generation platform. Most tools offer a free tier, which is enough to test the workflow and create your first model. For physical output, you can use your own 3D printer or send the file to a print service such as Shapeways or JLCPCB if you prefer professional production.
With these basics ready, you can move from an idea or photo to a custom AI-generated figurine with a much smoother workflow.
Step 1 — Generate Your 3D Figurine with AI
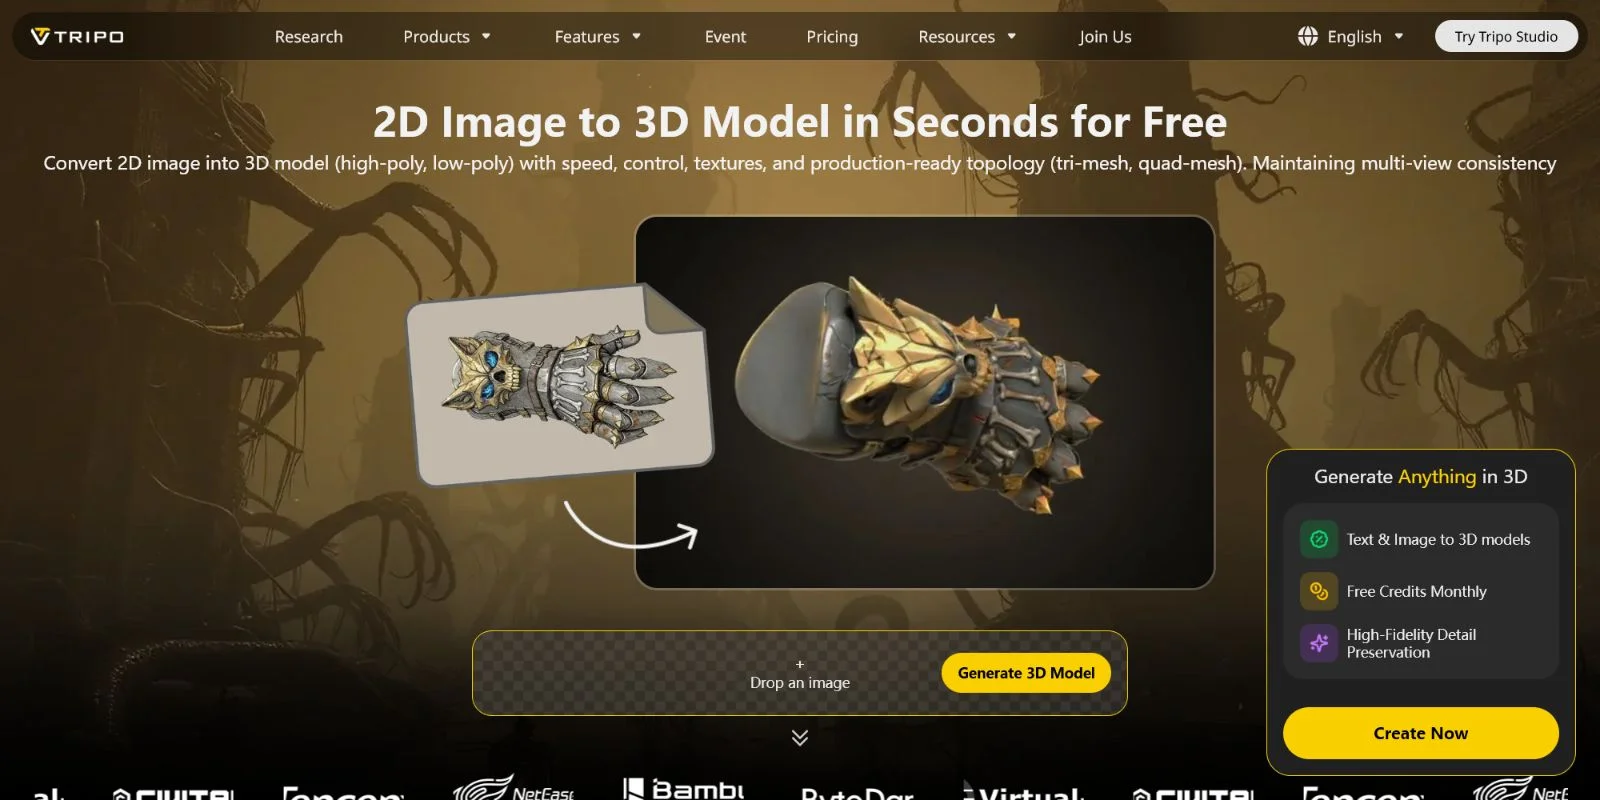
The first step is turning your idea or reference image into a 3D model. Open Tripo AI Studio and select the Image-to-3D workflow. Upload a clear reference photo of the character, person, or object you want to transform, then add a description to guide the style and result. For example, you can request a “chibi figurine,” “realistic bust,” or “action pose” depending on the type of collectible you want to create.
After submitting the input, Tripo AI generates a 3D mesh automatically in seconds. The quality of the first result depends heavily on your source image. A clean, well-lit reference with clear shapes usually produces better geometry, while dark photos, cluttered backgrounds, or unclear details may create noisy surfaces or inaccurate proportions.
Pro Tip: Use a front-facing photo with a plain background for the cleanest mesh output. The AI can better understand the subject’s silhouette and create a more accurate figurine.
If you do not have a reference photo, you can also use Text-to-3D to describe your character concept directly and generate a figurine from a prompt. This is useful for original designs, fantasy characters, or custom collectible ideas that exist only in your imagination.
Step 2 — Refine the Model
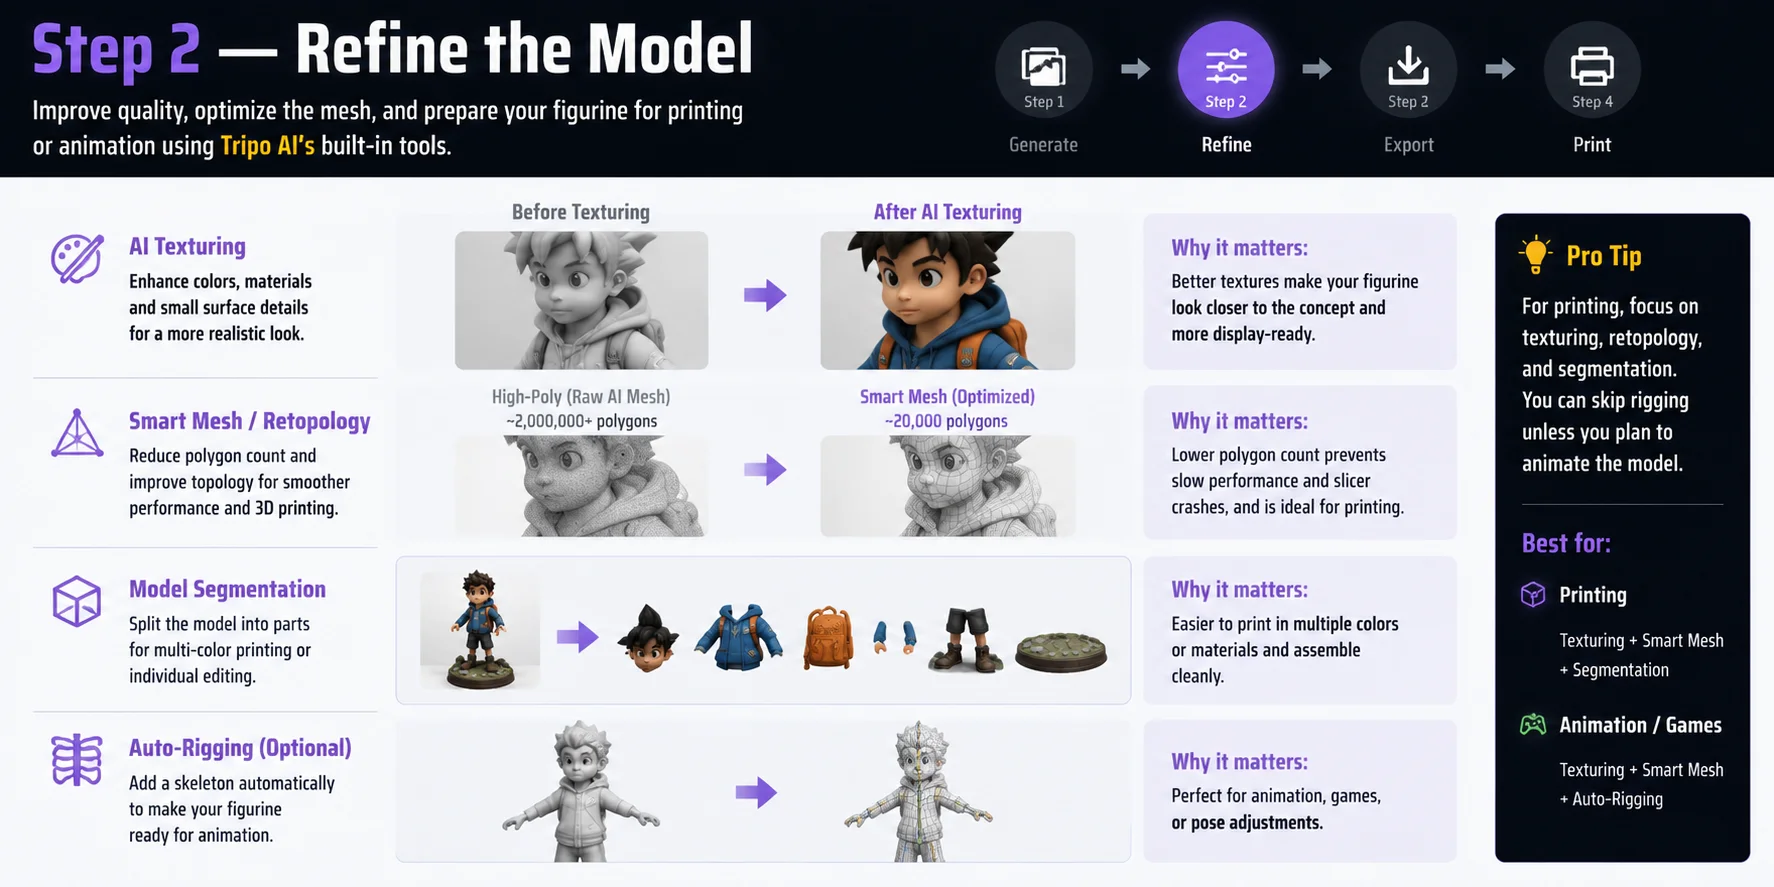
After generating your first AI figurine, refinement helps turn the raw 3D output into a cleaner, more usable model. In Tripo AI, you can improve the result with several built-in tools depending on your final goal.
Use AI Texturing to enhance surface details, colors, and material appearance. This is especially useful for display figurines where realistic textures and visual quality matter. If you plan to 3D print the model, Smart Mesh and retopology tools can reduce unnecessary polygons and create cleaner geometry. High-poly AI models may become difficult for slicers to process, so optimizing the mesh before export can prevent slowdowns or failed prints.
For more complex figurines, Model Segmentation lets you separate specific parts of the model, such as isolating the head, accessories, or other components. This is helpful for multi-color printing or when individual parts need separate edits.
If your figurine is intended for animation instead of printing, Auto-Rigging can add a skeleton and make the character ready for movement workflows. However, if your goal is simply creating a physical collectible, you can skip rigging and focus on texture, geometry, and print preparation.
Step 3 — Export Your Figurine File
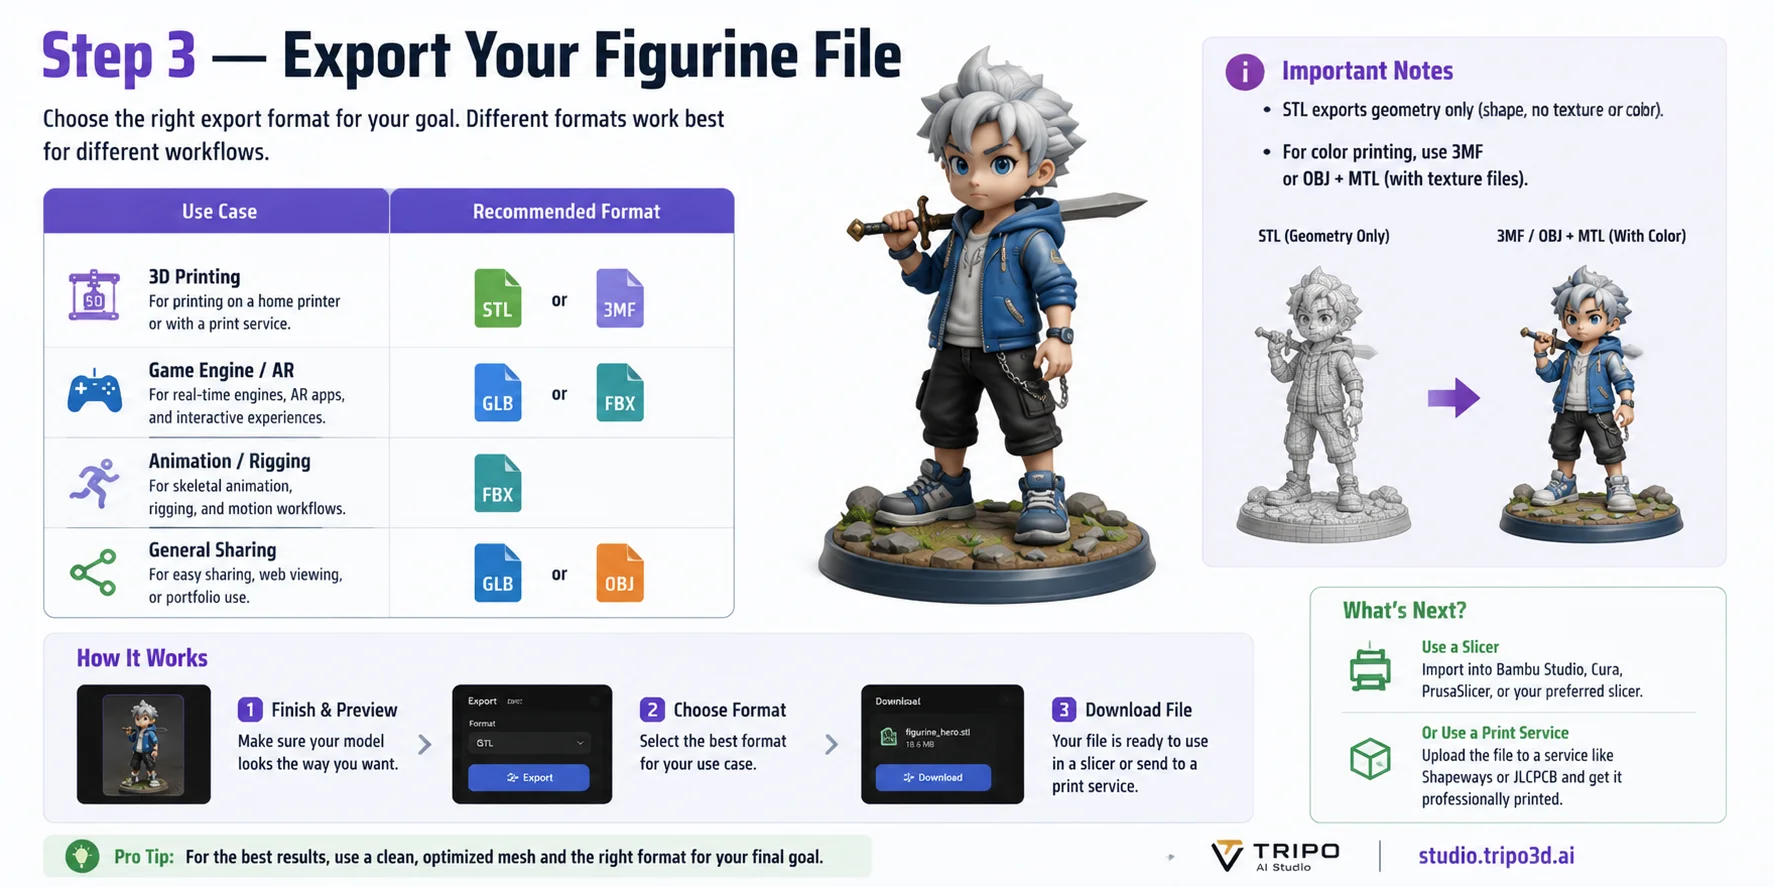
Once your AI figurine is refined, the next step is choosing the right export format for your final goal. Different formats are designed for different workflows, so selecting the correct file type helps avoid problems when printing, sharing, or importing the model into another application.
| Use Case | Recommended Format |
|---|---|
| 3D printing | STL or 3MF |
| Game engines / AR experiences | GLB or FBX |
| Animation and rigging | FBX |
| General sharing and online viewing | GLB or OBJ |
For physical printing, STL is the most widely supported format because it contains the model’s geometry and works with almost all slicer software. However, STL only stores shape data — it does not include textures, colors, or materials. If you want a color figurine, 3MF is usually a better choice because it can preserve additional information such as materials and print settings.
For digital workflows, GLB is a convenient option because it packages the model, textures, and materials into a single file that works well for web viewers, AR applications, and real-time platforms. FBX is better when you need animation, skeletons, or game-engine pipelines.
After selecting your format, download the finished model directly from Tripo AI Studio. The exported file can then be imported into slicer software for printing or sent to a professional print service for production.
Step 4 — Print or Display Your Figurine
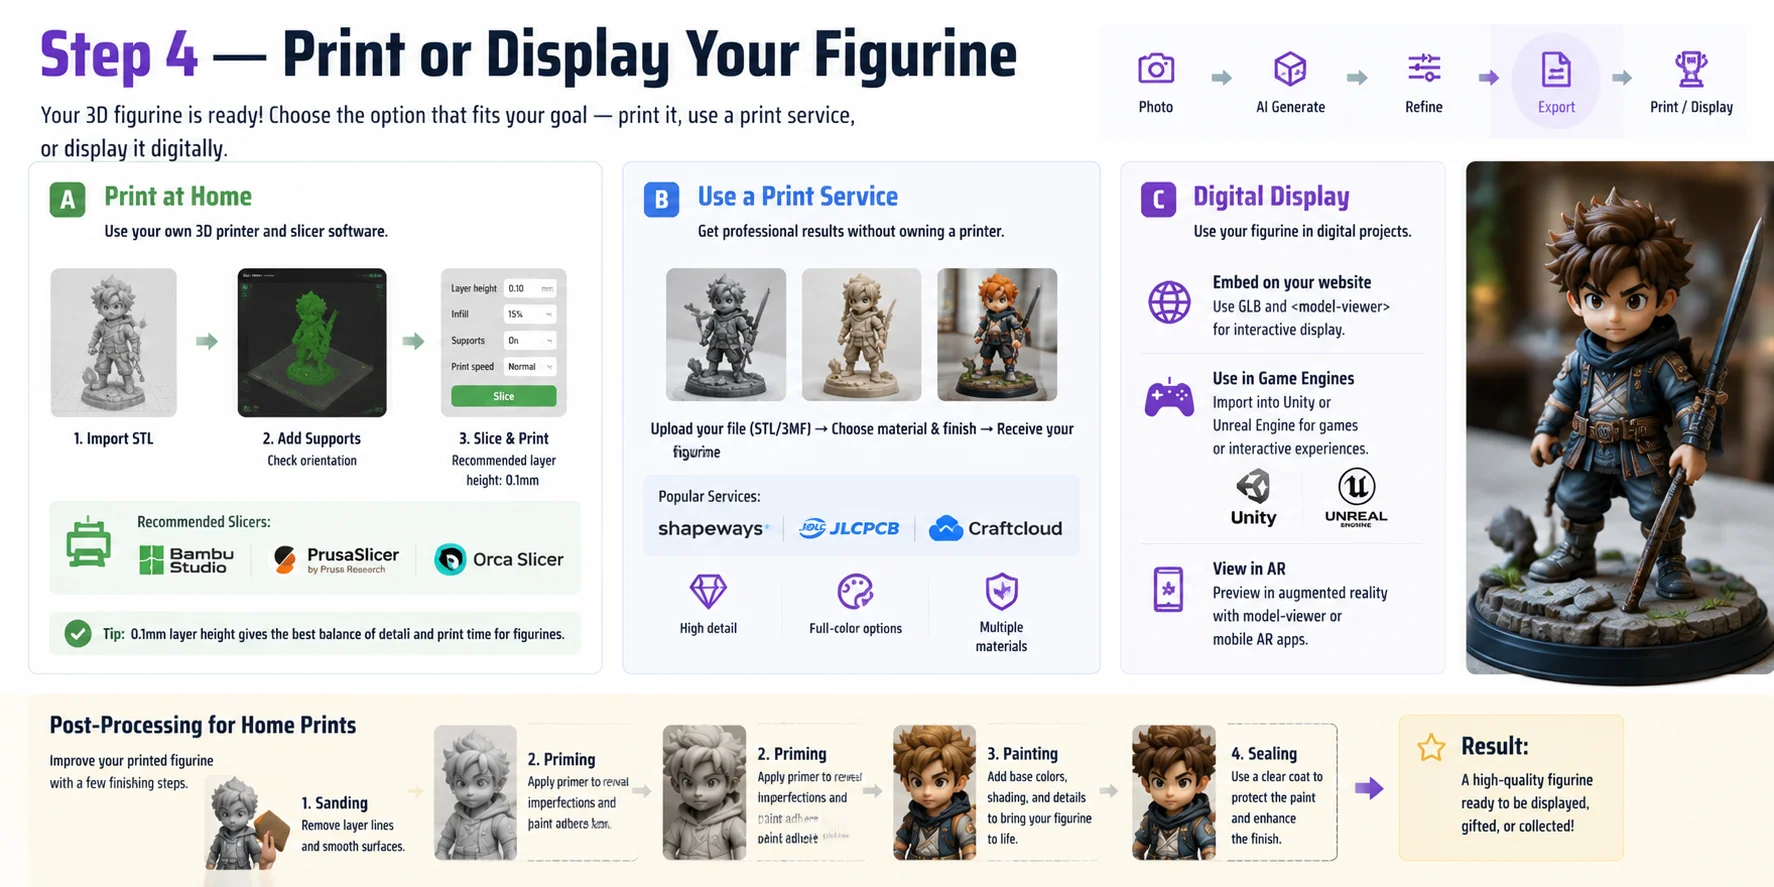
After exporting your AI-generated figurine, the final step is bringing it into the real world or using it digitally. The best option depends on whether you want a physical collectible, a professional print, or a virtual 3D asset.
Option A — Print at Home
If you have a 3D printer, import your STL file into slicing software such as Bambu Studio, PrusaSlicer, or Orca Slicer. Adjust settings like support structures, infill, and print resolution before starting the print. For detailed figurines, a 0.1 mm layer height is a good starting point because it preserves small details such as facial features, clothing patterns, and accessories.
Option B — Use a Print Service
If you do not own a printer, you can upload your model to a professional service such as Shapeways, JLCPCB, or Craftcloud. These platforms can produce resin prints, high-detail collectibles, or even full-color figurines without requiring any hardware at home.
Option C — Display Your Figurine Digitally
A physical print is not the only option. Export a GLB file to display your figurine on a portfolio website, import it into a game engine like Unity or Unreal Engine, or view it in augmented reality using web-based 3D viewers.
For home prints, post-processing can make a major difference. Sanding removes visible layer lines, primer creates a smoother surface, and painting adds the final colors and personality. With the right finishing steps, an AI-generated model can become a polished collectible ready for display.
Tips for Getting the Best AI Figurine Results
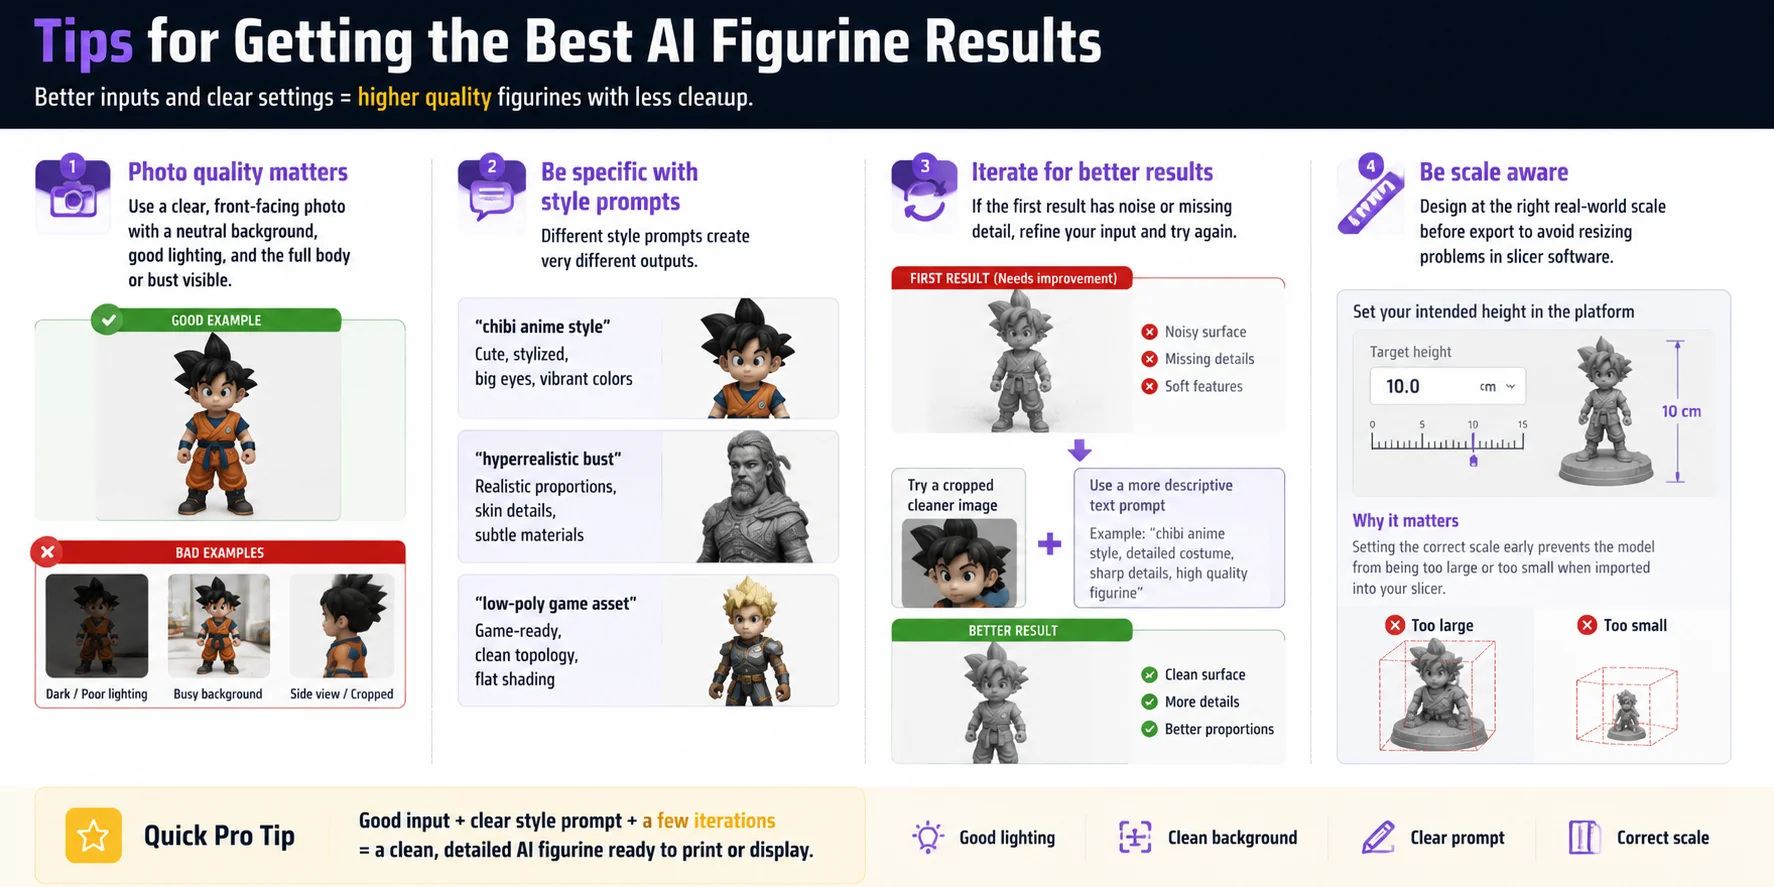
Getting a high-quality AI figurine starts with better inputs and a clear idea of the final result. Small improvements in your source image, prompt, and export settings can make a noticeable difference in the final model.
- Use a clear reference photo Choose a front-facing image with good lighting and a neutral background. Make sure the full body or main subject area is visible so the AI can understand the shape, proportions, and important details.
- Be specific with style prompts The style description strongly affects the output. A prompt like “chibi anime style” creates a cute collectible look, while “hyperrealistic bust” produces a more realistic sculpture. For game workflows, a prompt such as “low-poly game asset” helps guide the model toward cleaner, optimized geometry.
- Iterate when the first result is not perfect AI generation improves through refinement. If the model has noisy surfaces, missing details, or incorrect proportions, try uploading a cropped version of the image or adding more detailed instructions to your text prompt.
- Consider real-world scale before export Set your intended figurine size before exporting. Designing around a target height, such as a 10 cm collectible, helps avoid unexpected resizing problems when the model enters slicer software.
By combining better references, detailed prompts, and a few iterations, you can create AI figurines that look more accurate and require less cleanup before printing or sharing.
Frequently Asked Questions
How do I make an AI 3D model figure?
Upload a reference photo to an AI 3D model generator like Tripo AI, choose Image-to-3D, and the platform produces a mesh within seconds. You can then refine the texture, reduce polygon count, and export the file in STL or GLB format — no manual modeling required.
How do I make my own 3D figurine?
The easiest route is to use an AI figurine maker that converts a photo into a 3D mesh. Once you have the file, you can 3D print it at home or upload it to a print service like Shapeways. The whole process takes under 30 minutes for a first attempt.
Can I use AI to create 3D models?
Yes. Platforms like Tripo AI are built specifically for this — they take a text description or a single image and output a production-ready 3D model in seconds. You get a downloadable file in formats like GLB, OBJ, FBX, or STL.
How do I make a 3D object in AI?
In Tripo AI Studio, open the Image-to-3D or Text-to-3D tool, upload your input or type a description, and click generate. The result is a 3D mesh you can download, refine, and export immediately.
Can AI generate STL files for figurines?
Yes. Tripo AI exports directly to STL (geometry-only, ideal for FDM printing) and 3MF (which preserves color data). After export, import the file into a slicer like Bambu Studio or Prusa Slicer to prepare it for printing.
What is the best free AI figurine maker?
Tripo AI offers a free tier that lets you generate and download 3D models without a paid plan, making it a practical starting point. Free tiers typically cap the number of generations per day, so plan your sessions accordingly.
Is AI-generated 3D printing quality good enough for figurines?
For display figurines and prototypes, yes — modern AI 3D generators produce meshes with enough surface detail for resin or FDM printing at 100–150mm height. For commercial or collector-grade figures requiring fine sub-millimeter detail, manual cleanup in a sculpting tool (Blender, ZBrush) is still recommended.
What file format should I use for 3D printing a figurine?
Use STL for single-color prints and 3MF for multi-color or full-color prints. OBJ works as well but requires a separate MTL texture file. Most slicers accept all three formats.
Conclusion
Making a custom 3D figurine with AI is now accessible to everyone — from a single photo, you can create a print-ready model in under 30 minutes without any 3D modeling experience. The key is choosing a platform that supports the complete workflow, from AI generation and model refinement to exporting the right format for printing, sharing, or digital use.
**Main CTA → Try it now at **Tripo AI Studio
**Secondary CTA → See plans at **Tripo AI Pricing