Watertight 3D Models: Why They Matter for 3D Printing
TL;DR
- "Watertight" = manifold: a fully closed mesh with no holes, no flipped normals, no self-intersections—a real solid, not just a hollow shell.
- Your slicer needs it: a non-watertight model has an undefined inside/outside, so it slices wrong, prints with gaps, or fails outright.
- Five usual culprits: holes, non-manifold edges, inverted normals, internal/overlapping geometry, and zero-thickness surfaces.
- Check first, then fix: use Blender's 3D Print Toolbox, Meshmixer's Inspector, or Netfabb to find errors before you slice.
- Skip the repair grind: AI tools like Tripo generate clean, manifold meshes from text or an image, then export straight to STL or 3MF.
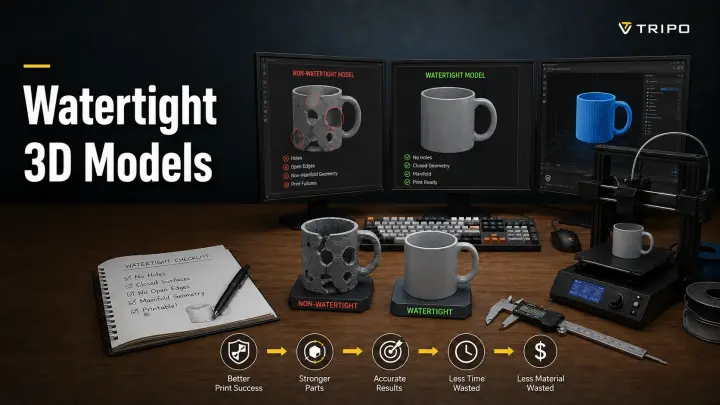
A watertight 3D model is a mesh that's completely sealed—every edge belongs to exactly two faces, with no holes, gaps, or flipped surfaces. 3D printers need this because the slicer has to know precisely what's inside the object and what's outside. If your model isn't watertight, you can repair it manually—or generate a clean one from the start with an AI tool like Tripo.
What Does "Watertight" Actually Mean?
In 3D printing, "watertight" is one of the most important (and most misunderstood) concepts. It describes whether a mesh is a complete, sealed solid that a slicer can interpret as a real physical object rather than just a collection of surfaces.
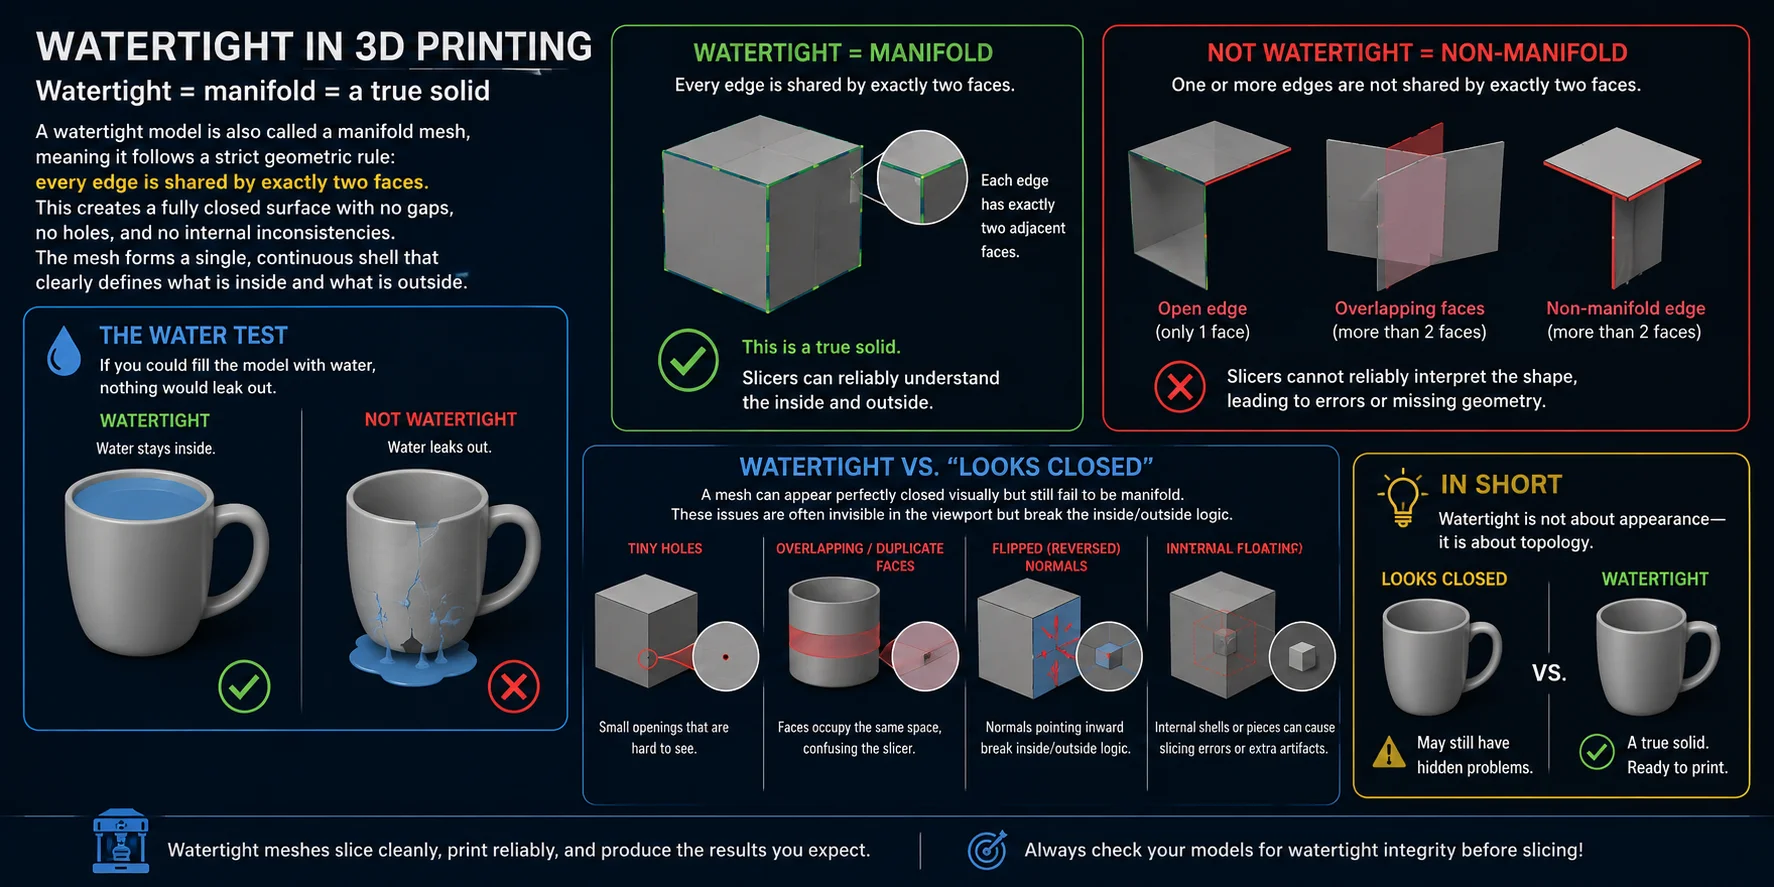
Watertight = manifold = a true solid
A watertight model is also called a manifold mesh, meaning it follows a strict geometric rule: every edge is shared by exactly two faces. This creates a fully closed surface with no gaps, no holes, and no internal inconsistencies. In other words, the mesh forms a single, continuous shell that clearly defines what is inside and what is outside.
A simple way to understand it is this: If you could fill the model with water, nothing would leak out.
That "water test" is the easiest mental model—if the shape behaves like a sealed container, it is watertight. If not, the slicer cannot reliably interpret it as a solid object, which often leads to failed prints or missing geometry.
Watertight vs. "looks closed"
A major mistake beginners make is assuming that a model that looks solid on screen is automatically watertight. This is not true.
A mesh can appear perfectly closed visually but still fail to be manifold. Common hidden issues include:
- Tiny holes that are hard to see
- Overlapping or duplicate faces
- Flipped (reversed) normals
- Internal floating geometry
These problems are often invisible in the viewport but break the "inside/outside" logic that slicers depend on. As a result, the model may slice incorrectly, produce missing layers, or completely fail to generate toolpaths.
In short: Watertight is not about appearance—it is about topology.
Why a Watertight Model Matters for 3D Printing
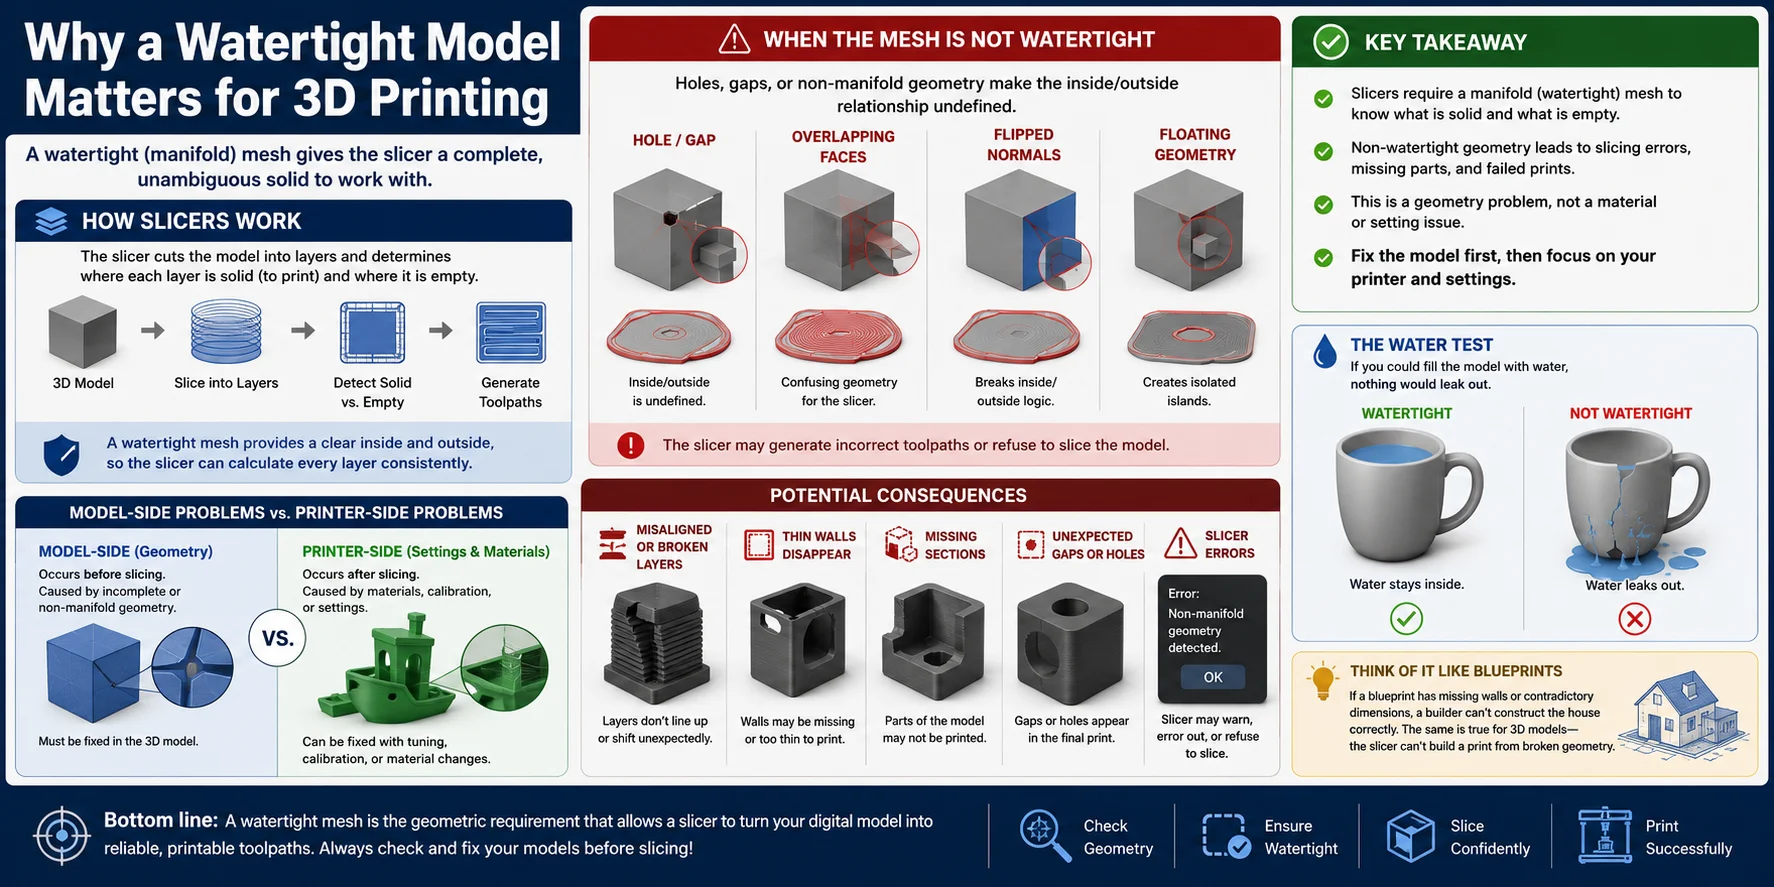
A watertight model is the foundation of successful 3D printing because it gives the slicer a complete, unambiguous solid to work with. Before your printer creates a single layer, the slicer must analyze the mesh and determine exactly which regions represent solid material and which represent empty space. That calculation is only possible when the model forms a fully enclosed volume.
During slicing, the software converts the 3D model into hundreds or even thousands of horizontal cross-sections. For every layer, it needs to know where to place extrusion paths, where to leave empty space, and where infill should be generated. A watertight mesh provides a clear inside and outside, allowing the slicer to calculate these regions consistently from top to bottom.
If the mesh contains holes, open edges, or other non-manifold geometry, that inside/outside relationship becomes undefined. Instead of a complete solid, the slicer sees an incomplete shell or conflicting surfaces. Because of this ambiguity, it may generate incorrect toolpaths or refuse to slice the model altogether.
The consequences often appear as:
- Missing sections of the model
- Misaligned or broken layers
- Thin walls that disappear during slicing
- Unexpected gaps or holes in the print
- Slicer warnings or errors about non-manifold geometry
Many beginners try to solve these problems by changing print settings such as layer height, nozzle temperature, infill, or wall count. Unfortunately, none of those adjustments can repair broken geometry. A missing face in the mesh cannot be compensated for by different materials, slower print speeds, or stronger cooling.
This highlights an important distinction between model-side problems and printer-side problems. Model-side problems originate in the geometry itself—the mesh is incomplete, inconsistent, or non-manifold. Printer-side problems occur after slicing and include issues such as poor adhesion, warping, stringing, or incorrect temperature settings. While printer-side issues can often be fixed through calibration or material adjustments, geometry errors must be repaired before slicing.
Think of it this way: the slicer is like an architect reading a blueprint. If the blueprint has missing walls or contradictory dimensions, the builder cannot construct the house correctly. Likewise, if a 3D model is not watertight, the slicer cannot accurately determine what should become solid plastic.
In short, a watertight mesh is not simply a quality improvement—it is the geometric requirement that allows a slicer to convert a digital model into printable toolpaths. Before tuning your printer or experimenting with materials, make sure the model itself is a true, manifold solid.
The 5 Things That Break Watertightness
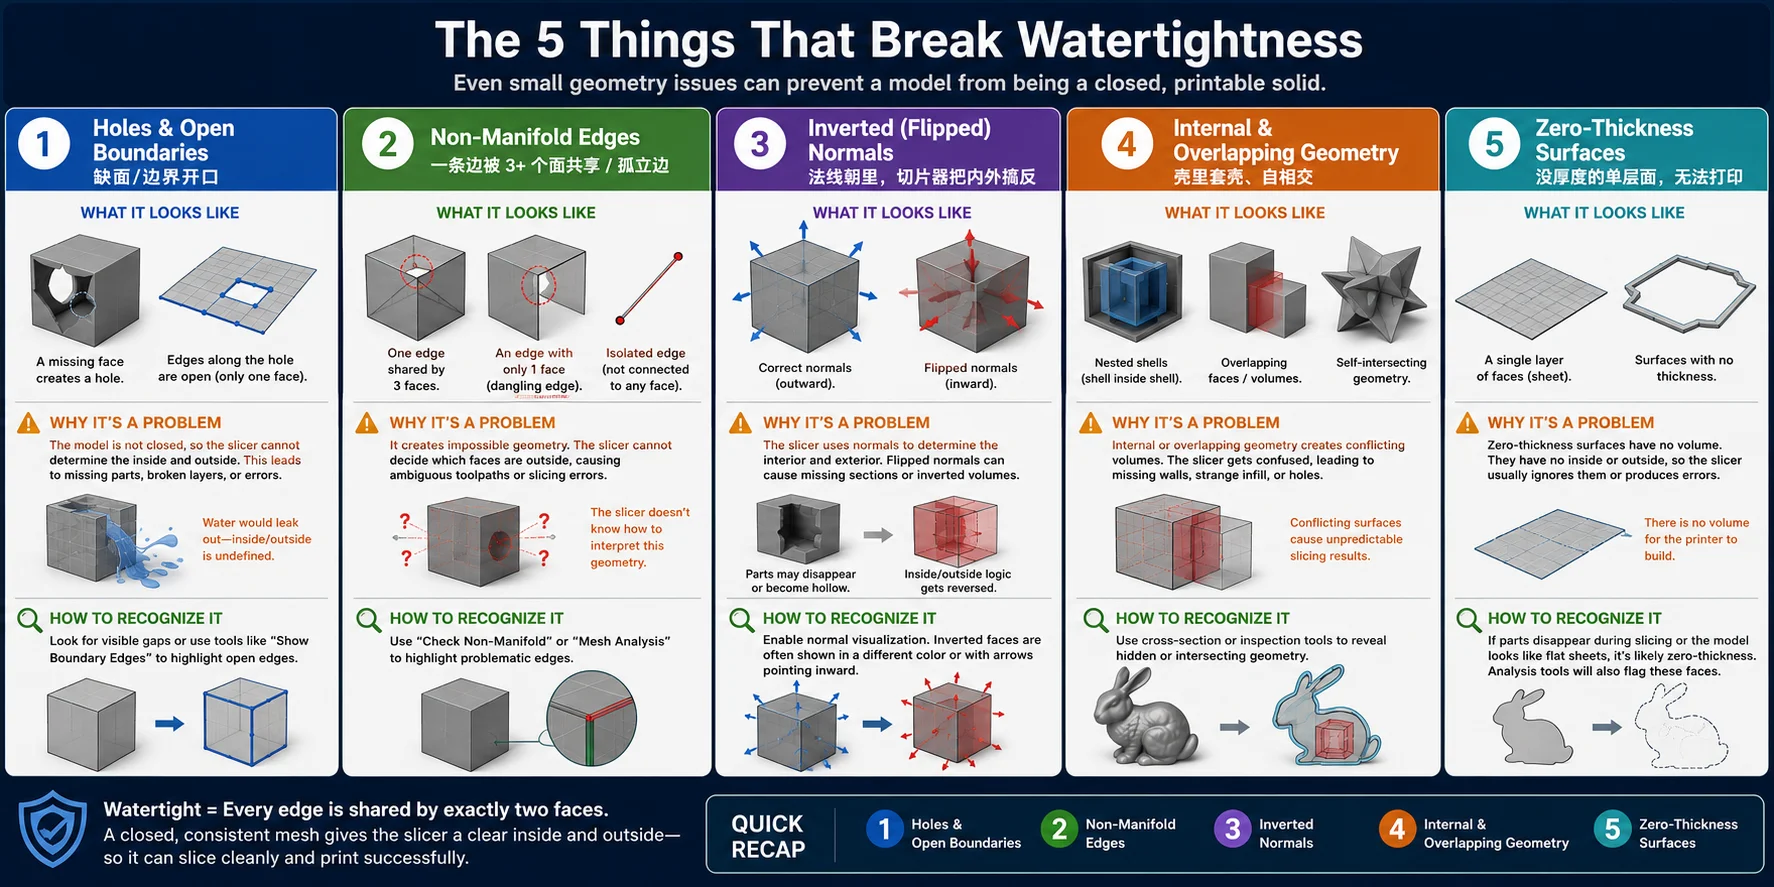
Even models that look perfectly fine on screen can contain hidden geometry errors that prevent them from being truly watertight. These problems confuse the slicer because they break the clear definition of what is inside and outside the model. Fortunately, most watertight issues fall into five common categories.
Holes & Open Boundaries
The most obvious watertight problem is a hole in the mesh. This happens when one or more faces are missing, leaving an opening in the surface. Open boundaries can also appear as edges that are connected to only one face instead of two.
Why it causes problems:
A hole breaks the closed shell, so the slicer cannot determine where the solid ends and empty space begins. Depending on the size and location of the gap, the slicer may ignore part of the model or generate missing walls.
How to recognize it:
Look for visible gaps in the mesh, or use your software's "Show Boundary Edges" or "Mesh Analysis" tool to highlight open edges automatically.
Non-Manifold Edges
A manifold mesh requires every edge to belong to exactly two faces. A non-manifold edge occurs when three or more faces share the same edge, or when an edge belongs to only one face. Isolated edges and disconnected vertices also fall into this category.
Why it causes problems:
These configurations create impossible geometry. The slicer cannot decide which faces belong to the outside of the object, leading to ambiguous toolpaths or slicing errors.
How to recognize it:
Most CAD programs and mesh repair tools include a "Check Non-Manifold" function that highlights problematic edges in a different color.
Inverted (Flipped) Normals
Every polygon has a normal—a direction that tells software which side of the face is outside. If some normals point inward while others point outward, the mesh becomes inconsistent.
Why it causes problems:
The slicer uses face normals to determine the interior and exterior of the model. Flipped normals can make sections of the object appear hollow, disappear entirely, or produce incorrect infill.
How to recognize it:
Enable a normal visualization mode. Faces with reversed normals often appear darker, transparent, or display arrows pointing inward instead of outward.
Internal & Overlapping Geometry
Sometimes a model contains extra geometry hidden inside the main shell. This may include nested shells, floating parts, self-intersecting surfaces, or duplicate faces occupying the same space.
Why it causes problems:
Internal geometry creates conflicting volumes, while overlapping faces make it unclear which surface should define the exterior. These conflicts often result in unexpected holes, strange infill patterns, or missing sections after slicing.
How to recognize it:
Cut the model with a cross-sectional view or use an inspection tool to reveal hidden geometry inside the object.
Zero-Thickness Surfaces
A zero-thickness surface is exactly what it sounds like—a single polygon sheet with no volume. While it may look like a solid object on screen, it has no printable thickness.
Why it causes problems:
A 3D printer can only manufacture objects with physical volume. Since zero-thickness surfaces have no inside or outside, the slicer usually ignores them or produces incomplete toolpaths.
How to recognize it:
If the model consists of flat sheets instead of enclosed walls, or if parts disappear during slicing, the geometry likely has zero thickness. Most mesh analysis tools will also flag these surfaces as non-manifold.
In short, nearly every watertight failure comes down to one of these five issues. Learning to identify holes, non-manifold edges, flipped normals, internal geometry, and zero-thickness surfaces will help you diagnose mesh problems quickly and produce models that slice cleanly and print reliably.
How to Check If Your Model Is Watertight
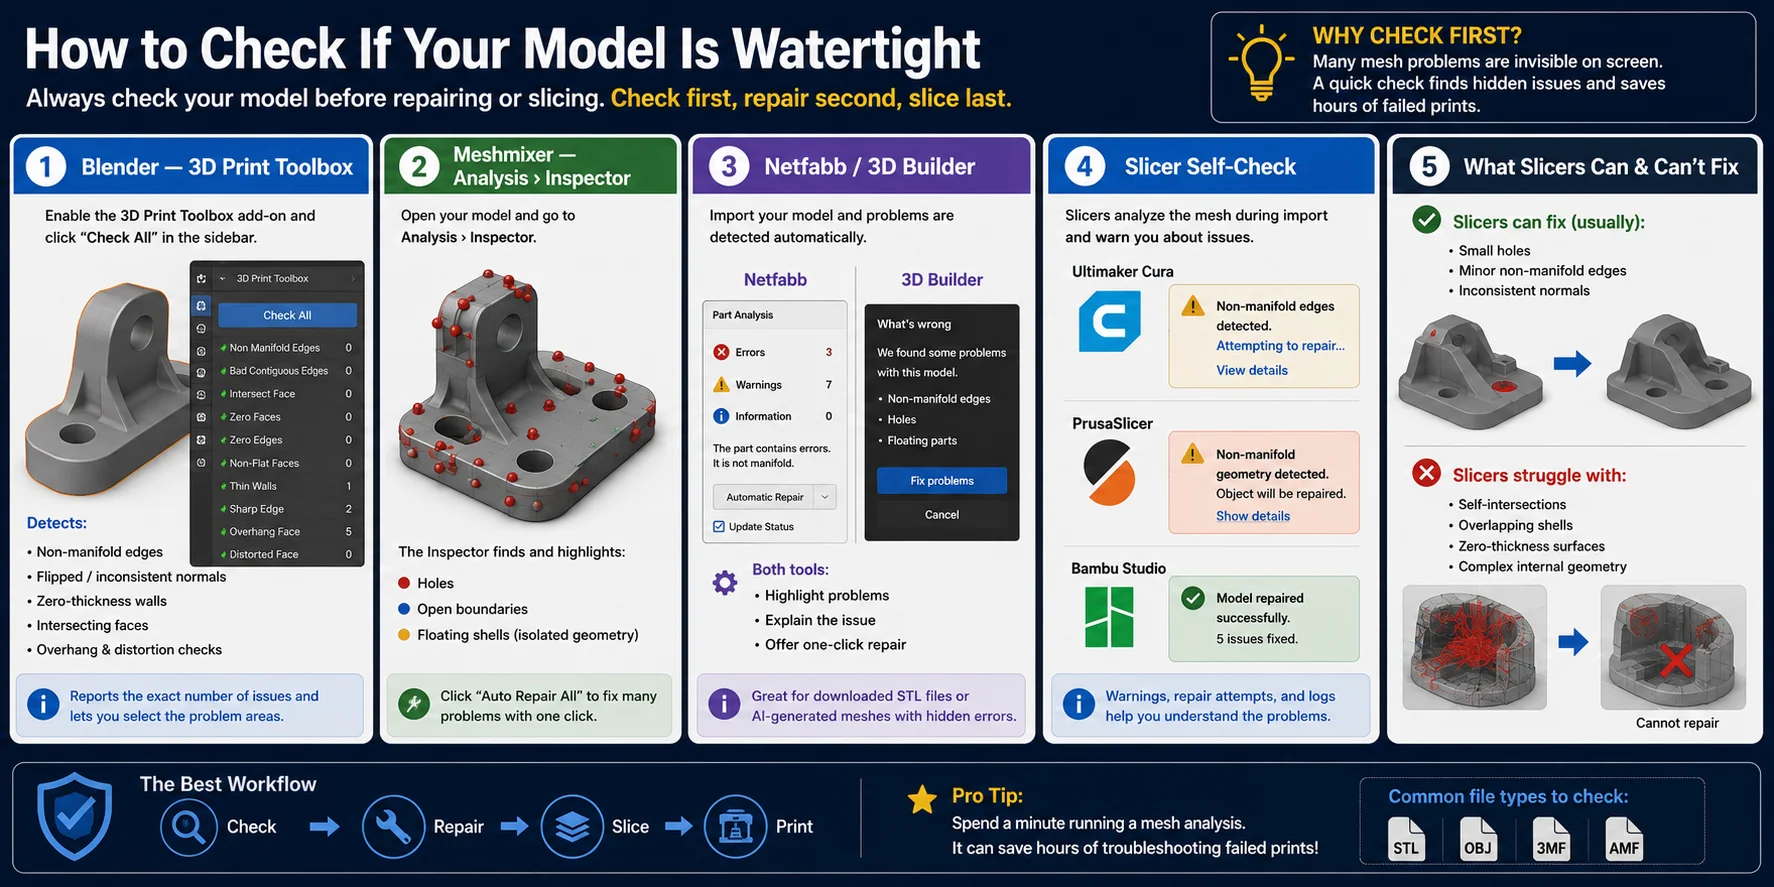
Before trying to repair a mesh, the first step should always be to inspect it. Many geometry problems are invisible in the viewport, so a model that appears perfectly solid may still contain holes, non-manifold edges, flipped normals, or zero-thickness surfaces. Fortunately, most modern 3D modeling and slicing software includes built-in tools that can detect these issues automatically.
Blender — 3D Print Toolbox
If you use Blender, enable the 3D Print Toolbox add-on (included with Blender). Once enabled, open the sidebar and click Check All.
The tool scans your mesh for common 3D printing problems, including:
- Non-manifold edges
- Flipped or inconsistent normals
- Zero-thickness walls
- Intersecting faces
- Overhang and distortion checks
Instead of guessing where the problem is, Blender reports the exact number of errors and lets you select the affected geometry, making repairs much faster.
Meshmixer — Analysis › Inspector
Meshmixer remains one of the easiest tools for checking mesh integrity. Open your model and choose Analysis → Inspector.
The Inspector automatically searches for:
- Holes in the mesh
- Open boundaries
- Floating shells (isolated geometry)
Detected problems are marked with colored spheres, making them easy to locate. In many cases, Meshmixer can also repair the issue with a single click.
Netfabb & Microsoft 3D Builder
Both Autodesk Netfabb and Microsoft 3D Builder are designed to detect mesh errors as soon as a model is imported.
If the model is not watertight, you'll typically receive an automatic warning. Both applications include built-in repair functions that can close holes, remove invalid geometry, and restore a manifold mesh without requiring manual editing.
These tools are especially useful when working with downloaded STL files or AI-generated meshes that often contain hidden topology errors.
Let Your Slicer Check the Model
Even if you don't use dedicated repair software, your slicer provides an important final check before printing.
Programs such as Cura, PrusaSlicer, and Bambu Studio analyze the mesh during import. If they detect non-manifold geometry or other mesh inconsistencies, they may:
- Display a "Non-Manifold" warning
- Attempt an automatic mesh repair
- Generate repair logs or error messages
- Fail to slice the model if the geometry is too damaged
Keep in mind that automatic repairs are convenient but not perfect. A slicer may successfully patch small holes, yet struggle with severe self-intersections, overlapping shells, or zero-thickness surfaces. That's why it's best to inspect the model before relying on automatic fixes.
The best workflow is simple: check first, repair second, slice last. Spending a minute running a mesh analysis can save hours of troubleshooting failed prints later.
How to Fix a Non-Watertight STL
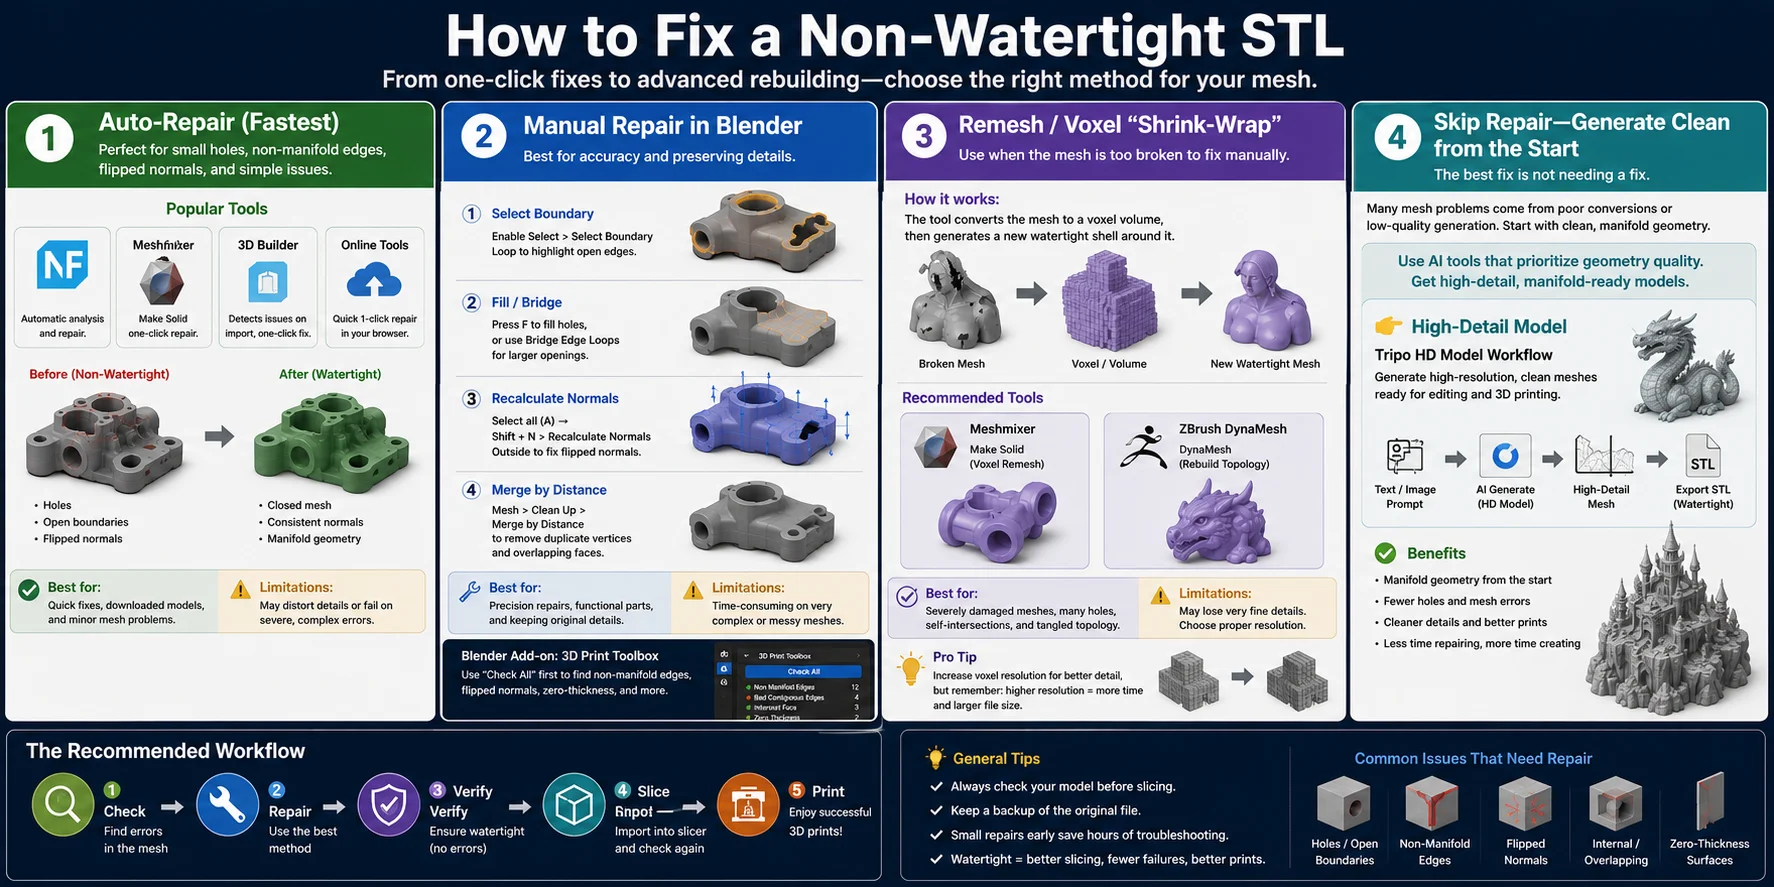
Once you've confirmed that an STL is not watertight, the next step is choosing the right repair method. The best approach depends on how badly the mesh is damaged. Small holes can often be repaired automatically, while heavily corrupted models may require manual editing or complete remeshing.
The good news is that you don't always need to rebuild the model from scratch. Start with the simplest solution first, then move to more advanced techniques only if necessary.
Auto-Repair (The Fastest Option)
For most downloaded or AI-generated STL files, automatic repair is the quickest place to start.
Several popular tools can detect and repair common mesh problems with just a few clicks:
- Autodesk Netfabb – Automatically finds holes, non-manifold edges, and invalid faces, then repairs them.
- Meshmixer – Make Solid – Converts a damaged mesh into a new watertight shell by rebuilding its geometry.
- Microsoft 3D Builder – Often detects mesh errors immediately after import and offers a one-click repair.
- Online STL repair tools – Useful for quick fixes when you don't want to install software.
Automatic repair works well for missing faces, small gaps, inconsistent normals, and simple non-manifold geometry. However, if the mesh contains severe self-intersections or complex overlapping shells, the repaired result may lose fine details or alter the original shape.
Manual Repair in Blender
When automatic repair isn't enough, Blender provides precise control over the mesh.
Common repair operations include:
- Fill or Bridge Edge Loops to close holes and open boundaries.
- Recalculate Normals Outside to fix flipped face normals.
- Merge by Distance to remove duplicate vertices that create overlapping geometry.
- Delete floating pieces or intersecting internal geometry manually.
Although manual repair takes longer, it preserves the original shape much better than fully automatic reconstruction. It's the preferred approach for mechanical parts, functional prints, or models where dimensional accuracy matters.
Remesh or Voxel Rebuild for Severely Damaged Meshes
Sometimes a mesh is simply too broken to repair face by face. If it contains hundreds of holes, tangled topology, or extensive self-intersections, remeshing is often the fastest solution.
Tools such as Meshmixer's Make Solid, ZBrush DynaMesh, or voxel remeshing workflows in Blender rebuild the entire object as a new closed shell.
Think of this process as wrapping the model in a brand-new skin. Instead of repairing every individual triangle, the software samples the overall volume and generates a fresh manifold mesh around it.
This approach almost always produces a watertight model, although very fine details may become softer depending on the remesh resolution.
Skip Repair—Generate a Clean Mesh from the Start
The easiest repair is the one you never have to perform.
Many mesh problems originate during model creation, especially when using low-quality conversions or older AI generators. Starting with cleaner geometry dramatically reduces the need for repair later.
If you're creating models with AI, choose a workflow that prioritizes geometry quality instead of textures. A High-Detail Model workflow produces denser, cleaner meshes that are much more likely to be manifold and ready for repair-free printing. For example, Tripo's HD Model workflow is designed to generate high-resolution geometry suitable for downstream editing, STL export, and 3D printing.
No matter which method you choose, follow the same workflow every time:
- Check the mesh for errors.
- Try automatic repair first.
- Use manual editing if needed.
- Remesh only when the topology is beyond repair.
- Verify that the model is watertight before slicing.
Following this progression saves time, preserves detail whenever possible, and greatly increases the chances of producing a successful print on the first attempt.
Which Repair Tool Should You Use?
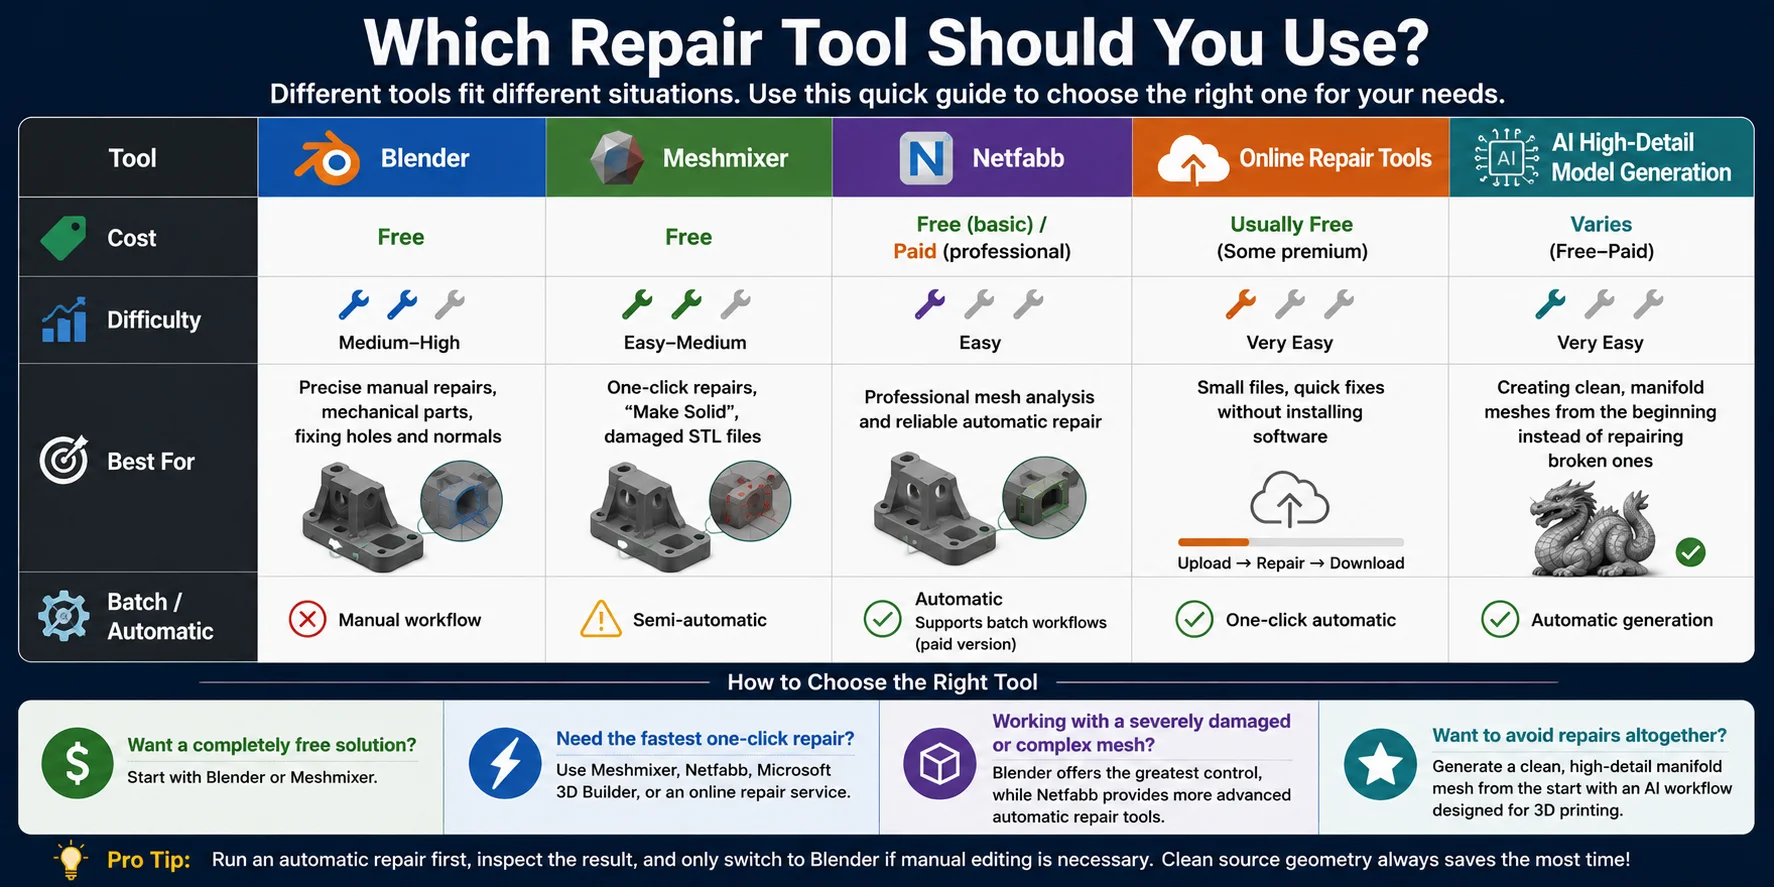
No single repair tool is the best for every situation. Some are designed for quick one-click fixes, while others offer precise manual editing or advanced mesh reconstruction. The right choice depends on your budget, experience, and the condition of your STL file.
The table below summarizes the strengths of the most common options.
| Tool | Cost | Difficulty | Best for | Auto? |
|---|---|---|---|---|
| Blender (+ 3D Print Toolbox) | Free | Medium | Full control, manual fixes | No |
| Meshmixer | Free | Easy–Medium | Inspector auto-patch, remesh | Partial |
| Netfabb / 3D Builder | Free–Paid | Easy | One-click STL repair | Yes |
| Online auto-repair | Free–Freemium | Easy | Quick fixes, no install | Yes |
| AI generation (Tripo) | Freemium | Easy | Clean manifold mesh from text/image | Yes (by design) |
Rather than asking which tool is "best," it's more useful to choose the one that matches your workflow:
- Want a completely free solution? Start with Blender or Meshmixer.
- Need the fastest one-click repair? Use Meshmixer, Netfabb, Microsoft 3D Builder, or an online repair service.
- Working with a severely damaged or complex mesh? Blender offers the greatest control, while Netfabb provides more advanced automatic repair tools.
- Want to avoid repairs altogether? Generate a clean, high-detail manifold mesh from the start with an AI workflow designed for 3D printing, rather than fixing topology after the fact.
For most hobbyists, a practical workflow is simple: run an automatic repair first, inspect the result, and only switch to Blender if manual editing is necessary. If you're regularly creating new models instead of repairing old ones, starting with clean source geometry will save far more time than fixing broken meshes later.
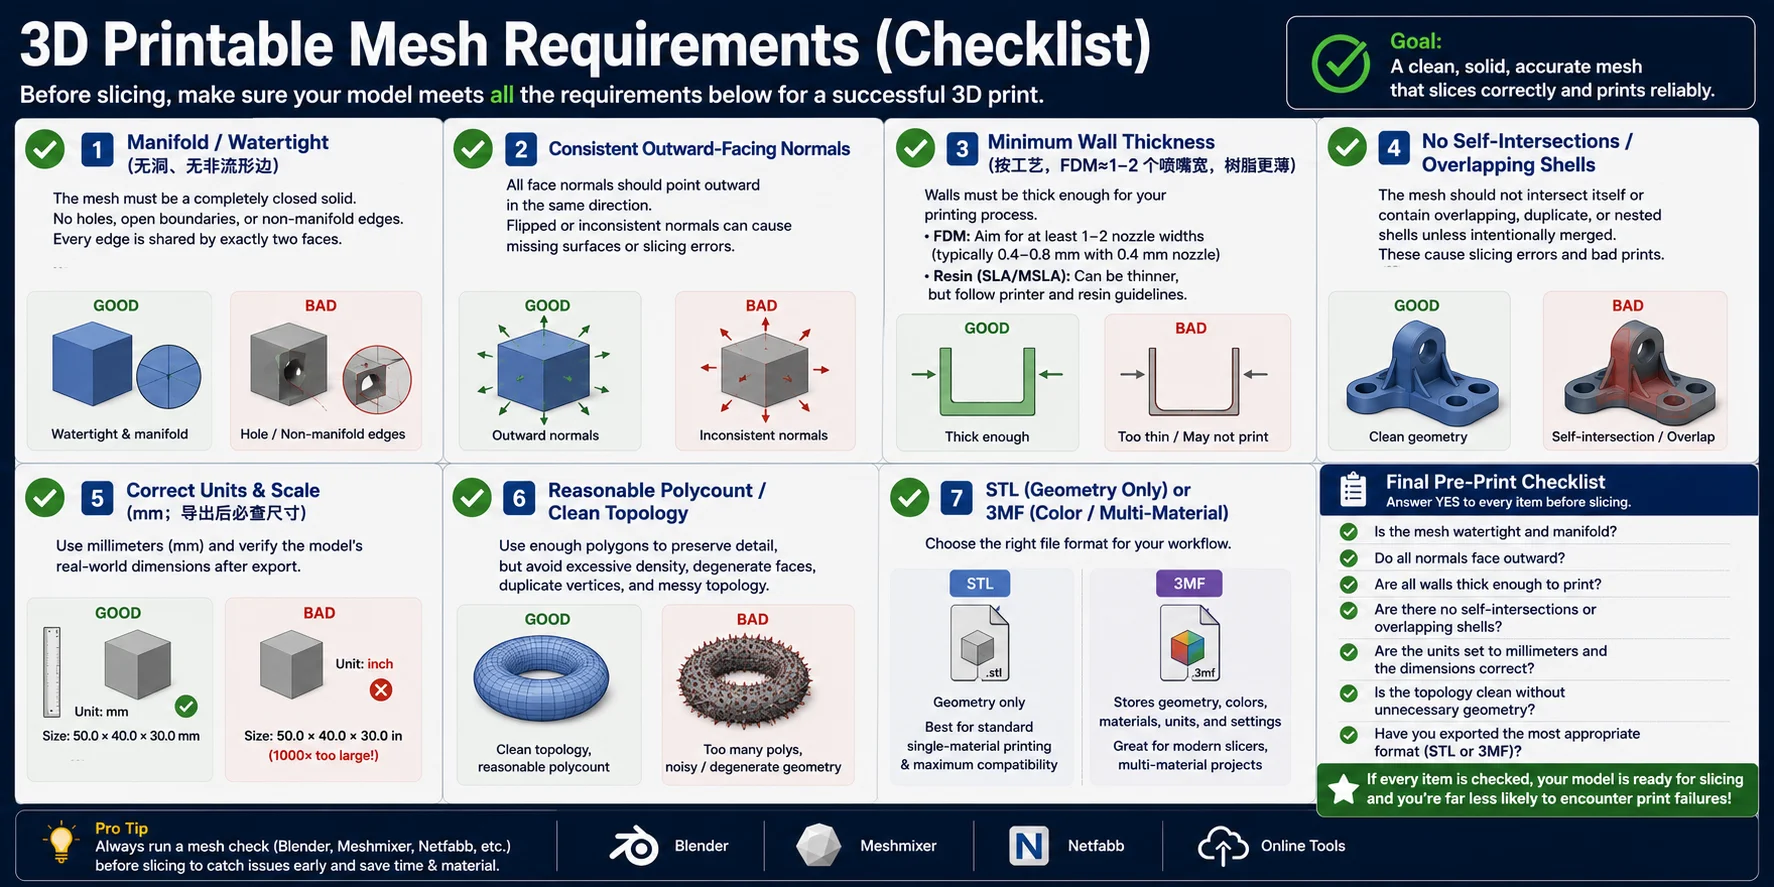
3D Printable Mesh Requirements (Checklist)
Before exporting your model or sending it to a slicer, run through this checklist. If every box is checked, your mesh is much more likely to slice correctly and produce a successful print. Most failed prints caused by geometry can be traced back to one or more of these requirements.
✅ Manifold (Watertight)
Your mesh must form a completely closed solid with no holes, open boundaries, or non-manifold edges. Every edge should be shared by exactly two faces so the slicer can clearly determine what is inside and outside the model.
✅ Consistent Outward-Facing Normals
All face normals should point outward in the same direction. Flipped or inconsistent normals confuse the slicer and can cause missing surfaces, incorrect infill, or hollow sections. Recalculate normals before exporting if necessary.
✅ Minimum Wall Thickness
Every printable feature must have enough physical thickness for your printing process.
- FDM: Aim for at least 1–2 nozzle widths (typically 0.4–0.8 mm with a 0.4 mm nozzle).
- Resin (SLA/MSLA): Thin walls are possible, but always follow your printer and resin manufacturer's recommendations for minimum thickness.
Walls that are too thin may disappear during slicing or break after printing.
✅ No Self-Intersections or Overlapping Shells
The mesh should not intersect itself or contain duplicate, overlapping, or nested shells unless they are intentionally merged. These geometry conflicts often produce slicing errors, missing layers, or unexpected internal cavities.
✅ Correct Units & Scale
Use millimeters (mm) as your working and export units whenever possible. After exporting, re-import the file or open it in your slicer to confirm the overall dimensions. Incorrect units are one of the most common causes of models printing much too large or too small.
✅ Reasonable Polycount & Clean Topology
A printable mesh does not need millions of unnecessary triangles. Use enough polygons to preserve smooth curves, but avoid excessive density, degenerate faces, duplicate vertices, and messy topology that slows editing and slicing.
✅ Choose the Right File Format
Export in the format that matches your workflow:
- STL – Geometry only. Best for standard single-material 3D printing and maximum software compatibility.
- 3MF – Stores geometry plus colors, materials, units, and print settings. Recommended for modern slicers, multi-material projects, and sharing complete print files.
Final Pre-Print Checklist
Before clicking Slice, make sure you can answer Yes to every question:
- ✅ Is the mesh watertight and manifold?
- ✅ Do all normals face outward?
- ✅ Are all walls thick enough to print?
- ✅ Are there no self-intersections or overlapping shells?
- ✅ Are the units set to millimeters and the dimensions correct?
- ✅ Is the topology clean without unnecessary geometry?
- ✅ Have you exported the most appropriate format (STL or 3MF)?
If every item is checked, your model is ready for slicing—and you're far less likely to encounter geometry-related print failures.
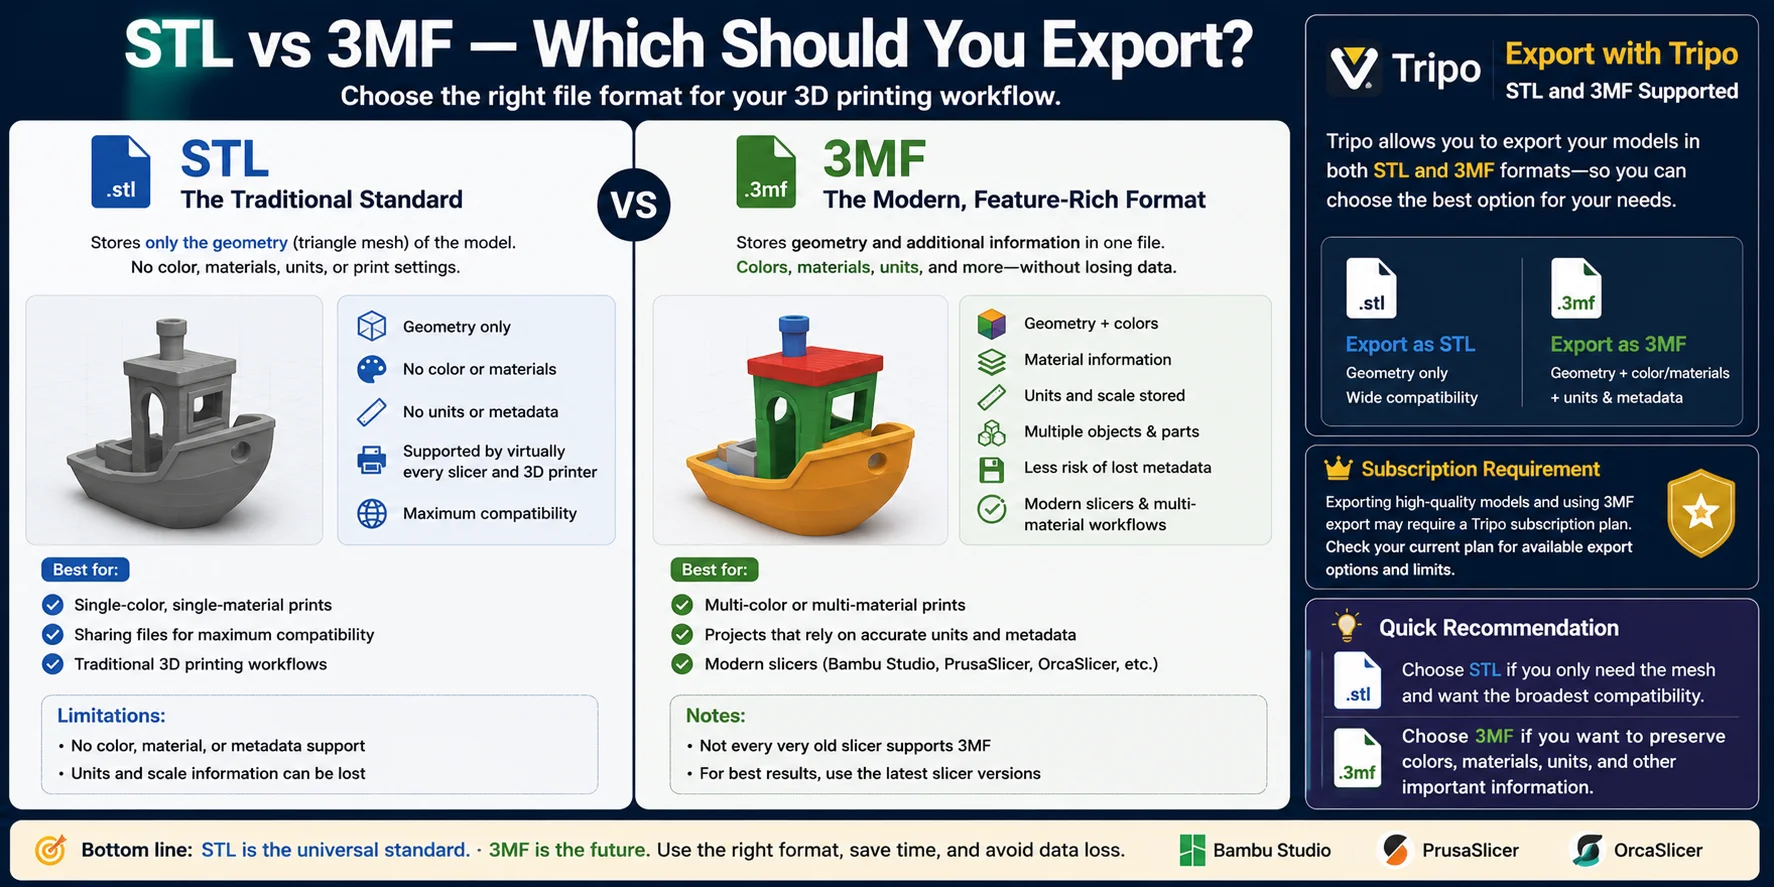
STL vs 3MF — Which Should You Export?
Once your mesh is clean and printable, the final step is choosing the right export format. For most 3D printing projects, that means deciding between STL and 3MF.
STL is the long-established standard for 3D printing. It stores only the model's geometry—the triangle mesh that defines the object's shape. Because it contains no color, material, units, or print settings, STL is supported by virtually every slicer and 3D printer on the market. If you're printing a simple single-material model or sharing files for maximum compatibility, STL is usually the safest choice.
3MF is the modern alternative. In addition to geometry, it can store colors, material assignments, measurement units, multiple objects, and other manufacturing data in a single file. Because this information stays with the model, 3MF reduces the risk of scaling errors and missing metadata when moving between software. It is also the preferred format for multi-color and multi-material printing in modern slicers.
A simple rule of thumb is:
- Export STL if you only need the mesh and want the broadest compatibility.
- Export 3MF if you want to preserve colors, materials, units, or other print information.
If you're generating models with Tripo, you can export in both STL and 3MF formats (depending on your subscription plan and available export options). Choose STL for traditional geometry-only workflows, or 3MF when you need a richer file that carries additional printing information into software such as Bambu Studio, PrusaSlicer, or OrcaSlicer.
For most modern 3D printing workflows, 3MF is the better long-term choice, while STL remains the universal format that works almost everywhere.
Frequently Asked Questions
What is a watertight 3D model?
A watertight 3D model is a completely closed mesh with no holes or non-manifold geometry. It's essential for 3D printing because slicers need a sealed model to generate correct toolpaths and reliable prints.
How do I make a 3D model watertight?
Repair the mesh by fixing holes, removing non-manifold edges, and correcting flipped normals until it becomes a single closed solid. Tools like Blender, Meshmixer, Netfabb, and Microsoft 3D Builder can automate most of the process, then verify the model is watertight before printing.
Can you make 3D prints watertight?
Not exactly. A watertight model is a closed mesh that's ready for slicing, while a waterproof print depends on print quality, materials, and settings. Every waterproof print starts with a watertight model, but a watertight model alone doesn't guarantee a waterproof result.
What does "non-manifold" mean and why does my slicer say it?
A non-manifold model contains geometry errors such as holes, overlapping faces, or edges that don't form a closed solid. Repair the mesh with tools like Blender, Meshmixer, or Netfabb, then verify it's watertight before slicing again.
How do I fix holes in an STL file?
Use a mesh repair tool to find and fill holes, making the STL a watertight mesh. For complex repairs, Blender, Meshmixer, or Netfabb provide more control before exporting and slicing the model again.
Do all 3D prints need a watertight model?
Yes. A watertight (manifold) model is required for reliable 3D printing because it allows the slicer to generate correct layers and toolpaths. While some slicers can repair minor errors automatically, fixing the model first is the best practice.
Conclusion
A watertight mesh is the foundation of reliable 3D printing—it ensures your model slices correctly, avoids geometry-related errors, and produces predictable results. Whether you inspect and repair an existing STL or start with a clean manifold mesh from the beginning, taking care of your model before slicing saves time and failed prints. Ready to streamline your workflow? Generate a clean, high-detail 3D model in Tripo AI Studio and export it as STL or 3MF for your next print.