How to Import an FBX File Into Blender (Step by Step)
TL;DR
- Two ways to import: File > Import > FBX, or drag the
.fbxstraight into the viewport.- If FBX (
.fbx) is missing from File > Import, search for FBX in Blender Preferences and install or enable the official importer for your Blender version.- Textures often don't auto-load; keep the
.fbxwith its texture folder, then assign maps manually if the model looks pink/purple.- Can't see the model? It's usually scale. Press Numpad
.to zoom to it, then fix the import scale.- For rigged or animated FBX files, start with the default armature settings and test Automatic Bone Orientation only if the imported bone axes look wrong.
To import an FBX file into Blender, go to File > Import > FBX (.fbx), select your file, and click Import FBX, or simply drag the .fbx from your file browser into the 3D viewport. If your asset is AI-generated, you can export FBX directly from Tripo Studio or send models to Blender in one click via the Blender Bridge tool. The tricky part is getting textures, scale, and animations to come through correctly, which is what this guide walks you through.
What Is an FBX File (and Why Blender Handles It Differently)
FBX is Autodesk's exchange format for 3D production. It can carry meshes, materials, skeletons, skin weights, cameras, and animation data in one asset package.
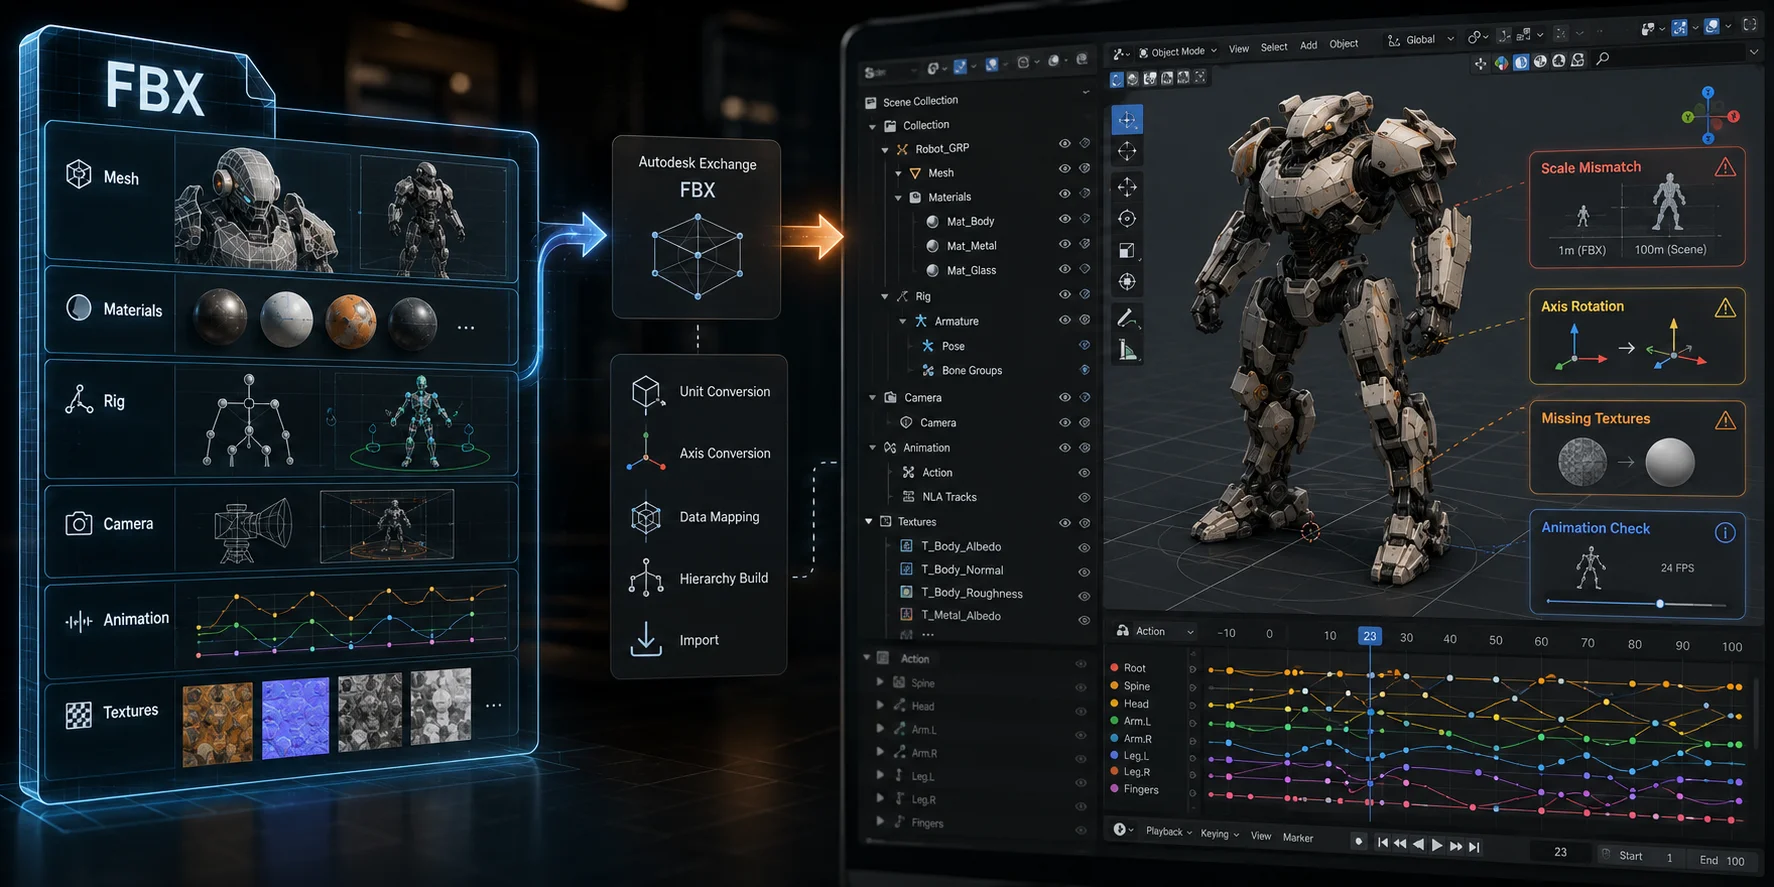
Because FBX is an interchange format, Blender has to interpret data created in other software. Geometry often transfers well, but texture paths, material nodes, bone axes, constraints, and animation settings may need checking after import.
Your model may come from an asset library, Maya, Mixamo, Unreal Engine, or your own AI workflow. If you generated it with AI, Tripo Studio can export it as FBX or send it directly into Blender through Blender Bridge, avoiding the manual download-and-import step.
Importing is the easy part. The more important work is making sure textures, scale, rigs, and animations arrive correctly, which this guide explains step by step.
Before You Import: Unzip and Keep the Texture Folder Together
Many downloaded FBX assets arrive as a .zip archive. Extract it before importing because Blender cannot import the archive itself as an FBX model.
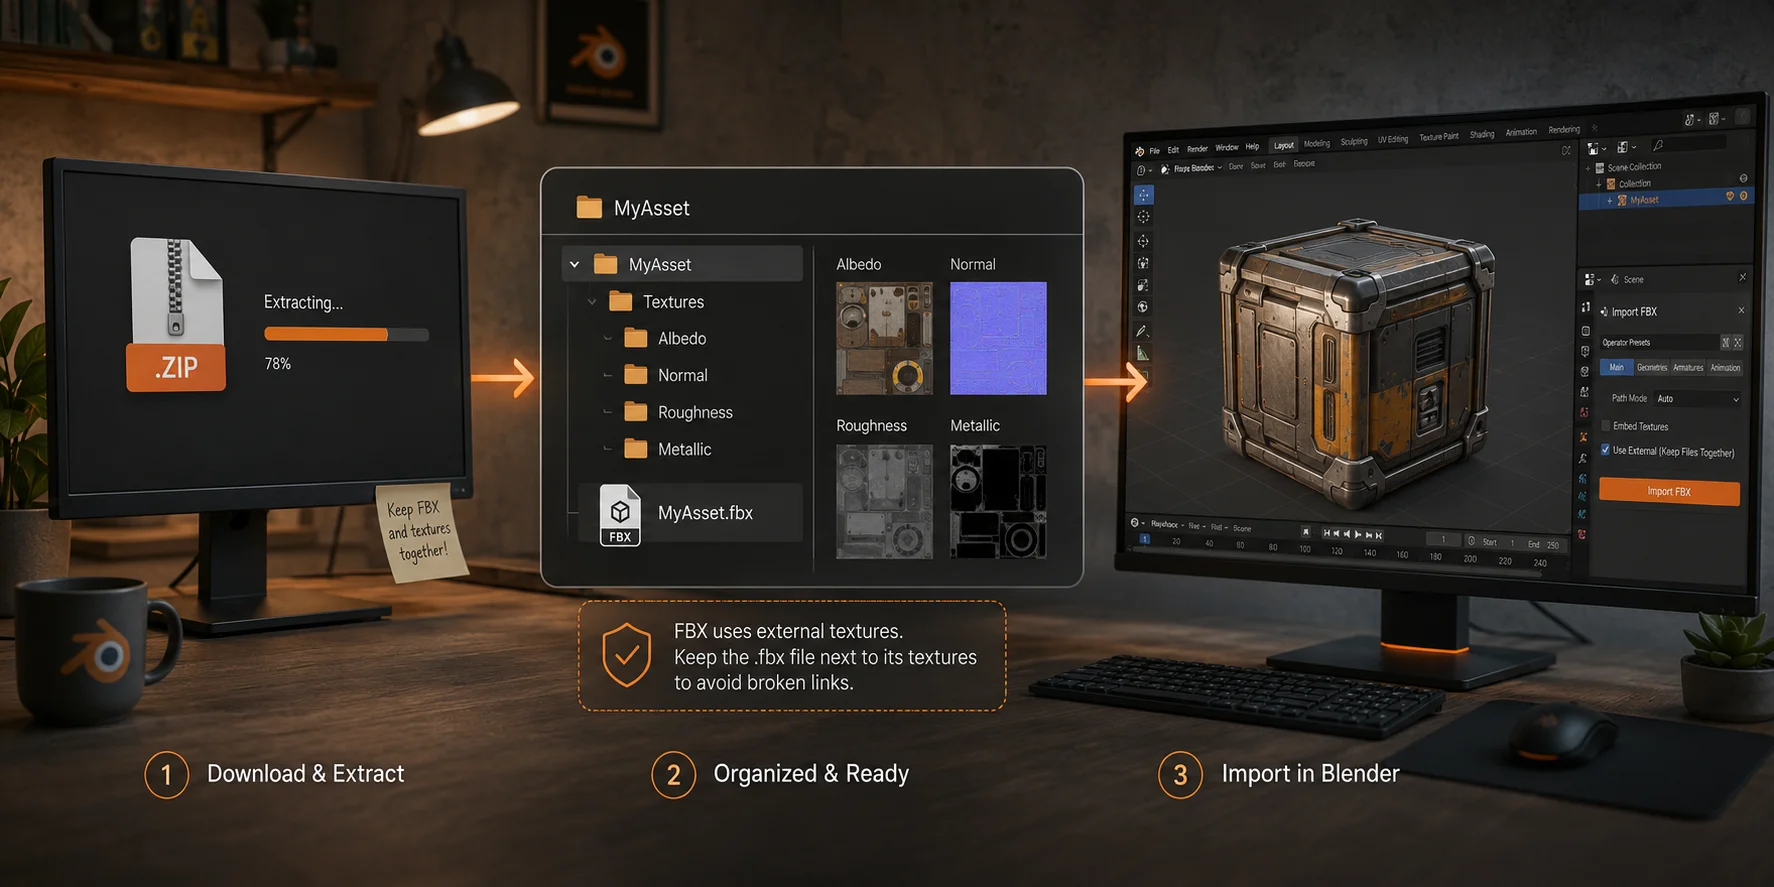
Keep the .fbx file beside its original textures, sourceimages, or material folder. Unlike GLB, FBX files often reference image files through external paths rather than embedding every texture.
Avoid moving, renaming, or separating these folders before import. Also keep the project path simple, preferably without unusual symbols or very long nested folders, to reduce broken-path problems.
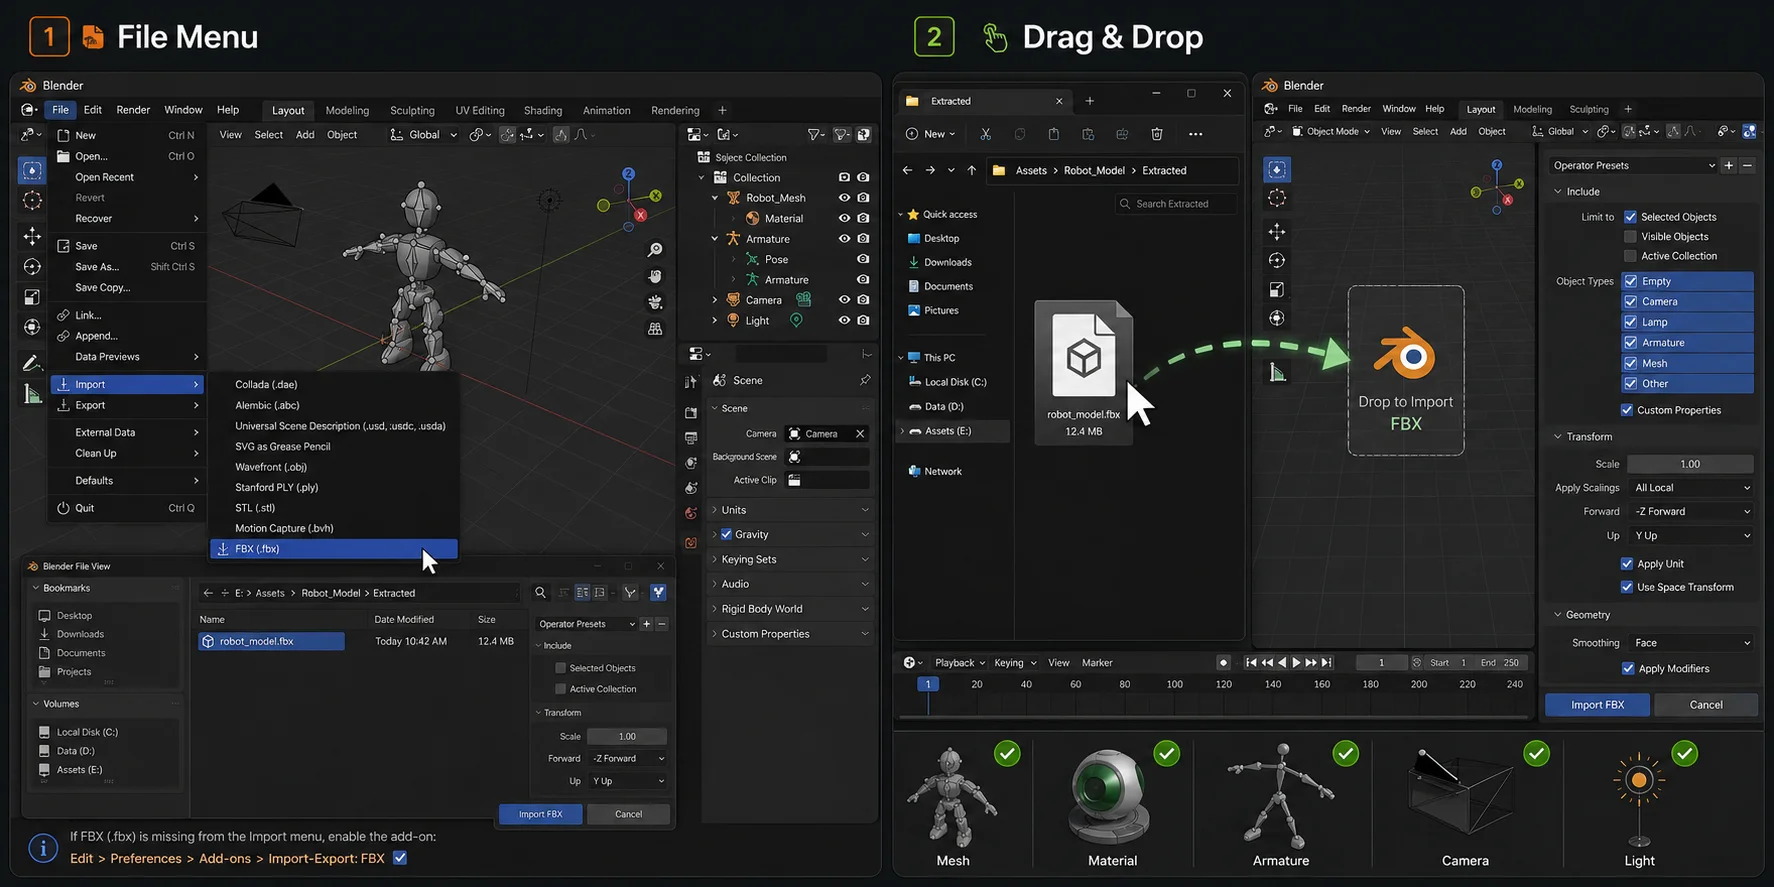
Method 1: Import via the File Menu
- Open Blender.
- Choose File > Import > FBX (.fbx).
- Browse to the extracted FBX file and select it.
- Optionally expand the import settings panel on the right.
- Click Import FBX.
After importing, check the Outliner. Blender may create mesh objects, materials, armatures, cameras, lights, and empty objects from the source file.
Don't See the FBX Option? Enable the Add-on
If FBX (.fbx) is missing from File > Import, open Edit > Preferences and search for FBX in the Extensions or Add-ons area, depending on your Blender version. Install or enable the official FBX importer if it is not available.
Method 2: Drag and Drop the FBX
You can also drag an .fbx file from your file manager into Blender's 3D Viewport. Blender opens the import panel, where you can confirm the defaults or adjust settings. Drag-and-drop is useful for quick tests, while the File menu is better for careful imports or multiple assets.
Key FBX Import Settings (and What to Touch)
Most static assets import correctly with default settings. Change only the options related to the issue you see.
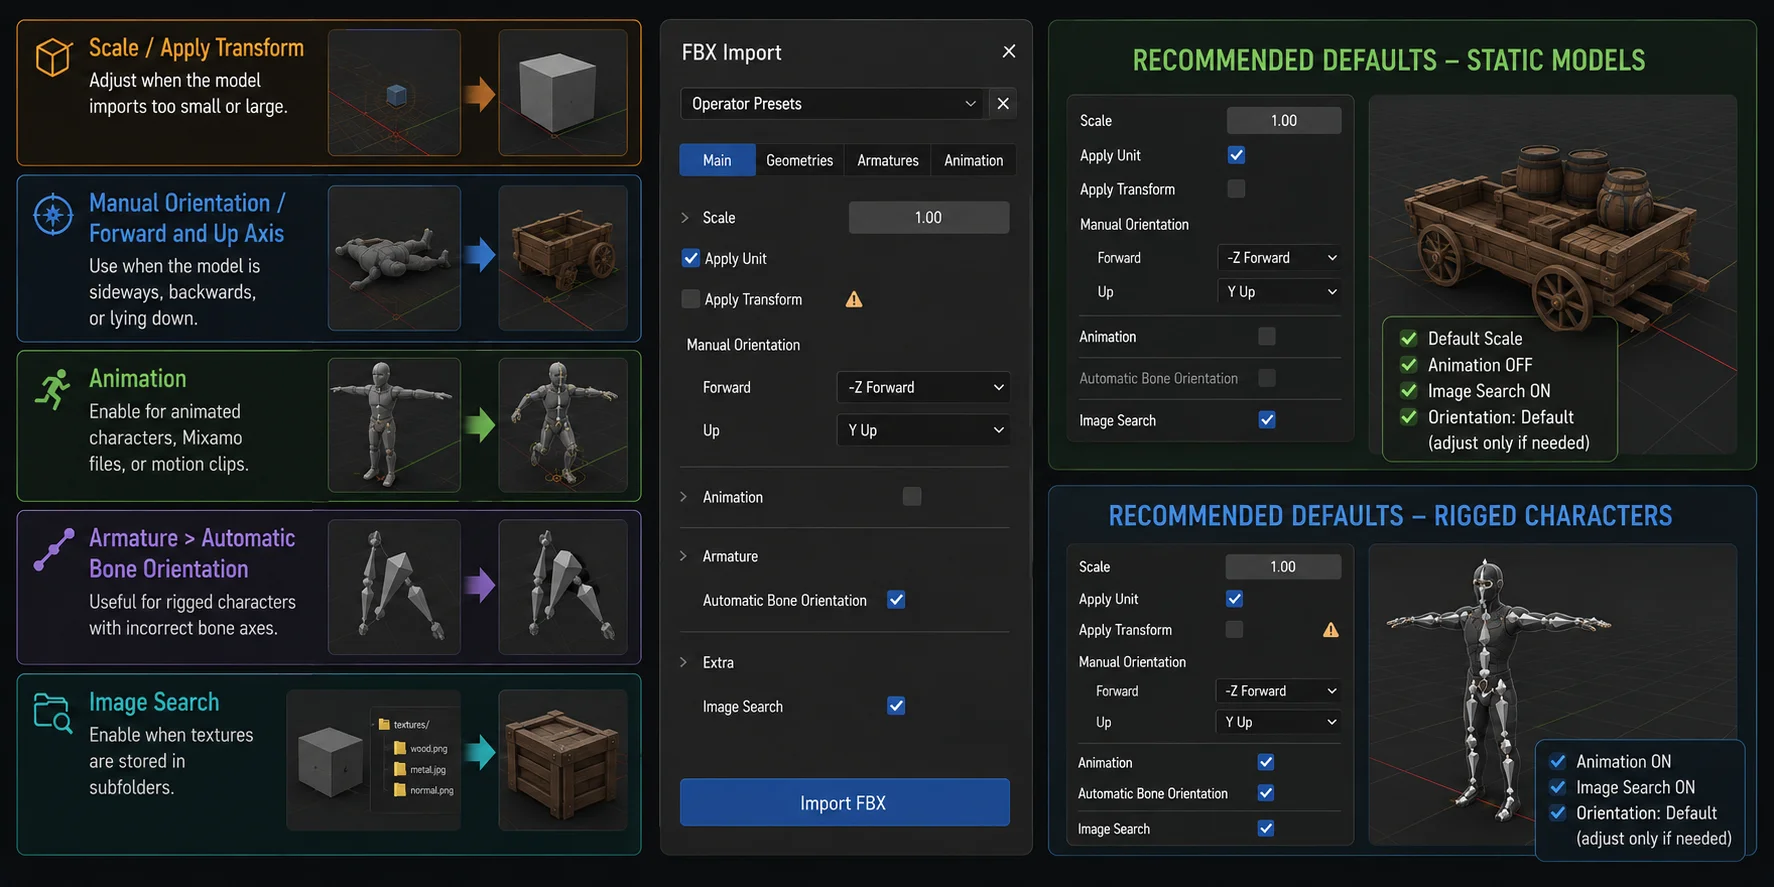
- Scale: Change this only when the imported model is clearly too small or too large. Treat Apply Transform as a separate compatibility option and test it on a copy if the source came from another 3D tool.
- Manual Orientation / Forward and Up Axis: Use when the model is sideways, backwards, or lying down.
- Animation: Enable for animated characters, Mixamo files, or motion clips.
- Armature > Automatic Bone Orientation: Leave it off for the first import. Re-import a copy and test it only if bone axes look wrong or your retargeting workflow requires it.
- Image Search: It can help Blender locate referenced images, but it does not repair missing, renamed, or unsupported material setups. Use Find Missing Files when texture paths are broken.
Recommended Defaults for a Clean Import
For static models, start with the default settings and leave Animation off. Use Image Search only as a convenience check; it is not a substitute for repairing broken texture paths.
For rigged characters, enable Animation if the source FBX contains motion data. Start with the default orientation and bone options, then re-import a copy only if the character's axes or retargeting results are incorrect.
Fix: My Model Imported but I Can't See It (Scale and Visibility)
Zoom to It First
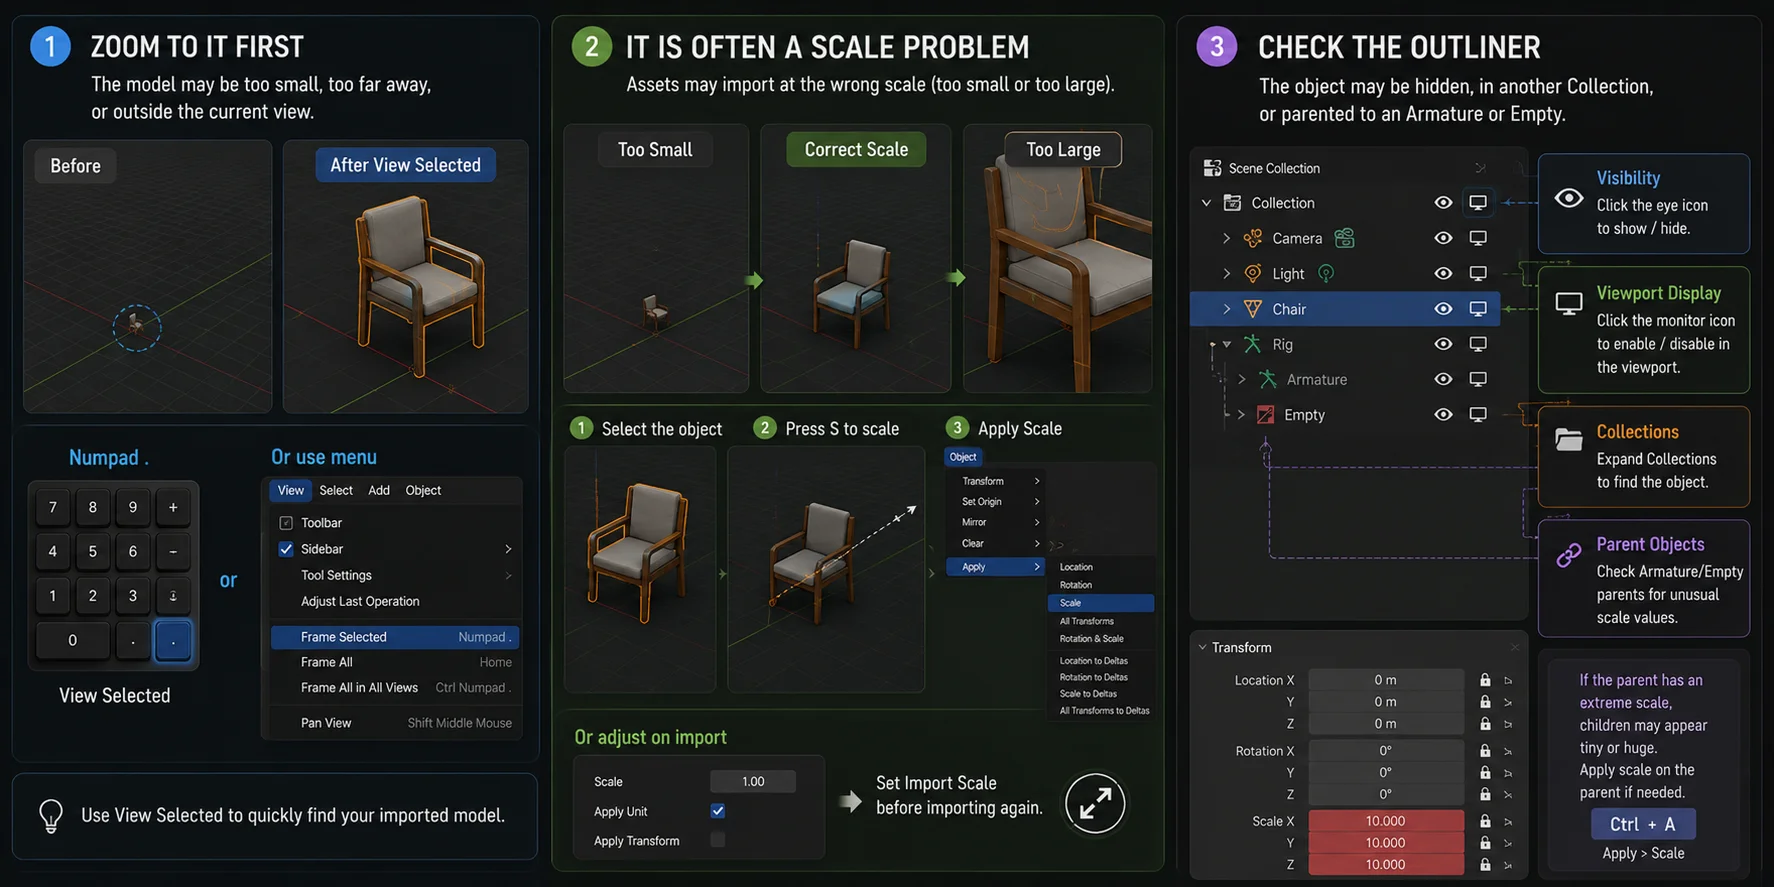
In the Outliner, expand the newly imported Collection and select an object with the mesh icon rather than a Camera, Light, Empty, or only the Armature. With the pointer over the 3D Viewport, press Numpad . to run View Selected and frame that mesh. Without a numpad, choose View > Frame Selected.
Check Scale Next
Assets from Maya, Unreal Engine, or other tools may import at 0.01x or 100x the expected size.
Select the object, press S, and resize it. Then apply the result through:
Object > Apply > Scale
If you know the original scale, you can also adjust Import Scale before importing again.
Check the Outliner
If framing does not help, inspect the Outliner. The object may be hidden, inside another Collection, or parented to an Armature or Empty.
Check the eye and monitor icons, expand Collections, and confirm that the mesh is enabled. Also inspect parent objects for unusual scale values.
Fix: Textures Missing or Model Looks Pink/Purple
Why It Happens
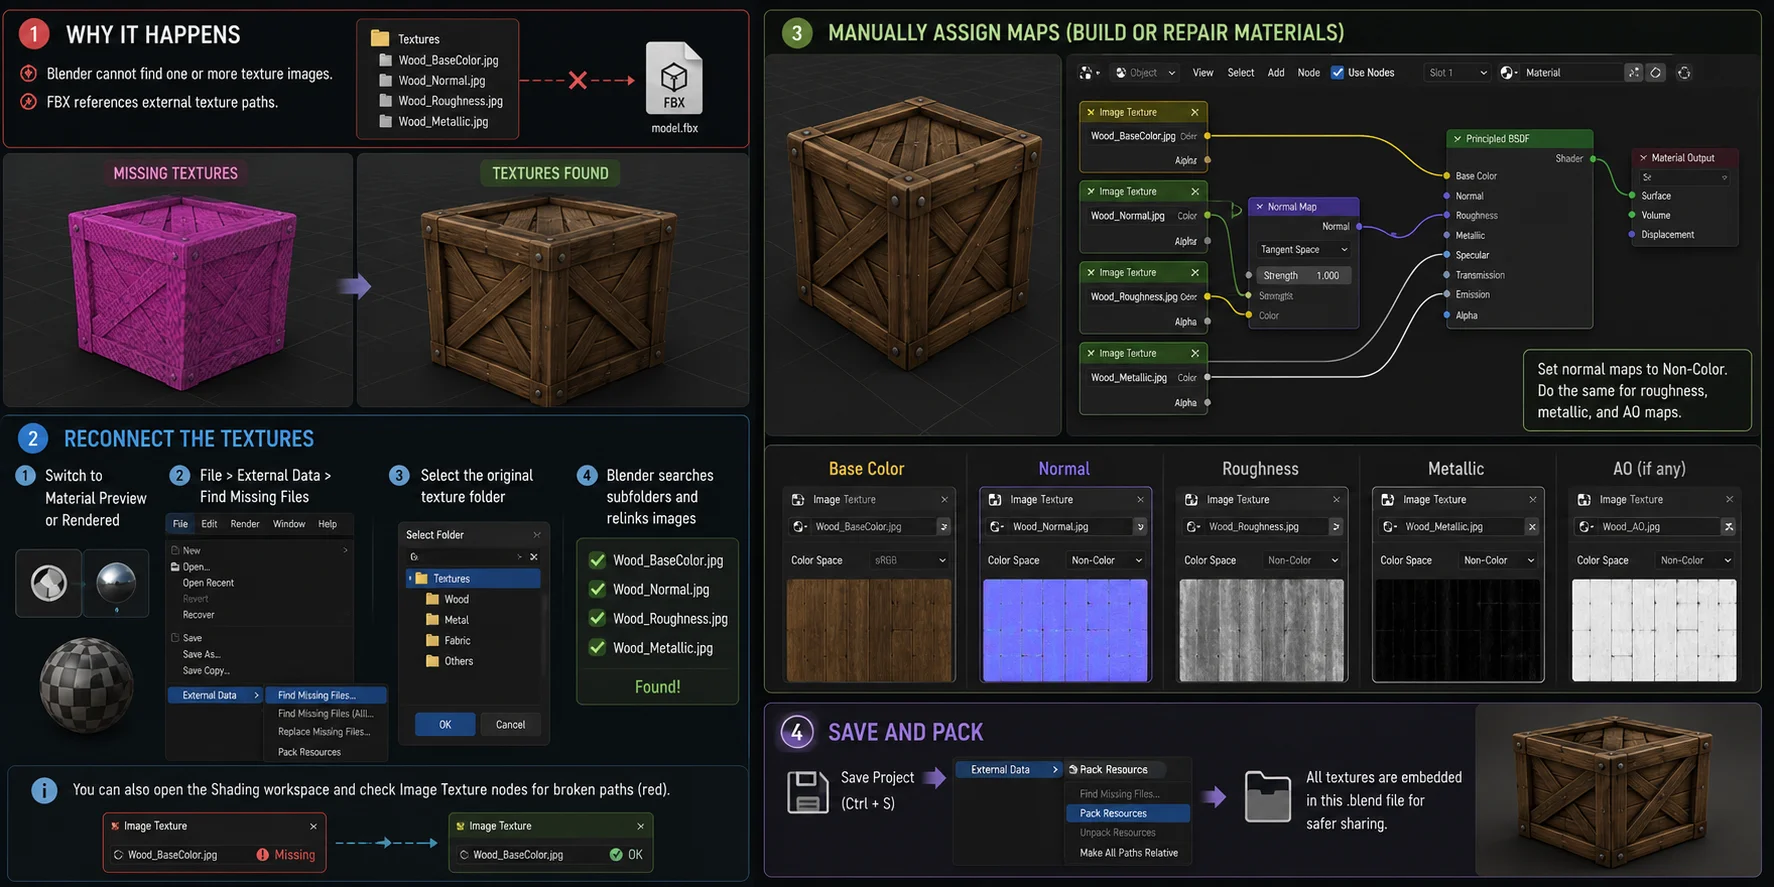
A pink or purple model usually means Blender cannot find one or more texture images.
FBX files often reference external texture paths rather than embedding every image. If the texture folder was moved, renamed, deleted, or separated from the FBX, Blender loses those links.
Reconnect the Textures
First, switch the viewport to Material Preview or Rendered mode.
Then choose:
File > External Data > Find Missing Files
Select the original texture folder. Blender will search that folder and its subfolders for matching images.
You can also open the Shading workspace and inspect Image Texture nodes for broken paths.
Manually Assign Maps
If the source material is missing or incomplete, rebuild it in the Shader Editor with a Principled BSDF shader.
- Base Color map -> Base Color
- Normal map -> Normal Map node -> Normal
- Roughness map -> Roughness
- Metallic map -> Metallic
Set normal maps to Non-Color. Do the same for roughness, metallic, and ambient-occlusion maps when needed. After repair, save the project and use File > External Data > Pack Resources to keep working assets together.
Importing FBX With Animation or a Rig
For a rigged character, enable Animation when the source FBX contains motion data. Start with the default orientation and armature settings. If the imported bones point the wrong way, re-import a copy and test Automatic Bone Orientation; do not treat it as a required default.
After import, select the armature, open the Dope Sheet, and switch to Action Editor. Check the action dropdown: if an Action is listed but the character does not move, select it and scrub the timeline. If no Action appears, re-import with Animation enabled and confirm that the source FBX contains animation data. Use the NLA Editor to arrange or combine confirmed Actions as strips.
Mixamo characters often use the mixamorig: bone naming structure. You can animate them directly or retarget them to another compatible rig.
Tripo Auto-Rig characters can export multiple animations in a single GLB or FBX file for Blender. After import, each animation appears as a separate Action, ready for review or sequencing. FBX remains a common choice for game and animation workflows, while GLB is useful when you also need compact asset packaging.
FBX vs. OBJ vs. .blend: Which Should You Use?
| Format | Animation and Rig | Materials | Best Use |
|---|---|---|---|
| FBX | Supports skeletons, skinning, and animation. | Can include materials, but texture paths may need repair. | Cross-software assets, games, characters, animation. |
| OBJ | Does not support animation or skeletal rigs. | Supports basic materials through MTL files. | Static meshes and simple geometry exchange. |
| .blend | Preserves Blender scenes, rigs, actions, modifiers, and settings. | Preserves Blender material setups. | Continuing work inside Blender. |
Use FBX when the asset needs to move between software or carry a rig. Use OBJ for basic static models. Use .blend once the asset is correctly imported and you want to preserve all Blender-specific work.
To convert FBX into a .blend file, import the FBX, verify the scene, then choose File > Save As and save the project as .blend.
A Faster Way In: Generate or Bridge Your Model into Blender
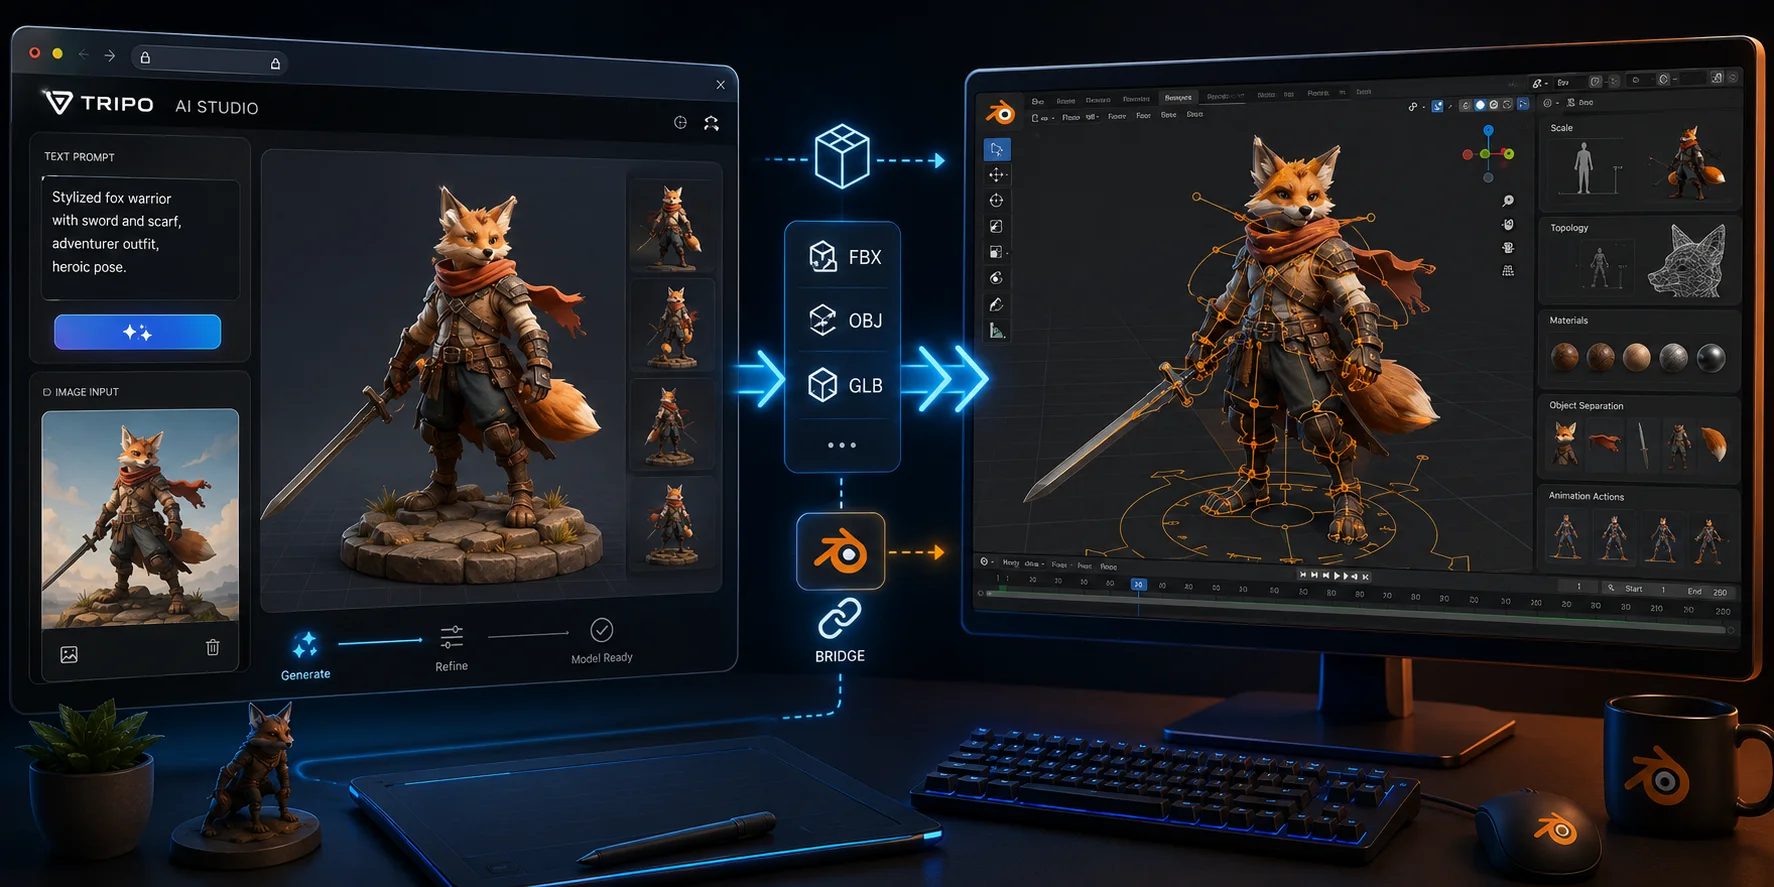
When you do not already have an FBX file, Tripo AI Studio can provide the starting asset. Generate a model from text or an image, then export it to FBX, OBJ, GLB, or another supported format for Blender. Tripo supports six export formats in total, including FBX.
This Bridge workflow applies to models created in Tripo Studio, not to any FBX file you already downloaded. For supported characters, AI Auto-Rigging can add a skeleton before export, giving you a starting point for animation work. Export availability depends on your plan and model version: Basic access supports v2.5 exports, while v3.0 and v3.1 exports require an eligible paid subscription.
Whether you import manually or use Bridge, still inspect scale, topology, materials, object separation, and animation actions before production use.
Troubleshooting Checklist
- No FBX menu option: Enable the FBX importer in Preferences.
- Model cannot be seen: Select it in the Outliner, press Numpad ., then check scale.
- Model is pink or purple: Restore the texture folder and use Find Missing Files.
- Model is sideways: Adjust Forward and Up Axis during import or rotate it after import.
- Animation is missing: Enable Animation, inspect the Action Editor, and check the armature.
- Model looks correct but textures do not: Switch to Material Preview and inspect Image Texture nodes.
Frequently Asked Questions (FAQ)
Why won't my FBX file open in Blender?
Extract the file from any ZIP archive first. Then use File > Import > FBX (.fbx) instead of opening it as a Blender project. If it still fails, update Blender, re-download the file, and check for corruption.
Can you convert FBX to .blend?
Yes. Import the FBX, check scale, materials, rig, and animation, then choose File > Save As to create a .blend file. This preserves Blender-specific edits such as modifiers, materials, collections, and animation setup.
What type of FBX does Blender support?
Blender supports common FBX files with meshes, materials, armatures, skinning, and animation. Some proprietary material settings, constraints, or advanced animation data may not transfer perfectly, so inspect the imported scene before use.
Is OBJ or FBX better for importing into Blender or Unity?
FBX is usually better for characters, rigs, and animations because it supports skeletons and motion data. OBJ is better for static geometry with simple materials. For Blender-only work, save a .blend copy after import.
Why does my imported FBX have no textures?
The FBX may reference texture images Blender cannot locate. Keep the original texture folder beside the FBX, then use File > External Data > Find Missing Files. Check material nodes manually if some maps remain missing.
Why is my FBX too small or invisible after import?
Select the object in the Outliner and press Numpad . to frame it. If the scale is still wrong, press S to resize it or adjust Import Scale and import again. Apply the corrected scale before exporting or adding modifiers.
Conclusion
Importing an FBX into Blender comes down to three practical steps: bring in the file, restore any missing textures, and correct scale or orientation when needed. Once the asset displays properly, you can edit its mesh, rework materials, organize its actions, and save it as a Blender project for the rest of your workflow.
Need a starting asset rather than an existing FBX? Generate one from text or an image, then export or bridge it into Blender through Tripo AI Studio.