How to Clean Up AI-Generated 3D Models in Blender (Step by Step)
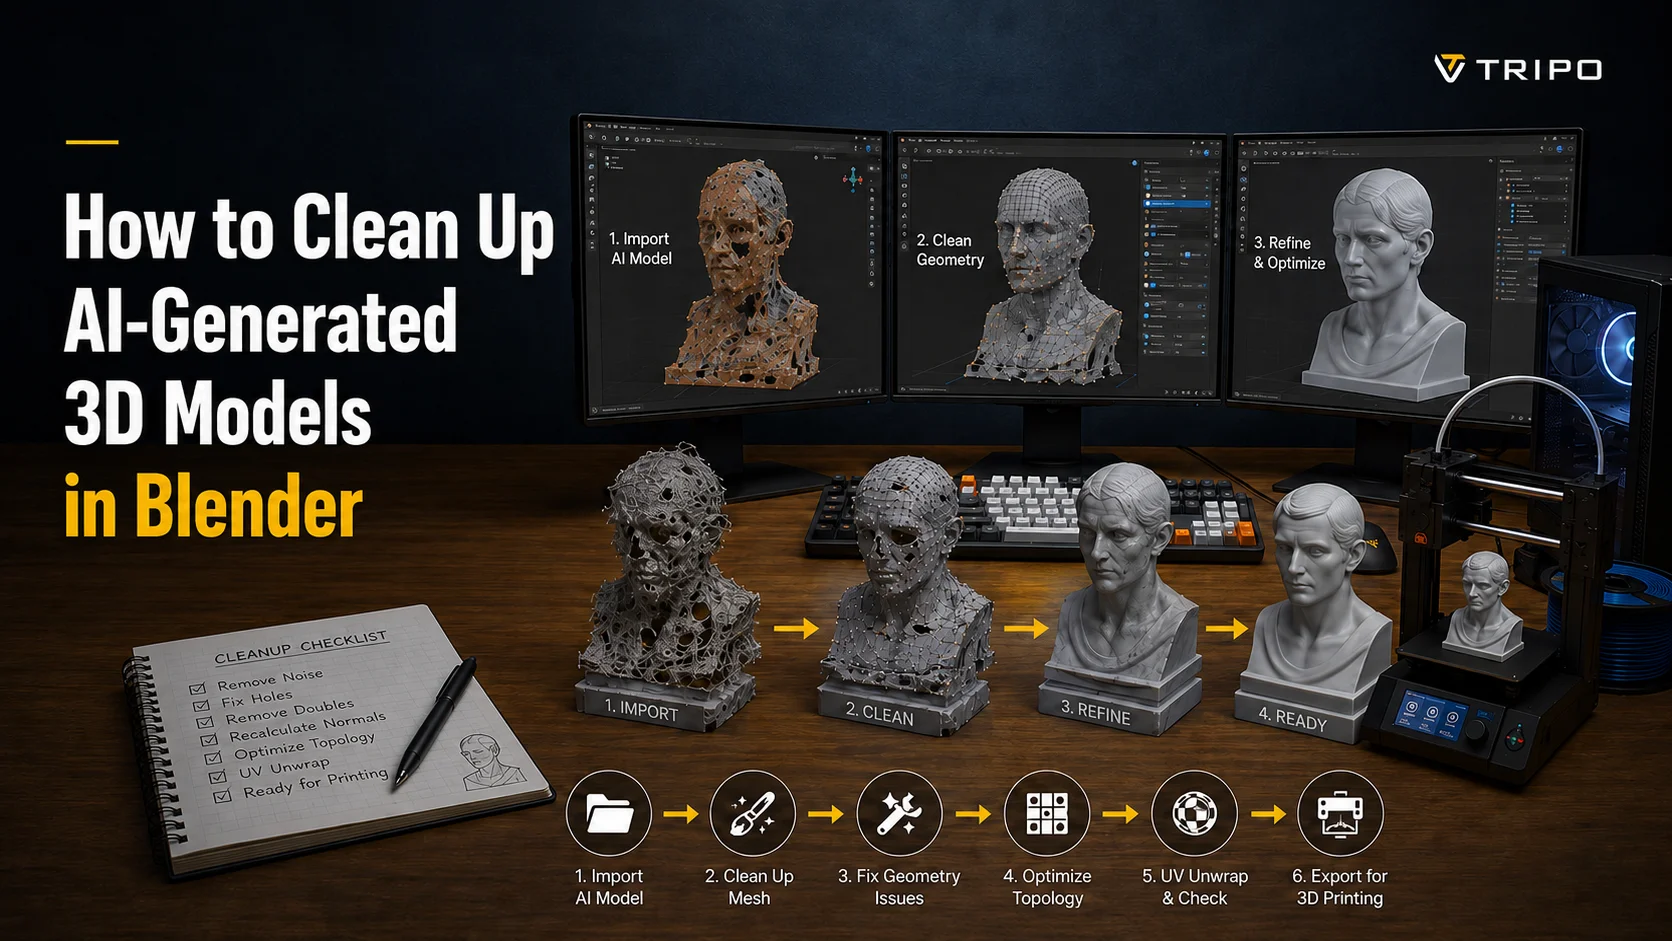
To clean up an AI-generated 3D model in Blender: import it, diagnose the issues (loose geometry, holes, non-manifold edges, flipped normals, and a huge triangle count), then fix them in order—merge duplicate vertices, delete floaters, fill holes, recalculate normals, and remesh or retopologize for clean topology. This guide walks through every step, and shows when it's smarter to start from a cleaner mesh instead.
TL;DR AI 3D outputs are messy by nature: dense triangle soup, loose bits, holes, flipped normals, and bad topology. Work in a fixed order: import → diagnose → merge & delete junk → fix holes/normals → remesh/retopo → fix UVs → export. The fastest wins: Mesh › Clean Up › Merge by Distance, then Select › All by Trait › Loose Geometry to delete floaters. For a usable mesh, remesh (Voxel/Quad) or use the Decimate modifier—pick by goal (printing vs games). Cleaning destroys textures: re-unwrap and bake if you need the look back. Sometimes it's faster to regenerate clean topology than to hand-fix.
Why AI-Generated Meshes Are Messy in the First Place
AI-generated 3D models can produce impressive results in seconds, but the mesh they create isn't always ready for manufacturing. Unlike CAD models, which are built from precise geometric rules, AI and 3D scanning workflows reconstruct surfaces by predicting or sampling shapes. That often leaves behind hidden geometry problems that only appear when you try to slice or print the model.
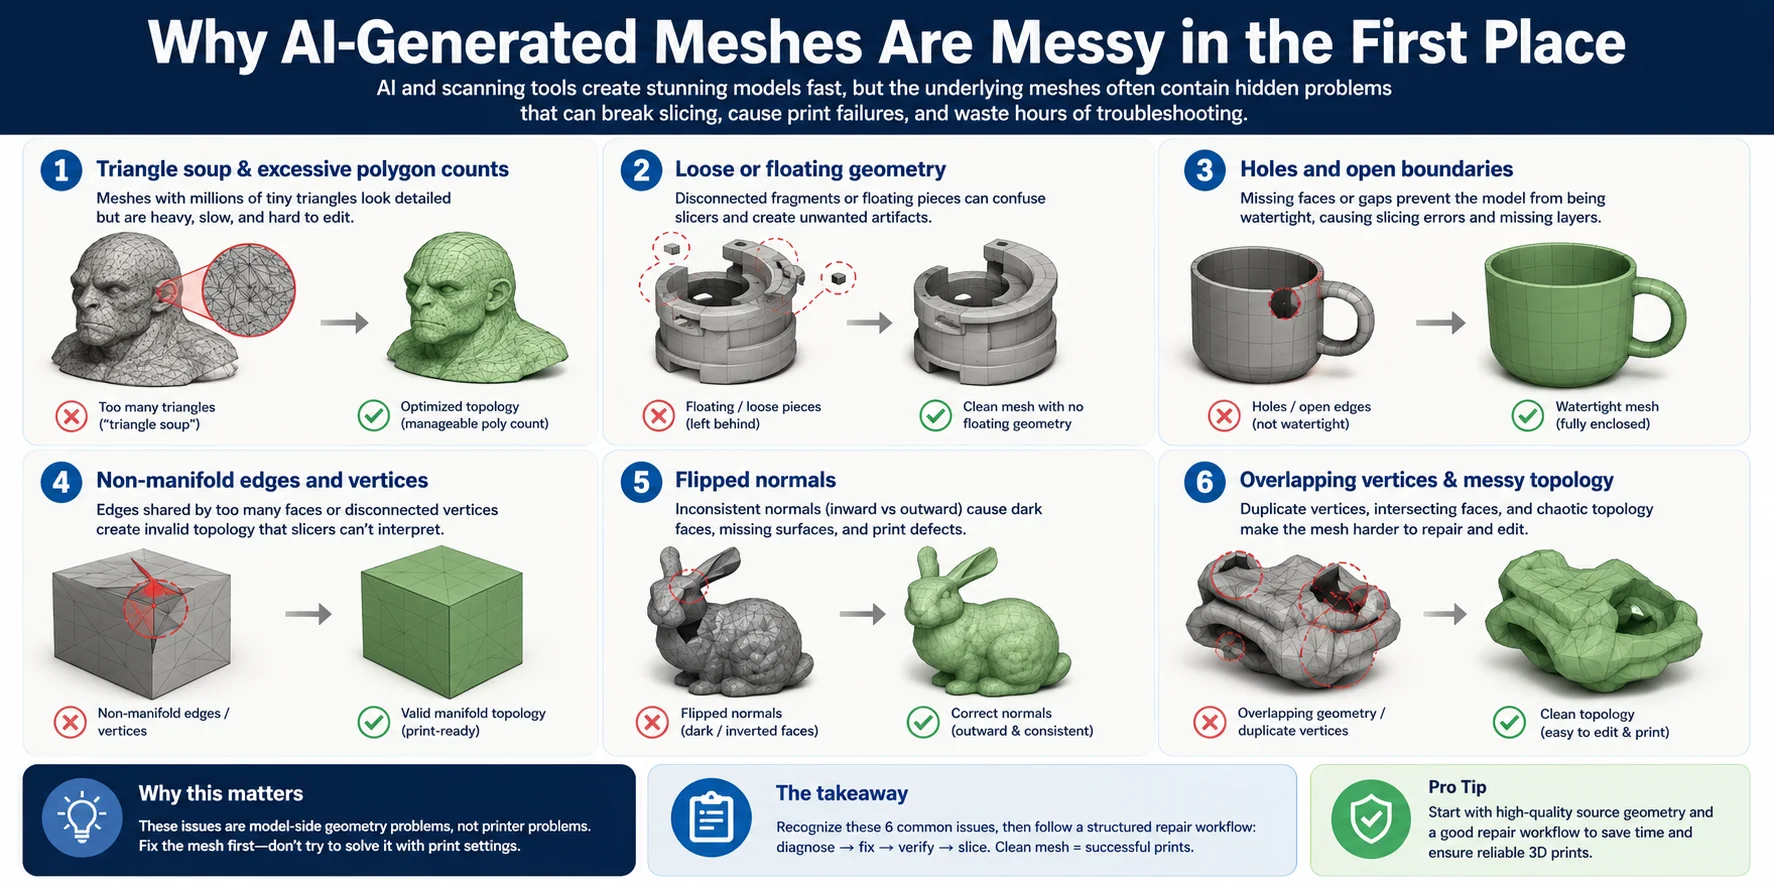
Here are the six most common issues you'll encounter:
1. Triangle soup & excessive polygon counts
Many AI models contain millions of tiny triangles, creating what's often called triangle soup. While this preserves visual detail, it also makes files unnecessarily large, slows down slicers, and complicates mesh editing. In many cases, the model benefits from decimation or retopology before printing.
2. Loose or floating geometry
Small disconnected fragments, floating faces, or isolated mesh islands are common in AI-generated and scanned models. These invisible pieces can confuse slicers, create unwanted artifacts, or even produce random printed blobs if left in the file.
3. Holes and open boundaries
AI sometimes fails to reconstruct hidden or occluded areas, leaving gaps in the mesh. Even tiny holes prevent the model from becoming watertight, causing missing layers or slicing errors during print preparation.
4. Non-manifold edges and vertices
A printable mesh requires every edge to connect correctly. AI-generated geometry may contain edges shared by too many faces or disconnected vertices, creating non-manifold topology that slicers cannot interpret as a solid object.
5. Flipped normals
Surface normals define which side of each face is outside. If some normals point inward while others point outward, you'll often see dark faces, missing surfaces, or strange shading in the viewport—and missing walls after slicing.
6. Overlapping vertices and messy topology
AI models frequently contain duplicate vertices, intersecting faces, uneven triangle sizes, and chaotic edge flow. Although these issues may not be immediately visible, they make the mesh harder to repair, edit, or convert into a clean printable model.
Recognizing these problems is the first step toward successful 3D printing. Once you know what you're looking at, you can follow a structured repair workflow instead of guessing which print setting might solve the issue.
Before You Start — Import & Set Up Your Scene
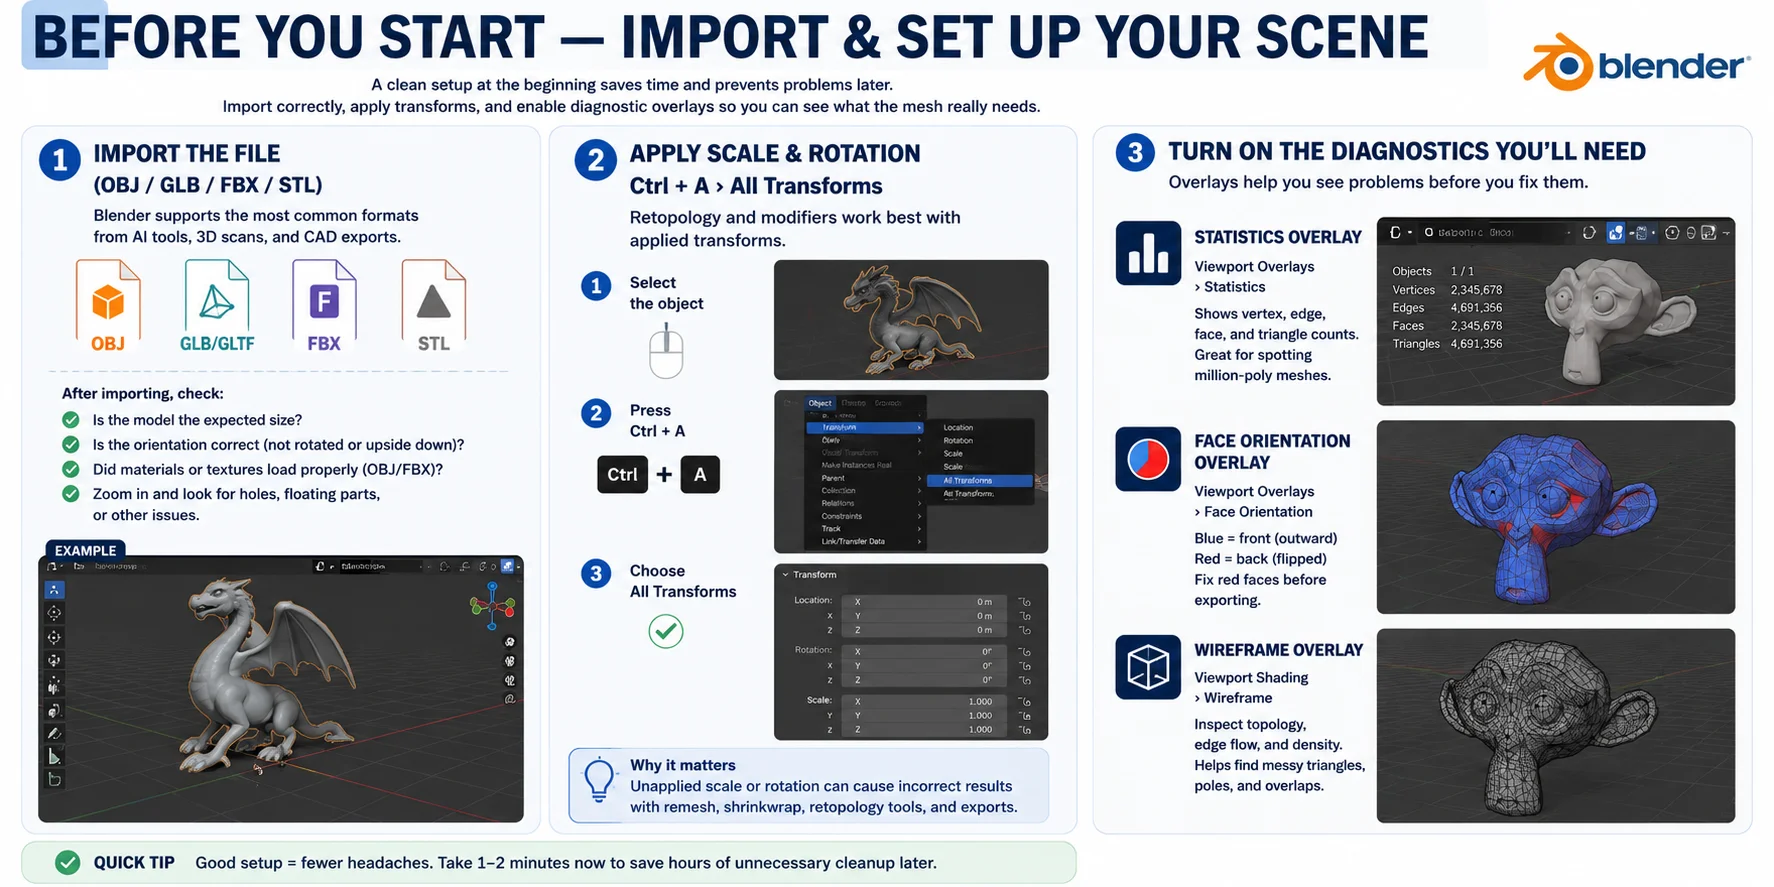
Before you begin cleaning or retopologizing a mesh, spend a few minutes setting up your scene correctly. Import settings, object transforms, and diagnostic overlays all affect how accurately you can inspect and repair the model.
Import the file (OBJ / GLB / FBX / STL)
Blender supports the most common formats used in AI generation, 3D scanning, and CAD export, including OBJ, GLB/GLTF, FBX, and STL. After importing, confirm the object imported at the expected size, check orientation is correct, and zoom in to inspect for obvious holes or floating geometry.
Apply scale & rotation
Before making any topology changes:
- Select the object
- Press Ctrl + A
- Choose All Transforms
This applies the current location, rotation, and scale to the mesh while resetting the object's transform values. It provides a clean, predictable starting point for every tool you'll use afterward.
Turn on the diagnostics you'll need
Statistics Overlay — Turn on Viewport Overlays → Statistics to display vertex, edge, face, and triangle counts.
Face Orientation Overlay — Enable Face Orientation to visualize normal direction. Blue faces point outward correctly, while red faces indicate flipped normals.
Wireframe Overlay — Switch to Wireframe to inspect edge flow and topology, identify messy triangle soup, and spot areas that may need retopology.
Step 1 — Diagnose the Problems First
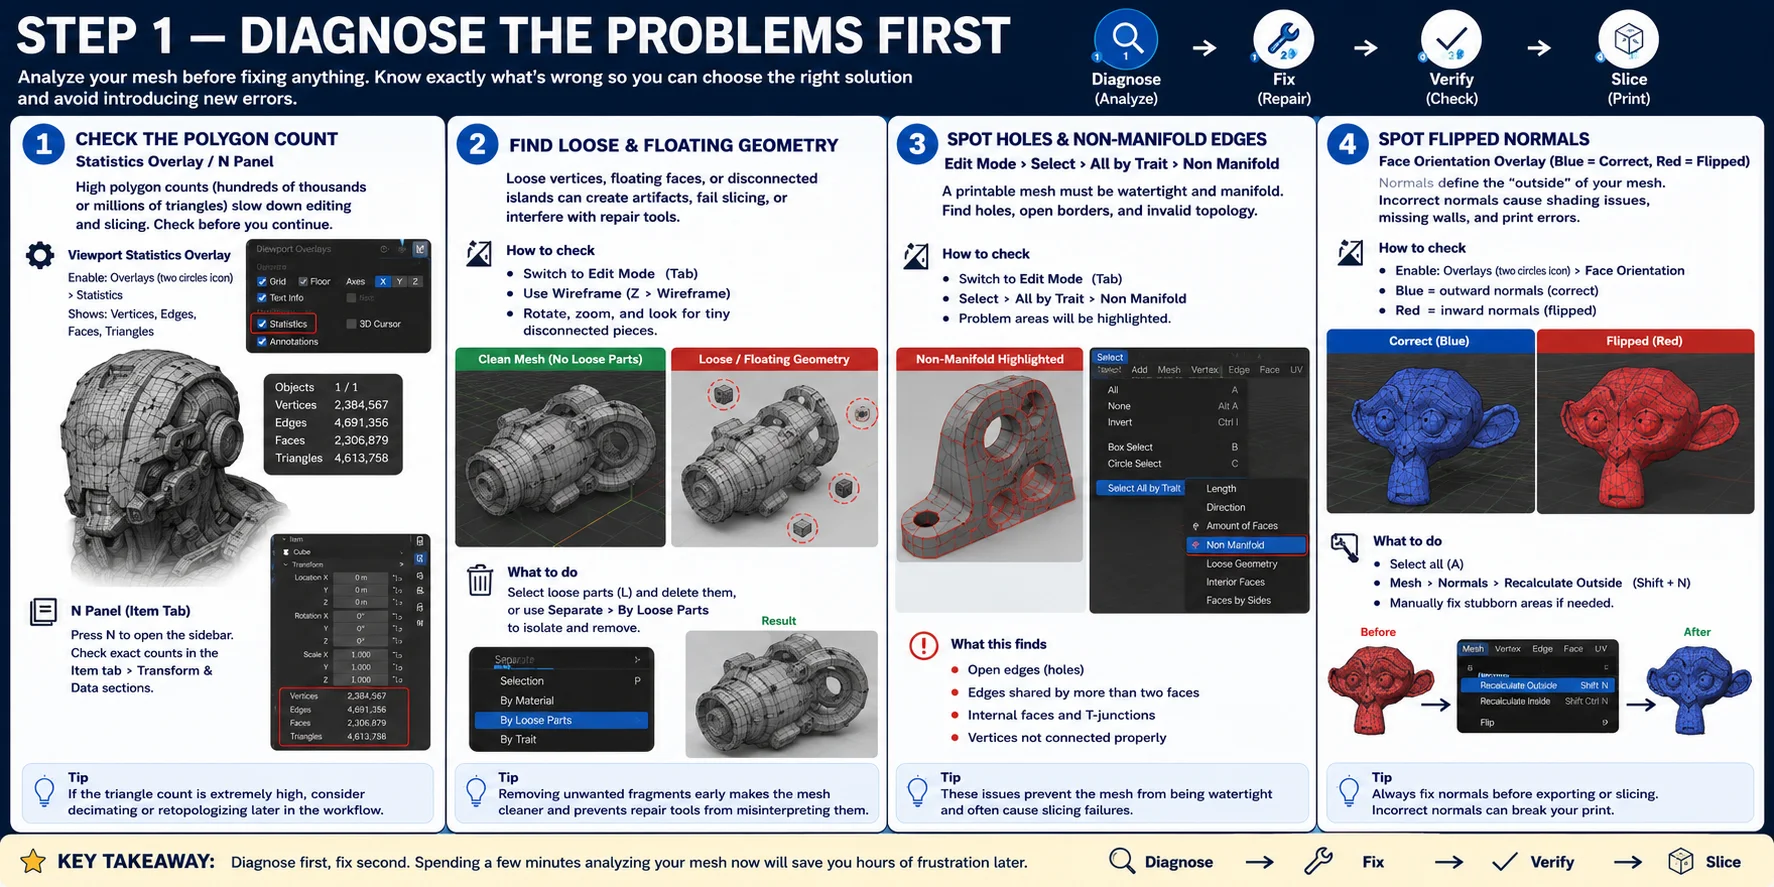
Before repairing or rebuilding any mesh, stop and analyze it first. Professional 3D workflows always begin with diagnosis because fixing the wrong problem wastes time and can even introduce new geometry errors.
Check the polygon count
Enable Viewport Overlays → Statistics to display the number of vertices, edges, faces, and triangles directly in the viewport. If the polygon count is far higher than necessary for your application, consider simplifying the mesh using a Decimate modifier or retopology workflow.
Find loose & floating geometry
Enter Edit Mode and inspect the mesh carefully in Wireframe view. Rotate the model and look for tiny disconnected pieces surrounding the main object.
Spot holes & non-manifold edges
Use Edit Mode → Select → Select All by Trait → Non Manifold to highlight edges and vertices that do not belong to a proper manifold mesh. Common causes include open borders, internal faces, T-junctions, and edges shared by more than two faces.
Spot flipped normals
Enable Viewport Overlays → Face Orientation. Blue = outward-facing normals (correct). Red = inward-facing or flipped normals (incorrect).
By checking polygon count, floating geometry, non-manifold edges, and face orientation before making any edits, you establish a professional "analyze first, repair second" workflow.
Step 2 — Merge Duplicates & Delete Junk Geometry
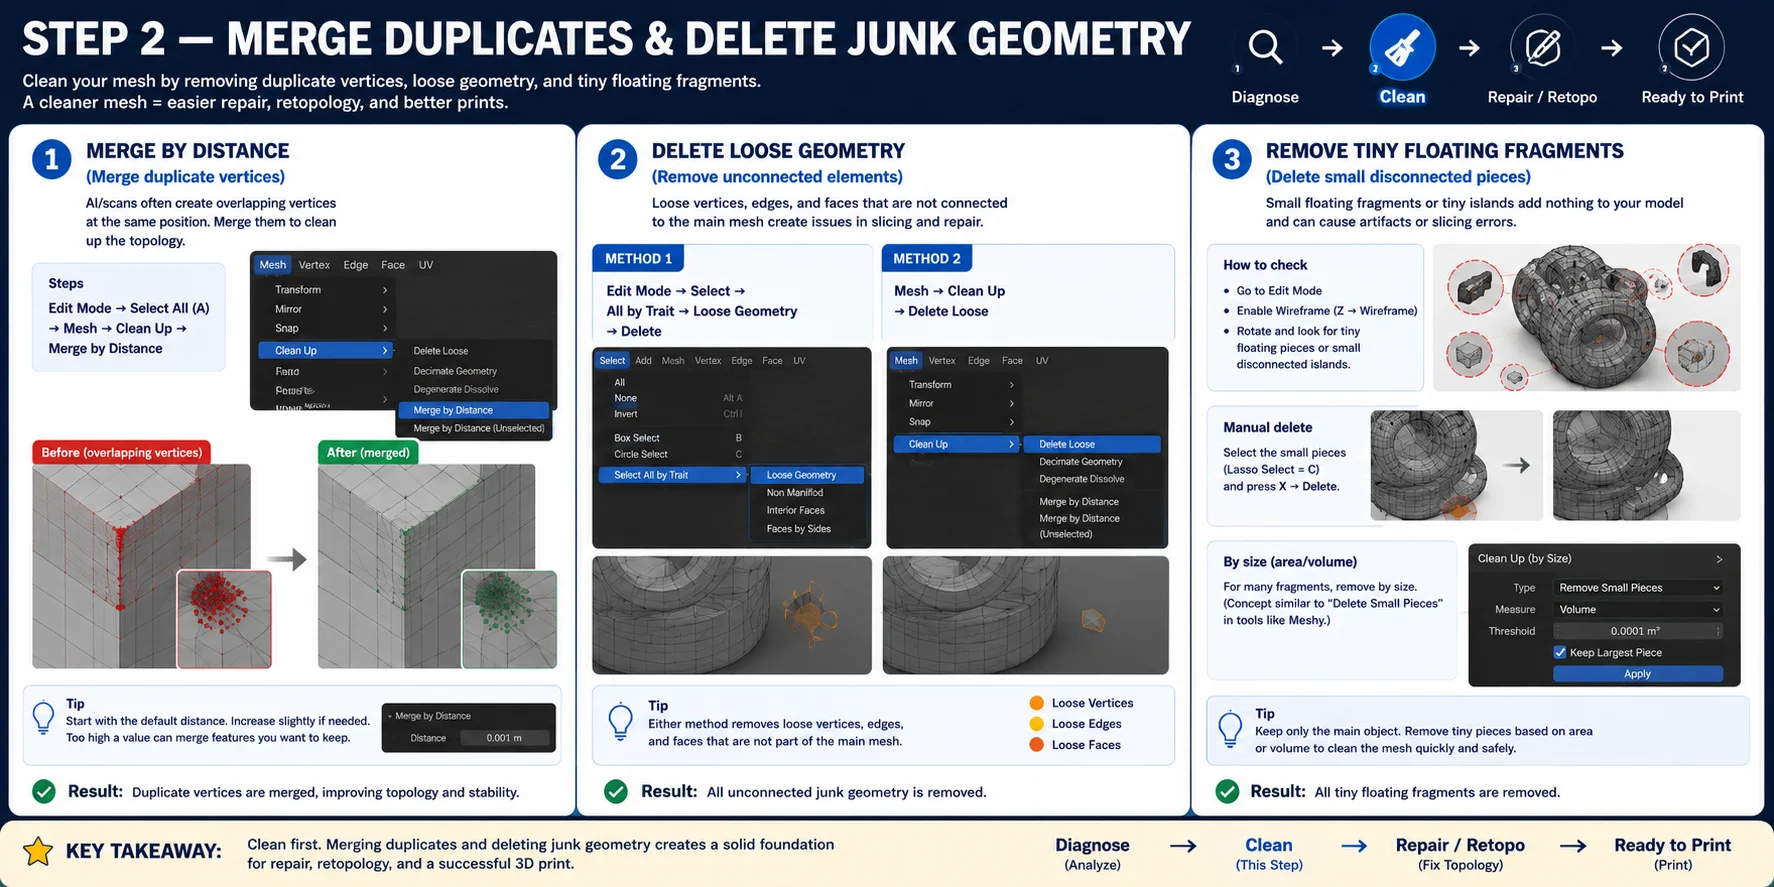
Once you've identified the problems in your mesh, the next step is to clean up unnecessary geometry. Cleaning these issues before attempting repair or retopology creates a much more stable foundation for the rest of your workflow.
Merge by Distance
To merge duplicate vertices in Blender:
Edit Mode → Select All (A) → Mesh → Clean Up → Merge by Distance
Blender automatically combines overlapping vertices that fall within the specified distance threshold. Start with the default value, then increase it slightly only if necessary.
Delete loose geometry
Method 1: Edit Mode → Select → Select All by Trait → Loose Geometry, then press Delete.
Method 2: Mesh → Clean Up → Delete Loose
Both methods remove isolated vertices, loose edges, and standalone faces that have no meaningful connection to the rest of the model.
Remove tiny floating fragments
Rotate around the model in Wireframe view and inspect it carefully for tiny floating pieces. Delete any small disconnected components that aren't part of the intended design.
Step 3 — Fix Holes, Non-Manifold Edges & Normals
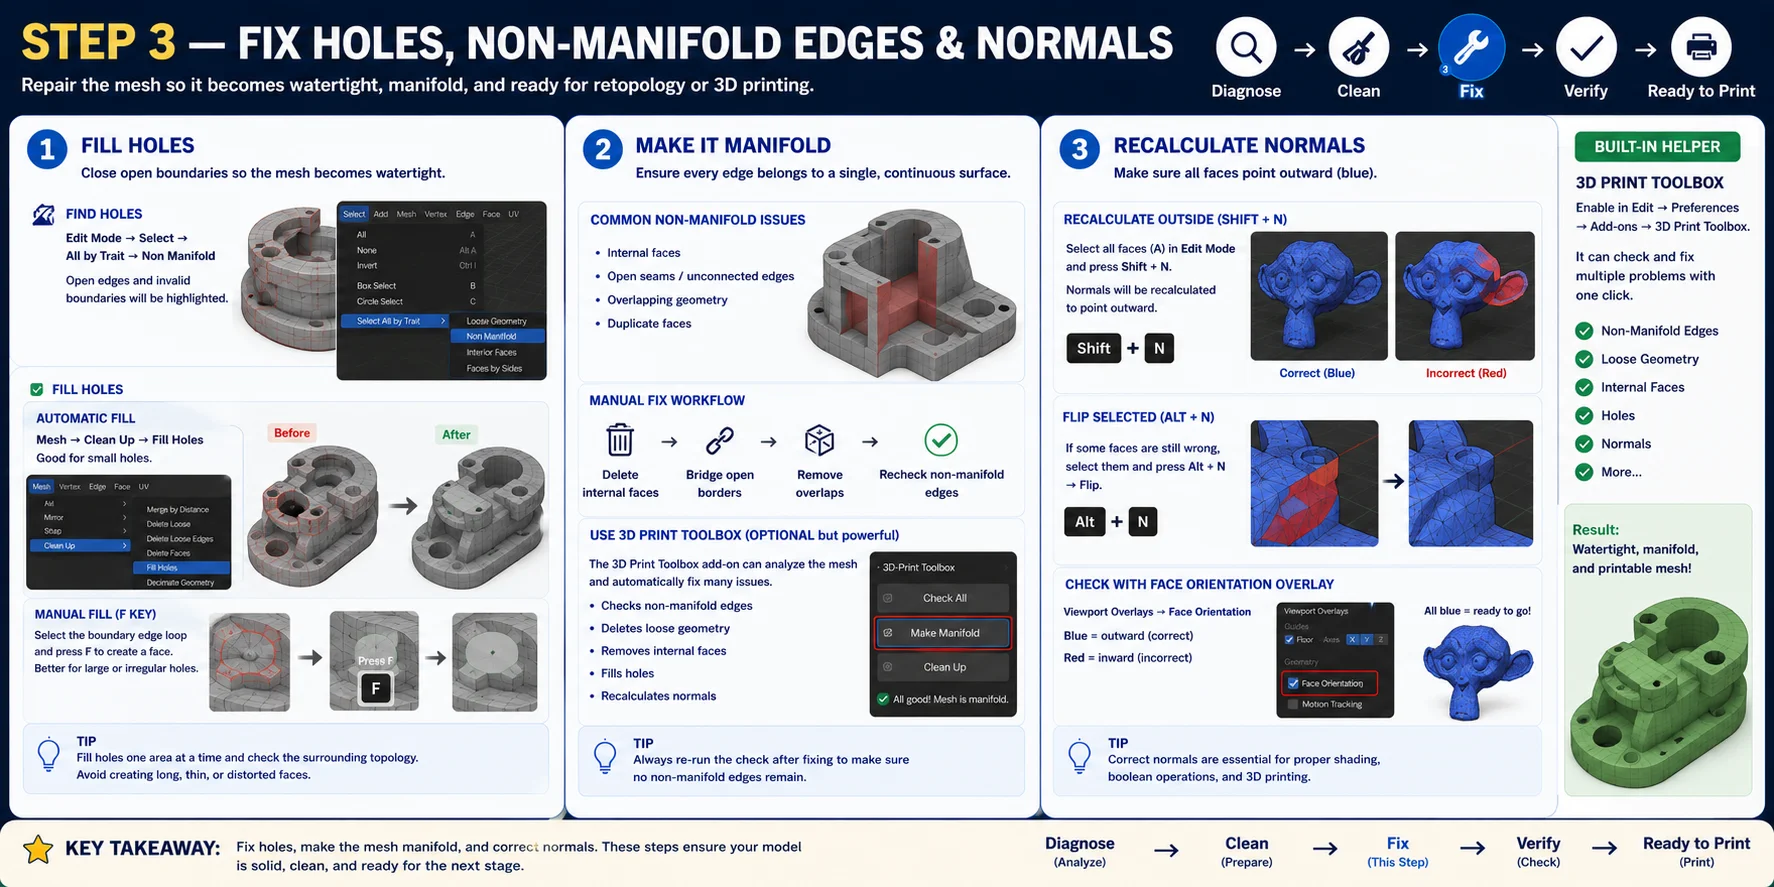
After removing duplicate vertices and unwanted fragments, it's time to repair the mesh itself. Most AI-generated and scanned models still contain open holes, non-manifold geometry, and inconsistent normals.
Fill holes
Start by locating problem areas using Edit Mode → Select → Select All by Trait → Non Manifold.
Automatic hole filling: Mesh → Clean Up → Fill Holes (works well for small gaps)
Manual filling: Select the boundary edge loop and press F to create a new face.
Make it manifold
Delete unnecessary internal faces, bridge open borders where appropriate, and remove overlapping geometry. If you've enabled Blender's 3D Print Toolbox add-on, it can quickly analyze your mesh and perform a Make Manifold operation that automatically fixes multiple issues at once.
Recalculate normals
Select the entire mesh in Edit Mode and press Shift + N to recalculate normals so they point consistently outward. Use Alt + N to flip or adjust normals only on selected faces.
Enable Face Orientation in the Viewport Overlays to verify the result. The entire exterior should display blue before exporting.
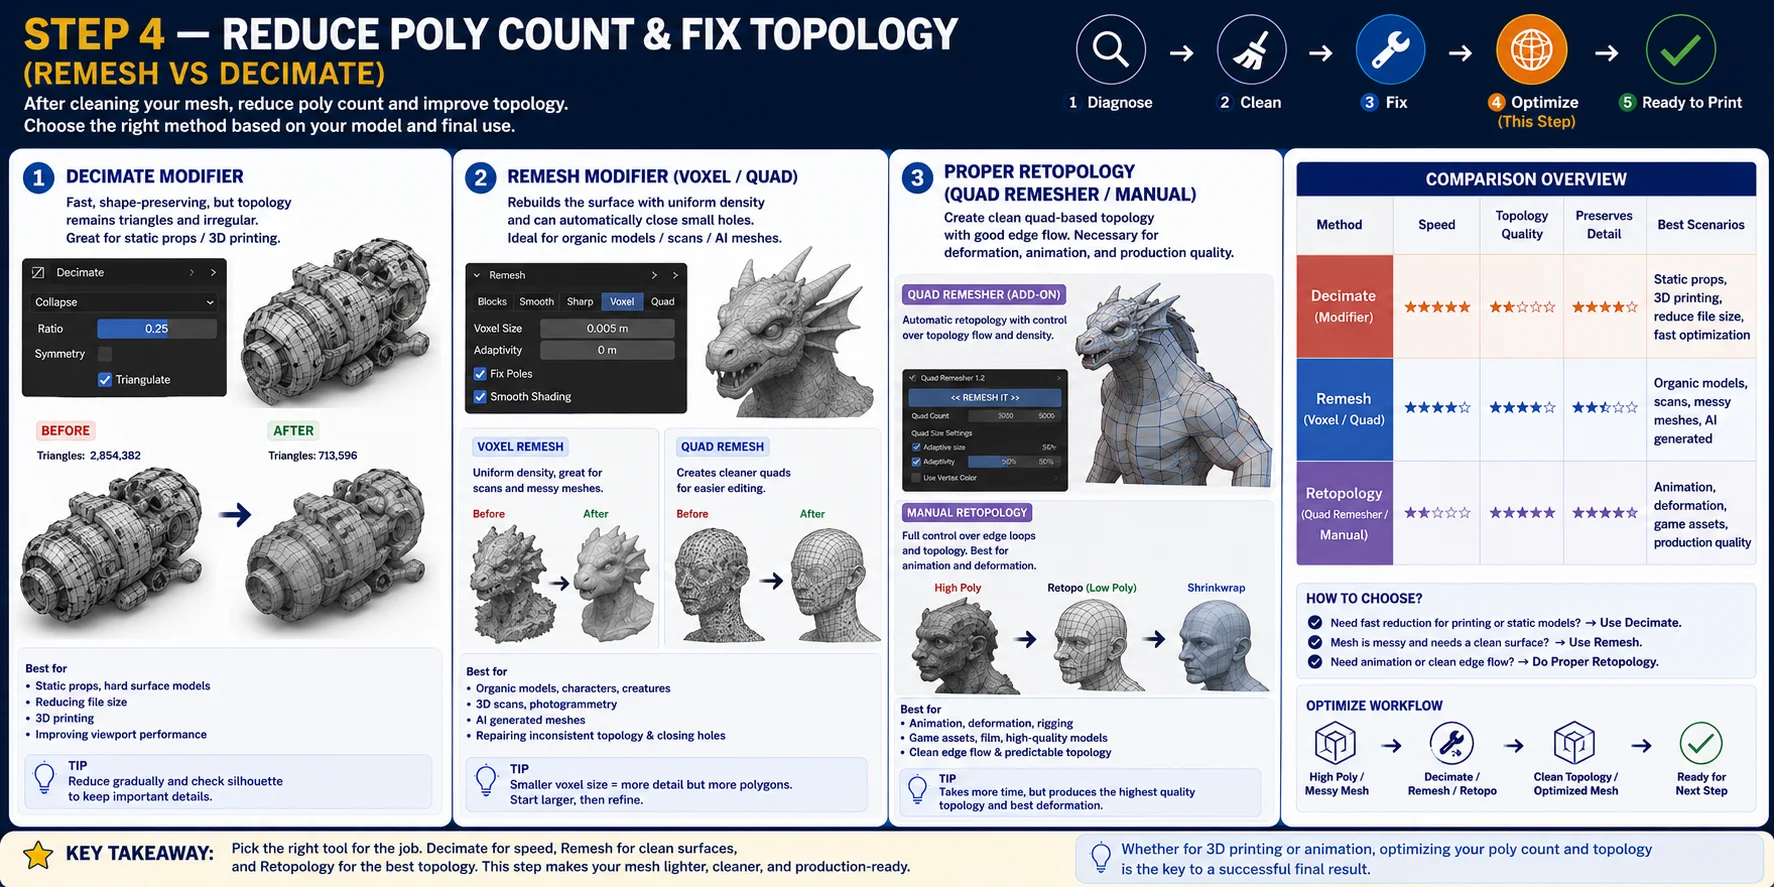
Step 4 — Reduce Poly Count & Fix Topology (Remesh vs Decimate)
Once your mesh is clean and watertight, the next decision is whether to simplify it or completely rebuild its topology.
Decimate Modifier
Modifiers → Add Modifier → Decimate
Adjust the Ratio until the polygon count reaches a reasonable level while maintaining the silhouette. Decimate works by removing unnecessary triangles, making it ideal for preparing static props, simplifying AI-generated meshes, reducing file size, and preparing models for 3D printing. However, Decimate does not rebuild topology.
Remesh Modifier (Voxel / Quad)
Modifiers → Add Modifier → Remesh
Voxel Remesh reconstructs the entire surface with evenly distributed polygons. Excellent for AI-generated meshes, photogrammetry scans, organic sculptures, and automatically sealing many small gaps.
Quad Remesh attempts to generate cleaner quadrilateral faces, creating a much more organized surface for later editing.
Proper retopology (Quad Remesher / manual)
For models that need animation, character deformation, rigging, or game asset optimization, dedicated tools such as Quad Remesher or Blender's manual retopology workflow using Shrinkwrap and Snapping create clean quad-based edge flow.
As a general guideline:
- Choose Decimate for quick polygon reduction for static models or 3D printing
- Choose Remesh when your mesh is messy and needs a cleaner, more uniform surface
- Choose proper retopology when the model must deform, animate, or meet professional production standards
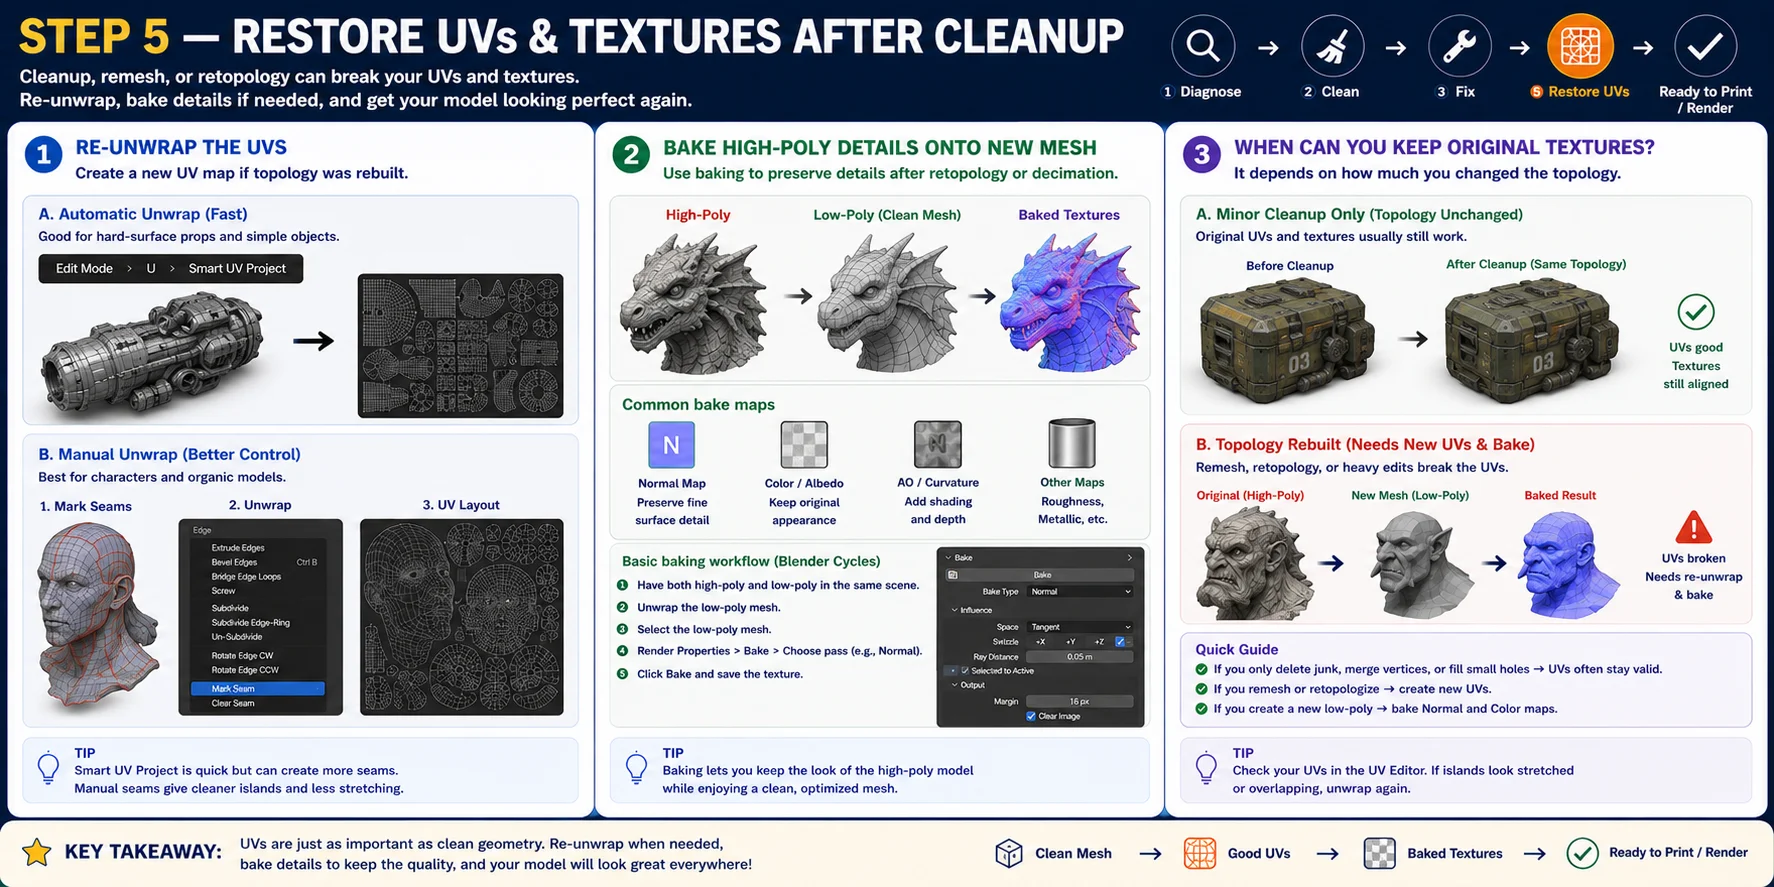
Step 5 — Restore UVs & Textures After Cleanup
Cleaning a mesh doesn't only affect its geometry—it can also impact UVs and textures. Operations such as remeshing or retopology usually change the vertex layout, which means the original UV map no longer matches the model.
Re-unwrap the UVs
For simple models, Blender's automatic unwrap works well: Edit Mode → U → Smart UV Project
For higher-quality results, create seams manually:
- Select the edges that should become UV seams
- Press Ctrl + E → Mark Seam
- Press U → Unwrap
Bake high-poly details onto the new mesh
Use Blender's baking tools to transfer surface information from the high-resolution mesh to the optimized model. Bake Normal Maps to preserve small surface details and Color (Diffuse/Albedo) Maps to retain the original appearance.
When can you keep the original textures?
As a rule of thumb:
- Minor cleanup only → Original UVs and textures usually remain usable
- Remesh or retopology → Create new UVs and rebake textures
- New low-poly mesh → Bake Normal and Color maps from the original model
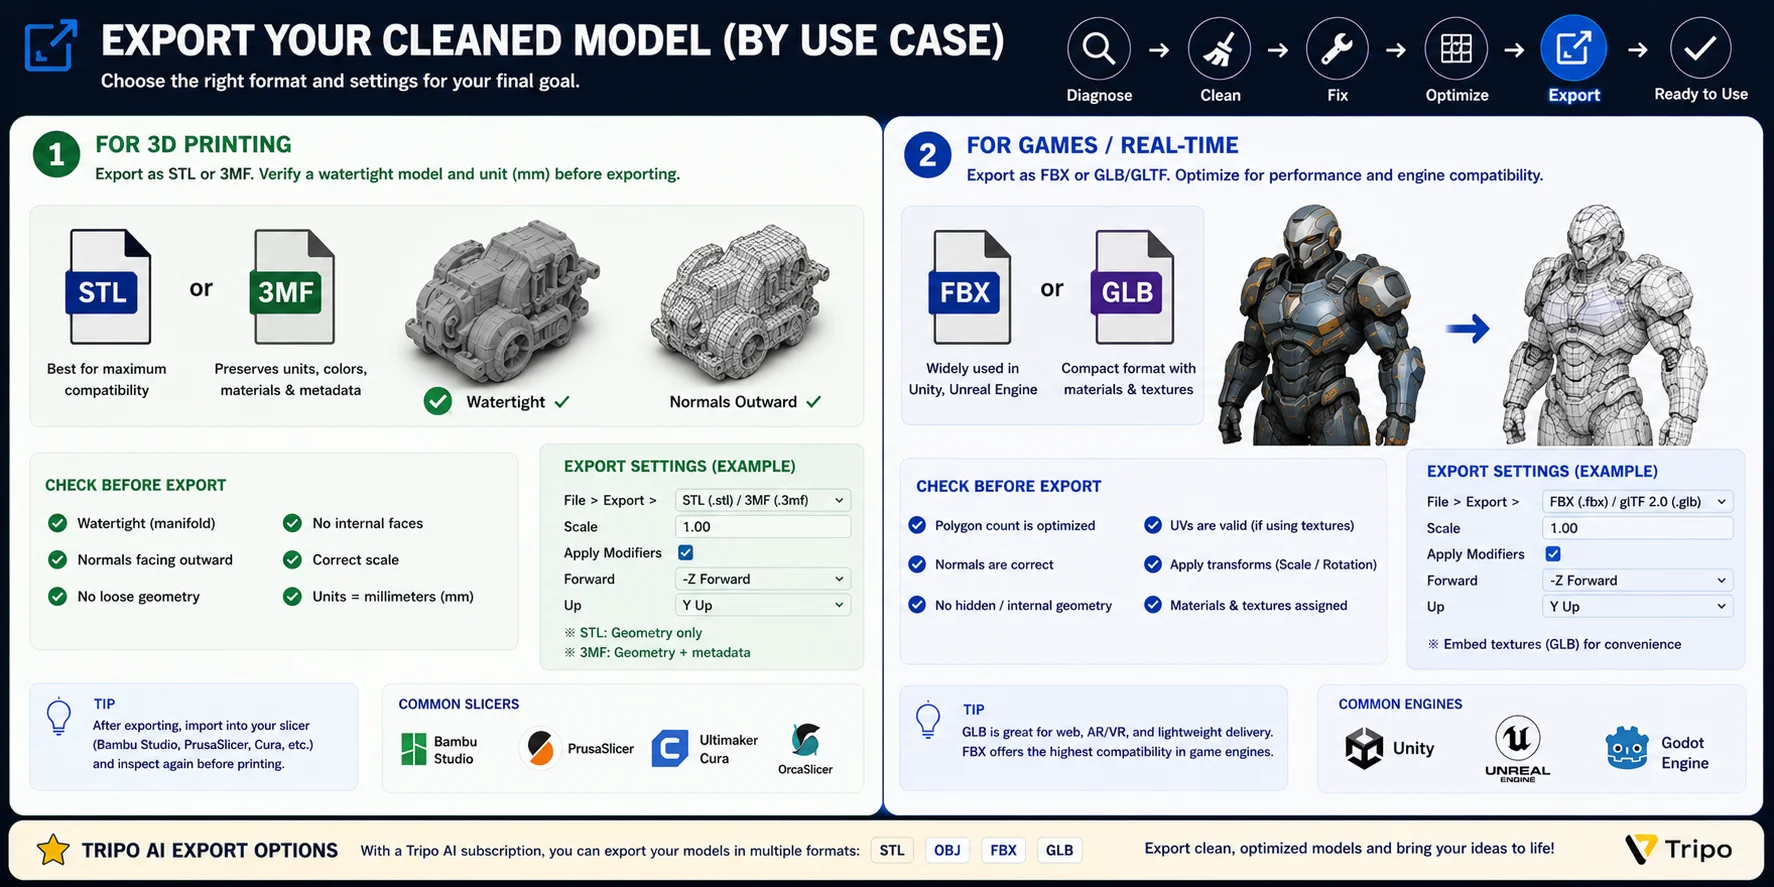
Export Your Cleaned Model (by Use Case)
Once your mesh is clean, watertight, and optimized, the final step is exporting it in the right format.
For 3D printing
Export as STL or 3MF. Before exporting, verify that the mesh is fully watertight (manifold), face normals point outward, the model is correctly scaled, units are set to millimeters (mm), and no loose geometry or internal faces remain.
Choose STL for maximum compatibility with printers and slicers. Choose 3MF when you want to preserve units, colors, materials, or other print metadata.
For games & real-time rendering
Export as FBX or GLB/GLTF. Reduce the polygon count to an appropriate level, confirm normals are correct, remove hidden geometry, verify UVs are valid if textures are included, and keep transforms applied.
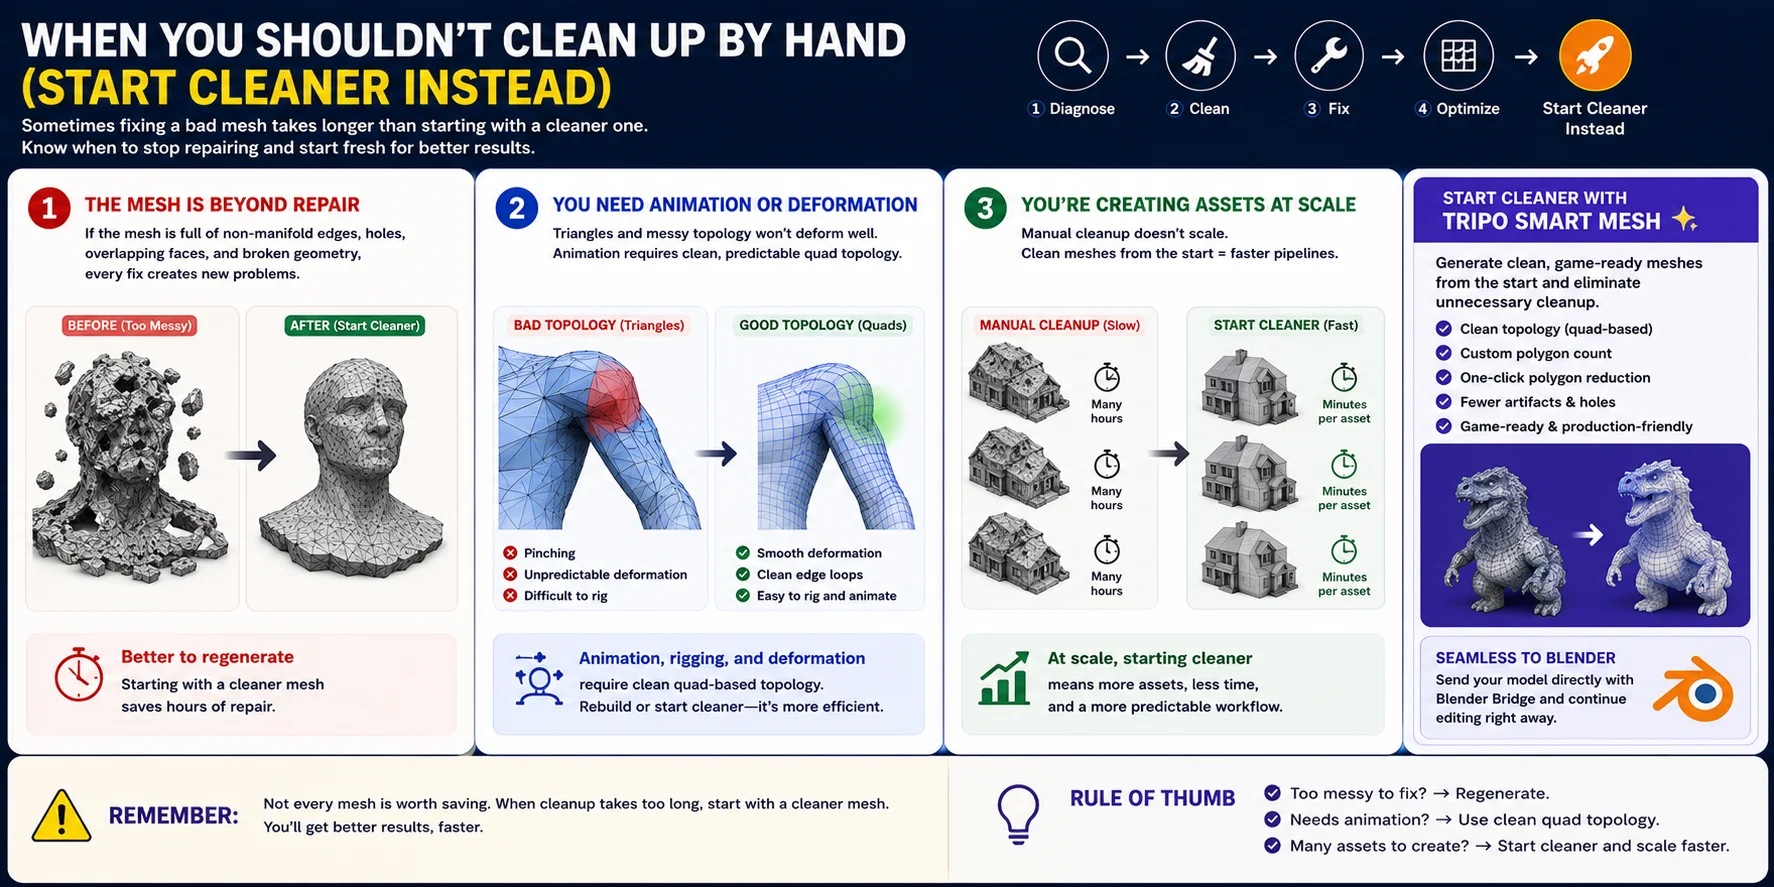
When You Shouldn't Clean Up by Hand (Start Cleaner Instead)
Mesh cleanup is an important skill, but it's not always the most efficient solution.
The mesh is beyond repair
Some AI-generated or scanned models contain so many topology problems that repairing them simply isn't worthwhile. If the mesh is filled with tangled triangles, overlapping surfaces, broken edge flow, and thousands of floating fragments, it's usually faster to regenerate the model with cleaner geometry.
You need animation or deformation
Manual cleanup can make a model printable, but it rarely creates the clean quad-based topology required for animation. If the model will be rigged, deformed by armatures, or used in games, rebuilding the mesh through proper retopology or starting with a cleaner quad mesh is usually much more efficient.
You're creating assets at scale
If you're producing dozens or hundreds of assets, manual cleanup quickly becomes the bottleneck. Tools designed to generate production-friendly meshes—such as Tripo Smart Mesh—can reduce cleanup time by creating cleaner topology, customizable polygon counts, quad-based meshes, and one-click mesh simplification from the outset. You can also transfer models directly using Blender Bridge before beginning any additional editing.
The goal isn't to avoid mesh cleanup entirely—it's to recognize when manual repair no longer provides the best return on your time.
Frequently Asked Questions
How do I clean up AI-generated 3D models in Blender?
Clean up an AI-generated 3D model by inspecting the mesh, removing loose geometry, fixing holes and normals, and optimizing the topology with tools like Decimate or Remesh. Then verify the model is watertight, check the polygon count and UVs, and export it in the format that fits your workflow, such as STL, 3MF, FBX, or GLB. If the mesh is heavily damaged, regenerating a cleaner model is often faster than repairing it manually.
How do I clean a 3D model in Blender?
To clean a 3D model in Blender, inspect the mesh for duplicate vertices, holes, loose geometry, and flipped normals, then fix them using tools like Merge by Distance, Fill, and Recalculate Normals. If needed, optimize the mesh with Decimate or Remesh, then check that it is watertight before exporting it as STL, 3MF, FBX, or GLB.
How do I edit Meshy (or Tripo) AI models in Blender?
If you generated a model in Tripo, you can edit it in Blender by importing the mesh, checking for holes, loose geometry, and flipped normals, then fixing them with Blender's cleanup tools. If the topology is messy, use Decimate or Remesh, and export the finished model as STL, 3MF, FBX, or GLB depending on your project.
Can AI generate 3D models directly inside Blender?
No. Blender does not include a built-in AI text-to-3D or image-to-3D generator. Instead, you can generate a model with tools like Meshy or Tripo, then import it into Blender for editing, cleanup, retopology, or rendering.
What's the difference between the Decimate and Remesh modifiers?
The Decimate modifier reduces the polygon count while keeping the overall shape, making it ideal for quick optimization. The Remesh modifier rebuilds the mesh with cleaner, more uniform topology, making it a better choice for messy AI-generated models or 3D scans.
How do I fix non-manifold geometry and holes in Blender?
To fix non-manifold geometry and holes in Blender, use Select → Select All by Trait → Non Manifold to find problem areas, then repair them with Fill Holes or by creating new faces. Finally, recalculate normals with Shift + N and verify the mesh is watertight before exporting or 3D printing.
Why does my AI model look black or inside-out?
Your AI model usually looks black or inside-out because its face normals are flipped. In Blender, press A to select all faces, then Shift + N to recalculate the normals, and use the Face Orientation overlay to confirm they point outward.
Conclusion
Cleaning an AI-generated mesh is much easier when you follow a structured workflow: diagnose the geometry, remove duplicate and loose elements, repair holes and normals, optimize the topology, then verify the model before exporting. This process produces cleaner assets for 3D printing, rendering, games, or animation—and helps you avoid problems later in your pipeline.
If a mesh is too damaged to repair efficiently, starting with a cleaner AI-generated model is often the faster solution. Tripo AI Studio lets you generate high-quality 3D models that you can refine further in Blender, reducing cleanup time and speeding up your workflow.