Cosplay Props with AI + 3D Printing: The Complete Workflow
TL;DR
- AI and 3D printing can turn cosplay prop ideas, sketches, or references into wearable builds.
- Choose text-to-3D for original concepts and image-to-3D for specific armor, helmets, or weapon references.
- Generated meshes still need repair, watertight checks, scaling, wall-thickness review, and print-bed splitting.
- Large props require smart seam placement, keyed joints, careful slicing, strong print settings, and patient finishing.
- AI helps accelerate modeling, but copyright, fit, safety, painting, and final craftsmanship remain your responsibility.
Making cosplay props used to mean weeks of foam work, CAD, or hand-sculpting. Now an AI cosplay prop generator can turn a text prompt or reference image into a starting 3D mesh in minutes, leaving you more time for print preparation and finishing. This guide walks through the full workflow—generate, clean, split, slice, print, and paint—from start to finish.
Why AI + 3D Printing Is Changing Cosplay Props
Cosplay prop making used to require one of three difficult routes: shaping EVA foam by hand, learning CAD or 3D modeling, or sculpting and molding parts for casting. All can produce excellent results, but they take time, practice, and repeated trial and error.
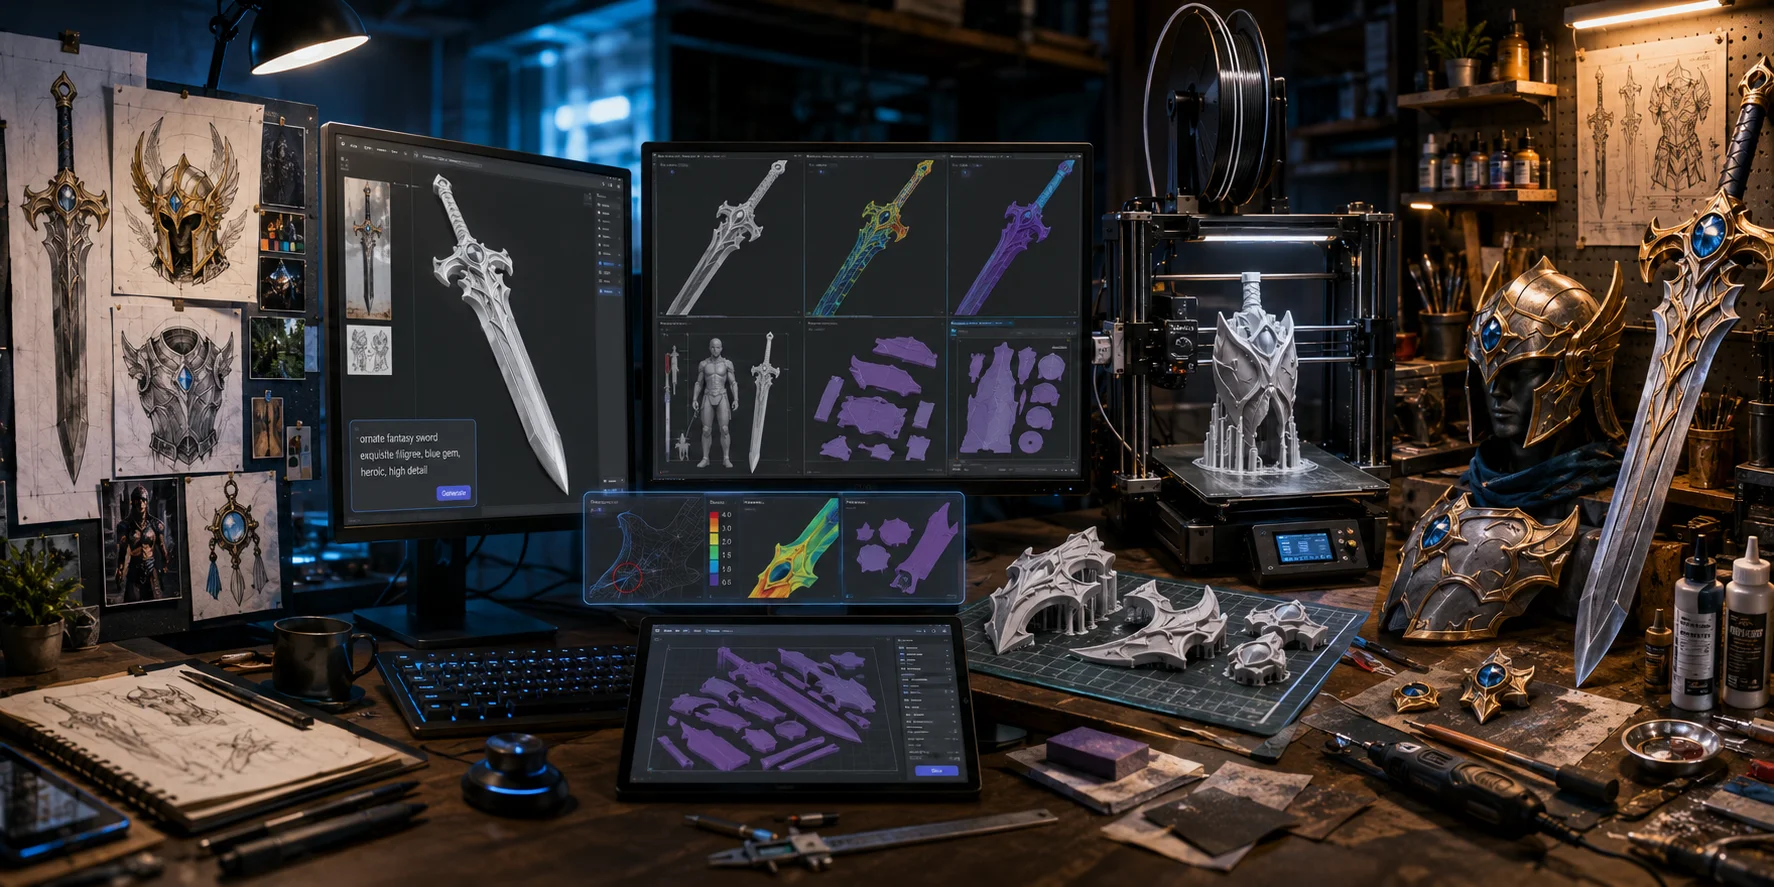
AI 3D generation simplifies the first stage. Instead of starting with an empty Blender file, you can describe a weapon, helmet, armor plate, or accessory, generate a starting mesh, and focus on making it printable and wearable.
3D printing then turns that digital model into repeatable physical parts at home. This is useful for convention deadlines, symmetrical armor details, ornate props, and makers with limited modeling experience.
AI does not replace prop making. The model still needs cleanup, scaling, wall-thickness checks, splitting, slicing, printing, assembly, sanding, priming, and painting. Its main advantage is reducing the time needed to create the first usable model.
The workflow is:
Generate → repair → scale → split → slice → print → assemble → finish → paint
What You Need Before You Start
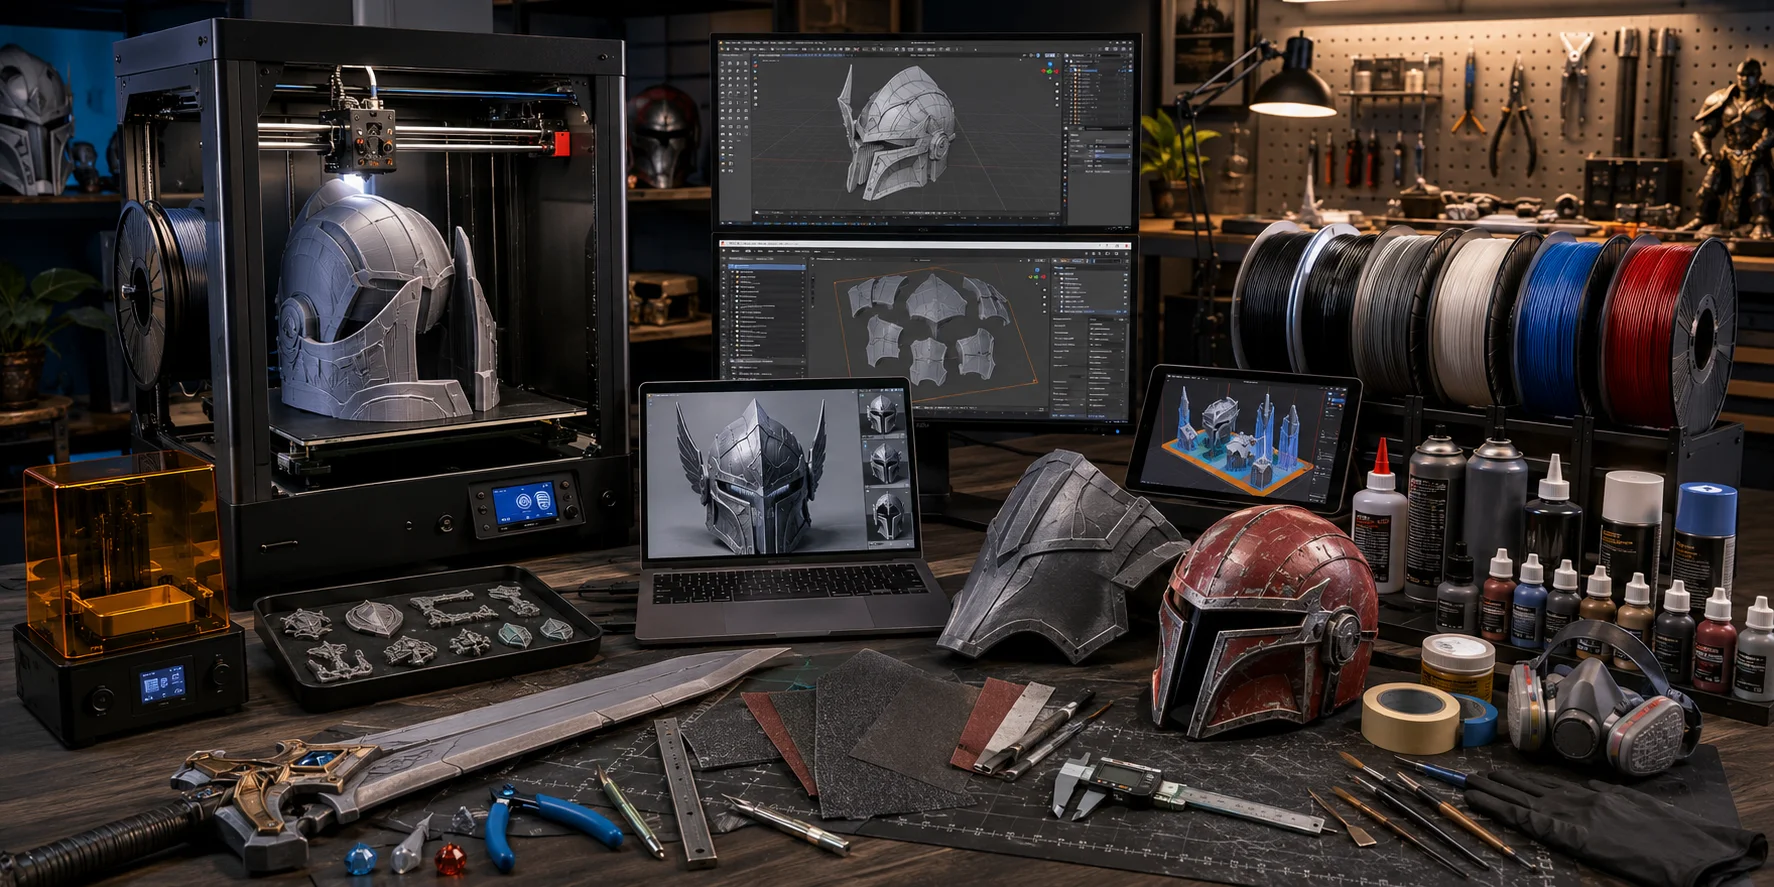
Hardware
For most cosplay props, an FDM printer is the practical starting point. It works well for helmets, armor plates, sword sections, gauntlets, blasters, and larger accessories.
A larger build volume reduces seams, but most large props still need splitting. Resin printers are better for small, high-detail pieces such as emblems, clasps, jewelry, decorative gems, and fine surface details. If you are still choosing a machine, see our guide to the best 3D printers for cosplay props for build-volume and material considerations.
Software
You need three main tools:
- an AI 3D generator for the starting model;
- Blender, Meshmixer, or another mesh tool for repair and cutting;
- a slicer such as Bambu Studio, Cura, PrusaSlicer, or OrcaSlicer.
Blender is especially useful for repairing geometry, adding thickness, cutting parts, creating alignment keys, and exporting revised files.
Materials and Tools
PLA is beginner-friendly for decorative props and armor. PETG is better for tougher parts, although it can be harder to sand smoothly.
Prepare flush cutters, a hobby knife, sandpaper, filler putty, filler primer, glue or epoxy, acrylic or spray paint, masking tape, brushes, gloves, and proper ventilation for sanding and painting. Keep wearable props free of sharp edges, and check the rules for any convention or event before bringing weapon-like pieces.
Step 1 — Generate the Prop with AI
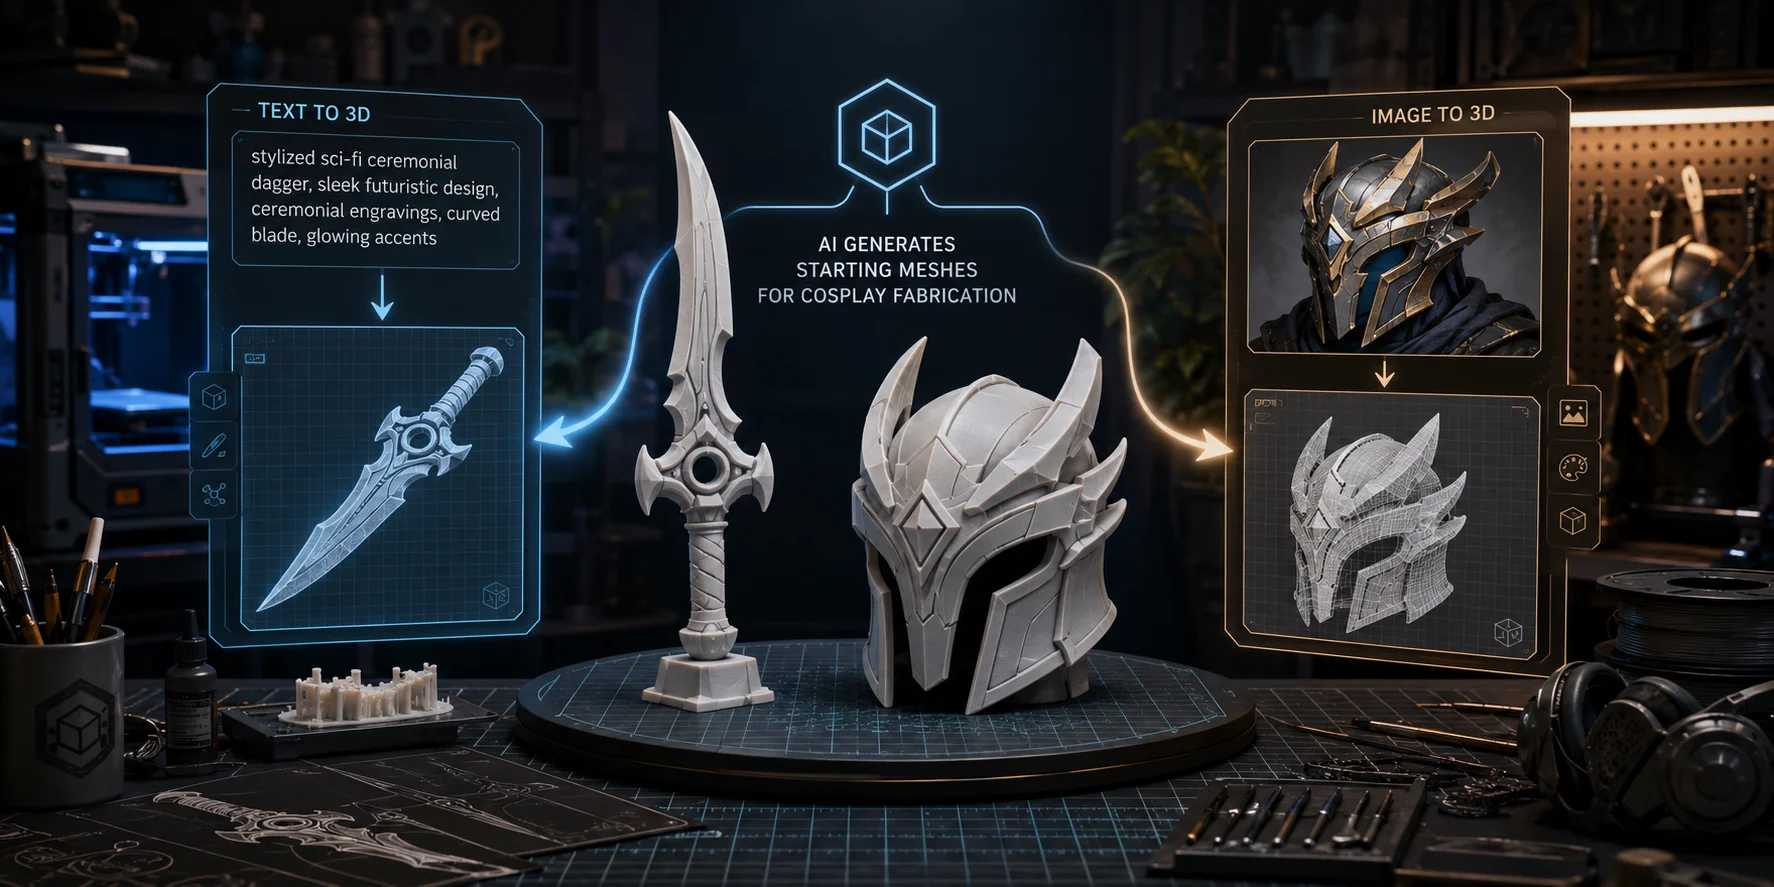
Text-to-3D: Describe the prop
Text-to-3D is best for original props or early ideas without a clear reference image. Describe the shape, structure, material cues, and printability instead of using vague prompts.
For example:
Stylized sci-fi ceremonial dagger, symmetrical design, broad blade, thick handle, engraved panels, no thin spikes, flat connection points, printable cosplay prop.
Useful terms include symmetrical, wearable, thick edges, broad surfaces, no floating parts, separate handle, smooth helmet shell, and sturdy ornament.
Tripo AI Text to 3D can generate a starting model from your prompt. Create several versions, then choose the clearest silhouette with the least fragile geometry.
Image-to-3D: From concept art or a photo
Image-to-3D is better when you already have concept art, a sketch, a reference photo, or a specific helmet or armor design.
Use a clean image with one centered subject, clear lighting, little background clutter, and no blocked details. Front or three-quarter views work well for armor, while side or orthographic views are often better for weapons. For props where the back, side profile, or symmetry matters, use multiple consistent reference views when possible; a single image can leave hidden geometry open to interpretation.
Tripo AI Image to 3D can turn a single image into a starting mesh. Use high-detail generation when needed, but always check structure, wall thickness, and printability afterward.
Text-to-3D vs image-to-3D: Which should you pick?
Use image-to-3D when you need to follow a specific visual reference or silhouette.
Use text-to-3D when creating an original weapon, emblem, accessory, artifact, or prop idea.
Either route creates a starting model; mesh repair, scaling, splitting, and slicing still come next.
Step 2 — Clean the Mesh: Make It Print-Ready
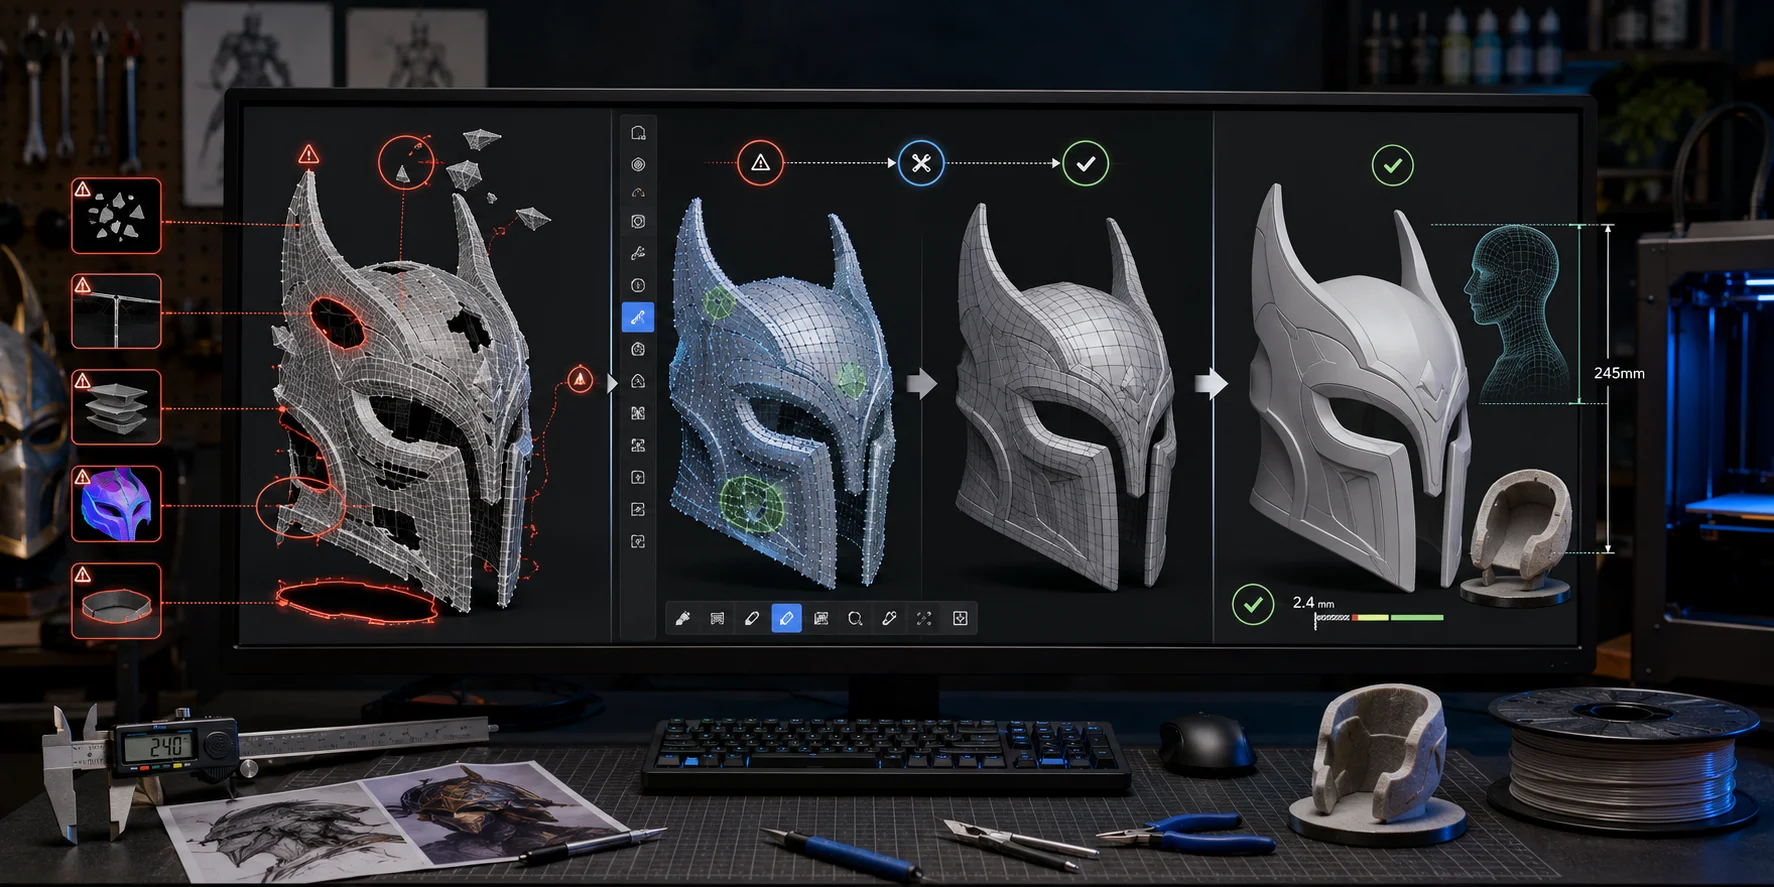
Why AI meshes need fixing
AI-generated cosplay models can contain holes, non-manifold edges, reversed normals, overlapping shells, floating fragments, internal faces, open bottoms, or disconnected decorative pieces.
For a solid prop part, the mesh should form a clean, closed volume so the slicer can generate predictable walls, infill, supports, and toolpaths. Incomplete or self-intersecting geometry can produce missing layers, broken outer walls, strange infill, or unsupported sections.
High-detail generation can preserve engraved panels, layered armor surfaces, ornaments, and prop texture. A Tripo HD Model generated at a 2M-triangle setting may retain more surface detail, but a denser mesh is not automatically more printable. More triangles can slow inspection, repair, cutting, and slicing, so every detailed model still needs review before fabrication.
Make It Watertight
A watertight model is a closed volume with no unintended holes—imagine filling it with water and nothing leaking out.
In Blender, inspect the mesh in Edit Mode, remove loose fragments, merge nearby vertices, recalculate normals, close holes, and delete internal geometry. Blender’s 3D Print Toolbox can help identify non-manifold edges and common print issues.
Meshmixer can also repair holes quickly. Remeshing may improve continuity, but aggressive settings can soften engraved details and sharp armor edges.
Keep intentional openings intact: helmets need head clearance, gauntlets need hand openings, sword sections need clean assembly surfaces, and armor plates may need flanges or strap attachment points.
Check Wall Thickness and Scale
AI models often import at arbitrary sizes, so scale the prop to the wearer before slicing.
Measure head circumference, arm width, shoulder span, hand clearance, and space for padding, clothing, straps, and movement. Check wall thickness again after scaling: thin surfaces may crack, while overly thick shells become heavy and slow to print.
Print a small fit test whenever possible. A helmet ring, wrist section, handle sample, or joint test can reveal sizing and comfort problems before a multi-day print.
Step 3 — Split Big Props for Your Print Bed
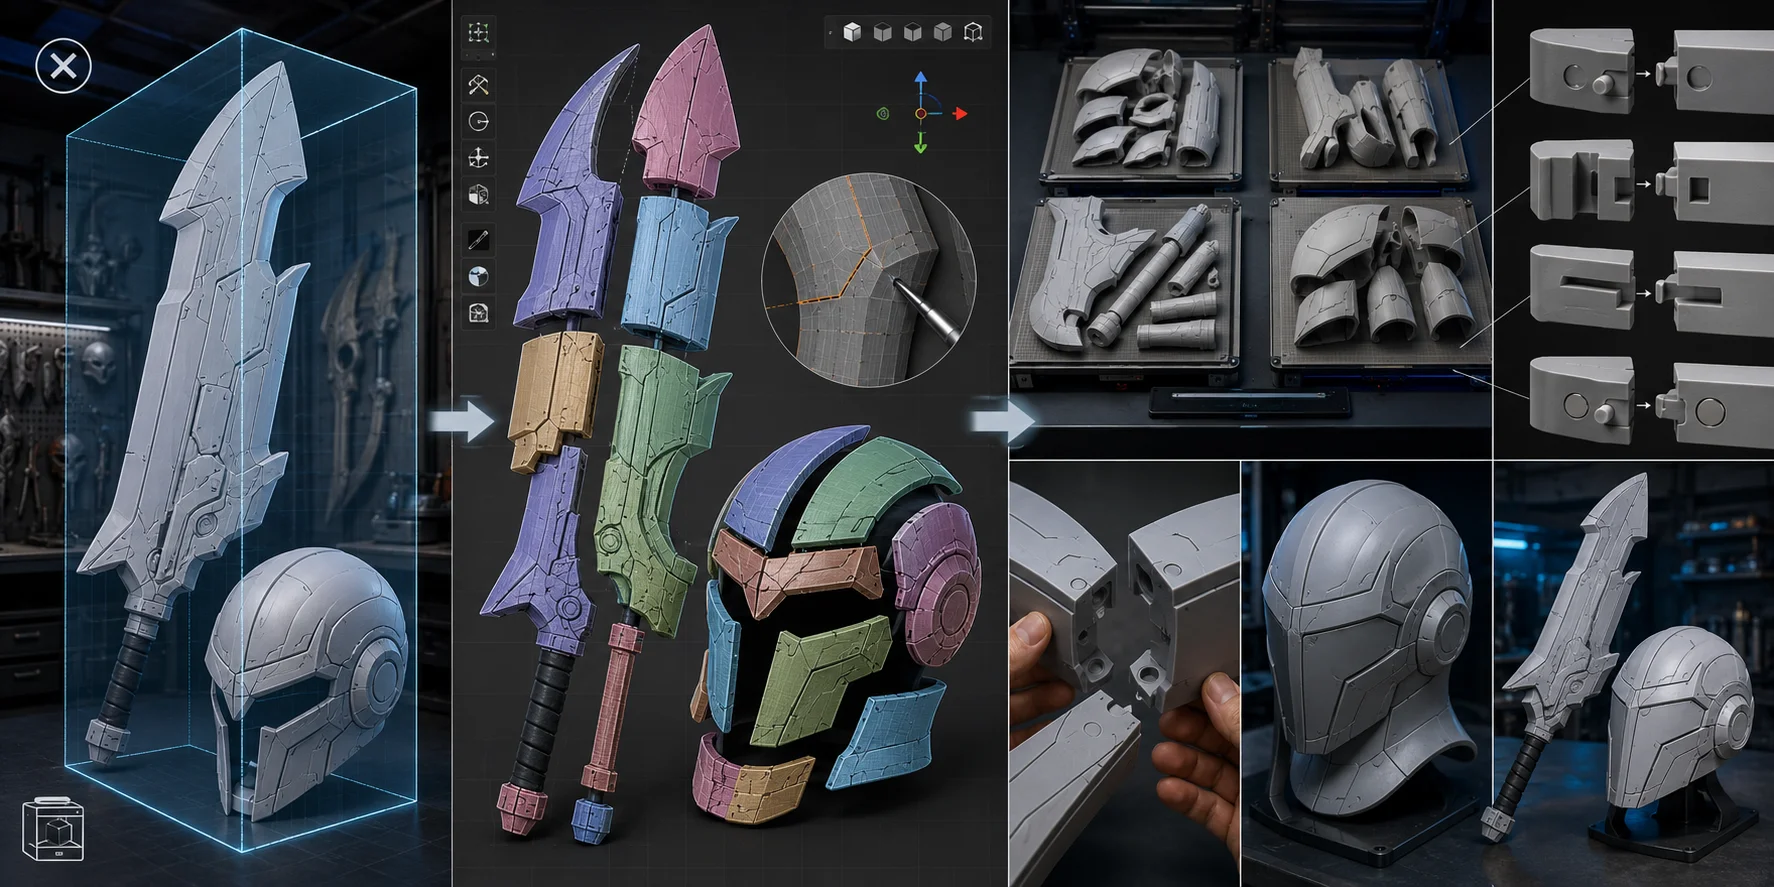
Why Splitting Matters
Most helmets, breastplates, shields, long weapons, shoulder armor, and staff parts exceed a printer’s build volume.
Good splitting reduces supports, hides seams, improves strength, and simplifies sanding. Place seams along panel lines, armor edges, engraved grooves, trim, color transitions, hidden interiors, or existing mechanical divisions.
Smart Part Segmentation
You can split models manually with Blender Bisect, Boolean cutters, or slicer cut tools when seam placement needs full control.
Tripo’s intelligent segmentation feature can automatically separate complex models into editable components, helping organize large props before printing. Treat segmentation as a starting point: revise cuts, clean internal faces, reinforce joints, and test whether every piece fits your printer.
A practical workflow is: generate the prop, segment or cut major parts, check build-volume fit, adjust seams, add joints, then test-print one connection. Select each segmented part in turn and confirm that its bounding box fits the build volume in the intended print orientation, with no isolated debris or unintended internal faces.
Keyed Joints and Alignment
Large props should not rely on glue alone. Add dowel holes, rectangular keys, dovetail inserts, tongue-and-groove edges, backing strips, flanges, or magnet pockets.
Leave tolerance between pegs and holes, because a perfect digital fit can print too tightly. Test one joint before printing every section.
For wearable armor, plan for movement: chest pieces may need straps, while gauntlets often work better as overlapping sections than one rigid shell.
Step 4 — Export and Slice
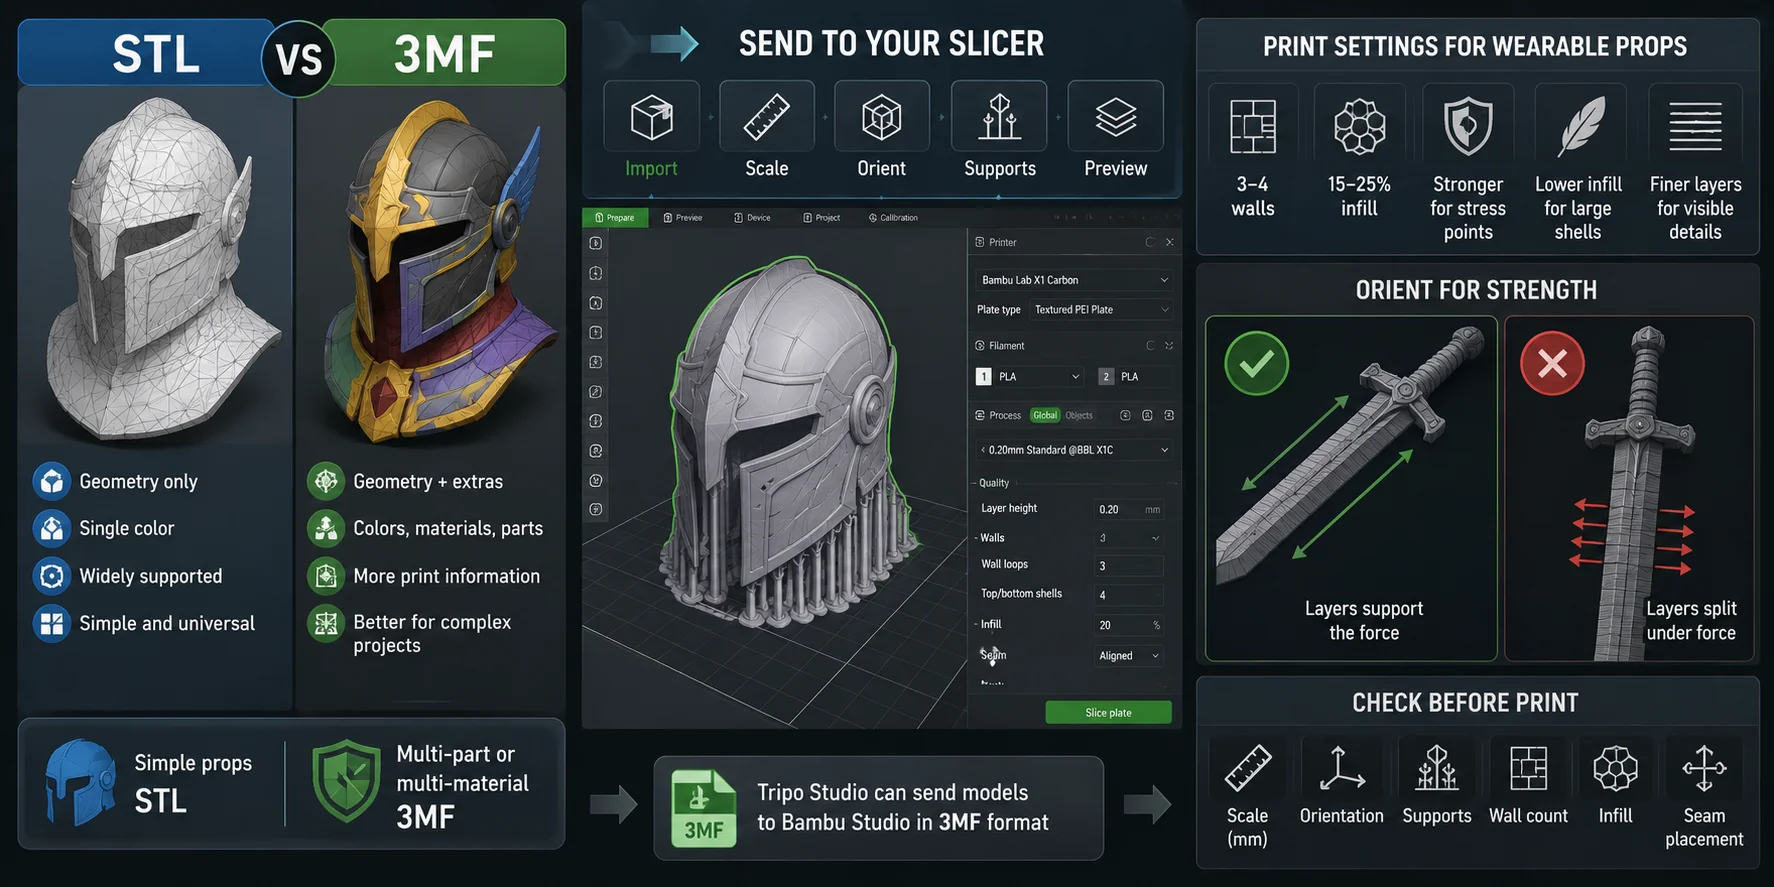
STL vs 3MF: Which should you choose?
Use STL when you only need geometry for a standard single-color print. It is widely supported and simple.
Use 3MF when your workflow needs extra project information, such as colors, materials, multiple parts, or richer printing data.
For a simple helmet or armor shell, STL is usually enough. For multicolor emblems or segmented parts with material information, 3MF may be better. 3MF can preserve richer project data, but the final result still depends on your printer, slicer profile, and available color or material system.
Send to your slicer
Before slicing, confirm the model imports in millimeters and is correctly scaled. Then check orientation, supports, wall count, infill, seam placement, layer height, and build-plate contact. Switch to layer preview and step through the first layers, joint areas, thin features, and support contact points to catch gaps, floating islands, or unexpected toolpaths before printing.
Tripo Studio can send compatible models to Bambu Studio in 3MF format, which can reduce manual file handling. The one-click handoff is for a monochrome workflow. For a colored model, export a multi-color printable file, import it into Bambu Studio manually, and verify the material-to-part mapping before slicing. Bambu Studio must be installed, and you may need to approve the browser handoff. Export eligibility depends on your model version and subscription status, so confirm the current export policy in your account before relying on this step. You still need to inspect scale, orientation, supports, and layer preview before printing.
Print settings for wearable props
Wearable props need strength without excessive weight. As a starting point for FDM printing—not universal settings—use:
- 3–4 walls or perimeters;
- 15–25% infill;
- stronger settings for handles and stress points;
- lower infill for large decorative shells;
- finer layers for visible detail pieces.
Orient parts so layer lines support expected forces. A handle printed in the wrong direction may split even with dense infill.
Step 5 — Print, Then Finish and Paint
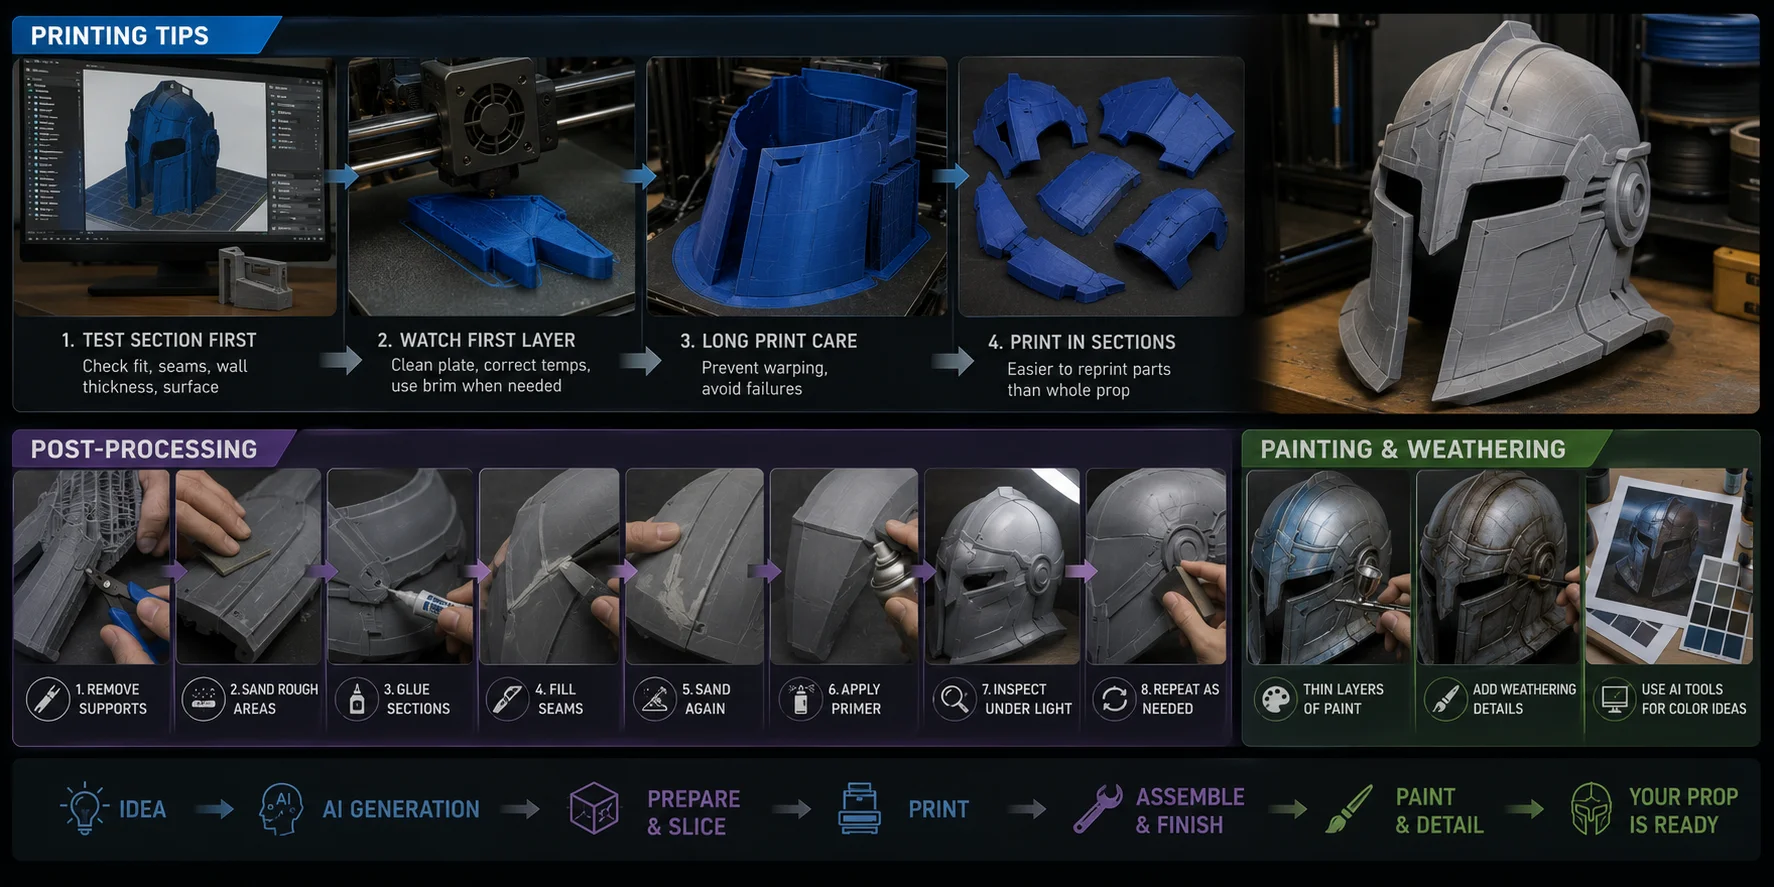
Printing tips
Print one test section before a long build. Check fit, seam alignment, wall thickness, and surface quality.
For long prints, watch the first layer, clean the build plate, use appropriate temperatures, and add a brim when needed. Large flat parts can warp, especially during long unattended prints.
Printing in sections is safer. Reprinting one failed helmet panel is easier than reprinting an entire helmet.
Post-processing
After printing, remove supports carefully with flush cutters and a hobby knife. Sand gradually, then glue and clamp the sections.
A simple finishing sequence is:
- Remove supports.
- Sand rough areas.
- Glue sections.
- Fill seams with putty.
- Sand again.
- Apply filler primer.
- Inspect under strong light.
- Repeat sanding and priming where needed.
Primer reveals layer lines, gaps, and low spots that raw filament can hide.
Painting and weathering
Use acrylic paint or spray paint after primer cures. Apply thin layers instead of one heavy coat.
Weathering makes props feel more convincing. Add dark paint into seams, dry-brush raised edges, and place scuffs where hands, armor, floors, or straps would naturally wear the surface.
AI image tools can also help create color-reference boards before painting an original prop.
Is It Legal to Sell AI-Generated Cosplay Props?
There are two separate questions: whether you have rights to the generated model and whether the prop reproduces someone else’s character, logo, weapon, or design.
Under Tripo’s current guidance, models you generate may be used commercially when the source materials are free of copyright disputes. Keep records of prompts, source images, edits, and export dates, and review the official Terms before commercial use.
A model can be AI-generated and still depict a protected character, emblem, or franchise prop. Personal cosplay, public display, and commercial sales can carry different practical risks, so check the relevant IP owner’s policies, marketplace rules, and local law before listing a product.
Do not assume “AI-generated” means “free to sell.” Check copyright, trademarks, marketplace rules, convention policies, and the specific franchise. This is practical guidance, not legal advice.
When AI + 3D Printing Is Not the Right Choice
AI generation and 3D printing are not ideal for every costume part.
Use EVA foam, fabric, thermoplastics, or flexible materials when the piece must bend with the body, stay very lightweight, or survive repeated flexing.
For very large seamless props, consider hybrid construction: printed details attached to foam, PVC pipe, wood, or molded parts.
For precision hinges, threads, sliding locks, electronics mounts, or exact mechanical fits, manual CAD refinement is still important.
Frequently Asked Questions
Can AI generate STL files for 3D printing cosplay props?
Yes. AI tools can generate 3D models that export to printing formats such as STL or 3MF when supported. Treat the export as a starting file, not proof that the model is ready to print. Open it in a mesh tool and slicer to check for holes, disconnected pieces, thin walls, and incorrect scale. For large helmets or armor, print a small test section before committing to the full build.
What’s the best AI cosplay prop generator for beginners?
The best option depends on your starting material rather than a single universal winner. Use image-to-3D when you have clean concept art, a sketch, or a photo with a clear silhouette. Use text-to-3D when you are creating an original prop from a description. For either route, start with a simple shape and print a small test piece before building a full wearable prop.
Is image-to-3D or text-to-3D better for cosplay armor?
Image-to-3D is usually the better starting point for armor with a specific reference or silhouette, especially when you can supply consistent views. Text-to-3D works well for original variations and early concepts. Neither route guarantees a wearable fit: both require scaling, mesh repair, and often splitting before printing. Check the head, arm, or body clearance with a small test piece before committing to a full part.
How do I fix an AI-generated model so it prints cleanly?
Make the mesh watertight, remove loose fragments, repair holes, recalculate normals, and check wall thickness after scaling. In your mesh tool, run the non-manifold or geometry check, then confirm that only intentional openings remain before export. Next, inspect the repaired model in your slicer for unexpected gaps, unsupported islands, and incorrect dimensions. Print a small coupon, joint, or fit section before printing a large part. If a repair tool closes an intentional opening, restore that opening before export.
How do I 3D print a prop that’s bigger than my printer?
Split it along natural seams, panel lines, or hidden edges, then confirm that every part fits your printer’s build volume in the intended orientation. Add keys, dowels, backing strips, or flanges so pieces align accurately during assembly. Leave clearance between pegs and holes, because a perfect digital fit can print too tightly. Test one connection before printing every section.
Can I sell cosplay props I made with AI?
You may have rights under the AI platform’s terms when your source materials are free of copyright disputes, but that does not automatically allow selling props based on protected characters or franchises. Check the relevant IP owner’s policies, marketplace rules, and local law before listing a product. Keep records of your source materials and edits. This is practical guidance, not legal advice.
Conclusion
From a single prompt or reference image to a painted, convention-ready prop, AI can remove much of the friction from the first modeling step. The finished build still depends on practical maker work: cleaning the mesh, checking fit, splitting large parts, printing test pieces, sanding, priming, and painting.
Your next costume is not one click away, but it can be one clear workflow away. Generate the starting model, turn it into a reliable physical object, and build the details that make the prop yours in Tripo AI Studio.