AI 3D Printed Figurines: From Photo to Printable Model
TL;DR:
- One clear, well-lit photo is enough to generate a starting model; add side or 45-degree views when likeness matters.
- AI turns that photo into a 3D model in minutes—no sculpting skills required.
- The step most people skip: clean the mesh (close holes, flatten the base) before printing.
- Choose your printer by goal: resin for fine facial detail, FDM for size and budget.
- Export STL (geometry) or 3MF (color), slice, print, then sand and paint to finish.
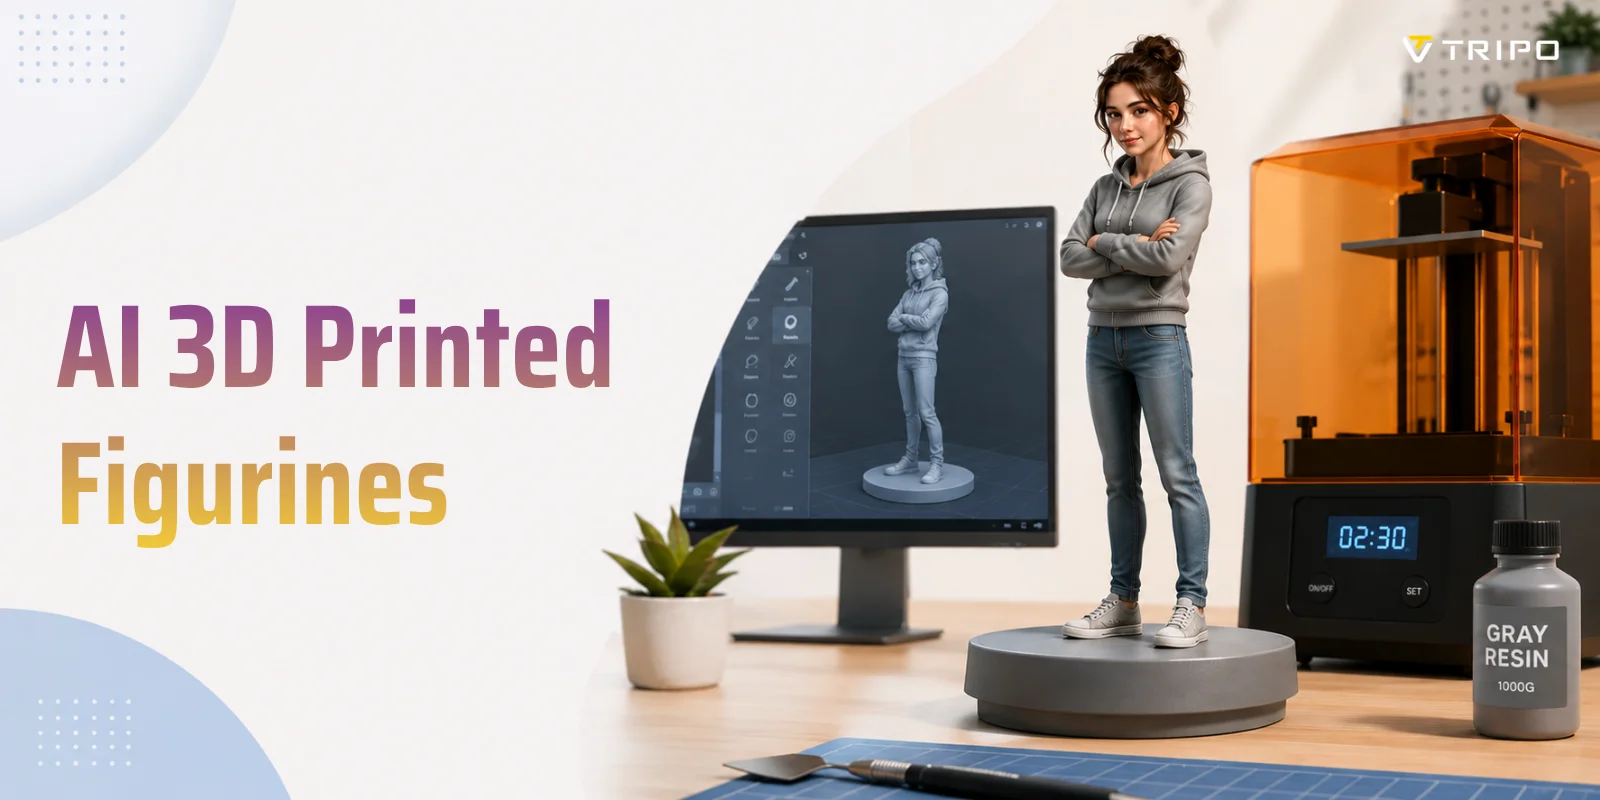
AI 3D printed figurines turn a photo into a physical model of a person, pet, or character. Generate the mesh with an AI image-to-3D tool, prepare it for printing, then slice, print, and finish it.
What Are AI 3D Printed Figurines?
From Photo to AI 3D Printed Figurine
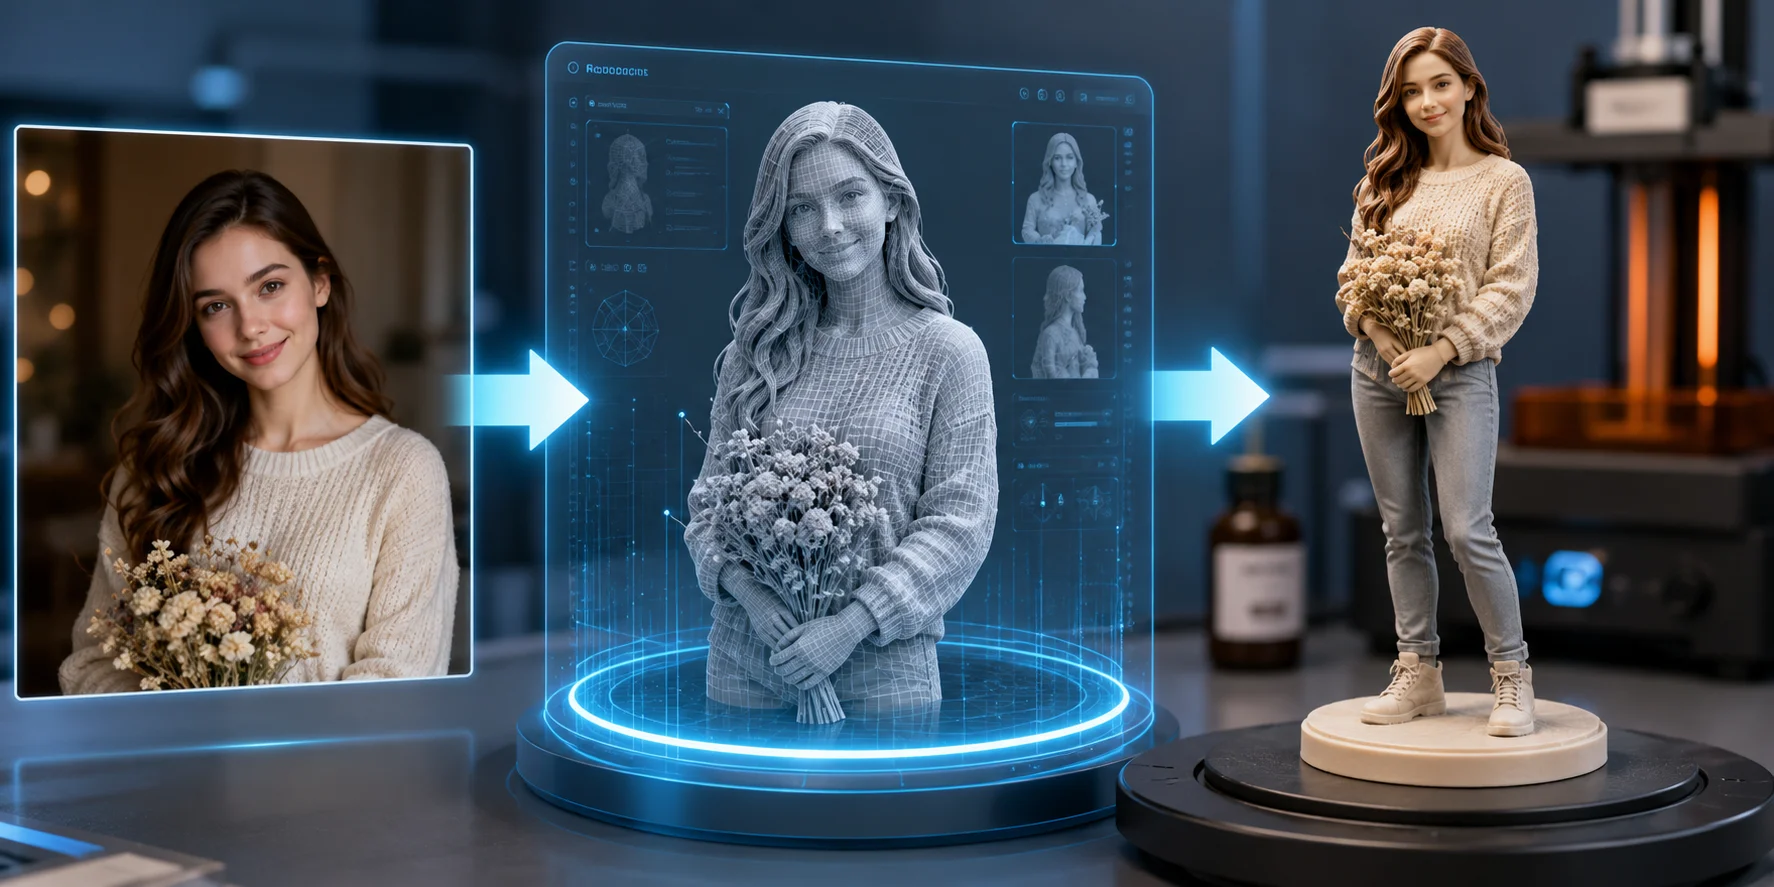
AI 3D printed figurines are physical models made by converting a photo or concept image into a printable 3D mesh. AI handles the starting geometry; you still inspect the model, make print-ready adjustments, and finish the resin or FDM print.
What You'll Need (Before You Start)
To start, you need a clear reference photo, an AI image-to-3D tool, access to a printer or print service, and a slicer. The table summarizes the essentials.
| What You Need | Why You Need It | Tips |
|---|---|---|
| A clear reference photo | Provides the visual information AI uses to build the model. | Use a single subject with even lighting, a simple background, and no objects blocking the face or body. Higher-resolution photos generally produce cleaner geometry. |
| An AI image-to-3D tool | Converts your photo into an AI figurine 3D model. | Choose a tool that exports printable formats such as STL, OBJ, GLB, or FBX and allows you to refine the generated mesh if needed. |
| A 3D printer or printing service | Turns the digital model into a physical figurine. | Resin printers are ideal for detailed figurines, while FDM printers are better for larger, lower-cost prints. If you do not own a printer, many online and local services can print your file for you. |
| Slicing software | Converts the 3D model into printer instructions (G-code). | Popular slicers let you adjust layer height, supports, infill, and print orientation before printing. |
| Optional finishing tools | Improve the final appearance after printing. | Sandpaper, primer, acrylic paints, brushes, and a clear protective coat can transform a raw print into a polished collectible. |
AI 3D Figurine Creation Workflow
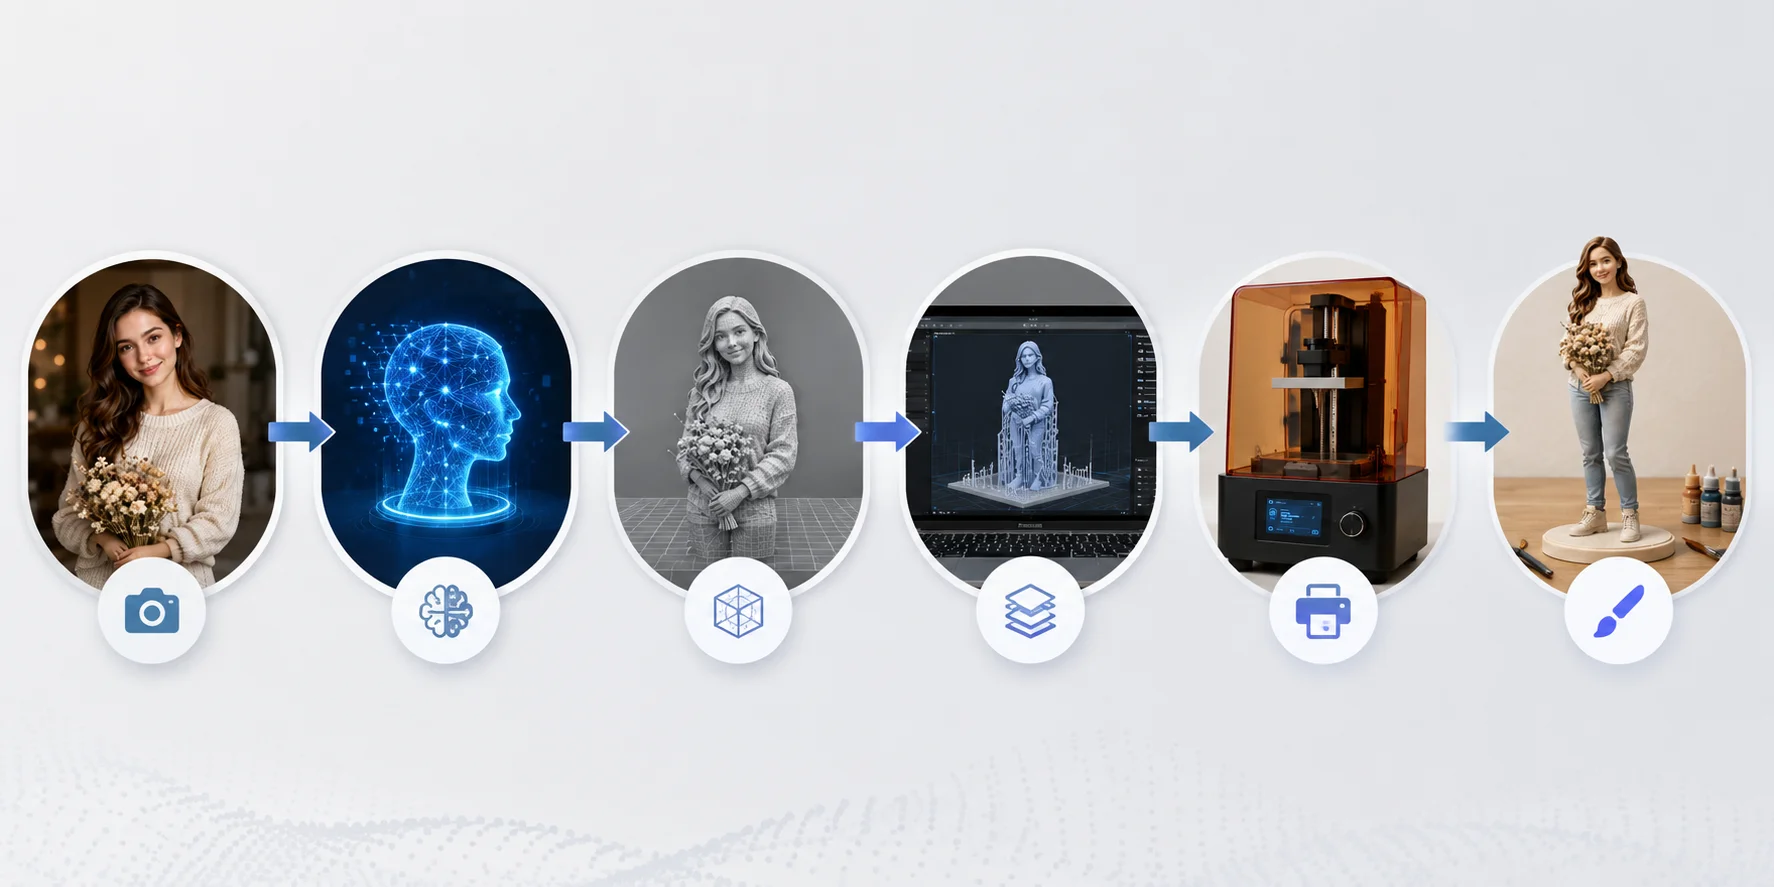
Step 1 — Pick or Prep the Right Photo
What Makes a Good Source Photo
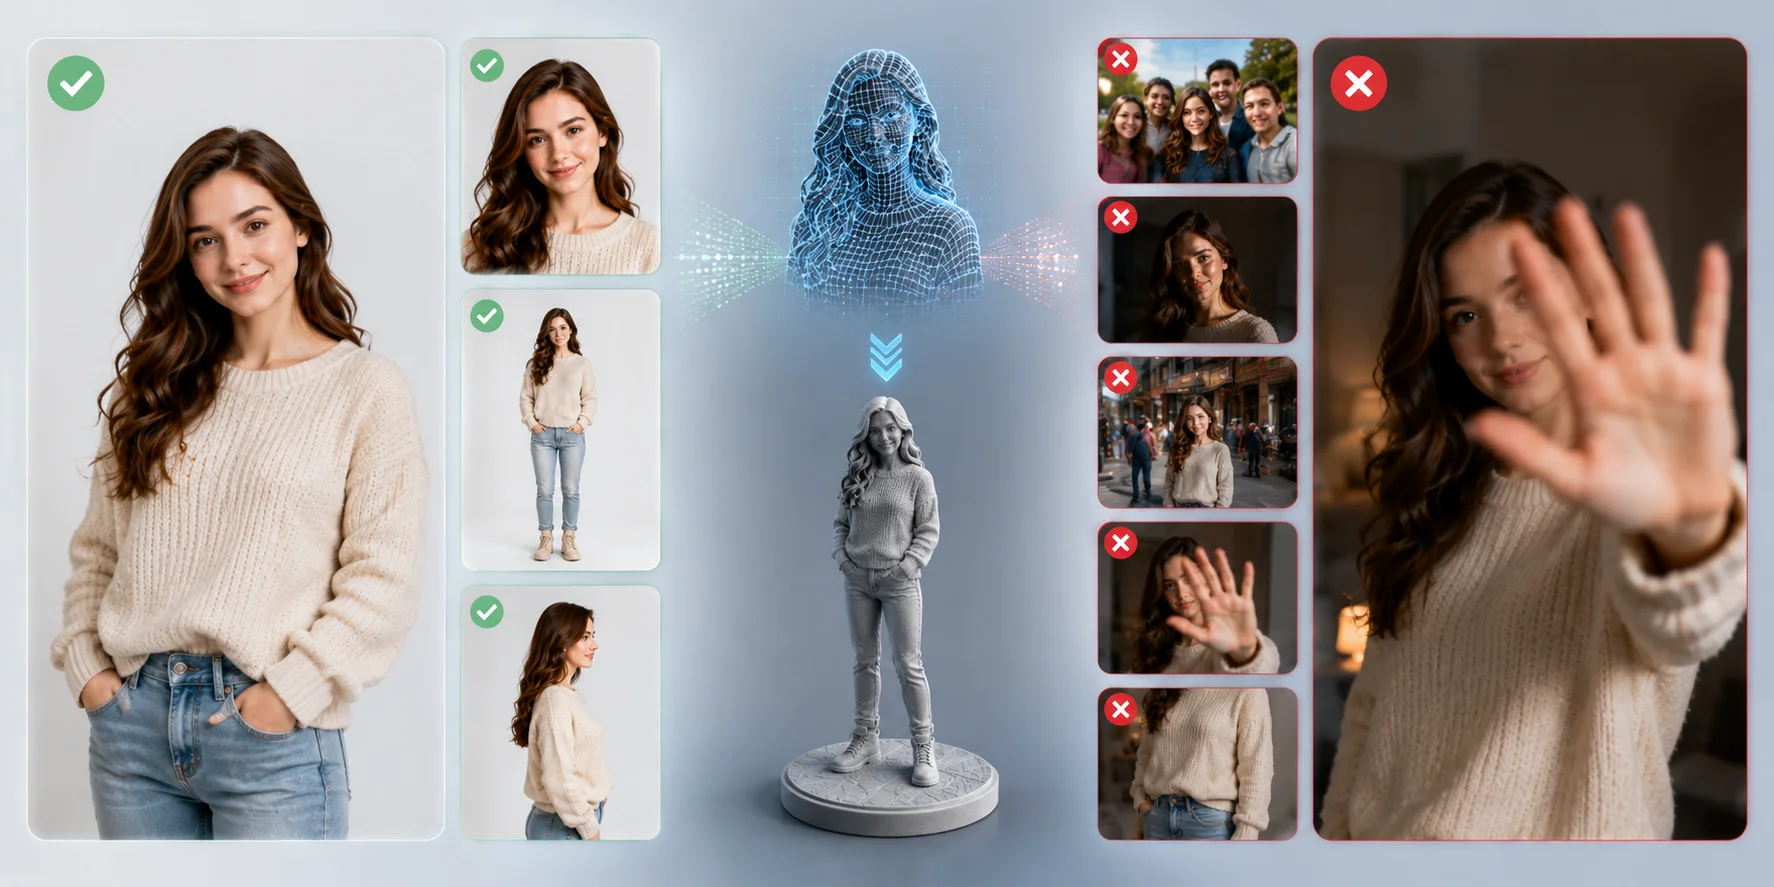
Use one clear subject with visible facial and body features, even lighting, and a simple background. Avoid heavy occlusion and use the highest-resolution photo available; missing or blurred details give the model less reliable information.
Good vs Bad Photos for AI 3D Figurines
Multiple Angles Help
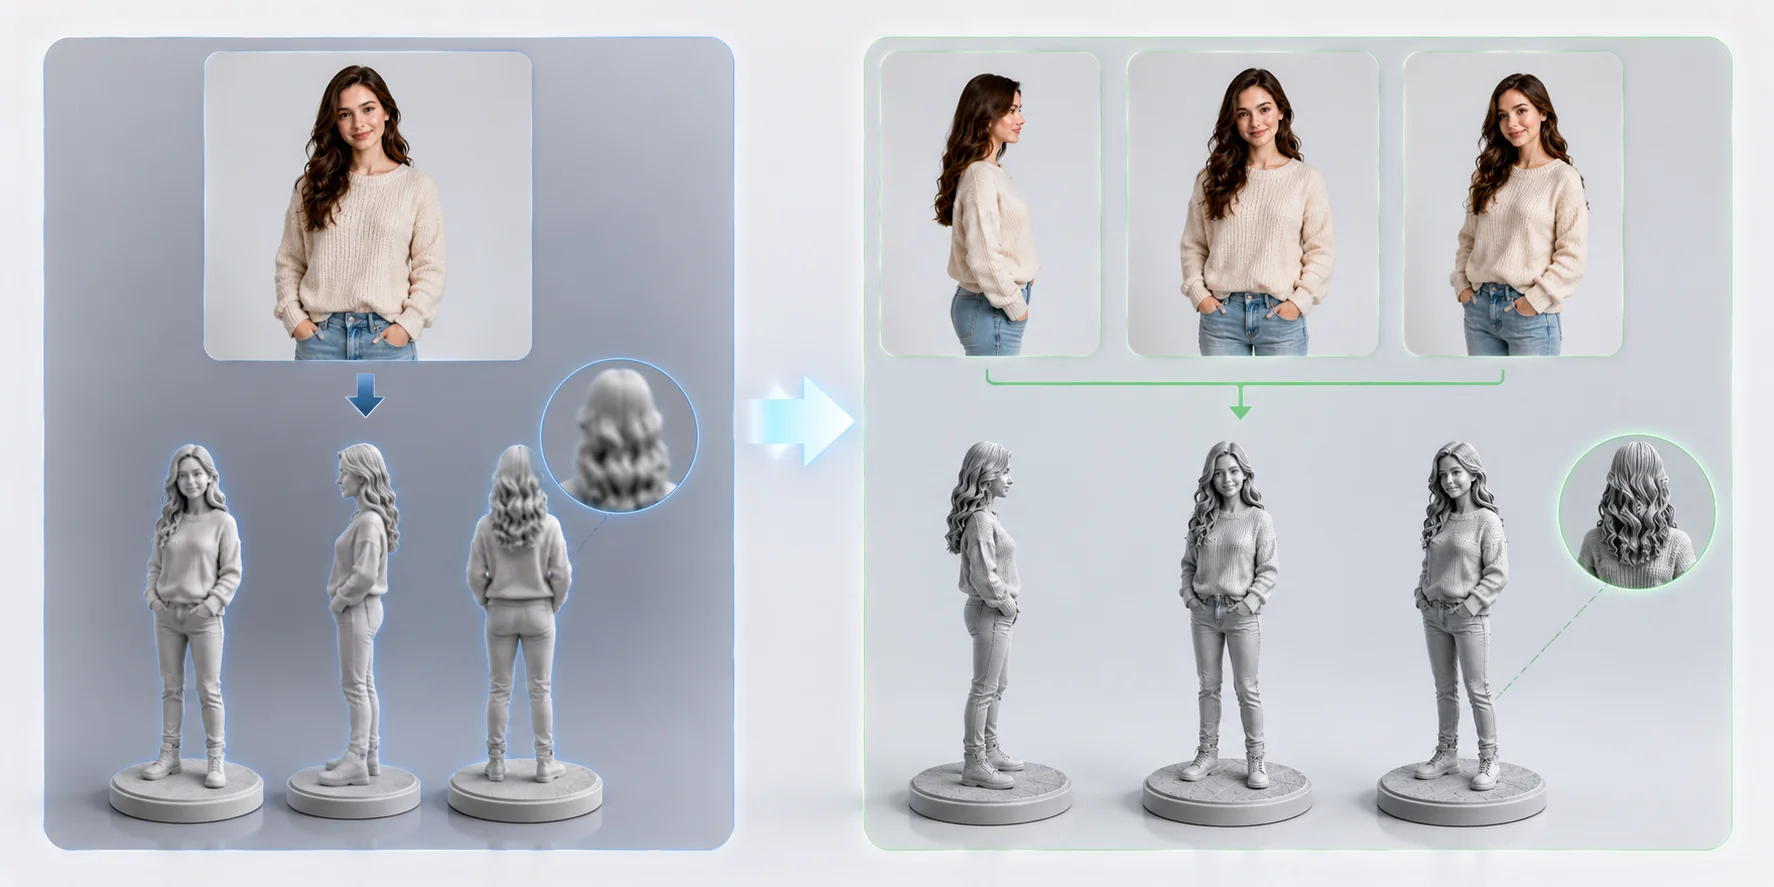
One photo can start a model, but a front view plus a side or 45-degree view reduces guesswork around hidden areas. When multi-image input is available, use two to four photos with consistent lighting.
Why Multiple Reference Photos Improve Results
Optional — Stylize First
For a collectible toy look, stylize the photo before converting it to 3D. A prompt such as "cute vinyl collectible figure, oversized head, simplified facial features, smooth plastic finish, studio lighting" can produce a more print-friendly design with a distinctive character.
Step 2 — Turn Your Photo Into a 3D Model
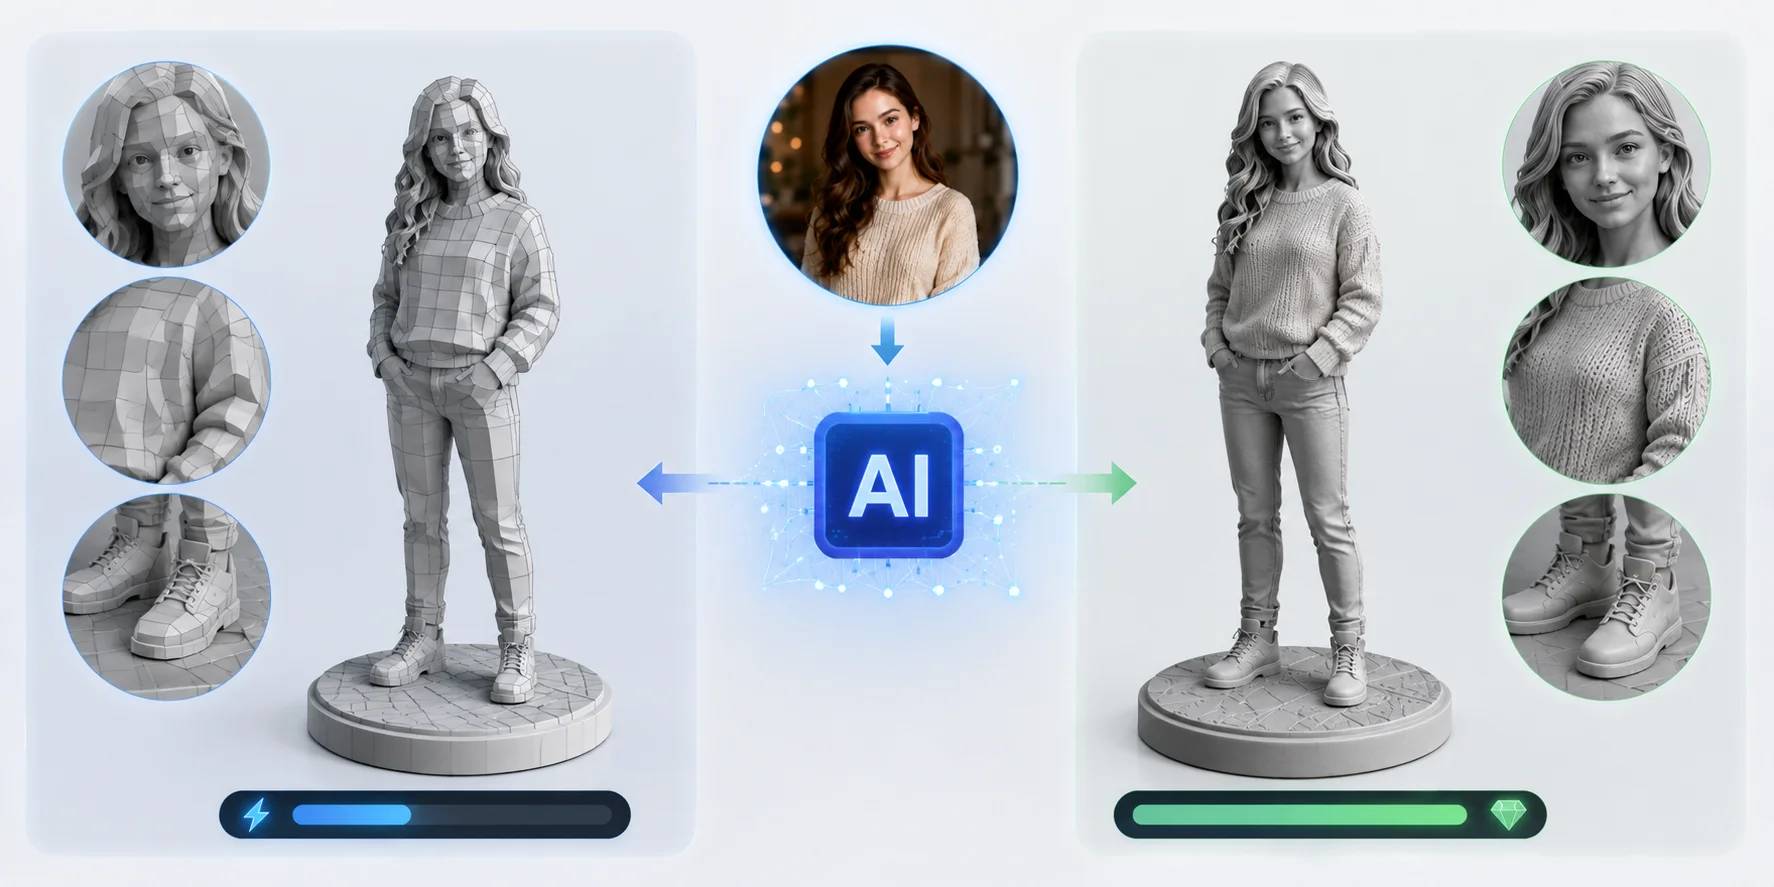
The workflow is straightforward: upload your reference image, choose Image-to-3D, and start the conversion. Use a quick preview when you are comparing photos or styles, then choose a higher-detail option for the final figurine. With Tripo Image to 3D, you can generate directly from a photo; for a print-focused final model, Tripo High-Detail Model supports up to 2 million polygons for richer geometry.
Inspect the generated model before exporting. Check the silhouette, proportions, face, hands, and accessories; if the overall likeness is wrong, regenerating is usually faster than repairing a weak starting mesh.
Mode names vary by tool. For Tripo, use HD Model when high geometric detail matters for a figurine; use Smart Mesh when speed and lightweight topology matter more than fine surface detail. A practical approach is to test the source photo first, then generate the final version in the mode that matches your printing goal before moving on to mesh cleanup.
Fast vs High-Quality AI Model Generation
Step 3 — Clean Up the Model for Printing
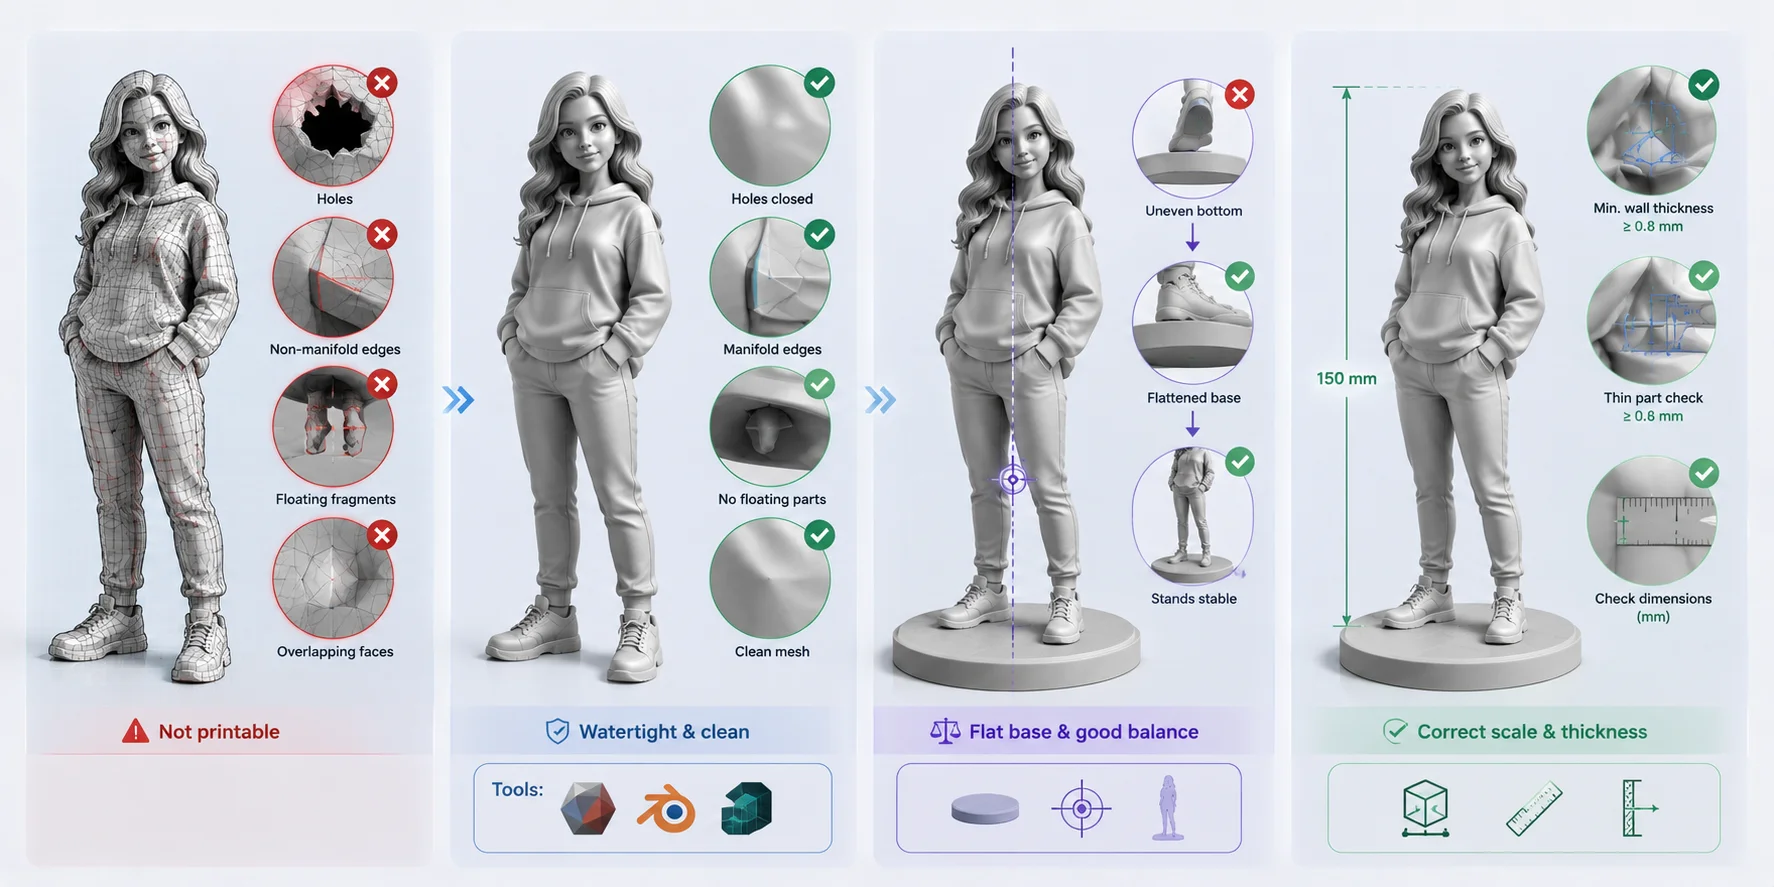
Generating a model with AI is only half the job. Before sending your AI figurine 3D model to a printer, you should make sure it is printable. AI-generated meshes often contain small geometry errors that are harmless for rendering but can cause failed prints, missing layers, or fragile parts. Spending a few minutes cleaning the mesh can dramatically improve both print success and final quality. Whether you're making a realistic keepsake or a custom figurine from photo, this is the step that turns an AI-generated model into a reliable printable file.
Why AI Meshes Need Cleanup
AI-generated models are created automatically, so they may contain imperfections that traditional CAD or sculpted models do not. Common issues include small holes in the surface, non-manifold edges, overlapping faces, floating geometry, and tiny disconnected fragments left behind during generation. These defects may confuse slicing software or create unsupported islands during printing.
Close Holes & Make It Watertight
For predictable slicing, aim for a watertight, manifold mesh: one closed solid with no unintended gaps or self-intersections. Open holes and broken surfaces can confuse the slicer about what is inside or outside the model, increasing the risk of repairs or failed prints.
Applications such as Meshmixer, Blender, and many modern slicers include repair tools that can close holes, merge overlapping surfaces, and remove loose fragments. Treat automatic repair as a first pass, then inspect the repaired preview before printing; a slicer may fix a minor defect differently from the way you expect.
Flatten the Base & Check It Stands
Many AI-generated figurines are created without considering how they will stand in the real world. A rounded shoe, uneven pose, or dynamic action stance may look great on screen but tip over after printing.
Create a flat base or slightly trim the bottoms of the feet so the figurine has a stable contact surface. Then test the model in your 3D viewer by checking whether the center of gravity falls over the base. If necessary, enlarge the base or slightly adjust the pose before slicing. Making these changes now is much easier than repairing a finished print.
Wall Thickness & Scale
Scale is just as important as geometry. A figurine that looks perfect on screen may become unprintable if it is reduced too much. Thin parts such as fingers, glasses, sword blades, hair tips, or clothing edges can disappear entirely if they fall below your printer's minimum printable thickness.
After deciding on the final size, always check the model dimensions in millimeters, not just percentages. If you're printing a small tabletop figure, slightly thickening fragile features usually produces better results than keeping them perfectly to scale. Before exporting the final STL, verify wall thickness, overall height, and any delicate details so your photo to figurine 3D print succeeds on the first attempt instead of requiring multiple failed prints and unnecessary material waste.
How to Make an AI 3D Model Printable
Step 4 — Choose FDM or Resin Printing
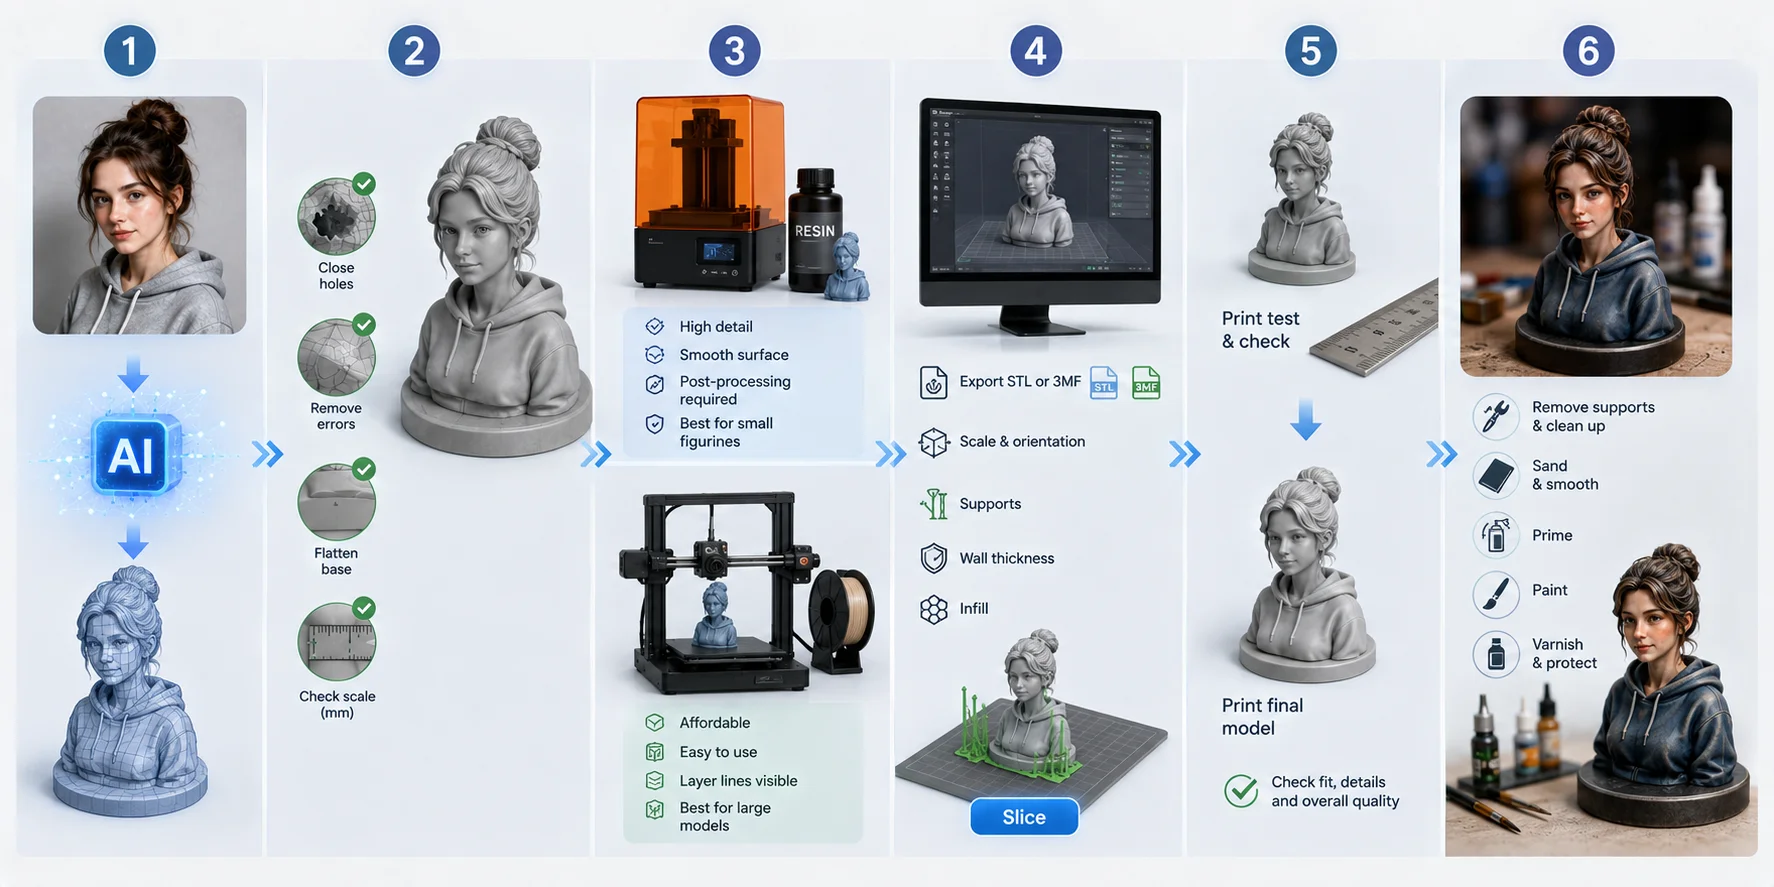
After preparing your model, the next step is choosing how to print it. For most AI 3D printed figurines, the decision comes down to resin or FDM printing. Resin delivers the best detail for small figurines, while FDM is more affordable and better suited for larger prints.
| Feature | Resin | FDM |
|---|---|---|
| Best for | Miniatures & collectibles | Large models & beginners |
| Detail | Excellent | Good |
| Surface | Smooth | Visible layer lines |
| Cost | Higher | Lower |
| Post-processing | Wash & UV cure | Remove supports & sand |
Resin (Best for Fine Facial Detail)
Resin printers produce sharp facial features, clothing textures, and fine details, making them a strong choice for AI figurine 3D models and collectible miniatures. Prints require washing and UV curing; handle uncured resin, wash liquid, and contaminated tools with suitable gloves and follow the resin manufacturer's safety instructions and disposal guidance.
Resin safety checklist:
- Wear suitable gloves and avoid skin contact with uncured resin and wash liquid.
- Keep food, drinks, and children away from the work area.
- Cure and dispose of resin waste according to the material SDS and local rules.
FDM (Best for Size & Budget)
FDM printers are more affordable, easier to use, and ideal for larger figurines or prototypes. They can also support multi-color printing, but small details are less crisp, and visible layer lines often require sanding.
No Printer? Use a Print Service
You do not need to own a printer to create a photo to figurine 3D print. Online and local print services can print an STL or 3MF file and ship the finished figurine to you. Tripo also offers Print&Delivery for physical products such as figures, magnets, keychains, and keycaps, so you can move from a generated model to a finished item without buying hardware.
Step 5 — Export, Slice & Print
Export the format that matches your workflow. STL is widely supported for 3D printing because it stores geometry only. 3MF can preserve additional information, such as materials and print settings, but whether color or multi-material data is retained depends on the exporter, slicer, and printer. OBJ, FBX, and GLB are useful when you need to edit the model before creating the final printable file.
Next, open the model in your slicer. Check the overall scale in millimeters, choose an orientation that reduces supports, and set supports, wall thickness, and infill for your printer and material. In Tripo's Bambu Studio workflow, one-click sending uses a monochrome 3MF file; for a colored model, export a multi-color printable file and import it into Bambu Studio manually.
Before printing the full-sized figurine, print a small test version first. A quick prototype helps you verify proportions, wall thickness, support placement, and fit while using much less time and material. Once you're satisfied with the result, print the final model, remove the supports, perform any necessary finishing, and your photo to figurine 3D print is ready for painting or display.
Step 6 — Finishing: Sand, Prime & Paint
Start by carefully removing the support structures with flush cutters or a hobby knife. Sand away support marks and visible layer lines using fine-grit sandpaper, paying extra attention to the face, hands, and clothing. If necessary, fill small gaps with modeling putty before sanding again for a smoother surface.
Next, apply a thin coat of primer. Primer helps paint adhere evenly and makes small imperfections easier to spot before you begin painting. Once dry, use acrylic paints to build up colors in several thin coats rather than one thick layer. Finish with a clear matte, satin, or gloss varnish to protect the paint from scratches and everyday handling.
If your printer supports multi-color printing, you can produce a colorful figurine directly from the printer with very little finishing work. However, hand painting usually delivers better shading, cleaner facial features, and more realistic textures. Many makers combine both approaches by printing the base colors first and then adding highlights, shadows, and fine details by hand.
AI 3D Printed Figurine Workflow
How Much Does It Cost?
The cost of creating AI 3D printed figurines depends on whether you generate the model yourself, print it at home, or use a professional printing service. In most cases, the total cost is made up of four parts: the AI tool, printing materials, equipment (or a print service), and optional finishing supplies.
| Item | Typical Cost |
|---|---|
| AI image-to-3D tool | Free tier available on many platforms; paid plans for higher quality and more exports |
| Resin or filament | Usually only a few dollars' worth of material for a small figurine |
| Print service | Often around 100+, depending on size, material, detail, and shipping |
| Paint & finishing | Optional; varies with the tools and materials you already own |
If you already own a 3D printer, DIY is often the lowest-cost option after the initial hardware investment. Each additional figurine mainly adds material, electricity, test prints, and post-processing time. For an occasional project, a print service can be better value than buying a printer, especially for one or two high-detail models.
Start your estimate with the final size. Larger models use more material, take longer to print, and cost more to finish. Service quotes can also change with material, hollowing, supports, cleanup, shipping, and region, so compare your AI-tool cost, estimated material use, and local quotes before deciding whether to print at home or outsource.
Is It Legal? Copyright & Likeness
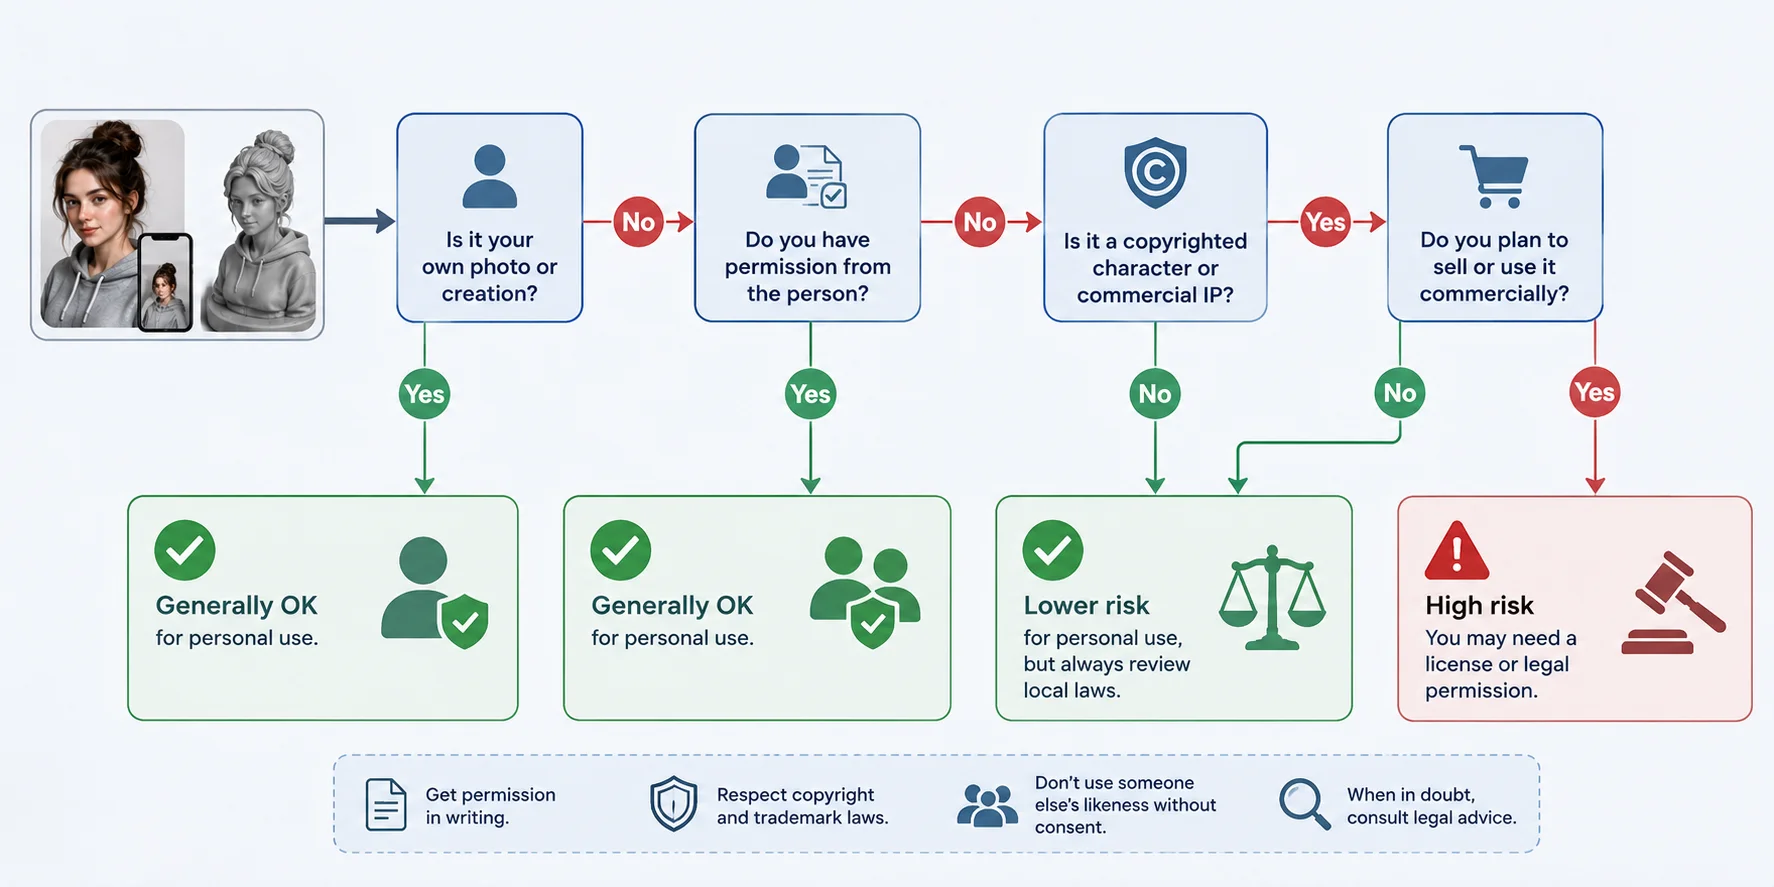
This is a practical overview, not legal advice. Whether you may create, share, or sell an AI 3D printed figurine depends on the source photo, the person or character depicted, the jurisdiction, and how you use the finished model.
If you are making a figurine of yourself, a family member, a friend, or a pet, start by confirming you have permission to use the person's likeness and the original photo. If you commission a custom figurine from photo, make sure the photo itself is yours to use or that you have the photographer's permission.
Copyrighted characters, branded designs, and commercial IP add another layer of risk. Personal use is not an automatic exception, and sharing, selling, or distributing a model can raise copyright, trademark, or likeness issues. For commercial work, use original designs or obtain the necessary permissions and licenses.
The same rule applies to photos of other people. Do not upload or print someone else's likeness without their permission, especially if the figurine will be shared publicly or sold.
Finally, check the commercial terms of the AI platform you use. For example, Tripo allows commercial use of generated models provided that the source materials you upload do not infringe the copyrights or other rights of third parties. In other words, the AI-generated model does not remove your responsibility to ensure that the input images and designs are legally yours to use.
Can You Legally 3D Print It?
When This Workflow Doesn't Work (Limits)
Very thin features—such as sword blades, fingers, glasses, or hair strands—can be difficult to print and may break easily, especially on small figurines. Thickening these parts or increasing the print size usually improves durability.
AI is also not the best choice for models that require precise mechanical fit, such as snap-fit parts, hinges, or threaded components. These projects are better suited to manual CAD modeling.
Finally, a single photo can only provide limited information. Hidden areas like the back of the head or clothing must be guessed by the AI, so the resemblance may not be perfect. If you need higher accuracy, use multiple reference photos or refine the model manually before printing.
For most collectibles, gifts, and tabletop miniatures, AI works extremely well. For highly accurate or functional models, combining AI generation with manual editing is still the best approach.
Frequently Asked Questions
Can you 3D print an AI-generated figurine from one photo?
Yes. A clear front-facing photo can generate a useful starting model, but hidden areas will be inferred rather than reconstructed. Inspect the mesh, repair printability issues, and export it as STL or 3MF before slicing. Add side or 45-degree reference photos when your tool supports them and facial likeness matters.
Can I 3D print directly from Midjourney or ChatGPT images?
Not directly. Midjourney and ChatGPT images are 2D references, not printable 3D meshes. Use the image as input for an AI image-to-3D tool, inspect and repair the resulting mesh, then export it for slicing and printing.
What's the best AI tool to make a 3D printable figurine?
Choose a tool based on the workflow, not a single marketing claim. Look for high-detail generation, support for multi-view references when you need a better likeness, and export options such as STL or 3MF. You should still expect to inspect and repair the mesh before printing, even when the generated model looks good on screen.
Should I use resin or FDM for AI figurines?
Resin is usually the better choice for small figurines when facial detail and smooth surfaces matter most, but it requires washing, curing, and careful handling. FDM is generally less expensive to operate and better suited to larger figures or quick prototypes, though fine details and layer lines may need more finishing. The best choice depends on the size, desired detail, material, and post-processing you are prepared to do.
How much does it cost to make a custom figurine from a photo?
Costs vary widely. Many AI tools offer free credits or trials; a small home print can use only a few dollars of material if you already own the printer, but test prints and finishing add cost. As a rough guide, print services may quote 100+ depending on size, material, hollowing, detail, cleanup, shipping, and location.
Is it legal to 3D print a figurine of myself or someone else?
Use your own photo or obtain permission from both the person depicted and the photographer when applicable. Copyrighted characters, brands, and public likenesses can create separate legal risks, especially if you share or sell the result. Rules differ by jurisdiction, so treat this as practical guidance rather than legal advice and seek qualified advice for commercial projects.
Conclusion
Ready to create your own? Generate a custom figurine from a photo in Tripo AI Studio, export a printable model, and bring it to life on your 3D printer.