The 3D Animation Pipeline: All Stages Explained (2026)
TL;DR
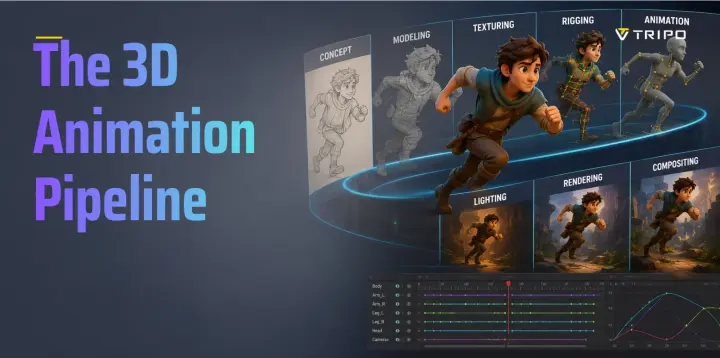
- The 3D animation pipeline moves from planning and design to asset creation, animation, rendering, compositing, and final delivery.
- Pre-production defines the story, visual style, shots, and timing before expensive 3D work begins.
- Production covers modeling, texturing, rigging, layout, and animation, with specialists using tools such as Maya, Blender, ZBrush, and Substance Painter.
- Post-production adds lighting, rendering, VFX, compositing, sound, and editing to turn completed shots into a finished sequence.
- AI can accelerate early modeling and basic rigging, helping creators produce editable assets faster before refining them in a traditional pipeline.
What Is the 3D Animation Pipeline?
The 3D animation pipeline is the structured, step-by-step workflow that turns an idea into a finished animation. It runs across three phases—pre-production (concept, story, storyboard), production (modeling, texturing, rigging, animation, lighting), and post-production (rendering, VFX, compositing, sound)—each with its own roles and software.
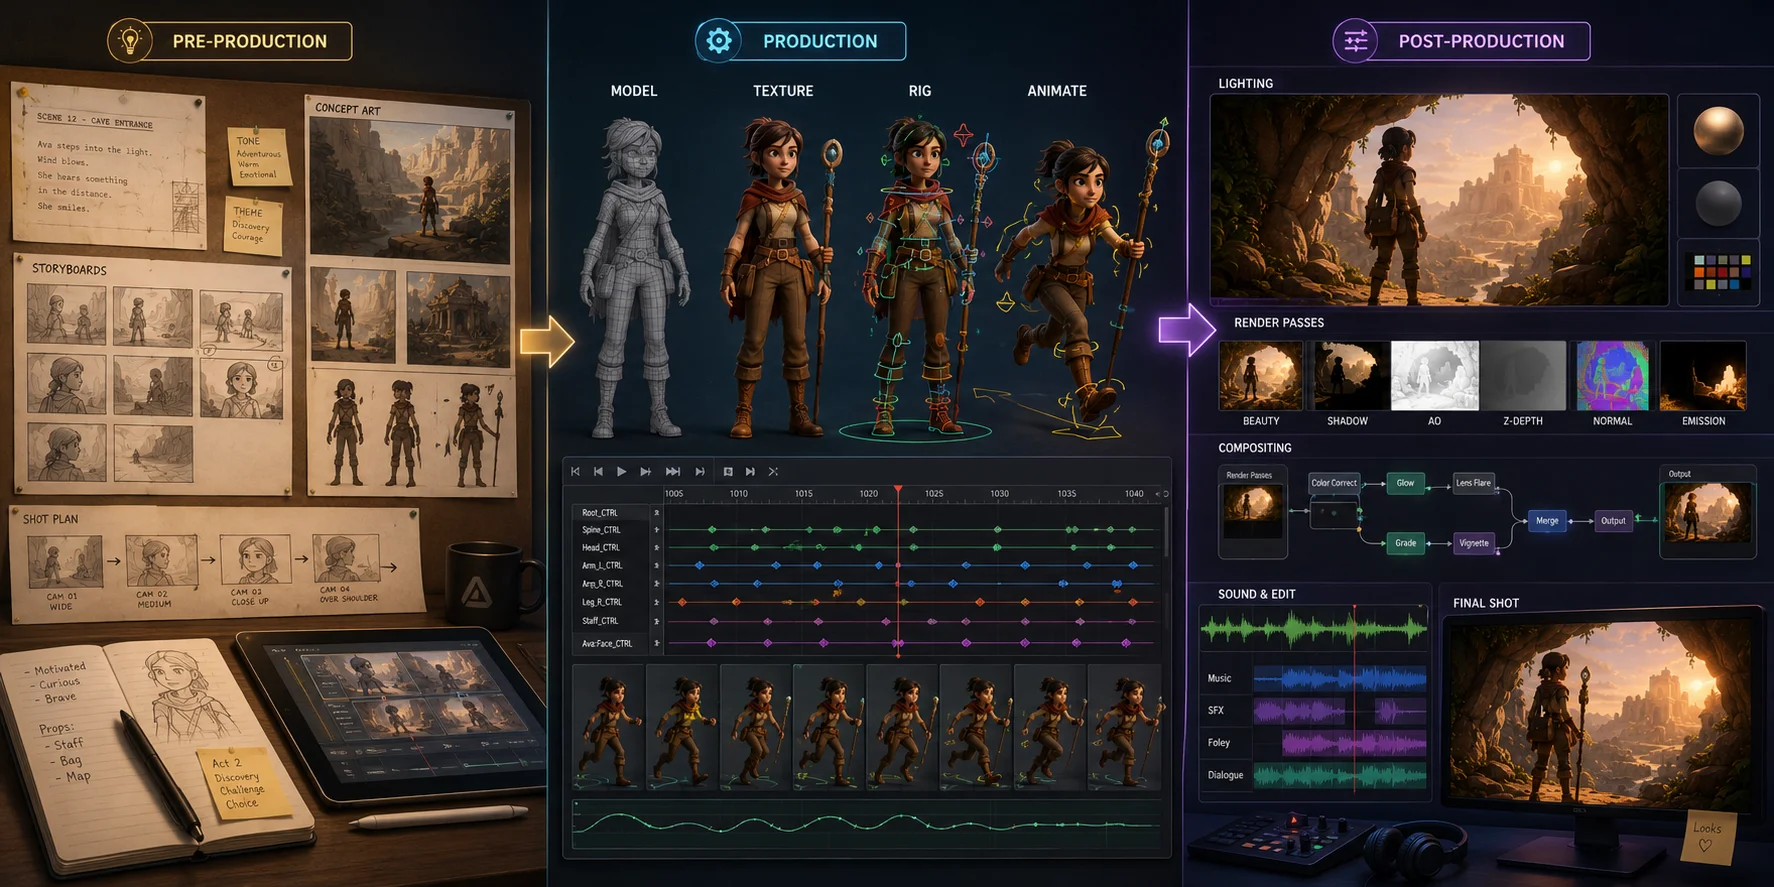
It includes planning the story, designing characters and environments, building 3D assets, creating materials, rigging characters, animating shots, lighting scenes, rendering frames, adding effects, compositing, editing, and sound design.
Studios use pipelines because animation is collaborative. A modeler needs approved visual direction before building a character. An animator needs a finished rig before creating performance. A lighting artist needs final cameras, materials, and animation before preparing the look of a shot.
A clear pipeline helps teams:
- divide work between specialists;
- keep assets consistent;
- reduce unnecessary revisions;
- allow departments to work in parallel;
- manage deadlines and approvals;
- scale from one short shot to a large production.
Most projects are organized into three phases:
- Pre-production — planning the story, design, and shot structure.
- Production — building assets, rigging, layout, and animation.
- Post-production — lighting, rendering, VFX, compositing, sound, and final delivery.
The 3 Phases of the Pipeline: Overview
A 3D animation project moves from planning to construction to finishing.
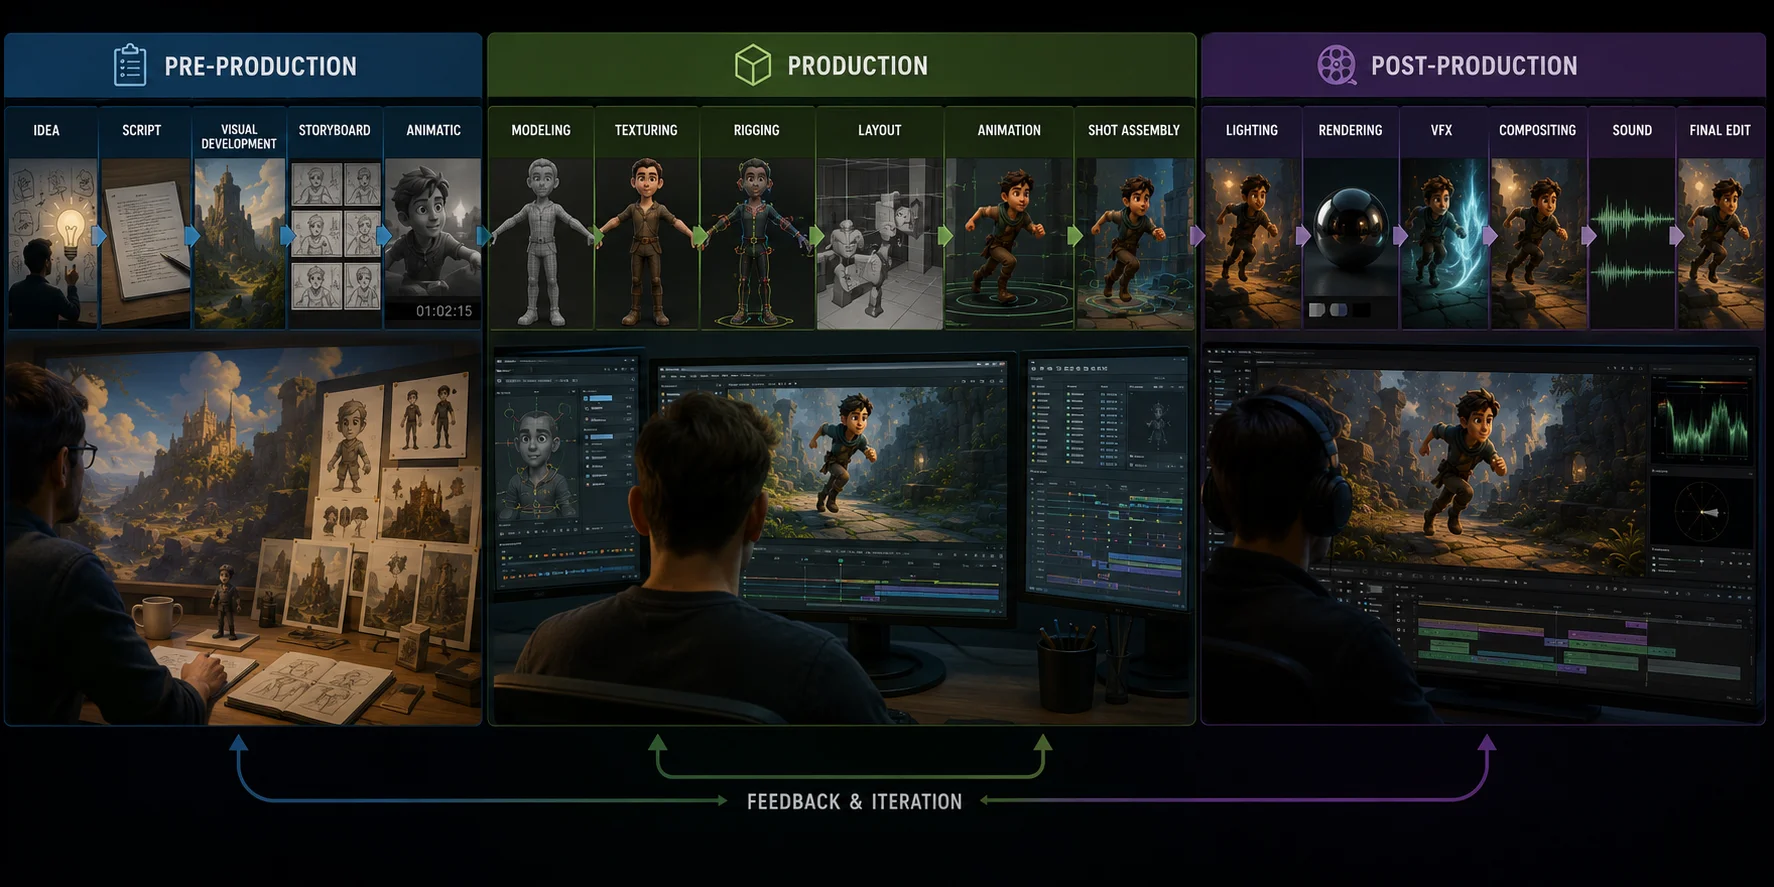
- Pre-production answers: What are we making, who is it for, what should it look like, and how will the story unfold?
Idea → Script → Visual Development → Storyboard → Animatic
- Production answers: What assets are required, how will characters move, where are the cameras, and what happens in each shot?
Modeling → Texturing → Rigging → Layout → Animation → Shot Assembly
- Post-production answers: How should the final image look and sound, how are effects integrated, and how will all shots become one finished sequence?
Lighting → Rendering → VFX → Compositing → Sound → Final Edit
The stages are connected, but they are not perfectly separate. A lighting test may reveal a texture problem. A storyboard change may require new animation. A rig issue may send an asset back to the modeling team. Good pipelines expect these feedback loops while keeping responsibilities clear.
Pre-Production
Pre-production solves the major creative and technical questions before expensive 3D work begins.
Changing a character design after it has been modeled, textured, rigged, and animated is costly. The goal of pre-production is to make as many high-level decisions as possible before the team starts building assets.
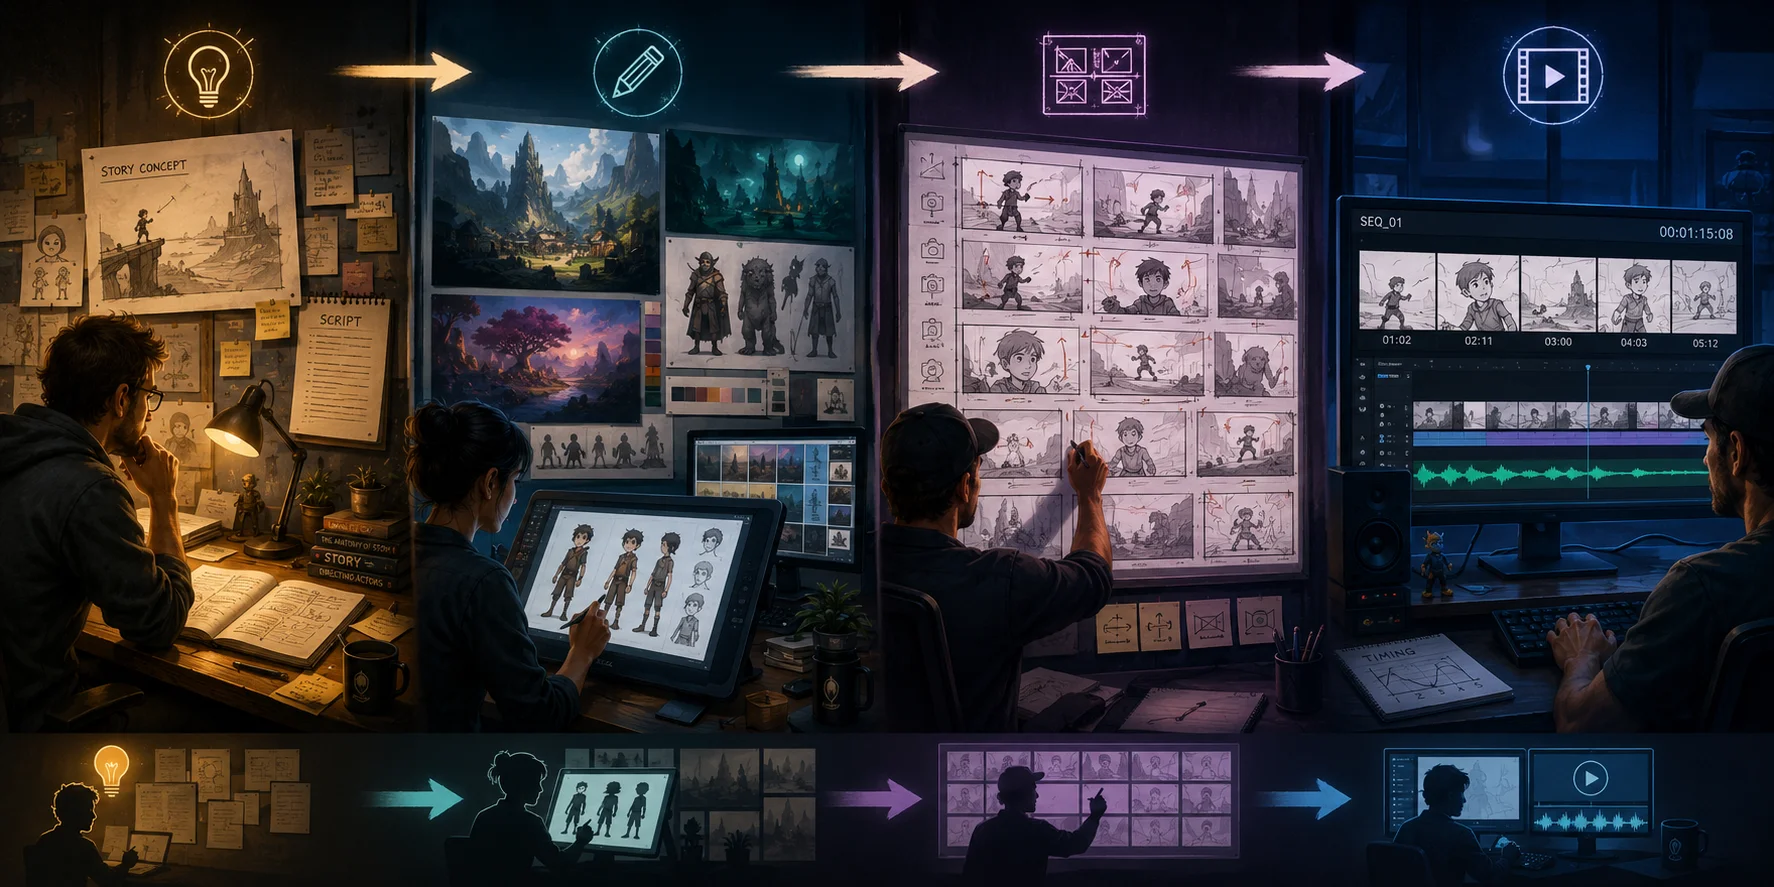
Concept and Story / Script
The story begins with a concept, treatment, script, or creative brief.
The writer, director, producer, or creative lead defines the basic idea: the audience, tone, setting, characters, conflict, length, and delivery format. For a commercial, the brief may be short and focused on a product message. For a short film, it may include a full screenplay. For a cinematic game, it may be a sequence built around an existing world and character set.
At this point, the team asks practical questions:
- How long is the animation?
- How many characters are needed?
- Which locations appear?
- Does the project require dialogue?
- Are there crowd scenes, destruction, water, fur, cloth, or other difficult effects?
- Will the final output be real-time or offline rendered?
- Which shots deserve the most detail?
The script is not only a creative document. It becomes the first production plan.
Visual Development and Concept Art
Once the story direction is clear, concept artists explore the visual language of the project.
The concept artist creates early designs for characters, props, environments, costumes, vehicles, color palettes, lighting mood, and key moments. Photoshop is widely used for painting and paint-overs, while some teams also use Blender, Procreate, Krita, or 3D blockouts to test perspective and scale.
Concept art does not need to show every detail. Its job is to give production departments a shared target.
A character concept may communicate:
- silhouette;
- proportions;
- materials;
- facial features;
- costume layers;
- color relationships;
- personality;
- wear and damage;
- turnaround views.
An environmental concept may establish scale, atmosphere, architecture, weather, vegetation, props, and the direction of light.
The more clearly visual development defines the target, the easier it is for modelers, texture artists, lighting artists, and compositors to make consistent decisions later.
Storyboarding
A storyboard translates the script into a sequence of shots.
The storyboard artist draws key frames that show camera angle, composition, character action, transitions, dialogue timing, and major visual beats. Storyboards may be rough sketches or highly polished boards depending on the project.
Common tools include Storyboard Pro, Photoshop, Procreate, Clip Studio Paint, and sometimes Blender for more technical shot planning.
A storyboard helps answer:
- What does the audience see first?
- Which shot reveals important information?
- When does the camera cut?
- How long does an action take?
- Where are characters positioned?
- Which shots need close-ups, wide shots, or camera movement?
- Are there continuity issues between shots?
Without a storyboard, a team may build and animate far more than the final edit actually needs.
Animatic
An animatic is an edited version of the storyboard with timing, temporary dialogue, music, sound effects, and rough camera rhythm.
The editor or director typically assembles it in Adobe Premiere Pro, DaVinci Resolve, Avid Media Composer, or Storyboard Pro.
The animatic reveals whether the pacing works before 3D production begins. It can show whether a scene is too slow, dialogue is too long, action is confusing, or a shot needs to be removed.
It also provides a shot list, approximate durations, and an early production schedule.
Production — Building and Animating
Production is where the 3D world is built, prepared, staged, and animated. It is often the longest phase because every asset and shot must be created in usable form.
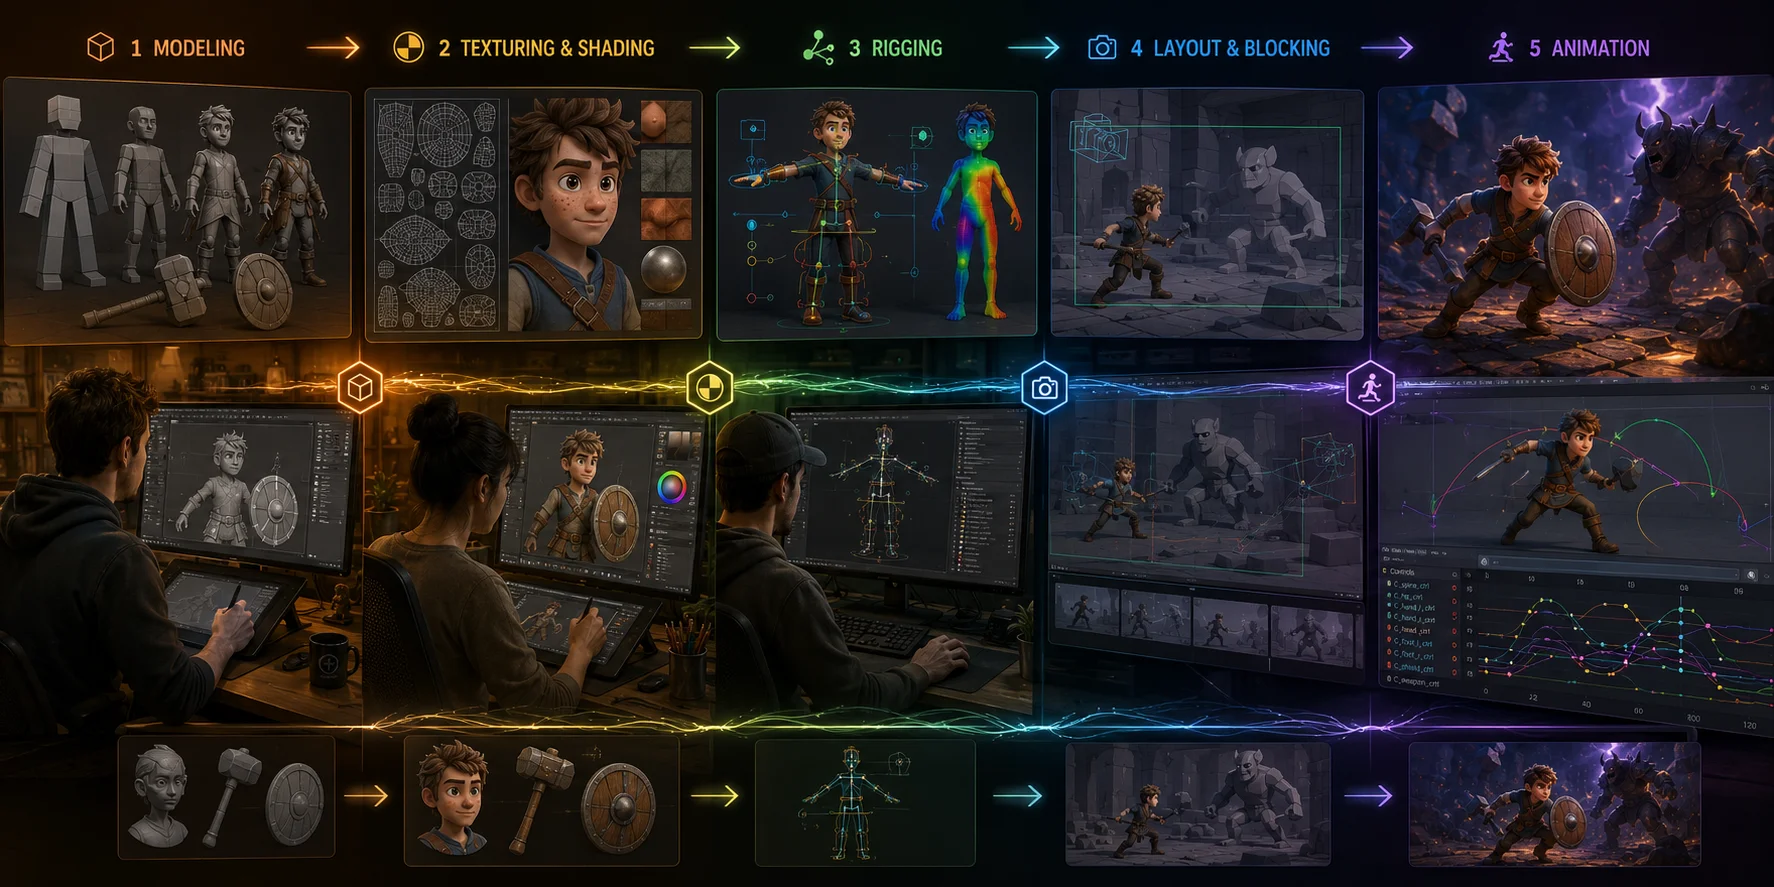
The core production sequence is not always perfectly linear. Modeling may overlap with texturing. Rigging may begin while a character is still being finalized. Layout may use simplified placeholder assets before final models arrive. However, handoffs remain important.
3D Modeling
The 3D modeler creates the geometry for characters, props, vehicles, environments, and sets.
Common software includes Maya, Blender, ZBrush, 3ds Max, Cinema 4D, and Houdini.
Modeling usually starts with a blockout. The artist first focuses on silhouette, proportion, scale, and major forms before adding surface detail.
A character-modeling workflow may include:
- blocking major proportions;
- sculpting anatomy, clothing, and facial features;
- retopologizing for animation-friendly geometry;
- creating accessories and separate costume pieces;
- building UVs for textures;
- checking naming, scale, and topology;
- delivering the asset for texturing and rigging.
A model must work downstream. A character with poor topology may deform badly at the shoulders, elbows, knees, mouth, or hands once it is rigged. A background prop may need simple geometry, while a hero asset used in close-up shots needs more detail and cleaner materials.
Texturing and Shading
The texture artist creates surface detail such as color, roughness, metallic response, scratches, fabric weave, skin variation, decals, dirt, and wear.
The look-development artist or shading artist builds the materials that determine how a surface reacts to light.
Common tools include Substance 3D Painter, Substance 3D Designer, Mari, Photoshop, Blender, Maya, and renderer-specific shader editors.
Texturing depends on UV mapping, which unfolds a 3D model into 2D space so textures can be painted correctly.
Shading determines whether an object looks like ceramic, metal, skin, glass, fabric, plastic, wax, stone, or another material.
Different projects need different levels of detail:
- stylized animation may use simple painted textures;
- photoreal VFX may require scanned surfaces and detailed displacement;
- game assets may need strict texture budgets;
- product animation may require physically accurate materials.
Rigging
The rigger creates the controls that allow a character or object to move.
Rigging usually includes a skeleton, skin weights, control curves, constraints, inverse kinematics, forward kinematics, facial controls, blend shapes, and deformation fixes.
Maya is widely used for professional rigging, while Blender also includes armatures, constraints, skinning, keyframes, and animation tools.
A character rig may include:
- body skeleton;
- arm and leg controls;
- hand and finger controls;
- facial controls;
- eye controls;
- IK and FK switching;
- blend shapes;
- cloth or accessory controls;
- space-switching controls;
- corrective shapes for difficult poses.
Skinning binds the model to the skeleton. Weight painting controls how much each joint influences surrounding geometry.
A poorly rigged model may have broken elbows, collapsing shoulders, twisting wrists, stretched faces, or unstable controls. Good rigs must be visually convincing, technically reliable, and easy for animators to use.
Props may also need rigs. Doors need hinges, vehicles need wheels, robots need mechanical constraints, and creatures may need tails, wings, tentacles, or secondary-motion controls.
Layout and Blocking
The layout artist places characters, props, environments, and cameras into a scene.
Layout establishes:
- camera position;
- focal length;
- shot framing;
- character entrances and exits;
- rough staging;
- prop placement;
- screen direction;
- scene scale;
- camera movement.
Layout often uses simplified proxy assets before final models are ready. This lets the team make large storytelling decisions without waiting for polished characters and environments.
Blocking is usually the first animation pass. The animator places major poses and timing beats to establish what happens in the shot.
At this stage, movement may be stepped and rough. The purpose is clarity: where the character starts, what they look at, how they react, and where they end.
Animation
The animator creates performance, movement, emotion, timing, weight, and interaction.
Common software includes Maya, Blender, MotionBuilder, Rokoko Studio, and Unreal Engine.
Animation usually develops through several passes:
- Blocking — major poses and story beats.
- Refinement — improved timing and smoother interpolation.
- Polish — overlap, arcs, facial performance, eye direction, and secondary motion.
- Finaling — technical cleanup and approval-ready delivery.
Animators use principles such as timing, spacing, anticipation, follow-through, arcs, overlap, staging, squash and stretch, and weight.
A convincing animation depends on performance rather than smooth movement alone. A tired character should move differently from an excited character. A heavy object should affect balance and timing. A camera move should support the audience’s attention.
How AI Speeds Up Modeling and Rigging
Modeling and rigging are among the most time-consuming asset stages because they sit before animation. If a character model is not ready, texture work cannot finish. If the rig is not ready, the animator cannot begin final performance work.
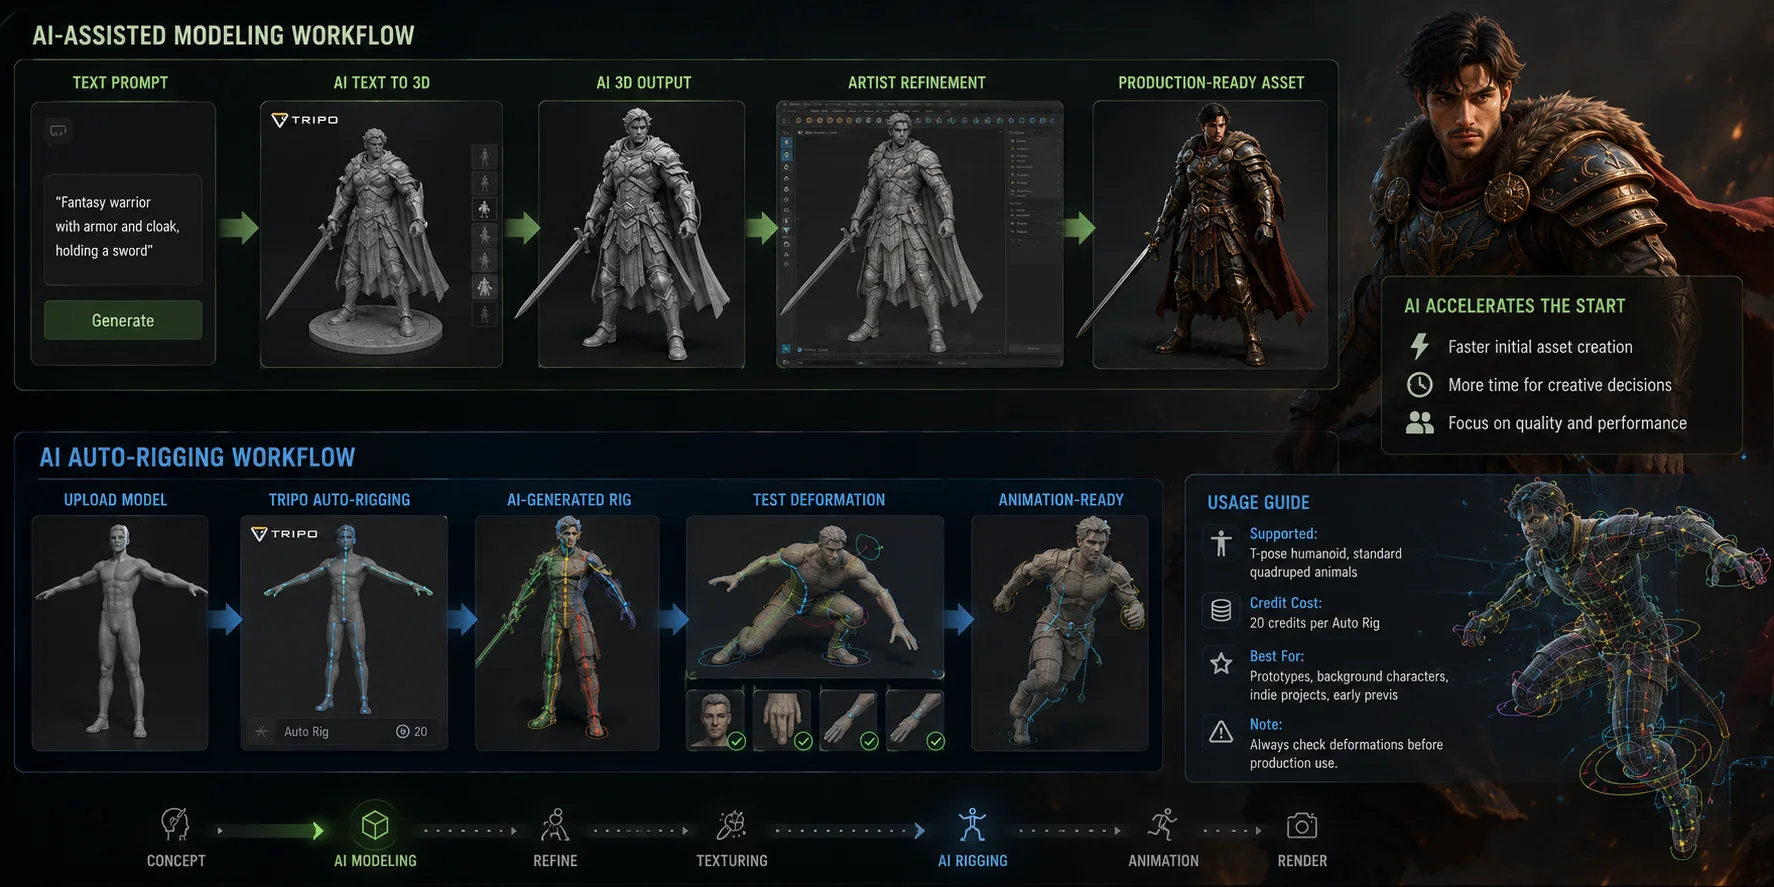
AI tools can reduce the time required to create early asset versions, especially for independent creators and small teams.
For modeling, text-to-3D and image-to-3D tools can create a starting point from a written prompt or a reference image. Rather than beginning every decorative prop, creature concept, background asset, or stylized character from an empty scene, an artist can generate an initial model, review it, then refine topology, proportions, UVs, materials, and production details in Blender, Maya, or ZBrush.
Tripo AI Text to 3D is one example of a tool that generates 3D assets from text descriptions. This does not eliminate the need for art direction or cleanup. A model intended for close-up animation may still need topology work, UV review, texture refinement, and shape corrections before it enters a studio pipeline.
AI can also reduce some of the repetitive work involved in character setup.
Tripo AI Auto-Rigging provides AI-powered skeleton and skinning for uploaded 3D models, producing an animation-ready rig automatically. This can be useful for fast prototypes, background characters, early previs, independent projects, and teams that need to test motion before investing in a custom production rig.
However, automatic rigging has practical limits. Tripo’s workflow should be used with eligible character types and checked carefully before animation. According to the platform’s documented Auto Rig guidance, it currently supports T-pose humanoid characters and standard standing quadruped animals only, and Auto Rig consumes 20 credits. For production use, test deformation at shoulders, elbows, hips, knees, hands, face, and any unusual costume components before relying on the result.
The most useful way to think about AI is as an acceleration layer.
It can help artists get from concept to an editable starting asset more quickly. It does not replace the modeler’s judgment about topology, the rigger’s understanding of deformation, or the animator’s responsibility for performance. Hero characters, expressive facial rigs, complex creatures, cloth systems, and close-up shots still benefit from specialist work.
AI is most effective when it removes repetitive setup and leaves the artist more time for choices that audiences actually notice.
Post-Production
Post-production turns the assembled shot into a finished image and final sequence.
Although lighting, rendering, and VFX sometimes overlap with production, they are often grouped as post-production because they refine the shot after assets, cameras, and animation are substantially complete.
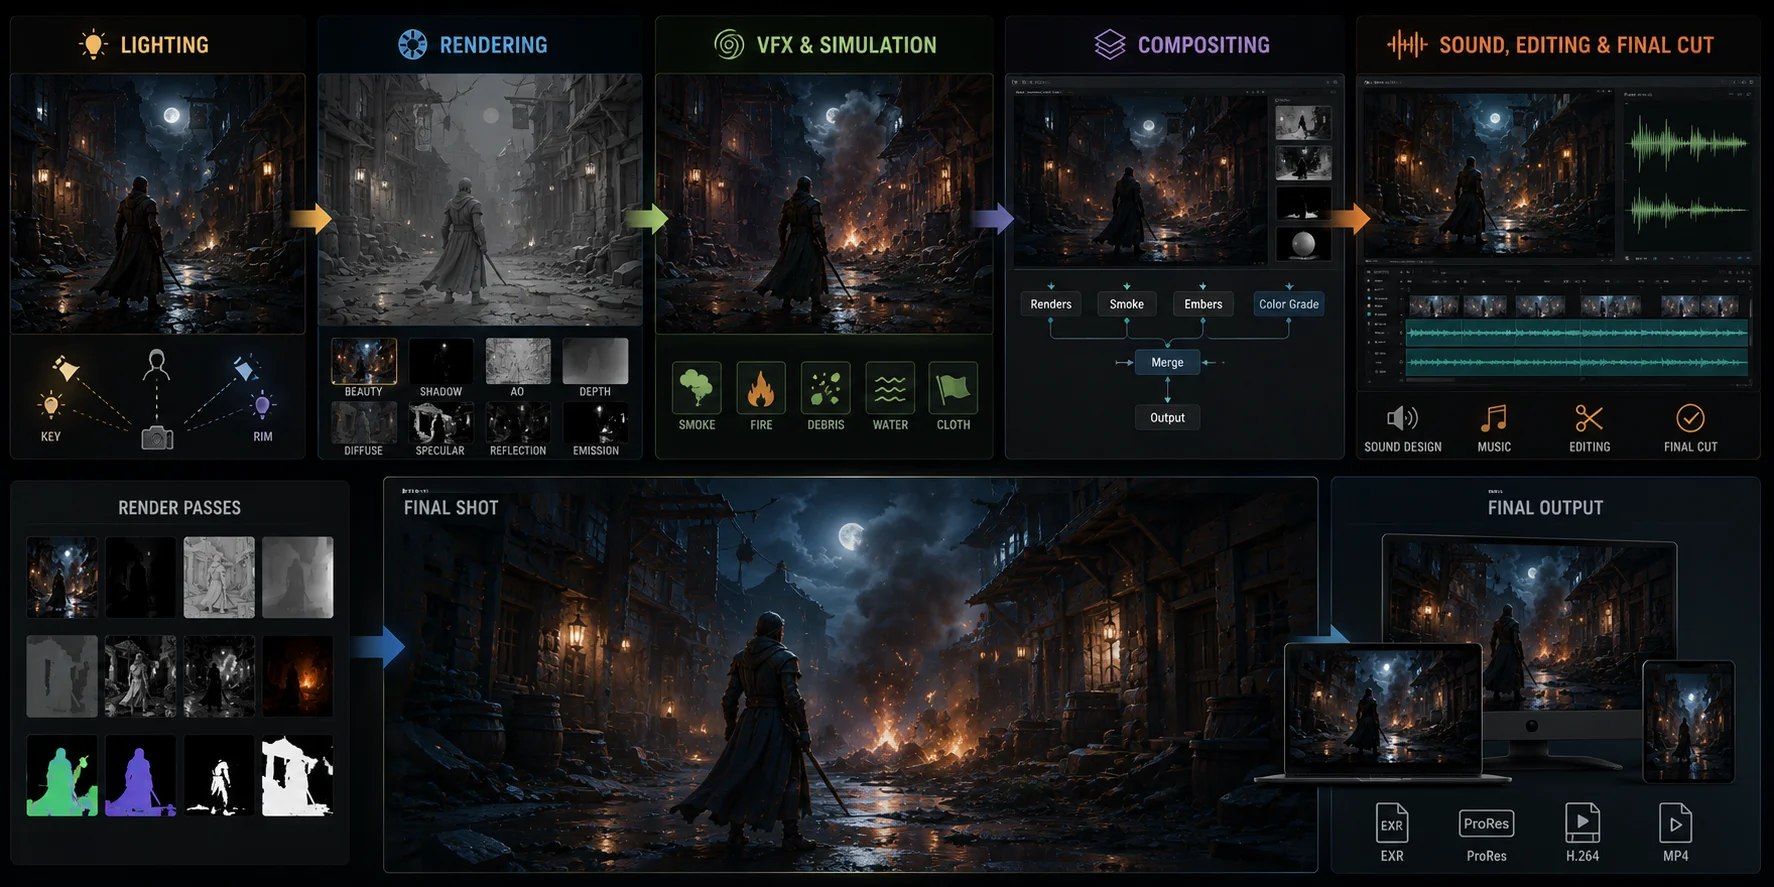
Lighting
This stage determines how the audience reads form, mood, depth, focus, time of day, and atmosphere.
The lighting artist places and adjusts lights, chooses exposure, controls shadow quality, balances practical lights, and works with the look-development team to make materials read correctly.
Common software includes Maya with Arnold, Blender with Cycles, Houdini Solaris, Unreal Engine, and lighting tools inside other DCC packages.
Lighting is not only about making a scene bright enough to see. It directs attention.
A lighting artist may use:
- key light to define the dominant direction;
- fill light to control shadow detail;
- rim light to separate a character from the background;
- practical lights such as lamps or screens;
- volumetric light for atmosphere;
- color contrast to support emotion;
- shadow design to create mystery or tension.
A well-lit scene can guide the eye to the important action. A poorly lit scene can make excellent modeling and animation difficult to read.
Rendering
This stage converts the 3D scene into final images or image sequences.
The render technical director, lighting artist, or rendering team manages render settings, render layers, quality targets, sample counts, denoising, motion blur, depth of field, and output passes.
Common renderers include Arnold, Redshift, RenderMan, V-Ray, Cycles, Karma, and Unreal Engine’s real-time rendering tools. Maya is designed as a professional toolset that includes modeling, layout, animation, FX, and rendering for film, television, and games.
A complex shot is rarely rendered as one flat image. It may be split into passes or AOVs, such as:
- beauty;
- diffuse;
- specular;
- reflection;
- shadow;
- ambient occlusion;
- depth;
- motion vectors;
- cryptomatte masks;
- emission;
- volume;
- character and environmental layers.
These passes give compositors more control later.
Rendering can be one of the most computationally expensive parts of the pipeline. Studios may use render farms to process many shots in parallel.
VFX and Simulation
VFX adds effects that are difficult or impossible to animate manually.
The FX artist may create smoke, fire, explosions, debris, dust, water, cloth, destruction, crowds, magic effects, particles, hair motion, or atmospheric elements.
Houdini is a major tool for procedural effects and simulation. SideFX describes Houdini as a CG application used to model, animate, render, and simulate.
FX work often depends on animation and layout. A simulated explosion must happen at the right time and location. A cloth simulation must follow character movement. A water splash must react to an object’s velocity and contact point.
Simulation requires iteration because physical realism alone is not always visually effective. An FX artist may exaggerate a splash, slow smoke movement, shape a debris trail, or guide particles to support the shot’s composition.
Compositing
This stage combines rendered layers, effects, color adjustments, mattes, and final image treatments into one finished shot.
The compositor works with rendered passes rather than rebuilding the 3D scene. Nuke is a standard node-based compositing tool in film and VFX pipelines, while Adobe After Effects is widely used for motion graphics, commercials, and smaller productions.
A compositor may:
- combine render passes;
- adjust exposure and color balance;
- add glow, depth haze, lens effects, or grain;
- integrate CG with live footage;
- create masks and rotoscoping;
- remove unwanted objects;
- enhance atmosphere;
- fix small render issues;
- match shots across a sequence.
Compositing is where the final image gains consistency. It is also where small issues can often be corrected without re-rendering an entire scene.
Sound, Editing, and Final Cut
The final stage combines image and sound into a finished sequence.
The sound designer creates effects, ambience, foley, dialogue cleanup, and mix elements. The editor assembles approved shots, adjusts pacing, handles transitions, and prepares the final delivery.
Common tools include Pro Tools, Adobe Audition, DaVinci Resolve, Premiere Pro, Avid Media Composer, and Final Cut Pro.
Sound has a major effect on how animation feels. A simple action can seem heavy, light, funny, dangerous, or emotional depending on timing, music, silence, and sound effects.
The final cut includes:
- approved shots;
- final color;
- dialogue;
- sound effects;
- music;
- titles;
- credits;
- subtitles;
- delivery files for the target platform.
Key Roles Across the Pipeline
| Role | Main Stage | Core Responsibility |
|---|---|---|
| Concept Artist | Pre-production | Designs characters, props, environments, color, and visual style. |
| 3D Modeler | Production | Builds characters, props, sets, and environments. |
| Texture Artist | Production | Creates materials, textures, surface detail, and visual consistency. |
| Rigger | Production | Builds skeletons, controls, deformation systems, and animator-ready rigs. |
| Animator | Production | Creates character performance, movement, timing, and interaction. |
| Lighting Artist | Post-production | Shapes mood, visibility, depth, and visual focus through lighting. |
| FX Artist | Post-production | Creates simulations, particles, destruction, fluids, smoke, and other effects. |
| Compositor | Post-production | Combines rendered passes and effects into the final image. |
In a small studio, one person may cover several roles. A solo animator may write, model, rig, animate, light, render, edit, and publish a short film. Larger productions divide these responsibilities because each discipline requires time and specialized judgment.
Software and Tools by Stage
| Pipeline Stage | Common Tools | Typical Use |
|---|---|---|
| Modeling | Maya, Blender, ZBrush, 3ds Max, Houdini | Characters, props, sets, environments |
| Texturing | Substance 3D Painter, Substance 3D Designer, Mari, Photoshop | Materials, texture maps, surface wear, look development |
| Rigging & Animation | Maya, Blender, MotionBuilder, Rokoko Studio | Skeletons, skinning, controls, keyframes, motion capture |
| Rendering | Arnold, Redshift, RenderMan, V-Ray, Cycles, Unreal Engine | Light placement, render passes, final frames |
| Compositing | Nuke, After Effects, Fusion | Layering renders, color, masks, finishing |
New artists do not need to learn every tool at once.
For many beginners, Blender is a practical starting point because it includes modeling, animation, rigging, basic simulation, rendering, and compositing in one environment. Maya, ZBrush, Substance Painter, Houdini, Arnold, and Nuke become more important as you specialize or work in pipelines that require them.
2D vs. 3D Animation Pipeline
Both 2D and 3D animation use planning, storyboards, animation, compositing, sound, and final editing. The major difference is how the images are created.
A traditional 2D pipeline often involves drawing or painting key poses and in-between frames. Artists may work with hand-drawn frames, vector rigs, cutout animation, or digital painting.
A 3D pipeline creates reusable digital assets:
- 3D models;
- UVs;
- textures;
- rigs;
- materials;
- cameras;
- lights;
- simulations;
- rendered frames.
In 2D animation, a character’s pose may be redrawn for each major moment. In 3D animation, the model is built once, rigged once, and animated through controls across many shots.
This makes 3D efficient for projects with recurring characters, long sequences, complex camera moves, and reusable environments. However, it also creates a larger upfront asset cost because modeling, texturing, and rigging must happen before animation can begin.
Pipeline Example and Diagram
Consider a simple 30-second animated short about a robot finding a plant on a distant planet.
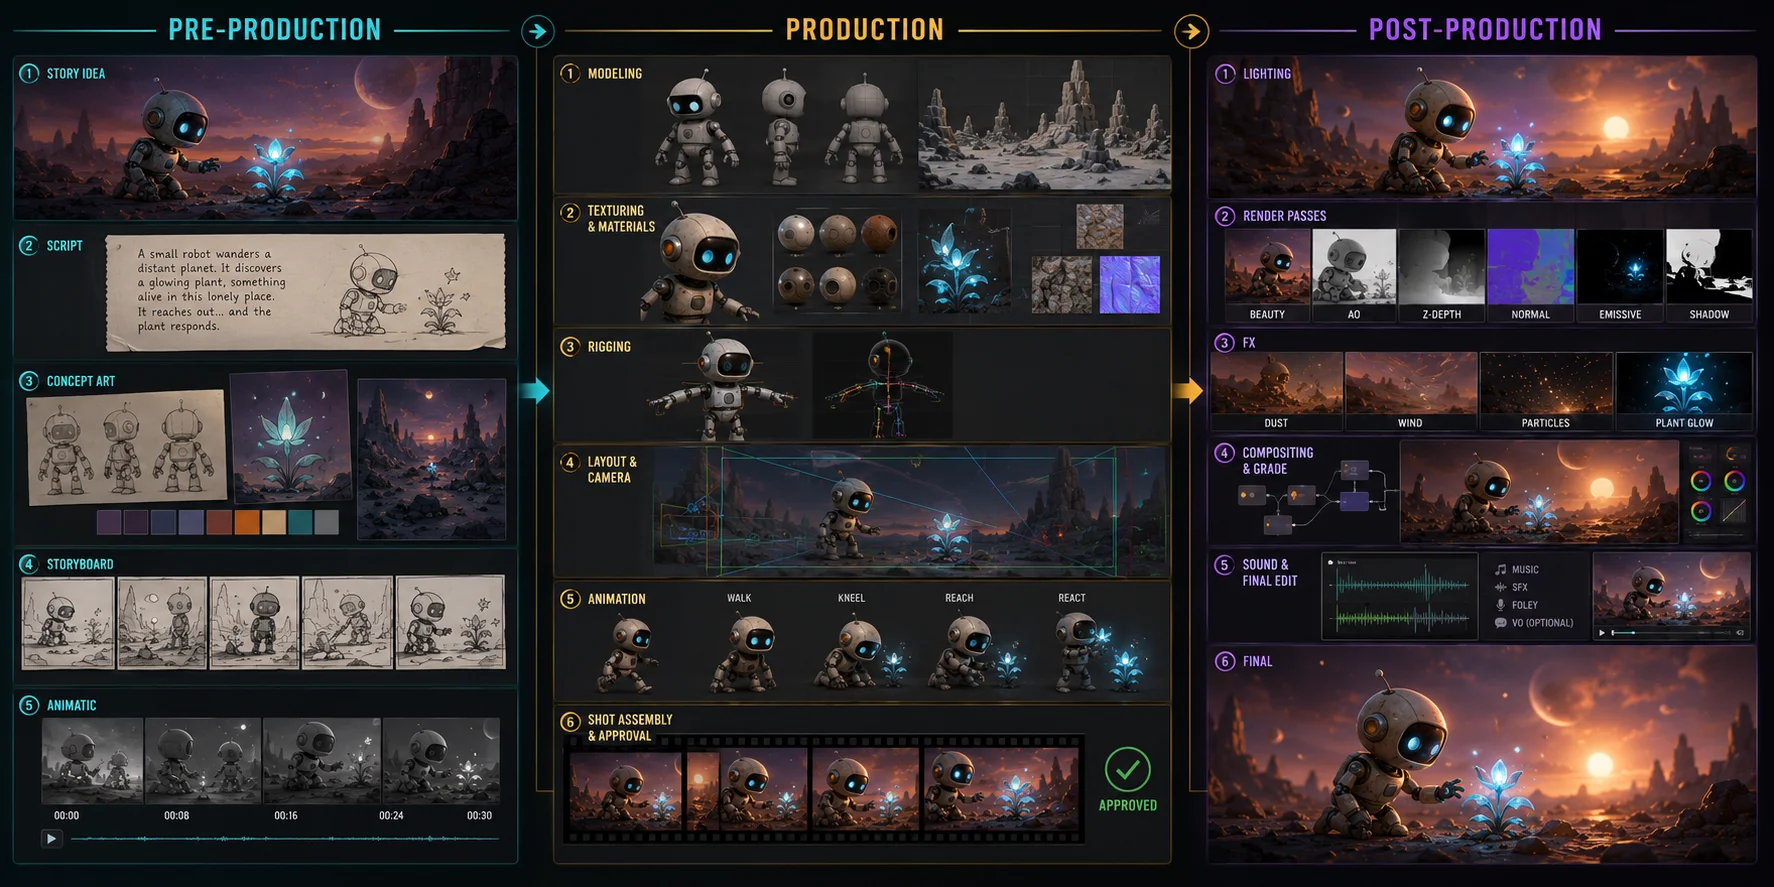
PRE-PRODUCTION Story idea ↓ Script: robot explores a silent planet ↓ Concept art: robot, plant, rocks, sky, color palette ↓ Storyboard: 10–15 shots ↓ Animatic: timing, temporary sound, camera rhythm
PRODUCTION Robot model + planet environment ↓ Textures and materials ↓ Robot rig ↓ Layout: cameras and rough character positions ↓ Animation: walk, look, kneel, react ↓ Shot assembly and approvals
POST-PRODUCTION Lighting: sunset, rim light, glowing plant ↓ Rendering: character, environment, shadow, atmosphere passes ↓ FX: dust, wind, floating particles ↓ Compositing: color, glow, depth haze, final image balance ↓ Sound and final edit
The important lesson is that the finished animation depends on handoffs.
If the robot’s arm design changes after rigging, the rigger may need to rebuild controls. If the robot’s material changes after lighting, the lighting artist may need to rebalance the scene. If the storyboard changes late, shots may need new animation and rendering.
That is why pipeline planning saves time: it does not prevent changes, but it makes the cost of changes visible earlier.
Frequently Asked Questions
Is AI replacing 3D animators?
AI is changing some tasks, especially concept generation, asset variation, motion assistance, cleanup, and repetitive setup. It is not replacing the need for animators who understand acting, timing, movement, staging, character motivation, and shot storytelling.
A generated motion or automatically rigged character still needs review. Animation is not only technical movement; it is performance and communication.
How much does a 20-minute animation cost?
The cost of a 20-minute animation varies widely based on style, quality, character count, shot complexity, voice work, rendering method, location count, revisions, and delivery requirements.
A simple motion-graphics project may cost far less than a cinematic 3D short with multiple characters, custom environments, simulation, professional voice acting, and high-end rendering. The most accurate estimate comes from a shot breakdown and asset list rather than a per-minute number alone.
What is the difference between a 2D and 3D animation pipeline?
A 2D pipeline often creates movement through drawn or cutout frames, while a 3D pipeline builds reusable models, rigs, materials, lights, and rendered shots. Both require planning and post-production, but 3D adds asset construction stages such as modeling, texturing, rigging, lighting, and rendering.
Can I get a 3D animation pipeline PDF or diagram?
Yes. The diagrams in this guide can be copied into a document or converted into a PDF for study. For a personal workflow, create a simplified diagram that matches your project size rather than copying a large-studio pipeline exactly.
What are the three stages of the 3D production pipeline?
The three main stages are pre-production, production, and post-production. Pre-production plans the story and visual direction; production builds and animates assets; post-production lights, renders, composites, edits, and finishes the final sequence.
Conclusion
The 3D animation pipeline becomes easier to manage once you understand how each stage supports the next. Strong projects begin with clear story and visual direction, then move through disciplined asset creation, animation, lighting, rendering, compositing, and final editing.
The 3D animation pipeline rewards good planning—and the right tools at each stage. To speed up the most time-consuming steps, generate production-ready models and auto-rig characters with Tripo AI.