Mesh Simplification for AI 3D Models: How to Reduce Polygons Without Losing Detail
TL;DR
- AI-generated and scanned 3D models are often dense (millions of triangles), too heavy for games, AR/VR, or smooth printing.
- Mesh simplification (decimation) removes triangles while keeping the shape; retopology rebuilds clean topology. Pick by use case.
- Three routes: Blender's Decimate modifier, a dedicated tool like MeshLib, or a one-click remesh inside your AI tool.
- Set a polygon budget by target: ~5K-20K for game assets, even lower for web AR/VR, high-poly for 3D printing.
- Always check UVs, normals, and silhouette after simplifying; aggressive decimation breaks textures.
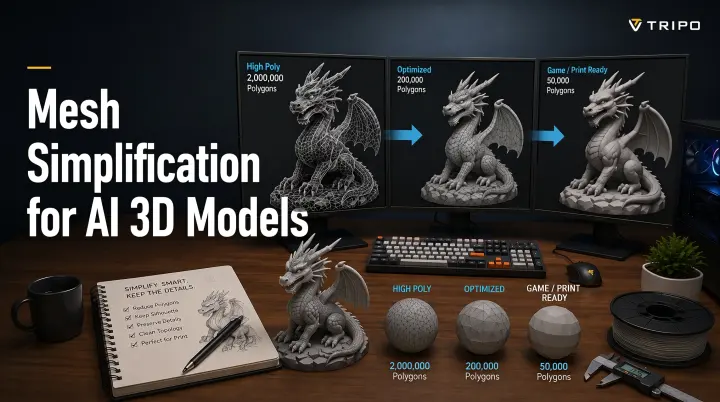
AI tools can turn a prompt or photo into a 3D model in seconds, but high-detail results may contain far more triangles than a real-time application needs. Mesh simplification reduces that polygon count while preserving the model's important shape. This guide explains when to simplify, how decimation differs from retopology, and how Blender, dedicated tools, or Smart Mesh can fit into the workflow.
Why AI-Generated 3D Models Have So Many Polygons
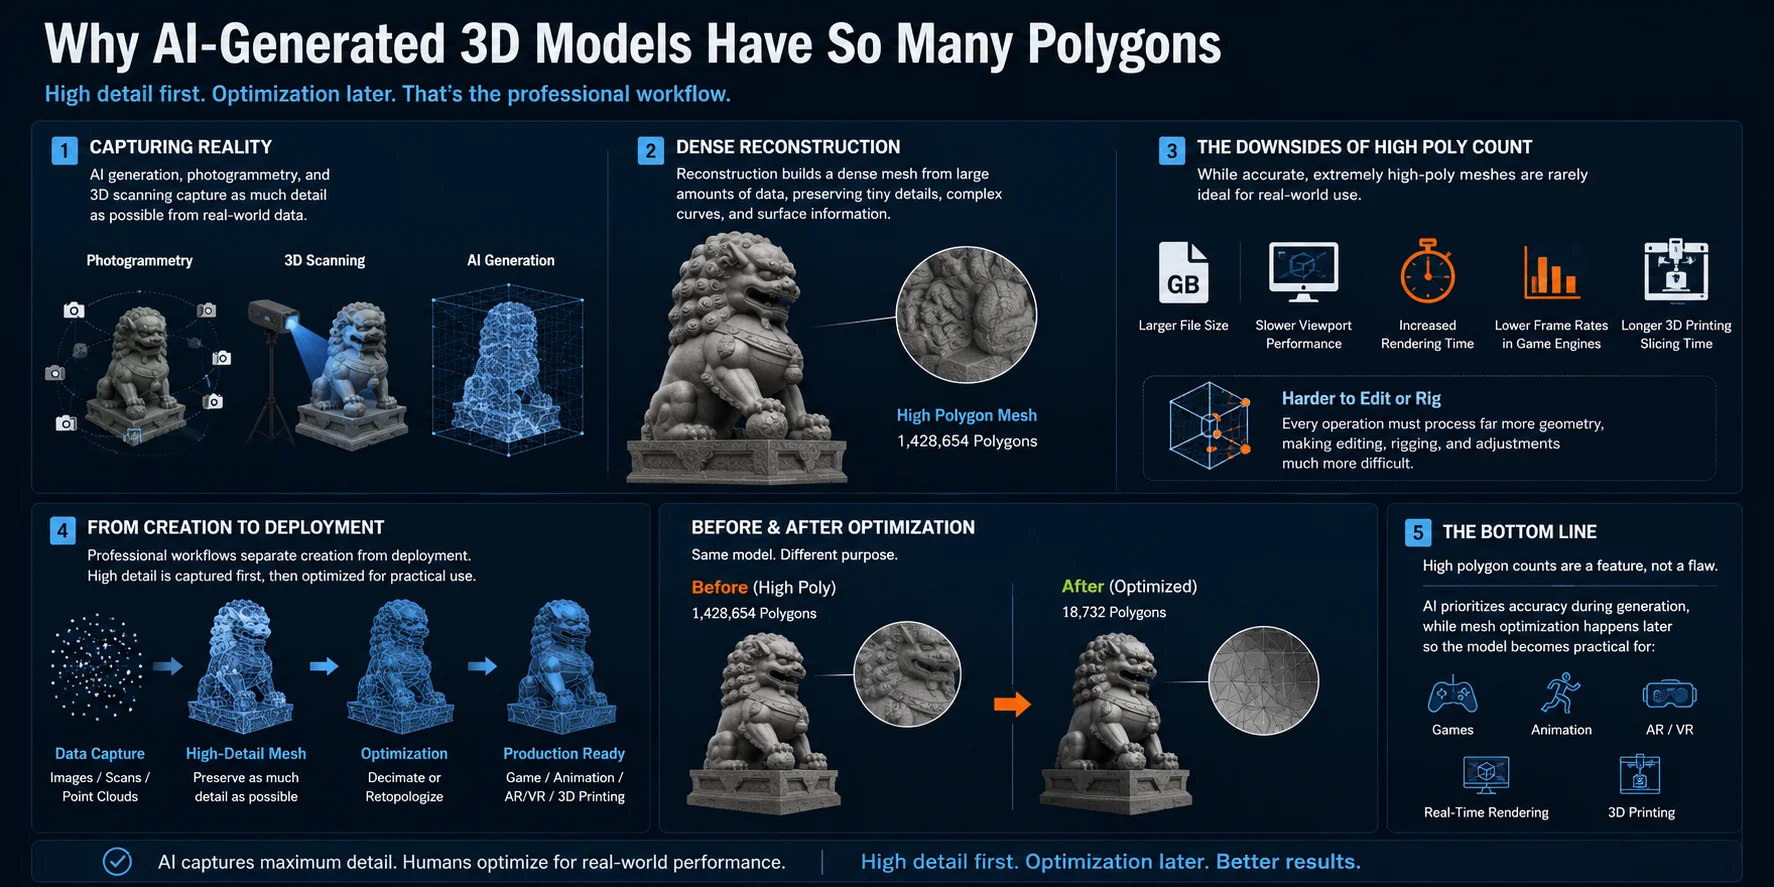
If an AI-generated or scanned 3D model contains hundreds of thousands, or even millions, of polygons, it was likely produced for detail rather than deployment efficiency. AI generators, photogrammetry tools, and 3D scanners can create dense geometry to preserve curves and small surface features.
AI generation, photogrammetry, and scanning all begin by reconstructing a shape from large amounts of data. Photogrammetry rebuilds a surface from dense point clouds, while many AI models generate detailed meshes using implicit surface or volumetric reconstruction techniques. The result is a dense mesh that preserves tiny features, curves, and surface details with high fidelity.
The downside is that these high-resolution meshes are rarely ideal for real-world use. A model with millions of polygons creates larger file sizes, slows viewport performance, increases rendering time, reduces frame rates in game engines, and takes longer to process in slicers for 3D printing. Editing or rigging these models also becomes much more difficult because every operation must process far more geometry.
This is why professional workflows separate creation from deployment. During generation, the priority is preserving as much detail as possible. Once the model is approved, it is simplified (decimated or retopologized) to reduce the polygon count while keeping the overall shape visually intact.
Dense output can preserve useful detail during generation, but it still needs to be evaluated for the target workflow. Optimization turns that high-detail source into a practical asset for games, animation, AR/VR, rendering, or 3D printing.
Mesh Simplification vs Retopology - Which Do You Need?
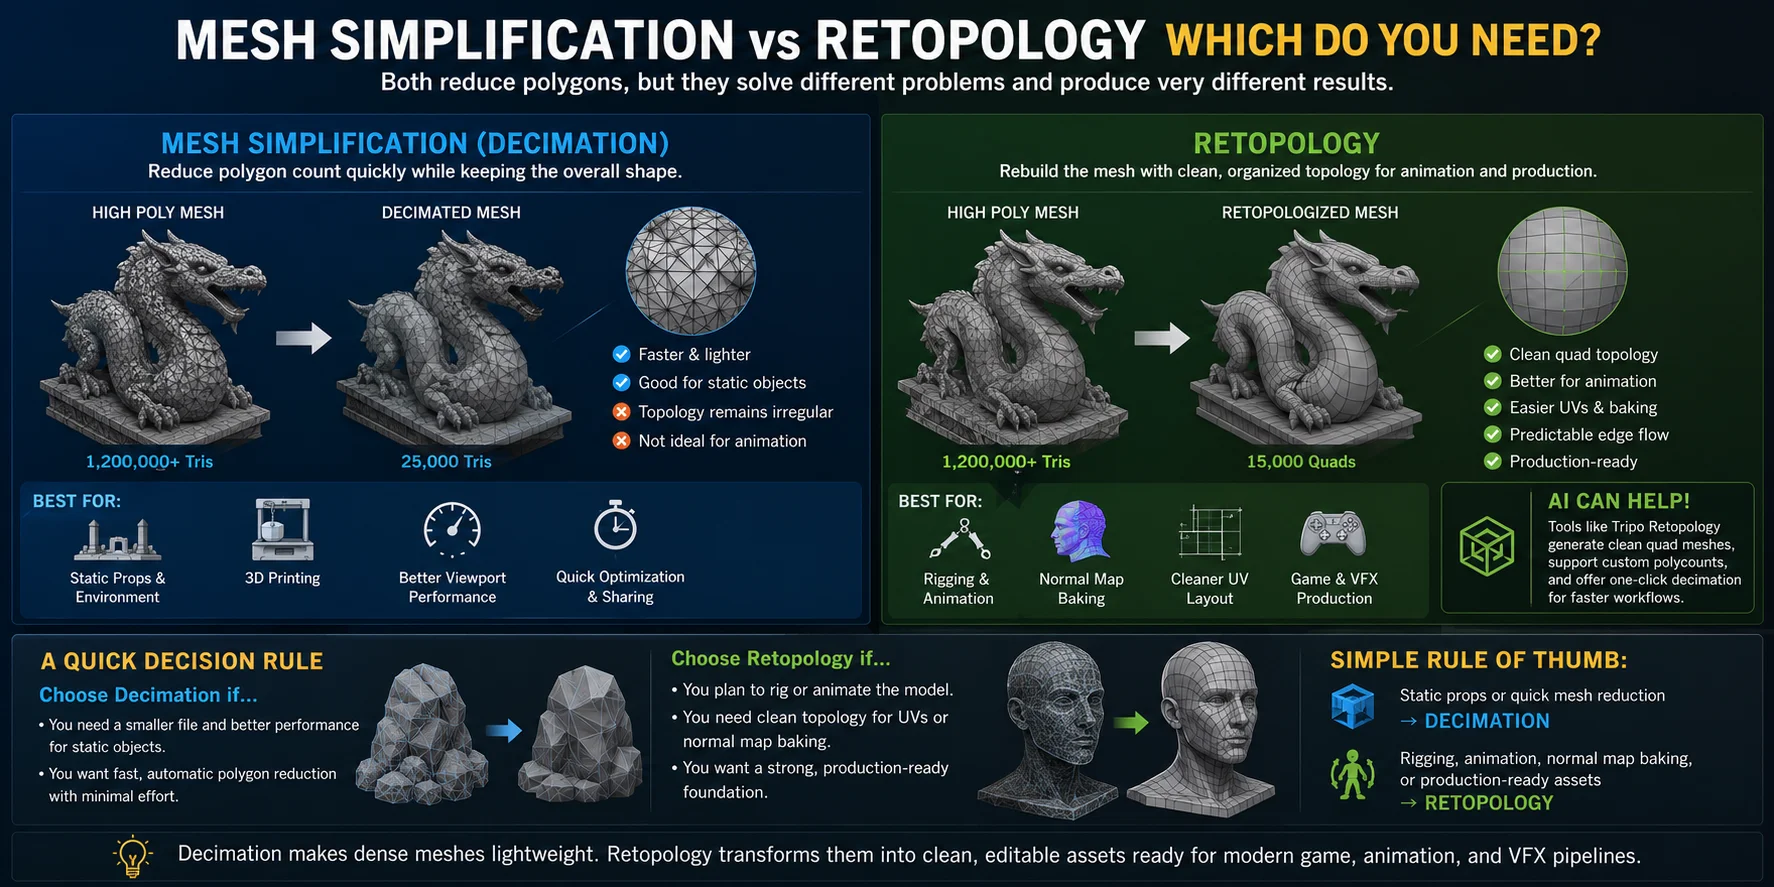
AI-generated meshes often contain hundreds of thousands, or even millions, of polygons. Before using them in a game, animation, or 3D printing workflow, you'll usually need to optimize the geometry. The two most common approaches are mesh simplification (decimation) and retopology. Both reduce complexity, but they solve different problems and produce very different results.
What Mesh Simplification (Decimation) Does
Mesh simplification, often called decimation, reduces polygon count by automatically collapsing or merging triangles while trying to preserve the model's overall shape. It's fast, requires little manual work, and is ideal when you simply need a lighter mesh.
The trade-off is that decimation does not improve topology. The mesh usually remains a dense triangle-based surface with irregular edge flow. While the model looks similar from the outside, it isn't optimized for deformation or clean editing.
Decimation is best suited for:
- Static props and environment assets
- Preparing models for 3D printing
- Faster viewport performance
- Quick optimization before rendering or sharing
What Retopology Does
Retopology goes a step further by rebuilding the mesh with a clean, organized topology, typically using evenly distributed quad polygons instead of irregular triangles. Rather than only reducing polygons, it creates edge loops that follow the shape of the model, making it much easier to animate, sculpt further, or bake high-resolution details.
A well-retopologized mesh can deform more predictably, support cleaner UV work, and improve normal-map baking. Manual retopology takes time, while automated tools can provide a useful starting point that should still be checked against the asset's production requirements.
Some AI workflows, including Tripo Retopology, can generate clean quad meshes, support custom polygon counts, and provide one-click decimation for users who need a faster optimization workflow.
| Feature | Decimation | Retopology |
|---|---|---|
| Speed | Very fast | Slower |
| Topology Quality | Keeps existing triangles | Rebuilds clean quad topology |
| Best For | Static models, quick optimization, 3D printing | Characters, animation, baking, game assets |
| Automation | Highly automatic | Manual or AI-assisted |
A Quick Decision Rule
If your model is a static object and you mainly want a smaller file with better performance, decimation is usually all you need. It preserves the overall appearance while dramatically reducing polygon count.
If you plan to rig a character, animate it, sculpt further, or bake normal maps, choose retopology instead. Clean quad topology creates predictable edge flow, better deformations, and a much stronger foundation for professional production.
As a simple rule of thumb:
- Static props or quick mesh reduction -> Decimation
- Rigging, animation, normal map baking, or production-ready assets -> Retopology
How Many Polygons Does Your Model Actually Need? (Polygon Budgets)
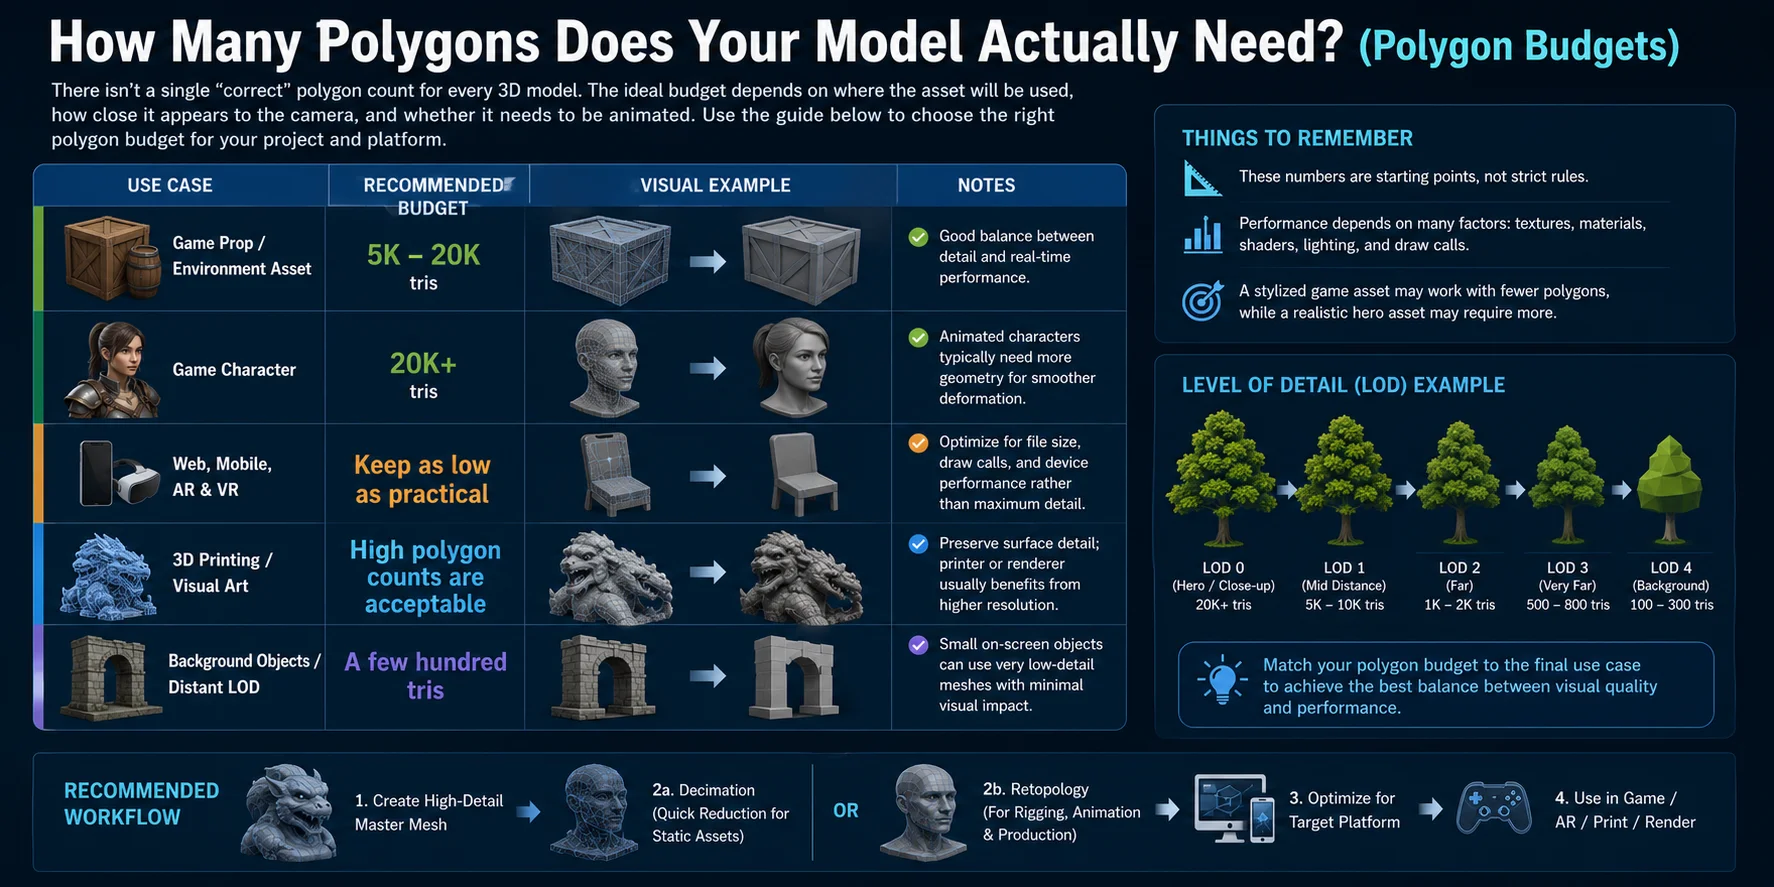
There isn't a single "correct" polygon count for every 3D model. The ideal budget depends on the platform, viewing distance, deformation needs, and visual target. A hero character usually needs more geometry than a background prop. For 3D printing, preserve detail that the printer can reproduce, but avoid geometry that only increases file size or slicing time.
As a general guideline, the following polygon budgets work well for many production workflows:
| Use Case | Recommended Budget | Notes |
|---|---|---|
| Game prop / environment asset | 5K-20K tris | Good balance between detail and real-time performance. |
| Game character | 20K+ tris | Animated characters typically need more geometry for smoother deformation. |
| Web, mobile, AR & VR | Keep as low as practical | Optimize for file size, draw calls, and device performance rather than maximum detail. |
| 3D printing / visual art | High polygon counts are acceptable | Preserve surface detail; printer or renderer usually benefits from higher resolution. |
| Background objects / distant LOD | A few hundred tris | Small on-screen objects can use very low-detail meshes with minimal visual impact. |
Remember that these numbers are starting points, not strict rules. A stylized game asset may work perfectly with fewer polygons, while a realistic hero asset may require more. Performance depends on many factors besides polygon count, including textures, materials, shaders, lighting, and draw calls.
A good workflow is to generate a high-detail master mesh first, then optimize it for the target platform. Use decimation when you need a quick reduction for static assets, or retopology when preparing models for rigging, animation, or professional game production. By matching your polygon budget to the final use case, you'll achieve the best balance between visual quality and performance.
Three Ways to Simplify an AI 3D Mesh
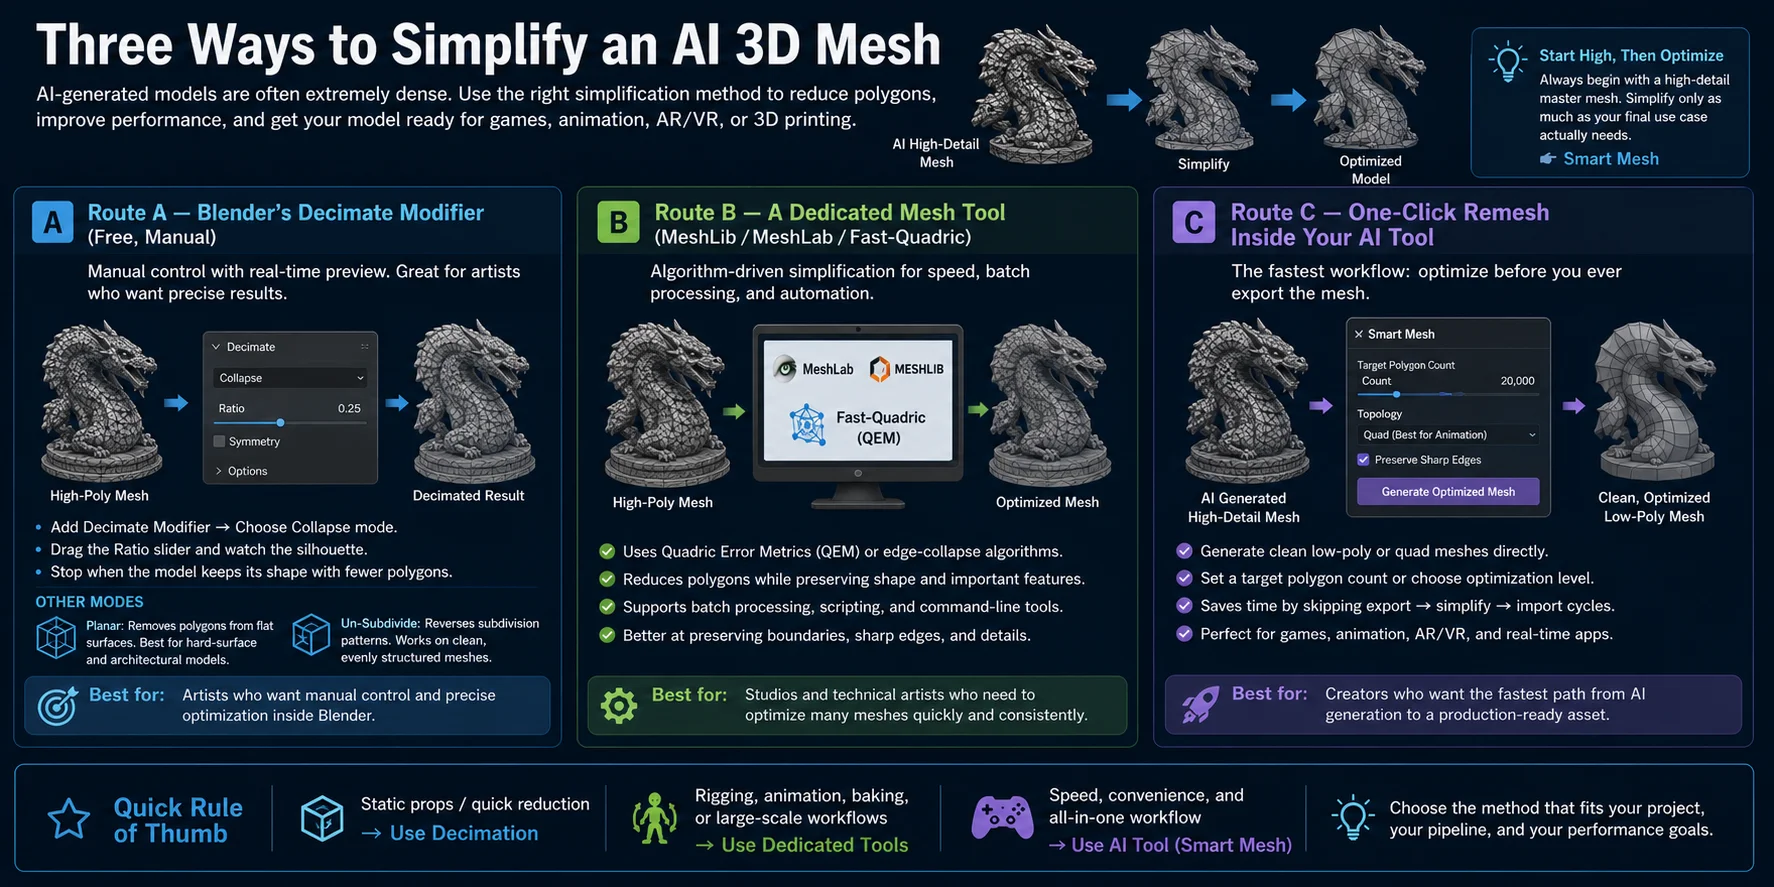
Once you've generated a high-detail AI mesh, the next step is choosing the right way to reduce its polygon count. The best method depends on how much control you need, how many models you're processing, and whether you want to optimize manually or automatically. In practice, there are three common workflows: using Blender, dedicated mesh optimization software, or built-in AI mesh optimization tools such as Smart Mesh.
Route A - Blender's Decimate Modifier (Free, Manual)
If you're looking for a free solution with complete control, Blender's Decimate Modifier is one of the most popular options. It works directly on your mesh and lets you preview the results before applying any changes.
Keep an untouched high-poly copy, select the mesh, and add Modifier Properties > Add Modifier > Decimate. Start with Collapse, lower the Ratio gradually, and watch both the face count and silhouette from several angles. Check UVs and shading before applying the modifier; stop when further reduction creates visible shape or texture damage.
Blender also offers two additional modes for specific situations:
- Planar removes polygons from flat or nearly flat surfaces. It's useful for architectural models, mechanical parts, and hard-surface objects with many flat faces.
- Un-Subdivide reverses subdivision patterns on meshes that were originally subdivided. It works best on clean, evenly structured geometry rather than irregular AI-generated meshes.
Because the modifier remains non-destructive until you apply it, compare several ratios before committing. Apply it only after the optimized copy passes the quality checks later in this guide.
Route B - A Dedicated Mesh Tool (MeshLib / MeshLab / Fast-Quadric)
For repeated or batch work, dedicated mesh-processing tools can be faster than editing every asset manually. Import a copy, choose a simplification or quadric edge-collapse filter, set a target face count or reduction percentage, enable any relevant boundary, normal, or texture-preservation options, and preview the result before exporting.
MeshLib, MeshLab, and Fast-Quadric-based tools commonly use Quadric Error Metrics (QEM) or related edge-collapse methods. Results depend on the implementation and settings, so test the silhouette, sharp features, UVs, and normals instead of assuming the default preset will preserve every detail.
Depending on the tool, this route may provide:
- Faster processing of very large meshes
- Batch processing for multiple models
- Command-line or script automation
- Optional controls for boundaries, normals, sharp features, or texture coordinates
This route is most useful when many scanned or AI-generated assets must be processed consistently and the team needs repeatable presets, scripting, or command-line automation.
Route C - One-Click Remesh Inside Your AI Tool
The fastest route is to optimize the mesh inside the AI platform. In Tripo, use Smart Mesh when you want clean, lightweight topology for real-time workflows. Use Retopology when the task specifically requires a custom polygon count, one-click decimation, or quad conversion.
This distinction matters: Smart Mesh focuses on efficient real-time geometry, while Retopology exposes topology choices for different production pipelines. Neither option removes the need to inspect silhouette, UVs, normals, and deformation quality.
A practical workflow is to generate a high-detail master model, keep it as the source of fine detail, then create a lighter version with Smart Mesh or use Retopology when you need more control over topology and polygon count.
Choose Blender for hands-on control, a dedicated tool for repeatable batch processing, or an in-platform option for the shortest generation-to-optimization workflow.
Check Your Mesh After Simplifying (Don't Skip This)
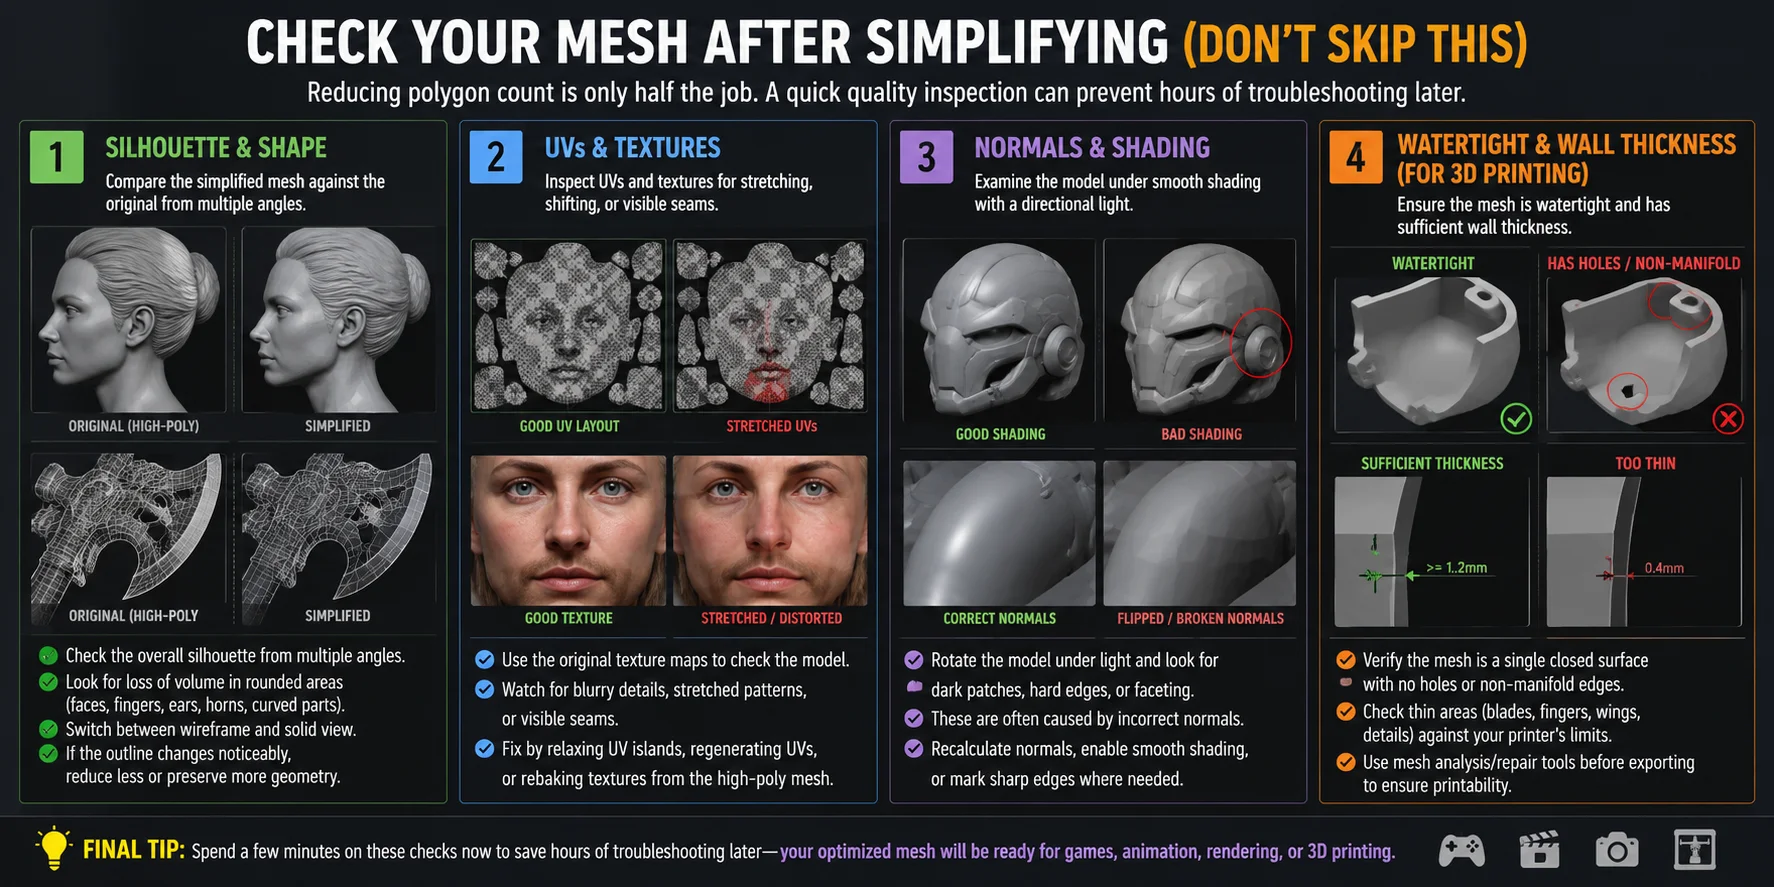
Reducing polygon count is only half the job. Every simplification pass can introduce subtle problems that aren't immediately obvious until you animate, texture, render, or print the model. Before considering the mesh finished, spend a few minutes checking these four areas. A quick quality inspection can prevent hours of troubleshooting later.
Silhouette & Shape
Compare the simplified mesh with the high-poly source from several angles in solid and wireframe view. Pay special attention to faces, fingers, horns, and curved hard-surface parts. If the outline or volume changes noticeably at the intended viewing distance, preserve more geometry.
UVs & Textures
Inspect the optimized mesh with its original texture maps. Look for stretched UV islands, blurry details, distorted logos or facial features, and visible seams. If needed, relax or regenerate the UVs, or rebake textures from the high-resolution source.
Normals & Shading
Rotate the model under a directional light and look for dark patches, hard edges, faceting, or inconsistent reflections. Recalculate normals, restore smooth shading where appropriate, and mark sharp edges only where the surface requires them.
Watertight & Wall Thickness (For 3D Printing)
For 3D printing, confirm that the mesh is watertight and free of non-manifold edges, holes, and problematic self-intersections. Check thin features against the minimum wall thickness recommended for your printer, material, and process, then run a final mesh analysis before slicing.
When NOT to Simplify (Limits)
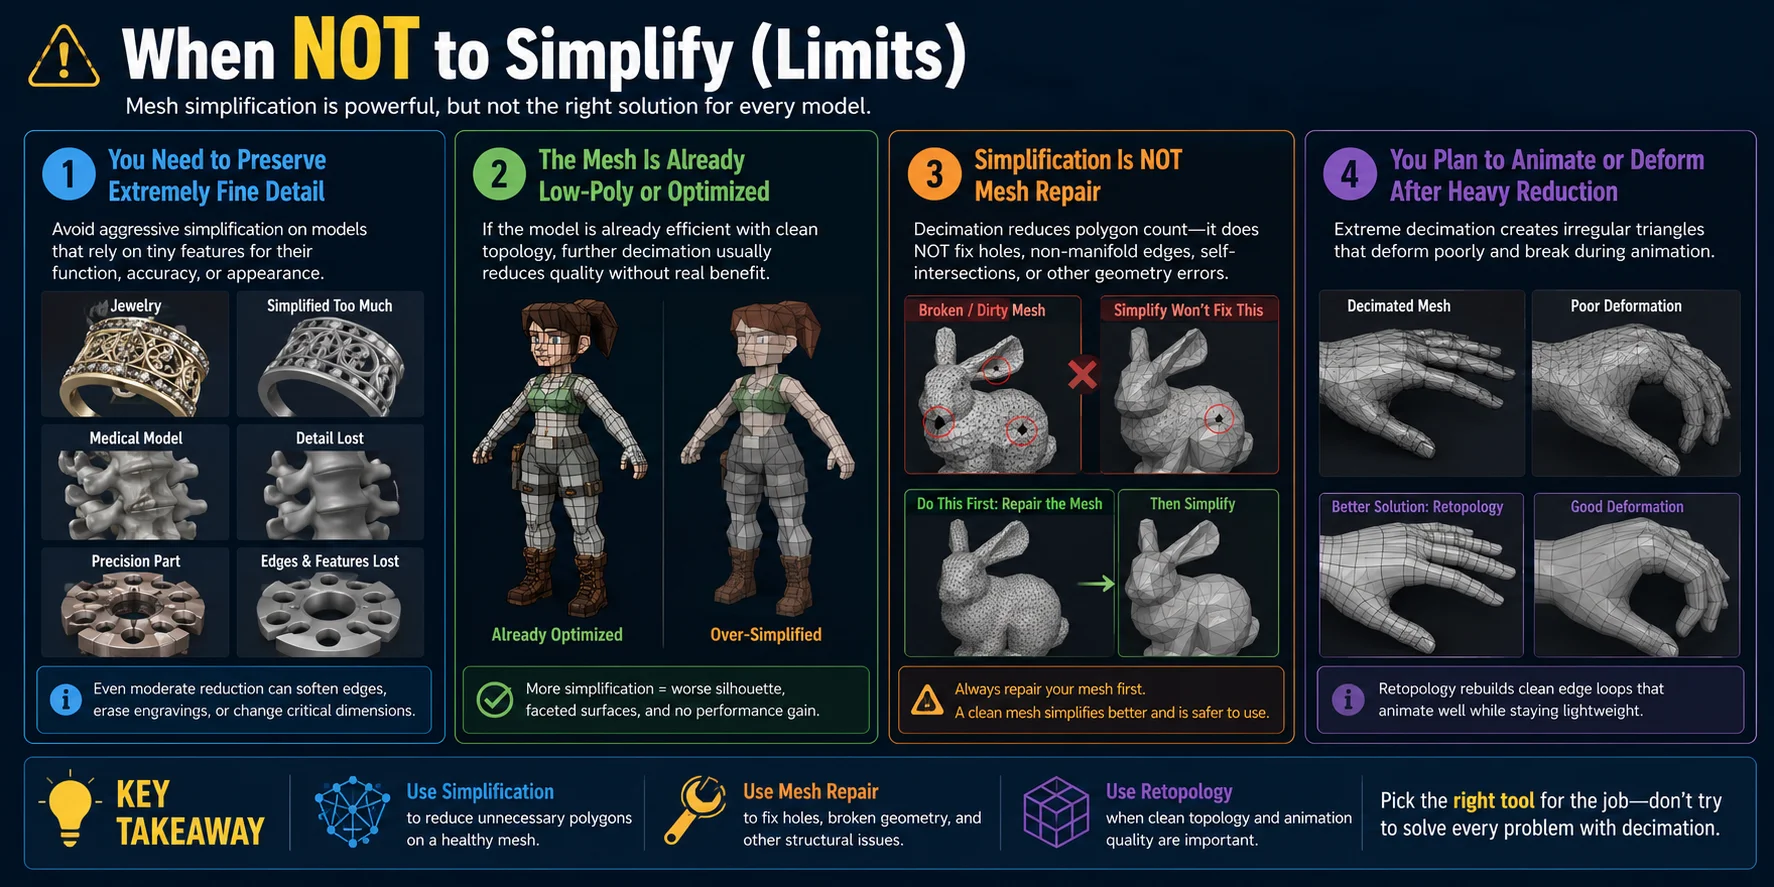
Do not simplify automatically just because a mesh is dense. Reduction can remove information that matters to the asset's function, appearance, or downstream workflow.
Avoid aggressive simplification on jewelry, dental or medical models, precision parts, and engravings where small features or dimensions matter. Reduce only after defining the smallest detail the final process must preserve.
Do not decimate an asset that already has clean topology and an appropriate polygon budget. Extra reduction may damage the silhouette or shading without delivering a meaningful performance gain.
Simplification is also not a substitute for mesh repair. If the source has holes, non-manifold edges, self-intersections, or flipped faces, repair those defects before judging the simplification result.
For rigging or deformation, heavy decimation usually creates irregular triangles and poor edge flow. Choose retopology when animation quality, editable loops, or predictable deformation matters.
Frequently Asked Questions
How do I reduce the polygon count on an AI-generated 3D model?
Use a mesh simplification (decimation) tool in Blender or MeshLab to reduce polygon count while monitoring the model's silhouette. Work on a copy, lower the ratio or target count gradually, and inspect UVs, normals, and, when printing, watertightness before export.
Can AI make or simplify meshes automatically?
Yes. Many AI-powered 3D tools can automatically generate or simplify meshes, reducing polygon count while preserving the model's overall shape. However, it's still important to review the result manually, since automatic optimization may affect fine details, topology, or texture quality.
Is there a way to simplify a mesh in Blender?
Yes. In Blender, you can use the Decimate modifier to reduce a mesh's polygon count while keeping its overall shape. Adjust the reduction ratio, apply the modifier, and then inspect the model for any loss of detail or shading issues.
How do I simplify an STL mesh for 3D printing?
Import the STL into a tool such as Blender, MeshLab, or Meshmixer and use a mesh simplification (decimation) tool to reduce the polygon count. After simplifying, verify that the mesh is watertight, has sufficient wall thickness, and slices correctly before sending it to your 3D printer.
What's the difference between mesh decimation and retopology?
Mesh decimation automatically reduces polygon count while preserving the model's overall shape, making it ideal for quick optimization. Retopology rebuilds the mesh with clean, animation-friendly topology, making it the better choice for characters, deformation, and professional production workflows.
How many polygons should a game-ready 3D model have?
There is no universal game-ready count; use the platform, asset role, viewing distance, and deformation needs to set a budget. As starting points, simple mobile props may use hundreds to a few thousand triangles, many real-time props fall around 5,000-20,000 triangles, and hero characters may require more. Measure the result in the target engine instead of treating any range as a hard rule.
Conclusion
A high-polygon AI model doesn't have to stay that way. With the right level of mesh simplification and a quick quality check for the silhouette, UVs, and shading, you can prepare it for games, VR, rendering, or 3D printing without sacrificing important detail.
If you'd rather start with a cleaner workflow, Tripo AI Studio lets you generate 3D models from text or images and export them for further optimization or production, helping you move from concept to a usable asset more efficiently.