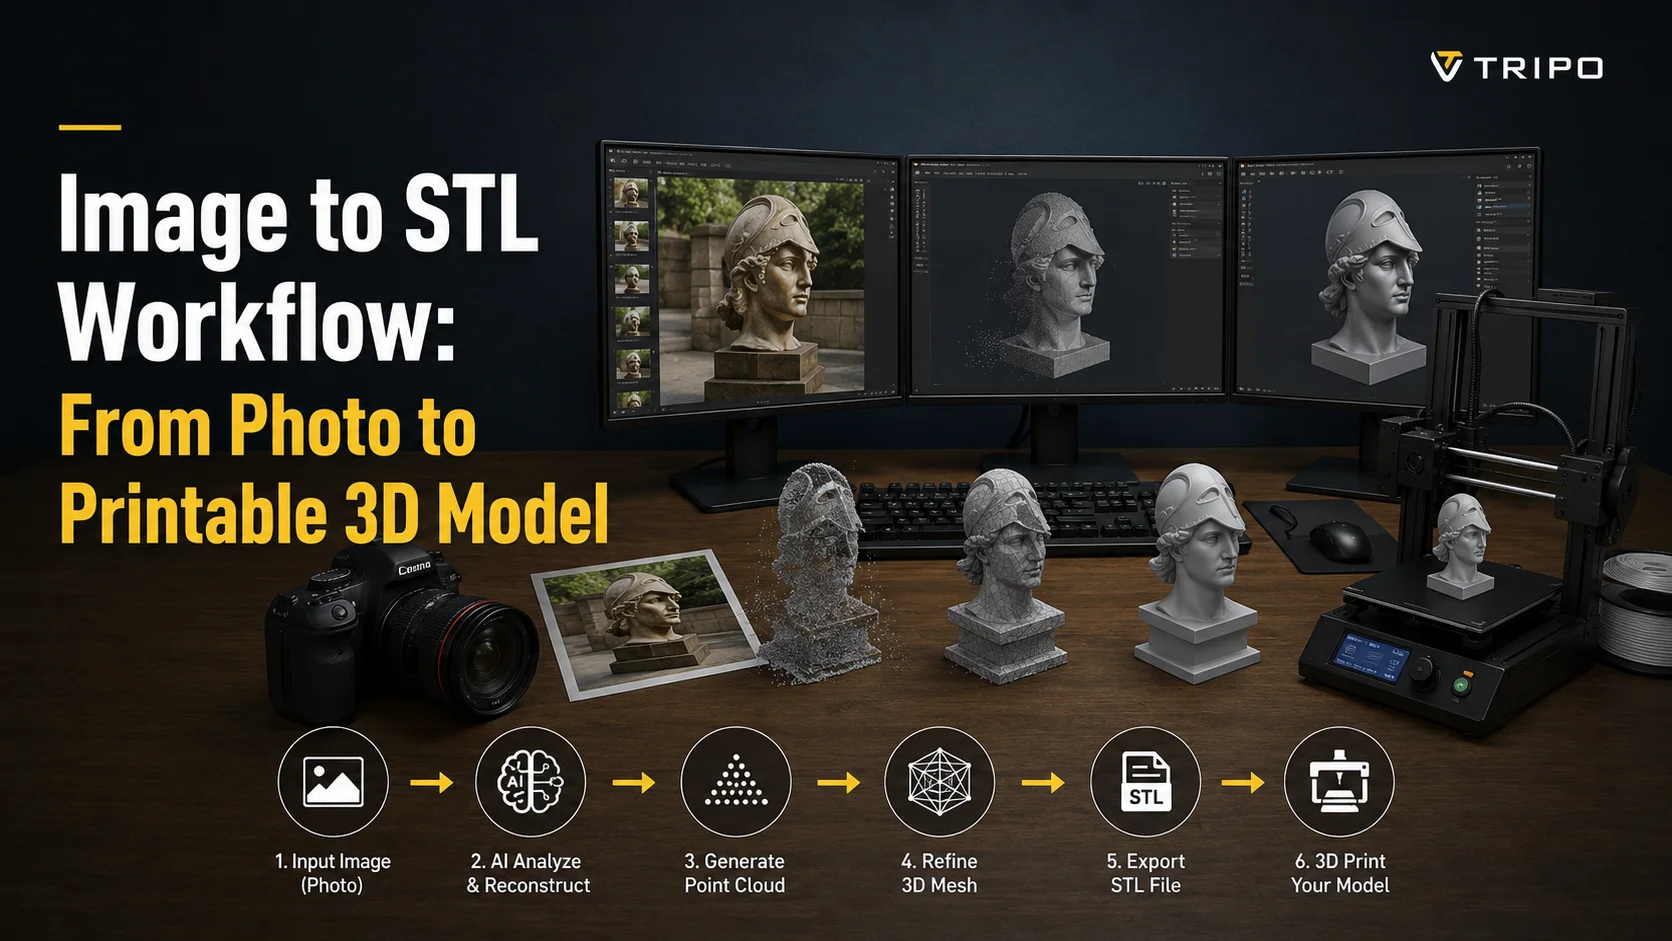
Image to STL Workflow: From Photo to Printable 3D Model
TL;DR
- Two routes: full 3D for objects, heightmap/relief for flat art.
- Input quality decides everything—one clean, centered subject.
- The step most guides skip: make the mesh watertight before export.
- Export STL (geometry only) or 3MF (color); set units to mm.
- Pick your tool by goal: fast (online), detailed (desktop CAD), or color (3MF/HueForge).
To go from an image to a printable STL: pick a clean photo, generate a 3D model with an AI image-to-3D tool, make the mesh watertight (no holes or non-manifold edges), then export it as STL and open it in your slicer. For flat artwork you can instead use a heightmap/relief approach. This guide covers both paths end to end.
Why Image-to-STL Now (and the Two Routes)
Creating a 3D-printable model used to mean learning CAD software from scratch or searching through online model libraries hoping someone had already designed what you needed. Today, AI-powered image-to-3D tools offer a practical third option. Instead of modeling every detail manually, you can start with a single image and generate a mesh in minutes. The key is choosing the right workflow before you begin, because not every image should become a full 3D object.
In general, there are two approaches to image-to-STL conversion. One creates a complete three-dimensional model, while the other generates a raised surface based on the brightness of an image. Picking the correct route at the start saves time and produces better print results.
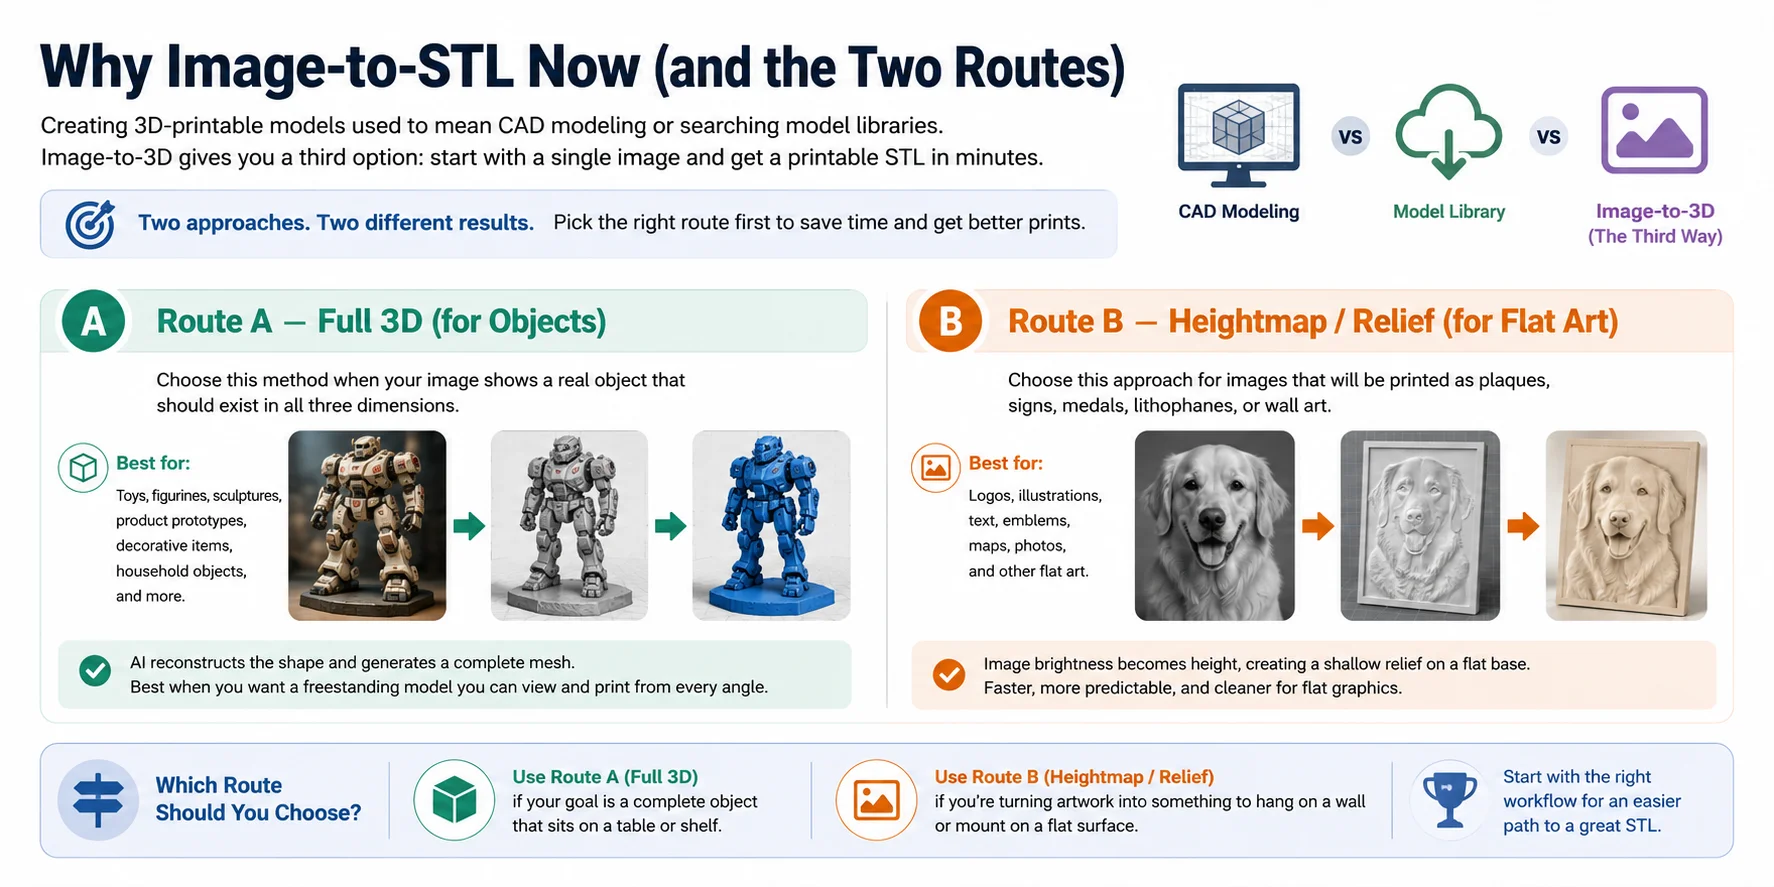
Route A — Full 3D (for Objects)
Choose this method when your image shows a real object that should exist in all three dimensions. Examples include toys, figurines, sculptures, product prototypes, decorative items, or household objects. AI reconstructs the visible shape and generates a complete mesh that can be repaired, exported as an STL, and prepared for printing.
This route is best when you want a freestanding model that can be viewed and printed from every angle.
Route B — Heightmap / Relief (for Flat Art)
Choose this approach for logos, illustrations, text, emblems, maps, or photographs that will be printed as plaques, signs, medals, lithophanes, or wall art. Instead of guessing hidden geometry, the software converts image brightness into height, creating a shallow relief on a flat base.
This workflow is faster, more predictable, and often produces cleaner results for flat graphics.
Which Route Should You Choose?
If your goal is a complete object that sits on a table, use the Full 3D route. If you're turning artwork into something to hang on a wall or mount on a flat surface, choose the Heightmap/Relief route. Starting with the right workflow is the easiest way to get a printable STL with less cleanup later.
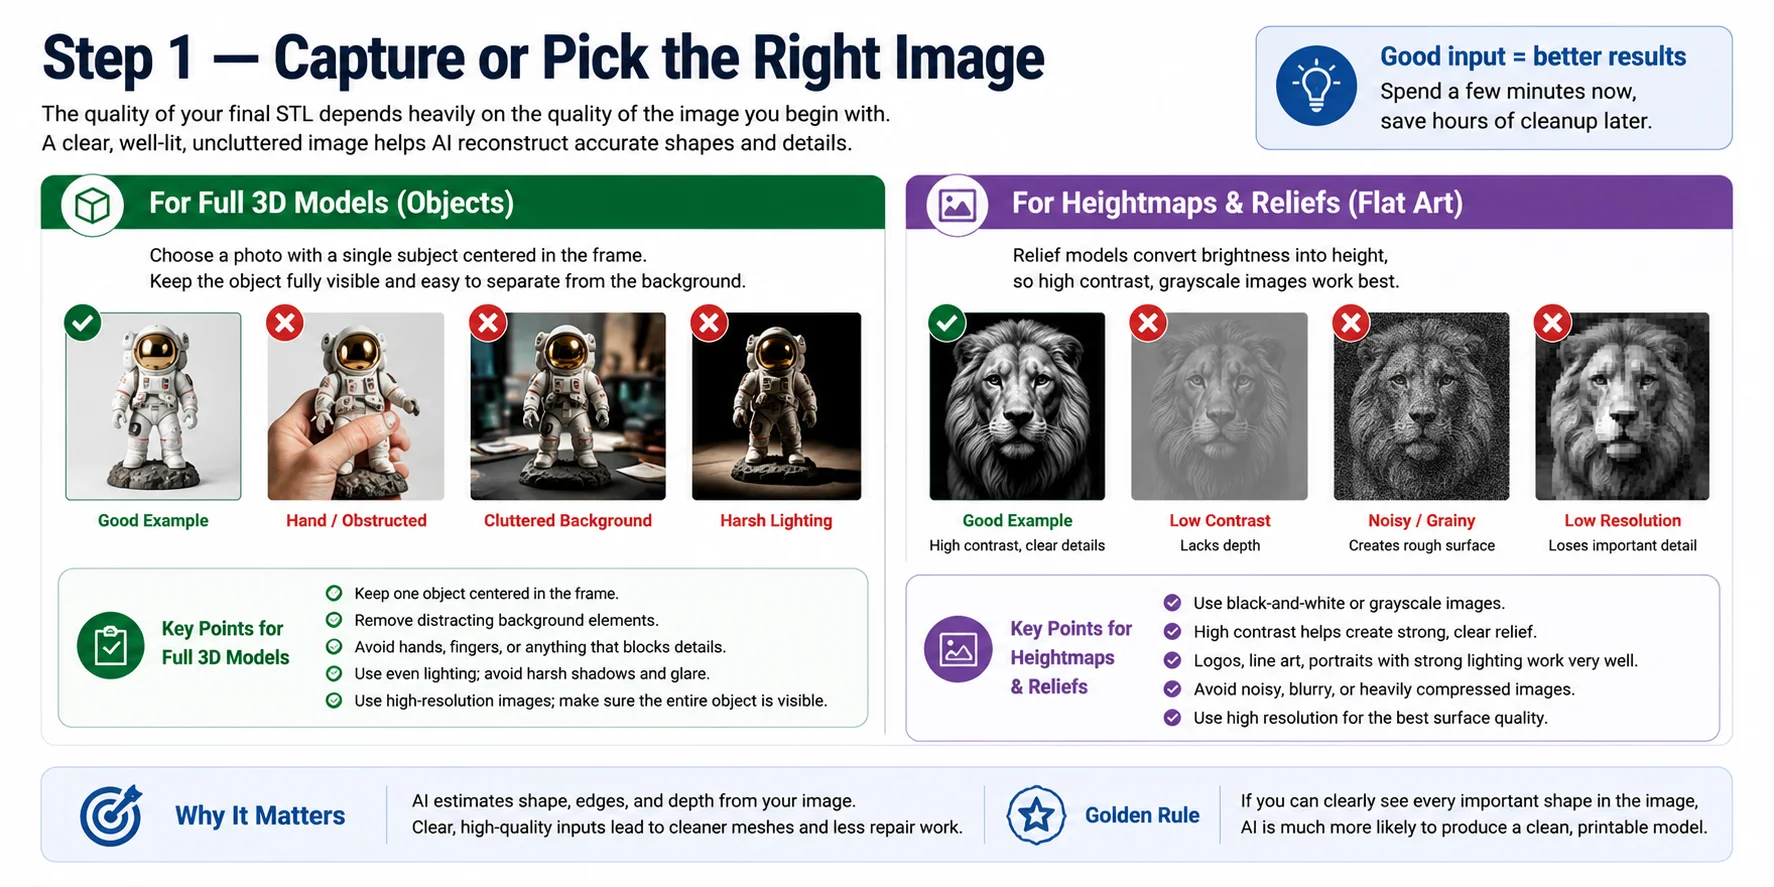
Step 1 — Capture or Pick the Right Image
The quality of your final STL depends heavily on the quality of the image you begin with. Even the most advanced AI can't accurately reconstruct details that are blurry, hidden, or poorly lit. Spending a few extra minutes choosing or taking a better photo will usually save far more time than repairing a messy mesh later.
Whether you're creating a full 3D object or a relief model, the goal is the same: give the software a clear, uncluttered view of the subject. Think of the image as the blueprint the AI uses to estimate shape, edges, and depth.
For Full 3D Models
If you're generating a complete 3D object, choose an image with a single subject centered in the frame. Keep the object fully visible—avoid hands, fingers, or other items blocking important details. A plain background helps the AI separate the subject from its surroundings, while even lighting reduces harsh shadows that can be mistaken for geometry.
Whenever possible:
- Keep one object centered.
- Remove distracting background elements.
- Avoid motion blur and low-resolution images.
- Make sure the entire object is visible from top to bottom.
Simple, well-lit photos almost always produce cleaner meshes and require less repair before printing.
For Heightmaps and Reliefs
Relief generation works differently. Instead of reconstructing a full object, the software converts image brightness into surface height. Because of this, high contrast is far more important than perspective.
Black-and-white or grayscale images usually give the cleanest results. Logos, line art, portraits with strong lighting, and high-resolution illustrations work particularly well. Avoid noisy images, heavy compression, or low-resolution graphics, as these can create rough or uneven surfaces in the final STL.
A good rule of thumb is simple: if you can clearly distinguish every important shape in the image, the AI is much more likely to produce a clean, printable model.

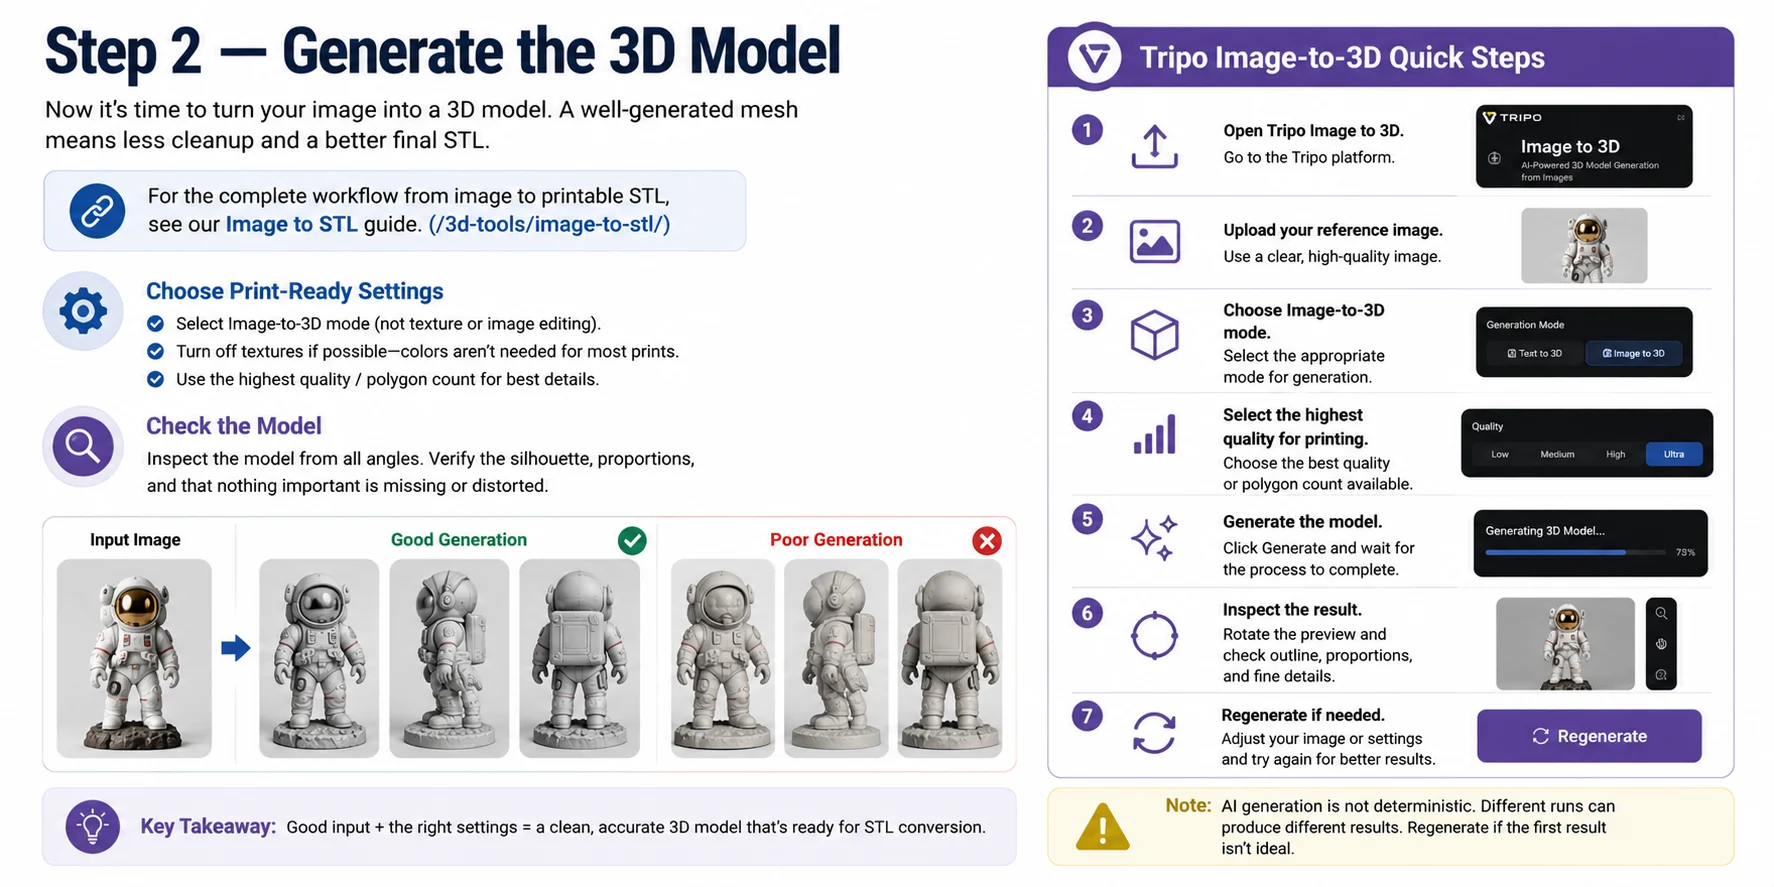
Step 2 — Generate the 3D Model
Once you've chosen a high-quality image, it's time to generate the 3D model. If your goal is 3D printing rather than game assets or animation, prioritize clean geometry over visual effects. A well-generated mesh requires much less repair before it becomes a printable STL.
If you're looking for a complete workflow, our Image to STL guide walks through the entire conversion process from image to printable file. This step focuses on creating the highest-quality mesh possible before export.
Most AI generators offer several quality options. For printable models, choose Image-to-3D mode instead of image editing or texture generation. Disable textures if the platform allows it, since color information isn't needed for most single-material 3D prints. Select the highest mesh quality or polygon count available to preserve small details and smoother curves.
After generation, don't immediately download the model. Spend a minute inspecting it from every angle. Check that the overall silhouette matches the original image, the proportions look natural, and there are no missing parts, floating geometry, or obvious distortions. Small issues are easier to correct now than after exporting an STL.
Tripo Image-to-3D Quick Steps
- Open Tripo Image to 3D.
- Upload your reference image.
- Choose Image-to-3D generation mode.
- Select the highest available quality for printing.
- Generate the model and wait for processing to finish.
- Rotate the preview and inspect the outline, proportions, and fine details.
- If necessary, adjust the input image or simply regenerate for a better result.
AI generation is not deterministic, so two runs can produce different meshes from the same image. If the first result isn't ideal, try another generation or slightly improve your source image before moving on to STL conversion and mesh repair.
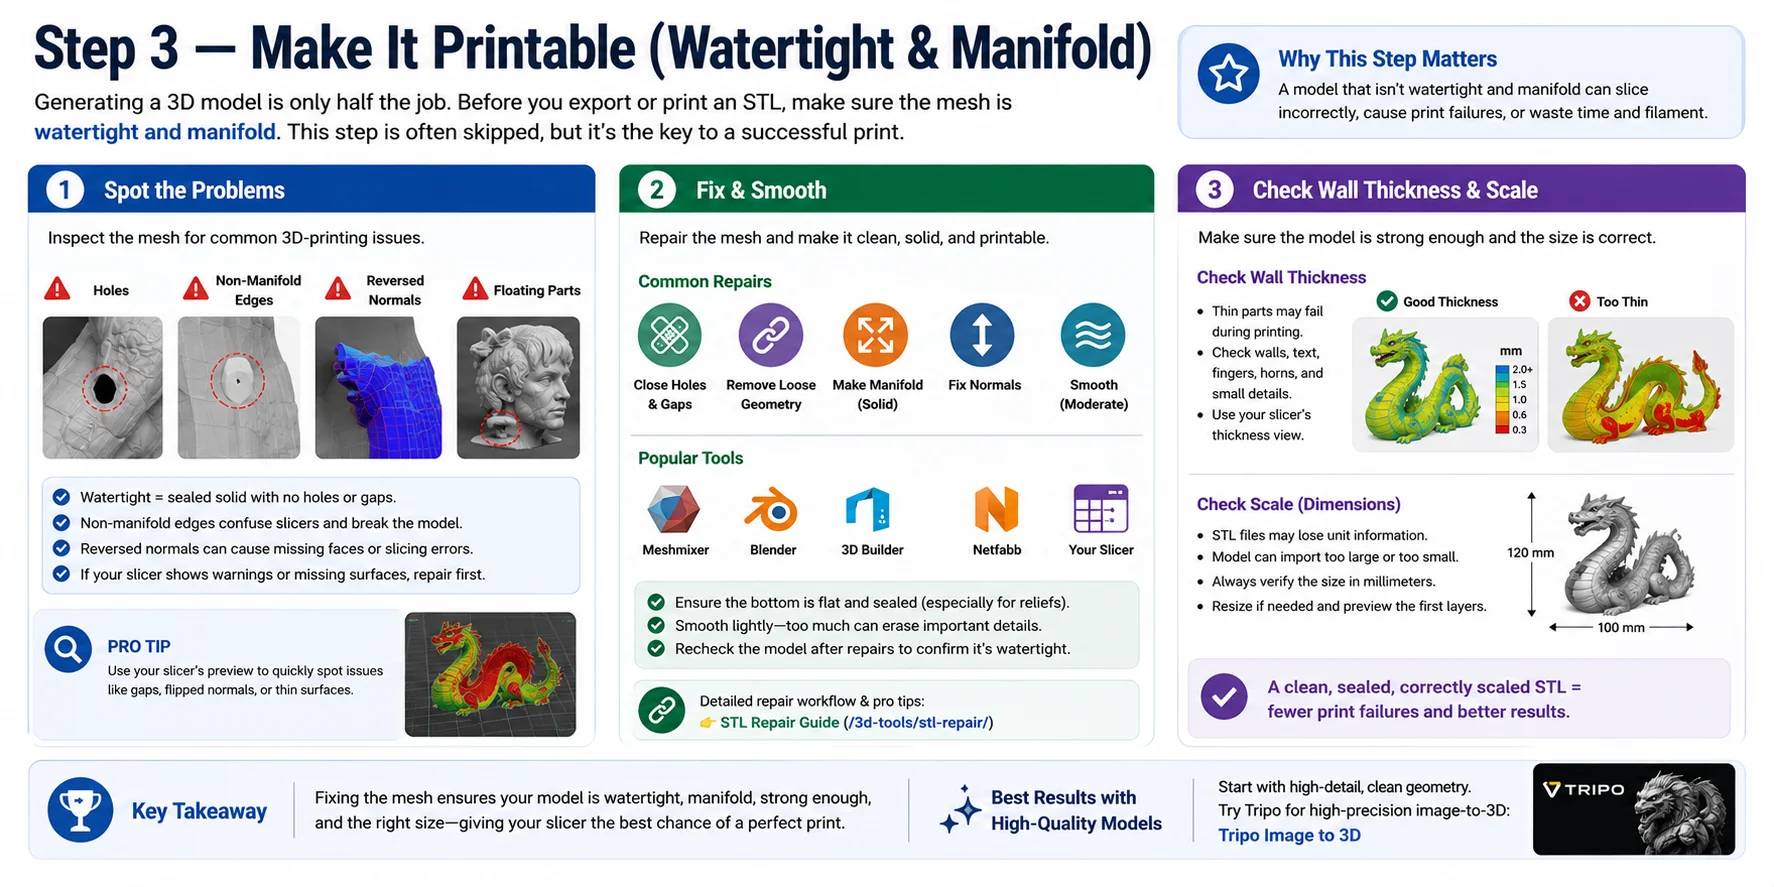
Step 3 — Make It Printable (Watertight & Manifold)
Generating a 3D model is only half the job. Before you export or print an STL, you need to make sure the mesh is actually printable. Many tutorials skip this step, but it is often the difference between a model that looks good on screen and one that slices correctly. Even a high-detail model from Tripo's HD Model may still need a quick printability check before it goes into your slicer.
Spot the Problems
Start by inspecting the mesh for common 3D-printing issues. Look for holes in the surface, open edges, non-manifold geometry, floating parts, and reversed normals. A watertight model should behave like a sealed solid object, not a thin shell with gaps. Non-manifold edges can confuse slicers because the software cannot tell what is inside or outside the model. Reversed normals can also cause missing faces or strange slicing results.
If you see warning colors, missing surfaces, or broken sections in your slicer preview, stop and repair the file before printing.
Fix & Smooth
Use a mesh repair tool to clean up the model. Meshmixer, Blender, Microsoft 3D Builder, Netfabb, and many slicers can automatically close holes, remove loose geometry, fix normals, and make the mesh manifold. For relief models, make sure the bottom is flat and sealed so the object sits properly on the print bed.
After repair, lightly smooth rough areas if needed, but don't overdo it. Too much smoothing can erase important details, especially on faces, text, logos, or small decorative features.
Check Wall Thickness & Scale
Finally, check whether the model is physically printable. Thin details may look fine on screen but fail during printing. Make sure walls, raised text, fingers, horns, and small parts are thick enough for your printer and material.
Also confirm the model's scale after conversion. STL files do not always store units clearly, so a model can import too large or too small. Before slicing, check the dimensions in millimeters, resize if needed, and preview the first layers. A clean, sealed, correctly scaled STL gives your slicer the best chance of producing a successful print.
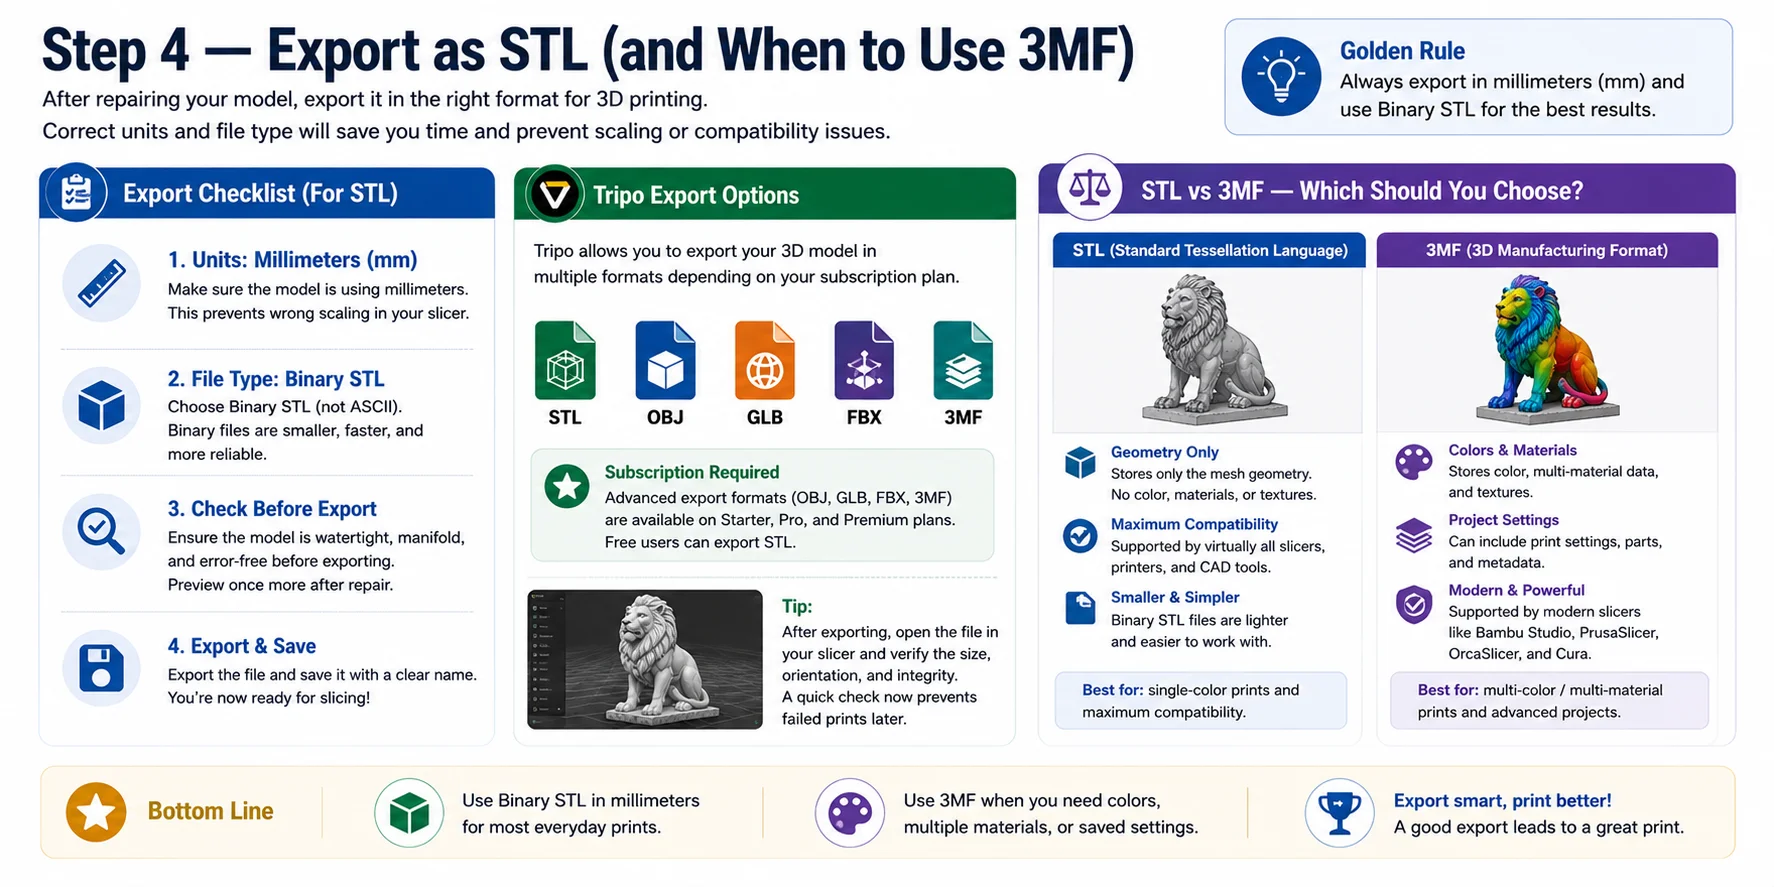
Step 4 — Export as STL (and When to Use 3MF)
After repairing your model, you're ready to export it for 3D printing. For most printers and slicers, STL remains the standard choice. Before exporting, make sure the model is using millimeters (mm) as its unit to avoid unexpected scaling issues when importing into your slicer.
If your software offers both ASCII and Binary STL, choose Binary STL. It stores the same geometry while producing much smaller file sizes, making it faster to save, transfer, and open.
Many AI 3D tools, including Tripo, let you export in multiple formats. Depending on your subscription plan, export options may include STL, OBJ, GLB, FBX, and 3MF. If you have access to these formats, choose the one that best matches your printing workflow.
STL vs. 3MF — Which Should You Choose?
Choose STL if you're printing a standard single-color model. STL stores only the mesh geometry, making it compatible with virtually every slicer and 3D printer. It does not include colors, materials, textures, or print settings.
Choose 3MF when you want to preserve color, multi-material assignments, or slicer settings in a single file. Modern slicers such as Bambu Studio, PrusaSlicer, OrcaSlicer, and Cura all support 3MF, making it the better option for advanced printing projects.
For most everyday prints, a Binary STL in millimeters is the simplest and safest choice. If your project relies on color or multiple materials, export a 3MF instead.
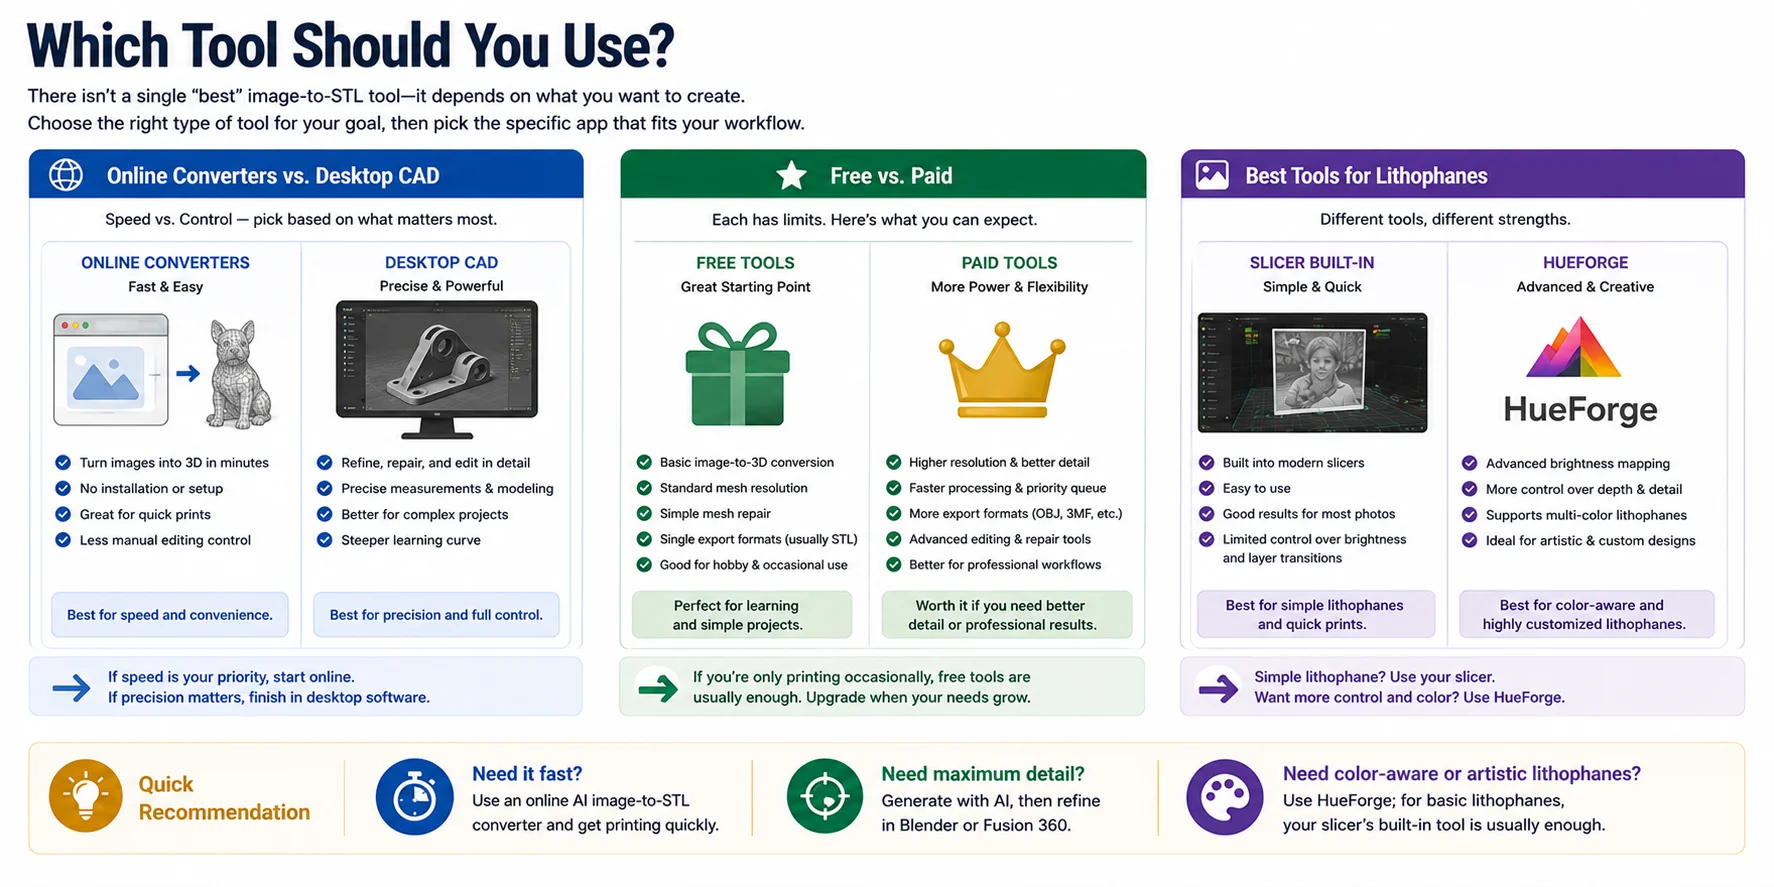
Which Tool Should You Use?
There isn't a single "best" image-to-STL tool—it depends on what you're trying to create. Some tools prioritize speed, while others offer more control over mesh quality or specialized features such as lithophanes. The good news is that you don't need to master professional CAD software for every project. Choosing the right category of tool is often more important than choosing a specific application.
Online Converters vs. Desktop CAD
Online AI converters are the fastest way to turn an image into a printable mesh. They're ideal when you want results in minutes and don't need extensive manual editing. Desktop applications like Blender or Fusion 360 are better for refining models, repairing geometry, or making precise dimensional changes after generation.
If speed is your priority, start online. If precision matters, finish the model in desktop software.
Free vs. Paid
Free tools are usually enough for basic image-to-STL conversion, simple mesh cleanup, and single-color printing. Paid tools often unlock higher-resolution meshes, faster processing, additional export formats, and advanced editing features.
If you're only printing occasionally, free software is usually sufficient. Upgrade only if you need better detail or professional workflows.
Best Tools for Lithophanes
For simple lithophanes, many modern slicers include built-in lithophane generators that work well with grayscale photos. If you want greater control over brightness mapping, layer transitions, and color-aware reliefs, HueForge offers significantly more creative flexibility.
Quick recommendation:
- Need it fast? Use an online AI image-to-STL converter.
- Need maximum detail? Generate with AI, then refine in Blender or Fusion 360.
- Need color-aware or artistic lithophanes? Use HueForge; for basic lithophanes, your slicer's built-in tool is usually enough.
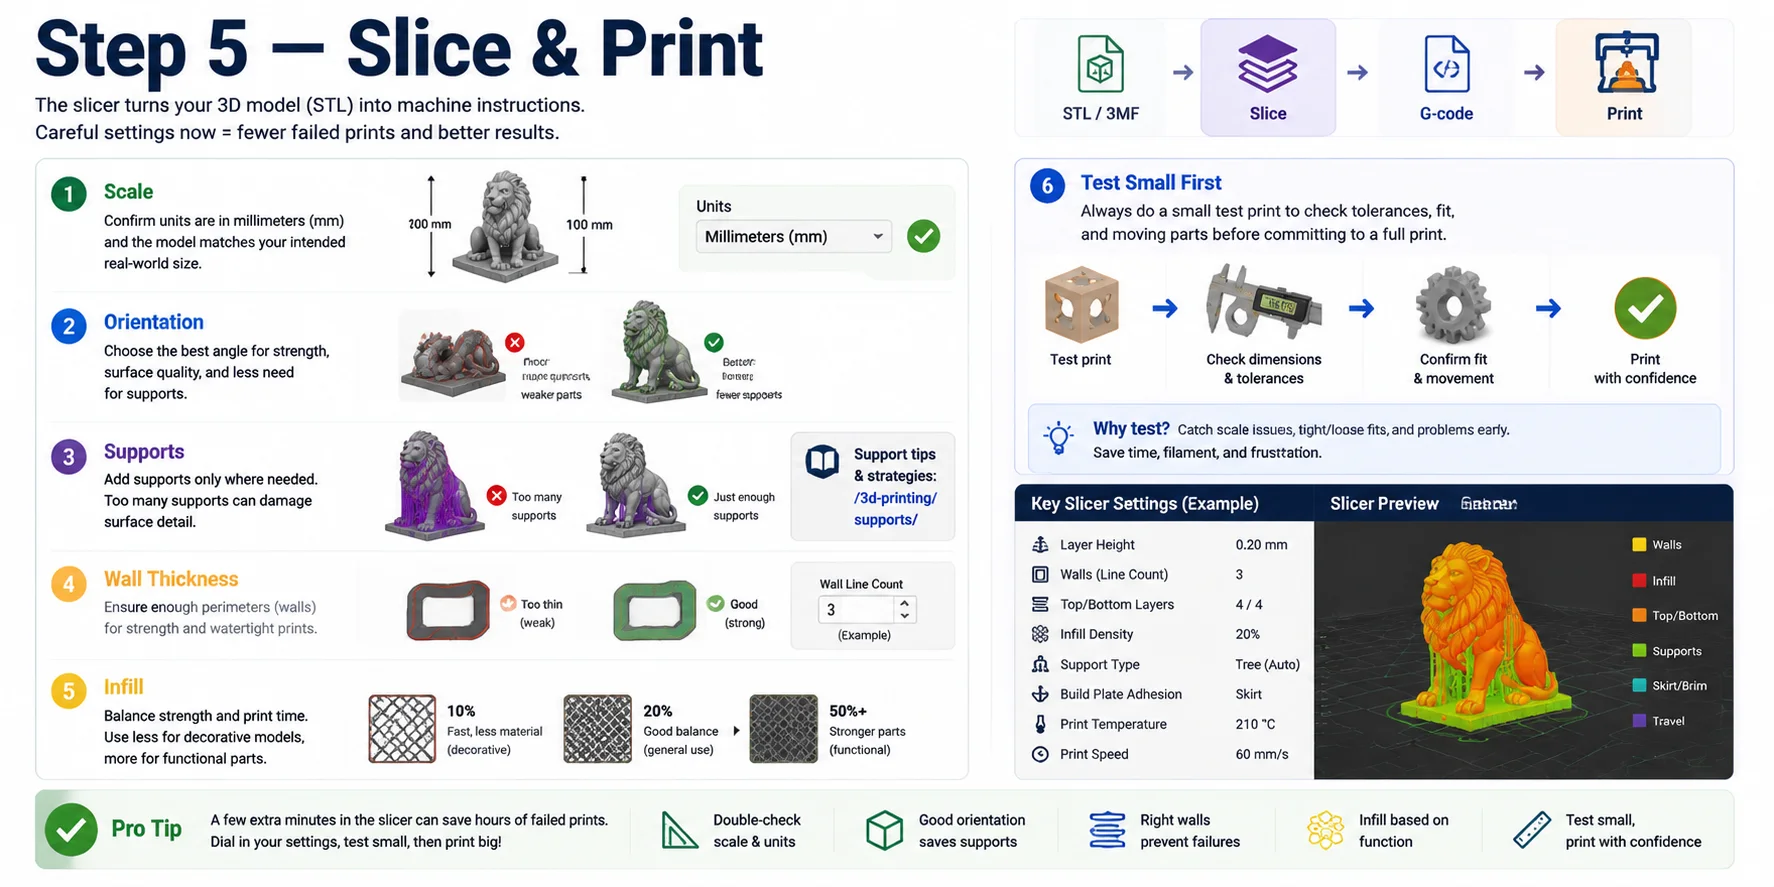
Step 5 — Slice & Print
Once your model is exported, the slicing stage determines whether your print succeeds or fails. A slicer converts your STL into machine instructions, but good results depend heavily on how you prepare the model before printing.
Start with scale. Always confirm the model is in millimeters and matches your intended real-world size. Many failed prints come from incorrect scaling rather than geometry issues.
Next, adjust orientation. Position the model to maximize strength and reduce the need for supports. A well-chosen angle can improve surface quality and shorten print time. Avoid leaving large overhangs facing downward when possible.
Then configure supports carefully. Only generate supports where necessary—overusing them can damage surface detail.
Check wall thickness before slicing. Thin areas may look fine in the model but fail during printing. Ensure critical parts have enough perimeters for strength and durability.
Set infill based on function. Lower infill is fine for decorative models, while functional parts need higher density for strength and stability.
Before committing to a full print, always run a small test print to check tolerances. This step helps verify fit, scale accuracy, and mechanical movement if your model has interlocking parts. A quick prototype can save time, filament, and failed prints later.
A properly sliced model is the final bridge between digital design and successful physical output—take time here, and your print quality will reflect it.
When This Workflow Doesn't Work (Limits)
This image-to-STL workflow is powerful, but it is not universal. In certain scenarios, AI generation and automated mesh processing will struggle, and switching back to traditional CAD modeling becomes the better option. Recognizing these limits early helps avoid wasted time and failed prints.
Precision Assembly Parts
If your model must fit into a larger mechanical system or interact with other parts, tight tolerances become critical. AI-generated meshes are not designed for engineering-grade alignment, and even small deviations can cause misfits. In these cases, parametric CAD tools are more reliable.
±1mm Tolerance-Sensitive Designs
When your design depends on very tight dimensional accuracy—especially within ±1mm—image-to-3D workflows can introduce unpredictable scaling or deformation. Even after repair and slicing, small errors may accumulate. For functional parts like hinges, connectors, or snap-fit joints, CAD or measured modeling is safer.
Ultra-Thin or Highly Complex Geometry
Very thin walls, intricate internal structures, or extreme geometric complexity often break during mesh reconstruction or repair. AI may "guess" missing structure, leading to non-manifold edges or unstable surfaces. If the model is too fragile or overly complex, it is usually better to return to CAD or rebuild the geometry manually.
In short, this workflow is best for visual models, prototypes, and general 3D printing. When precision, tolerance, or structural complexity becomes critical, stepping back to CAD ensures reliability and print success.

Frequently Asked Questions
Is there a way to turn an image into an STL file?
Yes. You can turn an image into an STL file using either an AI image-to-3D tool or a heightmap (relief) generator. For a full 3D object, upload a clear, single-subject image, choose "image-to-3D" mode, set quality to high or ultra, and disable textures so the output focuses on clean geometry. For relief models, convert the image to grayscale, increase contrast, and use a heightmap generator with moderate depth settings to avoid over-exaggeration. After generation, export the model as STL, open it in a slicer like Bambu Studio, PrusaSlicer, or Cura, and verify scale, orientation, and wall thickness before printing.
Can ChatGPT actually make STL files?
ChatGPT itself cannot directly generate or export actual STL files as downloadable 3D geometry. However, it can help you create them by generating 3D model code (such as OpenSCAD scripts), providing structured modeling instructions, or guiding you step-by-step through CAD or AI tools that output STL files. In practice, you would take that output and import it into software like Blender, Fusion 360, or an AI image-to-3D tool to generate the real mesh. It can also help you fix errors, optimize geometry, or prepare models for 3D printing once you already have an STL.
What image resolution works best for image-to-STL?
For image-to-STL workflows, a resolution of around 1024×1024 to 2048×2048 pixels is usually the sweet spot for most AI tools. This range preserves enough edge detail and shape clarity for the model to reconstruct geometry without introducing excessive noise or heavy processing time. If the image is for full 3D generation, higher resolution helps, but anything beyond 4K often gives diminishing returns unless the tool explicitly supports ultra-high-detail reconstruction. For heightmap or lithophane-style STL, resolution is even more important—use at least 1500 pixels on the shortest side and ensure the image is sharp, high-contrast, and free of compression artifacts. In all cases, avoid blurry, over-compressed, or heavily downscaled images, since those directly reduce mesh quality and lead to rough or inaccurate prints.
Do I need a black-and-white image for a heightmap/relief?
You do not strictly need a black-and-white image for a heightmap or relief STL, but it usually produces better and more predictable results. Most heightmap tools convert the image into grayscale internally, where brightness determines height (white is higher, black is lower). Because of this, starting with a clean grayscale image or converting a color image beforehand gives you more control over contrast and detail. If you use a color image, make sure it has strong lighting separation and avoid noisy or overly saturated backgrounds, since those can create unwanted bumps in the final mesh. For best results, adjust contrast and sharpness before generating the STL so important shapes are clearly defined.
What are the limitations of image to STL?
Image-to-STL has several important limitations because it is an estimation process rather than true 3D reconstruction. First, single images do not contain full depth information, so AI must "guess" hidden geometry, which often leads to inaccurate backside or internal structures. Second, fine mechanical precision is limited—tolerances, exact dimensions, and fitting parts are not reliable compared to CAD modeling. Third, complex or thin geometry can break easily during reconstruction, producing non-manifold edges, holes, or unstable surfaces that require repair before printing. Finally, results vary depending on image quality; blurry, low-contrast, or cluttered images significantly reduce mesh accuracy and printability.
How do I convert an image into a 3D model?
You can convert an image into a 3D model using either AI image-to-3D tools or a heightmap (relief) workflow, depending on the result you want. For a full 3D object, upload a clear single-subject image into an image-to-3D generator, select a high or ultra quality mode, and disable textures so the system focuses on geometry. The tool will reconstruct a mesh that you can export as an STL or OBJ file. For flat designs like logos or portraits, convert the image to grayscale and use a heightmap generator where brightness is mapped to depth, then export it as an STL relief model. After generation, always check scale, wall thickness, and surface errors in a slicer like Bambu Studio, PrusaSlicer, or Cura before printing.
Conclusion
Turn any image into a printable STL by following a simple pipeline: pick a clear input image, generate a 3D model with an image-to-3D or heightmap tool, repair the mesh to make it watertight, then export as STL and slice it for printing. Along the way, choose the right workflow based on your goal—full objects or relief surfaces—and always verify scale, wall thickness, and printability before sending to the printer.
If you're unsure where to start, this guide walks through the complete process step by step so you can go from image to ready-to-print model without guesswork.