How to Make an STL File: 6 Easy Ways (2026 Guide)
TL;DR
- An STL file stores geometry only — no colors, textures, or units. You need to create a 3D model first, then export it as .STL.
- There are 6 ways to make a STL file: CAD (Fusion 360, FreeCAD), beginner tools (Tinkercad), sculpting (Blender), 3D scanning, image-to-STL conversion, and AI generation.
- Tinkercad is the easiest free path: drag shapes, group them, set mm dimensions, click Export → STL.
- AI tools like Tripo AI let you generate a 3D model from a text prompt or image in seconds, then export as STL — no modeling skills needed.
- Before printing, verify your STL is watertight and manifold, then load it into a slicer (Bambu Studio, Cura, PrusaSlicer) to generate G-code.
To make an STL file, you create a 3D model and then export it as .STL. You can model from scratch in CAD (like Tinkercad or Fusion), sculpt it (Blender), 3D-scan a real object, convert a 2D image, or generate one with AI. Then you check the file is watertight and slice it for printing. This guide walks you through all six methods, with step-by-step tutorials for the easiest paths.
What Is an STL File? (Quick Explainer)
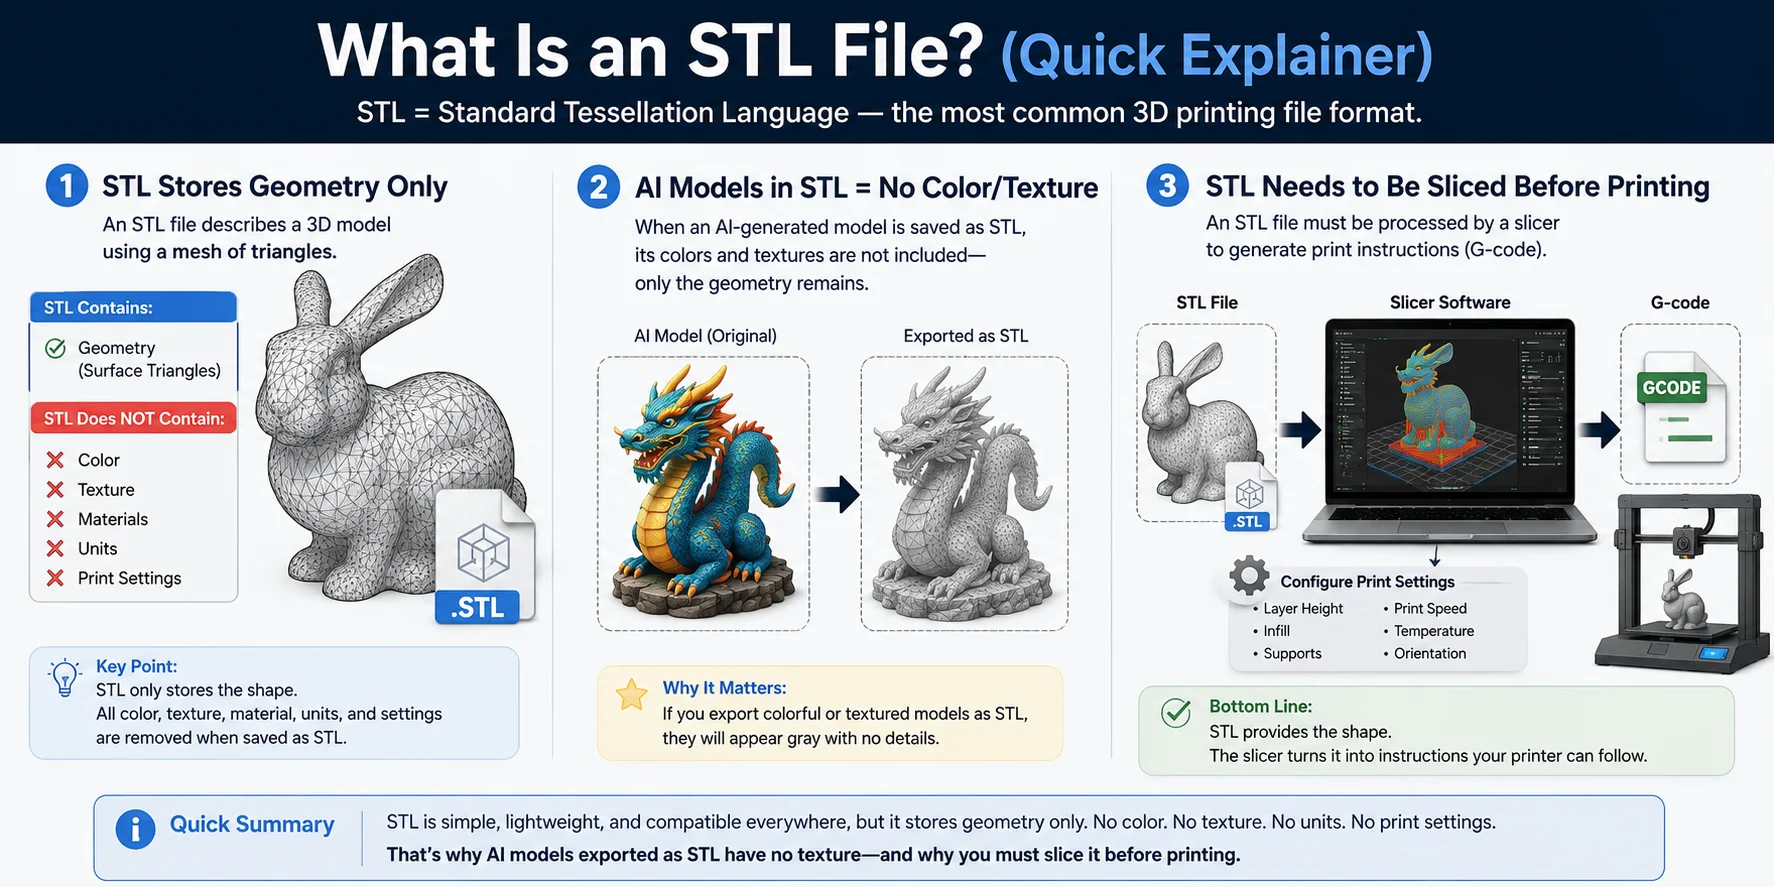
An STL file is the most common file format used in 3D printing. STL stands for Standard Tessellation Language (sometimes referred to as Standard Triangle Language) and represents a 3D model using a mesh of small triangles. These triangles describe only the shape of an object's surface, making STL a simple and widely supported format across CAD software, slicers, and 3D printers.
The key thing to understand is that an STL file stores geometry only. It contains the model's surface shape but does not include colors, textures, materials, measurement units, or printing settings. For example, if you export a colorful 3D model as STL, the file will keep the shape but lose all color and texture information. This limitation becomes especially important when working with AI-generated models or multi-color 3D printing projects.
Before an STL model can be printed, it must be processed by a slicer such as Bambu Studio, Cura, PrusaSlicer, or OrcaSlicer. The slicer converts the mesh into machine instructions (G-code) and allows you to configure settings such as layer height, infill, supports, and print orientation. In other words, an STL file provides the model's shape, while the slicer prepares it for actual manufacturing.
For a deeper look at what STL files contain and why they are the standard format for 3D printing, see Understanding .stl Files: Uses & Benefits.
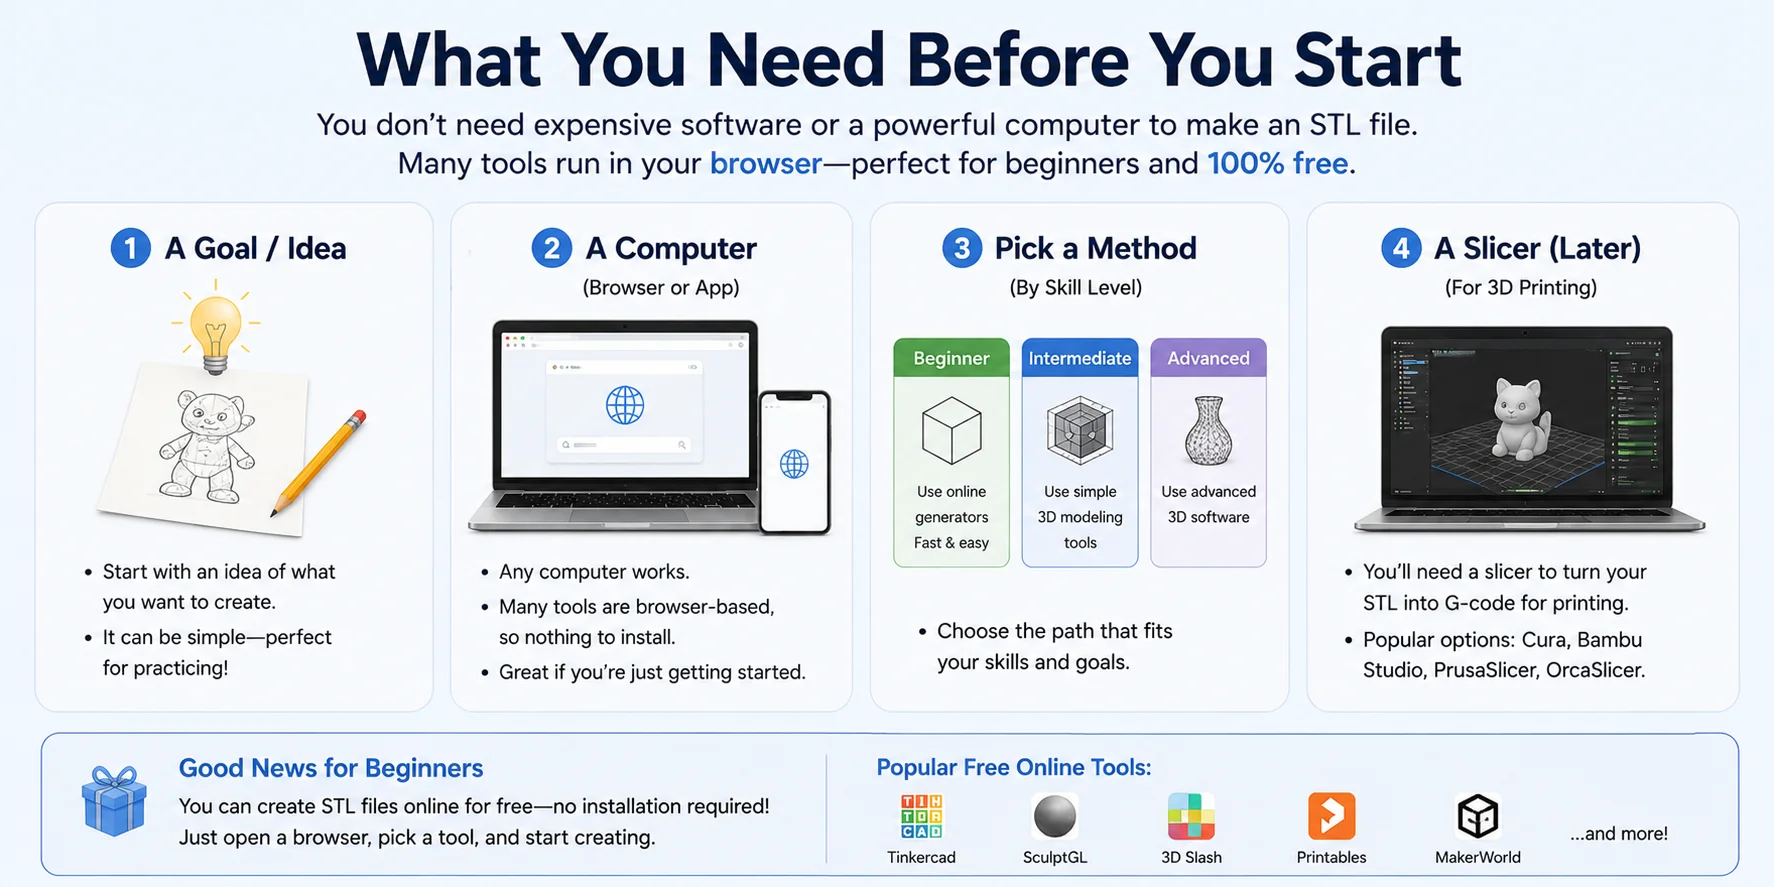
What You Need Before You Start
Creating an STL file is easier than many beginners expect. You don't need expensive software, advanced CAD skills, or even a powerful computer to get started. In fact, many modern tools run directly in your web browser, making it possible to create STL files online for free without installing anything.
Before you begin, all you really need is a clear idea of what you want to make, access to a computer, and a method that matches your skill level. Beginners may prefer browser-based AI or drag-and-drop modeling tools, while more experienced users might choose CAD software for greater control. The good news is that there are free options available for almost every workflow.
You'll also need a slicer later in the process. Once your STL file is ready, software such as Bambu Studio, Cura, PrusaSlicer, or OrcaSlicer converts the model into printer instructions (G-code) and lets you configure settings like layer height, infill, supports, and orientation before printing.
6 Ways to Make an STL File (Pick One)
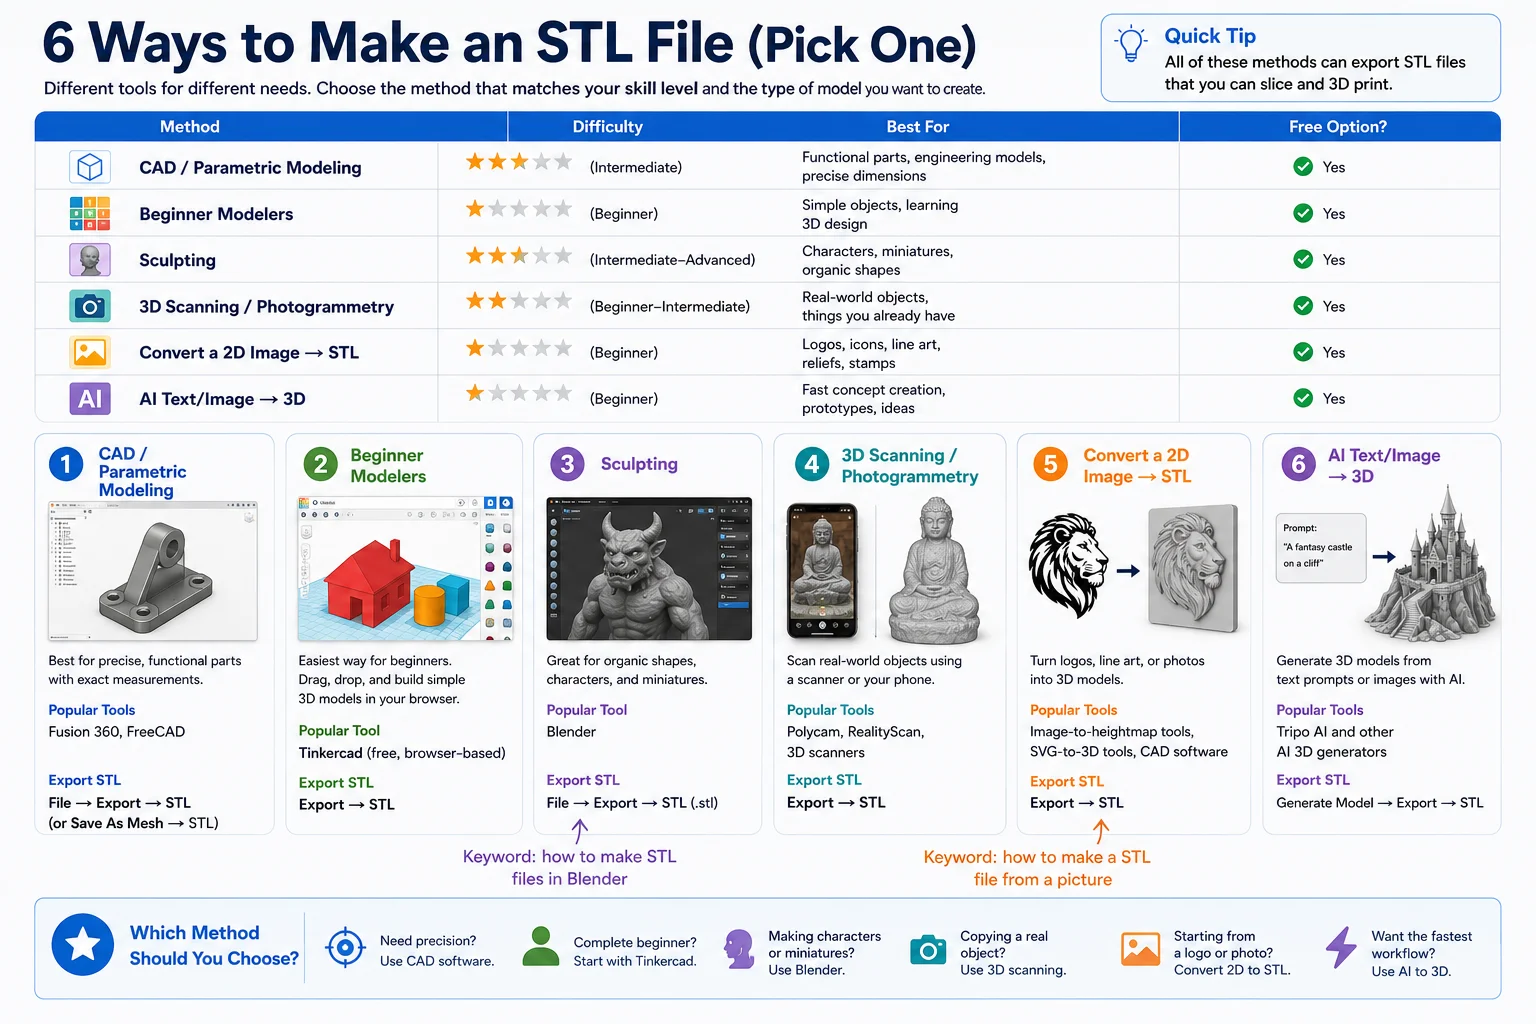
There isn't a single "correct" way to create an STL file. The best method depends on your experience level, the type of model you're making, and how much control you need over the design. The table below can help you choose the right workflow before diving into the details.
| Method | Difficulty | Best For | Free Option? |
|---|---|---|---|
| CAD / Parametric Modeling | Intermediate | Functional parts, engineering models | ✅ Yes |
| Beginner Modelers | Beginner | Simple objects and learning 3D design | ✅ Yes |
| Sculpting | Intermediate–Advanced | Characters, miniatures, organic shapes | ✅ Yes |
| 3D Scanning / Photogrammetry | Beginner–Intermediate | Real-world objects | ✅ Yes |
| Convert a 2D Image → STL | Beginner | Logos, silhouettes, reliefs | ✅ Yes |
| AI Text/Image → 3D | Beginner | Fast concept creation | ✅ Yes |
1. CAD / Parametric Modeling
If you're designing mechanical parts, prototypes, or objects that require precise dimensions, CAD software is usually the best choice. These tools use parametric modeling, allowing you to modify measurements and features later without rebuilding the model from scratch.
Popular tools: Fusion 360, FreeCAD
Export STL:File → Export → STL (or Save As Mesh → STL depending on the software)
This method is ideal for brackets, enclosures, replacement parts, and engineering projects.
2. Beginner Modelers
If you're completely new to 3D design, browser-based modeling tools offer the easiest learning curve. You can create models by combining simple shapes and exporting them directly as STL files.
Popular tool: Tinkercad (free, browser-based)
Export STL:Export → STL
Because it runs entirely in a browser, Tinkercad is one of the easiest ways to create STL files online for free without installing any software.
3. Sculpting
For characters, miniatures, creatures, and other organic shapes, sculpting software provides much more artistic freedom than traditional CAD tools.
Popular tool: Blender
Export STL:File → Export → STL (.stl)
If you're searching for how to make STL files in Blender, the typical workflow is to model or sculpt your object, check that the mesh is watertight, and then export it as an STL file for printing.
4. 3D Scanning / Photogrammetry
Instead of building a model from scratch, you can scan a real-world object and convert it into a printable 3D mesh.
Popular tools: Polycam, RealityScan, 3D scanners
Export STL:Export → STL
Many modern phone apps can generate surprisingly accurate models from a series of photos, making this one of the fastest ways to digitize physical objects.
5. Convert a 2D Image → STL
You can also create an STL file from a picture. This works particularly well for logos, icons, line art, stamps, signs, and relief-style models.
Popular tools: Image-to-heightmap converters, SVG-to-3D tools, CAD software
Typical workflow:
- Import the image or SVG.
- Convert it into a 3D shape.
- Adjust thickness or depth.
- Export as STL.
If you're wondering how to make an STL file from a picture, this is usually the simplest approach. The quality depends heavily on the clarity and contrast of the original image.
6. AI Text/Image → 3D
The newest approach is generating a 3D model directly from a text prompt or image using AI. This is often the fastest method when you don't want to model the object manually.
Popular tools: Tripo AI and other AI 3D generators
Export STL:Generate Model → Export → STL
AI-generated models can dramatically reduce the time required to create concepts, characters, props, and prototypes. We'll cover this workflow in more detail in the next section.
Which Method Should You Choose?
- Need precision? → Use CAD software like Fusion 360 or FreeCAD.
- Complete beginner? → Start with Tinkercad.
- Making characters or miniatures? → Use Blender.
- Copying a real object? → Use 3D scanning or Polycam.
- Starting from a logo or photo? → Convert a 2D image to STL.
- Want the fastest workflow? → Generate a model with AI and export it as STL.
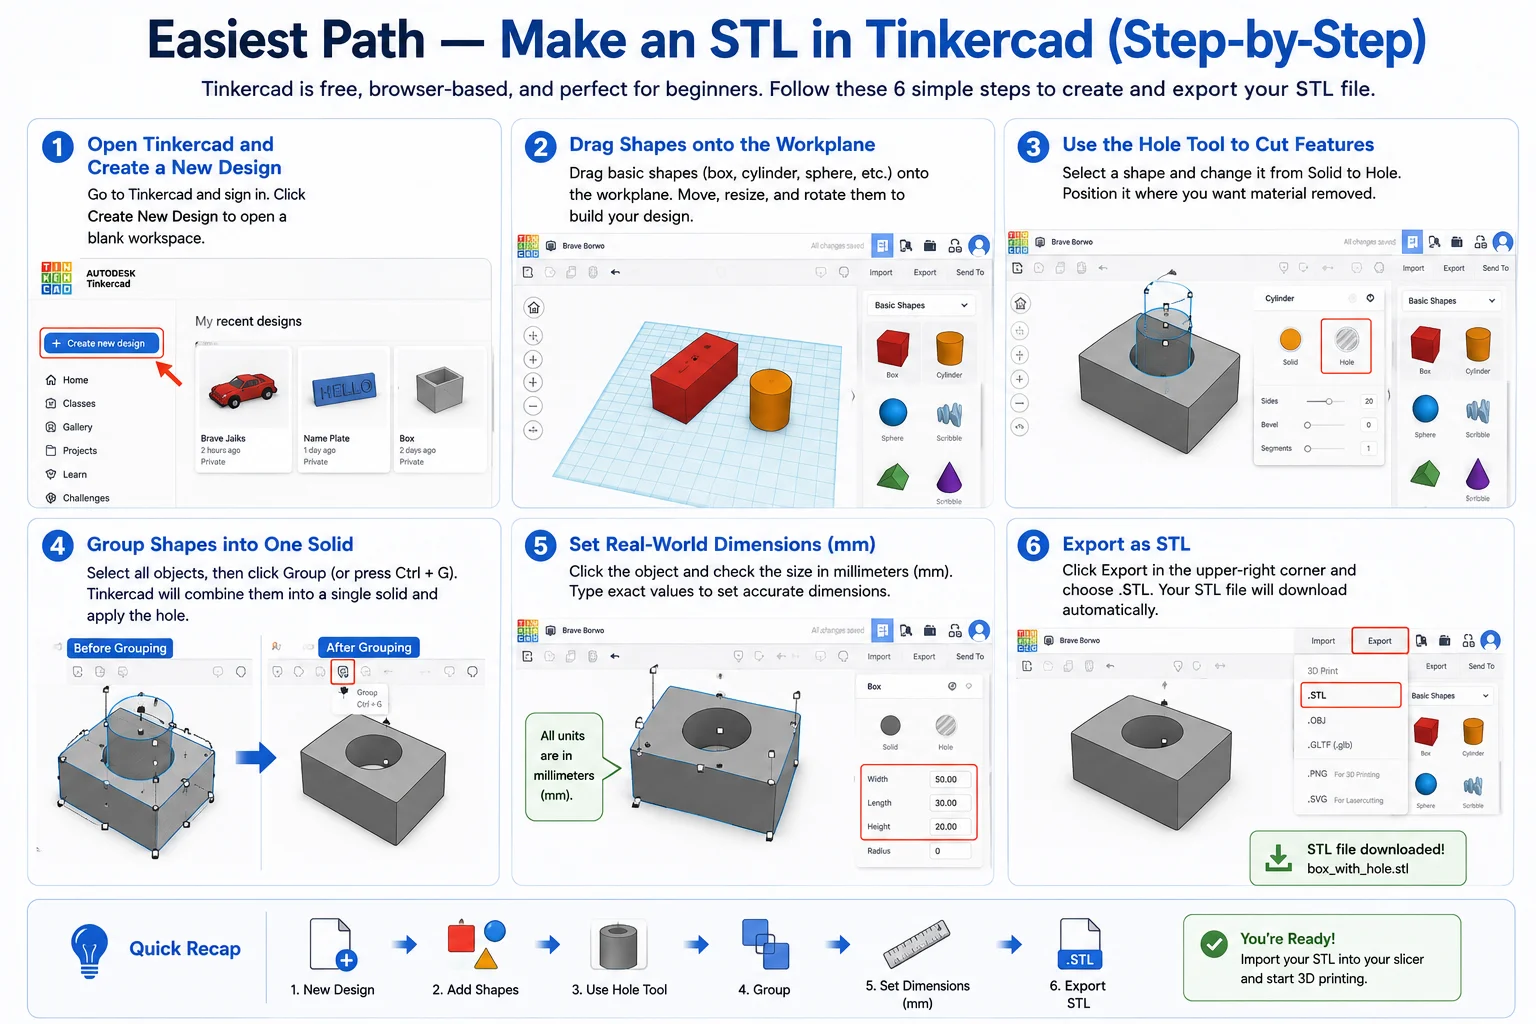
Easiest Path — Make an STL in Tinkercad (Step-by-Step)
If you're a complete beginner, Tinkercad is one of the easiest ways to create an STL file. It's free, runs entirely in your browser, and requires no previous 3D modeling experience. In less than 10 minutes, you can build a simple model and export it as an STL file ready for 3D printing.
Step 1: Open Tinkercad and Create a New Design
Go to Tinkercad and sign in or create a free account. From the dashboard, click Create New Design to open a blank workspace.
You'll see a workplane in the center and a panel of basic shapes on the right.
Step 2: Drag Shapes onto the Workplane
Start by dragging a few basic shapes (such as a box, cylinder, or sphere) onto the workplane.
You can:
- Move shapes by dragging them
- Resize them using the corner handles
- Rotate them using the curved arrows
- Stack shapes to create more complex designs
This simple drag-and-drop workflow is what makes Tinkercad so beginner-friendly.
Step 3: Use the Hole Tool to Cut Features
Need a hole, slot, or cutout?
Select a shape and change it from Solid to Hole using the options panel.
Then position the hole shape where you want material removed.
This is the easiest way to create openings and internal features without complicated modeling tools.
Step 4: Group Shapes into One Solid
Once your shapes are positioned correctly:
- Select all relevant objects.
- Click Group (or press Ctrl + G).
Tinkercad will combine the shapes into a single solid object and automatically apply any hole operations.
At this point, your model should look much closer to the final design.
Step 5: Set Real-World Dimensions (mm)
Before exporting, make sure your model is the correct size.
Click an object and check the dimensions shown in millimeters (mm). You can type exact values directly into the size boxes.
For example:
- Width: 50 mm
- Length: 30 mm
- Height: 20 mm
Using real-world dimensions now helps avoid scaling problems later when printing.
Step 6: Export as STL
When your design is finished:
- Click Export in the upper-right corner.
- Select .STL from the export options.
Tinkercad will generate and download the STL file automatically.
Export Path:Export → STL (.stl)
Quick Recap
If you're wondering how to create an STL file in Tinkercad, the workflow is simple:
- Create a new design.
- Drag and combine shapes.
- Use the Hole tool for cutouts.
- Group everything into one solid.
- Set dimensions in millimeters.
- Click Export → STL.
That's it — you now have a printable STL file that can be imported into a slicer such as Cura, Bambu Studio, PrusaSlicer, or OrcaSlicer for the next step of the 3D printing process.
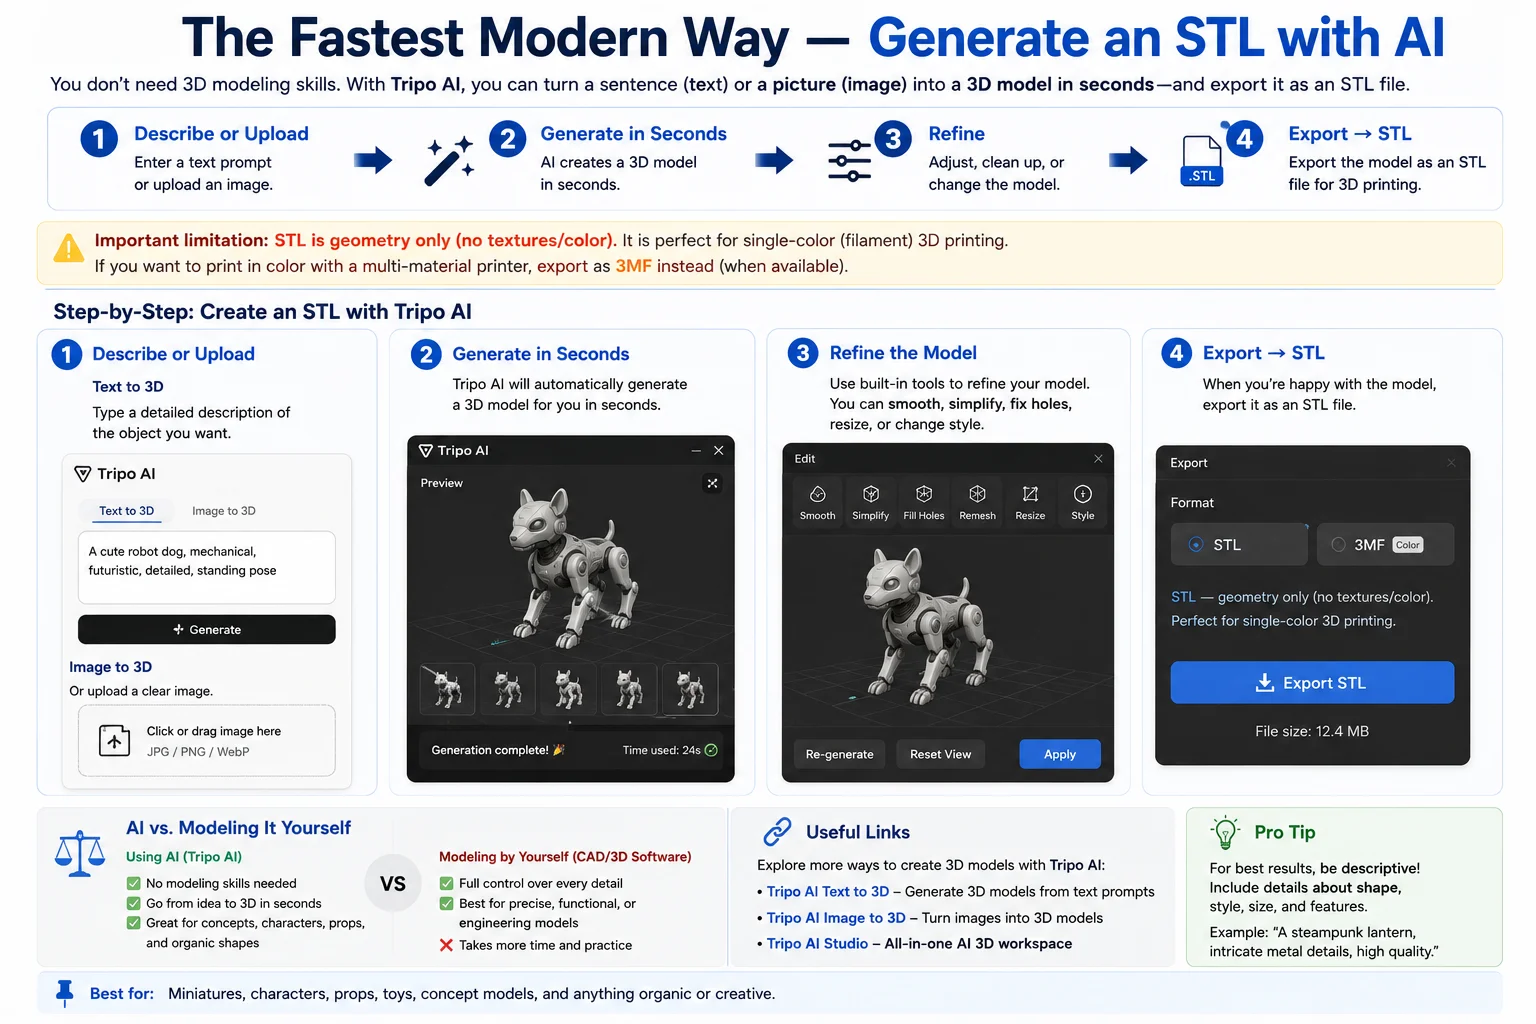
The Fastest Modern Way — Generate an STL with AI
Not everyone wants to learn CAD software or spend hours building a model from scratch. If your goal is simply to create a printable STL file, AI can be one of the fastest ways to get there. Modern AI 3D generators can turn either a text description or a single image into a 3D model in minutes, making STL creation accessible even to complete beginners.
One example is Tripo AI, which offers both Tripo AI Text to 3D and Tripo AI Image to 3D workflows. Instead of manually modeling every detail, you describe what you want or upload a reference image, and the AI generates a 3D mesh automatically. You can then refine the result and export it as an STL file for 3D printing.
Step 1: Describe Your Idea or Upload an Image
Start with either:
- A text prompt (for example, "a medieval castle with four towers").
- A reference image, sketch, concept drawing, or product photo.
Text prompts work well when you're starting from an idea, while image-based generation is useful when you already have a visual reference.
You can create models using:
Step 2: Generate a 3D Model in Seconds
Once you submit the prompt or image, the AI analyzes the input and automatically creates a 3D model.
Unlike traditional CAD workflows, you don't need to:
- Draw sketches
- Create reference planes
- Build meshes manually
- Learn modeling tools
For many simple projects, AI can produce a usable starting model in a fraction of the time required for manual modeling.
Step 3: Refine the Result
After generation, review the model and make adjustments if needed.
Typical refinements include:
- Improving proportions
- Adjusting small details
- Simplifying complex geometry
- Rotating or repositioning parts
- Regenerating variations
Think of AI as creating the first draft. A few minutes of refinement can often produce a much better final result.
Step 4: Export as STL
When you're satisfied with the model:
Export → STL
The exported STL file can then be imported into a slicer such as Cura, Bambu Studio, PrusaSlicer, or OrcaSlicer.
Important Limitation: STL Stores Geometry Only
Before exporting, it's important to understand what STL actually contains.
STL stores geometry only.
In other words, the file saves the shape of the model but does not store:
- Colors
- Textures
- Material information
This means that a colorful AI-generated model may appear as a plain gray mesh after export because the STL file only contains the surface geometry.
For this reason, STL is usually the best choice for:
- Single-color 3D printing
- Functional prototypes
- Mechanical parts
- Basic figurines and models
If you want to preserve colors, textures, materials, or other project information, export the model as 3MF instead whenever your software and printer support it.
AI vs Traditional Modeling
| Workflow | Time Required | Learning Curve |
|---|---|---|
| CAD Modeling | Hours to days | Moderate to high |
| Blender Sculpting | Hours to days | High |
| AI Text/Image → 3D | Minutes | Very low |
AI won't replace CAD for precision engineering or highly detailed professional work, but for many hobbyists, makers, educators, and rapid prototyping workflows, it can dramatically reduce the time required to create a printable STL file.
Quick Recap
The AI workflow is simple:
- Describe an object or upload an image.
- Generate a 3D model in seconds.
- Refine the result if needed.
- Export as STL.
- Slice and print.
If you've never created a 3D model before, AI is often the fastest path from idea to printable STL.
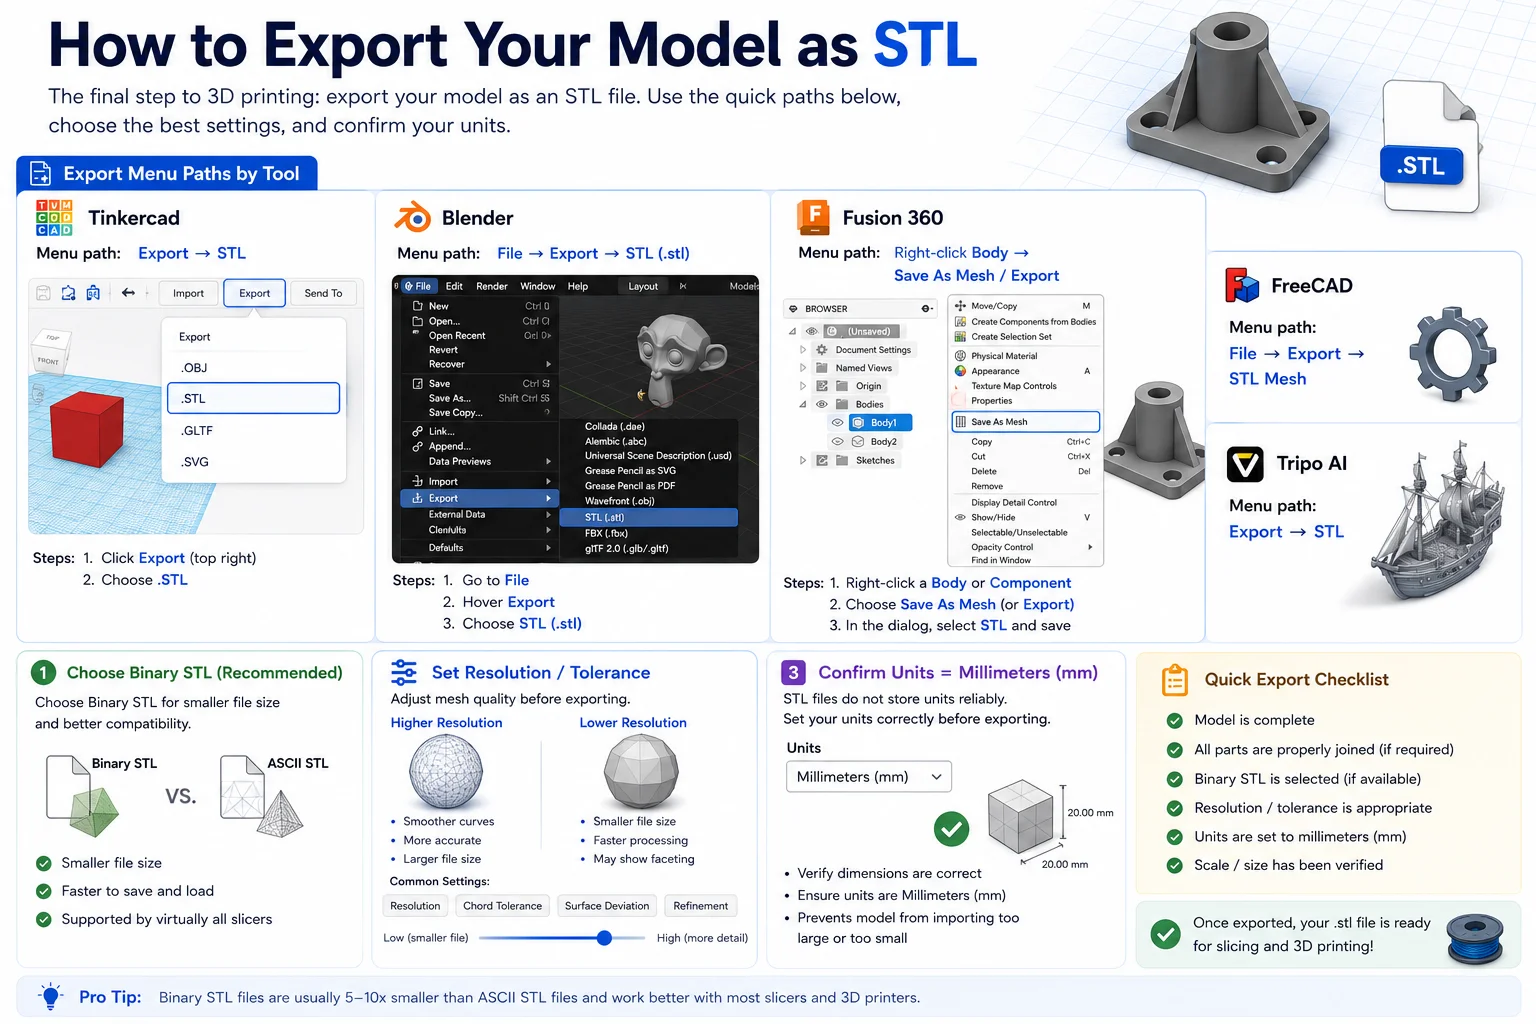
How to Export Your Model as STL
Once your model is finished, you'll need to export it as an STL file before it can be sliced and 3D printed. The exact menu varies by software, but the process is usually just a few clicks.
Quick Export Paths by Software
| Software | Export Path |
|---|---|
| Tinkercad | Export → STL |
| Blender | File → Export → STL (.stl) |
| Fusion 360 | Right-click Body → Save As Mesh → STL (or File → Export) |
| FreeCAD | File → Export → STL Mesh |
| Tripo AI | Export → STL |
If you've already created the model, this is the step that actually turns it into a .stl file.
Choose Binary STL (Recommended)
Some programs offer two STL formats:
- Binary STL
- ASCII STL
For most users, Binary STL is the better choice because it produces significantly smaller files while maintaining the same geometry. It is also supported by virtually all modern slicers and 3D printing workflows.
Adjust Resolution and Tolerance
Before exporting, you may see settings such as:
- Resolution
- Surface deviation
- Chord tolerance
- Refinement level
- Triangle count
Higher settings create smoother curves and more accurate surfaces, but they also increase file size. Lower settings create smaller files but may make curved areas appear faceted.
For most 3D printing projects, the default export settings work well. If your model contains lots of rounded surfaces, consider increasing the resolution slightly.
Confirm Units Are Set to Millimeters (mm)
One of the most common STL export mistakes is incorrect scale.
Before exporting, verify that:
- Dimensions are correct
- Units are set to millimeters (mm)
- The exported size matches the intended print size
Because STL files do not reliably store unit information, exporting with the wrong units can cause models to import much too large or much too small in your slicer.
STL Export Checklist
Before clicking Export, make sure:
✅ Model is complete
✅ Binary STL is selected (if available)
✅ Resolution/tolerance settings are appropriate
✅ Units are set to millimeters (mm)
✅ Scale has been verified
Once exported, your STL file is ready to open in Cura, Bambu Studio, PrusaSlicer, OrcaSlicer, or any other slicer for the final printing setup.
Make Sure Your STL Is Printable (Watertight & Manifold)
Creating an STL file is only half the job. Before sending it to a slicer or printer, you should make sure the mesh is watertight and manifold. Many failed prints, missing surfaces, and slicing errors are caused by problems in the model geometry rather than the printer itself.
What Does "Watertight" Mean?
A watertight mesh is completely sealed, with no gaps or holes in the surface.
Think of it like a real water bottle: if you filled the model with water, nothing could leak out. Every edge belongs to a closed surface, and the mesh forms a solid volume that a slicer can understand.
Common watertight issues include:
- Holes in the mesh
- Missing faces
- Open edges
- Gaps between connected parts
What Does "Manifold" Mean?
A manifold model has clean, valid geometry that can exist as a solid object in the real world.
Non-manifold geometry often includes:
- Self-intersecting surfaces
- Internal faces
- Floating or disconnected geometry
- Edges shared by more than two faces
- "Dangling" edges that don't form a closed surface
These issues can confuse slicers and may result in missing layers, strange toolpaths, or complete print failures.
How to Check and Repair STL Files
The good news is that most mesh problems can be fixed automatically.
Here are a few popular repair tools:
| Tool | What It Does |
|---|---|
| Microsoft 3D Builder | Automatically detects and repairs common STL errors |
| Meshmixer | Free mesh editing and repair tools from Autodesk |
| Netfabb | Advanced mesh analysis and repair |
| Cura / PrusaSlicer / Bambu Studio | Built-in mesh repair during import |
For many models, simply importing the STL into one of these tools and clicking Repair is enough to fix holes, flipped normals, and non-manifold edges.
Check for Flipped Normals
Normals determine which side of a surface is considered the "outside."
If the orientation is reversed:
- Parts of the model may disappear
- Slicers may generate incorrect toolpaths
- Surfaces can be interpreted as hollow
Most repair tools automatically detect and correct flipped normals during the repair process.
Verify Wall Thickness
Even a perfectly manifold STL can fail if the walls are too thin to print.
Before exporting or slicing:
- Check minimum wall thickness
- Ensure small details are printable
- Compare dimensions with your printer's nozzle size
As a general rule, walls thinner than the nozzle width are often difficult or impossible to print reliably.
Confirm Scale and Dimensions
STL files don't reliably store unit information, so always verify:
- Overall model size
- Width, height, and depth
- Units are interpreted correctly (usually millimeters)
A quick scale check can prevent the common problem of importing a model that's 10× too large or too small.
Quick Printable STL Checklist
Before printing, make sure your model is:
✅ Watertight (no holes or open edges)
✅ Manifold (no invalid geometry)
✅ Free of flipped normals
✅ Properly repaired if errors are found
✅ Thick enough to print reliably
✅ Correctly scaled in millimeters
Spending a minute on these checks can save hours of troubleshooting later. In many cases, print failures happen not because of the printer, but because the STL file wasn't fully printable in the first place.

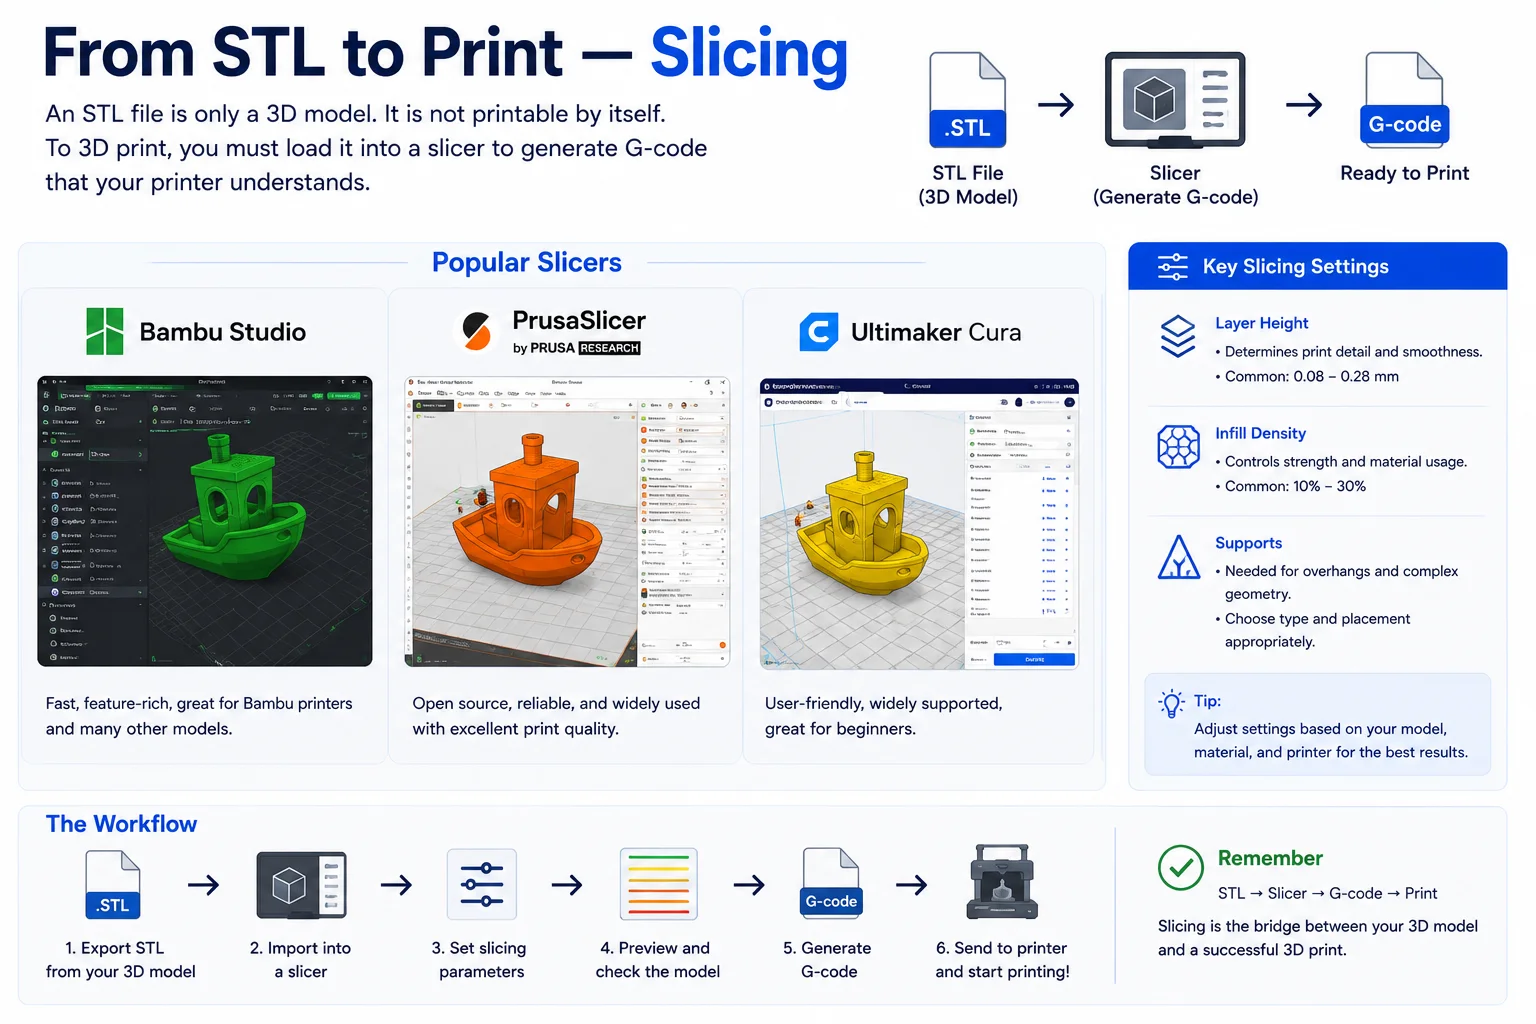
From STL to Print — Slicing
An STL file is not directly printable. It contains the 3D model's geometry, but your printer can't understand STL files on their own. Before printing, you need to load the STL into a slicer, which converts the model into machine instructions called G-code.
Popular slicers include Bambu Studio, PrusaSlicer, Ultimaker Cura, and OrcaSlicer. After importing your STL file, the slicer analyzes the model and generates the layer-by-layer toolpaths that the printer will follow.
During slicing, you'll typically configure settings such as:
- Layer height (print quality and speed)
- Infill density (strength and material usage)
- Supports (for overhangs and complex shapes)
- Print orientation
- Wall thickness and shells
Once the settings are configured, click Slice to generate the G-code file. That G-code is what gets sent to your 3D printer. In short, the workflow is:
Create STL → Import into a slicer → Configure settings → Generate G-code → Print
Think of the STL file as the digital model, while the slicer creates the actual instructions that turn that model into a physical object.
Frequently Asked Questions
How can I create STL files?
You can create STL files in several ways, depending on your experience level. Beginners often use tools like Tinkercad to build simple models, while more advanced users create precise designs in Fusion 360, FreeCAD, or Blender and then export them as .stl files.
Another fast option is to use AI 3D generators, which can turn a text prompt or image into a 3D model and export it as STL. Once the STL is created, you'll need to load it into a slicer such as Bambu Studio, PrusaSlicer, or Cura before printing.
How do I turn an image into a STL file?
You can turn an image into an STL file by importing the image into a 3D modeling tool or an AI 3D generator, which converts the picture into a 3D mesh. After adjusting the model's depth, thickness, or details, simply export it as an STL file.
For logos and simple graphics, SVG-to-STL workflows work well, while photos and concept art are often best converted using AI Image-to-3D tools before exporting to STL.
What software creates STL files?
Several types of software can create STL files. Tinkercad is a popular beginner-friendly option, while Fusion 360, FreeCAD, and SOLIDWORKS are commonly used for precise CAD modeling. For artistic and organic designs, Blender is one of the most widely used tools.
You can also generate 3D models with AI-powered tools and export them directly as STL files for 3D printing.
Can ChatGPT actually make STL files?
Not directly. ChatGPT can help generate code, modeling instructions, or prompts that can be used to create a 3D model, but it does not natively produce STL files on its own.
To get an actual STL file, you'll typically use a 3D modeling tool or an AI 3D generator that converts text or images into a 3D model and then exports it as .stl. ChatGPT can assist with the design process, but a separate tool is usually needed for the final STL export.
Conclusion
The easiest way to make an STL with zero modeling skills: describe it or upload a photo, let Tripo AI generate a 3D model in seconds, then export it as STL and slice.