How to Import a GLB File into Blender (and Edit It)
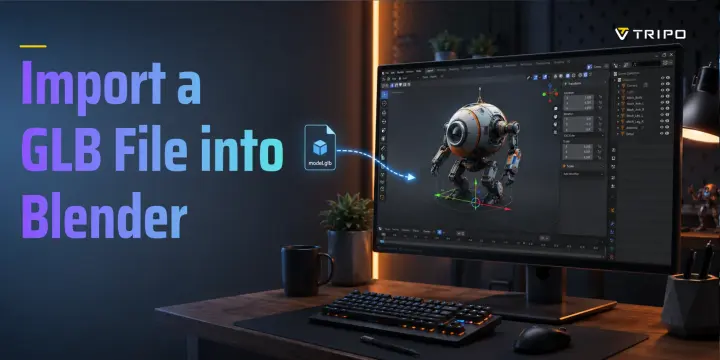
To import a GLB into Blender, go to File > Import > glTF 2.0 (.glb/.gltf), select your .glb file, and click Import glTF 2.0. Blender adds the model to your scene, ready for viewing, editing, or export. This guide covers the full process, common problems, and the practical edits to make after import.
TL;DR
- In current Blender releases, GLB import is built in: File > Import > glTF 2.0 (.glb/.gltf).
- If glTF 2.0 is missing, update Blender, then search for glTF in Preferences under the available add-ons or extensions.
- Many GLB files include images; if the model is gray, check Material Preview, Material Properties, and the Shader Editor before re-exporting the source file.
- Once imported, you can edit it like any Blender object: move, rotate, scale, edit the mesh, swap materials, and separate parts.
- Re-export with File > Export > glTF 2.0; or generate a GLB with an AI tool and send it straight to Blender.
What Is a GLB File and Why Blender Loves It
GLB is the binary version of glTF 2.0.
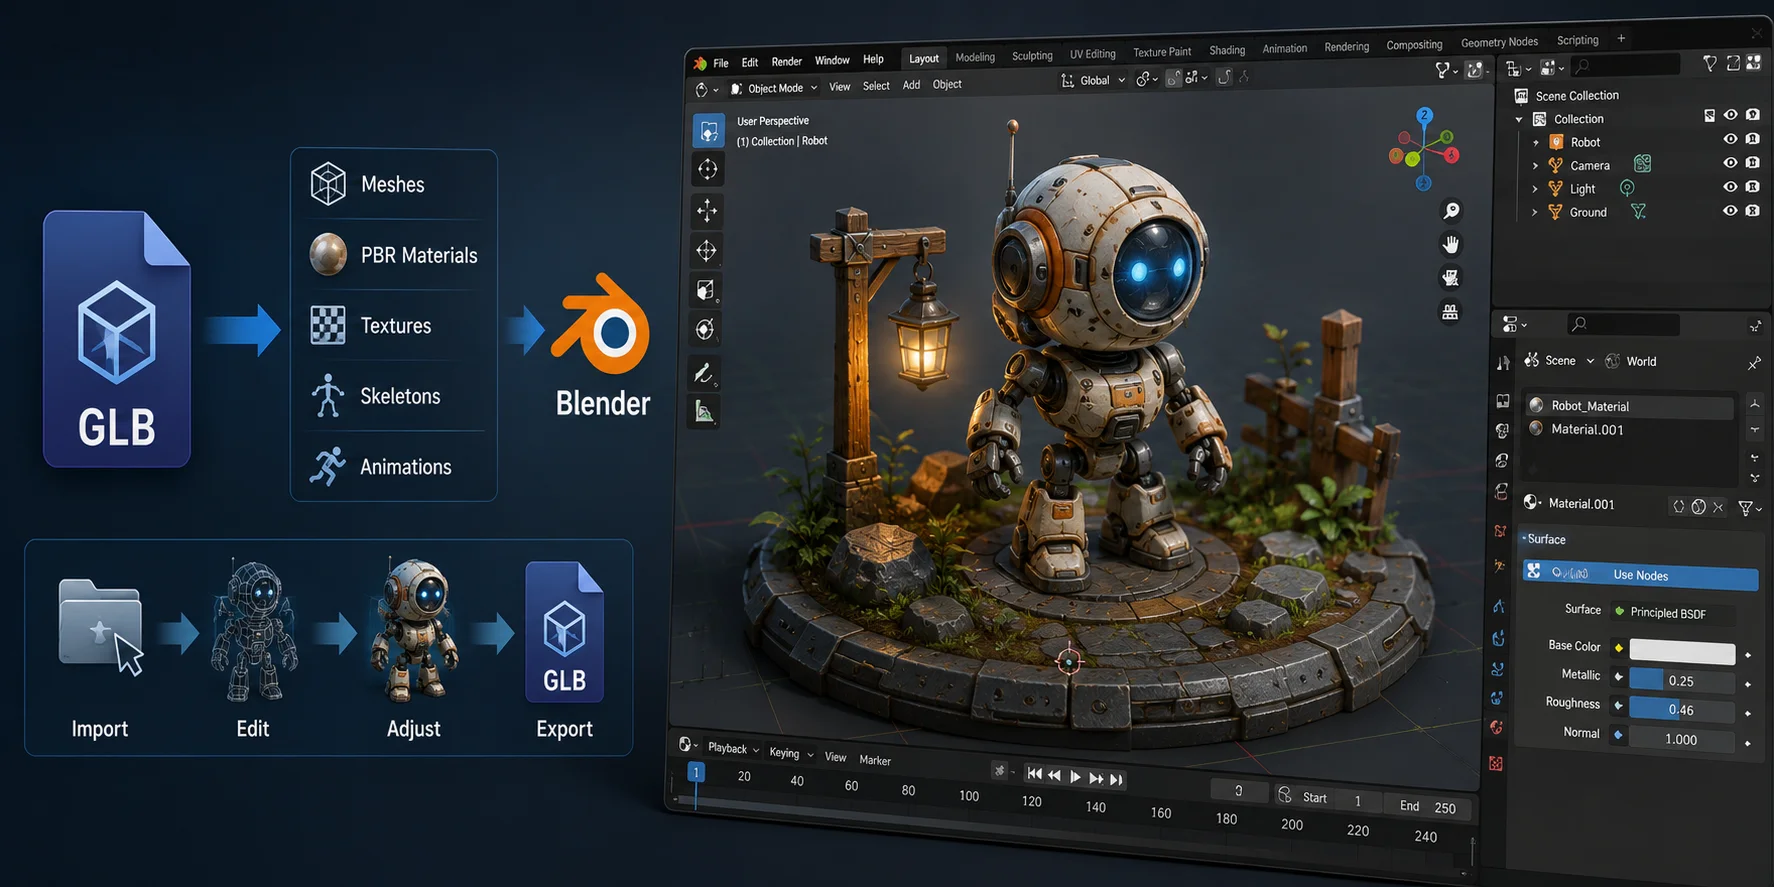
A .gltf file usually stores scene data as JSON and may reference separate geometry, texture, and material files. A .glb file is the binary form of glTF and can bundle meshes, PBR materials, images, skins, and animations into one file, depending on how the asset was exported.
This makes GLB common in web viewers, AR and VR projects, game engines, Sketchfab downloads, and AI 3D-generation tools. Blender supports it through the built-in glTF 2.0 importer.
GLB is useful because it can keep a model, its textures, and animation data together. Import it into Blender, make edits, then export it again for a game, web scene, AR project, or rendering workflow.
Step-by-Step: Import a GLB into Blender
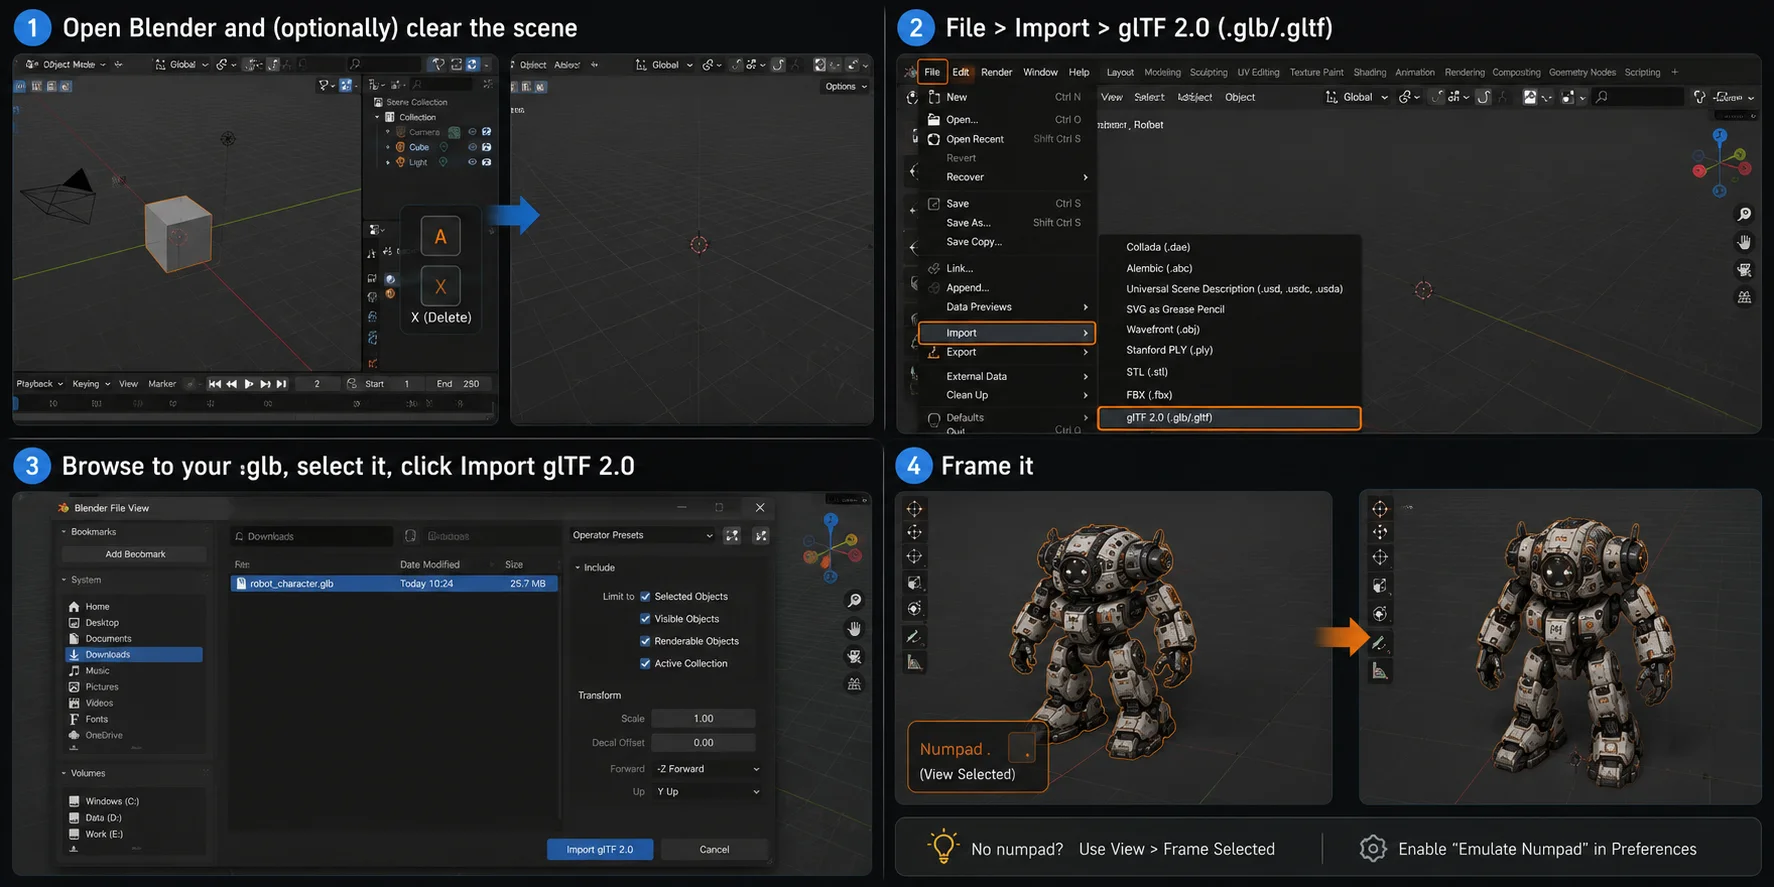
Step 1: Open Blender and (optionally) clear the scene
Open Blender and create a new General project.
To remove the default cube, camera, and light, press A to select everything, then press X or Delete.
Keeping the scene empty makes it easier to locate the imported asset.
Step 2: File > Import > glTF 2.0 (.glb/.gltf)
In Blender's top menu, choose:
File > Import > glTF 2.0 (.glb/.gltf)
This importer supports both GLB and glTF files.
Step 3: Browse to your .glb, select it, click Import glTF 2.0
Browse to the .glb file, select it, then click Import glTF 2.0.
Detailed models, textures, rigs, or animations may take a few seconds to load. Check the Outliner after import to confirm that Blender created mesh objects, materials, or armatures.
Step 4: Frame it
Sometimes the asset imports correctly but is too small, too large, or outside the current view.
Select the object, then press Numpad .
This runs View Selected and centers the viewport on the model.
Without a numpad, use View > Frame Selected in the 3D Viewport. You can also enable "Emulate Numpad" in Blender preferences.
GLB Import Settings That Actually Matter
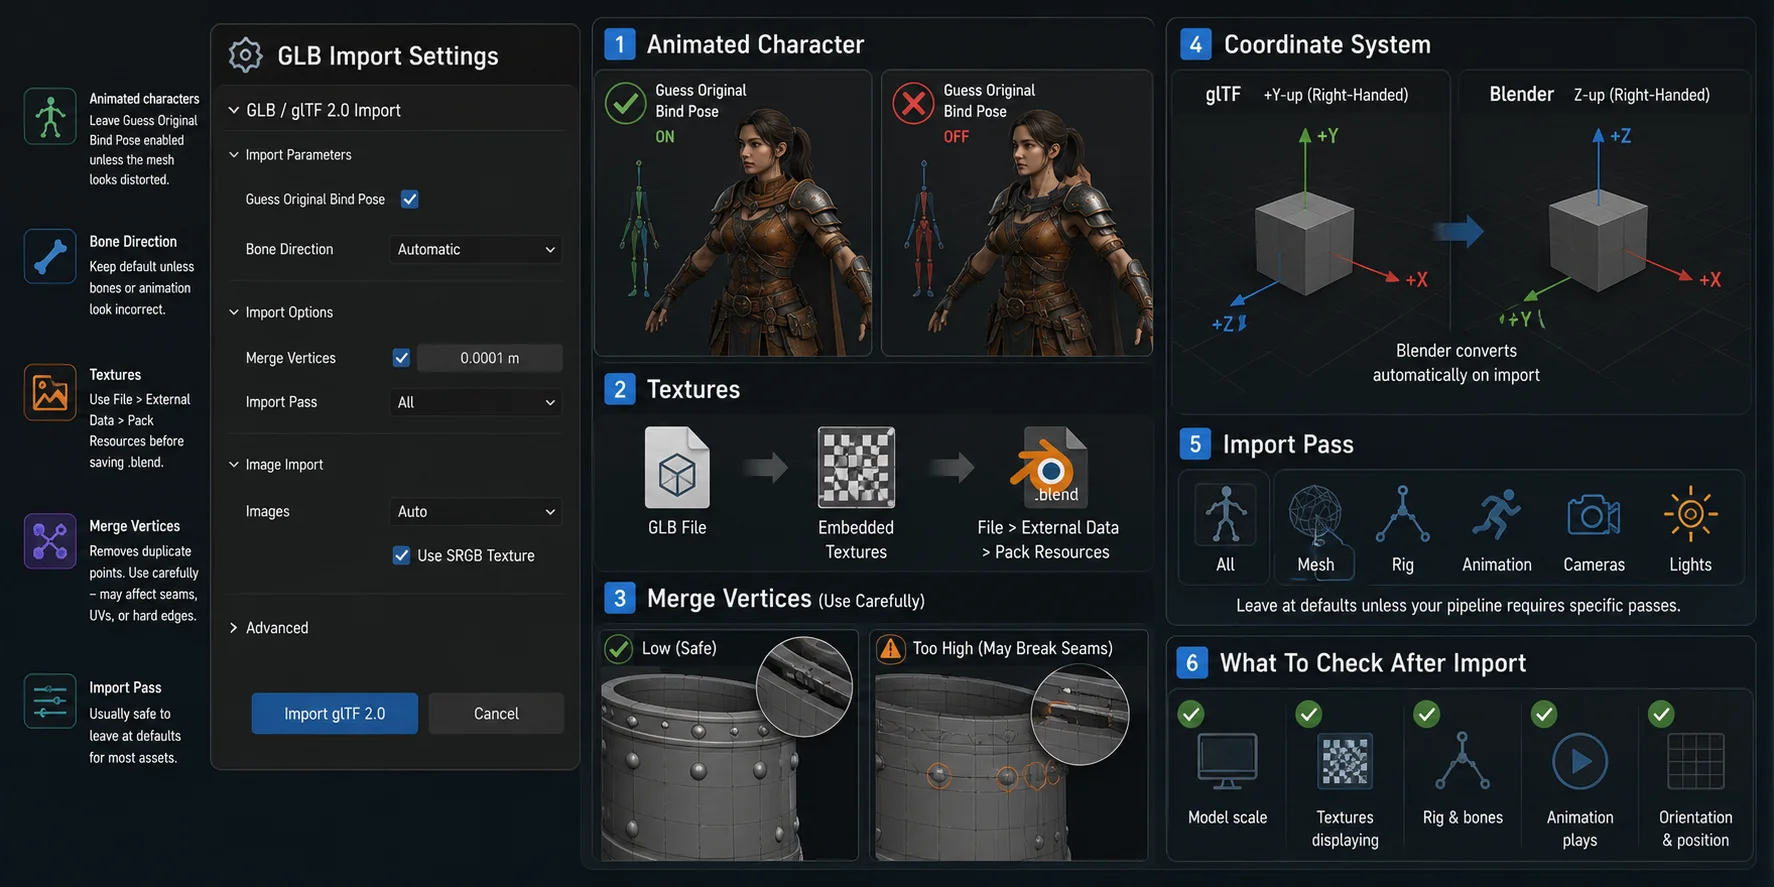
For most GLB files, leave Blender's import settings at their defaults. Only change an option when you are solving a specific issue, such as a distorted rig, broken animation, or unexpected geometry.
For a rigged or animated character, keep the default settings first. If the mesh looks distorted or an animation behaves incorrectly after import, revisit the rig-related options and test one change at a time.
Many GLB files include their images, but the result depends on the source export. Use File > External Data > Pack Resources before saving a .blend only after Blender has successfully found any external images you want to keep with the project.
Keep advanced options such as vertex merging at their defaults unless you know the model has duplicate geometry or a pipeline requirement. Changing them without a clear symptom can alter seams, shading, or animation data.
Finally, glTF uses a +Y-up coordinate convention, while Blender uses Z-up. Blender normally converts this automatically, but it explains why some imported models may appear rotated or lie on their side.
How to Edit a GLB After Importing It
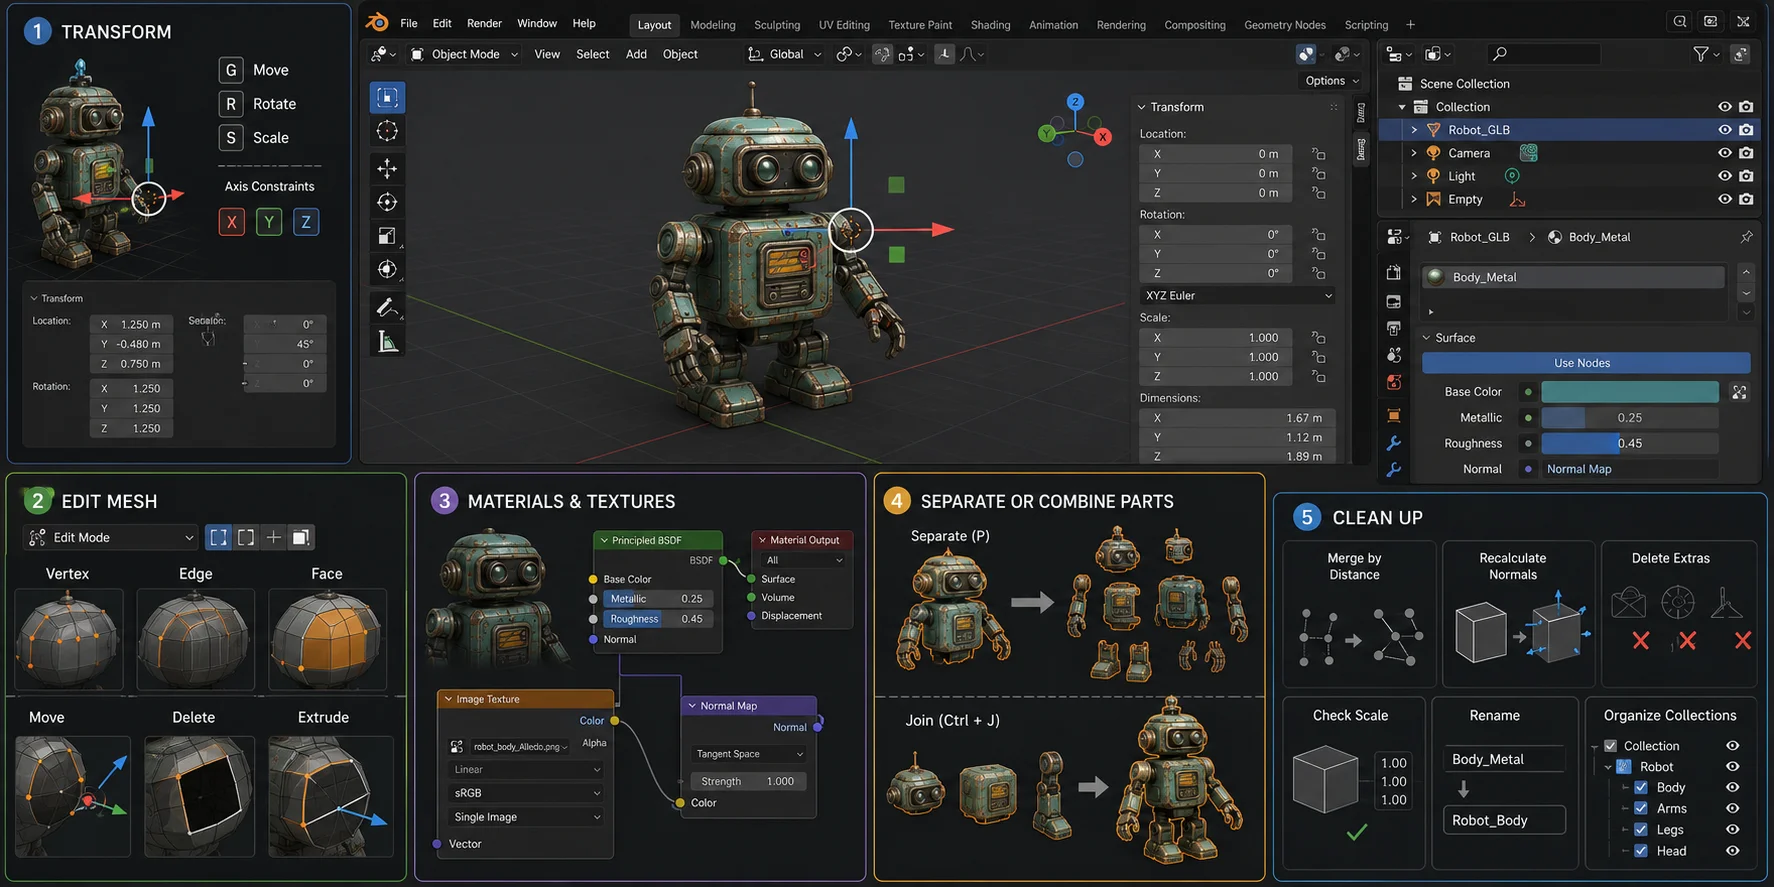
Move, rotate, and scale
Select the object and use:
- G to move;
- R to rotate;
- S to scale.
Press X, Y, or Z after the shortcut to constrain the action to an axis. For example, R, X, 90 rotates the object 90 degrees around the X-axis.
Press N to open the sidebar and enter exact transform values.
Before exporting for production, apply transforms with:
Ctrl + A > Apply Scale
or
Ctrl + A > All Transforms
This is useful before adding modifiers, exporting to a game engine, or preparing a printable asset.
Edit the mesh
Select the mesh and press Tab to enter Edit Mode.
Use 1, 2, and 3 on the top keyboard row to select vertices, edges, or faces. Then use G, R, and S to reshape the model.
Common edits include moving vertices, deleting unwanted geometry, adjusting a prop shape, closing simple holes, or selecting faces for separation.
For very dense AI-generated assets, broad edits are usually easier than editing individual vertices. Consider remeshing, sculpting, or proportional editing when the mesh is highly detailed.
Change materials & textures
Select the model, then open Material Properties using the red sphere icon.
You can change Base Color, Metallic, Roughness, Alpha, and normal-map settings.
For detailed material editing, open the Shader Editor. Common nodes include Principled BSDF, Image Texture, Normal Map, and Metallic Roughness.
Switch the viewport to Material Preview or Rendered mode to see imported textures correctly.
Separate or combine parts
To separate part of a mesh:
- Select the object.
- Press Tab for Edit Mode.
- Select faces.
- Press P.
- Choose Selection.
To combine objects, select them in Object Mode and press:
Ctrl + J
Keep parts separate when they need different materials, animation behavior, collisions, or future edits.
Clean up
Imported GLB files may include empty objects, cameras, lights, duplicate meshes, or unnecessary scene data.
Useful cleanup actions include:
- M > By Distance to merge nearby duplicate vertices;
- Shift + N to recalculate normals;
- deleting unused lights, cameras, and empty objects;
- checking object scale;
- renaming objects and materials;
- organizing parts with collections.
Do not delete armatures until you confirm that the model does not need animation.
Troubleshooting: When the GLB Import Goes Wrong
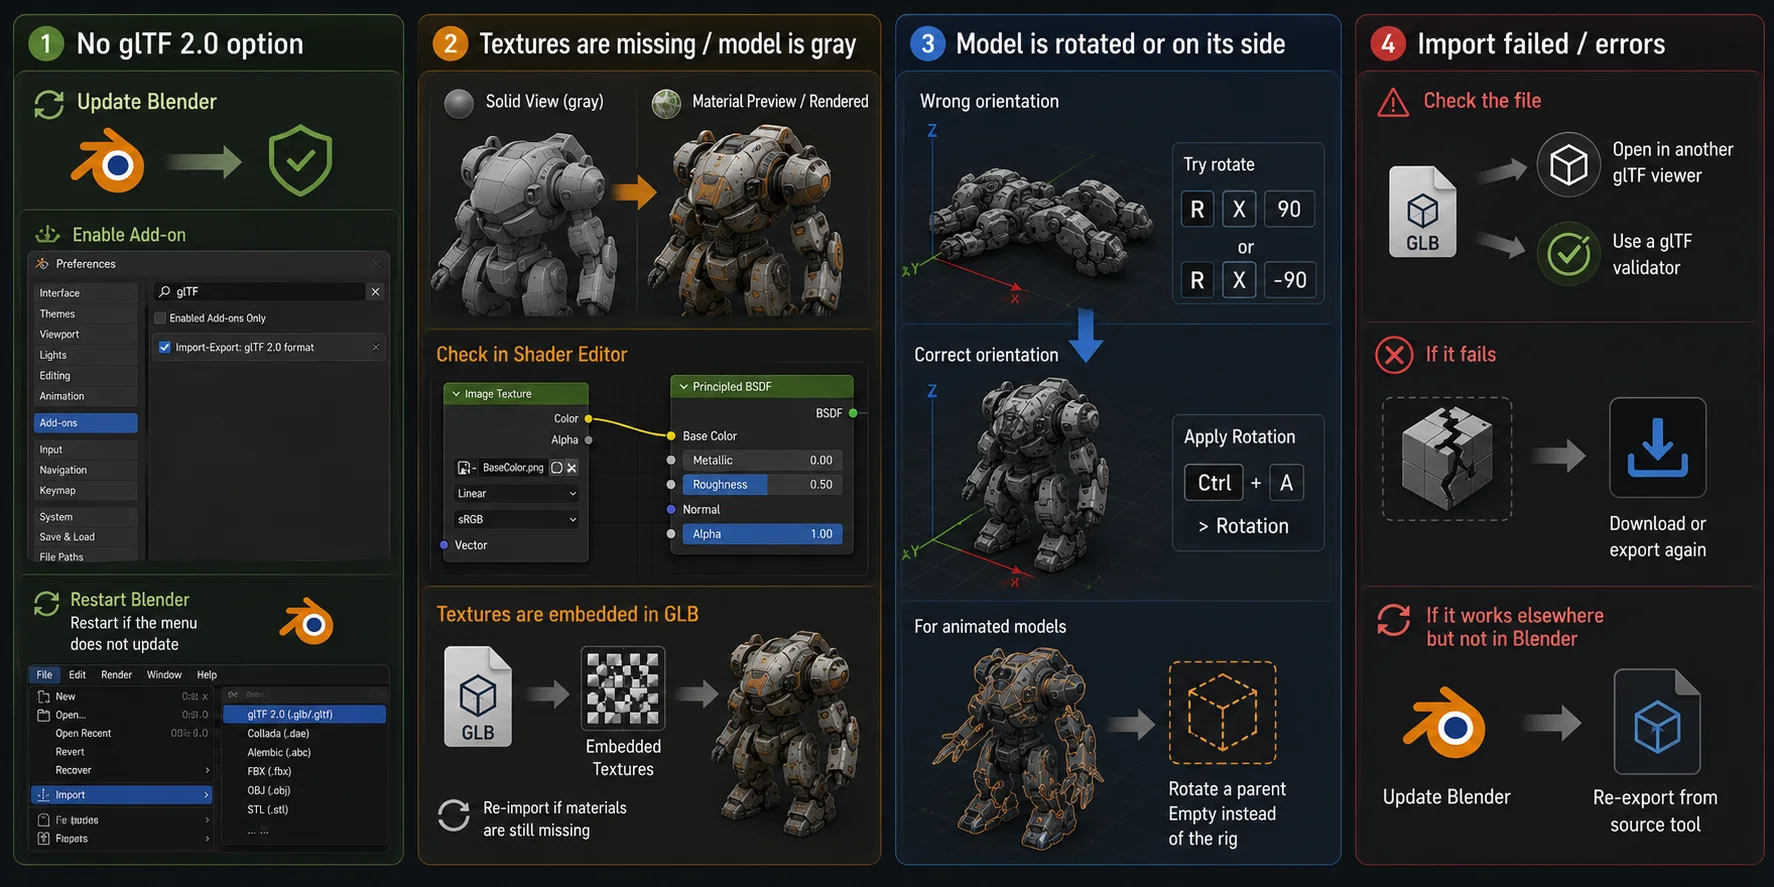
"There's no glTF 2.0 option in my import menu"
In most current Blender releases, glTF import is included with Blender.
If the option is missing, update Blender and restart it. Then open Edit > Preferences and search for glTF in the available add-ons or extensions section.
Enable the glTF 2.0 import/export entry if it is disabled, then restart Blender if the Import menu does not refresh.
"My textures are missing / the model is gray"
First, switch from Solid View to Material Preview or Rendered. A gray model can simply mean that Solid View is not displaying its materials.
If it is still gray, check Material Properties to confirm the object has a material, then open the Shader Editor and confirm that an Image Texture node connects to the Principled BSDF.
Many GLB files contain their images, but a missing material or image node usually points to an incomplete source export. Re-import the file, then re-export it from the source tool if the data is still absent.
"The model is rotated or lying on its side"
glTF assets may use a different up-axis than Blender.
Rotate the object on the axis that corrects its orientation. For example, R, X, 90 rotates it 90 degrees around the X-axis; use a different axis if that is the one that fixes your model.
When the orientation is correct, apply it with:
Ctrl + A > Rotation
For animated models, test the animation afterward. It may be safer to rotate a parent Empty instead of directly rotating the rig.
"The import failed / errors"
The GLB may be damaged, incomplete, or not fully compliant with glTF.
Try opening it in another glTF viewer or validator. If it fails there, download or export the model again. If it works elsewhere but not in Blender, update Blender and retry with a newer source export.
GLB vs. FBX vs. OBJ: Which Should You Import?
| Format | GLB | FBX | OBJ |
|---|---|---|---|
| Geometry | Meshes packaged in one binary file. | Strong general 3D and game-pipeline support. | Simple static mesh geometry. |
| Materials and textures | Can include PBR materials and embedded images. | Supported, but texture links may need repair. | Basic materials, often with separate MTL files. |
| Animation | Supports skeletons, skinning, morphs, and animations. | Strong animation support. | No animation support. |
| Best use | Web, AR, VR, AI-generated assets, lightweight game content. | Studio, engine, and animation workflows. | Static models and simple geometry exchange. |
Choose GLB for compact assets with materials and animation data. Choose FBX when your game engine or studio pipeline specifically requires it. Choose OBJ for simple static geometry.
Optional: Create a GLB with AI and Send It to Blender
If you already have a GLB file, skip this section and use the import steps above. If you need a starting asset, AI tools can generate GLB models from text prompts or images.
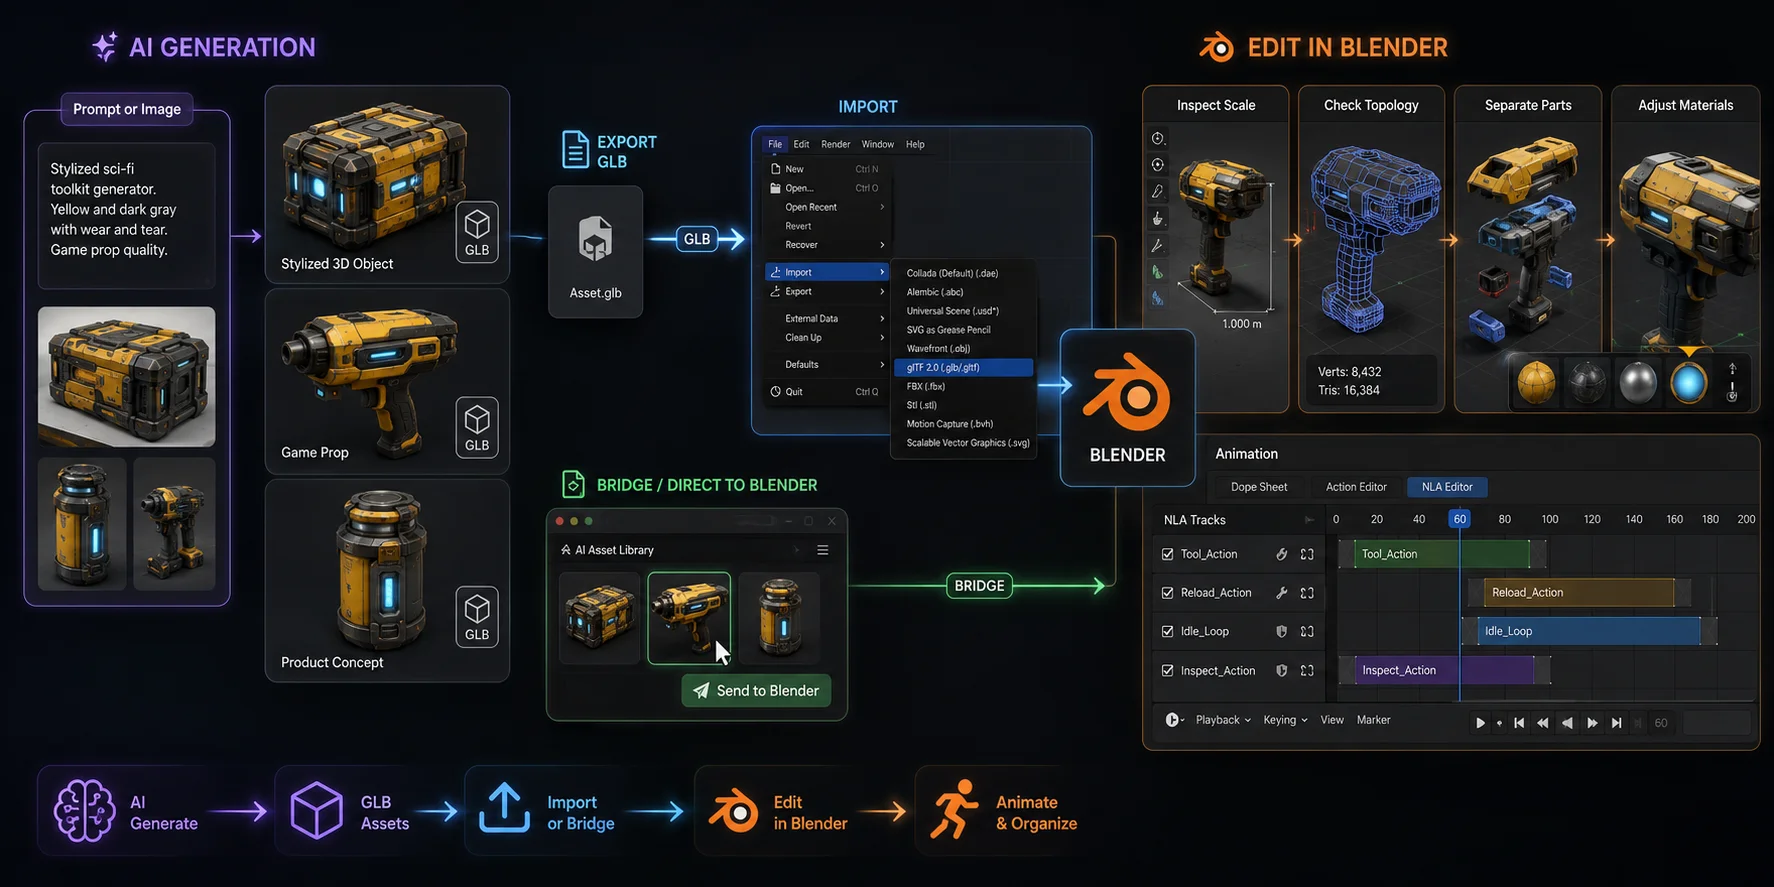
There are two workflows:
- Generate and export a GLB, then import it through File > Import > glTF 2.0.
- Generate in Tripo and use the Tripo3D Blender Bridge to send the asset directly into Blender.
The Blender Bridge removes manual download and import steps. It requires Blender 4.1.0 or later and Chrome, Edge, or Opera version 116 or newer.
After import, review scale, topology, object separation, and materials. AI reduces the starting workload, but Blender remains necessary for refinement.
For rigged GLB files with multiple animations, open the Dope Sheet, switch to Action Editor, and use the NLA Editor to manage separate animation actions.
Frequently Asked Questions (FAQ)
How do I import GLB models in Blender?
Choose File > Import > glTF 2.0 (.glb/.gltf), select the GLB file, and click Import glTF 2.0. If the model is not visible, select it in the Outliner and press Numpad . to frame it.
How do I view a GLB in Blender if I cannot see it?
Check the Outliner to confirm that Blender imported the object. Select it and press Numpad . or choose View > Frame Selected. Switch to Material Preview if the model appears gray.
Is FBX or GLB better for Blender?
Choose GLB when you need a compact, web-friendly asset that can carry PBR materials and animation data. Choose FBX when your destination app or established pipeline specifically requires it; use OBJ for simple static geometry.
Why are my textures missing after importing a GLB?
Switch to Material Preview or Rendered first. If the model is still gray, confirm that it has a material in Material Properties, then check the Shader Editor for an Image Texture node connected to Principled BSDF. If the image data is absent, re-export the GLB from the source tool.
Why is there no glTF option in my Blender Import menu?
Update Blender and restart it. Then open Edit > Preferences, search for glTF in the add-ons or extensions section, and enable the glTF 2.0 import/export entry if it is disabled.
How do I turn a GLB into an FBX in Blender?
Import the GLB through File > Import > glTF 2.0, check the model and animation, then choose File > Export > FBX (.fbx). Review object, armature, animation, and texture export settings before saving.
Conclusion
Importing a GLB into Blender takes only a few clicks: File > Import > glTF 2.0, choose the file, and frame the result. From there, the model is yours to move, retexture, separate, clean, animate, and export.
Need a starting asset? Generate a model from text or an image, then bring it into Blender through the normal GLB workflow or send it directly with Tripo AI Studio.