3D Prototyping: Workflow, Methods & Benefits (2026)
TL;DR
- 3D prototyping transforms digital 3D models into physical prototypes using 3D printing, allowing teams to validate ideas, test functionality, and improve designs before production.
- The typical workflow is Design → Model → Print → Test → Iterate. Choosing the right printing technology, material, and software helps balance speed, cost, and prototype quality for different applications.
- AI is making prototyping even faster by generating 3D models from text prompts or images in seconds, reducing the biggest bottleneck in the workflow and enabling rapid design iteration.
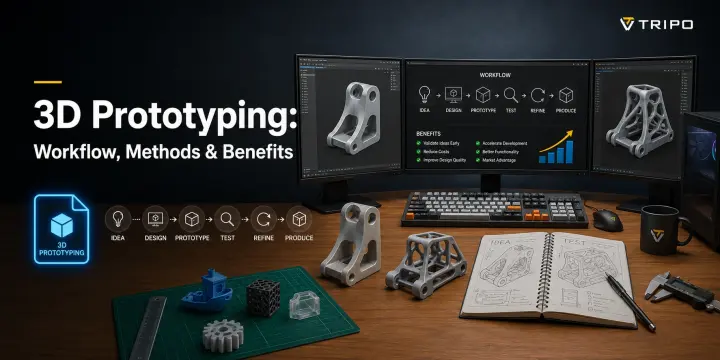
3D prototyping is the process of turning a digital design into a physical, testable model—usually with 3D printing (additive manufacturing). The typical workflow is: design → 3D model → print → test → iterate. It lets teams validate ideas in hours instead of weeks, cutting cost and risk before production. In this guide, we’ll walk through the full workflow, major 3D printing methods, materials, software, industry examples, service options, and how AI can speed up the modeling and iteration step.
What Is 3D Prototyping?
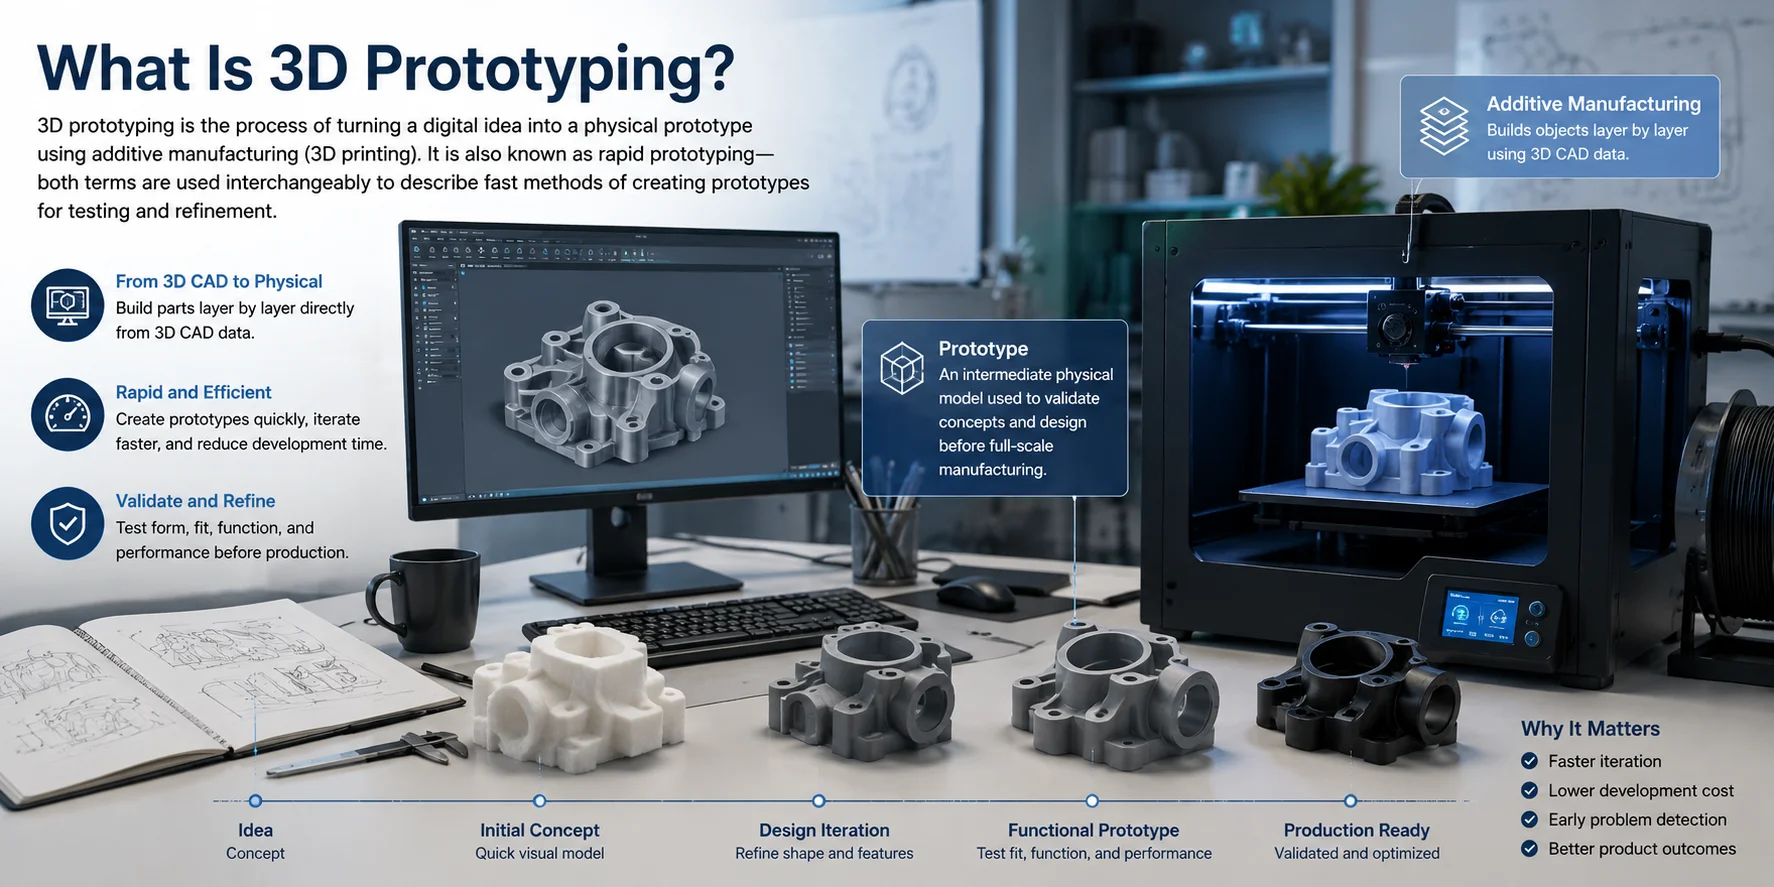
3D prototyping is the process of creating a physical prototype directly from a digital 3D model, most commonly through additive manufacturing (3D printing). Instead of removing material from a solid block, additive manufacturing builds an object layer by layer using 3D CAD data, allowing ideas to be transformed into tangible parts quickly and with minimal material waste.
You'll often see the terms 3D prototyping and rapid prototyping used interchangeably. While rapid prototyping originally referred to any fast method of producing prototypes, today it most commonly describes the use of 3D printing technologies to accelerate product development. In practice, both terms usually mean creating prototype parts quickly for testing and refinement before full-scale manufacturing.
A prototype is an intermediate version of a product used to validate concepts before production. It helps designers and engineers evaluate a product's size, shape, fit, function, ergonomics, and manufacturability, making it easier to identify problems early and reduce costly design changes later.
In its simplest form, 3D prototyping is the use of additive manufacturing to turn 3D CAD models into physical prototypes, giving teams a faster and more cost-effective way to iterate from concept to finished product. Whether you're developing a consumer product, mechanical component, or custom enclosure, 3D prototyping shortens development cycles and speeds up decision-making throughout the design process.
The 3D Prototyping Workflow: Design → Model → Print → Test → Iterate
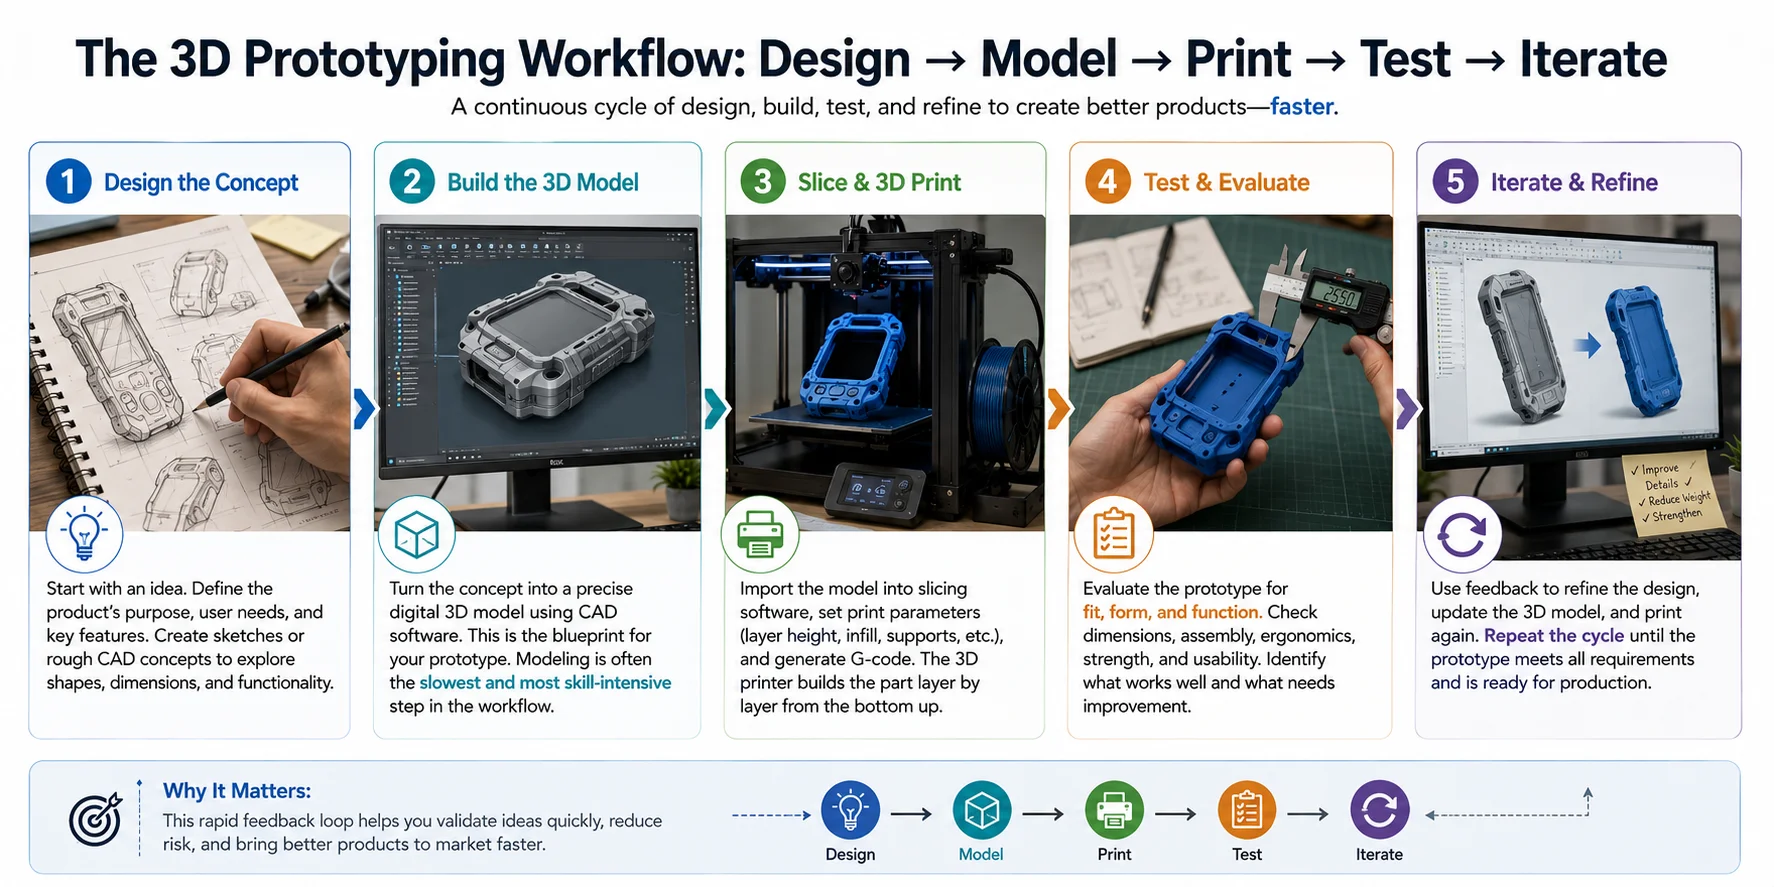
A successful 3D prototyping project follows a continuous cycle of designing, building, testing, and improving. Rather than aiming for a perfect product on the first attempt, the goal is to learn from each prototype and refine the design until it meets the required performance, usability, and manufacturing goals.
1. Design the Concept
Every prototype begins with an idea. This stage involves defining the product's purpose, identifying user requirements, and creating rough sketches or initial CAD concepts. Designers focus on the overall shape, dimensions, and functionality instead of fine details, establishing a clear direction before investing time in modeling.
2. Build the 3D Model
Next, the concept is converted into a digital 3D model using CAD software or other 3D modeling tools. This digital asset serves as the blueprint for the prototype and determines its geometry, dimensions, and features.
For many teams, 3D modeling is the slowest and most skill-intensive step in the workflow. Creating accurate CAD geometry often requires significant design experience, making it the biggest bottleneck before a prototype can be printed.
3. Slice and 3D Print
Once the model is complete, it is imported into slicing software, where print settings such as layer height, infill, supports, and materials are configured. The slicer generates machine instructions (typically G-code), and the 3D printer fabricates the prototype layer by layer.
4. Test and Evaluate
After printing, the prototype is evaluated for fit, form, and function. Teams inspect dimensions, assembly, ergonomics, structural strength, and overall usability to determine whether the design performs as expected. The feedback collected during this stage identifies areas that require improvement.
5. Iterate and Refine
Rarely is the first prototype the final one. Based on testing results, designers modify the digital model, adjust dimensions or features, and print a new version. This iterative cycle continues until the prototype satisfies the project's technical and design requirements.
The strength of 3D prototyping lies in this rapid feedback loop. By repeating the Design → Model → Print → Test → Iterate process, teams can validate ideas quickly, reduce development risk, and reach production-ready designs much faster than with traditional prototyping methods.
3D Prototyping Methods (3D Printing Technologies)
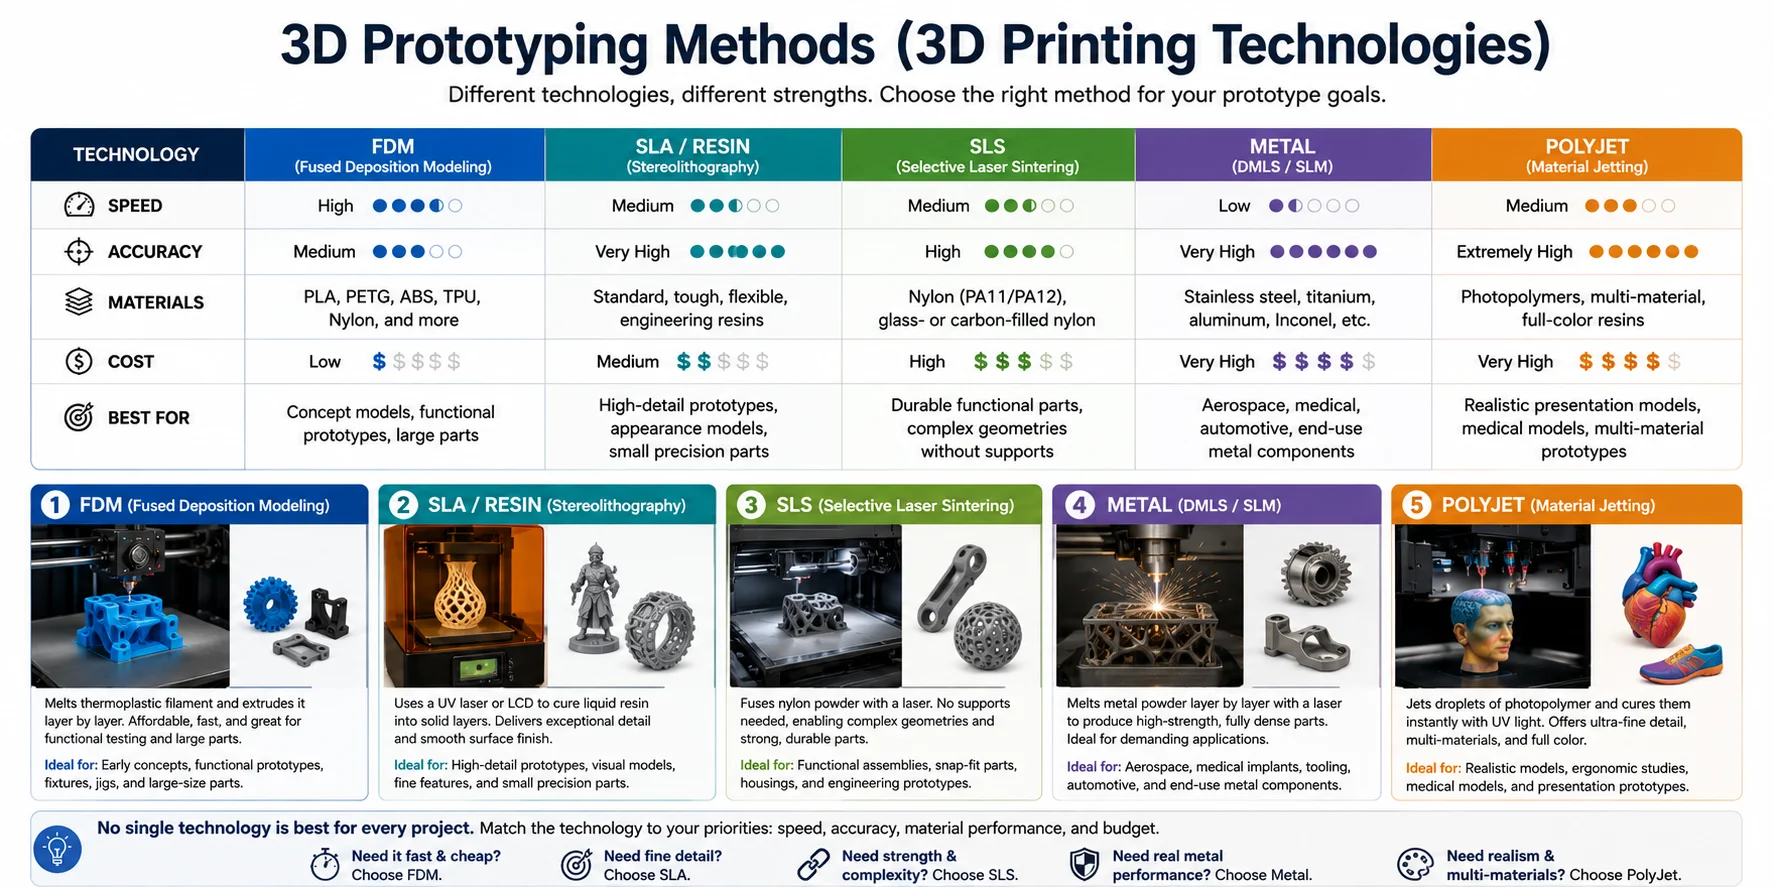
Not all 3D prototyping methods are the same. Each additive manufacturing technology offers different advantages in terms of speed, accuracy, material options, and cost. The best choice depends on whether you need a quick visual model, a highly detailed prototype, a functional engineering part, or a production-grade component.
Comparison at a Glance
| Technology | Speed | Accuracy | Materials | Cost | Best For |
|---|---|---|---|---|---|
| FDM (Fused Deposition Modeling) | High | Medium | PLA, PETG, ABS, TPU, Nylon | Low | Concept models, functional prototypes, large parts |
| SLA (Stereolithography / Resin) | Medium | Very High | Standard, tough, flexible, engineering resins | Medium | High-detail prototypes, appearance models, small precision parts |
| SLS (Selective Laser Sintering) | Medium | High | Nylon (PA11/PA12), glass- or carbon-filled nylon | High | Durable functional parts, complex geometries without supports |
| Metal (DMLS / SLM) | Low | Very High | Stainless steel, titanium, aluminum, Inconel | Very High | Aerospace, medical, automotive, end-use metal components |
| PolyJet (Material Jetting) | Medium | Extremely High | Photopolymers, multi-material, full-color resins | Very High | Realistic presentation models, medical models, multi-material prototypes |
FDM (Fused Deposition Modeling)
FDM is the most widely used and affordable 3D printing technology. It works by melting a plastic filament and depositing it layer by layer to build the part. While surface quality is lower than resin-based methods, FDM produces strong prototypes at a low cost and is ideal for early-stage concept validation, functional testing, and large components.
SLA (Stereolithography / Resin)
SLA uses a UV laser or LCD screen to cure liquid resin into solid layers. It delivers smooth surfaces, sharp edges, and exceptional dimensional accuracy, making it the preferred choice for prototypes where appearance and fine details matter. However, resin parts generally require washing and post-curing after printing.
SLS (Selective Laser Sintering)
SLS fuses nylon powder using a high-powered laser. Because the surrounding powder supports each layer, no support structures are needed, allowing highly complex geometries to be printed in a single build. SLS is well suited for durable functional prototypes, snap-fit assemblies, and engineering parts.
Metal (DMLS / SLM)
Direct Metal Laser Sintering (DMLS) and Selective Laser Melting (SLM) build fully dense metal components by melting fine metal powder with a laser. These technologies produce high-strength parts suitable for demanding industries such as aerospace, automotive, and medical manufacturing, although they require specialized equipment and represent the highest cost among common prototyping methods.
PolyJet (Material Jetting)
PolyJet printers jet microscopic droplets of photopolymer and cure them instantly with UV light. This technology provides outstanding surface finish, extremely fine detail, and the ability to combine multiple materials or colors in a single print. It is widely used for presentation models, ergonomic studies, medical visualization, and prototypes that closely resemble finished products.
No single technology is best for every project. FDM offers the lowest cost and fastest turnaround for everyday prototypes, SLA excels in detail and surface quality, SLS delivers strong engineering-grade plastic parts, Metal (DMLS/SLM) produces production-quality metal components, and PolyJet provides unmatched realism for high-end visual and multi-material prototypes. Choosing the right process depends on the balance between speed, accuracy, material performance, and budget.
3D Prototyping Materials
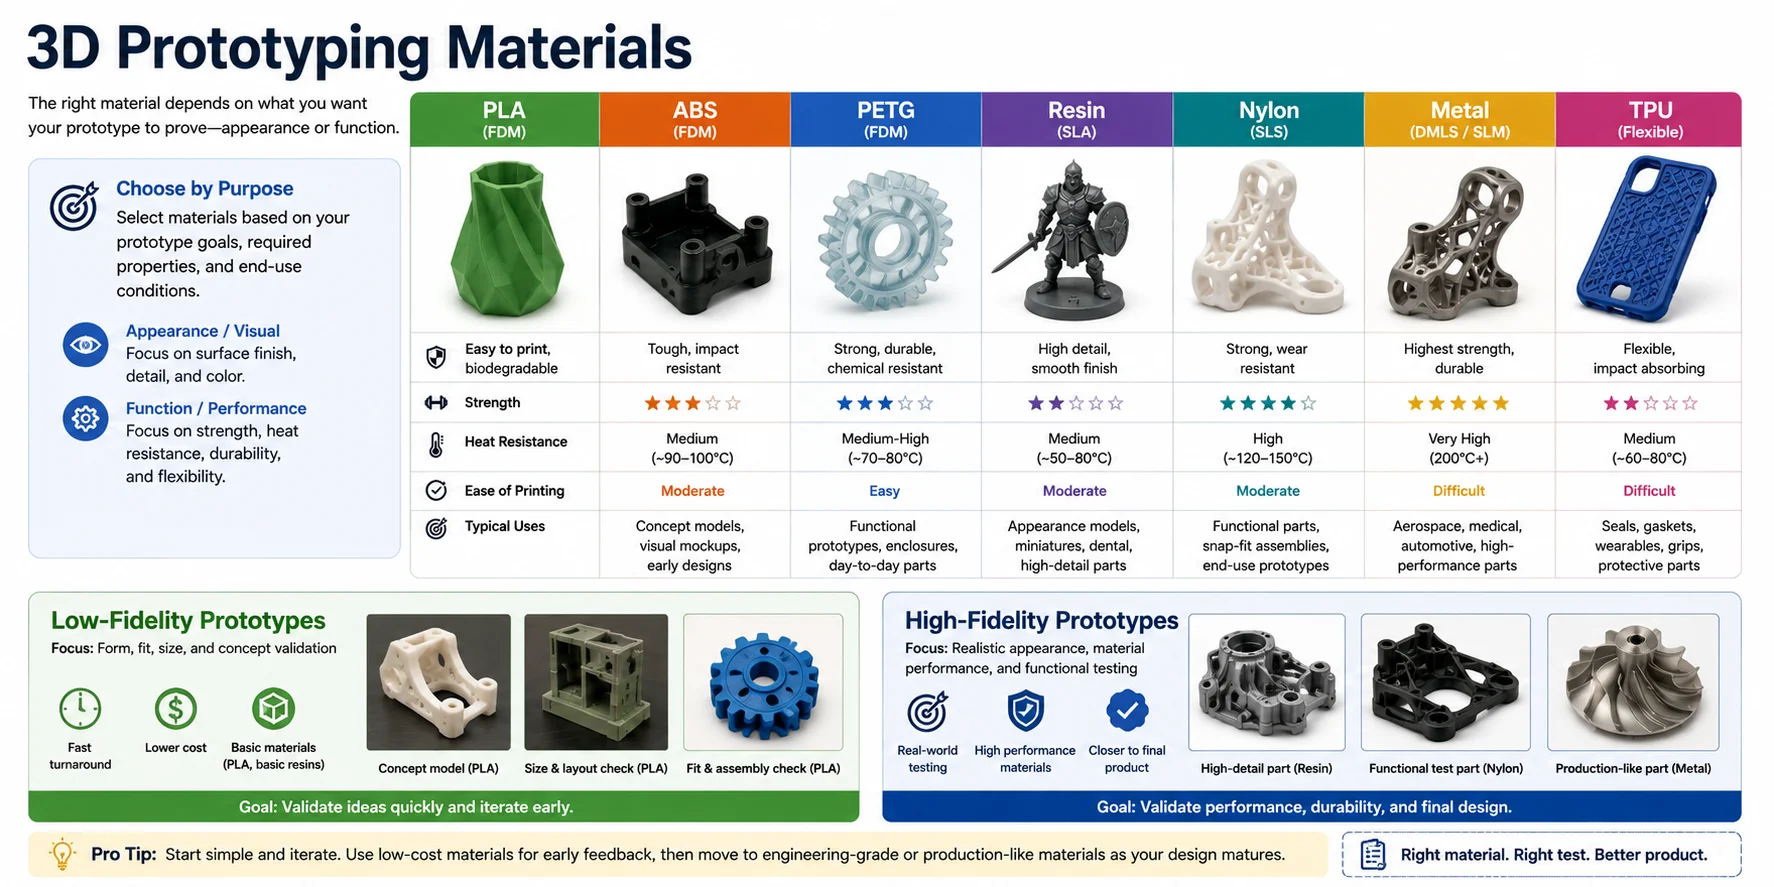
Material choice depends on what the prototype needs to prove. A quick concept model can use an inexpensive, easy-printing plastic, while a functional or presentation prototype may need stronger, smoother, flexible, heat-resistant, or production-like materials.
Common 3D Prototyping Materials
- PLA – Low-cost, easy to print, and useful for concept models or visual mockups, but not ideal for high heat or heavy loads.
- ABS – Tougher and more heat-resistant than PLA, commonly used for housings, fixtures, and functional prototypes.
- PETG – A balanced option with good strength, chemical resistance, and easier printing than ABS.
- Resin (SLA) – Best for smooth surfaces, fine details, and appearance models; engineering resins add toughness, heat resistance, or flexibility.
- Nylon (SLS) – Strong, lightweight, and wear-resistant, ideal for snap-fits, moving assemblies, and durable functional prototypes.
- Metal – Stainless steel, titanium, aluminum, and other alloys for high-strength aerospace, automotive, medical, and industrial prototypes.
- TPU (Flexible) – Rubber-like and abrasion-resistant, useful for seals, gaskets, protective covers, and wearable prototypes.
Low-Fidelity vs. High-Fidelity Prototypes
- Low-fidelity prototypes validate shape, size, layout, and interaction quickly with low-cost materials such as PLA.
- High-fidelity prototypes use resin, nylon, TPU, or metal when appearance, function, or production-like behavior matters.
In short, choose the material by prototype purpose: cheap and fast for form checks, stronger or more accurate for real-world performance tests.
3D Prototyping Software & Tools
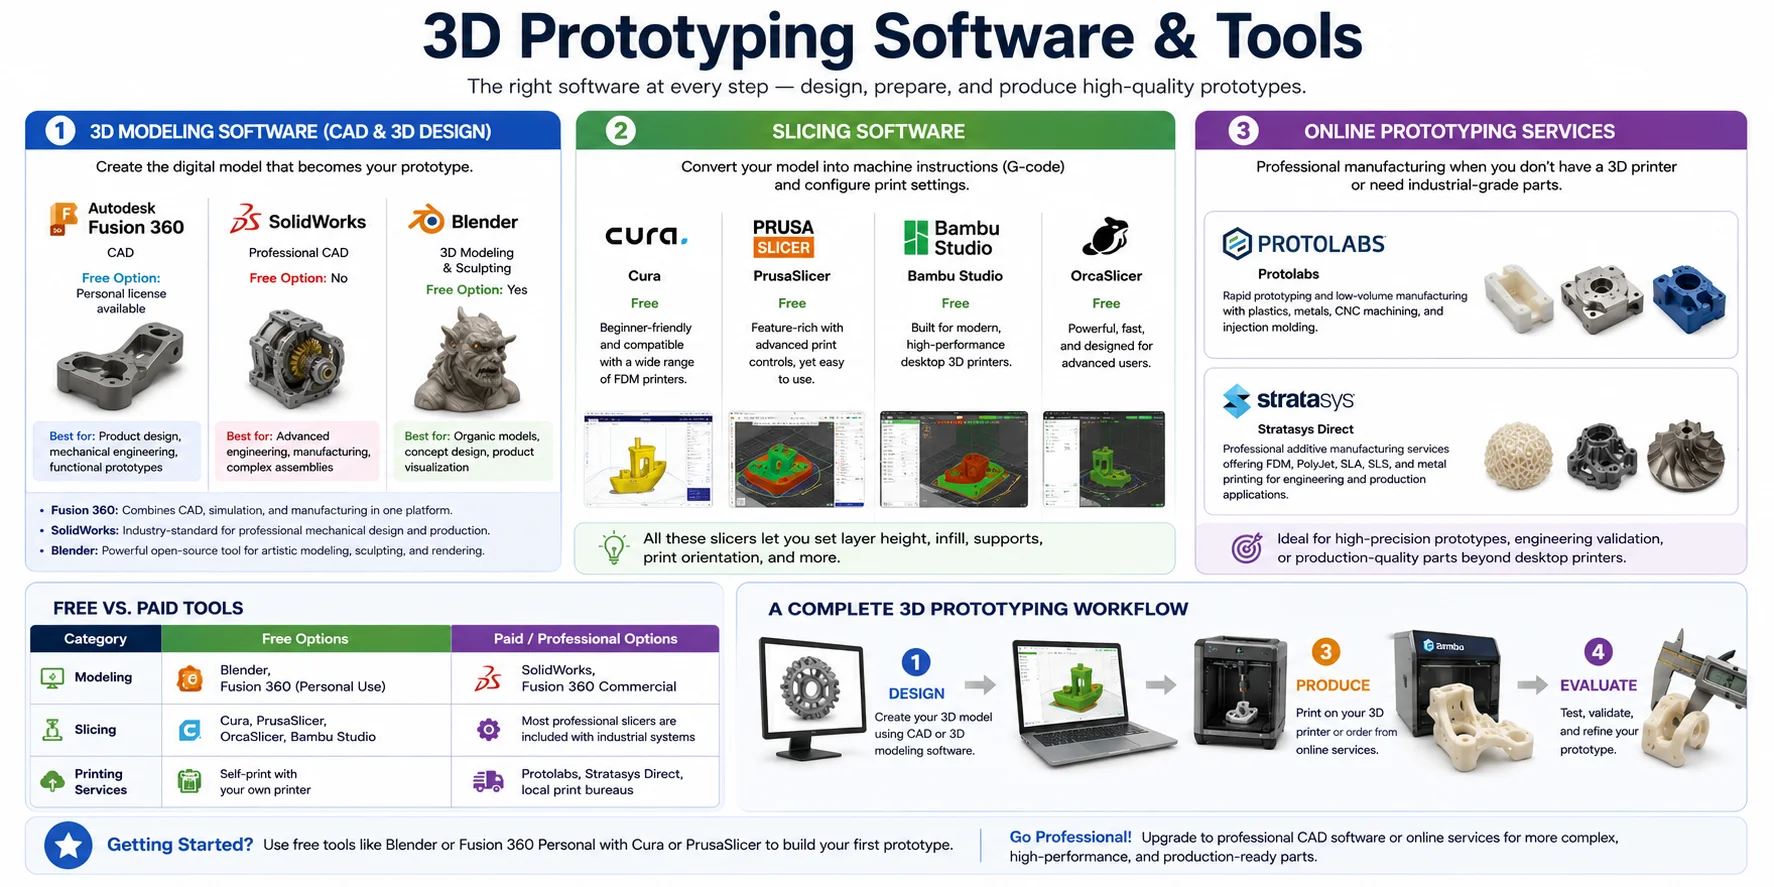
A complete 3D prototyping workflow typically involves three categories of software: 3D modeling tools to create the design, slicing software to prepare it for printing, and online manufacturing services when you need professional-grade prototypes without owning industrial equipment. Whether you're a beginner or an experienced engineer, there are both free and paid options available.
1. 3D Modeling Software (CAD & 3D Design)
These tools are used to create the digital model that will become your prototype.
| Software | Type | Free Option | Best For |
|---|---|---|---|
| Fusion 360 | CAD | Personal license available | Product design, mechanical engineering, functional prototypes |
| SolidWorks | Professional CAD | No | Advanced engineering, manufacturing, complex assemblies |
| Blender | 3D Modeling & Sculpting | Yes | Organic models, concept design, product visualization |
- Fusion 360 is one of the most popular choices for product designers because it combines parametric CAD, simulation, and manufacturing tools in one platform.
- SolidWorks is an industry-standard engineering package used for professional mechanical design and production-ready products.
- Blender is a powerful open-source application for artistic modeling, sculpting, and rendering. While it is not traditional CAD software, it is an excellent free option for concept development and creative prototypes.
2. Slicing Software
Once your model is finished, it must be converted into machine instructions that a 3D printer can understand. Slicing software generates G-code while allowing you to configure print settings such as layer height, infill, supports, and print orientation.
- Cura – Free, beginner-friendly, and compatible with a wide range of FDM printers.
- PrusaSlicer – Free and feature-rich, offering advanced print controls while remaining easy to use.
- Other popular slicers include Bambu Studio and OrcaSlicer, both designed for modern high-performance desktop 3D printers.
3. Online Prototyping Services
If you don't own a 3D printer—or need industrial-grade materials and finishes—you can upload your design to an online manufacturing service.
- Protolabs – Rapid prototyping and low-volume manufacturing with plastics, metals, CNC machining, and injection molding.
- Stratasys Direct – Professional additive manufacturing services offering FDM, PolyJet, SLA, SLS, and metal printing for engineering and production applications.
These services are ideal for high-precision prototypes, engineering validation, or production-quality parts that exceed the capabilities of consumer desktop printers.
Free vs. Paid Tools
| Category | Free Options | Paid / Professional Options |
|---|---|---|
| Modeling | Blender, Fusion 360 (Personal Use) | SolidWorks, Fusion 360 Commercial |
| Slicing | Cura, PrusaSlicer, OrcaSlicer, Bambu Studio | Most professional slicers are included with industrial systems |
| Printing Services | Self-print with your own printer | Protolabs, Stratasys Direct, local print bureaus |
If you're just getting started, you can build a complete free 3D prototyping workflow using Blender or Fusion 360 Personal, together with Cura or PrusaSlicer. As projects become more complex, professional CAD software and commercial prototyping services provide greater accuracy, advanced materials, and faster turnaround for engineering-grade products.
How AI Speeds Up the Modeling & Iteration Step
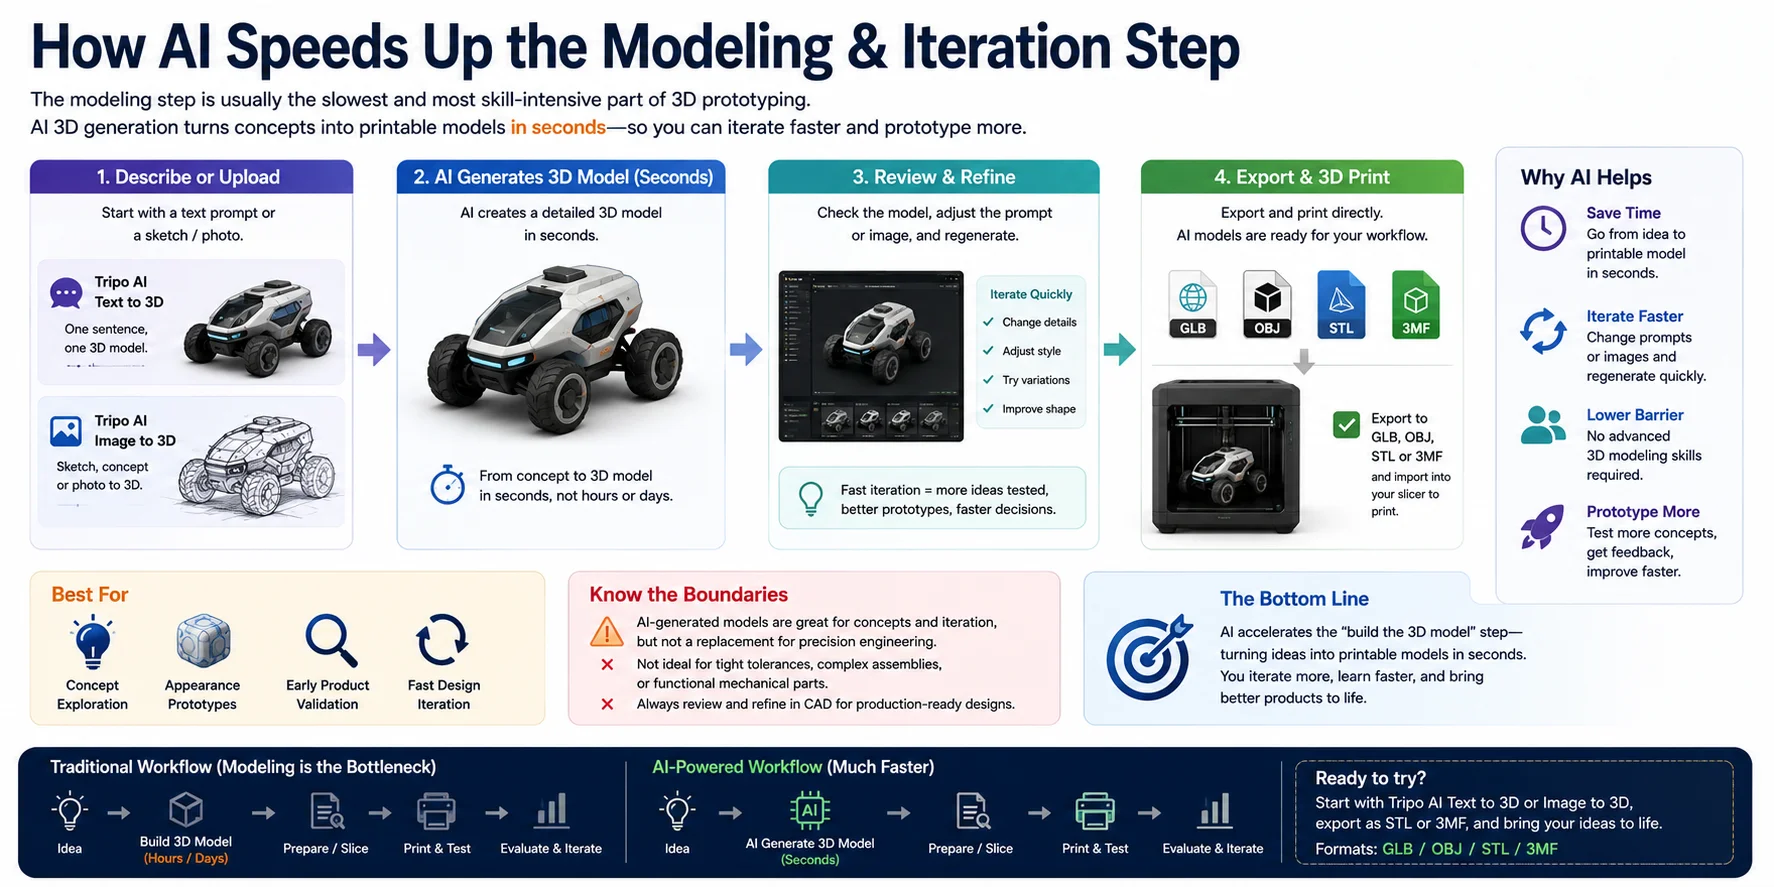
In the traditional 3D prototyping workflow, building the 3D model is usually the slowest and most skill-intensive step. Creating clean CAD geometry or sculpting a printable mesh often takes hours—or even days—and requires specialized 3D design experience. As a result, modeling frequently becomes the biggest bottleneck between an initial idea and a physical prototype.
AI-powered 3D generation dramatically shortens this stage. Instead of modeling every feature manually, you can describe an object with a text prompt or upload a sketch or reference photo, and AI generates a 3D model in seconds. This allows designers, engineers, and even people with no prior 3D modeling experience to move from concept to a printable model much faster.
A typical AI-assisted workflow looks like this:
- Describe your idea or upload an image.
- Use Tripo AI Text to 3D to generate a model from a simple text prompt.
- Use Tripo AI Image to 3D to convert a sketch, concept drawing, or photograph into a 3D model.
- Review and refine the model.
- Check the overall proportions, major features, and printable geometry.
- If the result isn't quite right, update the prompt or change the reference image and regenerate. Iterating with AI is often much faster than remodeling the object from scratch.
- Export for 3D printing.
- Once satisfied, export the model in common 3D formats such as GLB, OBJ, STL, or 3MF.
- STL and 3MF are the standard formats used for 3D printing and can be imported directly into slicing software for print preparation.
The biggest advantage of AI is the speed of iteration. Instead of spending hours modifying CAD features, you can quickly compare multiple design concepts, print promising versions, gather feedback, and refine the design again. For a deeper look at this workflow, see AI 3D generators in rapid prototyping. This rapid feedback loop makes early-stage product development significantly more efficient.
Where AI Works Best—and Where It Doesn't
AI-generated 3D models are particularly effective for:
- Concept exploration
- Appearance and presentation prototypes
- Early product validation
- Consumer product concepts
- Fast design iteration before engineering refinement
However, AI is not a replacement for precision CAD engineering. Functional mechanical parts, products with tight dimensional tolerances, mating components, or manufacturing-ready designs should still be reviewed and refined in CAD software before production. Engineering checks for dimensions, wall thickness, clearances, and manufacturability remain essential.
Used at the right stage, AI complements rather than replaces traditional CAD workflows. It accelerates the Build the 3D Model step, removes much of the manual modeling effort during early development, and enables more people to create and test prototypes quickly—even without a professional 3D modeling background.
3D Prototyping vs Traditional Prototyping: Key Benefits
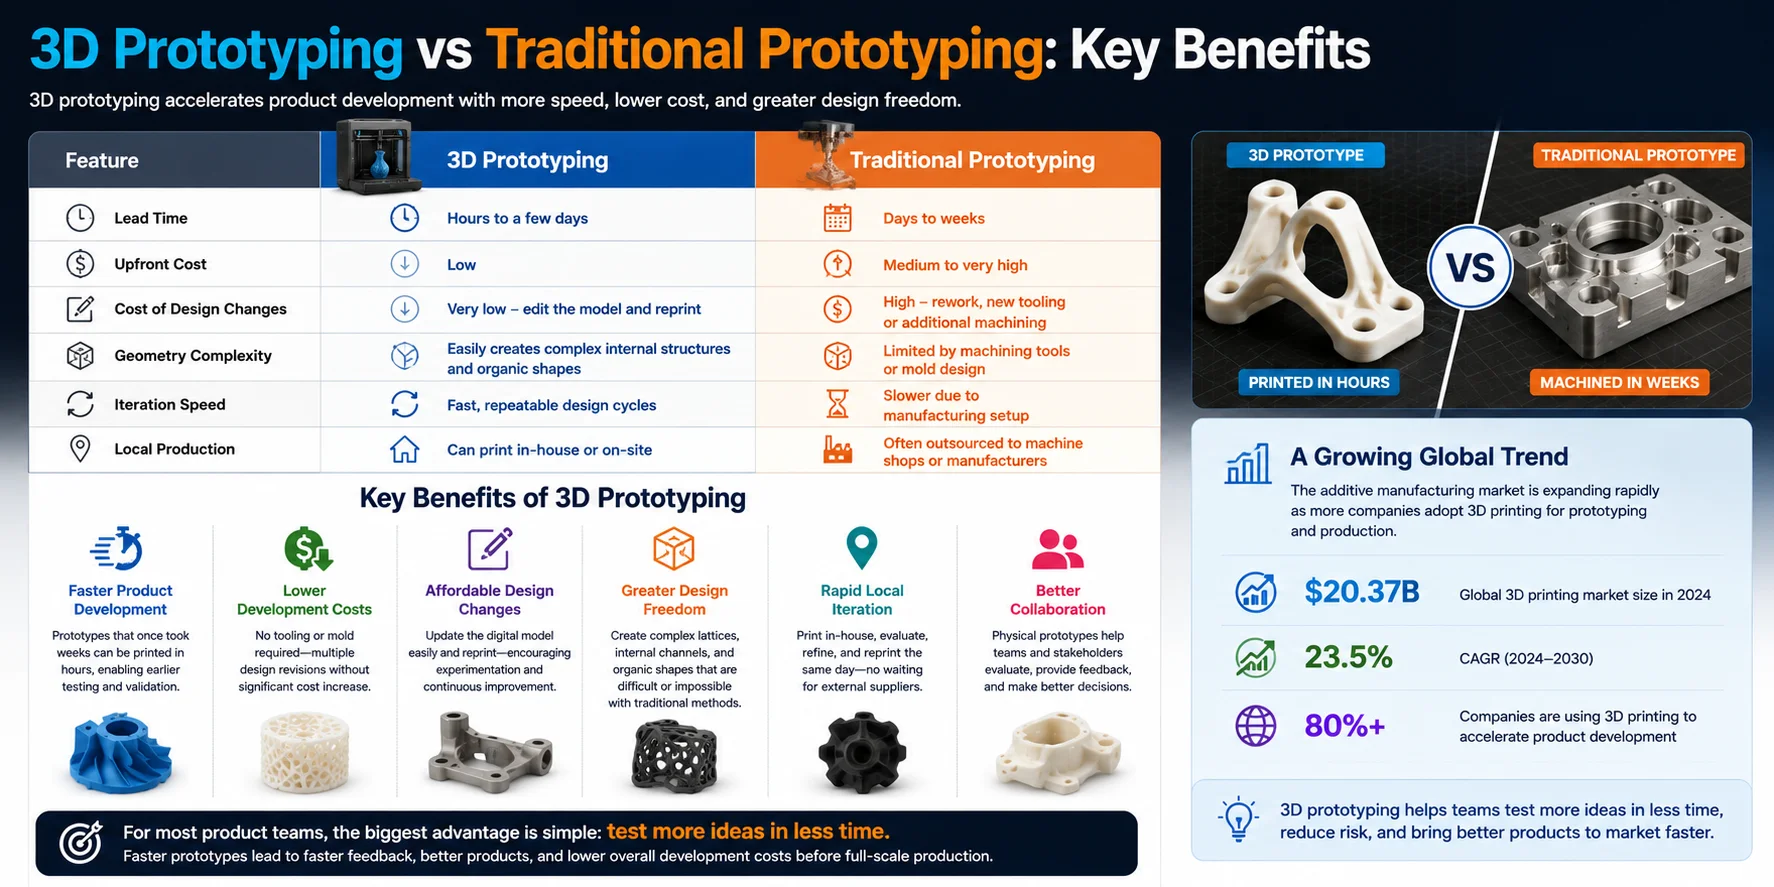
Compared with CNC machining, hand-built mockups, or injection mold tooling, 3D prototyping is faster to change and cheaper to repeat. Parts are produced directly from digital files, so teams can test more versions before committing to production.
3D Prototyping vs. Traditional Prototyping
| Feature | 3D Prototyping | Traditional Prototyping (CNC, Hand-Made, Tooling) |
|---|---|---|
| Lead Time | Hours to a few days | Days to weeks |
| Upfront Cost | Low | Medium to very high |
| Cost of Design Changes | Very low-edit the model and reprint | High-requires rework, new tooling, or additional machining |
| Geometry Complexity | Easily creates complex internal structures and organic shapes | Limited by machining tools or mold design |
| Iteration Speed | Fast, repeatable design cycles | Slower due to manufacturing setup |
| Local Production | Can print in-house or on-site | Often outsourced to machine shops or manufacturers |
Key Benefits of 3D Prototyping
- Faster product development
Teams can print, test, and revise ideas earlier in the design cycle. - Lower development costs
No dedicated tooling is needed for each design change. - Affordable design changes
Updating a digital model is simpler than remachining parts or changing molds. - Greater design freedom
Complex internal channels, lattices, and organic shapes are easier to prototype. - Rapid local iteration
In-house prints let teams test changes the same day. - Better collaboration
Physical prototypes make design feedback clearer for teams and stakeholders.
Why More Companies Are Adopting 3D Prototyping
More companies are adopting 3D prototyping because printers, materials, and AI-assisted modeling tools now make early validation faster and more accessible.
For product teams, the value is simple: test more ideas, learn faster, and reduce risk before full-scale production.
3D Prototyping Applications & Examples by Industry
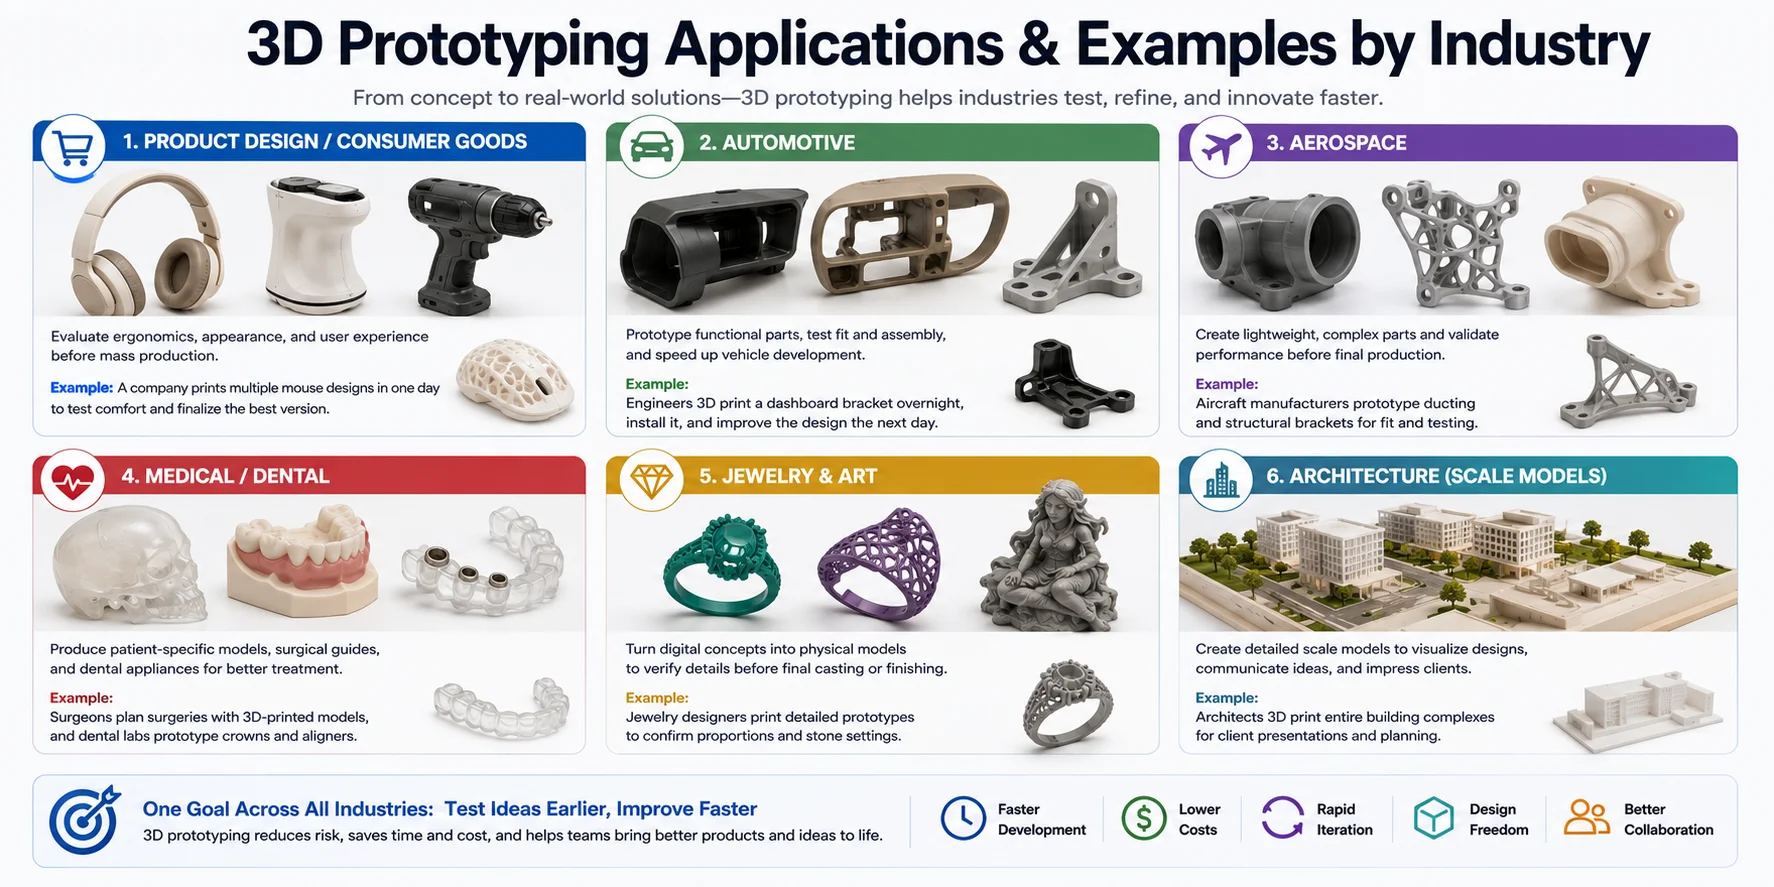
3D prototyping is used across a wide range of industries because it allows ideas to be tested, refined, and validated before committing to expensive manufacturing processes. From consumer electronics to aerospace components, physical prototypes help teams evaluate form, fit, function, and manufacturability while reducing development time and cost.
Product Design & Consumer Goods
Consumer product companies use 3D prototyping to evaluate ergonomics, appearance, and user experience before mass production. Designers can quickly print multiple versions of products such as headphones, kitchen appliances, power tools, phone accessories, or wearable devices to compare different shapes, button layouts, and assembly methods. Early prototypes help identify design improvements long before injection molds are produced.
Automotive
Automotive manufacturers rely on 3D prototyping to accelerate vehicle development and reduce engineering costs. Engineers produce prototypes of brackets, dashboards, air ducts, engine covers, sensor mounts, and interior trim components to verify fit and assembly before machining or mass production.
Aerospace
The aerospace industry uses 3D prototyping to develop lightweight components with complex geometries that would be difficult or expensive to manufacture conventionally. Engineers validate airflow, structural performance, and assembly while minimizing material waste.
Medical & Dental
Healthcare professionals use 3D printing to create patient-specific anatomical models, surgical guides, dental aligners, crowns, and prosthetic prototypes. These physical models improve treatment planning and allow clinicians to visualize complex procedures before surgery.
Jewelry & Art
Jewelry designers and artists use 3D prototyping to transform digital concepts into physical models before final production. Intricate rings, pendants, sculptures, and decorative objects can be evaluated, refined, and approved before casting precious metals or creating finished artwork.
Architecture
Architects use 3D printing to produce highly detailed scale models of buildings, neighborhoods, and urban planning projects. Physical models help clients better understand spatial relationships and make design reviews more interactive than digital renderings alone.
Why 3D Prototyping Works Across Industries
Although the applications vary, the goal is the same: test ideas earlier and improve designs faster. Whether validating the ergonomics of a consumer product, checking the fit of an automotive component, planning a surgical procedure, or presenting an architectural model, 3D prototyping reduces development risk and enables faster, more informed decision-making before full-scale production begins.
Choosing a 3D Prototyping Service vs In-House Printing
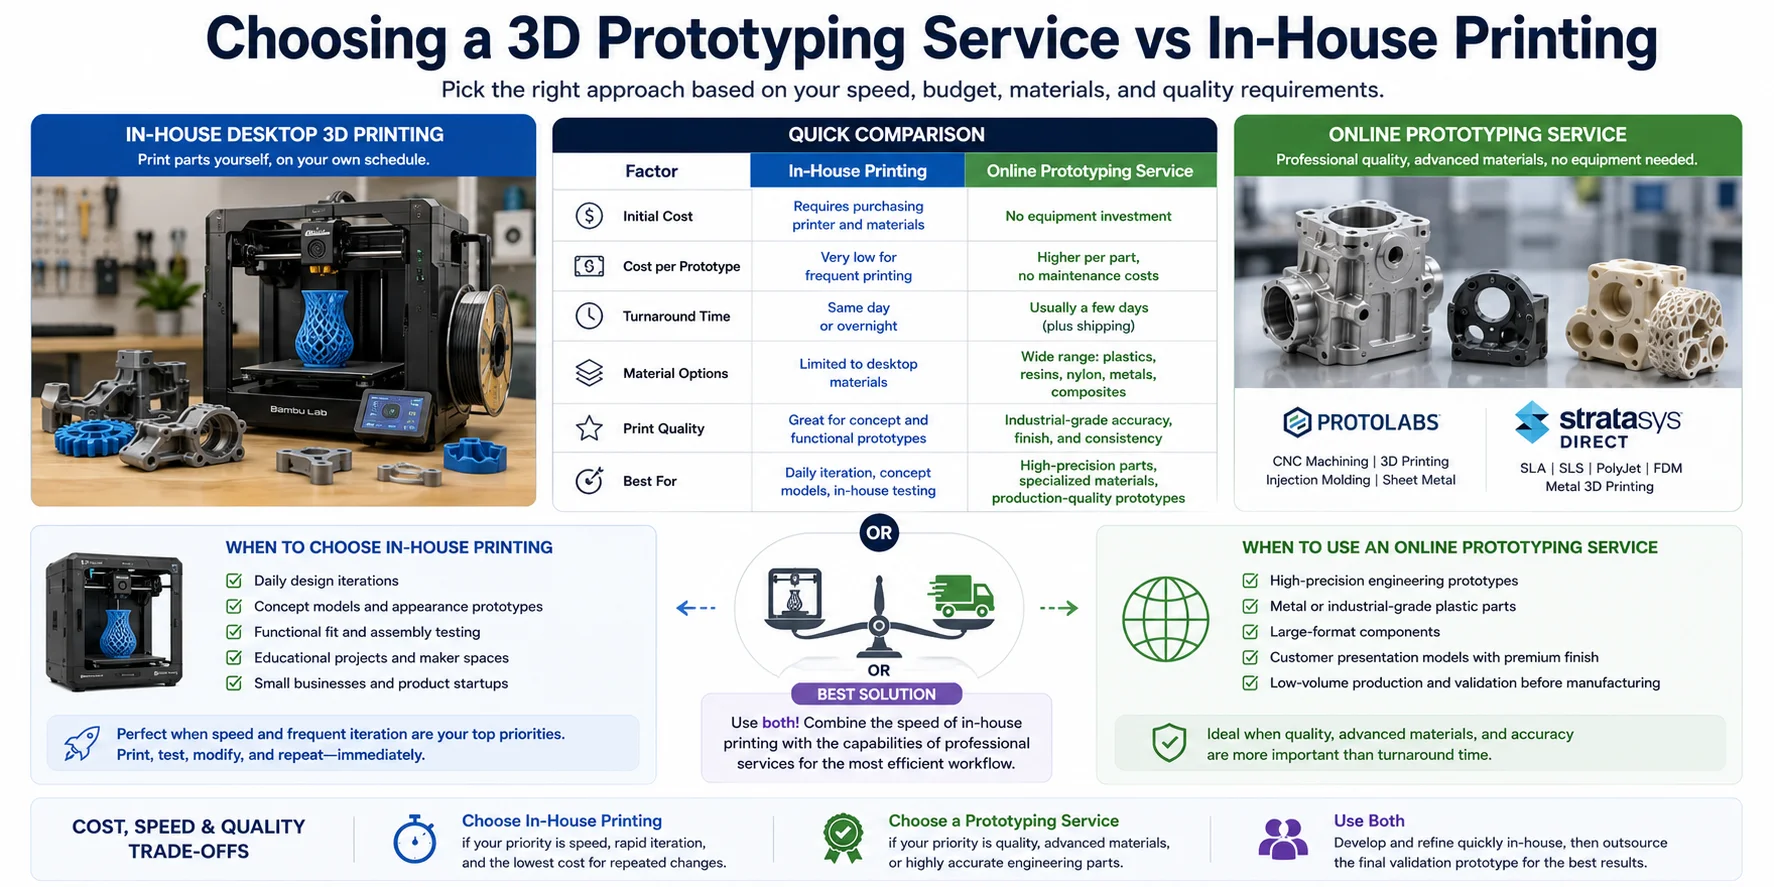
The choice between in-house printing and an online 3D prototyping service depends on prototype frequency, material needs, quality requirements, and turnaround time. Many teams use both: desktop printing for quick iteration, then a service for final validation.
Comparison at a Glance
| Factor | In-House Desktop 3D Printing | Online Prototyping Service |
|---|---|---|
| Initial Cost | Requires purchasing a printer and materials | No equipment investment |
| Cost per Prototype | Very low for frequent printing | Higher per part, but no maintenance costs |
| Turnaround Time | Same day or overnight | Usually a few days, depending on shipping |
| Material Options | Limited to desktop-compatible materials | Wide range of plastics, engineering resins, nylon, metals, and composites |
| Print Quality | Excellent for most concept and functional prototypes | Industrial-grade accuracy, finish, and consistency |
| Best For | Daily iteration, concept models, in-house testing | High-precision parts, specialized materials, production-quality prototypes |
When to Choose In-House Printing
Choose in-house printing when speed and frequent iteration matter most. It works well for daily design changes, concept models, fit checks, education, maker spaces, and small product teams.
When to Use an Online Prototyping Service
Use an online prototyping service when you need industrial materials, tighter tolerances, larger parts, metal printing, premium surface finish, or production-quality validation beyond a desktop printer.
Cost, Speed, and Quality Trade-Offs
Use in-house printing for speed and low-cost repeated changes; use a service for quality, advanced materials, and highly accurate engineering parts; use both when you need fast concept iteration followed by final validation.
Frequently Asked Questions
What is 3D prototyping?
3D prototyping is the process of turning a digital 3D model into a physical prototype, usually through additive manufacturing. It helps teams evaluate form, fit, function, and usability before committing to full production.
How does the 3D prototyping workflow work?
A typical workflow moves from concept design to 3D modeling, slicing, printing, testing, and iteration. Each prototype gives the team feedback, so the next version can improve dimensions, ergonomics, strength, or appearance.
What are the main 3D prototyping methods?
The most common methods include FDM, SLA, SLS, metal printing such as DMLS or SLM, and PolyJet. FDM is usually best for low-cost early prototypes, SLA for fine detail, SLS for durable functional parts, metal printing for high-strength components, and PolyJet for realistic presentation models.
What materials are used for 3D prototyping?
Common materials include PLA, ABS, PETG, resin, nylon, TPU, and metal alloys. The right choice depends on what the prototype needs to prove: visual form, ergonomic feel, mechanical strength, flexibility, heat resistance, or production-like performance.
What software do you need for 3D prototyping?
Most workflows need a modeling tool, a slicer, and sometimes an online manufacturing service. CAD or 3D modeling tools such as Fusion 360, SolidWorks, or Blender create the model, while slicers such as Cura, PrusaSlicer, Bambu Studio, or OrcaSlicer prepare it for printing.
How much does 3D prototyping cost?
Costs vary by size, material, printing method, finish, and whether the work is done in-house or by a service. A small FDM concept model can be inexpensive, while SLS, PolyJet, or metal prototypes cost more because they require industrial equipment, specialized materials, and more finishing work.
How long does it take to make a 3D prototype?
Simple desktop 3D prints can often be completed the same day or overnight. Industrial service parts may take several days depending on the technology, queue, shipping, and post-processing, while multiple design iterations can extend the overall timeline.
Should you use a 3D prototyping service or print in-house?
Use in-house printing when speed, frequent iteration, and low per-part cost matter most. Use a professional 3D prototyping service when you need industrial materials, tighter tolerances, larger parts, premium surface finish, or metal and high-performance plastic prototypes.
How can AI speed up 3D prototyping?
AI can reduce the time spent on the modeling step by turning a text prompt, sketch, or reference image into a 3D model quickly. It is most useful for concept exploration, appearance prototypes, and early iteration, while precision mechanical parts still need CAD review for dimensions, wall thickness, clearances, and manufacturability.
Is STL or 3MF better for 3D prototyping?
STL is widely compatible and works well when you only need geometry. 3MF is better for many modern workflows because it can preserve more information, including units, colors, materials, and print-related data, reducing the risk of scaling or setup errors.
Conclusion
3D prototyping shortens the path from idea to validation, and for many teams the biggest bottleneck is still building the 3D model. If you want to speed up that step, Tripo AI Studio can turn a text prompt or a single image into a print-ready 3D model in seconds, making it easier to iterate, test, and refine designs before production.