AI 3D Printed Miniatures: Workflow, Limits, and Tips
TL;DR
- AI miniatures start with a 3D model from text or a photo. You can begin without sculpting skills, but most results still need print preparation.
- The make-or-break step most guides skip: make the mesh watertight, thicken thin parts, and split into printable pieces.
- Resin (MSLA) wins for crisp tabletop detail; FDM is cheaper for terrain and big pieces.
- Export STL for broad compatibility, or use 3MF when your slicer supports the project metadata you need. STL does not define units, so always verify the imported size before slicing.
- Limits are real: fine faces and weapons can blur, and copying protected designs can create intellectual-property risk.
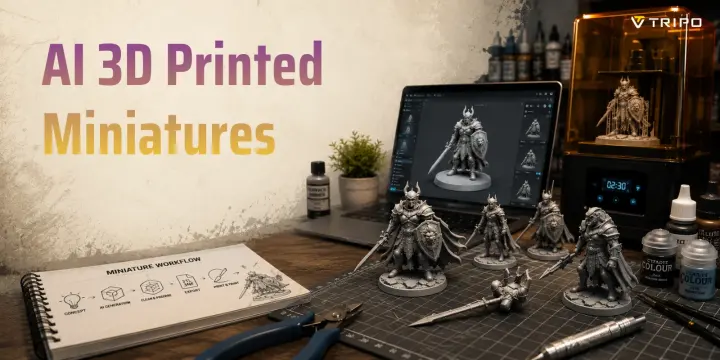
AI 3D printed miniatures let you turn a text prompt or a reference photo into a tabletop figure you can print at home. The process is short: generate a 3D model with an AI miniature generator, make it printable by repairing the mesh and planning supports, export a compatible file, then slice and print. This guide walks through the full workflow and its practical limits.
What Are AI 3D Printed Miniatures?
AI 3D printed miniatures are custom figures created by using artificial intelligence to turn a text description or reference image into a 3D mesh that can later be prepared for 3D printing. Instead of sculpting every detail by hand in traditional modeling software or learning complex CAD tools, you describe the character, creature, or object you want, and an AI miniature generator produces a starting mesh. While the result usually needs print preparation before it is ready for a printer, AI lowers the barrier to creating unique tabletop figures.
The technology is used across hobby and professional workflows. Tabletop players generate original heroes and monsters for Dungeons & Dragons campaigns, hobbyists prototype original units or conversion ideas, and board game creators create NPCs, terrain pieces, and props for playtesting. Others use AI tools to make personalized collectibles, fantasy creatures, or stylized “mini-me” statues from a reference photo. Rather than searching through thousands of existing STL files, users can generate a starting point tailored to a specific campaign, character concept, or gift.
Today there are three main ways to obtain a printable miniature. The first is downloading an existing STL from an online marketplace or free model library, which is fast but limits customization. The second is sculpting the model manually in software such as Blender or ZBrush, giving complete artistic control at the cost of a steep learning curve. The third—and increasingly popular—approach is generating a custom miniature 3D model with AI. This sits between the other two methods: much faster than digital sculpting while offering far more personalization than browsing pre-made files.
AI does not eliminate the rest of the workflow. Most generated meshes still benefit from mesh repair, wall-thickness checks, supports, and slicing before they become reliable prints. Even so, for many creators, AI 3D printed miniatures offer the fastest path from an idea to a unique physical figure, making custom tabletop models accessible without years of sculpting experience.
Three Ways to Create a 3D Printable Miniature
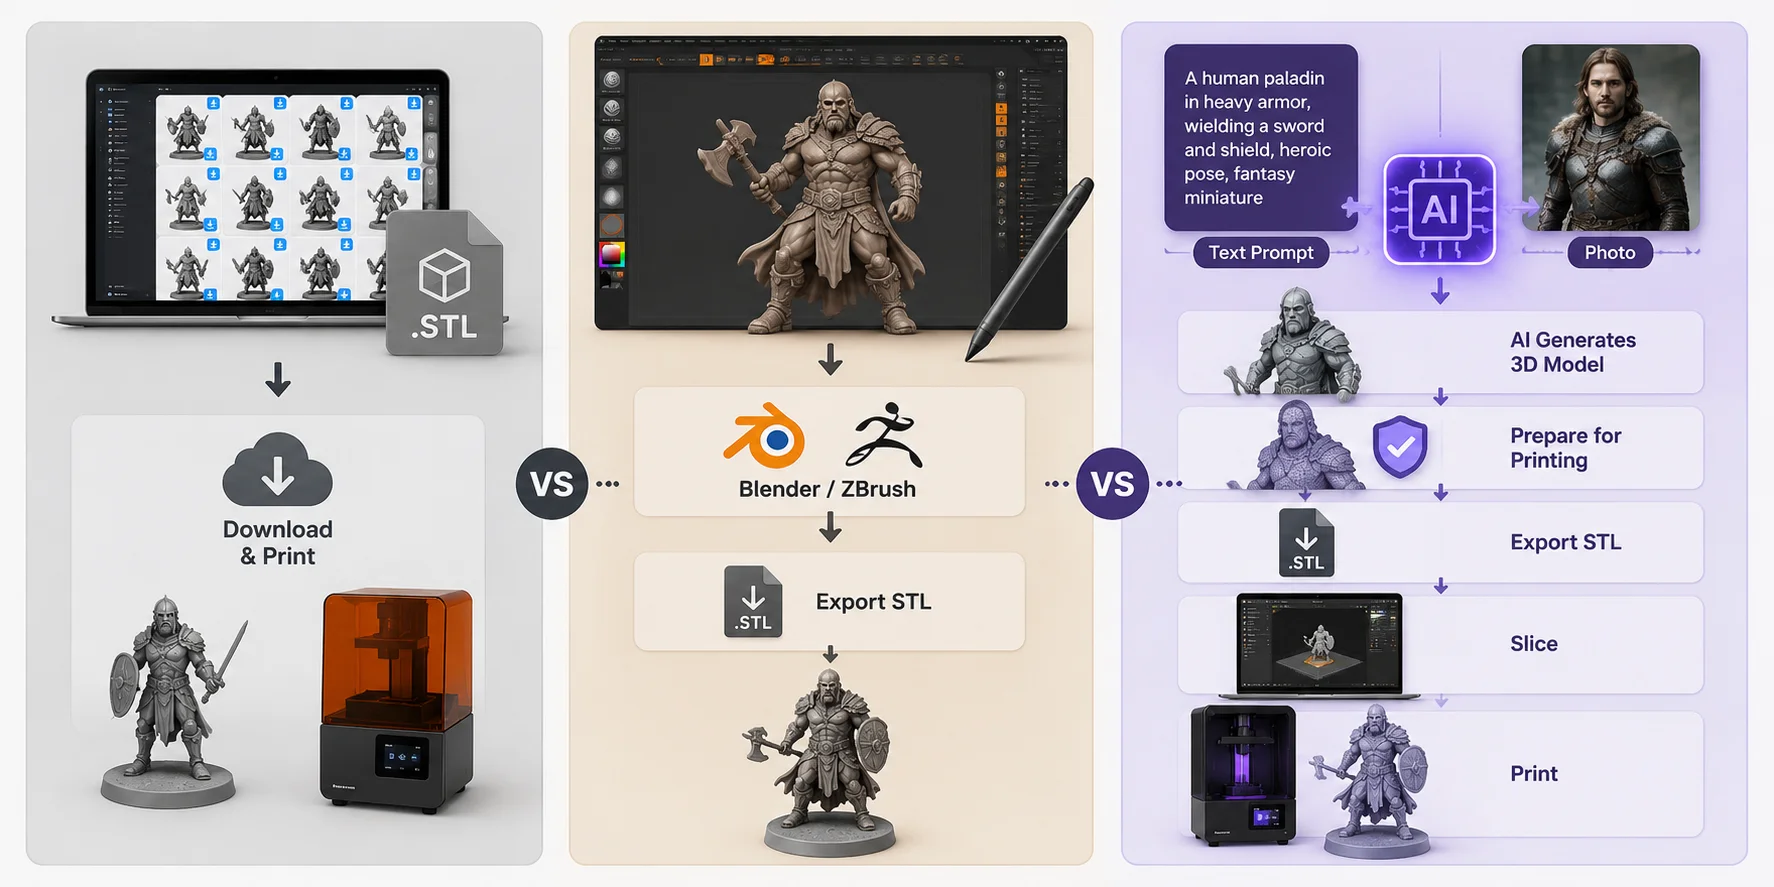
The AI 3D Printed Miniature Workflow (Overview)
Creating AI 3D printed miniatures is a straightforward process, but it involves more than generating a model with AI. After creating the mesh, you'll refine it, prepare it for printing, export the right file, slice it, and print the finished miniature. Whether you're making a D&D character, tabletop NPC, or custom miniature 3D model, the workflow is largely the same.
- Generate the model from a text prompt or photo.
- Refine the pose, proportions, and small details.
- Make it printable by repairing the mesh and checking wall thickness.
- Export as STL or 3MF.
- Slice the model and add supports.
- Print on a resin or FDM printer.
- Clean up & paint by removing supports, sanding, priming, and painting.
What You'll Need
Getting started only requires a few basic tools:
- An AI miniature generator to create the 3D model.
- A resin or FDM 3D printer for the final print.
- Slicing software such as Lychee Slicer, Chitubox, Cura, or OrcaSlicer.
- Basic finishing tools like cutters, primer, and paints for post-processing.
With these essentials in place, you can move from an AI-generated model to a tabletop-ready miniature in just a few steps.
AI 3D Printed Miniature Workflow
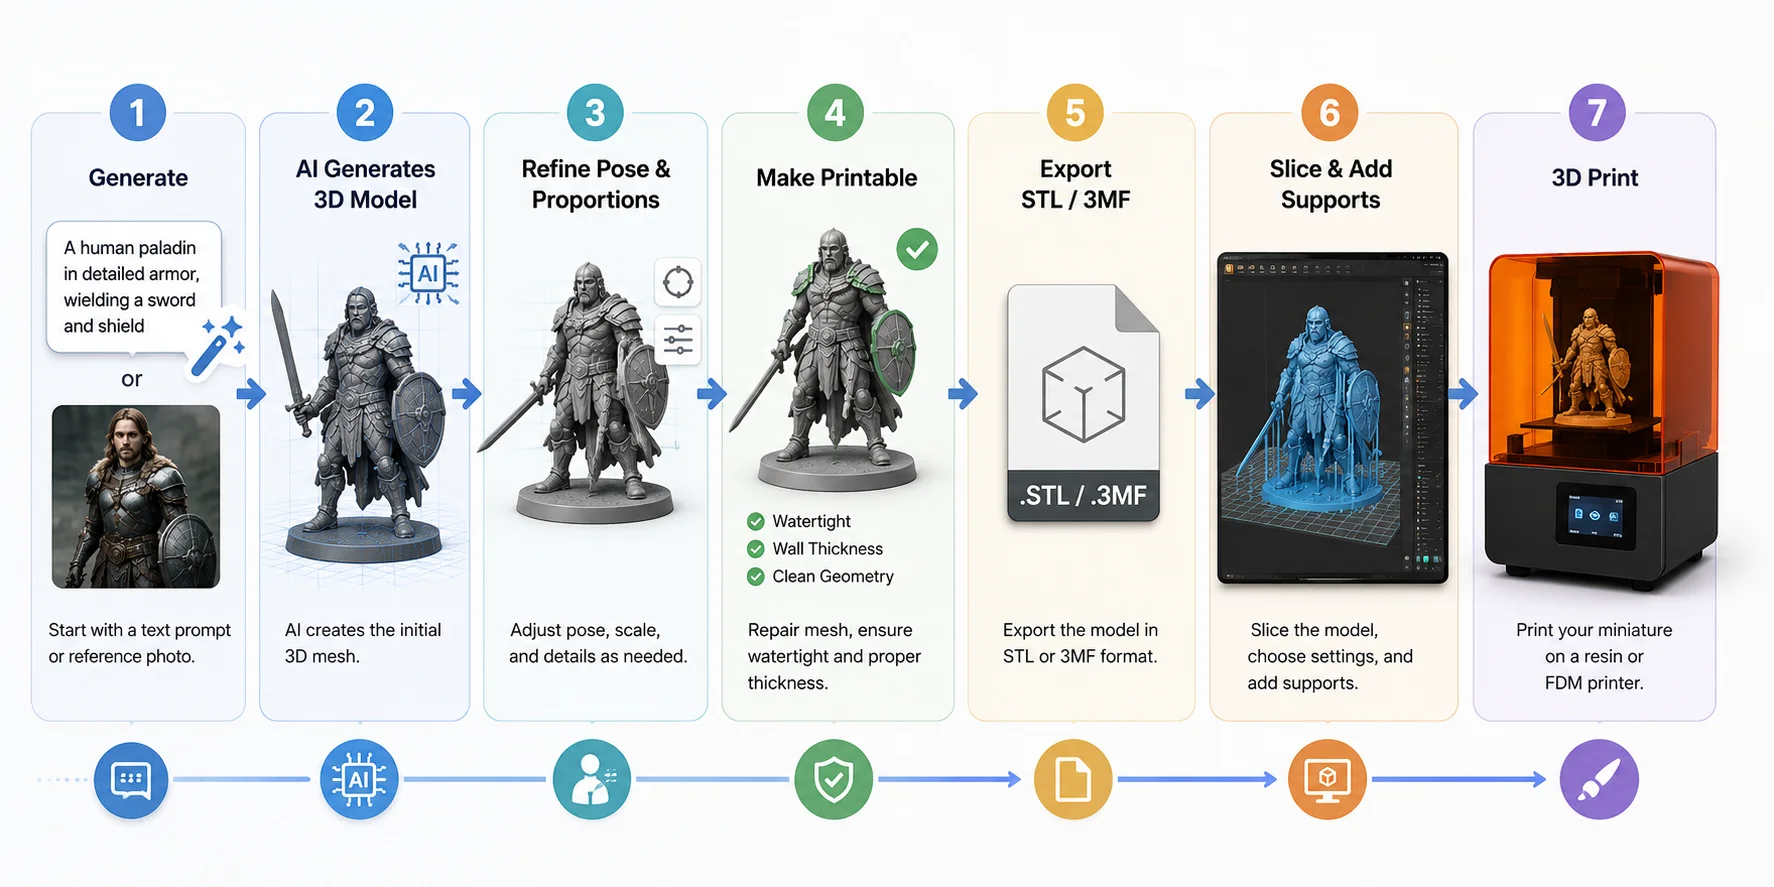
Step 1 — Generate the Model (Text, Image, or Photo)
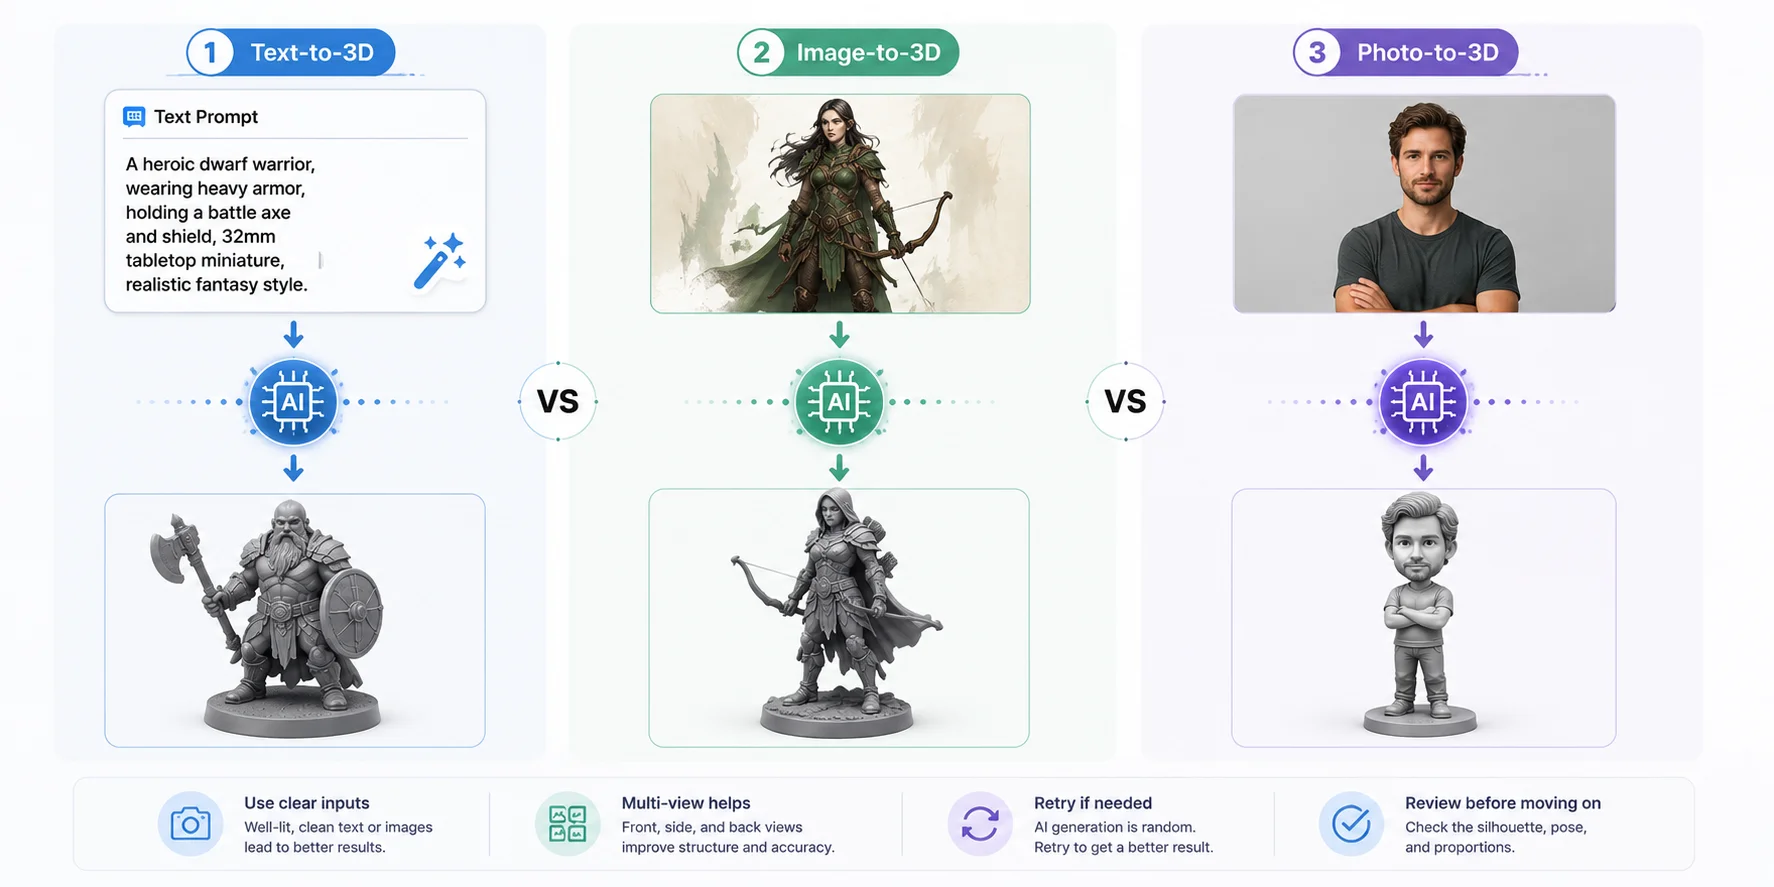
The first step is creating a base mesh with an AI generator. Most tools support three input methods, and the best choice depends on what you already have. Text-to-3D is useful when you are starting from an idea, image-to-3D works well for concept art or illustrations, and photo-to-3D can turn a person, toy, or object into a stylized mini-me or collectible. When you have strong reference art, image-based generation often gives you more control over the intended style than text alone.
A good prompt helps the AI create a cleaner model. Describe the subject, style, pose, materials, and proportions instead of only naming the character. For example:
"A heroic dwarf warrior, realistic fantasy style, holding a battle axe and shield, standing upright, thick armor, 32 mm tabletop miniature, highly detailed."
If you are using an image, choose one with a clear subject, even lighting, and minimal background clutter. Front and side references can improve the overall shape and reduce guesswork about hidden areas, especially for characters with backpacks, capes, or complex armor. A single image is best treated as a stylized starting point rather than an exact scan, because the AI must infer hidden surfaces. Only upload images you have permission to use.
AI generation is inherently variable: the same prompt can produce noticeably different results. Regenerate when the overall silhouette, pose, or proportions are wrong. Use local edits when the model is mostly usable and only needs a stronger base connection, a thicker weapon, or a fix for a floating accessory. Generation time varies by tool, model quality, and queue conditions, so treat the first result as a draft and plan for several iterations.
Once you're happy with the overall silhouette and proportions, you're ready to refine the mesh and prepare it for 3D printing.
Three Ways to Generate an AI Miniature
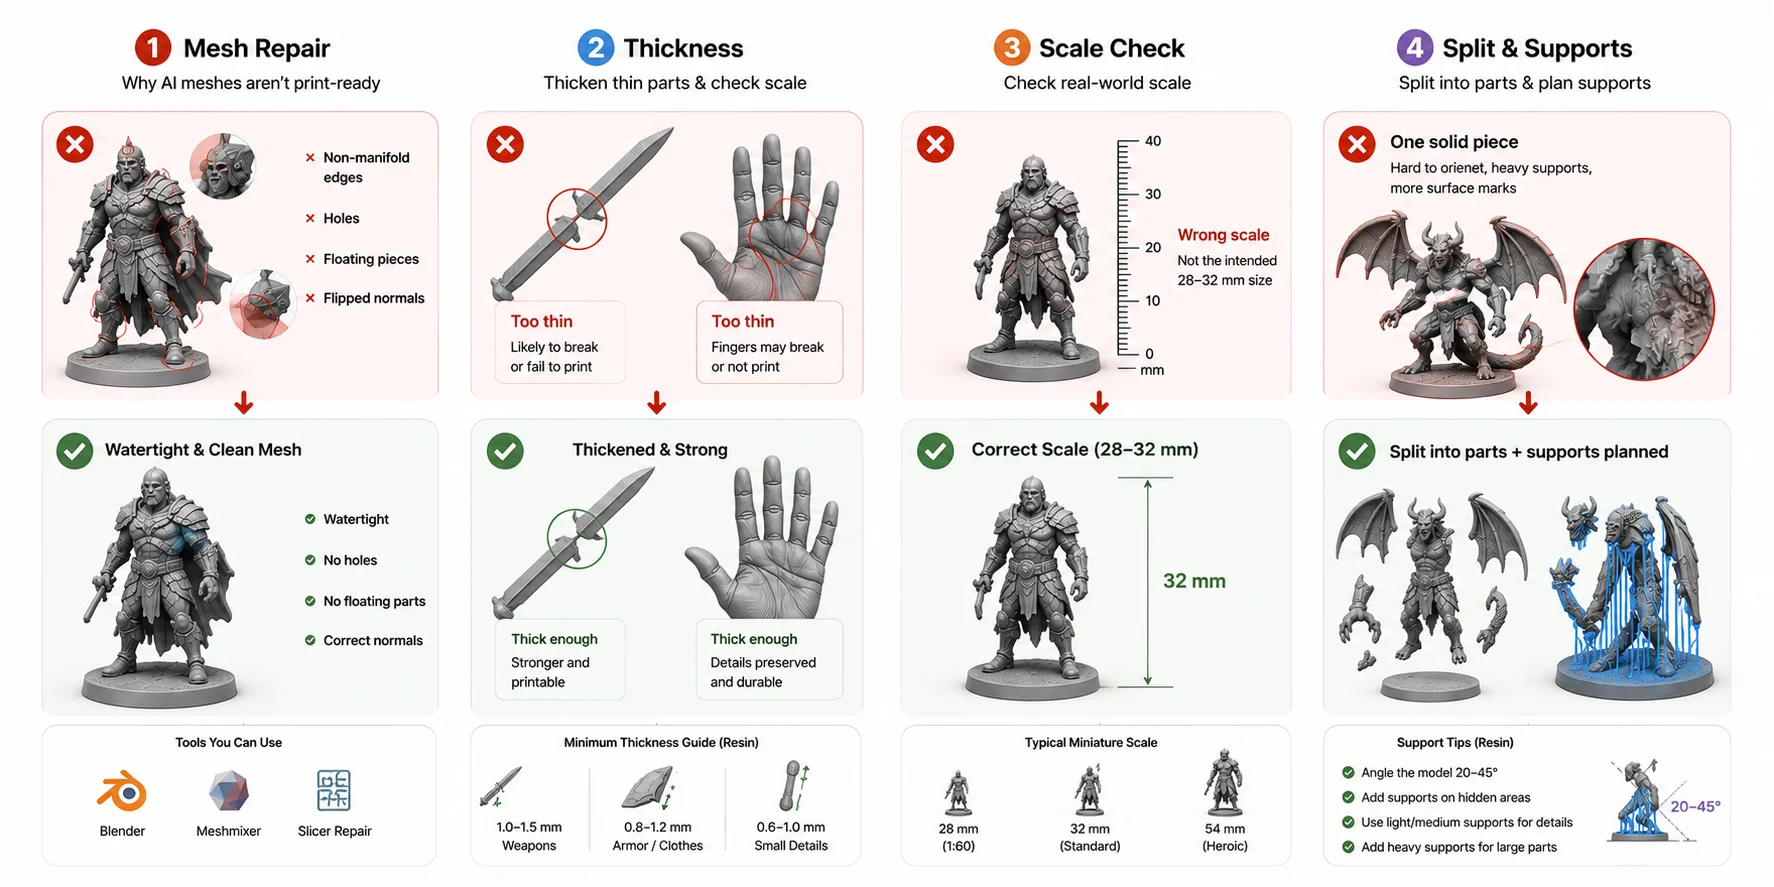
Step 2 — Make It Actually Printable
Generating a model is only half the job. Most AI-generated meshes look convincing in a viewer but still need preparation before they become reliable AI 3D printed miniatures. Spending a few minutes fixing geometry and checking printability can save hours of failed prints and broken parts later.
Why AI Meshes Aren't Print-Ready
AI models often contain geometry issues that are invisible until you load them into a slicer. Common problems include non-manifold edges, holes in the mesh, floating pieces, flipped normals, and parts that are too thin to print. Fine details such as swords, fingers, hair strands, and cape edges may look good digitally but can fail once the model is scaled to your target tabletop size.
Make It Watertight & Fix Geometry
Before exporting your final STL, make sure the mesh is watertight—a completely closed surface with no gaps. Most repair work can be done in Blender, Meshmixer, or even with the automatic repair tools built into many slicers. Check for holes, merge loose geometry, remove internal faces, and recalculate normals so every surface faces the correct direction. A quick repair pass greatly improves print reliability.
Thicken Thin Parts & Check Scale
After repairing the mesh, verify the model’s real-world size in your slicer. “28 mm” and “32 mm” can refer to different tabletop conventions, so check the target game or collection instead of assuming a universal standard. Inspect the thinnest weapons, shields, fingers, cloth, and connection points, then compare them with the minimum-feature guidance for your printer and material. Thicken or simplify anything that is likely to disappear or snap.
Split into Parts & Plan Supports
Complex miniatures often print better when divided into separate parts. Splitting large weapons, wings, or scenic bases lets you orient each piece for cleaner detail and fewer support marks. For resin printing, angle the model as needed and place supports on less visible surfaces whenever possible. For larger hollow resin parts, plan hollowing and drainage according to your material and slicer guidance. Preview the support layout before printing to reduce failures and post-processing.
Some AI tools can help before export with refinement and segmentation features. Prioritize clean, printable geometry at the final print size: a higher polygon count alone does not guarantee more visible detail on a small miniature. Taking time to prepare the model at this stage leads to cleaner prints, fewer failures, and less sanding after the miniature comes off the printer.
AI Miniature Printability Checklist
Step 3 — Export: STL vs 3MF
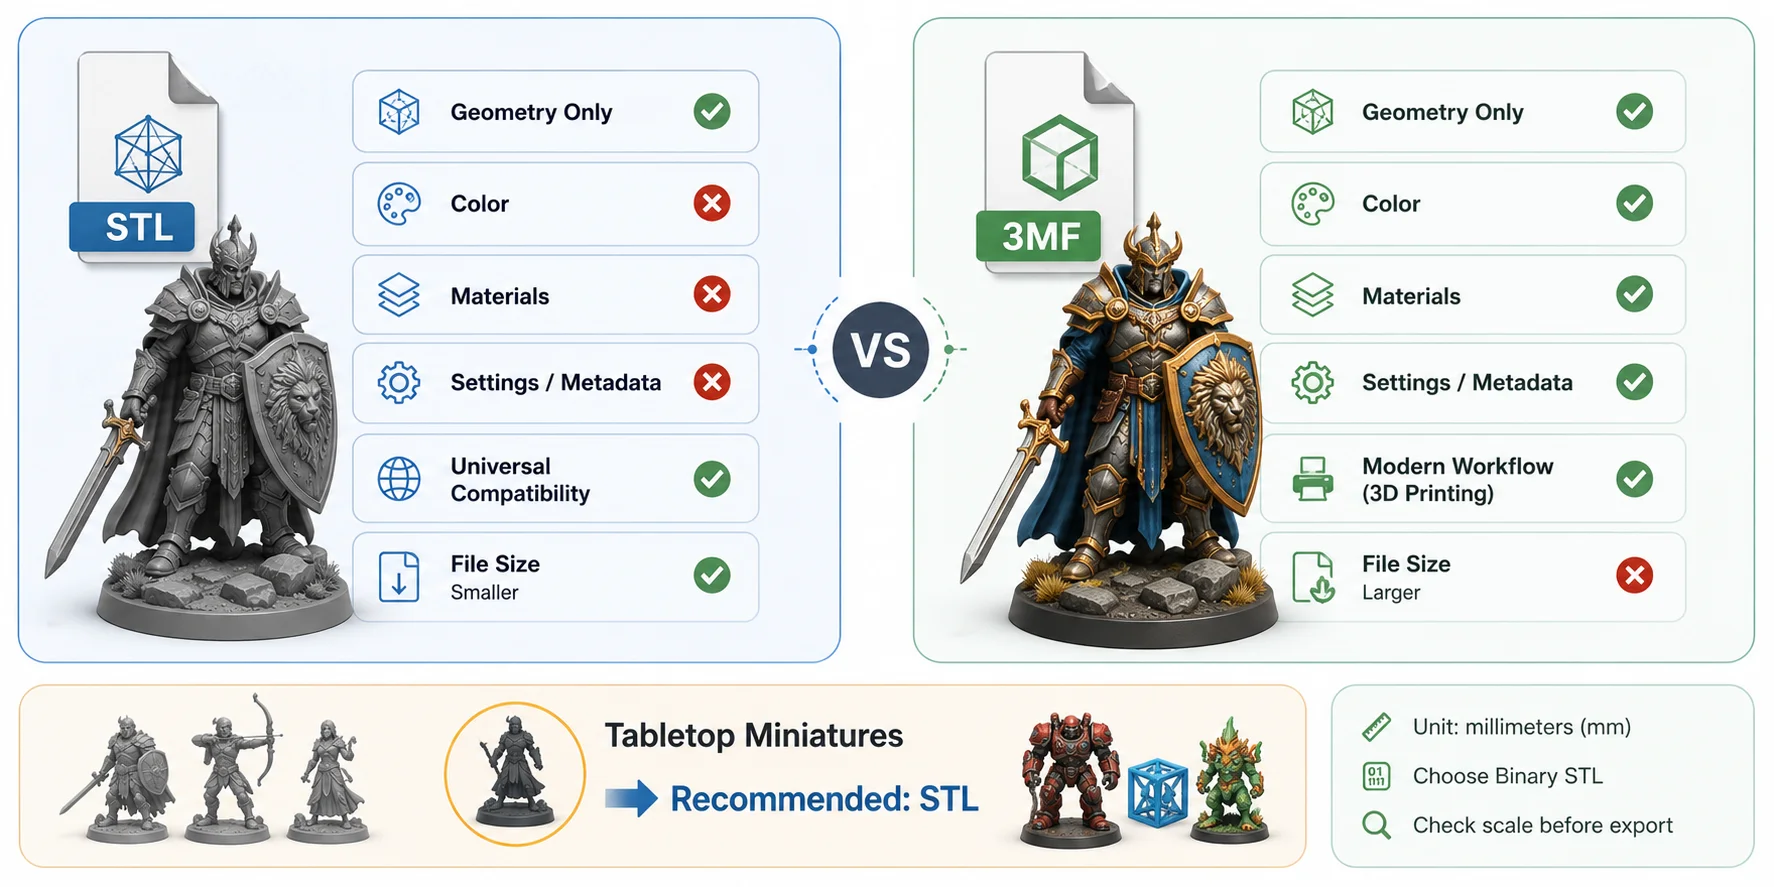
Once your miniature is print-ready, export it in a format your slicer can read. Set the intended unit to millimeters (mm) before export, then verify the imported dimensions in your slicer. This check matters especially for STL, because STL files do not define a unit. If you export STL, Binary STL is usually preferable to ASCII STL because it stores the same geometry in a smaller file.
STL vs 3MF — Which Should You Choose?
For tabletop miniatures, STL remains a broadly compatible geometry format. It is a practical choice when you need to move a model between different tools, but it does not retain units, colors, materials, or project settings. Always check the model size after importing it into your slicer.
Choose 3MF when your generator, slicer, and printer support the metadata you want to preserve. Depending on the workflow, 3MF can carry units, materials, colors, and project settings in addition to geometry. Support varies, so verify what your specific export and slicer actually retain rather than assuming every 3MF file includes the same information.
Before exporting, verify the model scale and confirm that your plan includes the export features you need. After import, inspect the size, geometry, and materials in your slicer before adding supports. Do not assume that export metadata will transfer unchanged between different tools.
STL vs 3MF
Step 4 — Choose Your Printer: Resin vs FDM
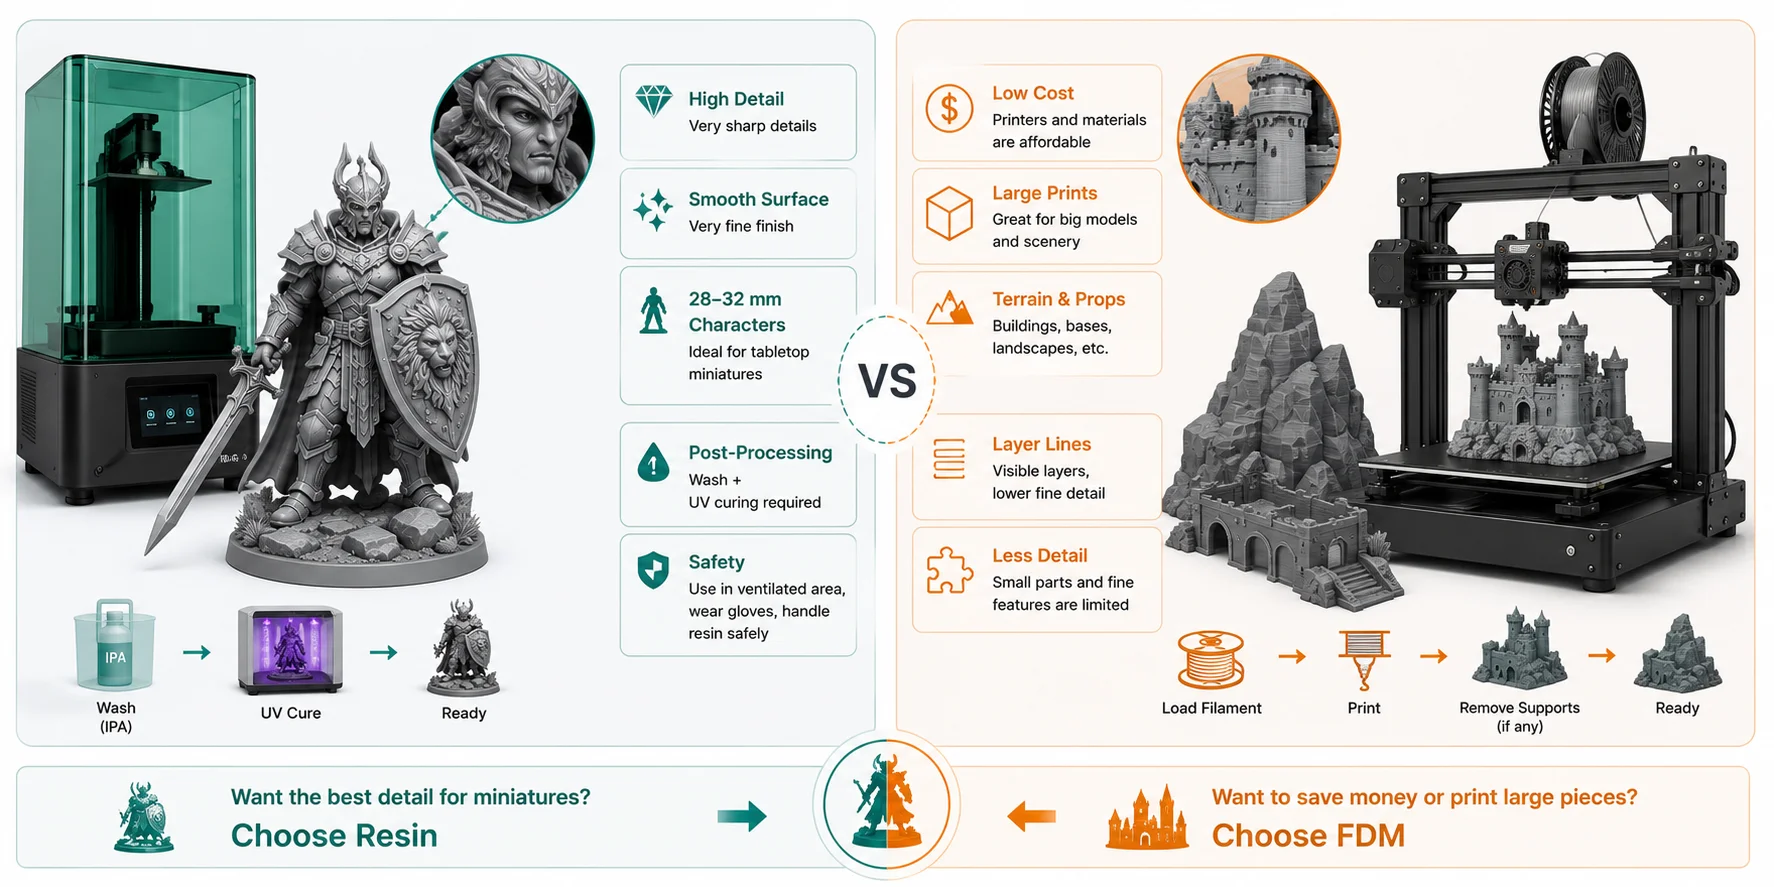
The best printer depends on what you plan to make. For most AI 3D printed miniatures, a resin printer delivers the highest level of detail, while an FDM printer is more affordable and better suited to larger models and terrain pieces. Both can print AI-generated miniatures, but they excel in different situations.
Resin (MSLA)
Resin printers produce sharp details and smooth surfaces, making them a strong choice for small tabletop characters. They are well suited to D&D heroes, original fantasy figures, and collectible miniatures where small features matter. Resin printing also requires a dedicated post-processing setup. Follow the safety data sheet (SDS) for your specific resin and wash solution, wear suitable gloves and eye protection, and avoid skin contact with uncured resin and solvents. The correct wash liquid, curing process, ventilation, and waste-disposal method vary by material, so do not assume every resin uses the same IPA workflow.
Resin safety checklist:
- Read the resin and wash-solution SDS before starting.
- Use appropriate gloves and eye protection when handling uncured resin or wash liquid.
- Wash and cure parts fully before regular handling or painting.
- Keep uncured resin and contaminated wash liquid out of drains and follow local disposal guidance.
FDM
FDM printers are less expensive to buy and operate, making them a great option for beginners. They work well for terrain, buildings, display bases, and larger miniatures where fine surface detail is less important. Because FDM builds models layer by layer with melted filament, very small features and smooth surfaces are harder to reproduce than with resin printing.
Quick recommendation: Choose resin if you want the best detail for tabletop characters. Choose FDM if your priority is lower cost, larger prints, or terrain pieces.
**Resin vs FDM **
Step 5 — Slice, Print, and Finish
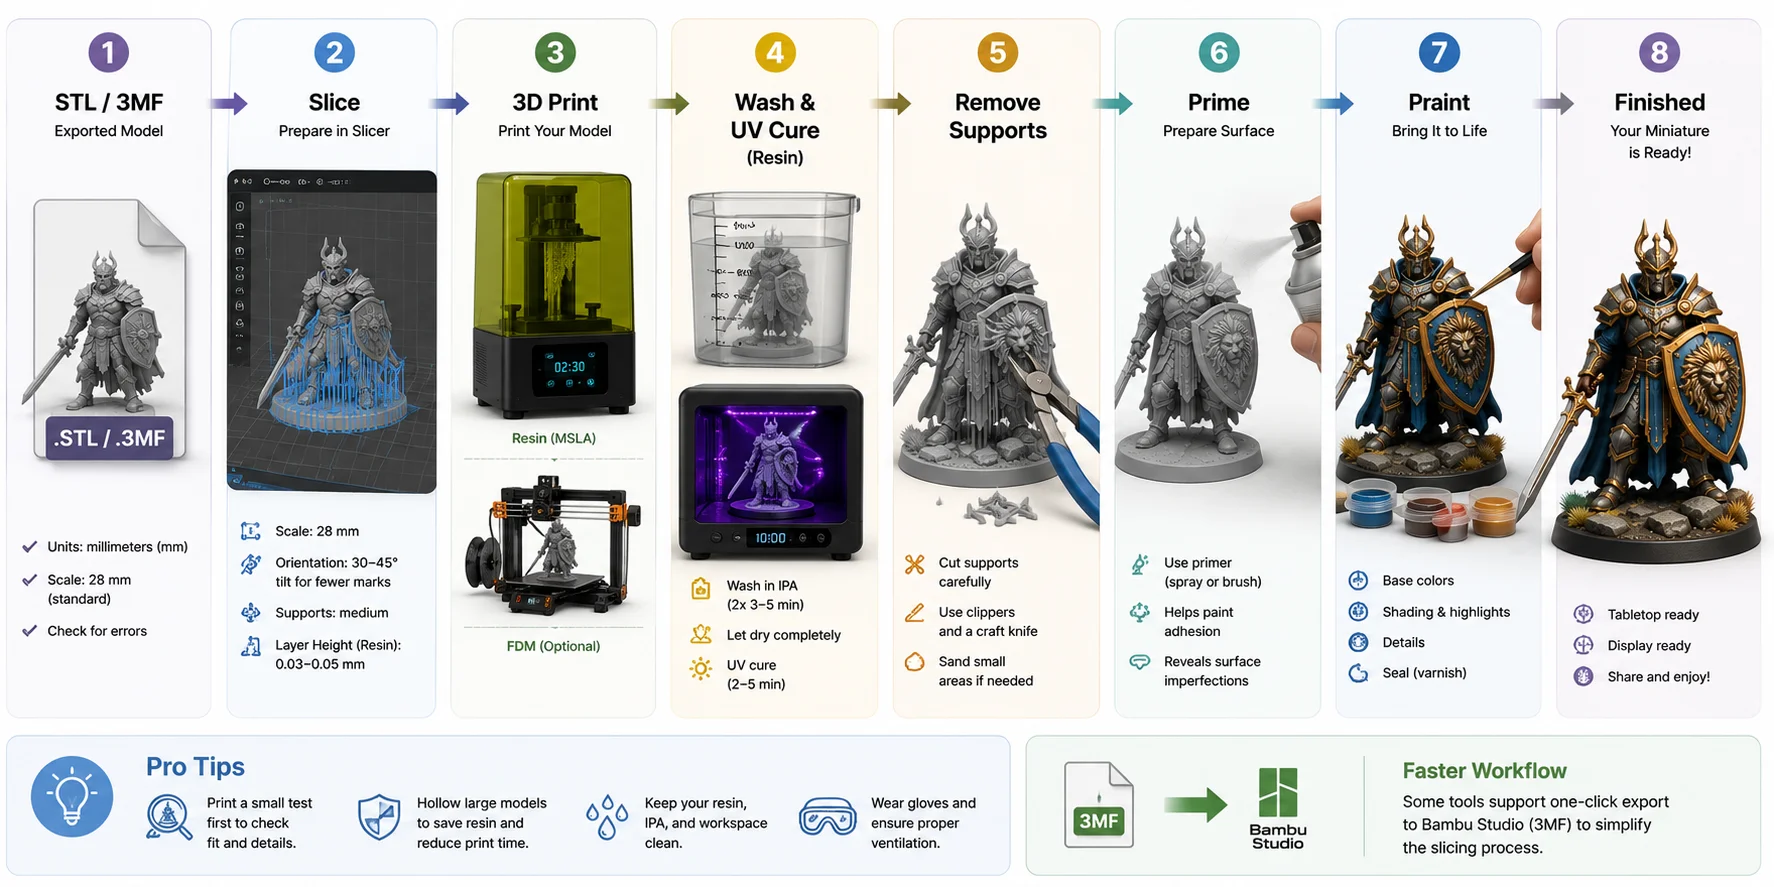
With your model exported, the final step is turning the digital file into a finished miniature. Import the STL or 3MF into your slicer, verify the target height for your game or collection, and choose an orientation that minimizes visible support marks. For resin printing, a layer height of 0.03–0.05 mm is a reasonable starting range for many printers, but use the validated profile for your machine and resin.
Before printing the final model, make a small test print or print one miniature first. A test helps verify scale, fit, fragile details, and support placement before you commit to a larger batch. If your workflow supports it, a compatible 3MF handoff can reduce manual setup, but still inspect the imported project before starting the print.
Once printing is complete, remove supports carefully. Wash and fully cure resin prints according to the material instructions before regular handling; FDM prints may only need support removal and light sanding. Dispose of uncured resin and contaminated wash liquid according to local rules and the product guidance, rather than pouring them down a drain. Finish the miniature with primer and acrylic paints to bring out the sculpted details.
From STL to Finished Miniature
The Real Limits of AI Miniatures (Be Honest)
AI can generate impressive starting points quickly, but it is not a replacement for an experienced digital sculptor. Understanding its limitations helps set realistic expectations and avoid disappointing prints.
The biggest challenge is fine detail. Faces, fingers, chainmail, weapon engravings, and other tiny features often become soft or distorted, especially after the model is scaled down to 28–32 mm. If you want a competition-quality display piece, expect to make manual edits in a 3D modeling program or sculpt additional details by hand.
Another common issue is printability. AI generators do not always consider wall thickness or structural strength. Thin swords, capes, horns, and fingers may print successfully but can break during support removal or tabletop use. Checking thickness and reinforcing fragile parts is still an essential step before printing.
AI is also inherently random. The same prompt can produce very different results, and complex characters with multiple accessories, flowing cloth, or intricate armor are more likely to contain errors. In many cases, generating several versions and choosing the best one is faster than trying to perfect a single result.
Finally, remember that AI does not bypass intellectual-property law. A miniature that closely copies a protected character, sculpt, logo, or distinctive design can create legal risk, especially if you upload, share, sell, or distribute the file or print. Personal use does not automatically make a reproduction lawful. For the lowest-risk workflow, create original characters, use assets with clear licenses, and avoid presenting fan-made models as official products. This is general information, not legal advice.
How to Evaluate an AI Miniature Generator
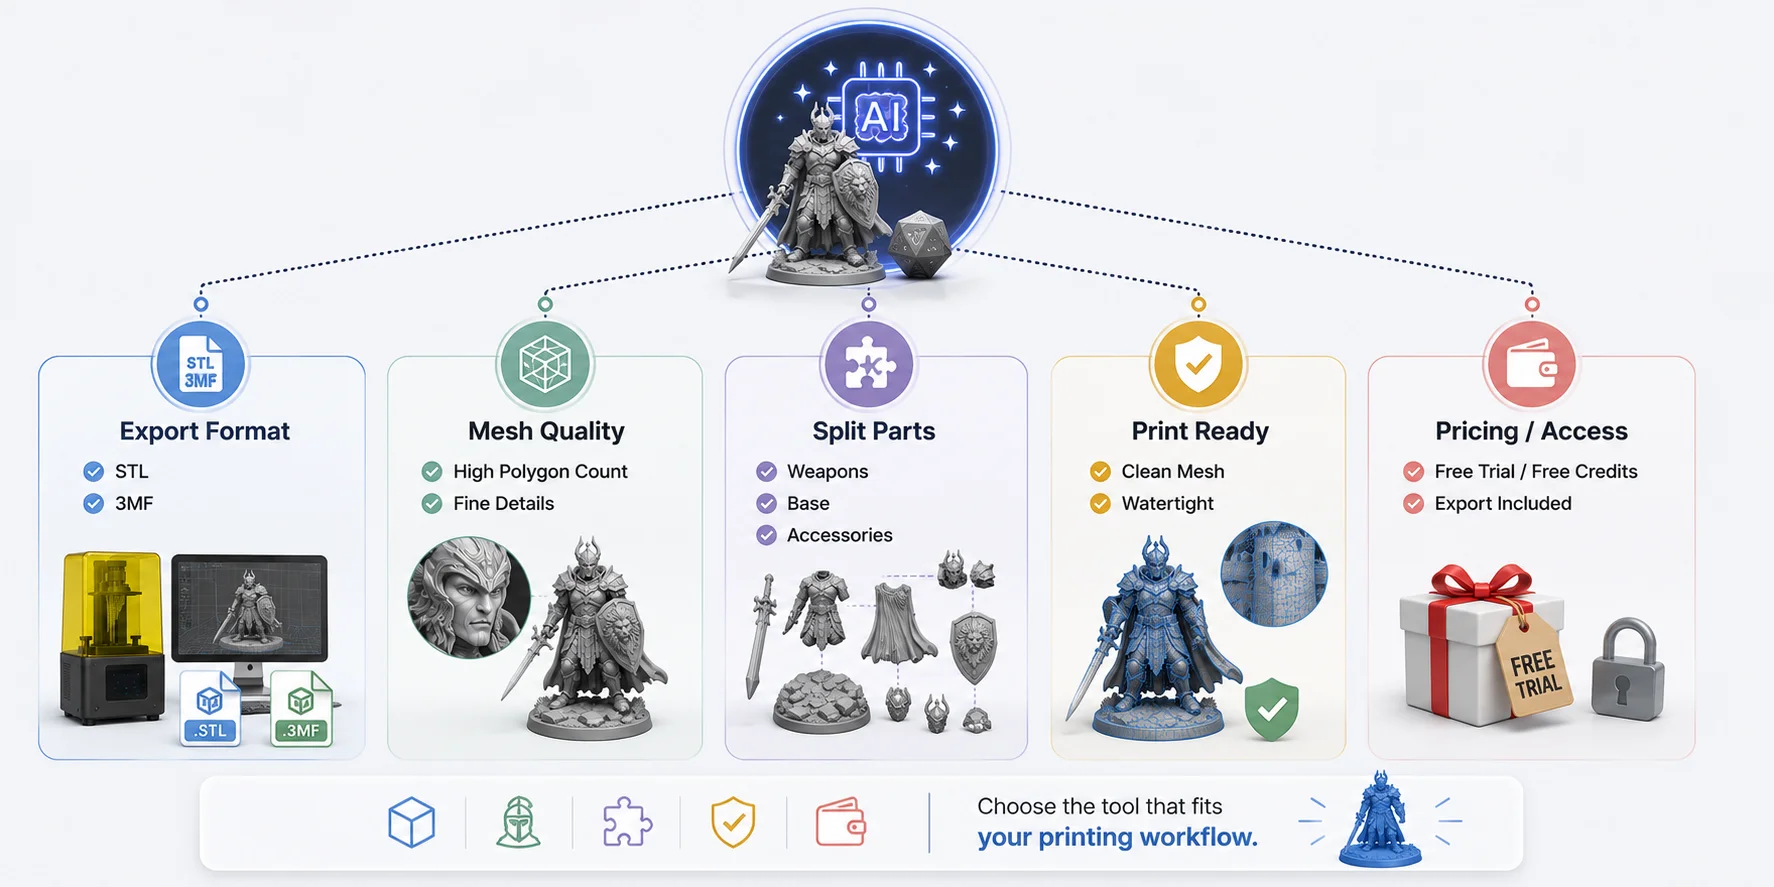
The right AI miniature generator depends on your workflow rather than a single universal “best” tool. If you are experimenting, start with a tool that lets you evaluate the mesh before you commit. If you need detailed prints, prioritize clean geometry at the final print size, editing controls, and export compatibility. For a smooth path from generation to printing, look for formats and post-processing features that work with your chosen slicer.
When comparing 3D printable miniatures AI tools, look beyond image quality. These features have a much bigger impact on the final print:
| What to Compare | Why It Matters |
|---|---|
| Export formats | Choose formats that your generator and slicer support; confirm what metadata is actually preserved. |
| Mesh quality | Prioritize clean surfaces, readable features, and strong thin parts at the final print size. More polygons alone do not guarantee a better miniature. |
| Part segmentation | Splitting weapons, bases, or accessories can make orientation and support placement easier. |
| Print-ready tools | Mesh cleanup, thickness checks, and slicer validation reduce manual repair work and failed prints. |
| Export policy | Confirm whether your plan includes the export formats and licensing rights you need. |
For a complete workflow, compare the quality of the mesh at your intended print size, the availability of editing and segmentation tools, and the export formats your slicer actually supports. The right choice depends on budget, desired detail, licensing needs, and how much post-processing you are prepared to do before the miniature reaches the printer.
Using Tripo in This Workflow
Use Tripo to create and refine a starting model, then validate the exported file in your slicer before printing. Check the current Tripo product page or Studio export options for the formats and export contents available to you, any segmentation or mesh-repair controls included in your workflow, your plan’s export access, and the applicable personal or commercial license. Select the options that match your intended printing workflow before you generate and export the final model.
How to Choose an AI Miniature Generator
Frequently Asked Questions
Can AI generate 3D printable models?
Yes. Modern AI tools can generate 3D models from a text prompt, concept image, or reference photo, and many of those models can be prepared for 3D printing. However, AI output is not always print-ready. Before printing, you should check that the mesh is watertight, repair any geometry issues, thicken fragile parts, and export the model as STL or 3MF for slicing.
Is 3D printing Warhammer 40K illegal?
It depends on the design, source material, country, and how the model is used. Personal use does not automatically make a reproduction lawful. Printing a model that closely copies protected characters, sculpts, logos, or distinctive designs can create intellectual-property risk, especially if you upload, share, sell, or distribute the file or print. Use original designs or models with clear personal-use or commercial licenses when possible. This is general information, not legal advice.
Is 3D modeling getting replaced by AI?
Not completely. AI is excellent for generating concepts and creating a first draft in minutes, but experienced artists are still needed to refine topology, improve fine details, prepare models for manufacturing, and create production-quality assets. Many professional workflows now combine AI generation with traditional 3D modeling instead of replacing it entirely.
Do AI-generated miniatures need supports for printing?
In most cases, yes. Resin miniatures commonly need supports for overhangs, weapons, capes, and other delicate features. Orient the model for reliable support contact while keeping marks on less visible areas, then preview islands and unsupported regions in your slicer before printing. The best angle and support density depend on the model, printer, resin, and slicer profile.
Is resin or FDM better for AI miniatures?
For small tabletop characters, resin printing is usually the stronger choice when fine detail and smooth surfaces matter. FDM printers are often more economical for terrain, larger models, and display bases, although they can require careful tuning to approach resin-level detail. Choose based on the scale, finish quality, workspace, safety requirements, and cost you can support.
What file format do I need to 3D print an AI miniature?
STL is a broadly supported choice for miniature printing because it stores mesh geometry and works across many slicers. Use 3MF when your generator and slicer support the extra project metadata you need, such as units, materials, colors, or settings. Because STL does not define units, verify the imported scale in your slicer before adding supports.
Conclusion
AI can make custom miniature creation faster: start with a text prompt or reference image, generate a custom 3D model, prepare it for your target printer, run a test print, and then finish it with confidence.
Ready to create your own miniature? Start in Tripo AI Studio to generate a custom 3D model, refine it, and export it for your 3D printing workflow. Before committing to a full batch, always check scale, printability, and support placement in your slicer.