The Complete AI 3D Asset Pipeline for Game Studios: From Concept to Engine-Ready in 2026
TL;DR
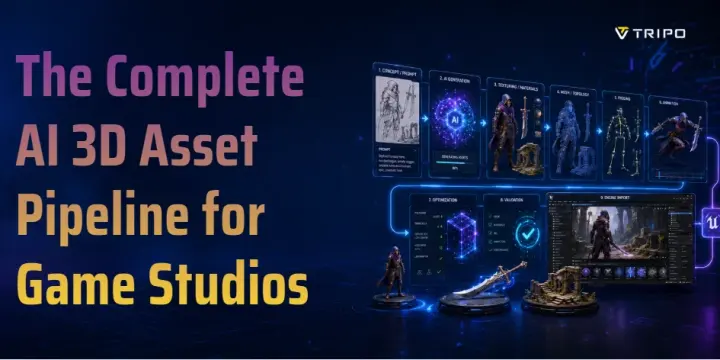
- An AI 3D asset pipeline connects concept definition, model generation, topology cleanup, texturing, rigging, QA, and engine export.
- AI is most useful when it accelerates repeatable first passes while artists retain control over style, deformation, gameplay requirements, and final approval.
- The practical workflow in this guide uses Tripo AI with DCC handoff and engine-side validation, so a generated mesh is treated as the start of production rather than the finished asset.
- Studio governance matters: record references, prompts, Tripo settings, edits, licenses, and review decisions before an asset enters a commercial build.
A mid-size game studio can spend six to eight weeks building a single hero asset pack once concept revisions, modeling, UV work, texturing, rigging, engine setup, and approvals are included. AI-assisted teams can now compress parts of that schedule into days—but only when generation is treated as the beginning of production rather than the finish line.
This guide covers the complete pipeline from concept brief to AI generation, post-processing, retopology, texturing, rigging, QA, engine export, and studio governance. Most guides stop when a mesh appears in a browser. This one follows the asset until it is optimized, tested, documented, approved, and ready to ship.
What Is an AI 3D Asset Pipeline?
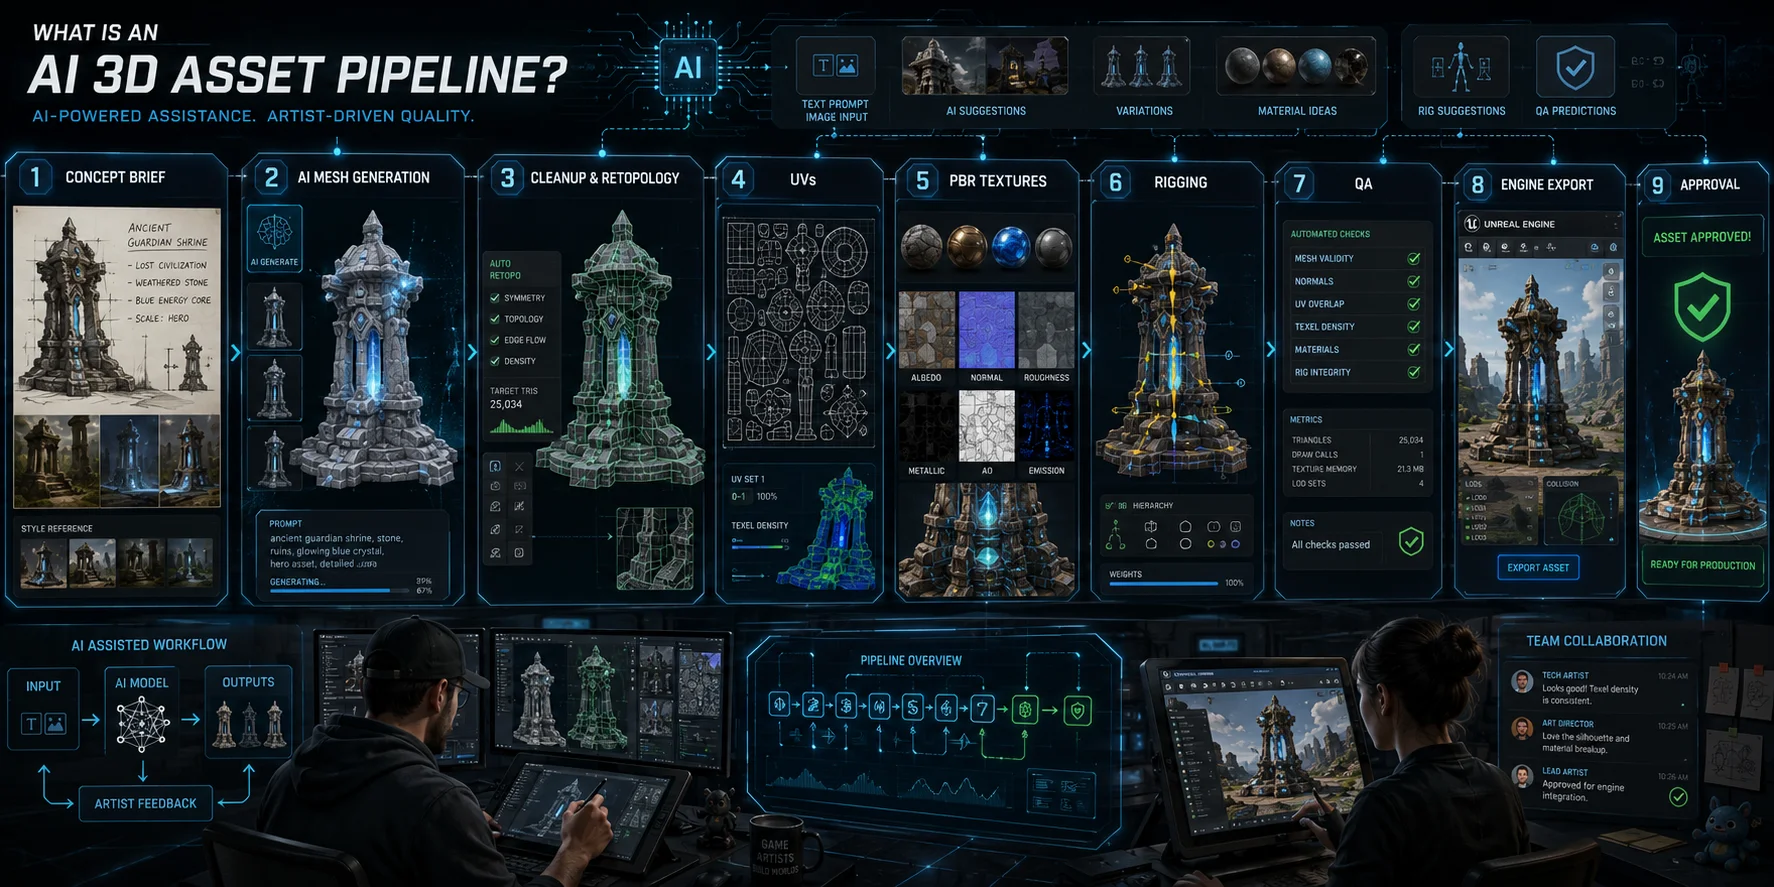
A 3D asset pipeline is the sequence of production steps that turns an idea into a usable game asset. In a traditional workflow, that sequence usually includes concept development, modeling, UV unwrapping, retopology, texturing, rigging, quality assurance, export, and engine integration.
An AI-assisted pipeline keeps those stages but uses machine learning to accelerate selected tasks:
Concept brief → AI mesh generation → cleanup and retopology → UVs and PBR textures → rigging → QA → engine export → approval
AI may generate the first mesh, rebuild topology, create texture maps, predict a skeleton, produce variations, or flag technical defects. It does not remove the need for art direction, production standards, or technical review.
Most studios integrate AI at two to four stages rather than replacing the entire pipeline at once. A team may begin with concept generation and background props, then add AI texturing or retopology after it has defined quality gates. This gradual approach lowers production risk and makes it easier to compare AI-assisted output against the studio’s existing benchmarks.
Pipeline Overview: The 7-Stage AI-Assisted Workflow
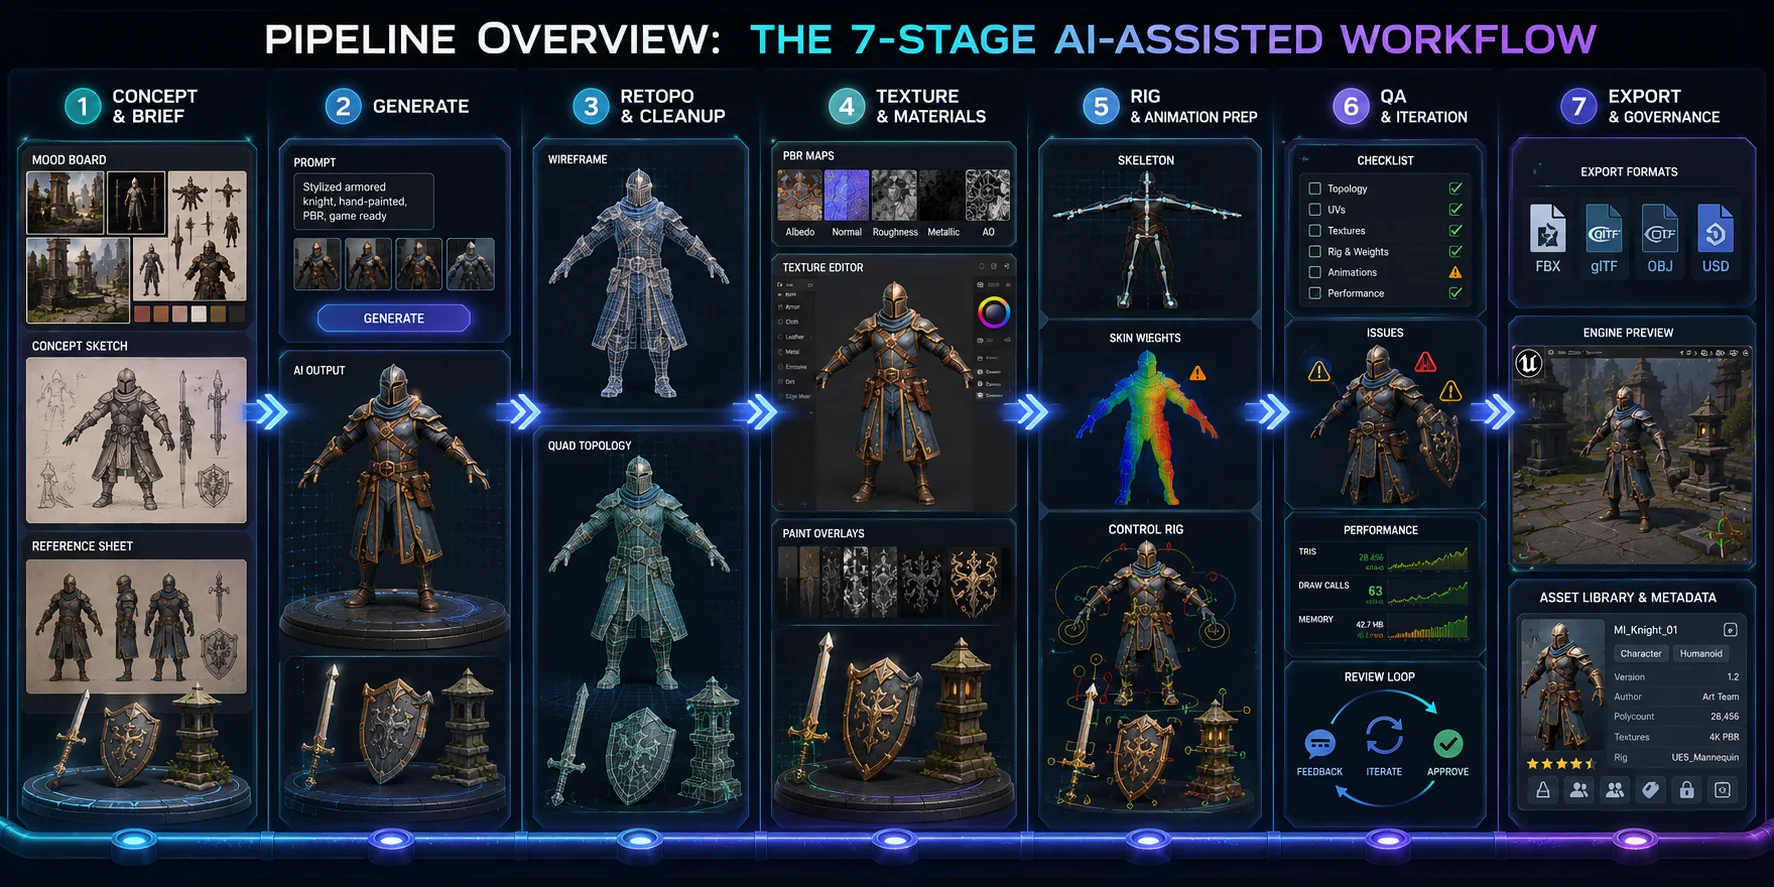
Concept and Brief
The art director or lead artist defines the asset’s purpose, scale, silhouette, material language, performance target, and references. AI image tools may explore variations, but the output of this stage should be a controlled production brief rather than a folder of loosely related images.
AI Generation
Text-to-3D is used for open-ended exploration, while image-to-3D is used when an approved design or reference already exists. Tripo AI can create a base mesh from text, single-image, or multi-view inputs, giving the team a starting point that can be evaluated and developed further.
Post-Processing and Retopology
The generated mesh is inspected for holes, disconnected parts, excessive density, poor edge distribution, and deformation problems. AI-assisted remeshing can produce a cleaner target, but an artist still reviews silhouettes, hard edges, joints, and bake quality.
Texture Generation and Editing
The team produces a consistent PBR material set, checks UVs, and corrects seams or artifacts. Prompt templates and reference materials help keep entire asset families in the same visual style.
Rigging and Animation Preparation
Characters and creatures receive a skeleton, skin weights, naming conventions, and test animations. Auto-rigging speeds up the first pass, while artists inspect deformation and repair weights before production use.
QA and Iteration
Automated checks catch measurable problems such as missing textures, invalid names, excessive triangle counts, and overlapping UVs. Artists then review visual quality, gameplay function, and consistency before deciding to fix, regenerate, or reject the asset.
Engine Export and Governance
The final asset receives collisions, LODs where needed, metadata, and engine-specific settings. Its source, tool, references, license status, edits, and approvals are recorded so the studio knows exactly how the asset was created.
These seven stages form the map for the rest of the article. The goal is not maximum automation. It is a repeatable route from generated material to approved game content.
Stage 1: AI 3D Generation—Turning Concepts into Meshes
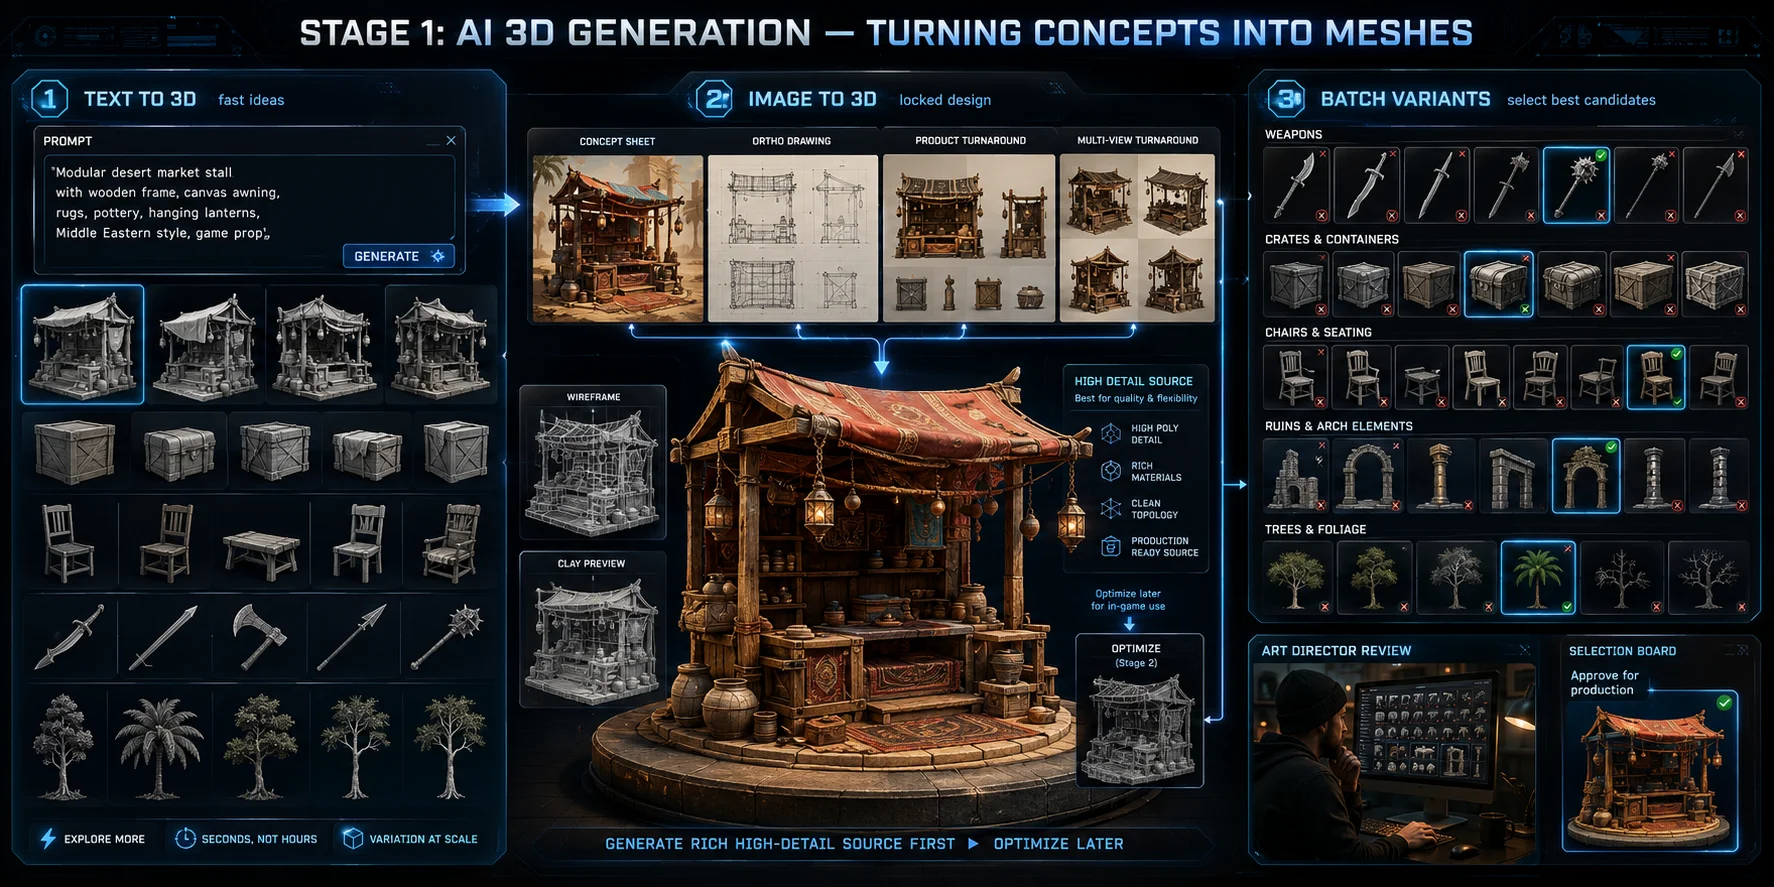
The two main input modes are text-to-3D and image-to-3D.
Text-to-3D works best for broad exploration. A prompt such as “stylized desert guard tower, eroded sandstone, heavy base, broken upper balcony, no vegetation” can produce several directions before the concept is fully locked. It is useful for props, silhouettes, variations, placeholders, and early world-building.
Image-to-3D works better when the design already exists. Concept art, product-style renders, photographs, or multi-view turnarounds provide stronger constraints on proportion and color. Clean backgrounds, even lighting, clear silhouettes, and consistent views usually reduce ambiguity.
For important assets, use the modes together. Generate or sketch several concepts, approve one design, prepare a controlled reference sheet, and then reconstruct it with image-to-3D. This separates creative exploration from production interpretation.
Tripo AI’s AI 3D Model Generator combines text and image generation with downstream tools such as Smart Mesh, quad remeshing, texturing, and auto-rigging. Its Text-to-3D feature is useful for rapid ideation, while its image workflow supports single-view and multi-view inputs. This keeps the article’s example pipeline centered on Tripo from the first generated mesh through optimization and export.
Polygon strategy starts during generation, but the source mesh and runtime mesh should not be confused. Mobile props, console weapons, cinematics, web games, and VR assets need different budgets.
Practical tip: generate the highest useful detail available, preserve that result as the source mesh, and retopologize downward. Do not begin with an aggressively low-poly generation and expect it to contain production-level bevels, facial planes, or surface detail that never existed.
Batch generation is where Tripo becomes especially valuable. A studio can produce ten weapon silhouettes, twenty ruin variants, or an entire group of clutter props from a shared prompt structure. Keep the art direction, scale class, references, and naming prefix consistent, then record how many Tripo outputs survive review and move into the production pipeline.
Before the asset moves forward, preserve three things: the approved reference, the untouched generated source, and the generation record. Those files become the baseline for topology, baking, comparison, and provenance.
DCC Scene Assembly Example
A practical scene workflow can start from one approved master image rather than isolated prompts. Generate a style-consistent scene reference, split it into clean single-object references, then use single-image generation for background props and multi-view generation for landmark buildings or hero pieces.
- Create a master scene image that fixes the town layout, lighting direction, scale language, and visual style.
- Crop or redraw individual asset references with clean backgrounds and consistent front views.
- Generate distant props with single-image input; use multi-view input for buildings, landmarks, or assets where back and side structure matter.
- Apply consistent PBR materials, quad or Smart Mesh settings, and GLB export rules before moving into a DCC scene tool.
- In the DCC scene tool, normalize scale, organize assets into collections, place them according to the master layout, add native terrain, and reproduce the lighting mood for the final scene render.
Stage 2: Post-Processing and Retopology
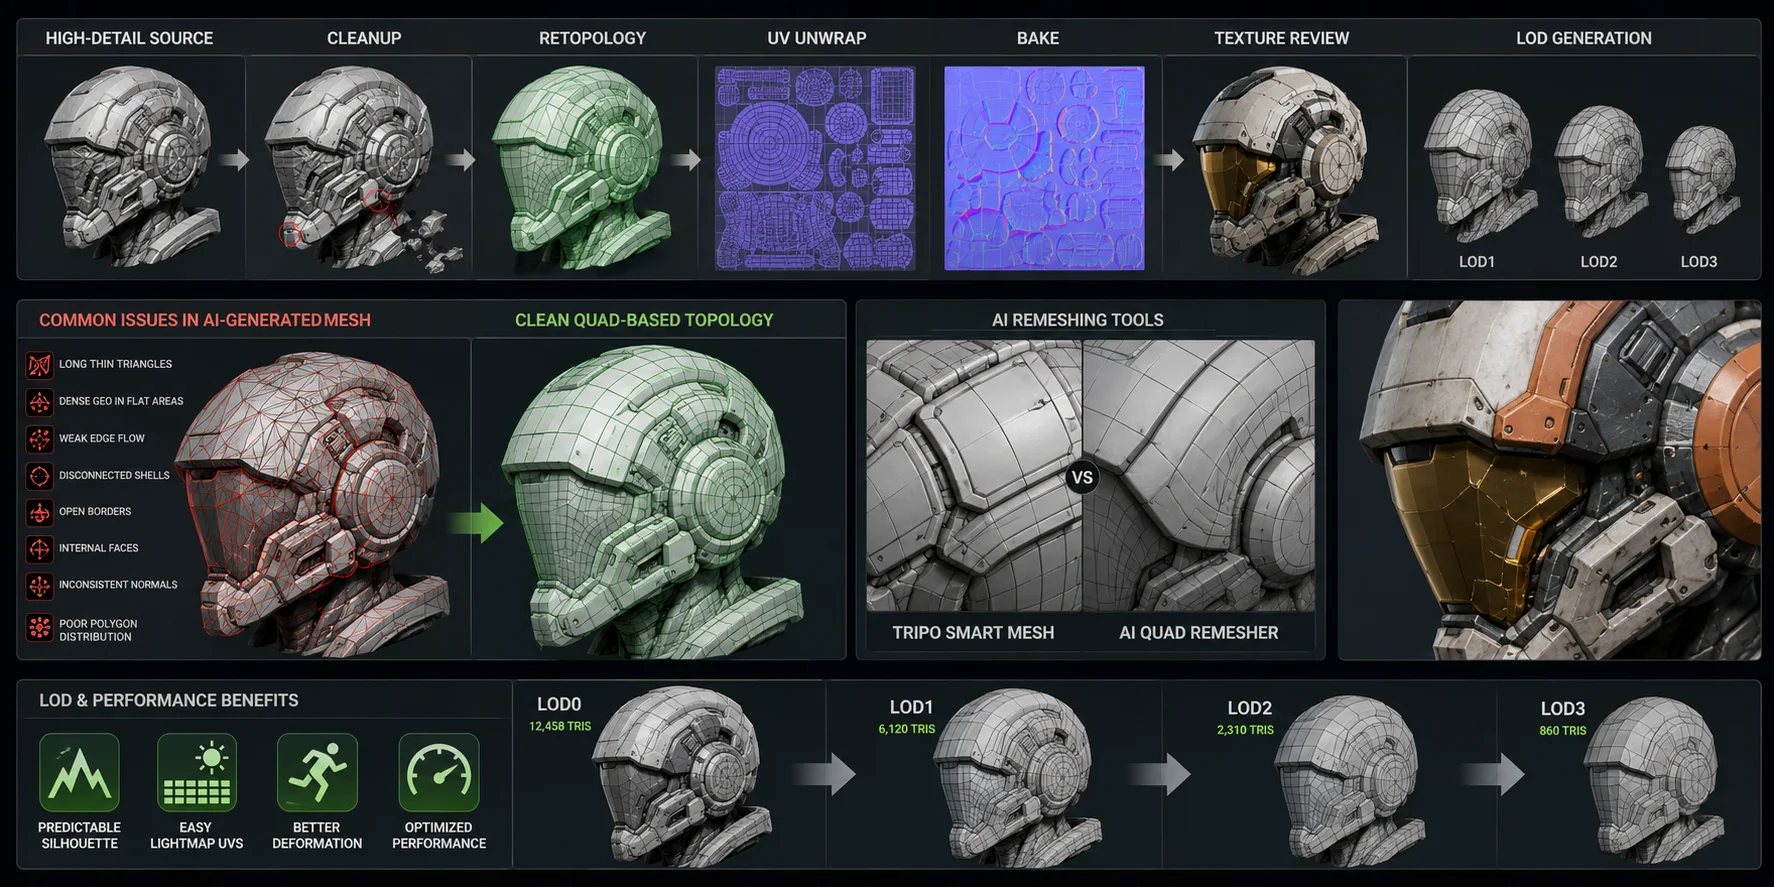
AI-generated meshes often look convincing in a turntable but hide problems that appear during baking, animation, lighting, or engine import. Common issues include long thin triangles, dense geometry in flat areas, weak loops around joints, disconnected shells, open borders, internal faces, inconsistent normals, and poor polygon distribution.
Retopology rebuilds the visible surface into a more intentional mesh. Tripo Smart Mesh is designed for optimized real-time output, while the AI Quad Remesher converts irregular meshes into cleaner quad-dominant topology. For game production, this Tripo step is what turns a visually promising generation into geometry that artists can test, optimize, and hand off.
A practical sequence is:
High-detail source → geometry cleanup → retopology → UV unwrap → bake → texture review → LOD generation
UV unwrapping should happen after the base topology is stable. Unwrapping a mesh that will soon be replaced creates duplicate work and can invalidate texture edits. Once the production mesh is approved, the team can create consistent UVs, bake high-detail normals, and generate LOD1, LOD2, and LOD3 while preserving pivots, material slots, and collision relationships.
Clean topology also makes downstream automation easier. LOD generation produces more predictable silhouettes, lightmap UVs are easier to validate, and rigs deform more reliably when edge flow is intentional.
For scheduling, compare the full cost of each route: generation time, cleanup, retopology, UV work, texture correction, QA, and engine integration. AI-assisted retopology may reduce manual work for suitable assets, but the result depends on topology requirements, asset complexity, and the amount of artist review. Treat any time estimate as a project-specific benchmark, not a universal promise.
The right question is not “Did the AI create quads?” It is “Does this topology support the asset’s actual use?”
Stage 3: Texture Generation and Editing
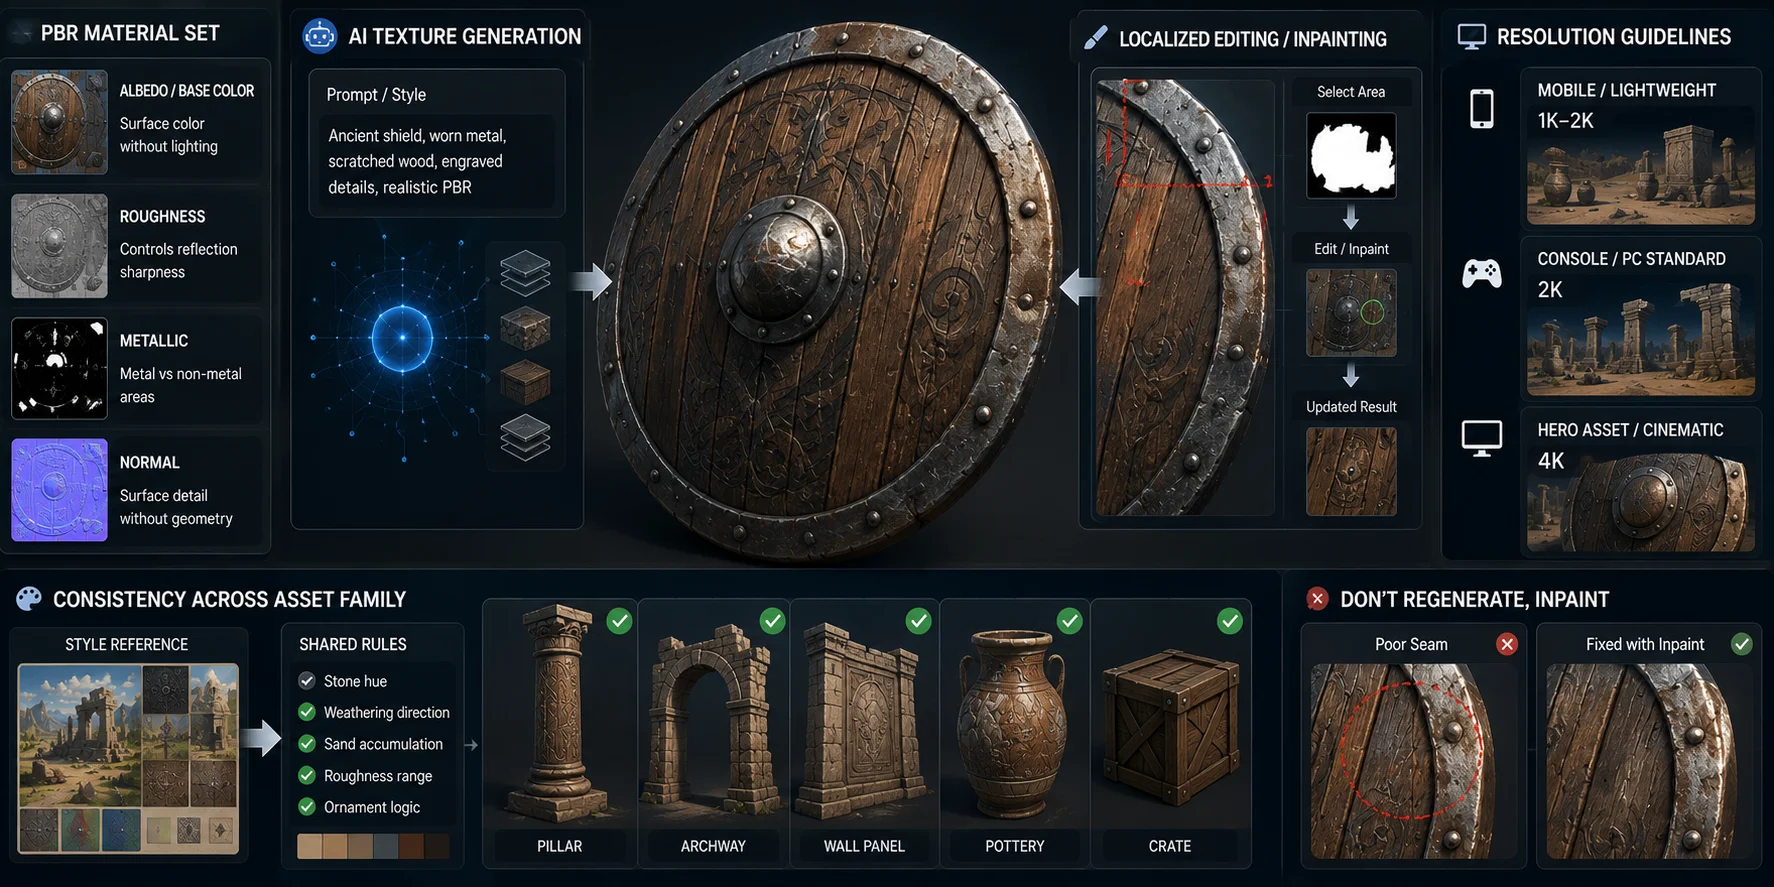
A game asset is not finished because it has a color image wrapped around it. A modern PBR material normally includes several coordinated maps:
- Albedo or base color: Surface color without baked lighting or reflections.
- Roughness: How broad or sharp the reflected light appears.
- Metallic: Which parts behave as metal rather than dielectric material.
- Normal: Small surface-direction changes that create detail without adding geometry.
Good AI texturing tools generate these maps as a connected material set. Tripo AI Texturing can create PBR maps and supports localized correction, allowing artists to repaint failed regions without regenerating the entire asset.
Texture resolution should follow platform, camera distance, and screen importance. Mobile props may use 1K or 2K maps, atlases, or shared trim sheets. Console and PC hero assets may justify 2K or 4K sets. Automatically assigning 4K textures to everything is not a quality strategy; it is an expensive way to increase build size and memory pressure.
Consistency across an asset family matters more than the quality of one isolated material. Create a reusable style prompt that defines palette, surface age, edge wear, dirt level, ornament density, realism, and material response. Pair it with the same approved reference sheet across a set of ruins, weapons, furniture, or foliage.
A “desert ruin” family, for example, should share stone hue, weathering direction, sand accumulation, roughness range, and ornament logic. Without those constraints, each generation may look individually attractive but collectively incoherent.
Use inpainting or localized texture editing when a single area fails. Correcting one seam, decal, face, or material transition is faster and safer than regenerating an already approved texture set.
Retexturing and Outfit Variant Workflow
For characters, clothing, or collectible variants, do not regenerate the whole model when only the surface design needs to change. Freeze the approved geometry, UVs, and rig first, then create texture variants on top of that stable base.
- Lock the base mesh, UV layout, pivots, and skeleton once the shape has passed review.
- Generate multiple texture directions from controlled prompts while keeping the same geometry.
- Repair seams, faces, decals, or material transitions locally instead of rebuilding the entire texture set.
- Export the required material channels, such as Base Color, Normal, Roughness, Metallic, and AO, according to the engine material setup.
- Build material variants in the DCC scene tool so artists can switch skins under the same lighting and check seams, baked lighting, and style consistency side by side.
Stage 4: AI Rigging and Animation Preparation
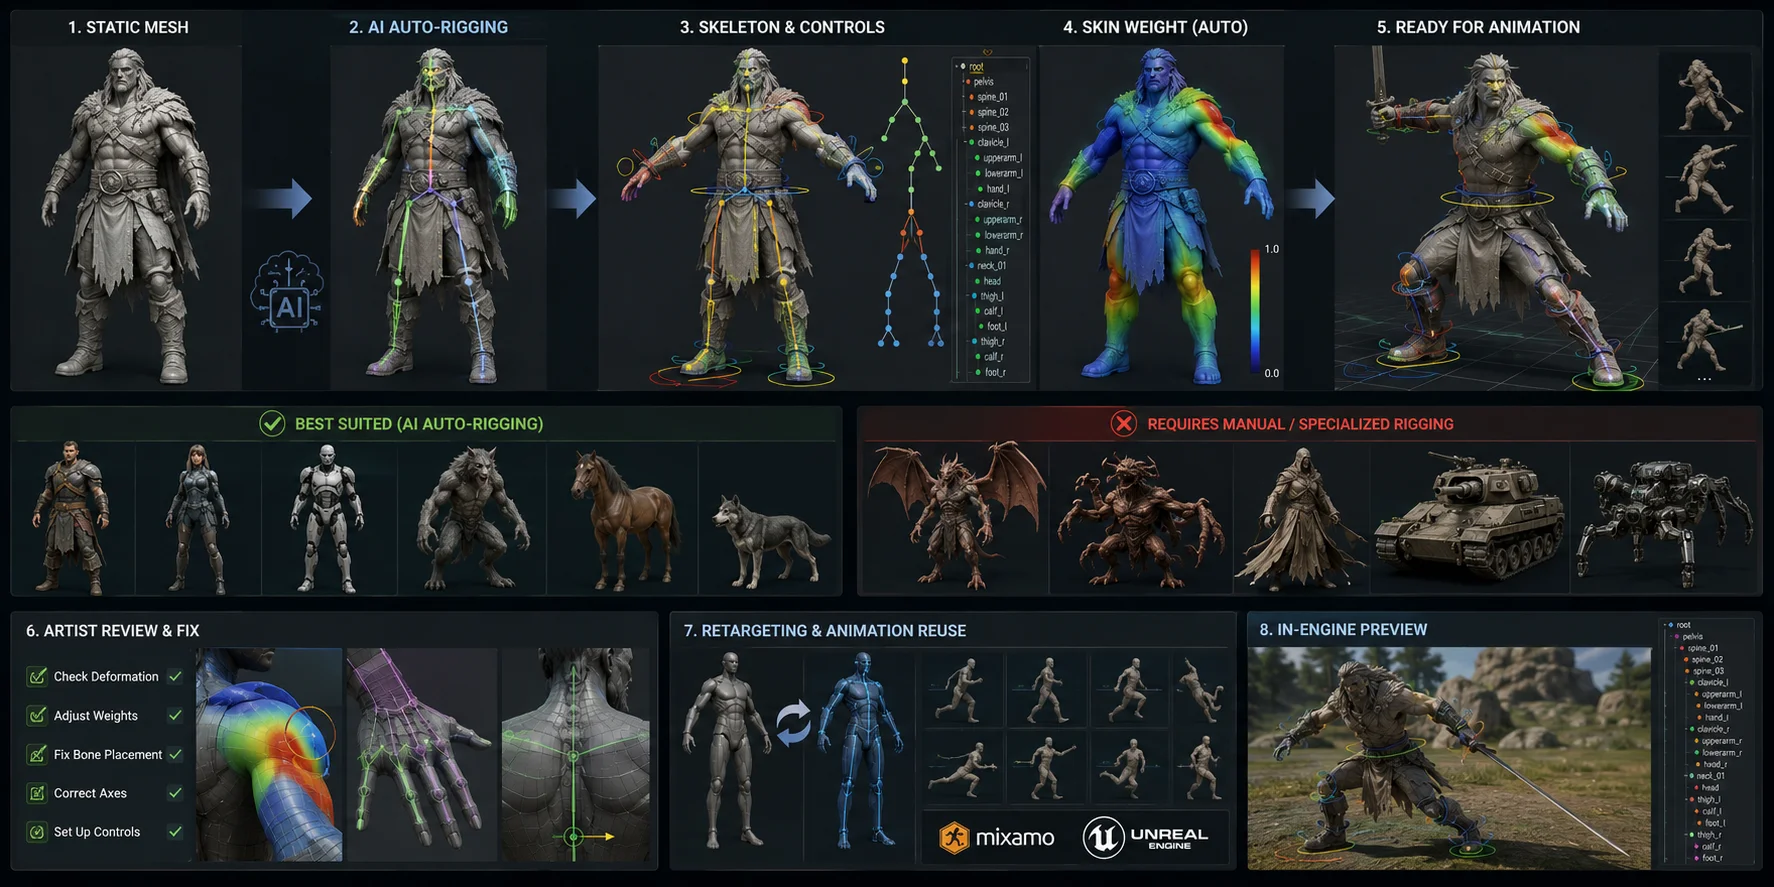
Rigging turns a static mesh into a deformable asset by adding a skeleton, skin weights, controls, naming, and engine-ready hierarchy. A production humanoid rig can take a skilled rigger one to three days when custom controls, facial systems, corrective shapes, and export constraints are included.
AI auto-rigging predicts joint placement from mesh shape and estimates how vertices should follow those joints. It is strongest on conventional humanoids, bipeds, quadrupeds, and common creature types. Exotic anatomy, asymmetrical monsters, cloth-heavy characters, vehicles, and mechanical rigs still require specialized work.
Tripo AI Auto-Rigging provides a fast first pass for supported characters. Once the skeleton matches a standard structure, the asset can accept existing animation libraries or motion-capture data through retargeting, reducing the cost of prototype locomotion and common actions.
Artist review remains mandatory. Test the shoulders, hips, wrists, ankles, neck, jaw, fingers, tail base, and any area where clothing or accessories intersect the body. Common fixes include weight painting, bone-axis correction, joint placement, root orientation, and geometry separation.
The production value of auto-rigging is not that it removes riggers. It lets technical artists spend less time placing predictable bones and more time solving deformation, control, and animation problems that actually affect quality.
Stage 5: Engine Integration and Export
Choose export settings according to the target engine and pipeline.
| Target | Recommended default | Practical use |
|---|---|---|
| Real-time production | FBX or GLB, based on the project import rules | Characters, props, skeletal animation, and general asset delivery |
| Web preview | GLB | Compact delivery of geometry, materials, and textures |
| AR preview | GLB plus USDZ when required | Cross-platform product and environment previews |
| DCC handoff | FBX, OBJ, or USD | Editing, cleanup, material checks, and scene assembly in downstream 3D tools |
| 3D printing review | OBJ, STL, or 3MF when appropriate | Geometry inspection, scale checks, and printable asset preparation |
OBJ is useful for static geometry but does not carry modern rigging or animation data well. FBX remains common because it supports meshes, skeletons, animation, and broad DCC compatibility. GLB is convenient when geometry, textures, and materials need to travel in one file. USD is increasingly valuable for structured scene composition, references, variants, and non-destructive collaboration.
Naming conventions determine whether scripts and import presets work reliably. A predictable folder might look like:
Assets/Environment/DesertRuins/SM_DR_Wall_A_01/
Inside it, stable suffixes can identify components:
_LOD0,_LOD1, and_LOD2for levels of detail_COLfor collision geometry_SKfor skeletal assets_MATfor materials_BC,_N, and_RMAfor texture channels
Store the source mesh, production mesh, baked textures, engine export, thumbnail, prompt or reference record, QA report, and license information together or connect them through asset metadata.
At export, validate units, axis orientation, pivot, frozen transforms, material slots, tangent basis, smoothing, skeleton scale, collision meshes, and LOD screen sizes. Automated import scripts can reject assets that violate naming, scale, texture, or triangle-budget rules before they enter the main project.
High-poly AI meshes can be useful for static environment assets when the target runtime supports high-detail geometry efficiently, but that is not permission to ignore production discipline. Teams must still evaluate material cost, collision, platform coverage, deformation requirements, overdraw, and fallback behavior. Skeletal characters and specialized gameplay assets continue to need more conventional optimization.
Metadata should include asset category, biome, style family, triangle count, texture-memory estimate, tool, model version, AI-assisted status, reviewer, and approval state. A searchable asset library becomes increasingly important when a studio generates hundreds of variants.
Stage 6: QA and Iteration Loops
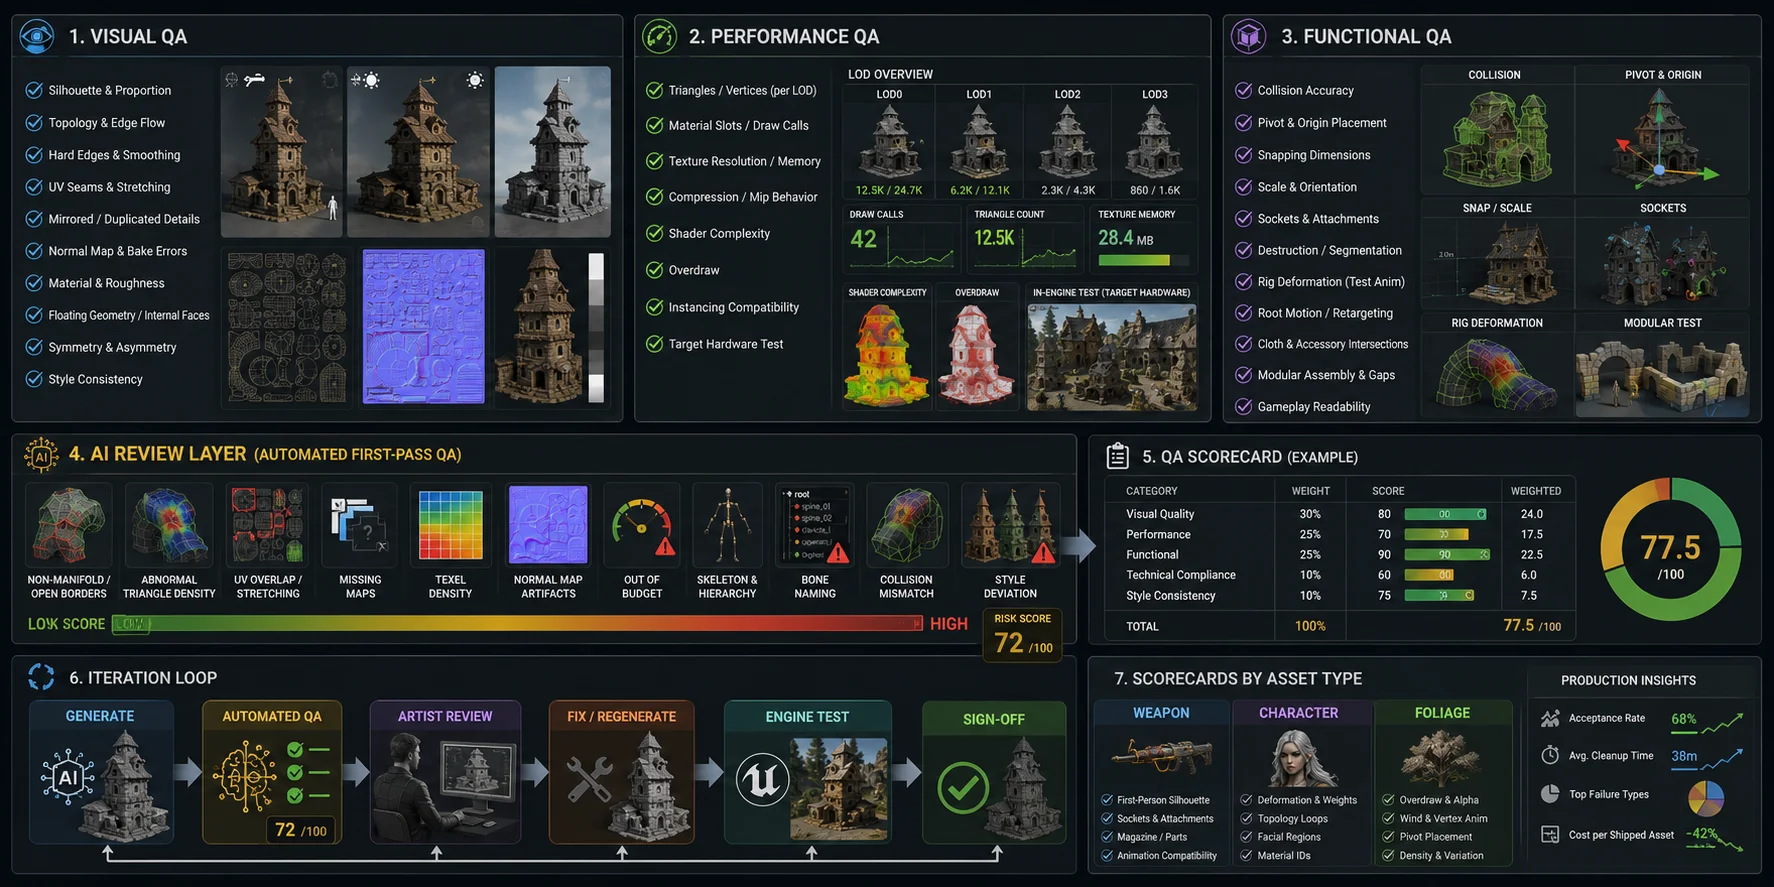
QA is the difference between a fast demonstration and a reliable production pipeline.
Visual QA
Check the silhouette against the approved reference from gameplay cameras. Inspect topology density, hard edges, normals, smoothing, disconnected shells, UV seams, stretching, mirrored details, texel density, and normal-map baking. Review the asset under neutral lighting and representative game lighting.
Performance QA
Compare triangles with the asset-class budget. Test LOD transitions, texture resolution, mipmaps, compression, resident memory, material-slot count, shader complexity, transparency, overdraw, draw calls, instancing, and streaming behavior on target hardware.
Functional QA
Test collision accuracy, walkable surfaces, projectiles, pivots, snapping, scale, sockets, physics, rig deformation, animation retargeting, destructible states, and variant switching. A beautiful model with incorrect collision or a broken socket is still a failed asset.
Add an AI Review Layer
An automated review layer can catch measurable defects before an artist opens the file. Useful checks include non-manifold geometry, open boundaries, overlapping UVs, missing maps, unusual topology density, invalid scale, naming errors, polygon-budget violations, and absent collision files.
This layer should not make aesthetic decisions. It filters obvious technical failures so artists spend their time on silhouette, style, materials, deformation, and gameplay relevance.
Use the following iteration loop:
Generate → Automated QA → Artist Review → Fix or Regenerate → Engine Test → Sign-Off
Regenerate when the design or geometry is structurally wrong. Fix locally when the asset is approved except for a seam, texture artifact, weight issue, or minor topology defect.
Create a QA scorecard for every asset class. Record blockers, warnings, reviewer, fix time, and final status. Over several batches, the scorecard will reveal which prompts, tools, model versions, and asset types produce the lowest accepted-asset cost.
AI-Generated vs. Hand-Crafted Assets: When to Use Each
| Decision factor | AI-generated assets | Hand-crafted assets | Recommended approach |
|---|---|---|---|
| Environmental scatter props | Excellent for volume and variation | Slow for large sets | AI first, artist cleanup |
| Hero character | Fast for concepts and base forms | Highest quality ceiling | Hand-crafted or heavily hybrid |
| Weapon family | Strong for silhouette variants | Better for exact mechanics and first-person polish | Hybrid |
| Background architecture | Efficient for secondary forms | Better for modular precision | AI for support assets; manual for gameplay-critical kits |
| Time cost | Low initial creation time | Higher initial labor | Compare total cleanup and QA time |
| Consistency | Requires references and prompt standards | Easier under a disciplined art team | Use a style guide for both |
| Customization | Fast broad changes | Precise local control | AI for breadth, artists for specificity |
| Quality ceiling | Variable but improving | Highest for intentional hero work | Match the method to asset importance |
The clearest production stance is simple: use AI for volume and humans for significance.
Scatter props, background dressing, early variants, and secondary objects benefit most from automation. Hero characters, iconic weapons, narrative objects, and gameplay-critical modular sets deserve deeper human control.
A hybrid weapon workflow might use AI to generate ten silhouettes, an artist to design the functional mechanism, AI texturing for a material pass, and manual polish for first-person presentation. The result is neither “AI-made” nor “fully traditional.” It is a controlled production asset built with the most efficient method at each stage.
AI also performs better when the studio provides a strong style guide, approved references, material rules, and proportion constraints. Without those, every prompt becomes a separate art direction decision, and consistency collapses quickly.
Common Pitfalls and Challenges
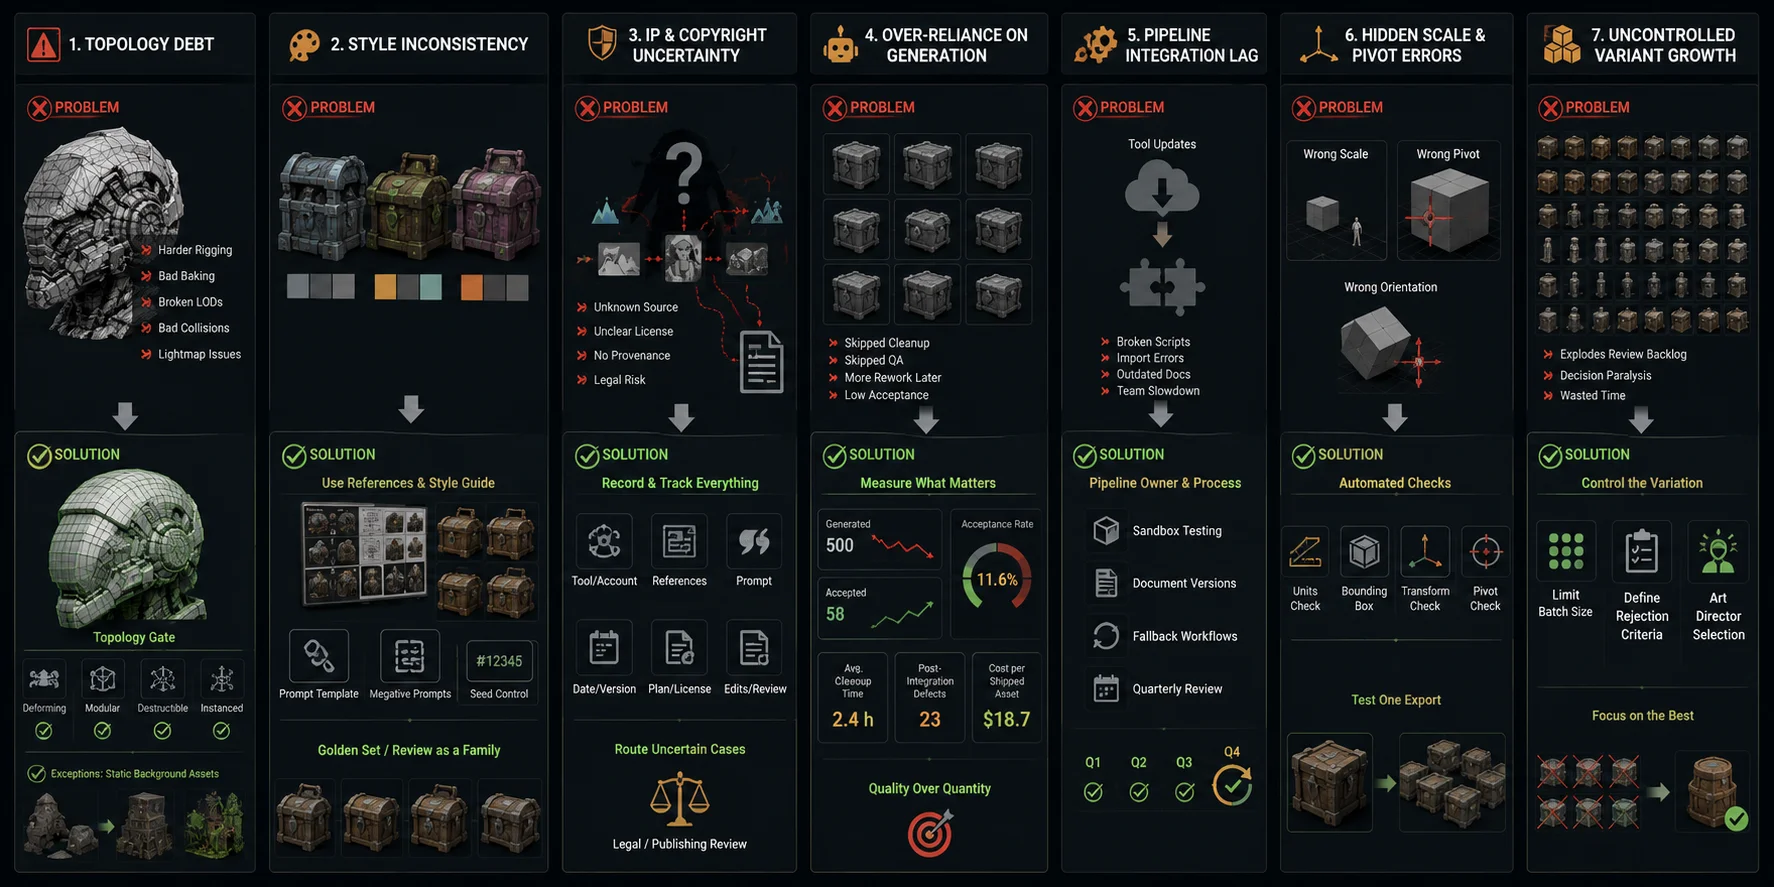
Topology Debt
Problem: The team imports raw AI meshes because they look acceptable in still images. Rigging, baking, LOD creation, collisions, and lightmaps then become harder.
Solution: Establish a topology gate before texturing or rigging. Define exceptions for static background assets, but require production topology for deforming, modular, destructible, or frequently instanced content.
Style Inconsistency
Problem: Assets generated from separate prompts have mismatched proportions, palettes, wear patterns, and ornament density.
Solution: Use approved reference sheets, prompt templates, shared negative prompts, controlled seeds where available, and a “golden set” of accepted assets. Review new outputs beside the family rather than alone.
IP and Copyright Uncertainty
Problem: The studio cannot later identify which tool, account, reference, license, or generation settings produced a commercial asset.
Solution: Restrict production to approved tools and accounts. Record source references, prompts, dates, tool versions, plan status, license information, human modifications, and reviewers. Route uncertain cases through studio legal or publishing review.
Over-Reliance on Generation
Problem: Fast generation creates pressure to skip cleanup, engine testing, or human review.
Solution: Measure accepted assets rather than generated assets. Track rejection rate, cleanup time, defects discovered after integration, and cost per shipped asset. Ten fast generations are not progress when nine are unusable.
Pipeline Integration Lag
Problem: AI platforms update faster than the studio’s scripts, import rules, or documentation.
Solution: Assign a pipeline owner. Test updates in a sandbox, document supported versions, maintain fallback workflows, and review approved tools quarterly instead of changing production in the middle of a sprint.
Hidden Scale and Pivot Errors
Problem: The mesh looks correct in a browser viewer but imports at the wrong scale, orientation, or pivot position.
Solution: Add automated unit, bounding-box, transform, and pivot checks. Test one representative export before launching a large batch.
Uncontrolled Variant Growth
Problem: The team generates hundreds of variations and creates a review backlog larger than the original art task.
Solution: Limit batch size, define rejection criteria before generation, and require art-director selection at the concept stage. Variation should reduce decision time, not create a digital warehouse of maybes.
Cost and Pricing Analysis
Traditional outsourcing and AI-assisted production should be compared at the shipped-asset level.
For rough planning, compare each option at the accepted, shipped-asset level. Include tool or compute cost, artist time, pipeline overhead, rejection cost, QA, legal review, storage, and engine integration. The figures in any budget model should be labeled as internal assumptions and refreshed against the studio's own batch data.
The useful metric is:
Tool cost + artist time + pipeline overhead + rejection cost ÷ accepted, shipped assets
Studios should not hardcode current subscription prices into long-term planning because credits, concurrency, privacy, API access, and commercial-use terms can change. Review the official Tripo AI Pricing page before budgeting.
For a studio producing hundreds of secondary assets, the savings can be redirected toward character artists, technical art, animation, level dressing, or additional QA—the areas where human judgment has the highest visual impact.
Governance and Studio Policy for AI Assets
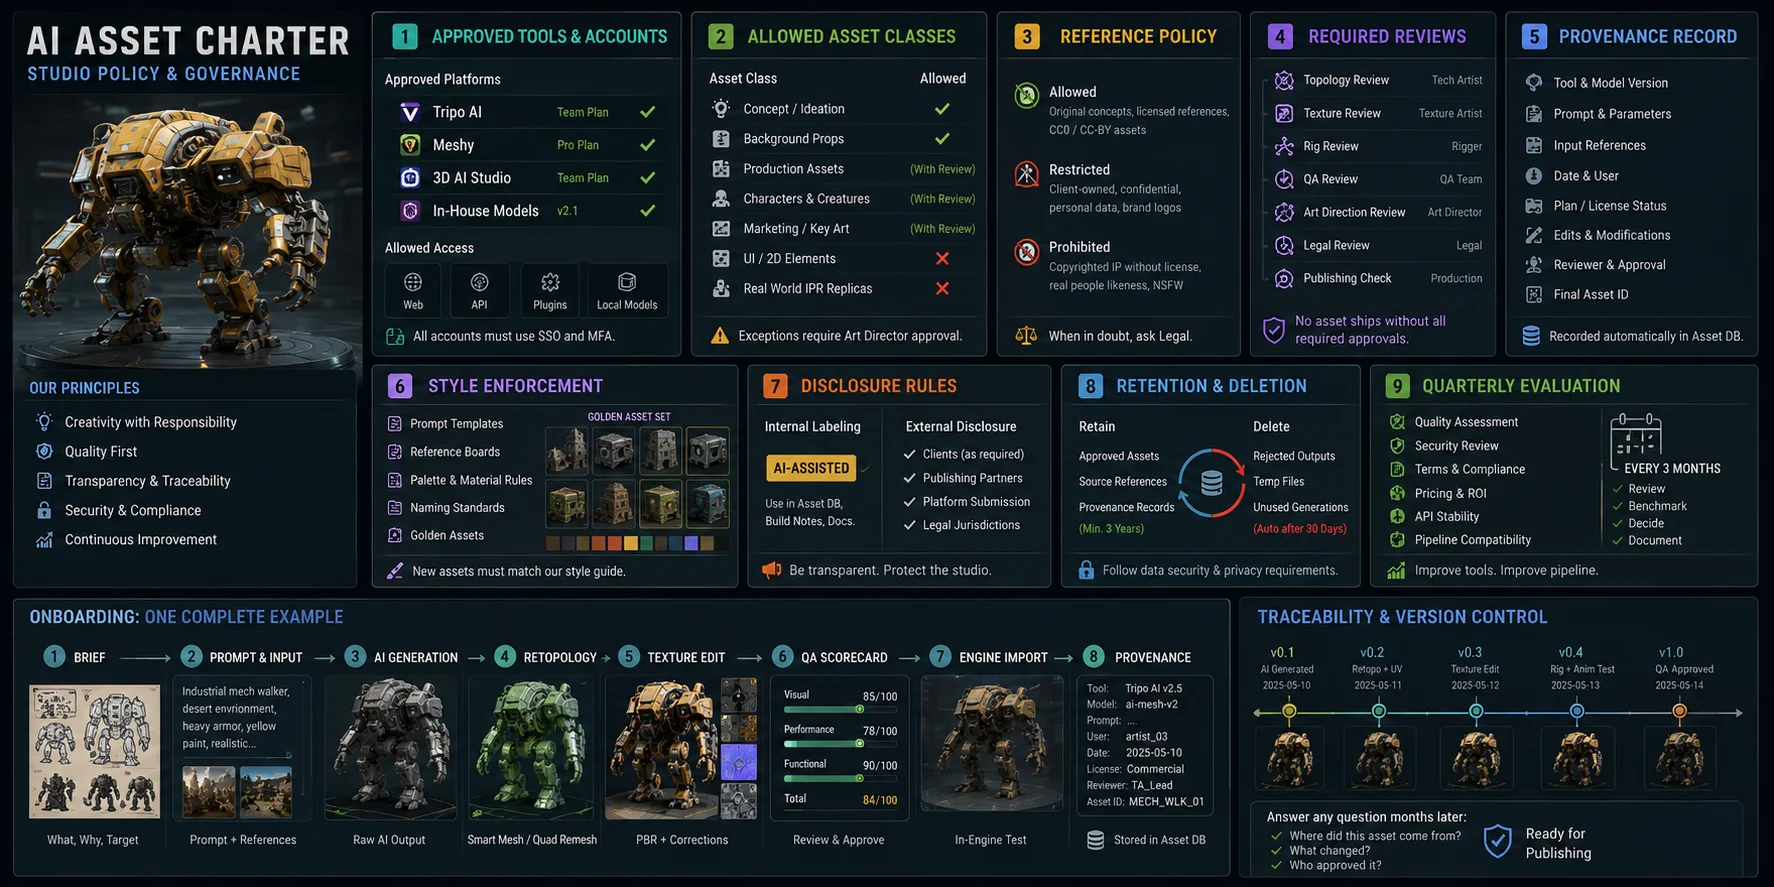
Once an AI-assisted asset enters a commercial build, governance becomes part of the art pipeline.
Create a short AI Asset Charter with the following sections:
- Approved tools and accounts: Define which platforms, plans, APIs, and local models may be used.
- Allowed asset classes: Specify whether AI is approved for concepts, background props, production assets, characters, marketing images, or only selected categories.
- Reference policy: Define what copyrighted, confidential, client-owned, or personal material may be uploaded.
- Required reviews: List topology, texture, rig, QA, art direction, legal, and publishing checkpoints.
- Provenance record: Save the tool, model version, prompt, input references, date, user, license status, edits, reviewer, and final asset ID.
- Style enforcement: Maintain prompt templates, reference boards, palette rules, naming standards, and golden assets.
- Disclosure rules: Define how AI-assisted work is labeled internally and what clients, platforms, or publishing partners must be told.
- Retention and deletion: State how cloud generations, source images, rejected outputs, and temporary files are stored or removed.
- Quarterly evaluation: Review quality, security, terms, pricing, API stability, and pipeline compatibility.
This charter should be practical, not theoretical. Artists need to know what they may generate, what references they may upload, what must be reviewed, and how to record the result.
Onboarding should include one complete example asset. A new artist should see the brief, prompt, generated source, retopology settings, texture correction, QA scorecard, engine import, and provenance record. A written policy without a working example is easy to misinterpret.
Version control should answer a simple question months later: Where did this asset come from, what changed, and who approved it?
That traceability matters when a publisher requests disclosure, a tool changes its terms, a reference source is questioned, or a technical problem appears late in development.
Frequently Asked Questions
How are game studios integrating AI into their 3D asset pipelines?
Most studios use a hybrid approach. They begin with generation, texturing, or retopology for secondary assets, then expand after establishing quality gates, licensing rules, and human review. Hero and narrative assets remain more heavily handcrafted.
What is the AI-driven 3D asset pipeline for game development?
It is an end-to-end workflow in which AI assists with text or image input, mesh generation, retopology, UVs, PBR texturing, rigging, QA, and export. Human artists direct the brief and approve every production stage rather than accepting raw output.
How can studios evaluate Tripo AI for 3D modeling?
This article focuses on Tripo AI as the example platform. Evaluate the workflow by checking Tripo generation quality, Smart Mesh and quad remeshing output, texture results, auto-rigging fit, export reliability, licensing, and cleanup time for the same asset brief.
How can AI reduce the time needed to create 3D game assets?
AI can reduce the time spent on repetitive first passes, especially when a team generates controlled variants, starts from approved references, and automates technical checks. Measure the gain with the same asset brief by tracking generation, cleanup, QA, rejection, and engine-integration time; the result will vary by asset class and quality bar.
What are the main challenges of using AI in game art production?
The most common problems are topology debt, style inconsistency, texture artifacts, unreliable deformation, unclear provenance, licensing uncertainty, and rushed QA. Studios reduce these risks through approved tools, reference standards, automated validation, and human sign-off.
How does machine learning optimize 3D game assets?
Machine-learning systems can predict cleaner topology, generate UV-aware PBR maps, estimate skeleton placement, create skin weights, produce LODs, and detect common defects. These systems reduce repetitive specialist work but still require technical-art review.
How can AAA studios use AI for 3D content creation at scale?
AAA teams can use AI for variants, background props, material creation, retopology, tagging, validation, and asset search. Scale requires approved vendors, APIs, private workflows, provenance, security review, style standards, and QA scorecards shared across teams.
What skills are needed to implement AI in a 3D asset pipeline?
Teams need art direction, modeling and topology knowledge, PBR texturing, rigging fundamentals, engine-import expertise, scripting or API integration, QA design, asset management, and licensing awareness. Prompting helps, but production judgment decides what ships.
Conclusion
AI does not replace the artist. It removes repetitive labor between an idea and a production decision.
The strongest pipeline connects seven controlled stages: brief, generation, retopology, texturing, rigging, QA, and engine export, with governance surrounding the entire process. Studios that build AI-literate art teams now gain reusable prompts, better review standards, stronger automation, and production knowledge that compounds as the tools improve.
Ready to try an AI-assisted workflow? Start generating and refining assets in Tripo AI Studio.
For current credits, team features, privacy options, and commercial-use plans, explore Tripo AI Pricing.
