How to Use a 3D Generation API: A Developer's Guide
TL;DR:
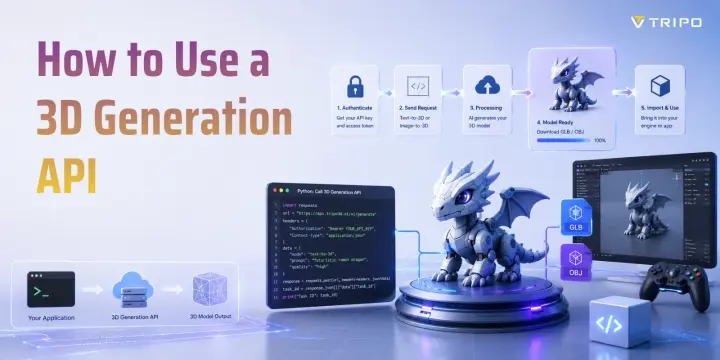
- A 3D generation API turns a text prompt or image into a 3D model you fetch over HTTP—no modeling needed.
- Most are asynchronous: you submit a job, get a task ID, then poll the status endpoint or use a webhook when the provider explicitly documents one.
- Authenticate with an API key (kept server-side), send a JSON request, and handle GLB/OBJ/FBX output.
- The real work is downstream: importing the mesh into Unity, Blender, or your web app.
- Pick text-to-3D for concepting and image-to-3D for fidelity to a reference; watch credits and rate limits.
A 3D generation API lets your app turn a text prompt or a single image into a ready-to-use 3D model with a single HTTP request—no manual modeling. This guide walks the full workflow: get an API key, send your first text-to-3D or image-to-3D request, fetch the result, and import the model into your engine. We'll use the Tripo API as the running example.
What a 3D Generation API Actually Does
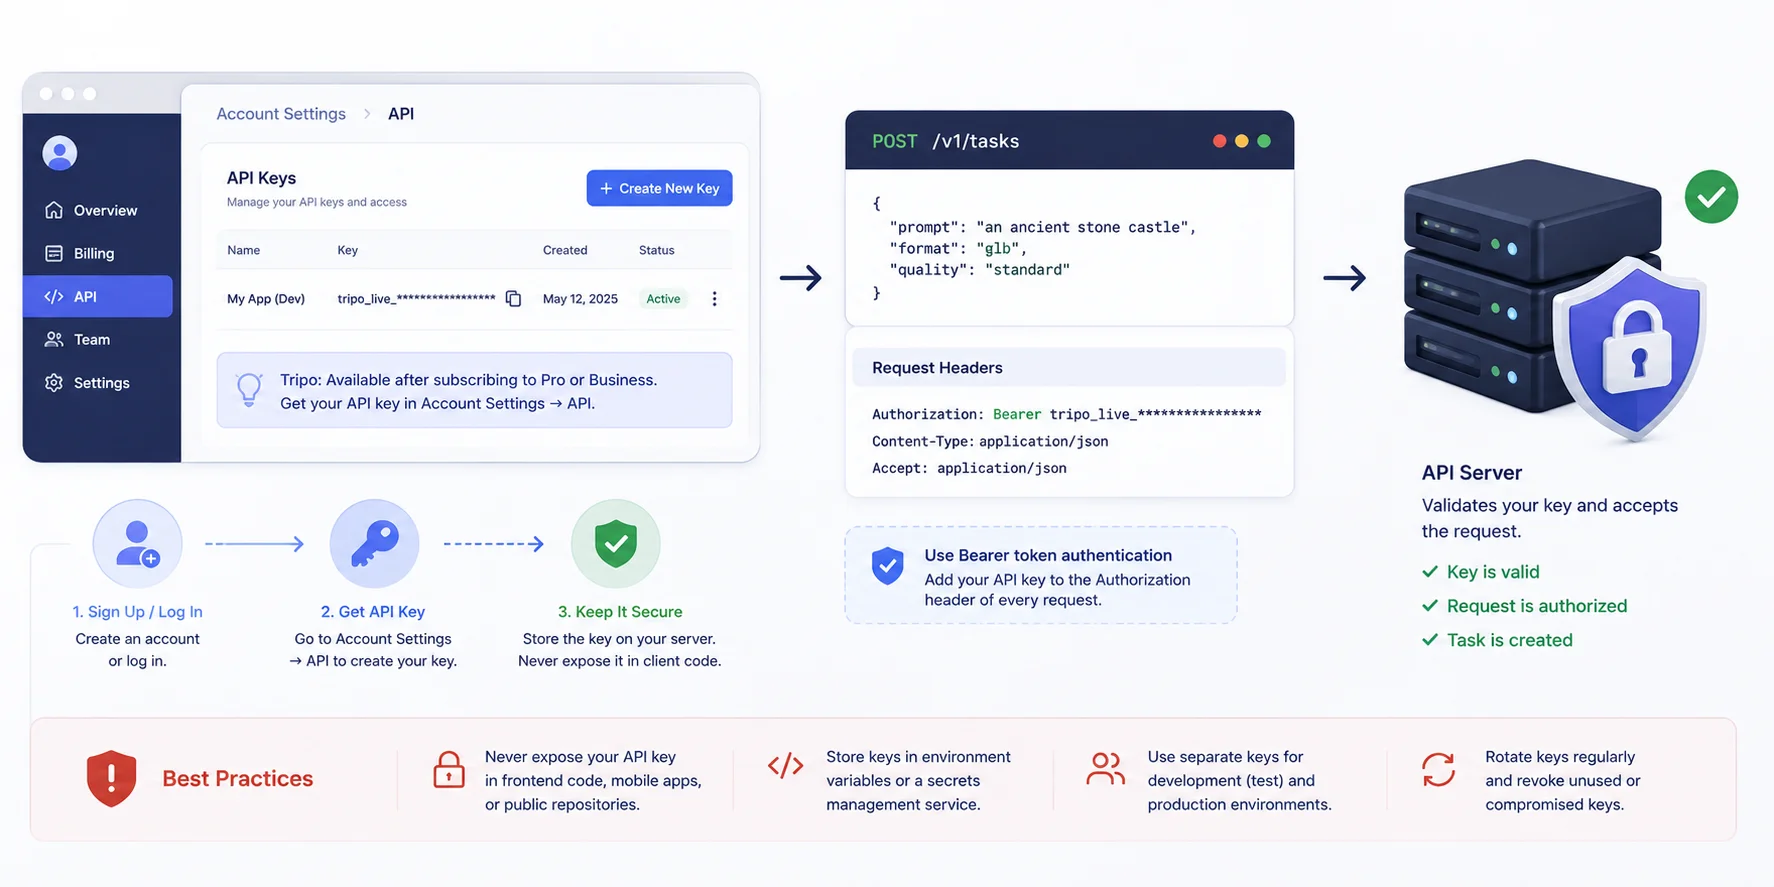
A 3D generation API lets developers turn either a text prompt or a reference image into a usable 3D asset through a simple API call. Instead of spending hours modeling objects by hand or searching through large asset libraries, an application can request a new model on demand and receive a ready-to-use mesh in formats such as GLB, OBJ, or FBX. This is why interest in how to use a 3D generation API has grown rapidly across modern development teams. As the global market for 3D content creation and real-time visualization continues to expand, APIs are becoming a practical building block rather than an experimental AI feature.
Think of a 3D generation API as a translation layer between human input and production-ready geometry. The input may be a short description like "low-poly medieval wooden cart" or an uploaded product photo, while the output is a structured 3D mesh complete with geometry—and, depending on the service, materials and textures. Developers can then import the generated asset directly into game engines, DCC tools, AR experiences, or 3D printing workflows.
This creates a third approach to building 3D content. Traditionally, teams either modeled assets manually in software like Blender or Maya, or purchased existing models from online marketplaces. AI-powered generation adds another option: creating custom assets automatically whenever an application needs them. For many teams, this 3D asset generation API workflow significantly reduces production time while still allowing artists to review, edit, or optimize the final mesh before shipping.
Today, game studios use these APIs to prototype environments and props, AR/VR developers generate interactive objects on demand, e-commerce platforms convert product images into 3D previews, and makers create printable models from sketches or photos. Whether you are following a text to 3D API guide for AI-generated game assets or an image to 3D API guide for product visualization, the core workflow is the same: provide an input, receive a standardized 3D file, and integrate it into your existing pipeline.
How a 3D Generation API Works
How These APIs Work — The Async Job Model
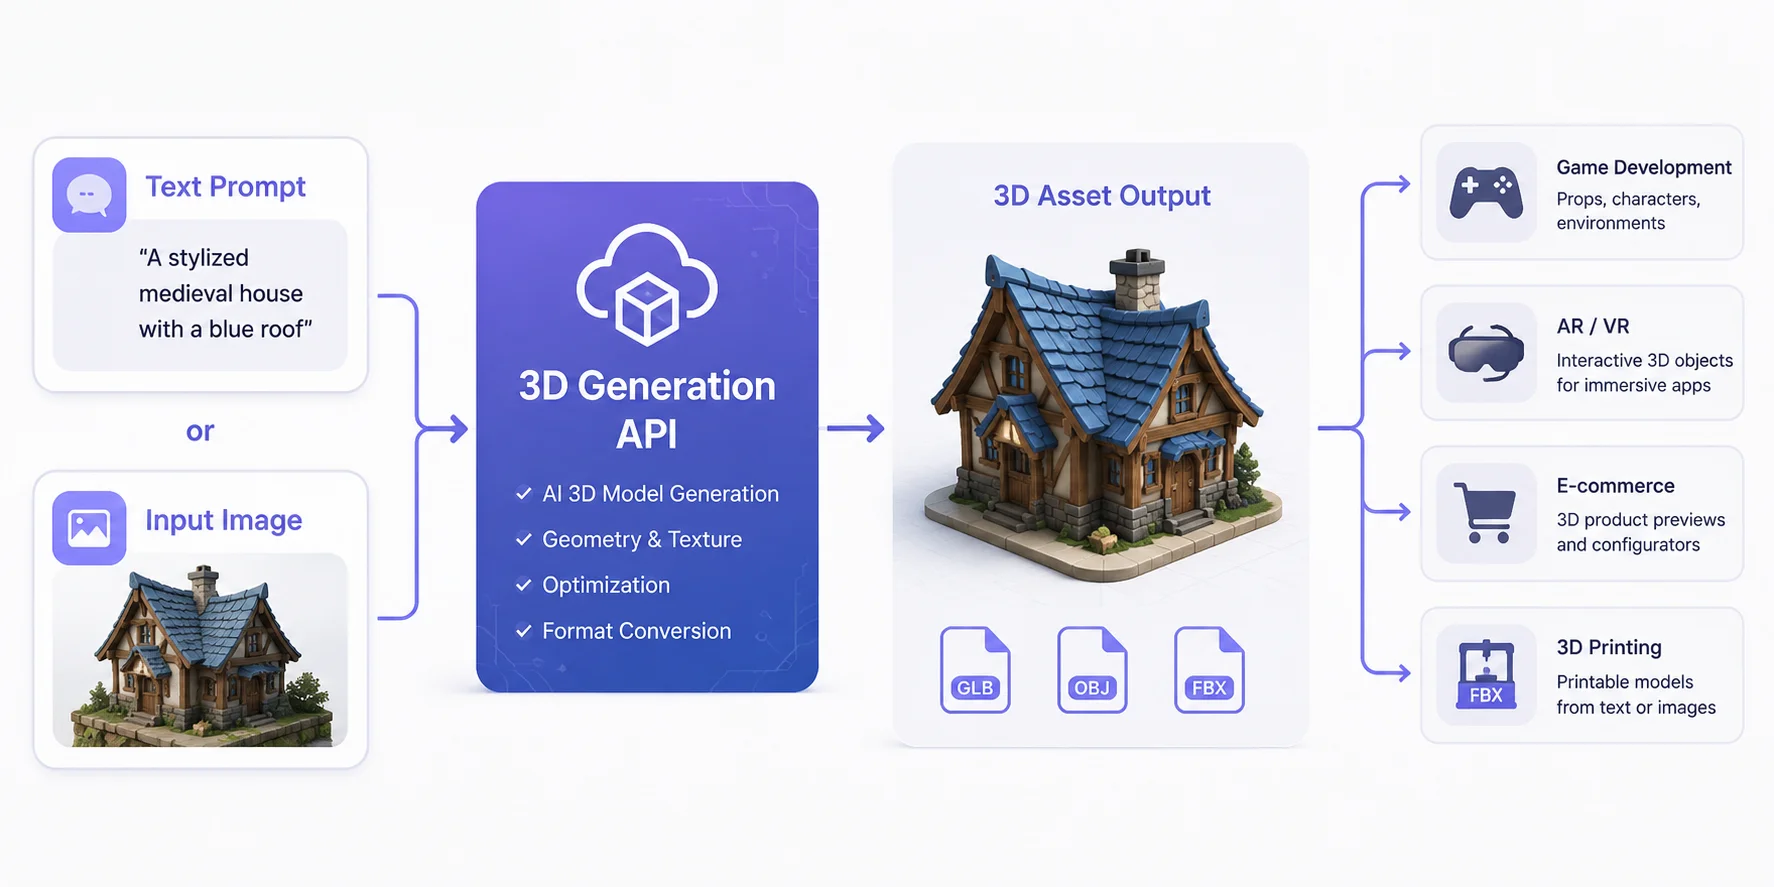
Most developers expect an API request to return a result immediately. A 3D generation API works differently because creating a mesh is a computationally intensive AI task that can take anywhere from a few seconds to several minutes, depending on model complexity and queue length. Instead of waiting for the HTTP request to stay open, almost every modern text to 3D API guide and image to 3D API guide follows an asynchronous job model. Your application submits a generation request, receives a task identifier, and checks back later for the finished asset. Understanding this pattern is far more important than memorizing a single endpoint because nearly every 3D asset generation API workflow is built around it.
Submit → Task ID → Fetch
The first request usually contains your input—either a text prompt or an uploaded image—along with optional parameters such as quality, mesh format, texture settings, or polygon count. Rather than returning a GLB or FBX file immediately, the API responds with a unique task ID and an initial status such as queued or running.
That task ID becomes the reference for every subsequent request. Your application uses it to query the job status, retrieve progress information, and finally download the generated model once processing is complete. This design prevents long-running HTTP connections from timing out and allows the generation service to scale efficiently under heavy workloads.
Polling and Provider-Supported Webhooks
There are two common ways to know when a job has finished.
Polling means your application periodically sends a request—for example every three to five seconds—to check whether the task status has changed. It is straightforward to implement and works well for prototypes, internal tools, and applications with relatively few generation requests. The trade-off is that repeated status checks create additional API traffic, especially if generation takes longer than expected.
Some providers support webhooks to reduce repeated status requests. When the API documentation exposes a callback URL parameter, payload schema, security method, and retry behavior, your application can receive a completion notification instead of polling continuously. Webhooks are useful for background processing and higher-volume systems, but they should not be assumed to exist across providers. If no webhook is documented, use the supported task-status endpoint with bounded polling and backoff.
What "success", "running", and "failed" Mean
A task typically moves through a simple state machine:
- Queued – The request has been accepted and is waiting for processing.
- Running – AI generation is actively creating the mesh and textures.
- Success – The model is complete and ready to download in the requested format, such as GLB, OBJ, or FBX.
- Failed – Generation could not be completed because of invalid input, unsupported parameters, server errors, or timeout conditions.
Your application should always check the task status before attempting to download the model. A robust how to use a 3D generation API implementation also includes retry logic, timeout handling, and clear error messages so users understand whether a job is still processing or genuinely needs to be resubmitted. This asynchronous workflow may feel unfamiliar at first, but it is the standard architecture used by modern AI generation platforms because it is reliable, scalable, and easy to integrate into existing development pipelines.
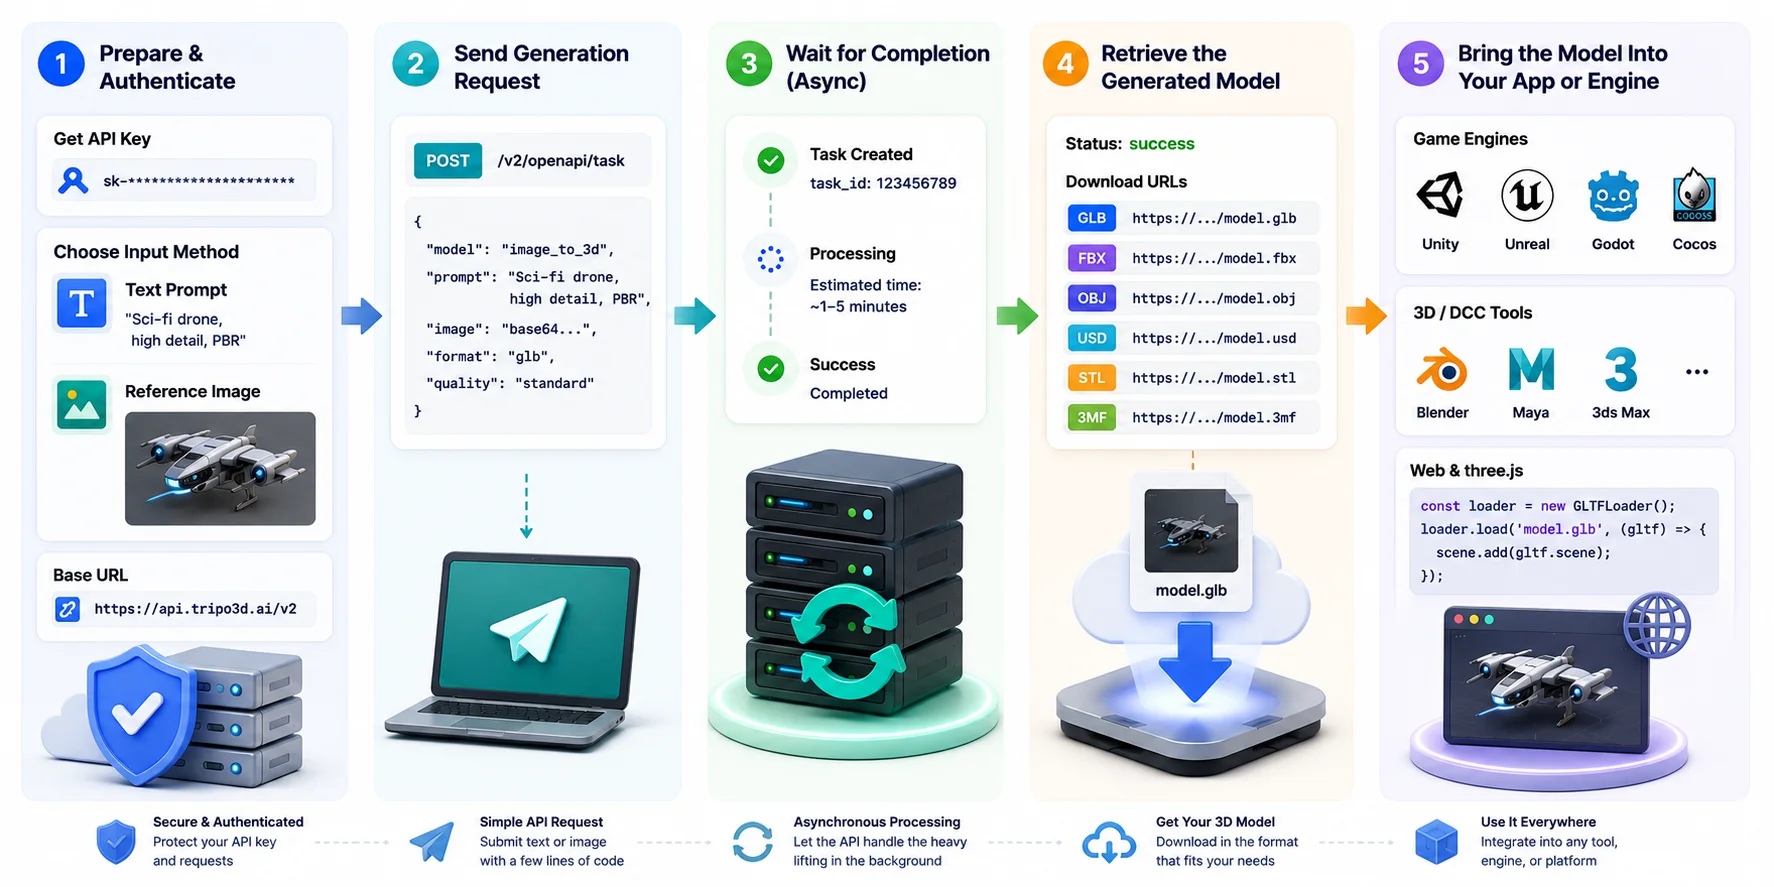
The Async 3D Generation API Workflow
Step 1 — Get Your API Key & Authenticate
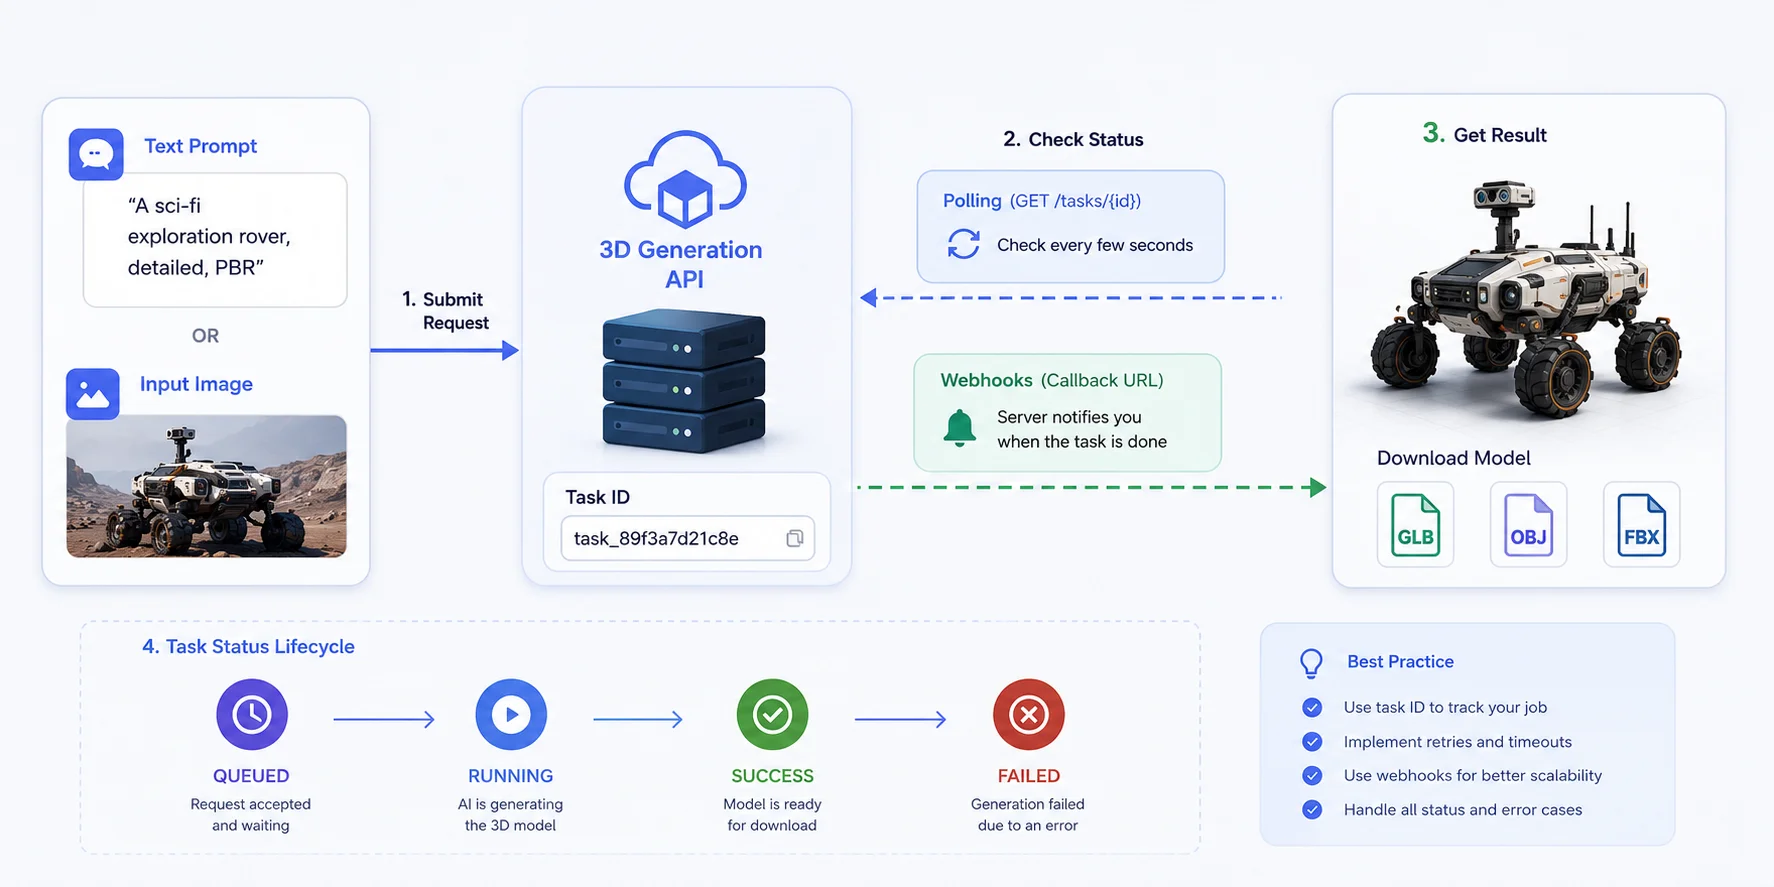
Before your application can generate any 3D assets, it needs permission to access the API. That starts with creating an account and obtaining an API key. Most providers place this in an Account or API Settings page after your account has API access enabled. For example, Tripo users can generate an API key from Account Settings → API once their subscription includes API access. This key uniquely identifies your application and authorizes every request you send.
Authentication is typically handled with a Bearer token in the HTTP request header. A common request includes an Authorization: Bearer YOUR_API_KEY header alongside the appropriate Content-Type. Once the request reaches the server, the API verifies the key before accepting any generation job. This authentication step is the same whether you are following a how to use a 3D generation API tutorial, a text to 3D API guide, or an image to 3D API guide.
The most important best practice is never expose your API key in client-side code. Do not hard-code it into a web application, mobile app, Unity project, or public GitHub repository. Instead, keep the key on your backend, store it in environment variables or a secrets manager, and let your server make API requests on behalf of the client. If a key is leaked, anyone can consume your API quota or incur unexpected usage costs.
Many teams also separate development and production credentials. Test keys are used during local development and integration testing, while production keys are reserved for live applications with stricter monitoring and rotation policies. Keeping these environments separate makes it easier to experiment safely without risking your production quota or exposing sensitive credentials. Starting with secure authentication establishes a solid foundation for the rest of your 3D asset generation API workflow.
Getting Started with API Authentication
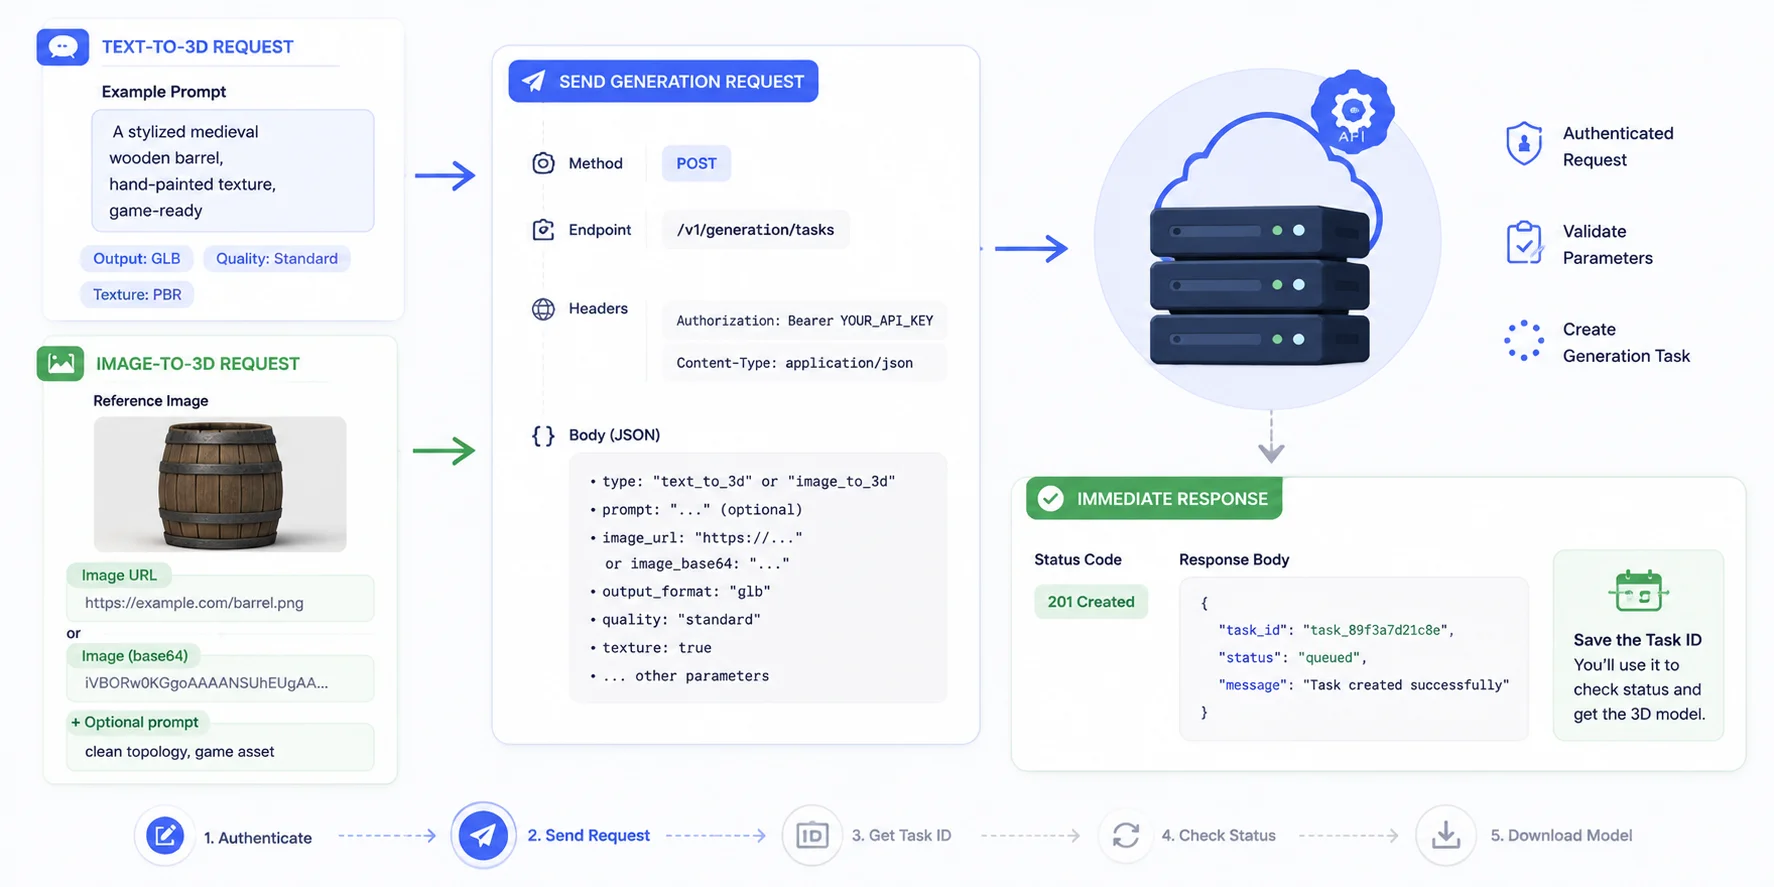
Step 2 — Send Your First Generation Request
Once authentication is set up, you are ready to send your first generation request. This is the point where your application tells the API what to create, what type of input you are providing, and which output format you want. The exact endpoint and parameter names vary by provider, so this is a natural place to link readers to the Tripo API documentation for the latest API reference.
Text-to-3D Request
A text-to-3D request starts with a POST request that includes a descriptive prompt and optional generation parameters. Besides the prompt itself, most APIs allow you to specify settings such as output format (GLB, OBJ, or FBX), texture generation, mesh quality, polygon count, or other generation options. The more specific your prompt is, the more predictable the result will be. For example, describing the object's style, intended platform, and level of detail usually produces better assets than using only a few generic words.
Image-to-3D Request
An image-to-3D request follows the same pattern but uses a reference image instead of relying entirely on text. Depending on the API, the image may be provided as a public URL, an uploaded file identifier, or a base64-encoded image. You can also include a short text prompt to guide the AI toward a particular style or geometry. This workflow is commonly used for product visualization, concept art, scanned objects, and turning 2D references into editable 3D models.
Regardless of whether you choose text or image input, every generation request follows the same structure: send an authenticated POST request, include the required generation parameters in the request body, and specify the desired output format. The API validates the request and immediately returns a task ID instead of the finished model. That task ID is the key to the rest of the 3D asset generation API workflow, because it allows your application to monitor progress and retrieve the completed asset once generation has finished.
Sending Your First 3D Generation Request
Step 3 — Retrieve the Generated Model
After submitting a generation request, the final step is retrieving the completed 3D asset. Because the process is asynchronous, your application should wait until the task status changes to success before downloading the model.
Continue polling the documented task-status endpoint until generation finishes. If the selected provider explicitly supports webhooks, the application can wait for the verified callback and then confirm the final task status. Once the task succeeds, the response should provide the generated asset or a download URL in the available output formats. The application can then download the file and pass it to the target engine, DCC tool, or production pipeline.
Your integration should also handle failures gracefully. A task may fail because of invalid input, unsupported parameters, or temporary service issues. Add retry logic, timeout handling, and clear error messages so users know whether a job is still processing or needs to be resubmitted. If a task remains stuck for an unusually long time, stop polling, record the task ID, and verify whether the platform has automatically refunded any generation credits. Building these safeguards makes your 3D asset generation API workflow more reliable and production-ready.
Step 4 — Handle the 3D File (GLB, OBJ, FBX & More)
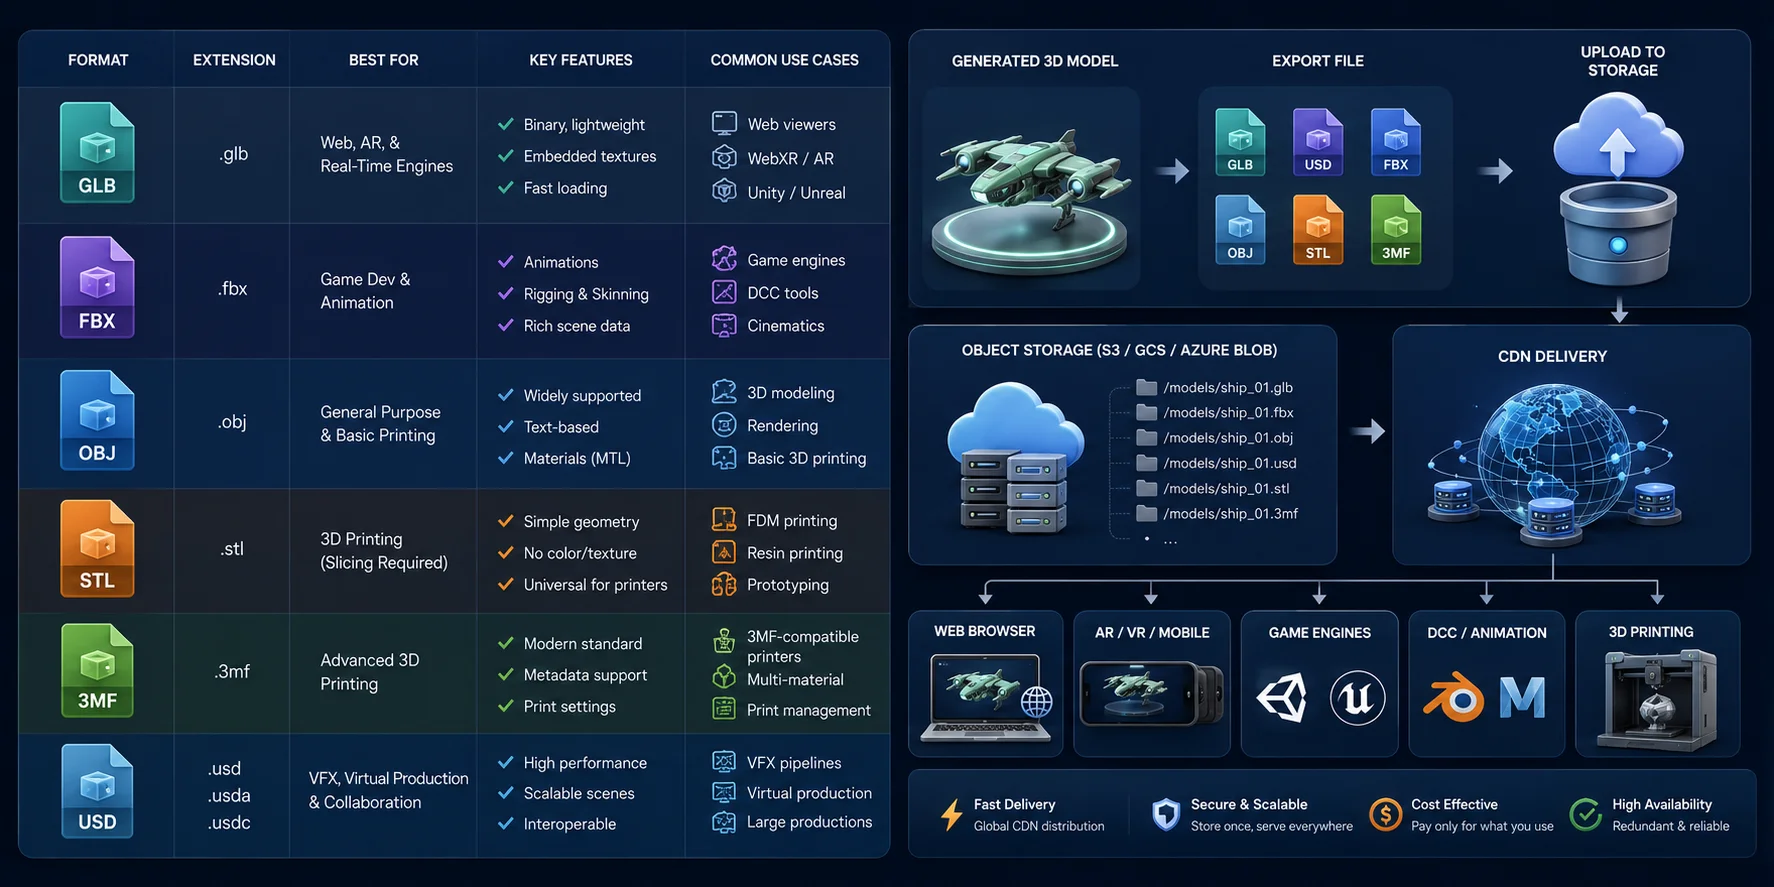
Once the model has been generated, the next step is choosing the right file format for your application. Most 3D generation APIs support multiple export options because different workflows require different formats. Tripo, for example, supports exporting GLB, USD, FBX, OBJ, STL, and 3MF.
Which Format for Which Target
| Format | Best For |
|---|---|
| GLB | Web viewers, WebXR, AR experiences, Unity, Unreal Engine, and general real-time applications |
| FBX | Game development, animation, character pipelines, and DCC tools like Blender and Maya |
| OBJ | General-purpose 3D exchange, simple rendering, and basic 3D printing workflows |
| STL | 3D printing after slicing, especially FDM and resin printers |
| 3MF | Modern 3D printing workflows with support for additional print settings and metadata |
| USD | VFX, virtual production, Apple ecosystems, and collaborative 3D pipelines |
Storing & Serving the Asset
After downloading the model, store it in object storage such as Amazon S3, Google Cloud Storage, or Azure Blob Storage instead of keeping it on your application server. The stored file can then be delivered through a CDN, allowing users around the world to download or preview assets with lower latency. Separating generation, storage, and delivery also makes your 3D asset generation API workflow easier to scale as the number of generated models grows.
Choosing the Right 3D File Format
Step 5 — Bring the Model Into Your App or Engine
Once you've downloaded the generated asset, the final step is integrating it into your production workflow. Most APIs simply generate the model—the rest depends on where you plan to use it. Whether you're building a game, editing assets in a DCC application, or rendering models on the web, the integration process is usually straightforward.
Game Engines (Unity, Unreal, Godot)
Game engines typically import GLB or FBX files directly. After importing, you can assign materials, add colliders, generate LODs, attach animations, or place the asset into your scene. If your workflow involves frequent AI generation, Tripo's official Bridge plugins can send models directly from the browser into Unity, Unreal Engine, Godot, and Cocos, eliminating the need to manually download and import files.
3D & DCC Tools (Blender, Maya, 3ds Max)
Artists often refine AI-generated assets before production. Import the model into Blender, Maya, or 3ds Max to edit geometry, adjust UVs, bake textures, retopologize the mesh, or prepare animations. Tripo also provides official plugins for these DCC tools, allowing models to be transferred directly into the software with fewer manual steps.
Web & three.js
For web applications, GLB is usually the best choice because it bundles geometry, materials, and textures into a single file. Libraries such as three.js can load GLB assets directly using a GLTF loader, making it easy to display interactive 3D content in a browser. Combined with object storage and a CDN, this approach provides fast loading and a smooth viewing experience across desktop and mobile devices.
At this point, your 3D asset generation API workflow is complete—from sending a prompt to delivering a production-ready model inside your application, engine, or web experience.
3D Generation API Workflow: From Prompt to App
Cost, Rate Limits & Quotas
Before deploying your integration at scale, make sure you understand how the API charges for generation and how it limits request volume. Most 3D generation APIs use either credits or per-request billing, with more complex generations consuming more resources than simple ones.
For example, Tripo uses a credit-based system. A standard generation starts at 25 credits, while optional features such as Ultra Generation (+15 credits) or Texture Generation (+10 credits) consume additional credits. The free plan includes 200 credits per month, making it easy to build and test a prototype before upgrading.
Besides cost, pay attention to rate limits and concurrent job limits. Sending too many requests at once may result in rate-limit responses or queued tasks. Your application should implement exponential backoff when retrying failed requests instead of immediately sending another request, helping reduce unnecessary traffic and improving reliability.
A good practice is to validate your workflow with the free quota first, measure average generation time and credit usage, then estimate costs before scaling to production. Monitoring credit consumption, retry rates, and failed jobs will help keep your 3D asset generation API workflow predictable as usage grows.
Text-to-3D vs Image-to-3D — Which Should You Call?
Both APIs generate 3D models, but they are designed for different tasks. The best choice depends on whether you are creating something entirely new or reconstructing an existing object.
| Generation Mode | Best For | Strengths |
|---|---|---|
| Text-to-3D | Concept art, game assets, rapid prototyping, batch generation | Creates original models from prompts and offers the most creative flexibility. |
| Image-to-3D | Product visualization, real objects, character references, e-commerce | Produces models that closely match the reference image with higher visual fidelity. |
| Multi-view-to-3D | High-accuracy reconstruction, complex products, detailed objects | Uses 2-4 images from different angles to generate more complete geometry and fewer missing details. |
If your application needs to generate new assets from scratch, text-to-3D is usually the best option. It works well for game props, environments, and early design concepts where speed and creativity matter more than matching a specific object. The quality of the result depends largely on how well you write the prompt.
Choose image-to-3D when preserving the appearance of an existing object is more important. This workflow is ideal for product catalogs, retail, collectibles, and turning concept art into editable 3D models because the AI follows the reference image rather than interpreting a text description alone.
Choose multi-view-to-3D when you can provide two to four consistent images of the same object from different angles. The additional views give the API more spatial information, which can improve shape accuracy, preserve proportions, and reduce missing or distorted geometry compared with a single image. This approach is a strong choice for complex products, detailed objects, and workflows where matching the reference matters.
When NOT to Use a 3D Generation API (Limits)
A 3D generation API can save significant time, but it is not the right tool for every project.
For engineering or manufacturing parts that require precise dimensions and tolerances, traditional CAD software is still the better choice. AI-generated meshes are intended for visual content rather than precision engineering.
If you need AAA-quality assets with fully controlled topology, UVs, or animation-ready meshes, manual modeling remains essential. AI works best for concept creation and rapid prototyping, while artists handle the final optimization.
Cloud APIs may also be unsuitable for offline environments or projects with strict privacy requirements, since prompts and reference images are uploaded for processing.
Finally, always check copyright before generating a model. Only use prompts and reference images that you have permission to use. Tripo states that when your input materials do not infringe on third-party rights, the generated models can be used commercially and the copyright belongs to you.
Frequently Asked Questions
How do I get an API key for a 3D generation tool?
Create an account with the provider and open its developer or API settings. For Tripo, the current product guidance says API access is available through the Pro or Business plan, and the key is retrieved from Account Settings → API. Store the key in a server-side secret manager or environment variable, never in browser code, a mobile app, or a public repository. Verify the credential with a small test request before connecting it to a production workflow.
How do I call a 3D generation API in Python?
Use a Python HTTP client such as requests to send an authenticated POST request with the prompt or image parameters required by the provider. Parse the returned task ID, then poll the documented status endpoint until the task reports success or failure, with a timeout and backoff between checks. Download the model only after a successful status, and log the task ID so failed jobs can be investigated. Use the provider's current API reference for the exact endpoint names and response fields.
How do I handle GLTF/GLB and OBJ files returned by the API?
GLB packages geometry, materials, and textures into one binary file, which makes it convenient for web viewers and many real-time pipelines. OBJ is broadly supported by 3D editing tools, but its materials and textures are often stored as separate files that must remain together. Validate the downloaded file, preserve the provider's scale and axis conventions, and store production assets in object storage with controlled access. Test the final import in the target engine or DCC tool before publishing it to users.
What's the difference between a text-to-3D and an image-to-3D API?
Text-to-3D creates a new asset from a written description, so it is useful for concept generation and producing many variations. Image-to-3D uses a visual reference when the model needs to resemble a specific object, character, or design. Because a single image does not show every surface, hidden geometry may still be inferred; multi-view input is preferable when the provider supports it and shape accuracy matters. Choose the input method based on whether the priority is open-ended ideation or fidelity to an existing reference.
How much does a 3D generation API cost per request?
Cost depends on the provider, generation mode, and optional processing steps, so there is no universal per-request price. Tripo's current credit table lists a standard generation at 25 credits, with options such as Ultra generation and texture generation consuming additional credits. Run representative test jobs to measure the real cost of the quality settings your application needs, including retries and post-processing. Also account for concurrency and rate limits when estimating production capacity, not only the nominal generation charge.
Can I use API-generated 3D models commercially?
Commercial use depends on the provider's current license and on whether you have the right to use the input prompt, image, brand, or character. Check the terms for ownership, resale, marketplace distribution, and customer-generated content before release. Do not assume that a technically successful generation removes copyright, trademark, privacy, or publicity-right risks. For high-value or legally sensitive products, retain the applicable terms version and obtain qualified legal review.
Conclusion
Using a 3D generation API is simpler than it first appears: authenticate, submit a text-to-3D or image-to-3D request, retrieve the completed model, and bring it into your application or engine. Once you understand the asynchronous workflow, integrating AI-generated assets into your pipeline becomes straightforward.
Ready to build your own workflow? Get an API key, explore Tripo Studio, and generate your first 3D asset in minutes.
