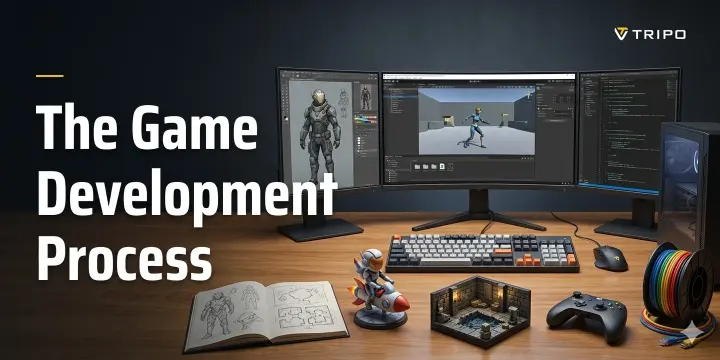
The Game Development Process: 3 Stages Explained (2026)
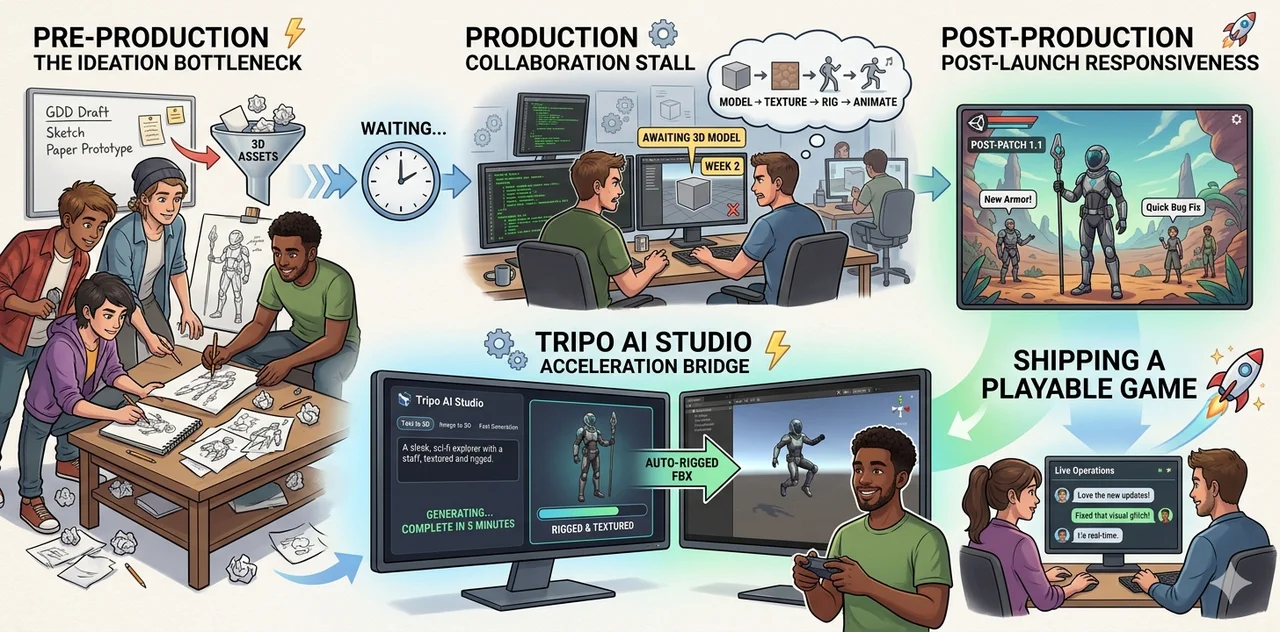
The game development process has three core stages: pre-production (concept, design, prototype), production (building the game—art, code, 3D assets, audio), and post-production (testing, launch, and live operations). Each stage involves specialized roles and tools, and AI is now accelerating the asset-heavy production phase. This article explores how AI‑powered 3D generation tools like Tripo AI are breaking traditional production bottlenecks, compressing feedback loops from weeks to minutes, and making game development more accessible for beginners and small teams.
TL;DR
- Game development consists of three stages—pre-production, production, and post-production—where slow 3D asset creation can become a major bottleneck.
- In pre-production, focus on a clear concept and a quick prototype to validate fun, while in production, art, code, 3D assets, and audio must work in parallel because manual modeling alone takes weeks.
- AI tools like Tripo AI turn text or images into rigged, textured 3D models in minutes, allowing teams to test gameplay earlier, align audio with animation, and iterate without fear of wasting weeks on discarded assets.
- Post-production demands fast asset iteration for player feedback and live updates, so choose the right lightweight tools for each stage, use AI to remove friction, and remember that shipping a playable game beats perfecting an unreleased one.
What Is the Game Development Process (Pipeline)?
In professional game development, there is a frequently used term called the "Game Development Pipeline." It refers to the structured process of creating a game from concept to completion, helping to organize the workflow so that every stage knows what to deliver and when to deliver it. In professional game development, the pipeline is typically divided into three phases.
Pre-Production
Many beginners, when they first open a game engine, drop in a cube and start writing a movement script. There's nothing wrong with that—but you'll quickly find yourself stuck in a cycle of "do one thing, change another, and have no idea what to do next." Before you start coding, there are three chances to "think it through."
First, don't write long setting descriptions or draw complex characters. Start by answering the most fundamental question:
What does the player do here? And why is that fun?
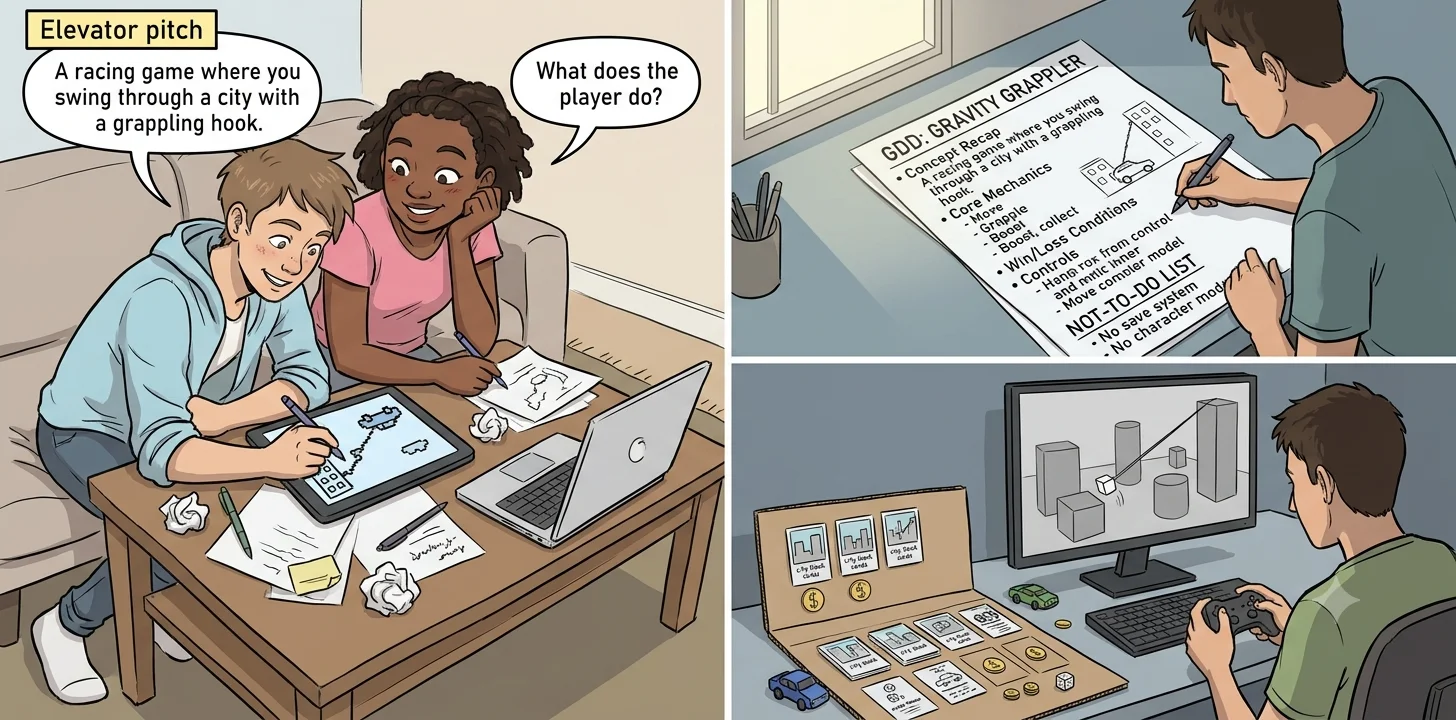
A clear concept is often like an elevator pitch:
- "A racing game where you swing through a city with a grappling hook."
- "A farming survival game set in a post-apocalyptic wasteland."
- "A party game where two players fight over the same button on a single device."
If you can't describe your game in one sentence, you haven't thought it through yet. If you start building at this point, your project will keep drifting off course.
Ask yourself before you start:
- What is the core experience of this game? Tense? Relaxing? Creative? Competitive?
- If you strip away all the art, effects, and story, leaving only the most basic actions—is it still fun?
- Can I use paper, dice, cards, or spoken rules to "explain" the gameplay to someone else first?
💡 A simple test: Tell your concept to a friend, then ask, "What would you most want to do in this game?" If their answer matches what you had in mind, your concept is clear.
Second, many people are intimidated by the word "documentation"—they think it means writing dozens of pages. For a beginner, a single‑page GDD is more than enough. Its purpose isn't to restrict you, but to give you a place to look back at whenever you hesitate over "should I add this feature or not?"
A one‑page GDD should contain at least:
- Concept recap: The elevator pitch from above.
- Core mechanics: List 3–5 things the player can do (move, attack, collect, talk…).
- Win / loss conditions: How do you win? How do you lose?
- Controls: Basic mapping for keyboard, controller, or touch.
- "Not‑to‑do" list: Explicitly write down the things you will not put in this version. This is what beginners most often overlook—and it's also the most lifesaving.
💡 Treat your GDD as your "project constitution." You can amend it, but you can't pretend it doesn't exist. Whenever you feel tempted to add a "cool but complex" new system, first check whether it would blur the core experience.
Finally, the goal of a prototype is not "to make a small game." It's to answer one specific question, such as:
- Does the jumping feel good enough?
- Is the counter‑relationship between items interesting?
- Does the "two players fighting over a button" produce unexpected funny moments?
The golden rule of prototyping: If you can use cardboard, don't use code. If you can use cubes, don't use models.
- Paper prototype: Use cards, coins, dice to simulate turn‑based or strategy mechanics.
- Digital greybox: Use cubes, spheres, and default capsule characters in the engine to build a playable mechanical core.
Don't write save systems, don't add UI animations, don't include background music, don't polish art. These things will consume exponentially more time during full production. In the prototype phase, you only need to answer one question: Is the gameplay itself sound?
If the prototype isn't fun, don't comfort yourself by saying "it'll get better once the art is finished." Art will not save gameplay. It will only make an unfun game more expensive. The right move at this point is: change the mechanics, or go back and prototype a different concept.
💡 A healthy rhythm: Concept → One‑page GDD → Prototype (completed in a few days) → Play it → Based on the results, decide: continue, iterate, or abandon. Abandoning isn't failure—it's spending a few days to avoid wasting months.
Production — Building the Game
If Pre-Production is about drawing a detailed map, then the Production phase is actually setting out to experience the storms and landscapes of that land. In a mature game development process, Production is a parallel engineering effort that covers art, code, 3D assets, and audio. It's called "parallel" because these four areas are not a serial assembly line – finish art then hand it to programming, or finish code then add sound effects afterwards. Instead, they are interwoven, echoing each other in a collaborative relationship. It is this interweaving that gradually turns a "validated prototype" into "a game that players will remember."
Why These Four Things Cannot Be Done Separately
Imagine this scenario: an artist spends two weeks carefully sculpting a highly detailed character model with every strand of hair clearly defined. The model looks flawless in Maya – but it's a high‑poly model with ten million faces. When imported into the game engine, the frame rate instantly drops to single digits.
The programmer frowns and says, "I can't run this character directly. I need a much lower‑poly version." The artist then spends another three days retopologizing, unwrapping UVs, and baking normal maps. Meanwhile, the programmer has already written two‑thirds of the code that depends on the original placeholder model – after switching to the new model, collision sizes are wrong and animation scales have changed.
As for the sound designer, they receive a model that has no animations yet, making it impossible to match sound effects like "blade cutting through air" or "footsteps on stone floor."
This scenario is typical because it accurately reveals the trap most beginners fall into: they treat Production as four isolated workshops, when in fact it should be an improvised ensemble.
In a professional pipeline, art, code, 3D assets, and audio are progressively interwoven. Concept art guides the style of 3D assets; the topology of 3D assets directly affects the collision detection written by the programmer; and the timing of audio triggers depends on the code's event system.
More importantly, audio often gets involved during the animation phase – footsteps, sword clash sounds, and ambient atmosphere all need to align with specific frames of animation. If you wait until "art and code are finished" before thinking about sound, you may find that the attack animation leaves no time window for the hit sound, or that the character moves so fast that footsteps trigger so densely it sounds like a mess.
All these problems are exposed and solved only when the four disciplines are connected along the same timeline.
The Four Pillars of Production
Art & Concept Direction
Art is not just about "making things look good." During Production, the core responsibility of art is to execute and expand the art direction established in Pre-Production, turning it into production specifications that the team can follow. For example, starting from initial concept art, the art team must determine polygon budgets (how many faces per character), material specifications (PBR vs hand‑painted textures), color schemes, lighting moods, and other key parameters. These parameters directly affect how 3D assets are created and how the code handles rendering optimization.
An experienced art director ensures that every prop and character maintains a consistent style, avoiding visual dissonance like "medieval armor standing next to a sci‑fi weapon." For a beginner, this means you should prepare a mood board in advance: a few reference images, a color palette, a few lines of style keywords. Every time you generate or modify a 3D model, first ask yourself using these references – does it match the feeling you originally wanted?
Code & Gameplay Logic
The programmer's core job is to turn the gameplay mechanics validated during prototyping into maintainable and extensible code structures. This is not just about writing a few functions to move, attack, or jump; more importantly, it involves designing an event system that allows art assets, sound effects, and animations to be correctly invoked and synchronized by code.
For example, a character's "jump" action should trigger a series of events: play jump animation, play jump sound, modify the character's physics state, update the stamina bar in the UI. If these events are not designed as clear interfaces in the code, then no matter how beautiful the models the artist later replaces, or how cool the sounds the sound designer prepares, they will not be "plugged in" correctly.
That is why professional development pipelines require programmers to stay closely synchronized with art and sound teams – a good programmer leaves slots for "animation hooks" and "audio events" when designing class structures, rather than trying to "squeeze everything in" after all the assets are done.
3D Assets & Pipelines
This is the longest and most daunting part of traditional development, and the one where beginners most often give up. A complete manual modeling workflow includes: concept sketch, blockout, high‑poly sculpting, low‑poly retopology, UV unwrapping, texture baking, material painting, rigging, and weight painting. For a moderately complex character, the full cycle for a single asset can take weeks or even months.
To make matters worse, these steps have strict dependencies: wrong topology will cause seams later during texture baking; bad UV unwrapping will stretch textures; and if you don't group model parts properly before rigging, building a modular outfit system later becomes extremely difficult.
For beginners, stumbling at the very first step of this lengthy pipeline is all too common. However, it's worth noting that the evolution of AI 3D modeling is starting to knock down a corner of this wall – it can skip several intermediate steps, converting a concept or text directly into a base mesh, allowing beginners to bypass the most time‑consuming steps like manual retopology, UV unwrapping, and initial rigging, and obtain a visual asset that – while not yet polished – is fully usable for gameplay validation at a very low threshold.
Audio & Soundscape
Audio is often the most underestimated part of Production. Many beginners don't realize until their game is almost ready to ship just how much background music, footsteps, sword clashes, and even UI button clicks affect the "game feel." In a professional pipeline, sound designers work with technical artists and programmers to ensure that sounds change in real time based on game state – for example, when the player goes underwater, the volume and low‑frequency characteristics of all ambient sounds automatically adjust; when the character switches between running and walking, the rhythm and impact material of footsteps also change accordingly.
Audio is not just "one more thing to do." It is also a validator: if your code doesn't fire events correctly, your sound effects will never play at the right time. If your animation doesn't define clear keyframe positions, footsteps will sound like sliding. Therefore, audio should be involved from the very first playable greybox prototype – even if it's just a metronome standing in for real footsteps and white noise for ambient sound. The quality of sound can be improved later, but the trigger logic of sound must be deeply integrated with art, code, and animation from the start.
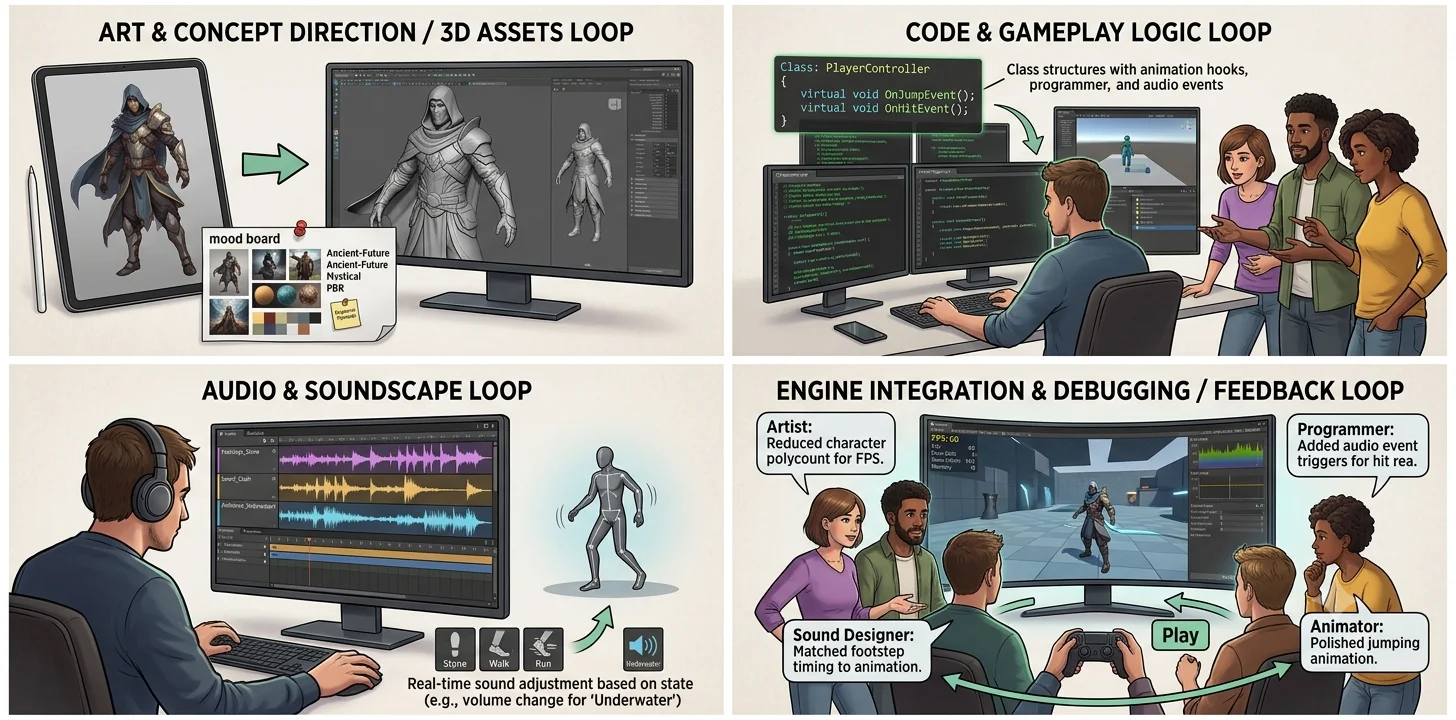
How They Connect to Each Other: A Complete Loop
A simplified flow diagram shows that this is not a linear "art → 3D → code → audio" process, but a reverberating collaboration.
Concept Art → define character silhouette, color scheme, material style 3D Asset Generation → create models following art guidelines (topology, UV, rigging, PBR materials) Code & Event System → define trigger logic for animations and audio Animation & Audio Integration → produce actions and align sound playback points Engine Integration & Debugging → integrate all assets in the engine, test gameplay loops, optimize performance Feedback & Iteration → art reduces model poly count based on code performance; programmers add event types based on audio needs; sound designers adjust trigger timing based on animation… back to the first step.
In a real production cycle, this feedback runs dozens or even hundreds of times. The artist doesn't wait for the programmer to "finish coding" before adjusting model details, and the programmer doesn't wait for the artist to "finish everything" before implementing animation events. This high‑frequency, mutual feedback is the core working method of the Production phase.
The Bridging Value of AI 3D Modeling in Production
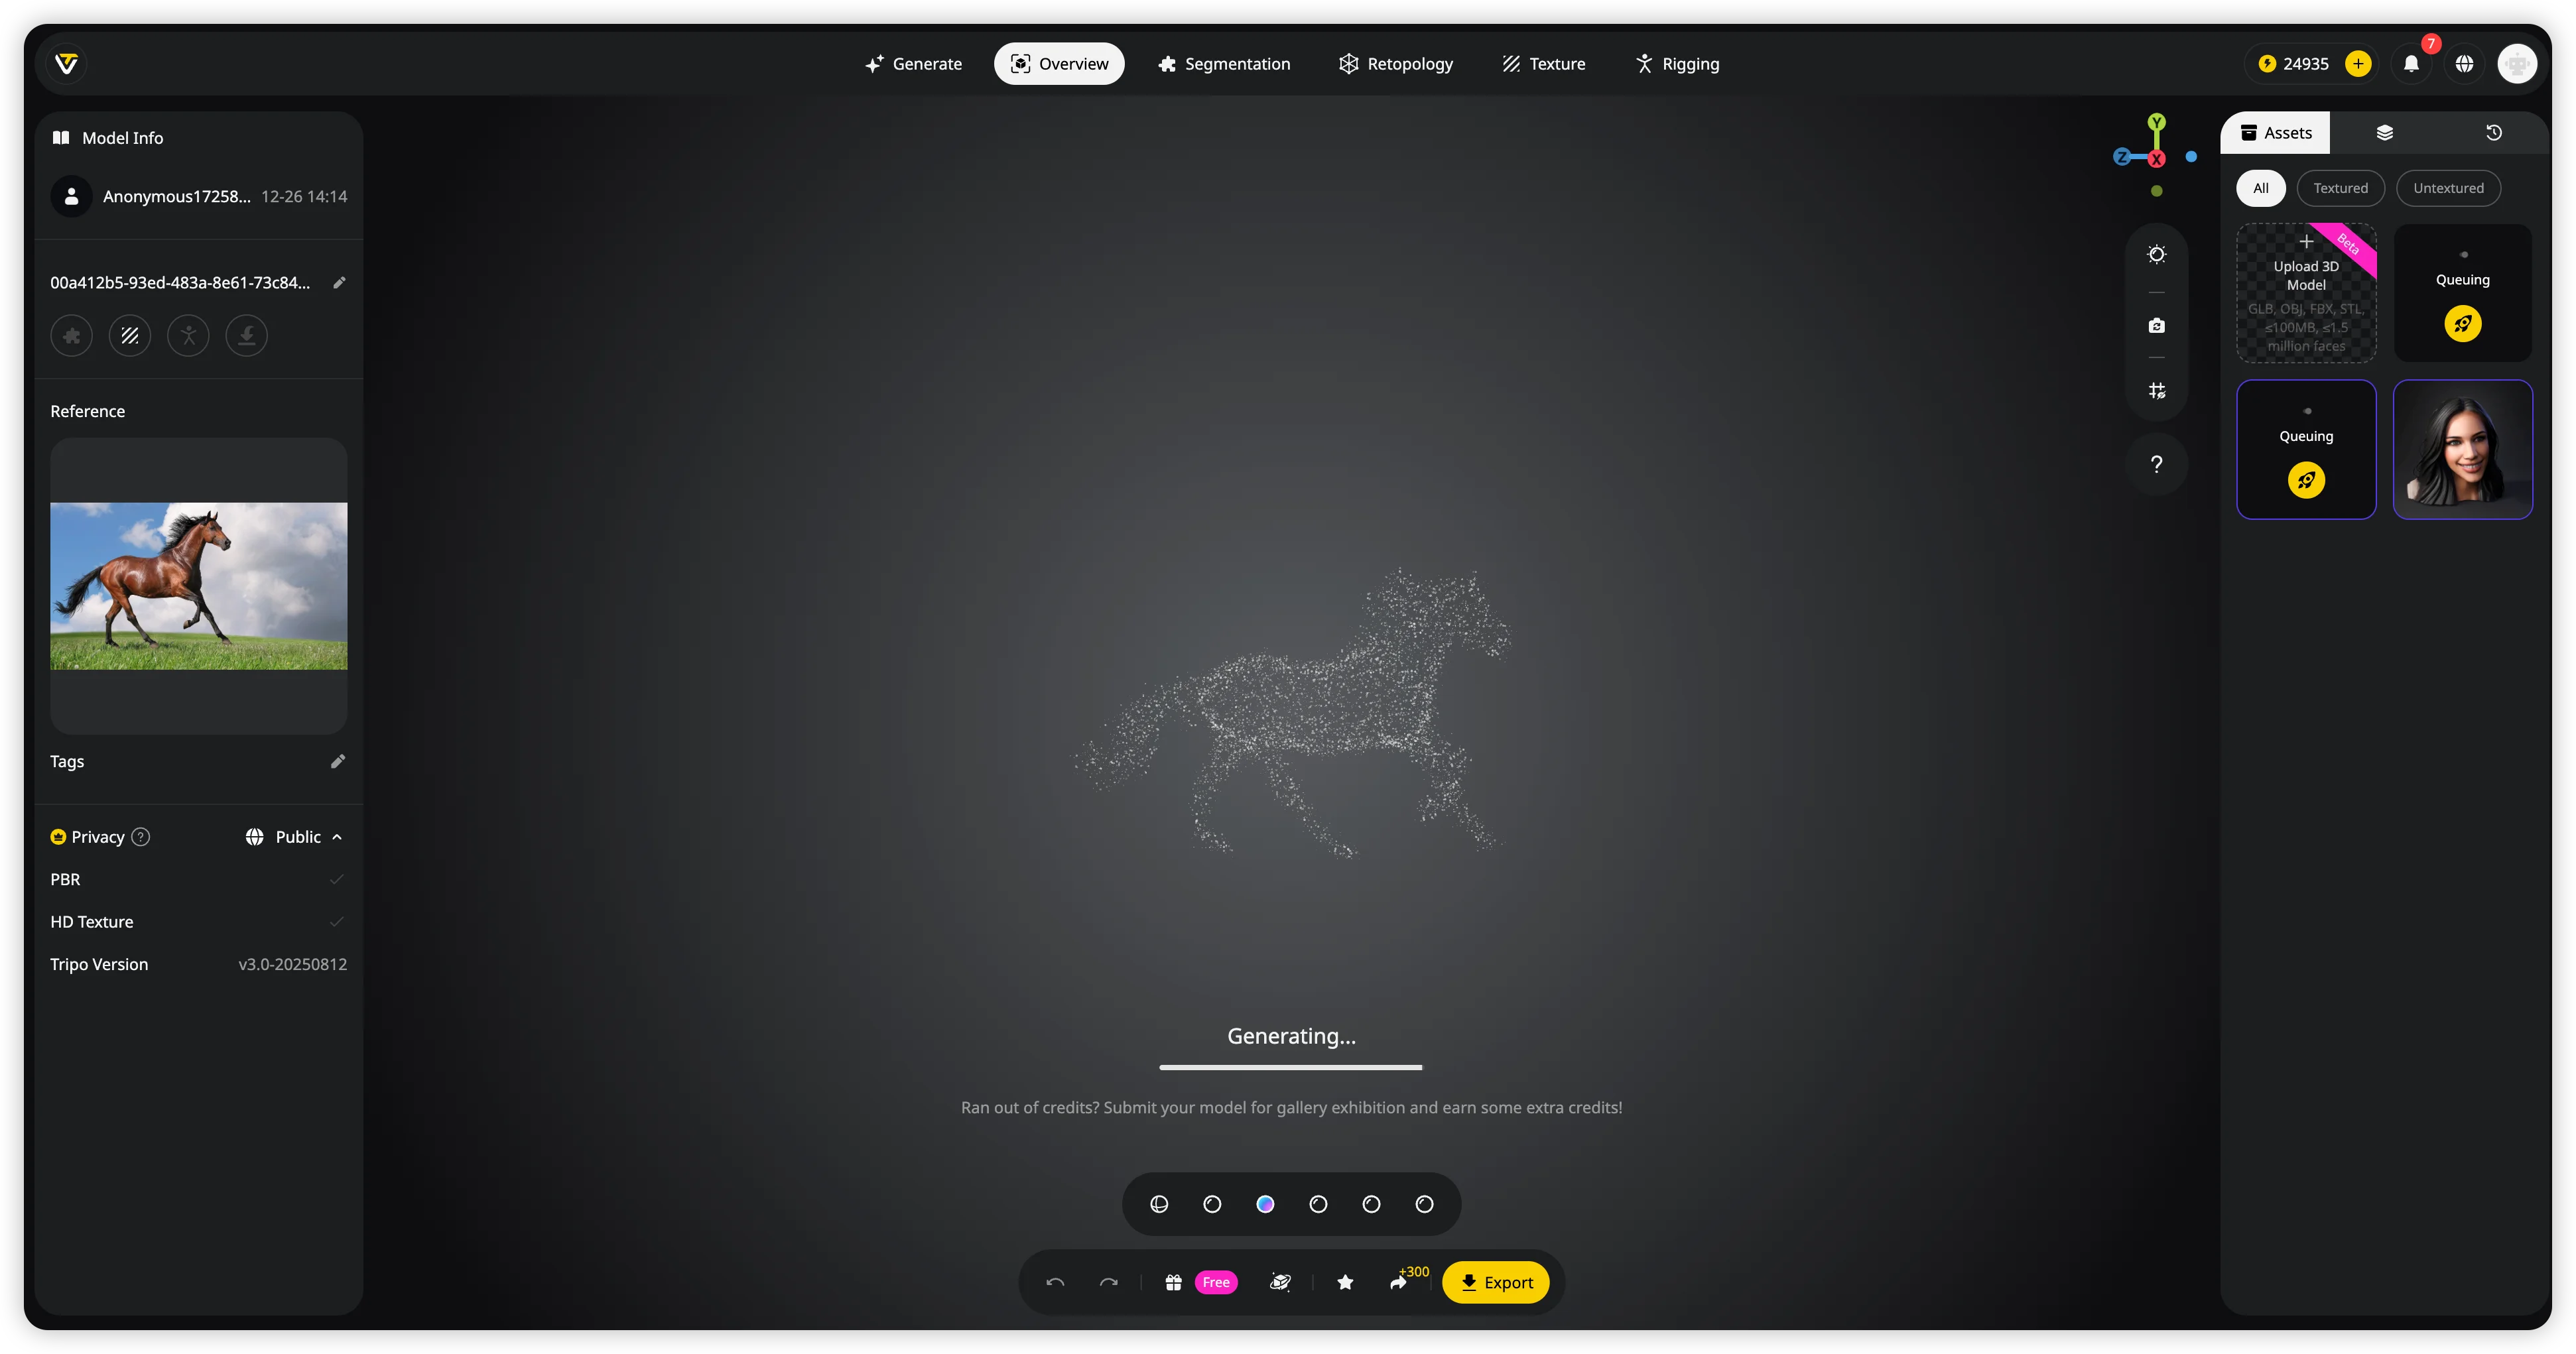
For beginners, the emergence of AI 3D modeling tools (exemplified by Tripo AI) actually builds a "low‑cost rapid validation bridge" within the loop described above. Tripo AI is a browser‑based AI 3D generation platform that supports both text‑to‑3D and image‑to‑3D input, and includes built‑in automation features such as smart part segmentation, smart low‑poly generation, and auto‑rigging, all aimed at lowering the professional barrier to 3D asset creation.
In the Production phase, its value manifests in three main areas:
- Building quick, playable 3D assets between art and code – When a programmer needs a character model to test basic logic like jumping or attacking, the traditional wait for a completed model could be weeks. With Tripo AI, they can generate a 3D model – complete with basic textures and even auto‑rigging – in just minutes based on text or a sketch. The model can be exported in common formats such as FBX, OBJ, or GLB and dropped directly into Unity or Unreal.
This means the programmer can start implementing the full event system and animation logic before the final art assets are ready, rather than waiting passively. After generation, the built‑in Smart Part Segmentation automatically splits the model into logical components – head, torso, limbs, accessories – making it easier to assign materials or build a modular character system.
The auto‑retopology feature also helps convert high‑density meshes into game‑friendly low‑poly versions, while preserving critical edge loops around deformable areas (elbows, knees, face) to ensure smooth deformation during animation, rather than simply brute‑forcing a reduction in polygon count. - Providing immediate visual feedback between audio and animation – When an animator hasn't yet finished a full skeletal animation, a sound designer often cannot determine exactly where the "impact" of an action falls in time. Using an AI‑generated, auto‑rigged character model, they can quickly set up a basic animation test script inside the engine.
This allows the sound designer to tell in advance whether the footstep trigger interval is reasonable, or whether a sword‑clash sound needs to be delayed or advanced by a few frames. Tripo's integrated Auto Rig attaches the character to an anatomically‑plausible skeleton. Developers can choose whether to keep the full bone hierarchy for later fine‑tuned animation work. - Reducing the cost of throwing work away during iterative feedback – In Production, "starting over" is one of the most painful experiences. An artist designs a character, but after testing, player feedback says "we don't like it." Re‑sculpting from scratch would take another two weeks, which often leads the team to convince themselves to "make do with it."
With AI modeling tools, the psychological and economic cost of abandoning a direction is drastically lowered. No, it cannot magically produce a final‑quality asset ready for AAA close-ups. But it can provide a team with alternative directions extremely quickly. If one approach doesn't work, generate a new version from a different concept image – the whole process rarely takes more than one or two hours.
It is important to stay objective about the limits of AI tools. Tripo's current pricing page lists a free plan with 200 credits per month and public models, while paid plans add private models and commercial use; the Pro tier includes 3,000 credits per month. Generated models may still need manual cleanup for texture artifacts, topology issues, or animation details, especially with complex designs and highly stylized characters. Use Tripo AI as an accelerator for early validation, not as a master key that replaces every manual workflow.
The Production phase is never a linear track. It's more like four musicians playing an unfinished piece together at the same time – the artist starts a melody, the code provides a rhythmic framework, the 3D assets fill in the harmony, and the audio adds echoes in every gap. Every debug session, every error, every time you press Play in the engine and see the character move, hear the sound play – that's a test of the ensemble. Tools like Tripo AI, in this ensemble, hand the beginner their first instrument. It won't play for you, but it lets you join the conversation as fast as possible.
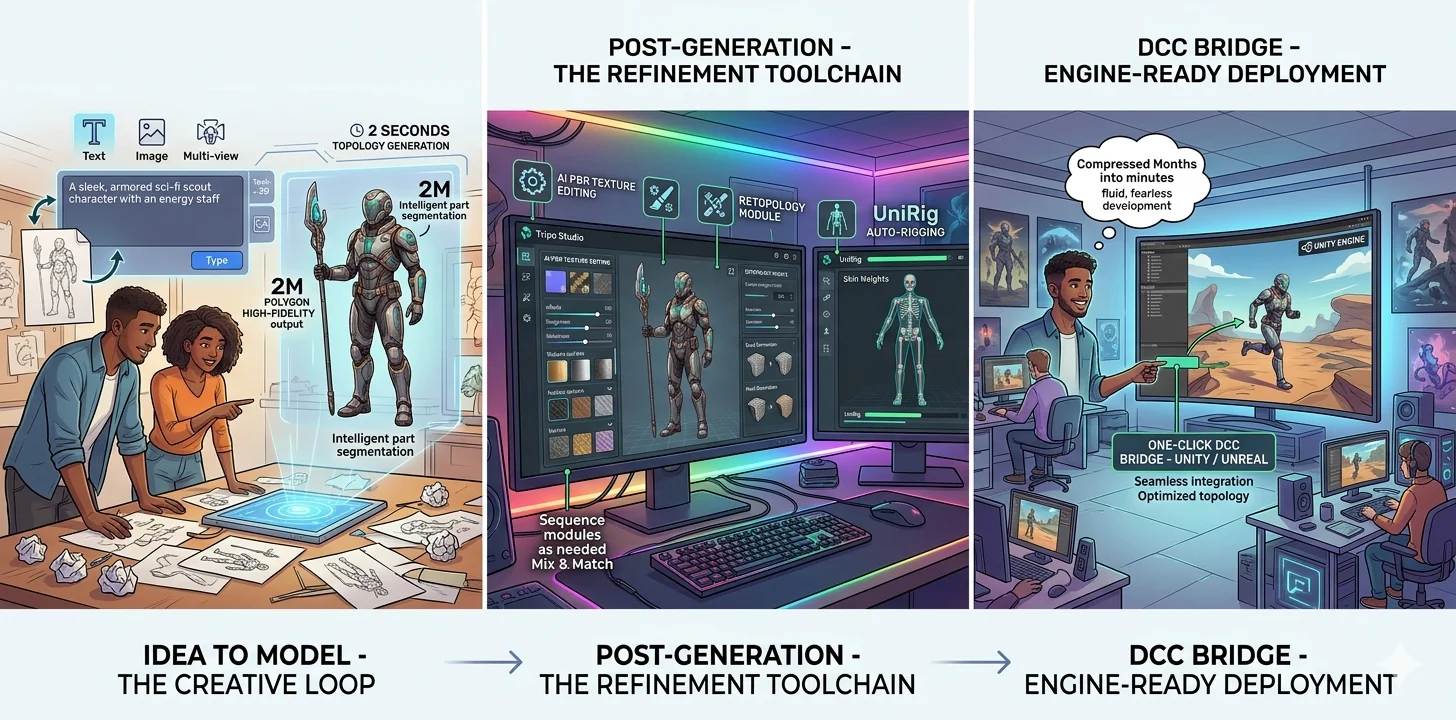
AI is fundamentally reshaping game development by collapsing asset pipelines that once took weeks into workflows measured in minutes. Tripo sits at the center of this shift, not as a single-function generator but as an end-to-end AI‑powered 3D workstation that covers every step from idea to engine‑ready asset. For game teams, this means the feedback loop between concept and playable prototype no longer breaks when the art pipeline stalls.
Tripo starts at the beginning of creation: its text-to-3D and image-to-3D tools let you type a prompt or upload a sketch to generate a model quickly. For higher precision, multi-view-to-3D can build richer geometry from 2-4 reference images. For visual arts and 3D printing, Tripo's high-detail mode supports dense output up to 2 million polygons, while Smart Mesh focuses on cleaner, lower-poly topology for games and Web3D.
After generation, Tripo gives teams several editing and optimization steps in the same workspace. Users can refine textures, separate models into editable parts with segmentation, and use retopology tools such as custom polygon targets, mesh decimation, and quad conversion. With auto-rigging, characters can receive skeletons and skin weights for downstream animation work, then export to tools such as Blender, Unity, or Unreal through supported formats and bridges.
Because these modules can be used in different sequences, Tripo fits best as a speed layer around a team's existing pipeline: concept models for prototypes, cleaner meshes for game testing, and fast alternatives during iteration. This is the practical value of AI in game development: it shortens the distance between an idea and a playable test, especially for small teams that cannot wait weeks for every asset revision.
Post-Production
When a game moves from Production into a released state, many beginners think, "It's finally done." But the real work is just shifting gears. For any game that wants to stay alive — even a small indie title — the workload after launch is no less than during development: player feedback, bug tracking, performance monitoring, version updates, seasonal events, new content drops. All of this falls under Post-Production, and it determines how far your game can go.
QA & Bug Fixing Under Pressure
What beginners often miss is that testing and QA never really stop after launch. During Production, you test features before they ship. In Post-Production, you test live builds, edge cases, and player-reported issues — often under tight time pressure.
A server log shows a crash on level 3. A community thread points out a visual glitch with a specific skin. A payment flow fails on one device model. These are not "one-off fixes." They require the same collaborative rhythm — art, code, 3D assets, audio — that you built during Production, but now running at a much faster tempo.
Fast Asset Iteration for Live Updates
This brings us back to the core bottleneck we discussed in Production: the responsiveness of 3D asset creation. If your pipeline cannot turn around a small asset — a holiday hat, a community-requested emote, a bug-fix prop — within hours or days, your ability to respond to both problems and opportunities collapses. Many indie games go silent after launch not because the developers lost interest, but because "making a new asset" still takes weeks. This is exactly where tools like Tripo AI (text‑to‑3D and image‑to‑3D with basic textures and rigging) can help reduce the friction. They don't replace final‑quality art, but they can fill the gap between "we have a good idea" and "we can ship something today."
Planning for Post-Production from Day One
In short, Post-Production is the phase where your Production‑phase pipeline proves its worth. Testing and QA keep the game stable, fast asset iteration keeps it fresh, and genuine player joy is the metric that ultimately matters. If you plan for Post-Production from day one, and choose tools that allow you to move quickly, your game has a chance to grow beyond its launch day.
Tools Across the Pipeline
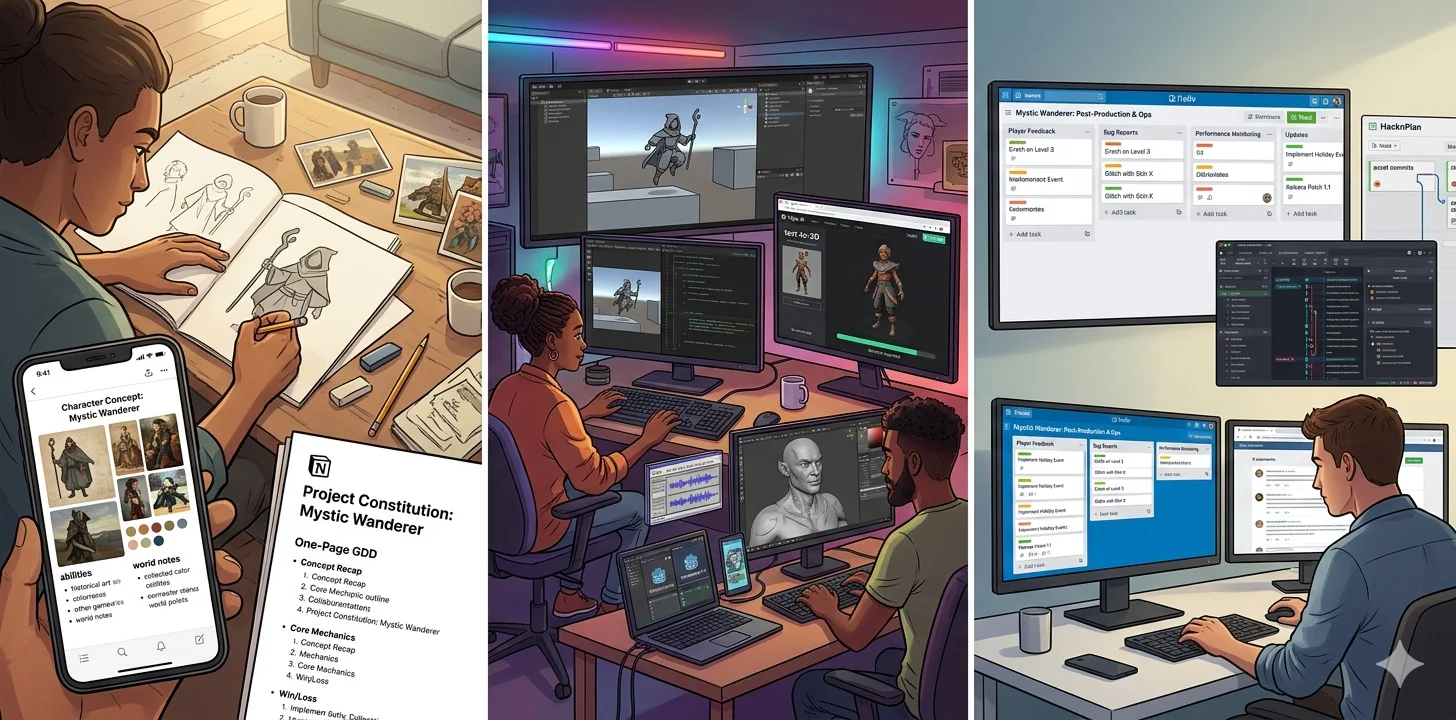
After walking through the three stages of game development, a natural question arises: which tools should you use at each stage? You don't need to install a full suite of professional software right from the start. In Pre‑Production, a pen and paper, plus a tool that lets you gather reference images, is enough — Milanote or Notion work well for organizing concepts and writing a one‑page GDD.
Moving into Production, for the game engine, Unity is a solid choice for 3D and general projects; Godot is very 2D‑friendly and completely free; Construct 3 lets you build playable prototypes without writing any code. For 3D assets, Blender remains the most complete free manual modeling solution, though its learning curve is steep. If you want to quickly validate gameplay without waiting weeks for a model, Tripo AI can generate a model with basic textures and rigging from text or an image, which you can drop directly into your engine to start using right away. For audio, Audacity is free and sufficient — no need to jump straight into a professional DAW.
Once you reach Post‑Production, testing and version management become more important — Git + LFS to handle code and assets, and HacknPlan or even a simple Trello board to track operational tasks. Remember one principle: start with the lightest tools, and only switch to heavier ones when you actually hit a bottleneck. Don't overload your toolchain too early.
Frequently Asked Questions
What are the 7 stages of game development?
The game development process has seven key stages: planning, pre-production, production, testing & QA, pre-launch, launch, and post-launch support.
Why do 90% of gamers never finish games?
The most common reasons are a lack of time, overwhelming game length, and the sheer volume of other games competing for attention. Many players also lose interest once the novelty wears off or get stuck at a difficult section without the motivation to push through.
What game costs $1 billion to make?
The development of Grand Theft Auto VI is estimated to have cost between 1.5 billion, which would make it the most expensive video game ever made. The space simulator Star Citizen has also crossed the $1 billion mark, though this figure comes from its long-running crowdfunding campaign rather than a traditional development budget.
How long does it take to make a video game?
Development timelines vary widely by scope: small indie games typically take 6 months to 2 years across all three stages, while mid-sized titles average 2–4 years. AAA productions regularly span 4–7 years, with pre-production alone sometimes running 1–2 years before full-scale production kicks off.
What is the difference between the production and post-production stages?
Production is the active building phase where code is written, assets are created, and levels are assembled — the game is still taking shape. Post-production begins once the game reaches "feature complete" status, shifting focus entirely to bug fixing, QA testing, platform certification, and launch preparation. No new features are added in post-production; every effort goes toward polishing an existing build until it is ready to ship.
Conclusion
From the first sketch on paper to the final patch after launch, game development is a journey across three distinct stages—Pre-Production, Production, and Post-Production. Each stage has its own challenges, but one bottleneck cuts across all of them: the speed of creating and iterating 3D assets. A slow asset pipeline slows down prototyping, stalls production collaboration, and kills post-launch responsiveness. That is why choosing the right tools matters. For beginners and small teams, the goal is not to replace craftsmanship, but to remove unnecessary friction.
If you find yourself waiting weeks just to get a basic model into your engine, it might be time to try a different approach. Tripo AI Studio can help by turning text or images into rigged, textured 3D models in minutes—not as a replacement for final art, but as a way to accelerate the asset pipeline so you can focus on what actually makes your game fun. Plan your stages, use the right tool at the right time, and remember: shipping a playable game beats perfecting an unreleased one every time.
