3D Printing for Beginners: The Complete Step-by-Step Guide
TL;DR
- 3D printing builds physical objects layer by layer from a digital model—efficient, flexible, and accessible to anyone.
- For beginners, an FDM printer with PLA filament is the easiest, most affordable starting point.
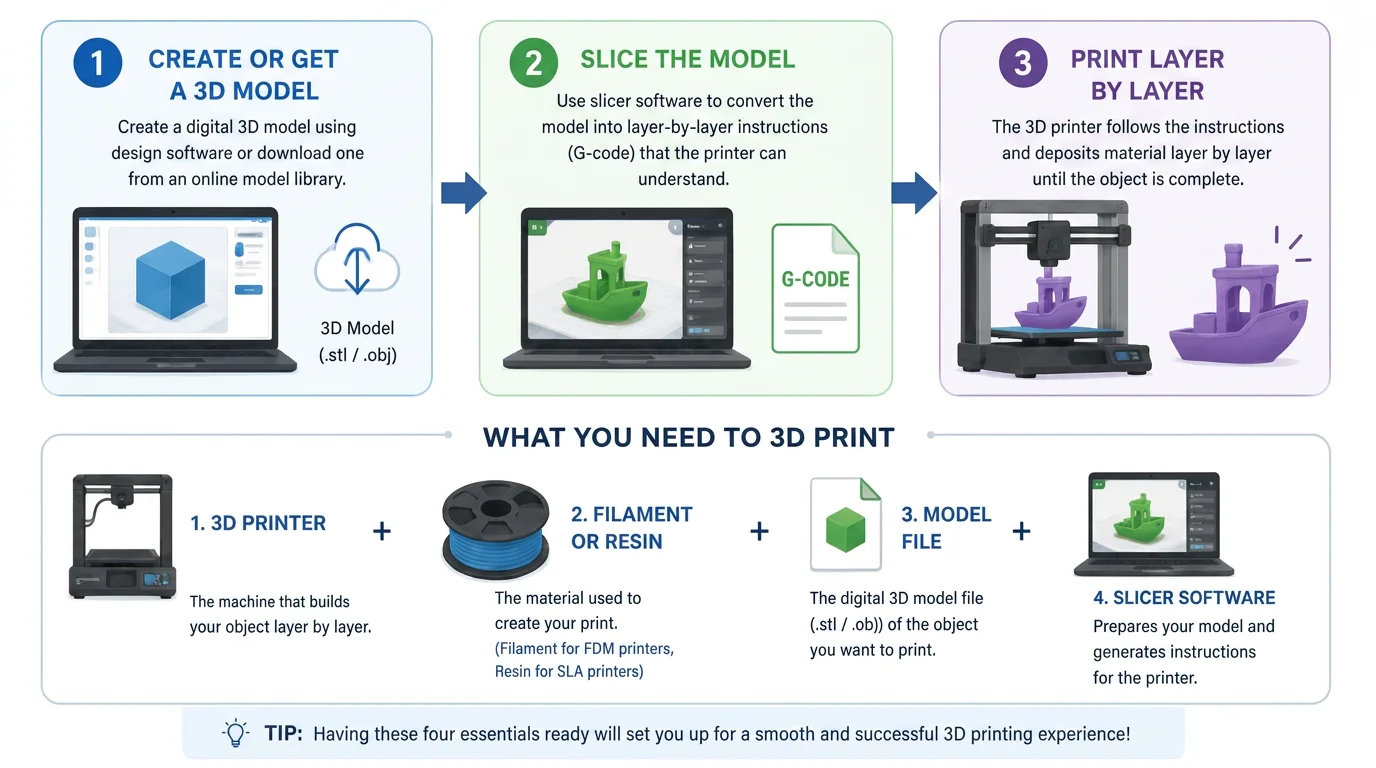
- You need four essentials: a 3D printer, filament or resin, a model file, and slicer software.
- No design skills needed—grab models from Thingiverse or generate them instantly with Tripo AI Text to 3D or Tripo AI Image to 3D.
Whether your goal is creating prototypes, functional parts, miniatures, educational projects, or custom designs, 3D printing offers a practical way to turn ideas into real-world objects. The learning curve is much lower than many people expect, and with modern tools and AI-assisted model creation, beginners can start producing useful prints within just a few hours of setting up their first printer.
This guide covers everything you need: how 3D printing works, which printer and material to start with, where to get models, and how to complete your first print step by step.
What Is 3D Printing & How Does It Work?
3D printing, also known as additive manufacturing, is a technology that creates physical objects by building them layer by layer from a digital model. Unlike traditional manufacturing methods that remove material through cutting or machining, 3D printing adds material only where it is needed, making it an efficient and highly flexible way to produce parts, prototypes, and custom products.
If you are wondering how to start 3D printing, it helps to first understand the 3D printing basics. At its core, the process follows three main steps: first, a digital 3D model is created using design software or obtained from an online model library. Next, the model is processed in slicer software, which converts it into layer-by-layer instructions that the printer can understand. Finally, the printer follows these instructions and deposits material layer by layer until the physical object is complete. Knowing what you need to 3D print—a printer, filament or resin, a model file, and slicer software—is essential before you begin your first project.
From Digital Model to Physical Object
What makes 3D printing particularly exciting is its accessibility. Today, anyone can download ready-made models, create their own designs, or even generate printable models using AI-powered tools. This significantly lowers the barrier to entry, allowing hobbyists, students, engineers, and entrepreneurs to bring ideas to life faster than ever before.
3D printing is now used across a wide range of industries. Engineers use it for rapid prototyping and product development, manufacturers create custom tooling and functional parts, healthcare professionals produce medical models and prosthetics, educators use it for hands-on learning, and artists bring complex creative designs into the physical world. From household gadgets and replacement parts to aerospace components and medical devices, 3D printing continues to transform how products are designed, tested, and manufactured.
Whether you're exploring the technology for the first time or looking to create your own projects, understanding 3D printing basics and what you need to 3D print is the first step toward turning digital ideas into real-world objects.
Types of 3D Printing Technologies
3D printing is not one single process. Different technologies use different materials, costs, color workflows, and levels of detail. The fastest way to choose a process is to start with the final use case, then review the details for each technology below.
Beginner recommendation: Start with FDM / FFF for low-cost learning and fast prototypes. Use SLA / DLP when Tripo-generated characters, collectibles, or organic models need fine surface detail. Choose SLS / MJF for stronger industrial parts, and add post-processing when the model needs a premium commercial finish.
| If You Need... | Use... |
|---|---|
| Cheap first prints, fast prototypes, props, or test models | FDM / FFF for the lowest cost and easiest workflow |
| Fine surface detail, figures, collectibles, or organic shapes | SLA / DLP for smooth resin prints and high detail |
| Strong functional parts or complex internal structures | SLS / MJF for industrial powder-bed strength |
| Transparent, metallic, flocked, painted, or product-level finishes | Special processes and post-processing after the base print |
Desktop and Creator-Friendly Processes
FDM / FFF
- Principle: Plastic filament is heated, melted, extruded through a nozzle, and stacked layer by layer.
- Commonness: Very high. It is the most common desktop 3D printing process, especially for makers, education, and personal studios.
- Tripo fit: High. Tripo-generated prototypes, props, toys, and concept models are ideal for quick FDM test prints after basic mesh repair, scaling, and slicing.
- Cost: Very low. Entry-level machines often start under 6–15/kg, with many small prints costing under $1 to a few dollars.
- Strengths: Affordable, accessible, easy to learn, and compatible with materials such as PLA, PETG, and TPU.
- Limitations: Visible layer lines, lower fine-detail accuracy, and extra sanding or painting for polished results.
- Color capability: Single-color printing is common. AMS or multi-material systems can print 4–16 colors; complex finishes usually rely on painting.
SLA / DLP
- Principle: Light cures liquid resin into solid layers with high precision.
- Commonness: High. It is frequently used for anime figures, collectibles, jewelry prototypes, dental models, and precision industrial design.
- Tripo fit: Very high. Tripo-generated characters, sculptures, creatures, and organic forms can preserve skin texture, small features, and sculpted detail well with resin printing.
- Cost: Medium. Printers range from about 1,500+ for common desktop setups; resin is often about $12–45/L, plus washing alcohol and curing equipment.
- Strengths: Excellent detail, smooth surfaces, and strong visual quality for display models.
- Limitations: Requires washing and post-curing. Resin needs ventilation and protection, and many standard resins are relatively brittle.
- Color capability: Usually printed in one resin color, then painted. Specialized full-color resin systems can produce high-color, one-piece results.
Industrial and Finishing Processes
SLS / MJF
- Principle: A laser or thermal process fuses powder materials such as nylon into solid parts.
- Commonness: Medium to low. It is mostly used through industrial print services; personal ownership is uncommon.
- Tripo fit: Medium. Useful for Tripo-generated mechanical, industrial, porous, or load-bearing structures that need stronger physical performance.
- Cost: Very high. Industrial machines often cost tens of thousands to hundreds of thousands of dollars, and material, setup, and chamber costs are high.
- Strengths: Strong parts, no traditional support structures, and good freedom for complex internal geometry.
- Limitations: Expensive equipment and materials, industrial workflow, complex post-processing, and a grainier surface finish.
- Color capability: Usually single-color, commonly white, gray, or black. Parts can be dyed or painted after printing.
Special Processes / Post-Processing
- Principle: Additional finishing is applied after a base process such as FDM, SLA, or SLS.
- Commonness: Low. It is mostly used for custom, premium, or project-specific production needs.
- Tripo fit: Medium to high. Important when a Tripo model needs to become a commercial blind-box sample, metallic display piece, transparent concept model, or premium product prototype.
- Cost: High. Cost mainly comes from labor, finishing equipment, surface treatment, and per-piece or per-area service fees.
- Strengths: Can create transparent or translucent effects, electroplating, metallic spray finishes, red wax, flocking, polishing, and professional paintwork.
- Limitations: Adds cost and lead time, and requires the printed base model to be prepared correctly.
- Color capability: Depends on the finishing process, from single-color to multi-color, metallic, transparent, gradient, or textured surfaces.
Process Selection Takeaway
- FDM / FFF is the cheapest and easiest way to test a Tripo-generated model in the real world.
- SLA / DLP is best when the model depends on small details, smooth surfaces, or collectible-level visual quality.
- SLS / MJF is the stronger option for functional parts, complex geometry, or small-batch industrial use.
- Post-processing turns a raw print into a product-like object with special surface and color effects.
3D Printing Materials
Material choice determines how a 3D print feels, performs, and survives real use. Instead of forcing every detail into one wide comparison table, this section uses a mobile-friendly structure: first choose the material by goal, then read the short material notes below.
Beginner recommendation: Use PLA for the easiest first prints and decorative models, PETG when durability matters, TPU for flexible parts, and resin when small details and smooth surfaces matter more than toughness.
| If You Need... | Start With... |
|---|---|
| Easy first prints, low cost, rich colors | PLA for prototypes, decoration, and artistic effects |
| More durable everyday functional parts | PETG for toughness, weather resistance, and practical parts |
| Harder parts with better heat resistance | ABS for enclosures, EDC toys, and post-processed structural pieces |
| Soft, flexible, or shock-absorbing parts | TPU for wearable accessories, damped joints, and flexible components |
| High-detail figures or miniature prototypes | Resin for smooth surfaces and precise details |
| Industrial strength or end-use parts | Nylon for jigs, fixtures, clips, and lightweight functional parts |
| True metal strength and high-temperature use | Metal for implants, aerospace parts, and advanced tooling |
FDM Filaments
PLA
- Core traits: The best entry-level material. It is easy to form, relatively eco-friendly, and rigid enough for most decorative prints.
- User experience: Extremely compatible with high-speed printers and multicolor systems such as AMS. Failed prints are less costly, so beginners can experiment freely.
- R&D focus: HS-PLA flow performance, matte finishes, silk finishes, and aesthetic additives are major competition points.
- Trend potential: PLA remains the first choice for decorative products and artistic effects because it has the richest color and specialty-finish ecosystem.
ABS
- Core traits: More durable and heat-resistant than PLA, making it suitable for harder structural parts.
- User experience: Usually needs an enclosure and gives off stronger odor. It is often used for parts that will be sanded, smoothed, or painted after printing.
- R&D focus: Low-odor, low-warping modified ABS is a key direction, including reinforced options such as ABS-GF.
- Trend potential: ABS is a low-cost engineering filament with potential in EDC toys, automotive aftermarket modification parts, and rapid validation of electronic enclosures.
PETG
- Core traits: Good toughness, weather resistance, and cost performance, making it a practical alternative to PLA for functional parts.
- User experience: Easy to adopt, but stringing can be a pain point, especially in parametric assemblies or multi-part prints.
- R&D focus: Formula upgrades focus on reducing stringing, improving transparency, and strengthening layer adhesion.
- Trend potential: Modified PETG is catching up with PLA in printability and special colors, with potential to become a more durable default filament.
TPU
- Core traits: Flexible, wear-resistant, and useful for soft or elastic parts.
- User experience: TPU strongly tests extruder gears and feed-path stability. It can jam, buckle, or extrude unevenly on less optimized FDM setups.
- R&D focus: Manufacturers are expanding Shore hardness options and improving stability for faster feeding and higher-speed printing.
- Trend potential: As multicolor printing evolves into multi-material printing, TPU can pair with PLA or PETG for soft-hard effects such as damped joints, wearable accessories, and shock-absorbing structures.
Photopolymer Material
Resin
- Core traits: High precision and smooth surface quality, but many standard resins are brittle and require washing and curing.
- User experience: Support removal and waste-liquid handling are inconvenient, yet resin remains hard to replace for high-detail model prototypes.
- R&D focus: Material ecosystems are moving toward safer water-washable resin and tougher ABS-like resin formulas.
- Trend potential: Resin is the preferred material for figure prototypes, desktop digital cultural heritage, miniature landscape models, and dental or orthodontic models.
Industrial and Advanced Materials
Nylon
- Core traits: Extremely wear-resistant and impact-resistant, with strong mechanical performance.
- User experience: Ideal for end-use parts and industrial jigs or fixtures on automated production lines.
- R&D focus: Mainstream routes include SLS nylon powder and FDM fiber-reinforced materials such as PA-CF. Moisture absorption remains a key challenge.
- Trend potential: Nylon has strong potential in aerospace lightweight brackets and customized functional clips for new energy vehicles.
Metal
- Core traits: True metal parts with high strength and high-temperature resistance.
- User experience: Metal printing enables complex internal channels and topology-optimized parts that are difficult or expensive to machine traditionally.
- R&D focus: Development focuses on improving SLM powder spreading, multi-laser efficiency, and lower-cost extrusion-and-sintering routes.
- Trend potential: Titanium, stainless steel, and aluminum alloys are used in medical implants, aerospace engine blades, and conformal-cooling molds.
Material Selection Takeaway
- PLA is the safest first material for beginners and visual models.
- PETG is the strongest everyday upgrade when durability and outdoor use matter.
- ABS is useful for tougher engineering-style parts, but it needs better printer control and ventilation.
- TPU unlocks flexible and soft-hard designs as multi-material printing becomes more common.
- Resin, nylon, and metal move 3D printing from hobby projects into high-detail, industrial, and end-use applications.
What You Need to Start
Getting started with 3D printing is easier than many beginners expect. Whether you want to create prototypes, custom parts, or hobby projects, there are a few key elements you'll need before making your first print. Understanding these fundamentals will help you avoid common mistakes and get better results from day one.
1. A 3D Printer
The first and most important requirement is a 3D printer. For beginners, an FDM (Fused Deposition Modeling) printer is usually the best choice because it is affordable, easy to operate, and compatible with a wide range of materials.
When choosing a printer, consider:
- Build volume (maximum print size)
- Ease of setup and maintenance
- Auto-leveling features
- Material compatibility
- Community support and documentation
2. Printing Material (Filament or Resin)
Every 3D printer requires material to create physical objects.
PLA Filament
PLA is the most recommended material for beginners because it is easy to print, affordable, and produces reliable results. It works well for prototypes, decorative models, and educational projects.
ABS Filament
ABS offers better strength and heat resistance but requires more experience due to its tendency to warp.
Resin
Resin is used with SLA/DLP printers and provides excellent detail and surface quality for miniatures, jewelry, and highly detailed parts.
3. A 3D Model File
Before printing, you need a digital 3D model. These files are typically provided in STL, OBJ, or 3MF formats.
You can:
- Download ready-made models from online repositories
- Purchase professional designs
- Create your own models using CAD software
4. Slicer Software
A slicer converts a 3D model into instructions that the printer can understand. It generates the printing path, layer settings, support structures, and print parameters.
Common slicer functions include:
- Layer height adjustment
- Infill settings
- Support generation
- Print speed control
- Material profiles
Without slicer software, a 3D printer cannot process a model for printing.
Beginner 3D Printing Checklist
Before starting your first print, make sure you have:
✓ A 3D printer ✓ PLA filament (recommended for beginners) ✓ A computer or laptop ✓ A 3D model file (STL, OBJ, or 3MF) ✓ Slicer software installed ✓ Basic design software (optional) ✓ SD card, USB connection, or network access for file transfer ✓ A clean, stable workspace
Where to Get (or Create) Models
As part of learning the 3D printing basics, one of the first challenges for new enthusiasts is: "I bought a printer, but what can I actually print?" Many beginners face exactly this dilemma—owning the machine but not knowing where to find models or how to create them. Fortunately, you don't need to be a professional designer to get started. In fact, understanding what you need to 3D print is only part of the picture; you also need accessible 3D models. We usually recommend the following ways to get 3D models.
1. Download from Model Libraries
A simple and reliable approach is to download ready-to-print models from online libraries. Platforms like Thingiverse host millions of free STL files covering toys, household items, educational models, and more. While these models allow beginners to start printing immediately, they are limited to what others have designed. If you want to bring your own ideas to life, traditional model libraries cannot fully capture your creativity—they provide convenience but little room for originality.
2. Generate Models with AI
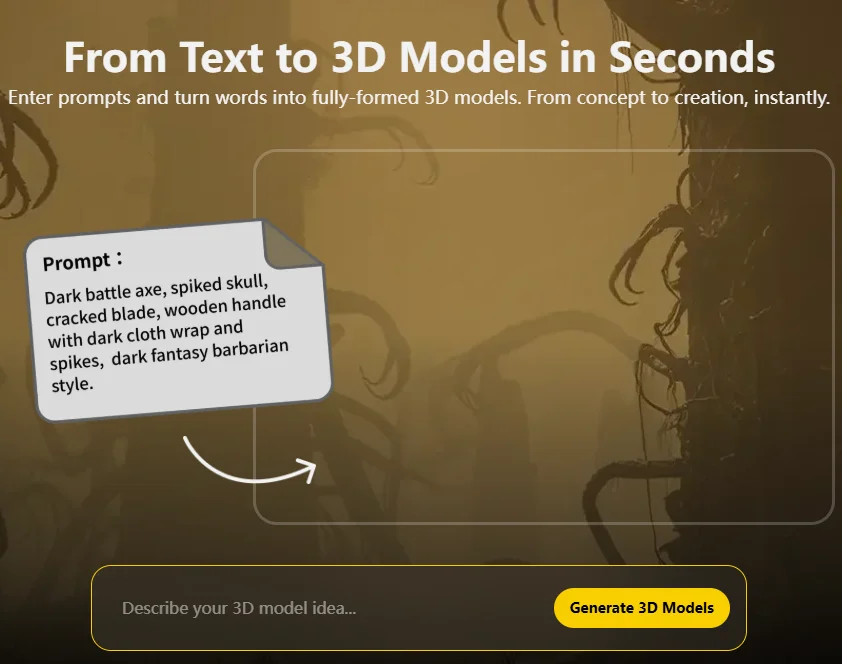
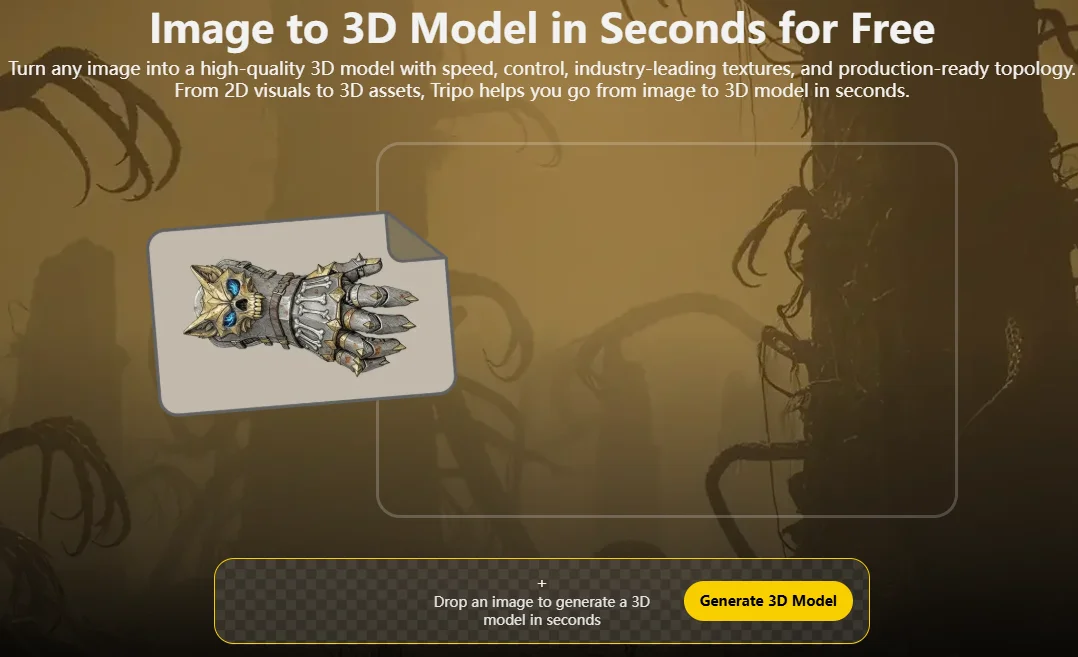
If you want something truly unique—or don't know how to design—AI now offers a zero-barrier solution. Tools like Tripo AI Text to 3D and Tripo AI Image to 3D can generate printable 3D models directly from text descriptions or images. For example, you can type a short description of the object you want, or provide an image reference, and the AI will produce a model ready to slice and print. This approach removes the traditional CAD learning curve, letting even complete beginners turn ideas into printable files quickly.
Option 1: Tripo AI Text to 3D
Create a 3D Model by Simply Describing Your Idea
Option 2: Tripo AI Image to 3D
Create a 3D Model from a Single Image
By combining traditional model libraries with AI-assisted creation, anyone—regardless of experience—can build a diverse library of 3D models. While libraries provide convenience, an AI 3D model generator like Tripo AI gives you the freedom to create your own designs and express your personal vision, making every print truly your own.
Your First Print, Step by Step
If you are wondering how to start 3D printing, this guide will take you through the entire process—from selecting a model to holding your first finished print. Even complete beginners can follow these steps to turn ideas into physical objects.
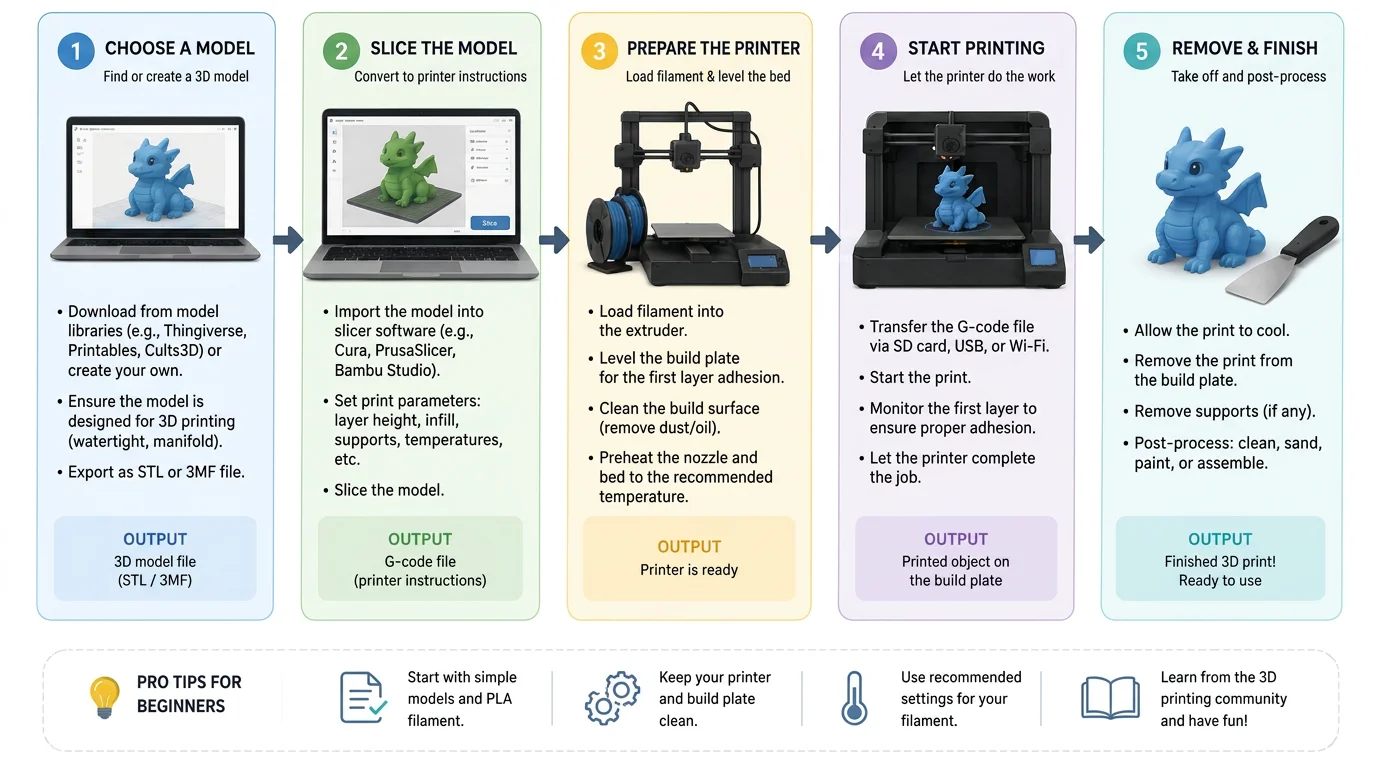
1. Choose a 3D Model
The first step is deciding what you want to print. Beginners can:
- Download models from online libraries like Thingiverse, which provide ready-to-print STL files. While convenient, these models are limited to what others have created.
- Create custom models using AI tools such as Tripo AI Text to 3D or Tripo AI Image to 3D, allowing even those with no design experience to generate printable files.
For your first print, choose a simple object with minimal overhangs for the best results.
2. Slice the Model
Once you have your model file, use slicer software to convert it into instructions your printer can understand. Popular slicers include Cura and PrusaSlicer. Newer options like Bambu Studio and OrcaSlicer are also popular, especially with high-speed printers.
In the slicer, you will:
- Set the layer height (thinner layers give more detail).
- Choose the infill density (how solid the object should be).
- Add supports if your model has overhangs.
- Select the material profile to match your filament or resin type.
Export the sliced file (usually as G-code) to your printer via SD card, USB, or network.
3. Prepare the Printer
Before printing:
- Load the filament (PLA is recommended for beginners) or prepare resin if using SLA/DLP.
- Level the build plate so the first layer sticks properly. Many printers have auto-leveling, but manual adjustment may be needed.
- Ensure the printer is clean and stable.
4. Start the Print
Send the sliced file to the printer and begin. During printing:
- Watch the first few layers carefully to ensure good adhesion.
- Monitor occasionally for filament jams or warping.
Printing time can range from minutes to several hours depending on the model.
5. Remove and Finish the Print
Once the print is complete:
- Carefully remove the object from the build plate.
- Remove any supports or rafts.
- Optional: sand, paint, or smooth the surface for a polished finish.
Congratulations! You now have your first 3D printed object. Following these steps is the easiest way for beginners to understand how to start 3D printing and gain confidence in creating more complex designs.
A Beginner-Friendly Workflow
Beginner Tips & Common Mistakes
Every 3D printing beginner experiences a few failed prints along the way. The good news is that most printing problems are predictable and easy to prevent once you understand the basics. Below are some of the most common mistakes new users make—and practical tips to help you avoid them.
1. Don't Ignore Bed Adhesion
Poor bed adhesion is one of the leading causes of failed prints. If the first layer does not stick properly, the entire print may shift, detach, or fail completely.
How to avoid it:
- Ensure the build plate is properly leveled.
- Clean the print surface regularly to remove dust and oils.
- Use the correct bed temperature for your material.
- Watch the first layer before leaving the printer unattended.
A successful print almost always starts with a successful first layer.
2. Watch Out for Warping
Warping occurs when the corners of a print lift away from the build plate as the material cools. This is particularly common with ABS but can happen with other materials as well.
How to avoid it:
- Keep the printing environment free from drafts and sudden temperature changes.
- Use a heated bed when possible.
- Add a brim or raft for better adhesion.
- For beginners, start with PLA, which is much less prone to warping.
3. Avoid Layer Separation
Layer separation (or layer splitting) happens when printed layers do not bond properly, resulting in visible cracks or weak parts.
How to avoid it:
- Use the recommended nozzle temperature for your material.
- Avoid excessive cooling on materials that require strong layer bonding.
- Store filament in a dry environment, as moisture can negatively affect print quality.
4. Follow the 45-Degree Rule
One of the most useful design principles for beginners is the 45-degree rule. Most FDM printers can reliably print overhangs up to approximately 45 degrees without requiring support structures.
When designing or choosing models:
- Overhangs under 45° usually print well.
- Steeper angles often require supports.
- Reducing unnecessary supports saves material and shortens print time.
Understanding this rule can help you select beginner-friendly models and improve print success rates.
5. Start Simple
Many beginners try large or highly detailed models for their first print. While ambitious projects are exciting, they also increase the chance of failure.
Instead:
- Begin with small calibration models.
- Print simple functional objects.
- Learn how your printer behaves before attempting complex projects.
A successful small print teaches more than a failed 20-hour print.
6. Use PLA for Your First Projects
PLA remains the easiest material for beginners because it:
- Prints at lower temperatures.
- Produces minimal warping.
- Requires less tuning than ABS or specialty materials.
- Delivers consistent results on most printers.
Once you become comfortable with printer settings, you can experiment with more advanced materials.
7. Check Your Slicer Settings
Many printing problems originate in the slicer rather than the printer itself.
Before starting a print, double-check:
- Material profile
- Layer height
- Infill percentage
- Support settings
- Print temperature
Using the wrong profile can lead to poor print quality even if the printer is functioning perfectly.
8. Be Patient and Learn from Failed Prints
Failed prints are a normal part of the learning process. Every issue—whether it's poor adhesion, stringing, warping, or layer separation—provides valuable information about your settings and workflow.
Experienced makers rarely achieve perfect prints every time. What separates successful users from frustrated ones is the willingness to troubleshoot, adjust settings, and try again.
Key Takeaway
For beginners, the most effective strategy is simple: use PLA, ensure good bed adhesion, follow the 45-degree rule, verify slicer settings, and start with easy models. By avoiding these common mistakes, you'll achieve better print quality, waste less material, and enjoy a much smoother introduction to 3D printing.
Frequently Asked Questions
How to Learn 3D Printing for Beginners?
Start with an FDM printer and PLA filament—the easiest combination for beginners. Download models from sites like Thingiverse or generate them instantly with AI tools like Tripo AI Text to 3D and Tripo AI Image to 3D. The best way to learn is by printing simple projects and gaining hands-on experience.
What Is the 45-Degree Rule in 3D Printing?
Most FDM printers can print overhangs up to about 45° without support structures. Designs exceeding this angle often require supports to prevent sagging or failure. Following this rule improves print quality while reducing material usage and print time.
How Does a 3D Printer Work Step by Step for Beginners?
A 3D printer turns a digital model into a physical object layer by layer: choose or create a model, slice it into printable instructions, load filament and level the bed, start printing, then remove and finish the part. The printer follows the sliced instructions to deposit material one layer at a time. This additive process builds the object from bottom to top until complete.
Conclusion
Want to start 3D printing but don't know how to model? With Tripo AI Studio, you can generate a fully printable 3D model from just a single sentence or an image. This makes it easy for beginners to bring their ideas to life without learning complex CAD software, covering the essential 3D printing basics.
Simply describe what you want or upload a reference image, and Tripo AI will create a ready-to-print model that works seamlessly with your slicer and 3D printer, helping you understand what you need to 3D print and how to get started. Whether you're experimenting with PLA, exploring functional parts in ABS, or designing intricate resin prints, Tripo AI makes it simple to turn concepts into physical objects.
