Midjourney Image to 3D Workflow: Turn AI Art Into a 3D Model
TL;DR
- Midjourney makes 2D images, not 3D—you need an AI image-to-3D tool to bridge the gap.
- The image you prompt decides everything: one clean subject, neutral background, and orthographic/turnaround views for characters.
- The step most guides skip: AI meshes are messy—clean topology and fix holes in Blender before you use them.
- Export GLB/FBX/OBJ for game engines; STL/3MF if you're 3D printing.
- Pick your tool by goal: fast and game-ready (Smart Mesh) vs. maximum detail (HD model).
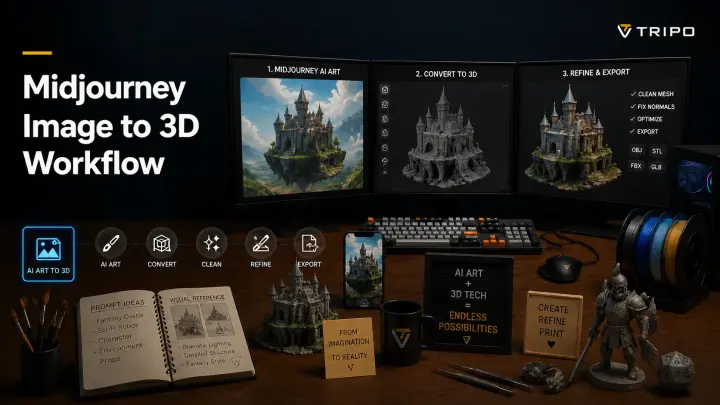
Midjourney is brilliant at generating images—but it doesn't output 3D models. To go from a Midjourney image to a usable 3D asset, you prompt a clean, 3D-friendly image, feed it to an AI image-to-3D tool, clean up the mesh, and export it for your game engine or 3D printer. This guide walks the full workflow end to end.
Can Midjourney Make 3D Models? (Start Here)
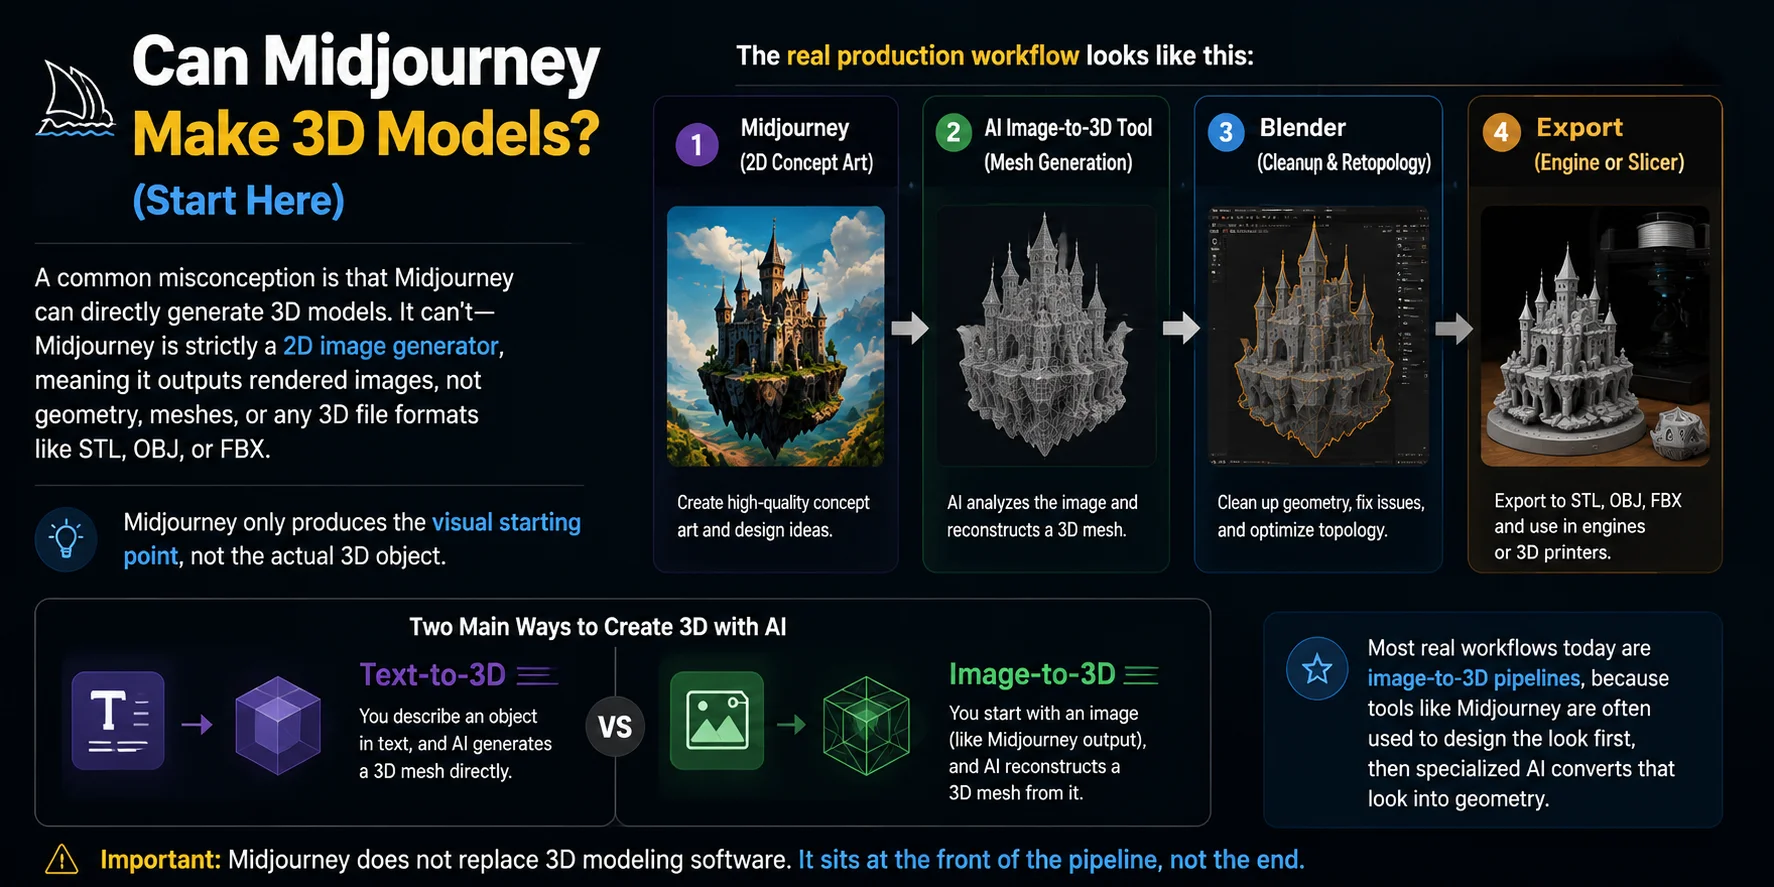
A common misconception is that Midjourney directly exports 3D models. Its standard output is a 2D image rather than geometry, a mesh, or a downloadable 3D format such as STL, OBJ, or FBX.
So if you’re trying to create a 3D model from Midjourney, the key thing to understand is this: it only produces the visual starting point, not the actual 3D object.
The real production workflow looks like this:
Midjourney (2D concept art) → AI image-to-3D tool (mesh generation) → Blender (cleanup & retopology) → export to engine or slicer
In other words, Midjourney is just the concept stage. The actual 3D model comes from the next step, where image-to-3D tools reconstruct geometry from the 2D render.
A useful distinction here is:
- Text-to-3D: You describe an object → AI generates a 3D mesh directly
- Image-to-3D: You start with an image (like Midjourney output) → AI reconstructs a 3D mesh from it
Most real workflows today are image-to-3D pipelines, because tools like Midjourney are often used to design the look first, then specialized AI converts that look into geometry.
Finally, it’s important to be clear: Midjourney does not replace 3D modeling software. It sits at the front of the pipeline, not the end.
Step 1 — Prompt a 3D-Friendly Image in Midjourney
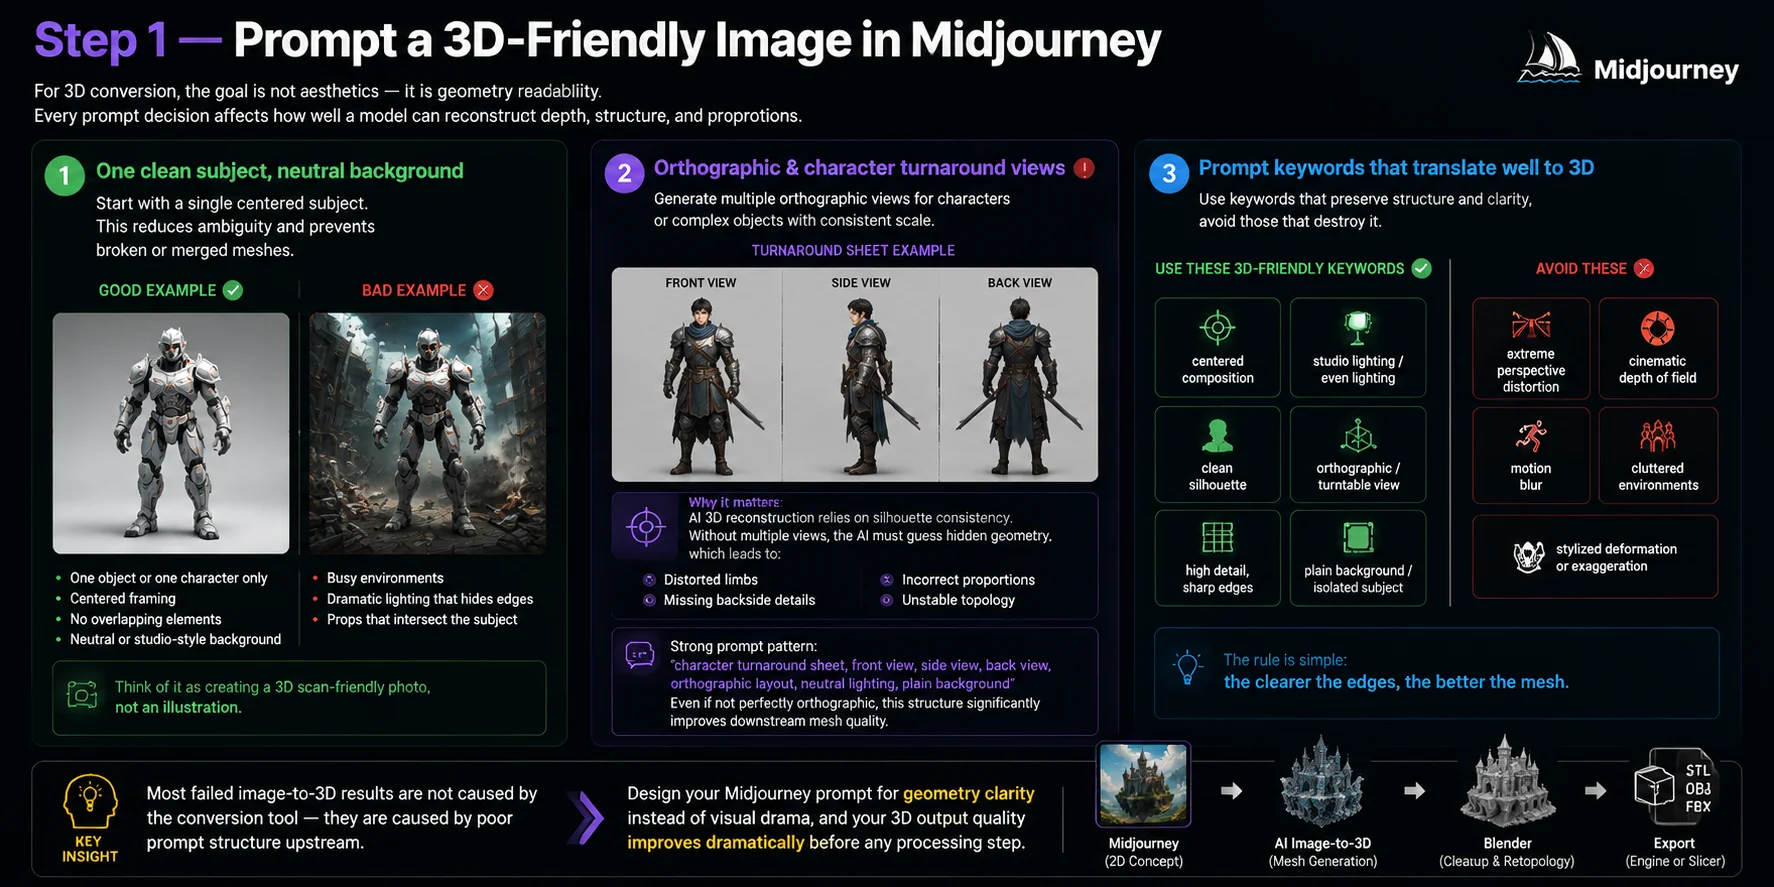
When using Midjourney, the most important mistake to avoid is treating it like a “make it look cool” tool. For 3D conversion, the goal is not aesthetics—it is geometry readability. Every prompt decision affects how well a model can later reconstruct depth, structure, and proportions.
One clean subject, neutral background
Start with a single centered subject. This is critical. Multiple objects create ambiguous depth cues, which leads to broken or merged meshes during image-to-3D reconstruction.
Keep the composition simple:
- One object or one character only
- Centered framing
- No overlapping elements
- Neutral or studio-style background (white, gray, soft gradient)
Avoid:
- busy environments
- dramatic lighting that hides edges
- props that intersect the main subject
Think of it as creating a 3D scan-friendly photo, not an illustration.
Orthographic & character turnaround views
This is the step most “Midjourney-to-3D” workflows completely miss.
For characters or complex objects, you should explicitly generate:
- front view
- side view
- back view
- consistent scale across views
These are called turnaround sheets or orthographic-style layouts.
Why it matters: 3D reconstruction models rely heavily on silhouette consistency. If only a single perspective is provided, the AI must guess hidden geometry, which causes:
- distorted limbs
- incorrect proportions
- missing backside details
- unstable topology
A strong prompt pattern is:
“character turnaround sheet, front view, side view, back view, orthographic layout, neutral lighting, plain background”
Even if Midjourney does not produce perfect orthographic projection, this structure still significantly improves downstream mesh quality.
Prompt keywords that translate well to 3D
Not all visual styles transfer well into geometry. Some keywords help preserve structure, while others destroy it.
Use these 3D-friendly keywords:
- centered composition
- studio lighting / even lighting
- clean silhouette
- orthographic / turntable view
- high detail, sharp edges
- plain background / isolated subject
Avoid:
- extreme perspective distortion
- cinematic depth of field
- motion blur
- cluttered environments
- stylized deformation or exaggeration
The rule is simple: the clearer the edges, the better the mesh.
How to iterate when the first reference fails
Do not keep sending the same difficult Midjourney image into an image-to-3D generator and expect a different mesh to solve an input problem. When the first result has a collapsed weapon, missing back side, merged clothing, or unreadable limbs, return to the reference image and change one variable at a time. This gives you a repeatable way to identify whether the failure comes from composition, perspective, occlusion, or the amount of fine detail.
Start by simplifying the scene. Remove secondary props, particles, dramatic backgrounds, and any object that overlaps the main subject. If the silhouette is still unclear, generate a closer crop with more empty space around the object. For a character, keep both feet visible and separate the arms from the torso where possible. For a vehicle or hard-surface prop, use a three-quarter view only after you have a clean front or side reference; strong wide-angle perspective can make a straight form look curved to the reconstruction model.
Next, decide whether you need a single-image result or a multi-view result. A single well-lit image can be enough for a simple prop or a fast concept mesh. If the back side, profile, or proportions matter, create a consistent front, side, and back set instead. Keep the same subject, material, lighting, and scale across those images. Treat them as references for the same object, not three separate illustrations. When the image-to-3D tool supports multiple inputs, use the cleanest set available and check whether the added views improve the silhouette before spending time on texture details.
Finally, make a small evaluation sheet for each attempt: reference image, generation settings, visible failure, and the next adjustment. After two or three focused iterations, you will know whether the asset is worth repairing in Blender or whether it needs a new reference from the start. This is faster than trying to rescue every weak mesh downstream.
Key insight
Most failed image-to-3D results are not caused by the conversion tool—they are caused by poor prompt structure upstream. If you design your Midjourney prompt for geometry clarity instead of visual drama, your 3D output quality improves dramatically before you even touch Blender or any AI reconstruction tool.
Step 2 — Generate the 3D Model From Your Image
Once you have a clean prompt image from Midjourney, the next step is converting it into actual geometry. This is where image-to-3D tools interpret depth, structure, and surfaces to build a mesh. The quality of this step depends heavily on how clean and “3D-readable” your input image is.
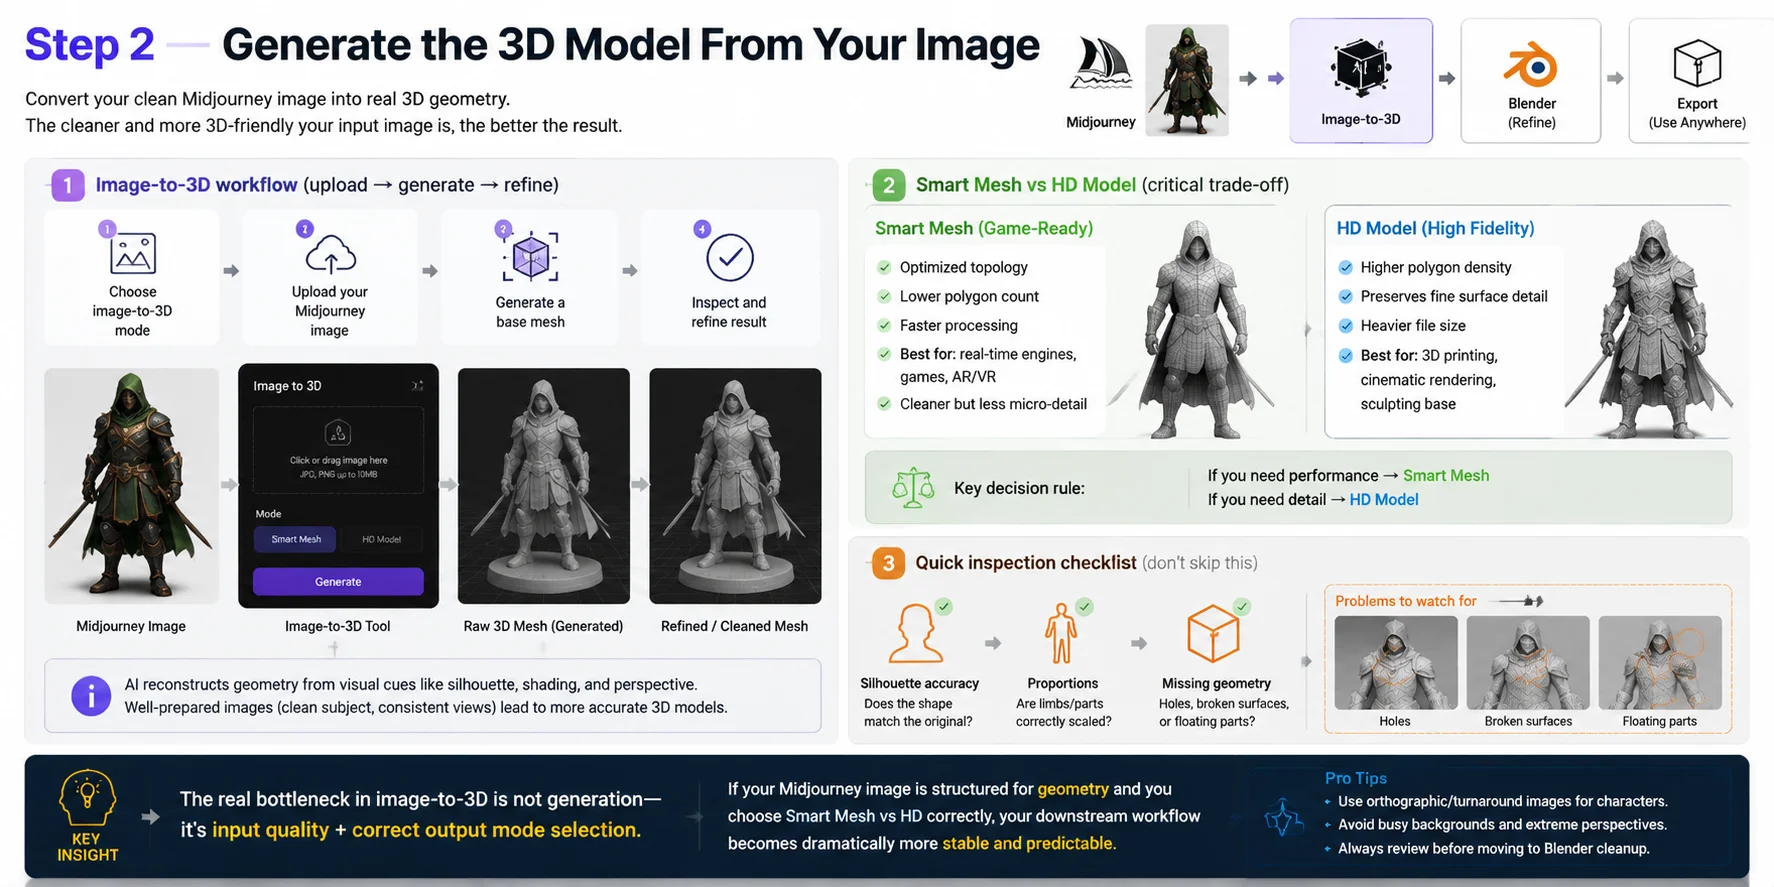
Image-to-3D workflow (upload → generate → refine)
In a typical workflow, you:
- Choose image-to-3D mode rather than text-to-3D.
- Upload your Midjourney image
- Generate a base mesh
- Inspect and refine the result
At this stage, the AI reconstructs geometry from visual cues like silhouette, shading, and perspective. If the input image is well-prepared (clean subject, consistent views), the output mesh will be significantly more accurate.
Smart Mesh vs HD Model (critical trade-off)
Most modern tools (including Tripo-style pipelines) offer two main output modes:
Smart Mesh (game-ready)
- Optimized topology
- Lower polygon count
- Faster processing
- Best for: real-time engines, games, AR/VR
- Cleaner but less micro-detail
HD Model (high fidelity)
- Higher polygon density
- Preserves fine surface detail
- Heavier file size
- Best for: 3D printing, cinematic rendering, sculpting base
Key decision rule:
- If you need performance → Smart Mesh
- If you need detail → HD Model
Choosing the wrong mode can either overcomplicate your mesh or remove important surface detail.
Quick inspection checklist (don’t skip this)
After generation, always check:
- Silhouette accuracy (does the shape match the original?)
- Proportions (are limbs/parts correctly scaled?)
- Missing geometry (holes, broken surfaces, floating parts)
Even high-quality AI outputs usually need small cleanup in tools like Blender before final export.
Key insight
The real bottleneck in image-to-3D is not generation—it’s input quality + correct output mode selection. If your Midjourney image is structured for geometry and you choose Smart Mesh vs HD correctly, your downstream workflow becomes dramatically more stable and predictable.
Step 3 — Clean the Mesh & Fix Topology in Blender
After generating a mesh from an image-to-3D pipeline, the most critical stage begins: cleanup and topology correction inside Blender. This step determines whether the asset is usable for games, animation, or 3D printing. Even if the model looks correct visually, AI-generated geometry often contains structural issues that must be fixed before export.
Spot the problems: diagnosis first
Before making any edits, you need to identify mesh issues clearly.
Common problems include:
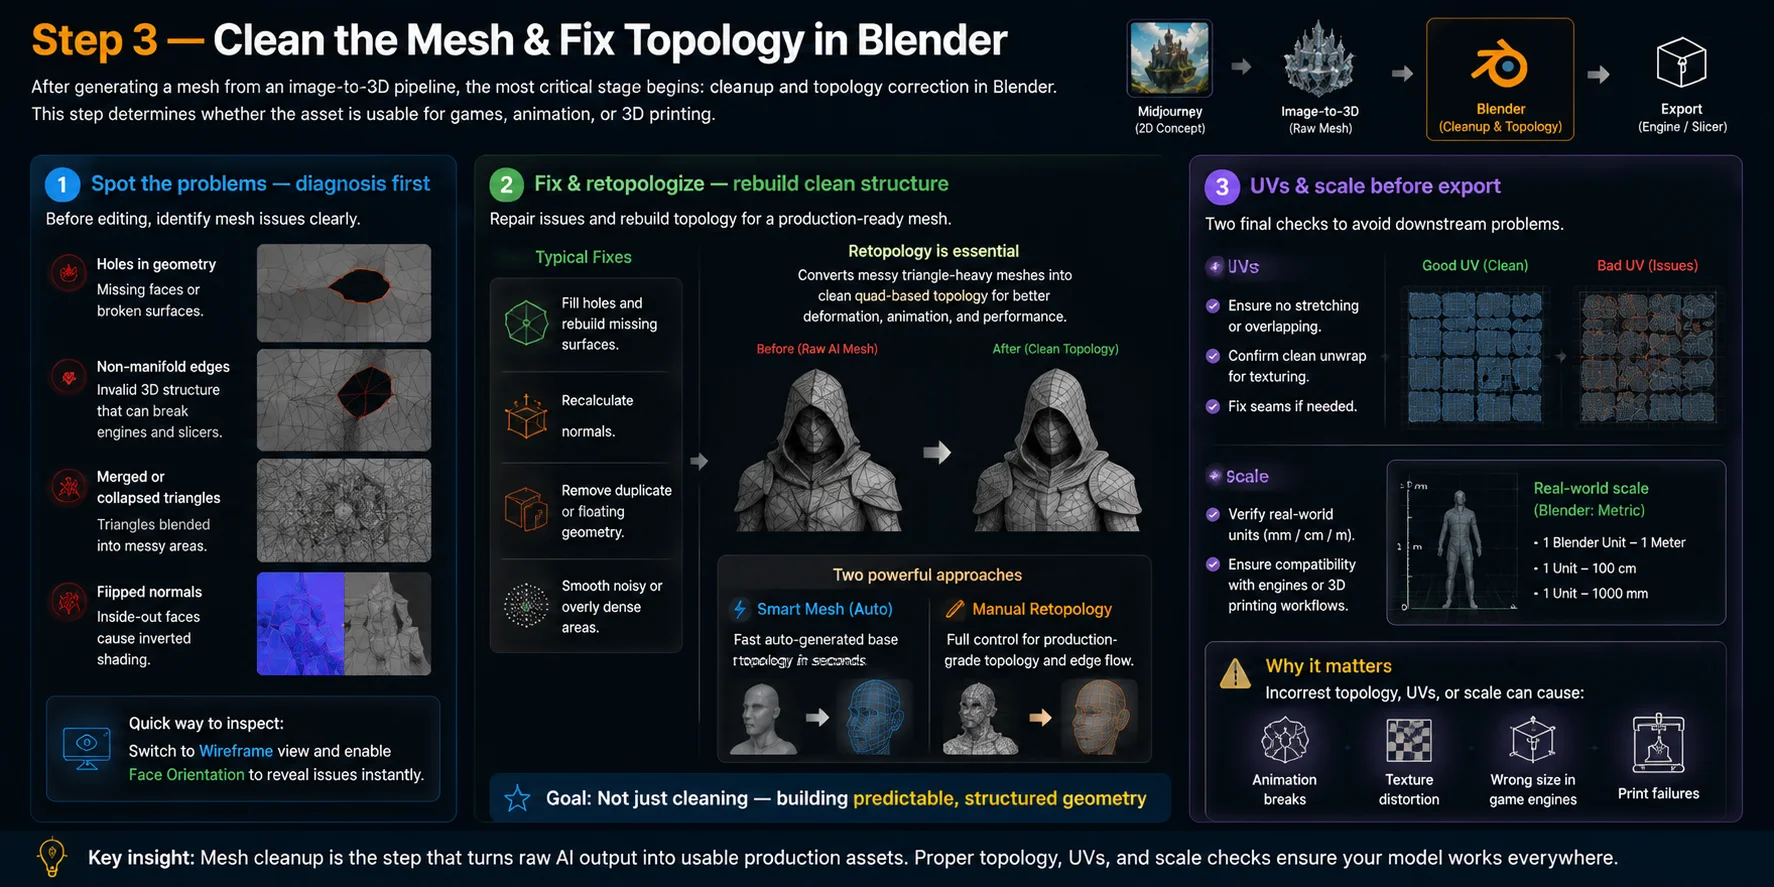
- holes in geometry (missing faces or broken surfaces)
- non-manifold edges (invalid 3D structure)
- merged or collapsed triangles
- flipped normals causing inverted shading
These issues happen because image-to-3D systems reconstruct depth from visual inference rather than true geometric rules.
A fast way to inspect is switching to wireframe view and enabling face orientation checks.
Fix & retopologize: rebuild clean structure
Once problems are identified, the next step is repair and retopology.
Typical fixes include:
- filling holes and rebuilding missing surfaces
- recalculating normals
- removing duplicate or floating geometry
- smoothing noisy or overly dense areas
For production workflows, retopology is essential. It converts messy triangle-heavy meshes into clean quad-based topology that behaves correctly in animation, simulation, and deformation.
Modern pipelines often combine:
- fast auto-generated “Smart Mesh” as a base
- manual retopology for production-grade control
The goal is not just cleaning—it is building predictable, structured geometry.
UVs & scale before export
Before exporting, two final checks are essential:
UVs
- ensure no stretching or overlapping
- confirm clean unwrap for texturing
- fix seams if needed
Scale
- verify real-world units (mm / cm / meters)
- ensure compatibility with engines or 3D printing workflows
Incorrect scaling is one of the most common downstream errors in production pipelines.
Blender handoff checklist
Before you start detailed cleanup, make a copy of the original AI mesh and keep it on a separate collection. Work from the copy so you can compare the repaired asset against the generated result and return to the source if a destructive operation removes useful detail.
- Apply the object scale before measuring or exporting. A model that looks correct in the viewport can still import at the wrong size in an engine or slicer.
- Use Face Orientation and wireframe view to find flipped normals, thin shells, overlapping surfaces, and accidental internal faces.
- Run a non-manifold check, then decide whether each issue needs a quick repair or a rebuild. Filling a small hole is different from trying to make an inferred mechanical joint dimensionally accurate.
- For static props, remove loose geometry, recalculate normals, and inspect the silhouette after smoothing. For deforming characters, also check joints, edge loops, and whether the topology will survive bending.
- Check UV islands before spending time on textures. If the generated UVs are unusable, unwrap or remesh before painting rather than trying to hide stretching later.
- Export one test asset early, import it into the target engine or slicer, and verify scale, material slots, normals, and animation data there. The DCC viewport is not the final proof that the handoff works.
If you need a lighter starting mesh for a game workflow, Smart Mesh can reduce the cleanup burden. It is still a starting point: inspect edge flow, UVs, and deformation where the asset will actually be used, and use manual retopology when the production requirement demands it.
What to document before export
Record the target unit, polygon budget, texture resolution, and destination format before you export. This small handoff note prevents a common loop where a visually good model is rebuilt because nobody agreed whether it was for a static web viewer, a rigged engine character, or a printable object.
Key insight
Mesh cleanup is the step that turns raw AI output into usable production assets. Without proper topology and UV/scale validation, even visually good models will fail in real pipelines.
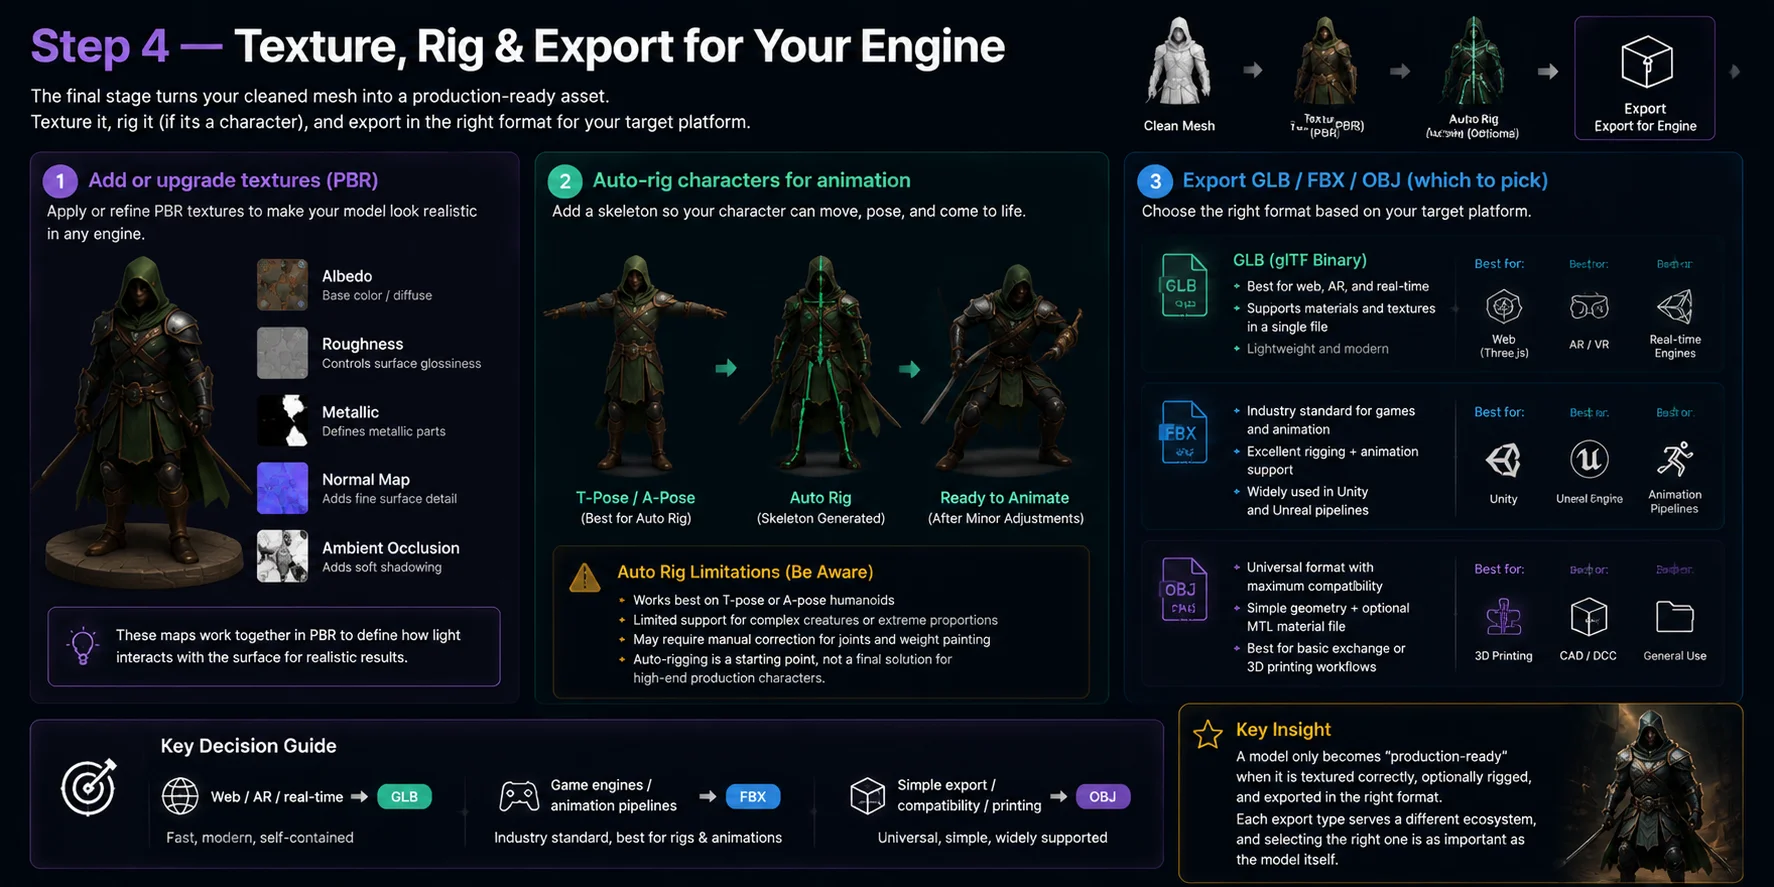
Step 4 — Texture, Rig & Export for Your Engine
After cleaning and preparing a mesh, the final stage is turning it into a usable asset for real applications. This includes texturing, rigging, and exporting, depending on whether the model is used in games, animation, AR/VR, or 3D printing.
Add or upgrade textures (PBR)
The first step is applying or refining PBR textures (Physically Based Rendering).
Typical maps include:
- Albedo (base color)
- Roughness
- Metallic
- Normal map
- Ambient occlusion
These maps define how light interacts with the surface, making the model visually realistic in real-time engines.
If your model came from image-to-3D, textures may already exist—but they often need cleanup, rebalancing, or complete replacement for production quality.
Auto-rig characters for animation
If your model is a character, the next step is rigging—adding a skeleton for animation.
Modern tools can auto-rig humanoid or simple quadruped models, including solutions like Tripo-style auto-rig systems. However, there are important limitations:
- Works best on T-pose or A-pose humanoids
- Limited support for complex creatures or extreme proportions
- May require manual correction for joints and weight painting
Rigging transforms a static mesh into an animatable asset, enabling walking cycles, facial animation, and interaction.
Important note: auto-rigging is a starting point, not a final solution for high-end production characters.
Export GLB / FBX / OBJ (which to pick)
The final step is exporting your model. The format depends on your target platform:
GLB (glTF binary)
- Best for web, AR, and real-time engines
- Supports materials and textures in a single file
- Lightweight and modern
FBX
- Industry standard for games and animation
- Excellent rigging + animation support
- Widely used in Unity and Unreal pipelines
OBJ
- Universal format with maximum compatibility
- Simple geometry + optional material file (MTL)
- Best for basic exchange or simple 3D printing workflows
Key decision guide
- Web / AR / real-time → GLB
- Skeletal or animation pipelines → FBX
- Simple export / compatibility / printing → OBJ
Choosing the correct format early prevents rework and compatibility issues later in production.
Validate the asset in its destination
Do not treat a successful export as the end of the workflow. Open one test model in the software where it will actually be used and make a short acceptance pass there. The same model can look fine in Blender but reveal a scale mismatch, missing material, broken normal map, unsupported texture path, or unexpected rig behavior after import.
For Unity or Unreal: import a single FBX or GLB test asset into a blank project before you export a whole batch. Check the unit scale against a known object, confirm that material slots were created as expected, and look at the asset under a simple directional light. For a rigged character, preview an idle or walk animation and inspect elbows, knees, shoulders, and fingers. This reveals whether the mesh needs weight-paint fixes or a cleaner deformation topology before production.
For web, AR, or real-time viewers: test the GLB in the actual viewer or runtime rather than only in a desktop DCC. Watch the file size, loading time, texture resolution, and whether the model still reads clearly at mobile scale. A dense mesh with several large textures may be visually impressive in a close-up preview but unnecessarily heavy for a product page or AR scene. Reduce texture resolution and simplify geometry only after checking the result in context.
For 3D printing: import the export into your slicer and inspect it as a physical object, not a render. Confirm that the model is watertight, that thin parts are printable at the intended scale, and that cavities, separate parts, or overhangs are deliberate. STL is appropriate when you need geometry only; use 3MF when the printing workflow needs color or texture information. If an AI-generated feature is too thin or an opening is not real geometry, repair it before sending the job to a printer.
For handoff to another artist: include the source format, target unit, texture folder, polygon count, and a note about any unfinished cleanup. That makes it clear whether the recipient is receiving a concept mesh, a game-ready prop, a rigging candidate, or a print-ready asset. A short handoff note is often more valuable than another round of polishing that nobody can see in the final destination.
This last validation step turns a Midjourney-to-3D experiment into a reliable production workflow: generate, clean, export, test in the destination, then iterate only on the failure you can observe.
Key insight
A model only becomes “production-ready” when it is textured correctly, optionally rigged, and exported in the right format. Each export type serves a different ecosystem, and selecting the right one is as important as the model itself.
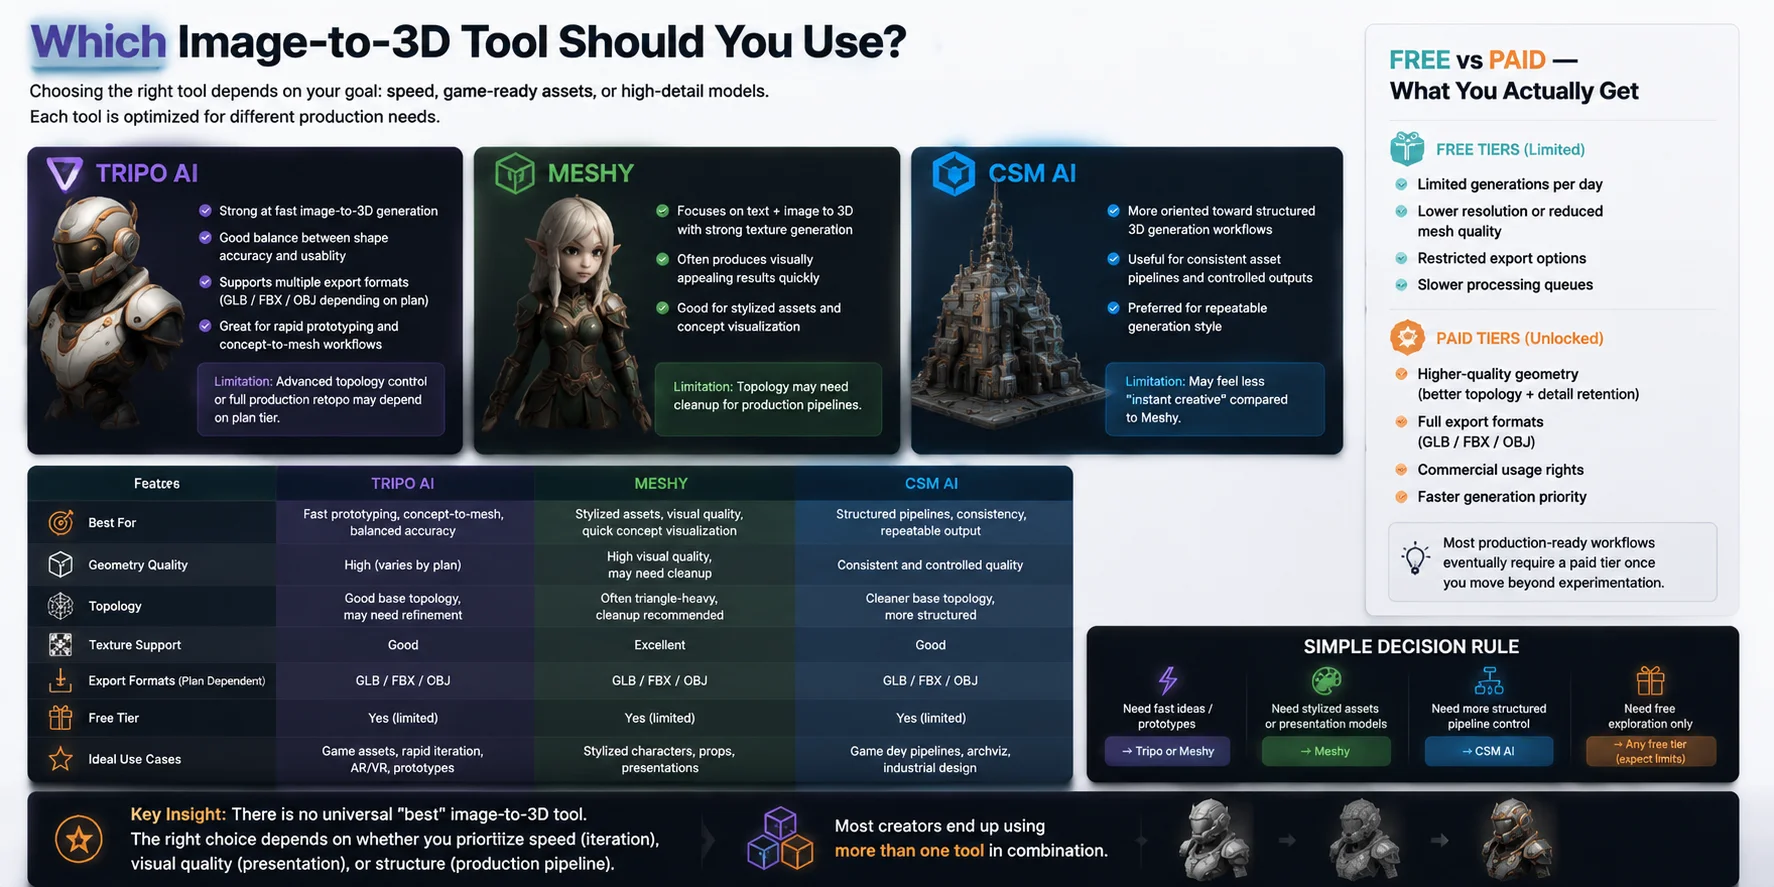
Which Image-to-3D Tool Should You Use?
Choose an image-to-3D tool by the asset you need to deliver, not by a generic "best tool" claim. Start with the same input image and judge the result against the requirements of your destination: silhouette accuracy, usable topology, texture quality, export options, turnaround time, and the amount of cleanup you can accept.
Compare the workflow, not just the first render
Tripo, Meshy, and CSM can all be useful places to test a Midjourney reference, but their output can change with model versions, settings, and plan limits. For a fair comparison, run the same image through each candidate and inspect the result in Blender rather than relying on a polished viewport preview.
| What to test | What a good result looks like |
|---|---|
| Shape fidelity | The silhouette, major proportions, and visible details stay close to the reference without inventing large forms. |
| Topology and UVs | The mesh is clean enough for the intended use, with workable edge flow and UVs that do not immediately require a rebuild. |
| Textures | Materials support the target look without obvious stretching, baked shadows, or details that break when viewed from another angle. |
| Pipeline fit | The service can export the format you need and leaves a reasonable amount of cleanup for Blender, your engine, or your slicer. |
For Tripo specifically, start with Image to 3D for the conversion step. Use Smart Mesh when you need a lighter game-oriented asset, then inspect the topology in your DCC; use an HD model when visual detail or a print-oriented starting point matters more than real-time efficiency. Neither choice removes the need to validate the exported asset for your own pipeline.
Free vs paid: check the current plan before committing
Free access is useful for testing whether a tool understands your subject and art style, but do not assume every feature, model version, export option, privacy setting, or commercial-use term is included. Those terms vary by provider and can change. Before building production work around a result, confirm the current pricing and license page for the exact plan you intend to use.
For Tripo, the current free plan includes limited downloads of v2.5 models, while paid plans list broader downloads, Smart Mesh, and private models with commercial use. Treat that as a planning checkpoint, not a substitute for reviewing the live plan details before a client or commercial release.
Simple decision rule
- Prototype or block out an idea: prioritize iteration speed and a clean enough silhouette to make the next decision.
- Build a game asset: prioritize topology, UVs, scale, and the engine import path over surface detail in the first render.
- Prepare a print or presentation model: prioritize visible detail, watertight geometry, and the time available for repair.
- Choose between services: test one representative asset in each, export it, and compare the cleanup time instead of judging only the preview.
Key insight
There is no permanent winner for every Midjourney image. The right tool is the one that produces the most usable result for the specific asset, target format, and cleanup budget you have today.
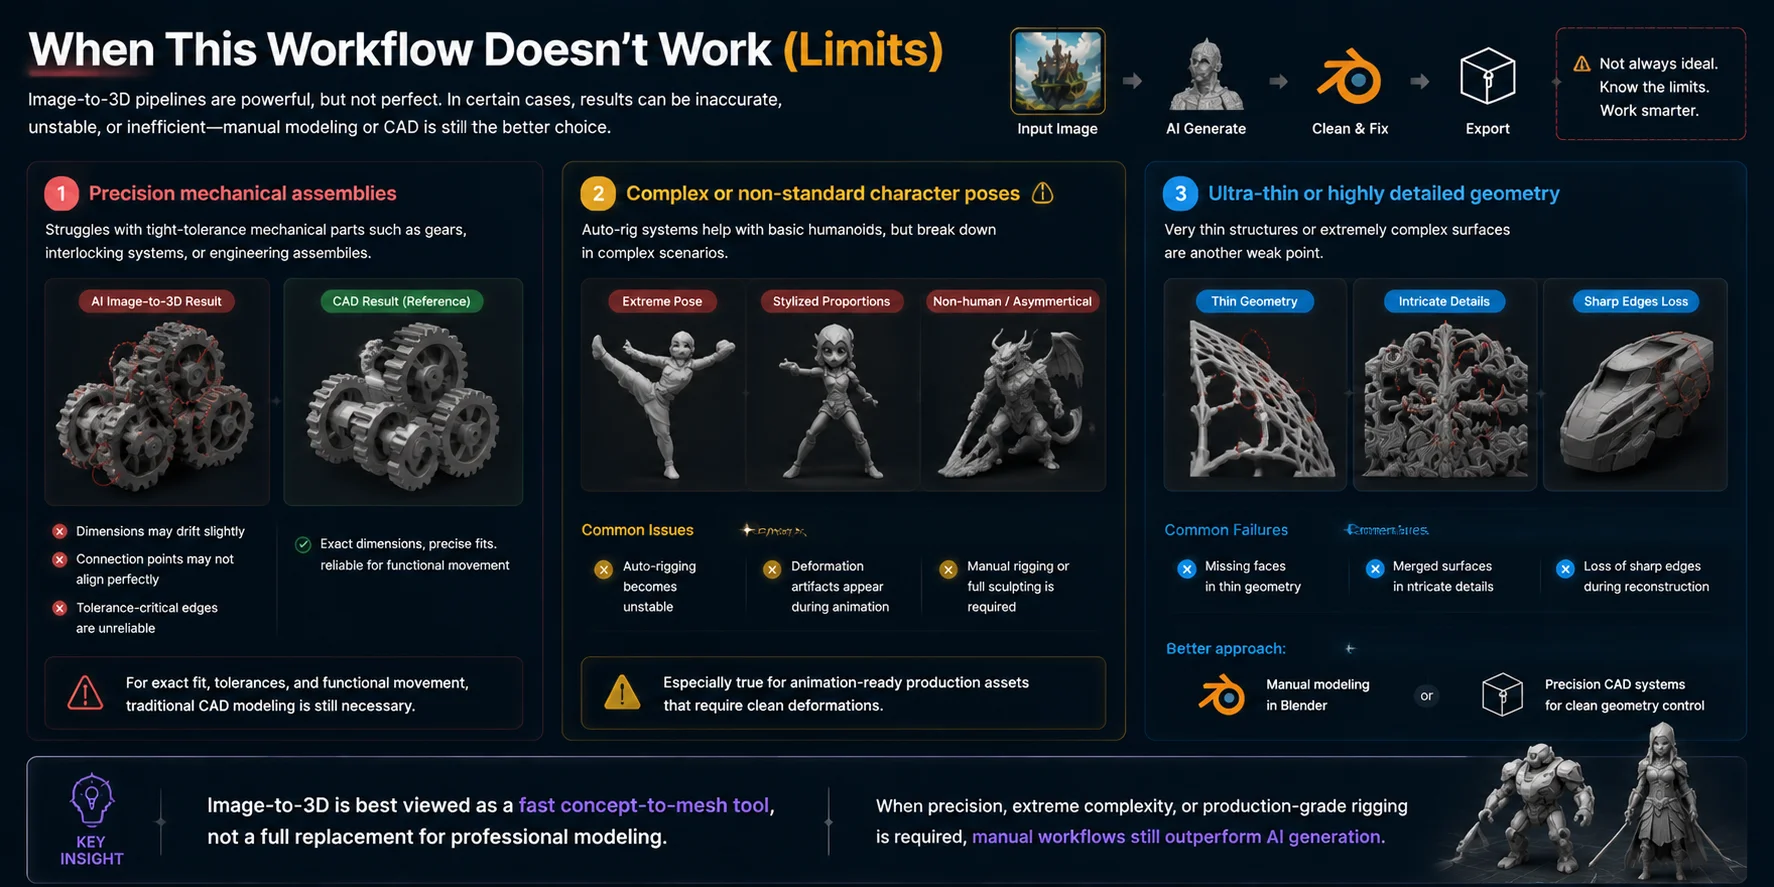
When This Workflow Doesn't Work (Limits)
Even though image-to-3D pipelines can produce impressive results, there are clear cases where this workflow breaks down or becomes inefficient. Understanding these limits is important for deciding when to switch back to manual modeling or CAD workflows.
Precision mechanical assemblies
This workflow struggles with tight-tolerance mechanical parts such as gears, interlocking systems, or engineering assemblies.
Image-to-3D tools prioritize visual reconstruction, not engineering accuracy. As a result:
- dimensions may drift slightly
- connection points may not align perfectly
- tolerance-critical edges are unreliable
For anything requiring exact fit or functional movement, traditional CAD modeling is still necessary.
Complex or non-standard character poses
While tools like Tripo-style auto-rig systems help with basic humanoids, they break down when:
- characters are in extreme poses
- proportions are stylized or exaggerated
- creatures are non-human or asymmetrical
In these cases:
- auto-rigging becomes unstable
- deformation artifacts appear during animation
- manual rigging or full sculpting is required
This is especially true for animation-ready production assets.
Ultra-thin or highly detailed geometry
Very thin structures or extremely complex surfaces are another weak point.
Common failures include:
- missing faces in thin geometry
- merged surfaces in intricate details
- loss of sharp edges during reconstruction
For models like jewelry, micro-mechanical parts, or highly detailed hard-surface designs, AI reconstruction often collapses detail.
In these cases, the workflow usually falls back to:
- manual modeling in Blender
- or precision CAD systems for clean geometry control
Key insight
Image-to-3D is best viewed as a fast concept-to-mesh tool, not a full replacement for professional modeling. When precision, extreme complexity, or production-grade rigging is required, manual workflows still outperform AI generation.
Frequently Asked Questions
Can Midjourney create 3D models directly?
No. Midjourney generates 2D images, not exportable mesh files. Use its image as a reference for an image-to-3D tool, then inspect and refine the generated mesh before exporting it.
How do I turn a Midjourney image into a 3D model?
Generate a clean, single-subject reference in Midjourney, upload it to an image-to-3D tool, and inspect the base mesh. Clean the result in Blender, validate scale and normals, then export the format that matches your target workflow.
What's the best image to use for image-to-3D conversion?
Use one centered subject with clear edges, a simple background, and limited occlusion. For characters or complex objects, consistent front, side, and back references can improve the result when your chosen tool supports multiple images.
Why does my AI-generated 3D mesh look messy, and how do I fix it?
A single 2D image leaves hidden surfaces for the model to infer, so holes, noisy topology, and distorted proportions are common. Improve the reference first, then use Blender to check normals and non-manifold geometry; retopologize when the asset needs reliable deformation or a clean production mesh.
Can I rig and animate a 3D model made from a Midjourney image?
Yes, but treat auto-rigging as a starting point. It works best with a clean character mesh in a standard T-pose or A-pose; test the joints and weights in your target animation workflow before relying on the result.
What file format should I export for Unity or Unreal?
FBX is a common choice for skeletal and animation workflows in Unity or Unreal, while GLB can suit web, AR, and simpler real-time delivery. Choose based on the target importer and asset type, then test one exported model before committing the full batch.
Conclusion
Your Midjourney artwork does not need to stay flat. Start by prompting a clean, structured image, then turn it into a 3D model, refine the mesh, and export it into your engine for real production use.
If you want a faster pipeline, you can also explore tools like Tripo AI Studio to move from image to 3D in minutes and continue your workflow directly from there.