How to Bake Normals for AI 3D Models (Step-by-Step)
TL;DR
- Normal baking transfers high-poly surface detail to a low-poly mesh as a normal map, preserving the look without the full geometry cost.
- Raw AI-generated meshes often need cleanup plus a separate low-poly target before baking.
- The practical workflow is to clean or retopologize, UV unwrap, set up projection, bake, inspect, and export.
- Use tangent-space normal maps for most game assets, and keep the high- and low-poly meshes aligned.
- Most artifacts come from projection distance, flipped faces, hard-edge or UV-seam mismatches, and insufficient padding.
AI 3D generators can produce detailed models in seconds, but many raw outputs are too dense for a real-time engine. Baking normals transfers their surface detail to a lightweight low-poly version. This guide covers the full workflow, from preparing a clean low-poly mesh to baking in Blender and fixing common artifacts.
What Does "Baking Normals" Actually Mean?
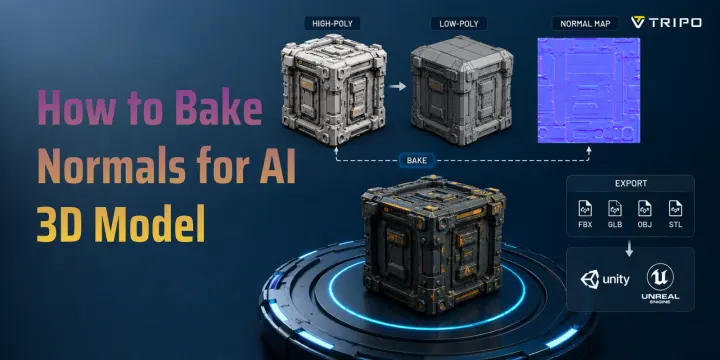
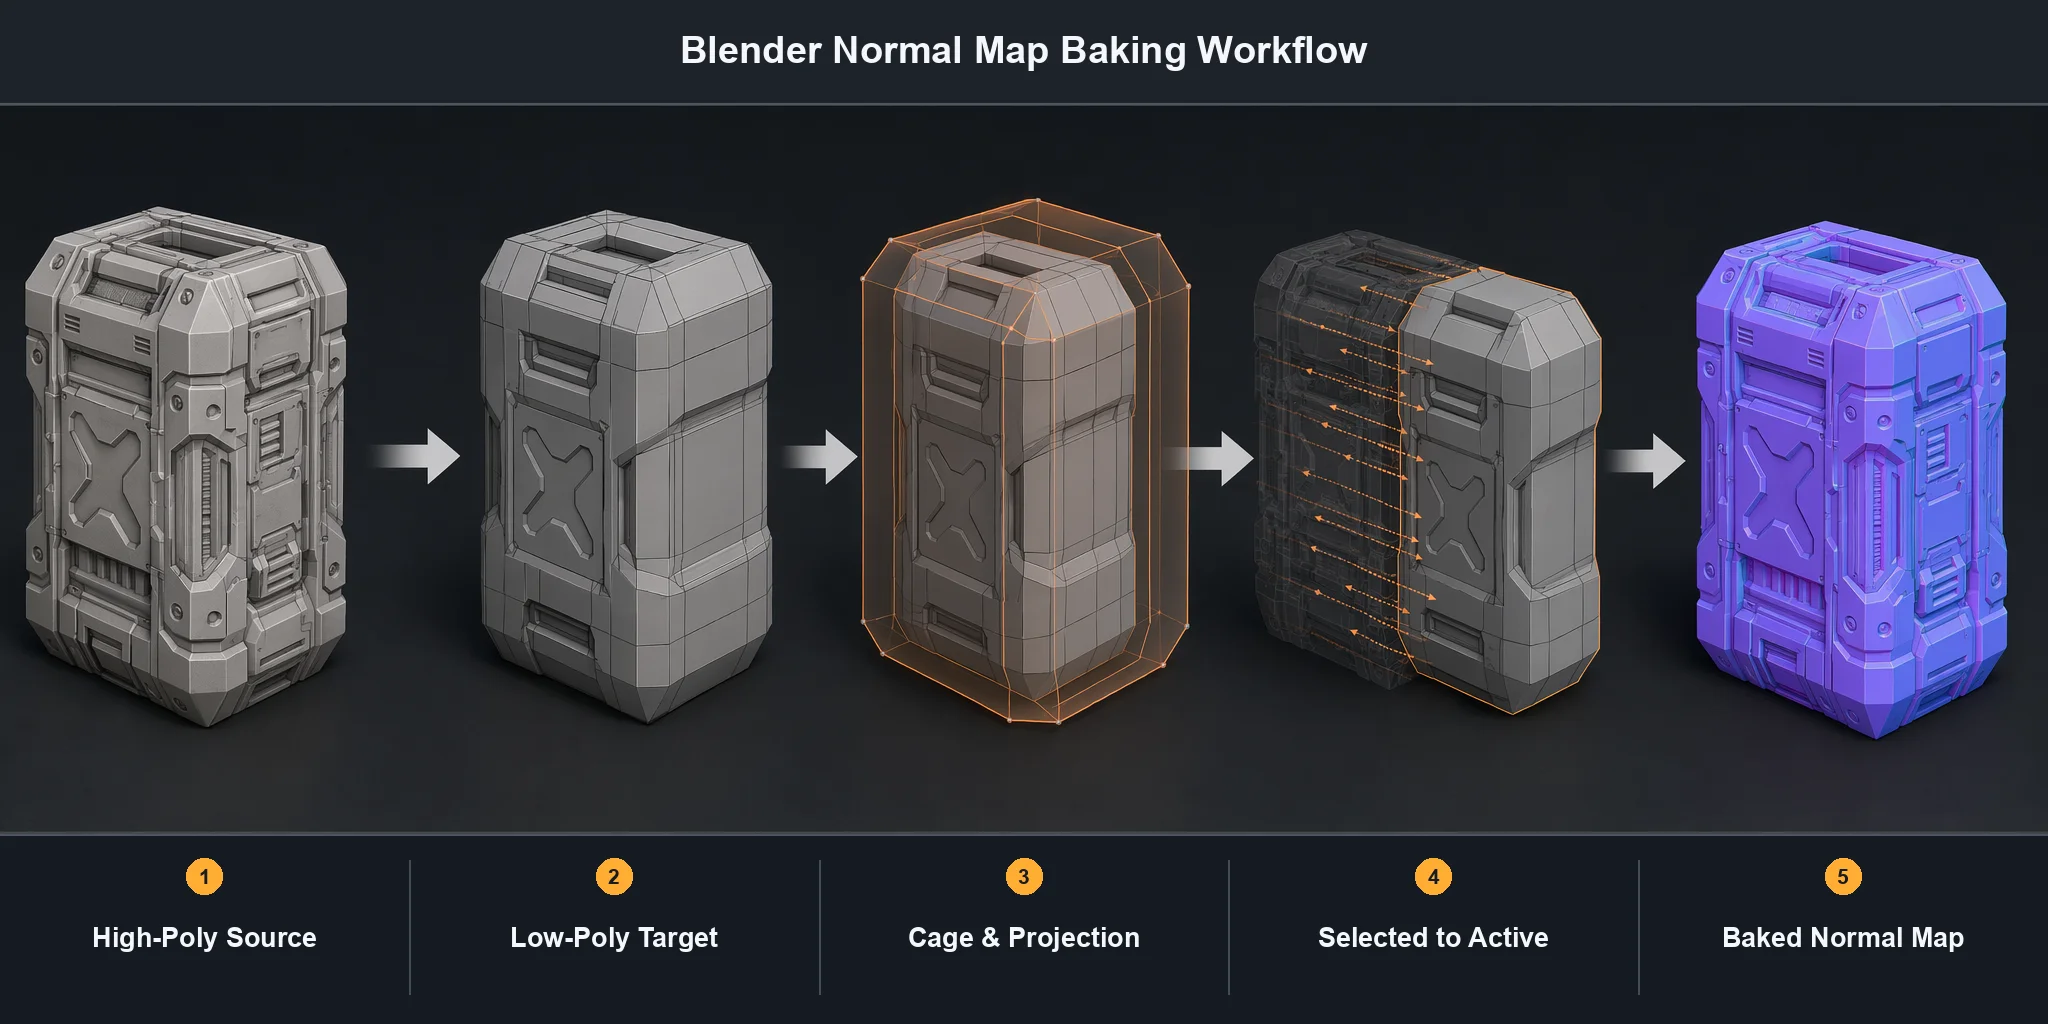
Normal baking transfers fine surface detail from a high-poly model to a low-poly version by generating a normal map. Instead of storing every groove, scratch, or bevel as geometry, the texture records how each point on the surface should respond to light.
A normal map does not add polygons or change the silhouette. It changes the surface normals used in lighting calculations, allowing an optimized mesh to retain much of the high-poly appearance. This mesh normal baking workflow is standard for real-time game assets.
Why AI 3D Models Need a Special Approach
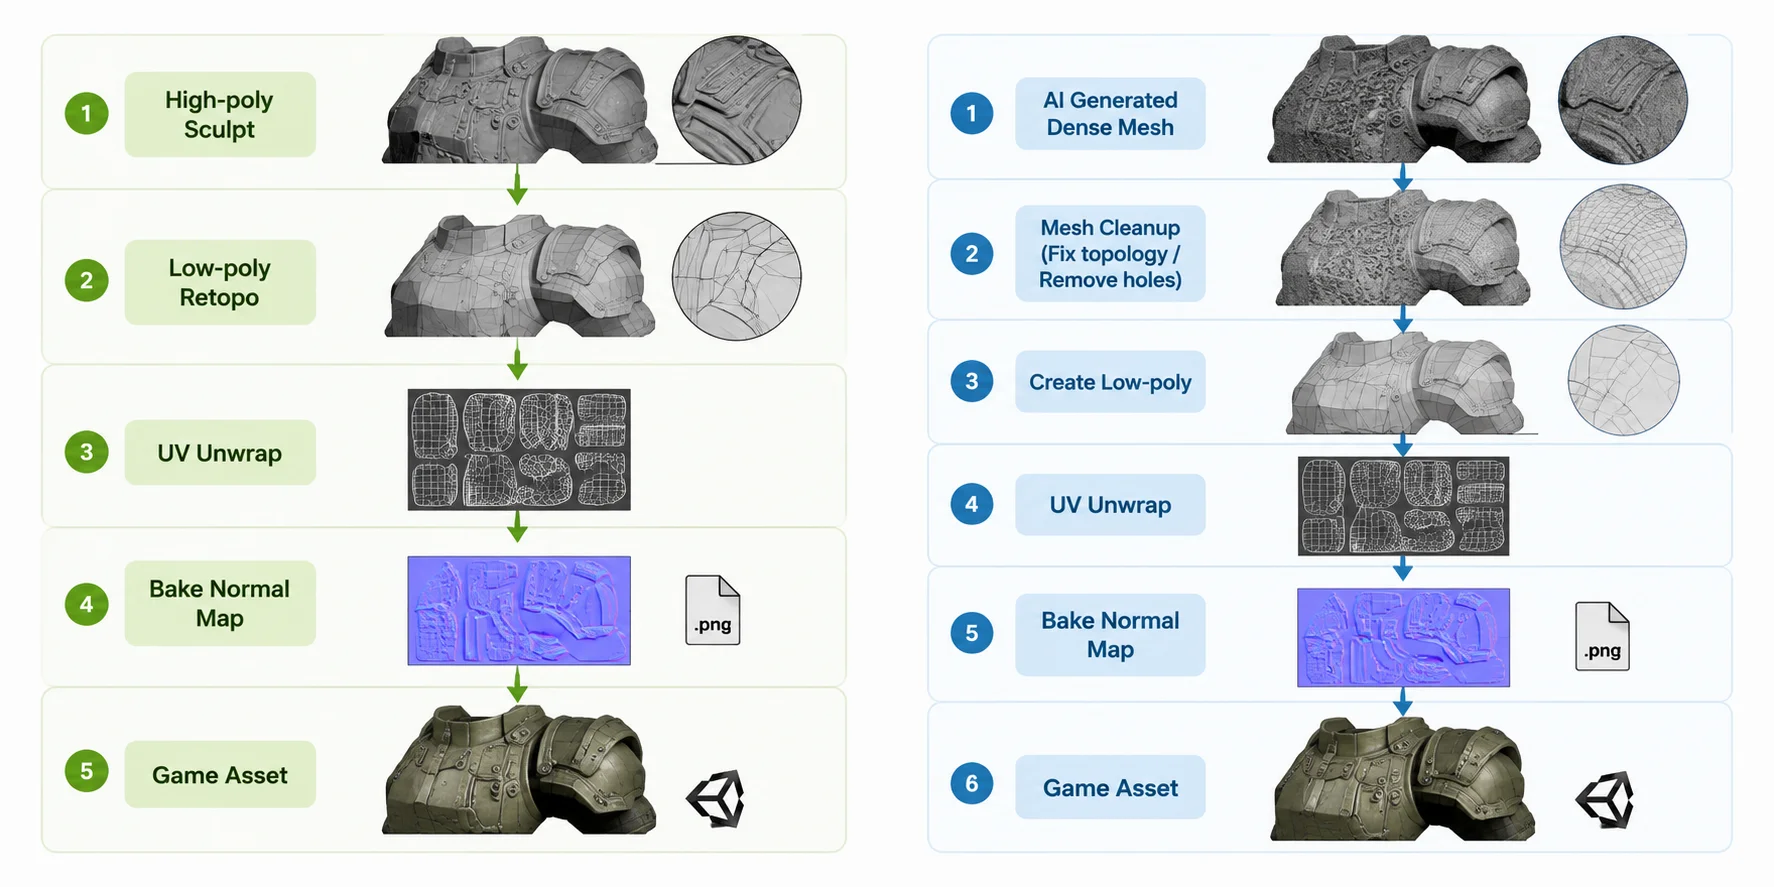
Traditional asset pipelines often create a sculpted high-poly model and a matching low-poly target. Many raw AI-generated meshes start differently: they provide one dense result that still needs optimization before it is suitable for baking normals for AI 3D models.
AI Meshes Have No Low-Poly Twin
The dense AI mesh can serve as the high-poly source, but the bake still needs a separate low-poly receiver. Depending on the generator and mode, UVs and optimized topology may also need to be created or refined.
Do not assume every AI output is production-ready. Inspect the polygon density, silhouette, UVs, topology, and surface integrity before deciding whether to decimate, remesh, or retopologize it.
The Topology Is Usually Messy
Raw AI meshes may contain uneven triangle density, weak edge flow, non-manifold areas, overlapping faces, or small holes. These issues can create projection artifacts or unstable shading, so repair obvious geometry problems before baking.
What This Changes
The added preparation stage is the main difference: create a suitable low-poly target, check the geometry, and unwrap clean UVs before baking. After that, the process follows the same high-to-low workflow used for conventional game assets.
Traditional vs. AI 3D Normal Baking Workflow
Step 1: Prepare a Low-Poly Model From Your AI Model
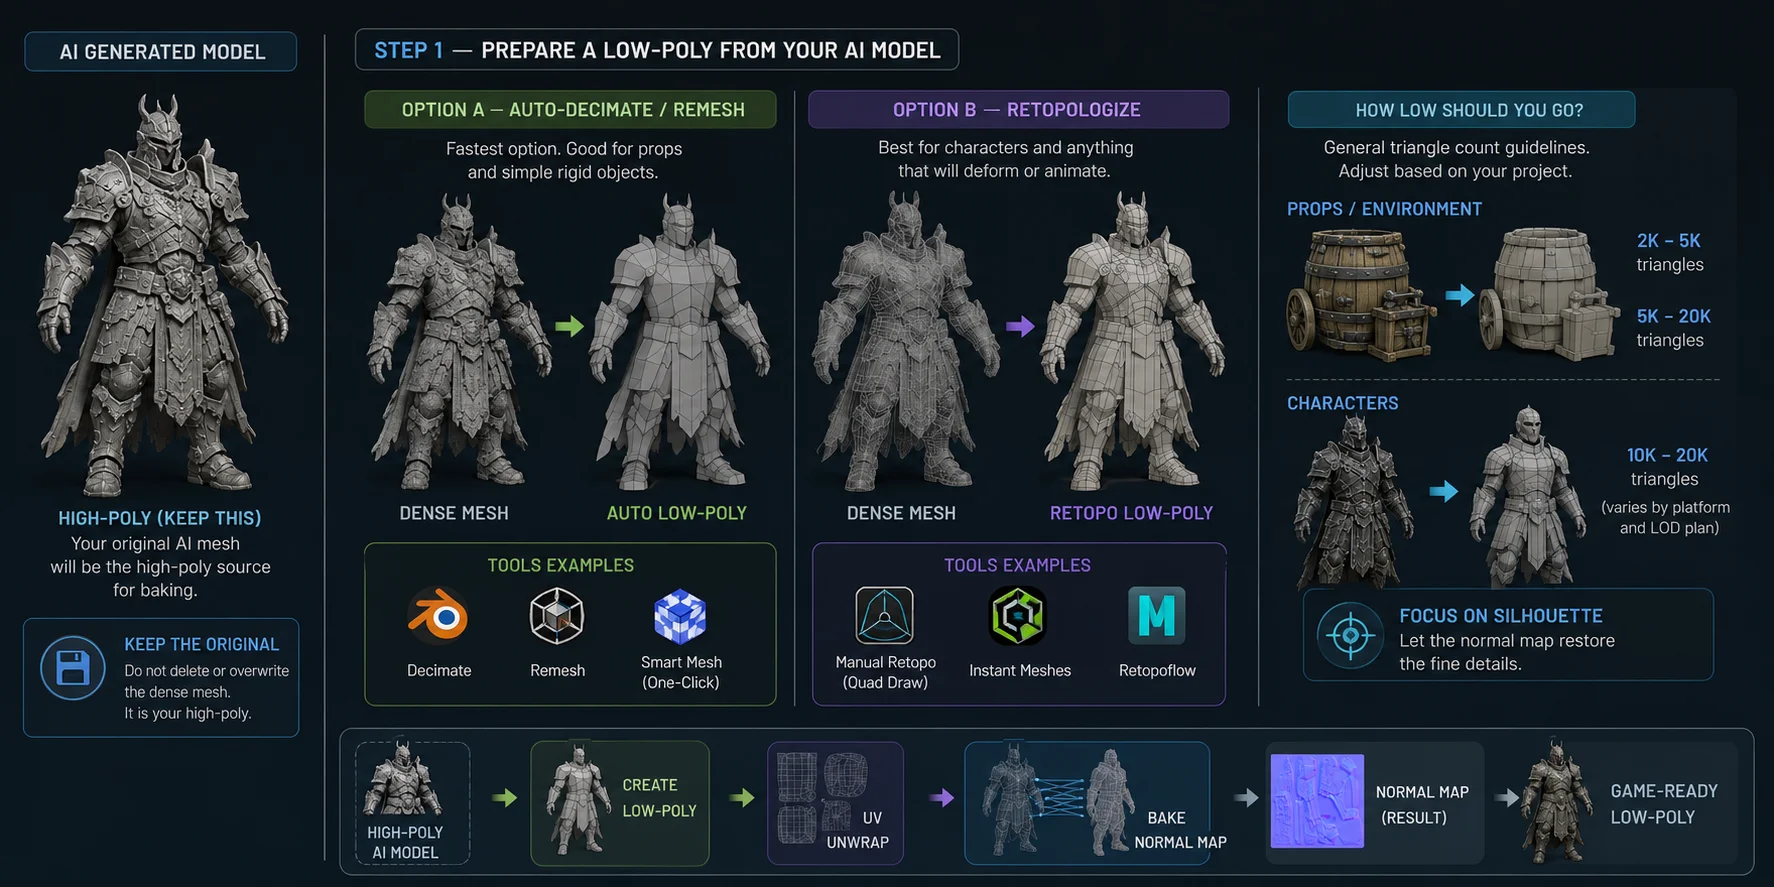
You need two aligned versions of the asset: the original detailed mesh as the high-poly source and an optimized mesh that receives the baked map.
Option A: Auto-Decimate or Remesh
For rocks, furniture, props, and other rigid objects, automatic decimation or remeshing is often the fastest option. A tool such as Smart Mesh can generate clean, optimized low-poly topology for real-time workflows; inspect the result and adjust its target face count for the asset.
Option B: Retopologize
For characters or assets that must bend and deform, manual or quad-based retopology is usually more reliable. Edge loops should follow the form and expected motion, which improves deformation, UV layout, and bake stability.
How Low Should You Go?
Use polygon counts as starting budgets, not universal rules. A small prop may use a few thousand triangles, larger environment pieces may use roughly 5,000-20,000, and characters may need 10,000-20,000 or more depending on platform, camera distance, deformation, and LOD strategy.
Focus on preserving the silhouette rather than tiny surface details. The normal map will restore much of that detail after baking.
Keep the Original as Your High-Poly
Keep a copy of the original dense mesh as the high-poly source. The optimized version becomes the runtime asset, while the baker projects the source detail onto its UV layout.
Preparing AI 3D Models for Normal Baking
Step 2: UV Unwrap the Low-Poly
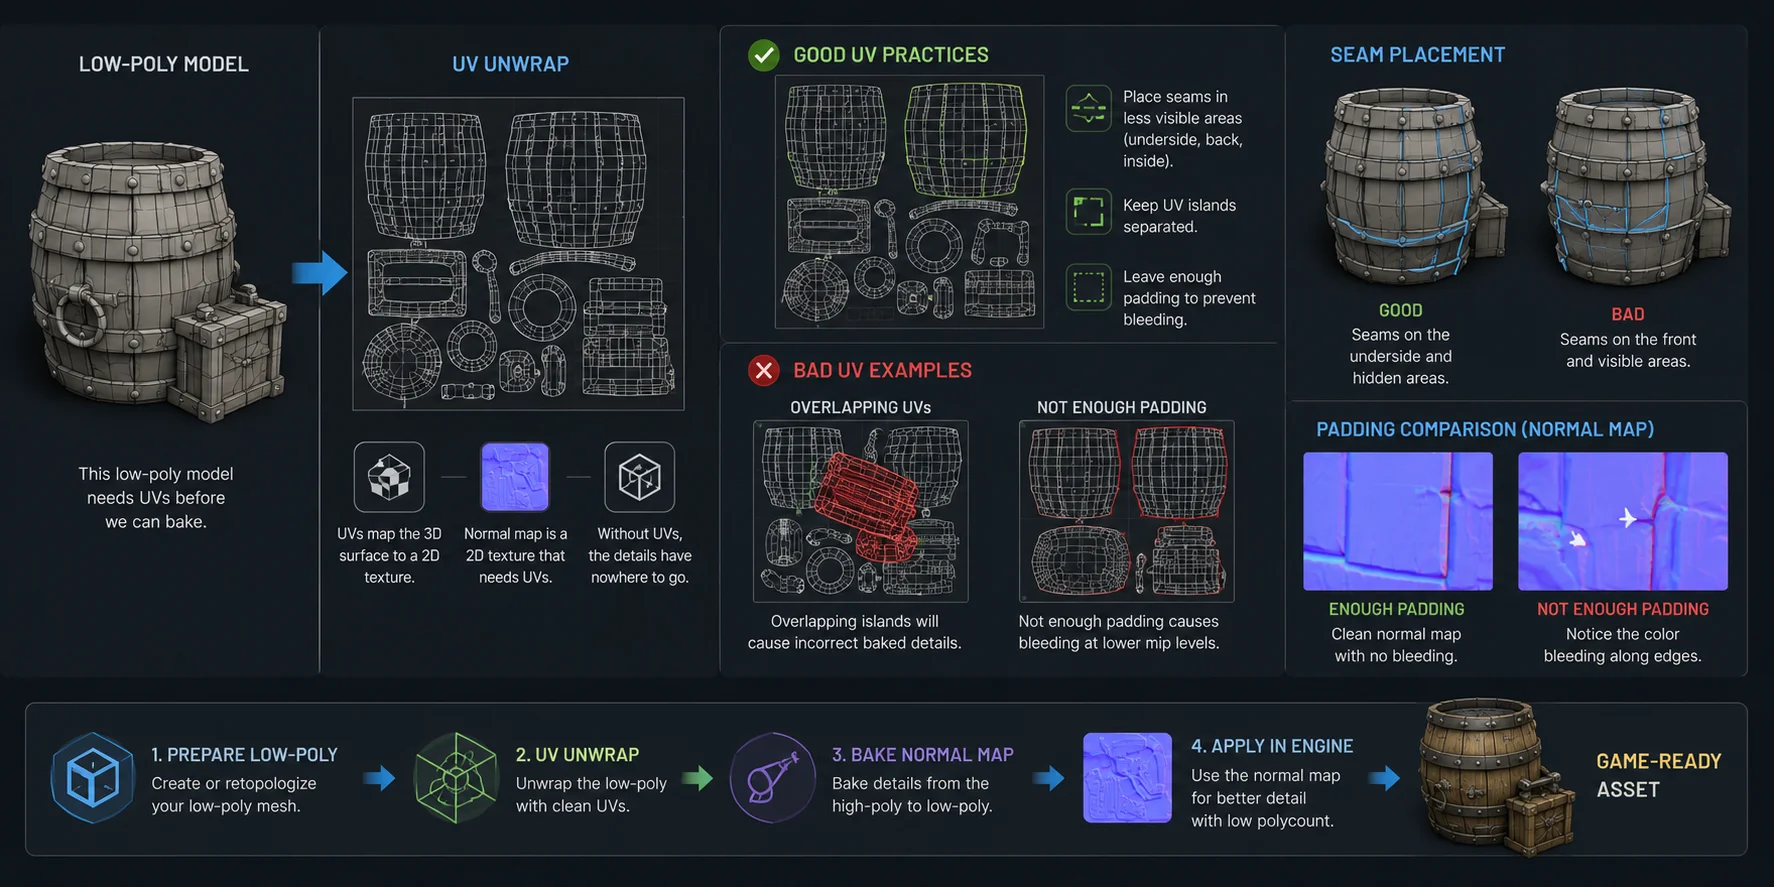
The low-poly model needs a non-overlapping UV layout because the normal map is a 2D texture. Place seams in less visible or structurally natural areas, such as the underside of a prop or along a clothing seam.
Leave enough padding between islands to prevent bleeding, and avoid unintended overlaps. Automatic UV tools are a useful start, but check seams, island scale, orientation, and spacing before baking.
UV Unwrapping Best Practices for Normal Baking
Step 3: Set Up the Bake (High + Low + Cage)
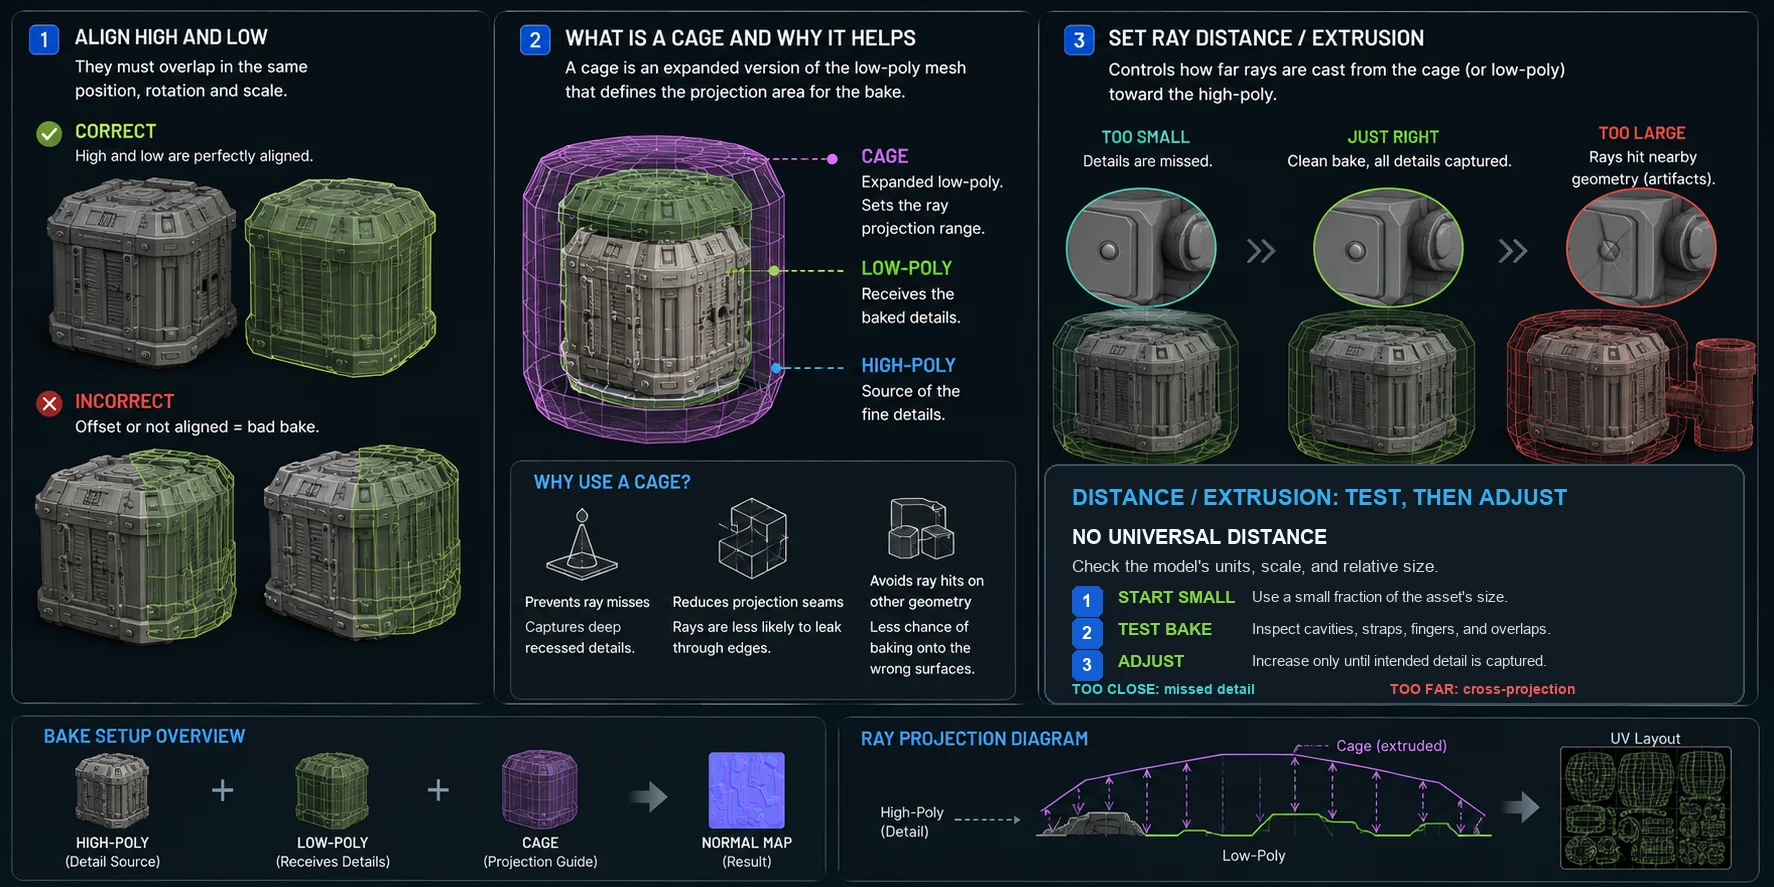
Before baking, make sure the high-poly and low-poly meshes are set up correctly. Most baking errors come from incorrect positioning or projection settings rather than the baking software itself.
Align the High and Low in the Same Spot
The high- and low-poly objects should share the intended position, rotation, and scale, with transforms checked or applied consistently. The low-poly surface should follow the high-poly silhouette closely; it does not need to enclose every detail because projection range is controlled by the cage or ray settings.
What a Cage Is and Why It Helps
A cage is an expanded version of the low-poly mesh that defines where projection rays begin. A well-fitted cage surrounds the relevant high-poly detail without reaching unrelated surfaces, reducing missed rays and cross-projection.
Set Ray Distance or Extrusion
If you are not using a separate cage, adjust Max Ray Distance; with a cage, adjust cage extrusion. There is no universal value: first check the model's units and scale, start with a small fraction of its overall size, run a test bake, and increase only until the intended detail is captured.
Too little distance misses details; too much can hit nearby geometry and create unrelated marks. Inspect difficult areas such as fingers, straps, cavities, and overlapping parts separately.
Step 4: Bake the Normal Map in Blender
Once your high-poly mesh, low-poly mesh, and UVs are ready, you can bake the normal map in Blender. The basic setup only takes a few steps.
- Switch the render engine to Cycles.
- Select the low-poly object, create a material, add an Image Texture node, create the target image, and leave that node selected and active.
- In Render Properties > Bake, choose Normal and enable Selected to Active. Select the high-poly source first and the low-poly target last so the low-poly object is active, then configure the cage or ray distance.
- Click Bake, inspect the result on the model, and save the generated image before closing Blender.
Choose resolution from the asset's screen size and texel-density budget: 1K can suit small props, 2K is common for many environment assets, and 4K should be reserved for assets that genuinely need close-up detail. Resolution cannot compensate for poor UVs or projection settings.
Tangent vs. Object Space: Which Should You Pick?
For most game-asset normal baking, choose Tangent Space. Tangent-space maps are defined relative to the mesh surface and remain usable when an object transforms or deforms, making them the standard choice for animated assets and real-time engines.
Object Space maps store normals in the object's local coordinate system. They can be useful for static or specialized pipelines, but they are not suited to deformation. Use them only when the target renderer and asset workflow explicitly call for object-space normals.
Step 5: Check the Result and Fix Common Errors
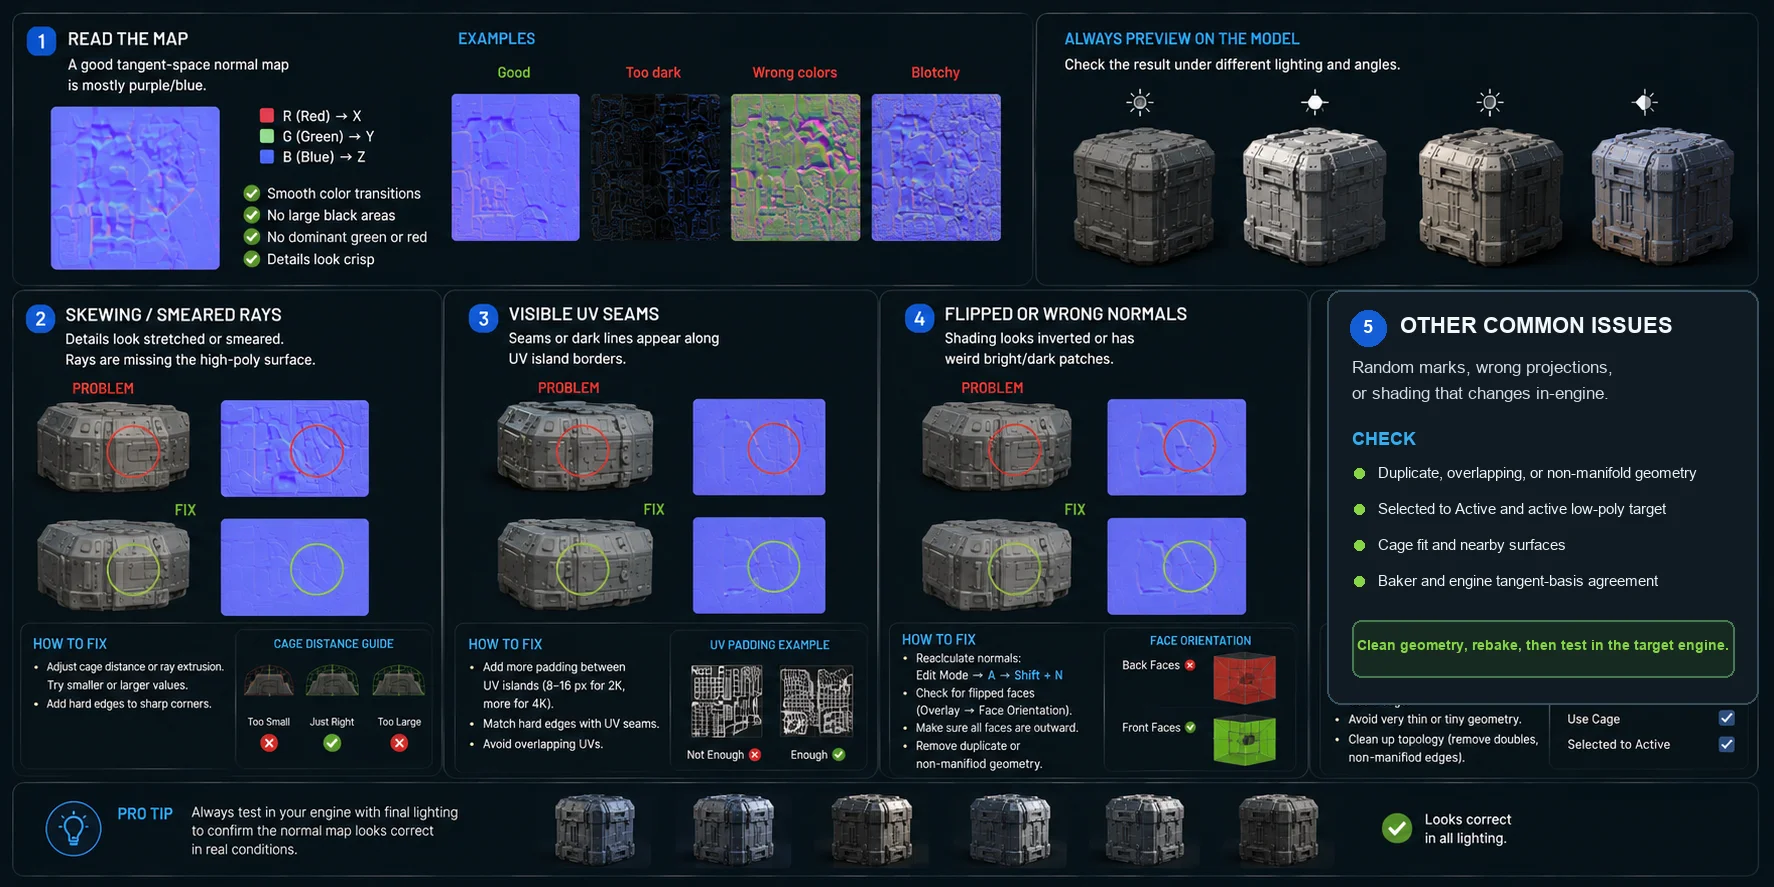
A successful bake does not end when Blender finishes processing. Before exporting your asset, inspect both the normal map and the model under different lighting angles. Most baking problems are easy to fix once you know what to look for.
Read the Map
A tangent-space normal map is usually blue-purple, but color alone does not prove the bake is correct. Preview it on the low-poly model under rotating light and look for black gaps, gradients crossing unrelated parts, or details projected from the wrong surface.
Skewing or Smeared Rays
Stretched details usually mean the rays or cage do not fit the source surface. Adjust the projection distance locally, separate nearby parts when necessary, and rebake. For hard-surface assets, also verify the relationship between hard edges, smoothing, and UV splits.
Visible UV Seams
Visible seams can come from insufficient padding, mismatched hard edges and UV splits, or differences between the baker's and engine's tangent basis. Increase padding, split UVs at required hard edges, and test the exported asset in its target renderer.
Flipped or Wrong Normals
If part of the model appears inside-out or has inverted lighting, recalculate the mesh normals and check for reversed faces. In Blender, use Recalculate Outside and enable Face Orientation to identify incorrectly oriented polygons. Correct face normals before baking again, as even a small number of flipped faces can create noticeable artifacts in the final normal map.
Step 6: Export and Use in Your Engine
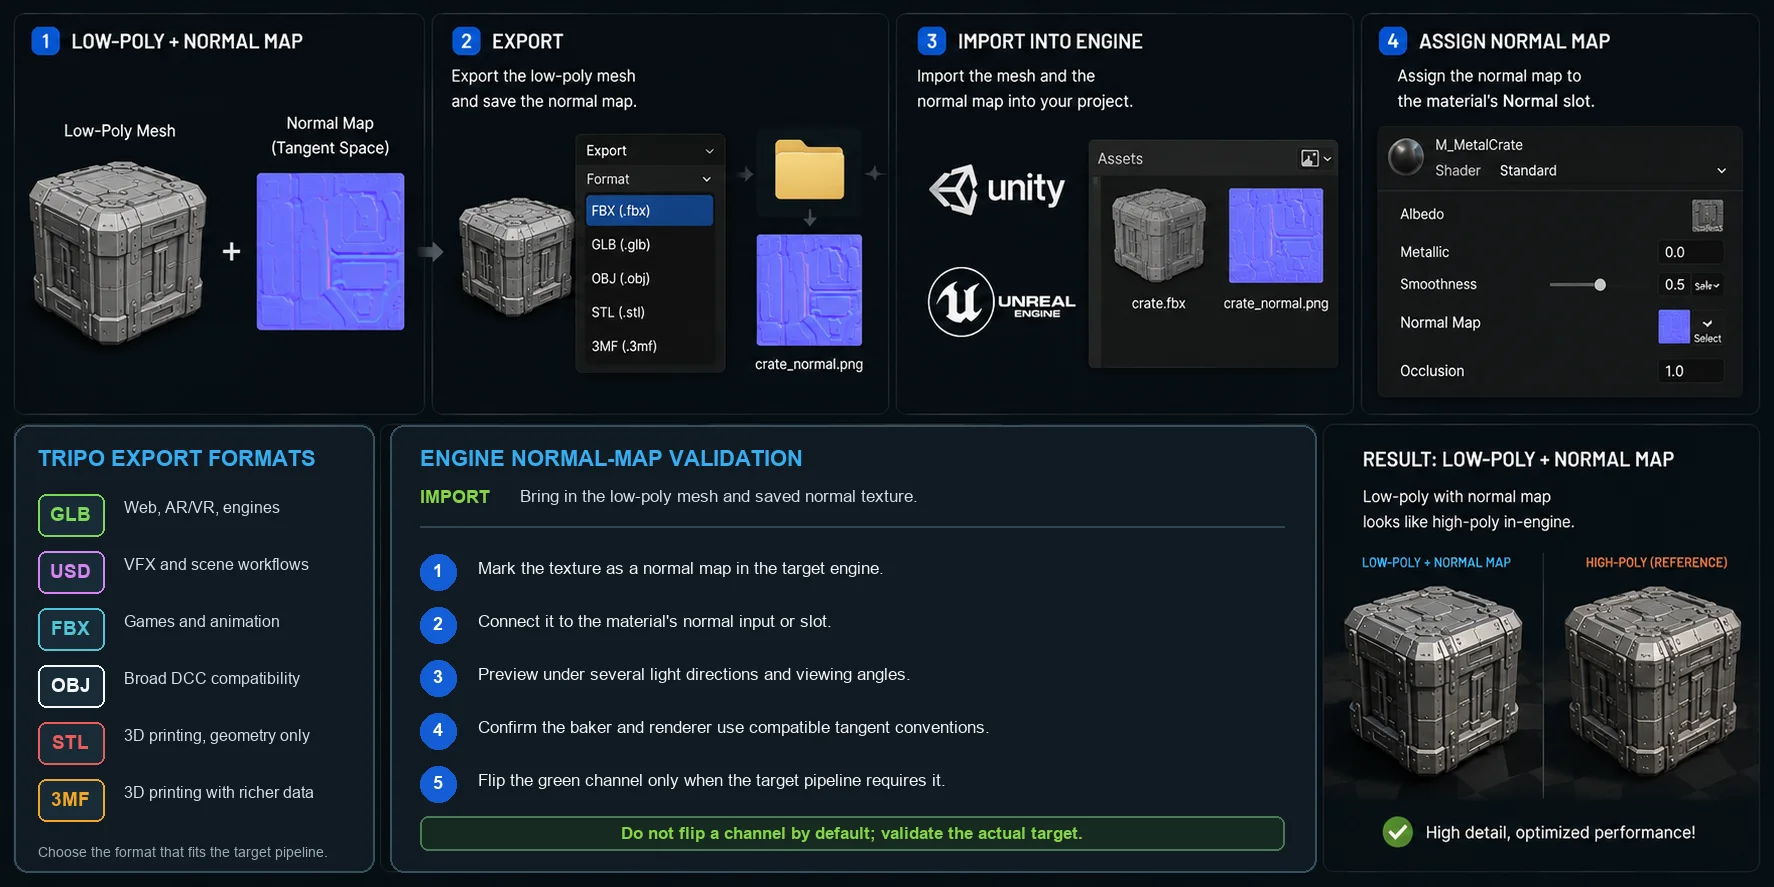
Export the low-poly mesh with the baked normal map using a format supported by your pipeline, such as FBX, GLB, or OBJ. Keep the normal texture as a separate file or package it with the asset when the format and toolchain support that workflow.
In Unity or Unreal Engine, import the texture as a normal map and connect it to the material's normal input. Unity uses Y+ (OpenGL-style) normal maps; if lighting appears inverted in another target pipeline, confirm its convention before flipping the green channel rather than changing it by default.
Check the final asset under several light directions and at its expected viewing distance. A good low-poly mesh and normal map preserve small surface detail, but major silhouette features still require geometry.
When Baking Normals Is Not Worth It
Normal baking adds setup and maintenance cost, so it is not necessary for every asset. Simple geometric props, distant objects, or short-lived prototypes may be better served by a well-optimized mesh and straightforward materials.
Normal maps only change lighting; they cannot create holes, deep cutouts, or a different outer profile. If a feature must affect the silhouette or cast its own shadow, retain enough geometry to represent it.
Frequently Asked Questions
What Does Baking Mean in 3D Modeling?
Baking transfers selected information from one representation to another. In normal baking, high-poly surface directions are written into a texture for a low-poly mesh. This keeps the runtime mesh lighter while preserving small visual details.
How Do I Bake Normals in Blender?
Use Cycles, give the low-poly object clean UVs, and create an active Image Texture target. Select the high-poly source first and the low-poly target last, then enable Selected to Active and bake a tangent-space Normal map. Inspect and save the image when the bake completes.
Can I Bake Normals Directly on an AI 3D Model Without Retopology?
You can bake data on any mesh with suitable UVs, but baking a dense model onto itself provides little optimization benefit. For a game asset, create a separate low-poly target through Smart Mesh, decimation, remeshing, or retopology. Keep the original dense mesh as the detail source.
Do I Need a High-Poly and a Low-Poly Model to Bake Normals?
For a standard high-to-low normal bake, yes: the high-poly mesh supplies detail and the low-poly mesh receives it. They should align in the same coordinate space, while a cage or ray distance controls projection. A multiresolution workflow is a separate case that can bake between subdivision levels of one mesh.
How Do I Texture or Fix an AI-Generated 3D Model?
First inspect the geometry, normals, UVs, and topology instead of applying one automatic fix to every model. Repair major defects, create an appropriate low-poly version, unwrap it, and bake the required maps. Then texture and test the asset in the renderer or engine where it will actually be used.
What Is the Difference Between Tangent-Space and Object-Space Normal Maps?
Tangent-space maps store directions relative to the mesh surface and are the usual choice for games, skinned characters, and deforming objects. Object-space maps use the object's local coordinate system and are best reserved for static or specialized pipelines.
Conclusion
Baking normals turns a dense source mesh into a practical real-time asset: prepare a clean low-poly target, bake the detail, and validate it in the destination engine. To shorten the preparation stage, start with optimized topology in Tripo AI Studio, then carefully refine the UVs and bake settings for your project.