Level Design: Principles, Process & How to Start (2026)
TL;DR
- Level design turns game mechanics into playable spaces, encounters, routes, and decisions.
- It differs from game design’s rules and environment art’s visual finish.
- Strong levels use pacing, flow, guidance, readability, and fair challenge curves.
- Build levels through concept, graybox, playtesting, art pass, polish, and optimization.
- AI can speed prop creation during art passes, but designers still control player experience.
Level design is the practice of planning and building the spaces players move through in a game: the rooms, paths, encounters, and obstacles that turn rules into an experience. A level designer shapes pacing, flow, and difficulty so players feel guided, challenged, and rewarded. It sits between game design and environment art. This guide explains what level design means, how its core principles work, how levels move from greybox to polish, which tools help, and how beginners can start building a portfolio.
What Is Level Design?
Level design is the practice of planning and building playable spaces for a game.
A level designer decides where the player goes, what they notice, what they learn, what challenges they face, and how the space supports the game’s systems. That may include combat encounters, traversal routes, puzzles, objectives, checkpoints, exploration areas, environmental storytelling, and the rhythm between intense and quiet moments.
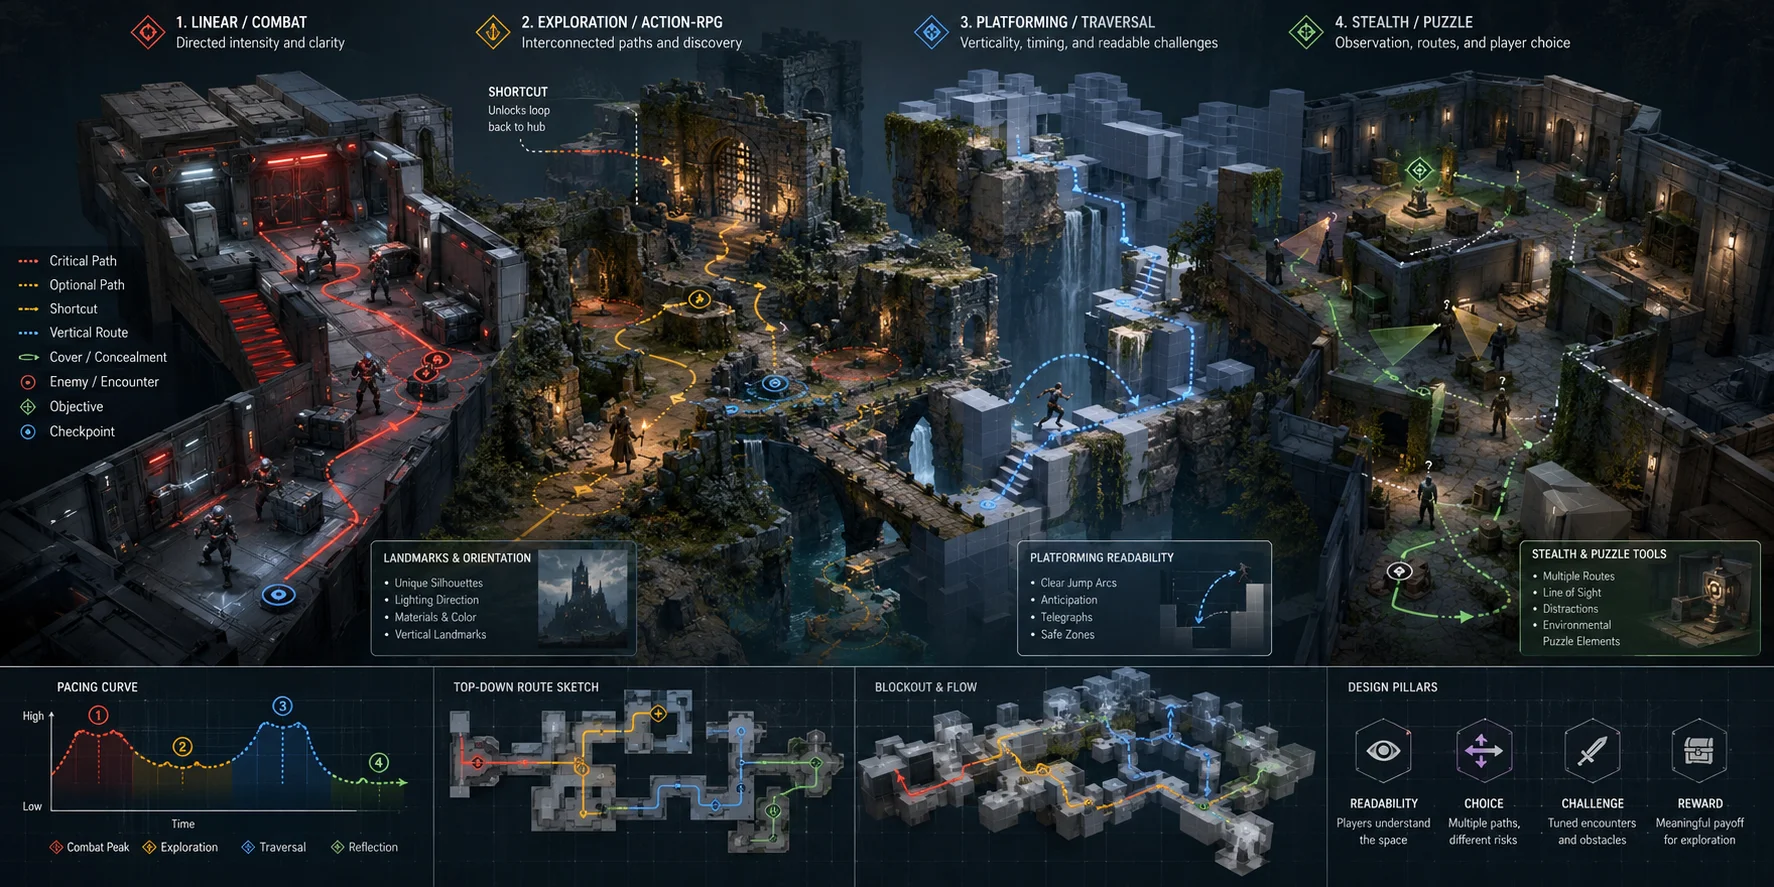
A “level” can mean many things depending on the game. It may be a mission in a linear shooter, a dungeon area in an action RPG, a race track, a multiplayer arena, a platforming stage, a puzzle room, or a section of an open world. A level is not simply a location with art assets. It is a playable sequence of decisions.
For example, a chapter in Half-Life is a level because it combines movement, combat, scripted events, environmental clues, and pacing into a structured experience. A Dark Souls area is a level because it teaches routes, risks, shortcuts, enemy patterns, landmarks, and spatial relationships. The player is not only looking at the environment; they are learning how to move through it.
A useful way to define level design is:
Level design turns game rules into places where players can understand, test, and enjoy them.
If a game has jumping, shooting, stealth, building, puzzle solving, racing, or exploration, level design creates the conditions that make those systems meaningful. A jump mechanic becomes interesting when the space creates timing, distance, risk, recovery, and reward. A stealth mechanic becomes interesting when sightlines, cover, noise, routes, and objectives are arranged deliberately.
This is why level design sits between creative direction and player experience. It uses design principles, spatial reasoning, technical tools, and repeated playtesting to make spaces feel intentional.
Level Design vs. Game Design vs. Environment Art
New developers often confuse game design, level design, and environment art because all three influence what players see and do. They overlap, but they solve different problems.
| Discipline | Main Focus | Typical Questions |
|---|---|---|
| Game Design | Rules, systems, goals, progression, balance | What can the player do? How does combat work? What are the winning conditions? |
| Level Design | Playable spaces, encounters, routes, pacing, player guidance | Where does the player go? What happens there? How does the level teach and test mechanics? |
| Environment Art | Visual assets, materials, lighting support, world detail | What does space look like? Which props, buildings, textures, and set dressing make it believable? |
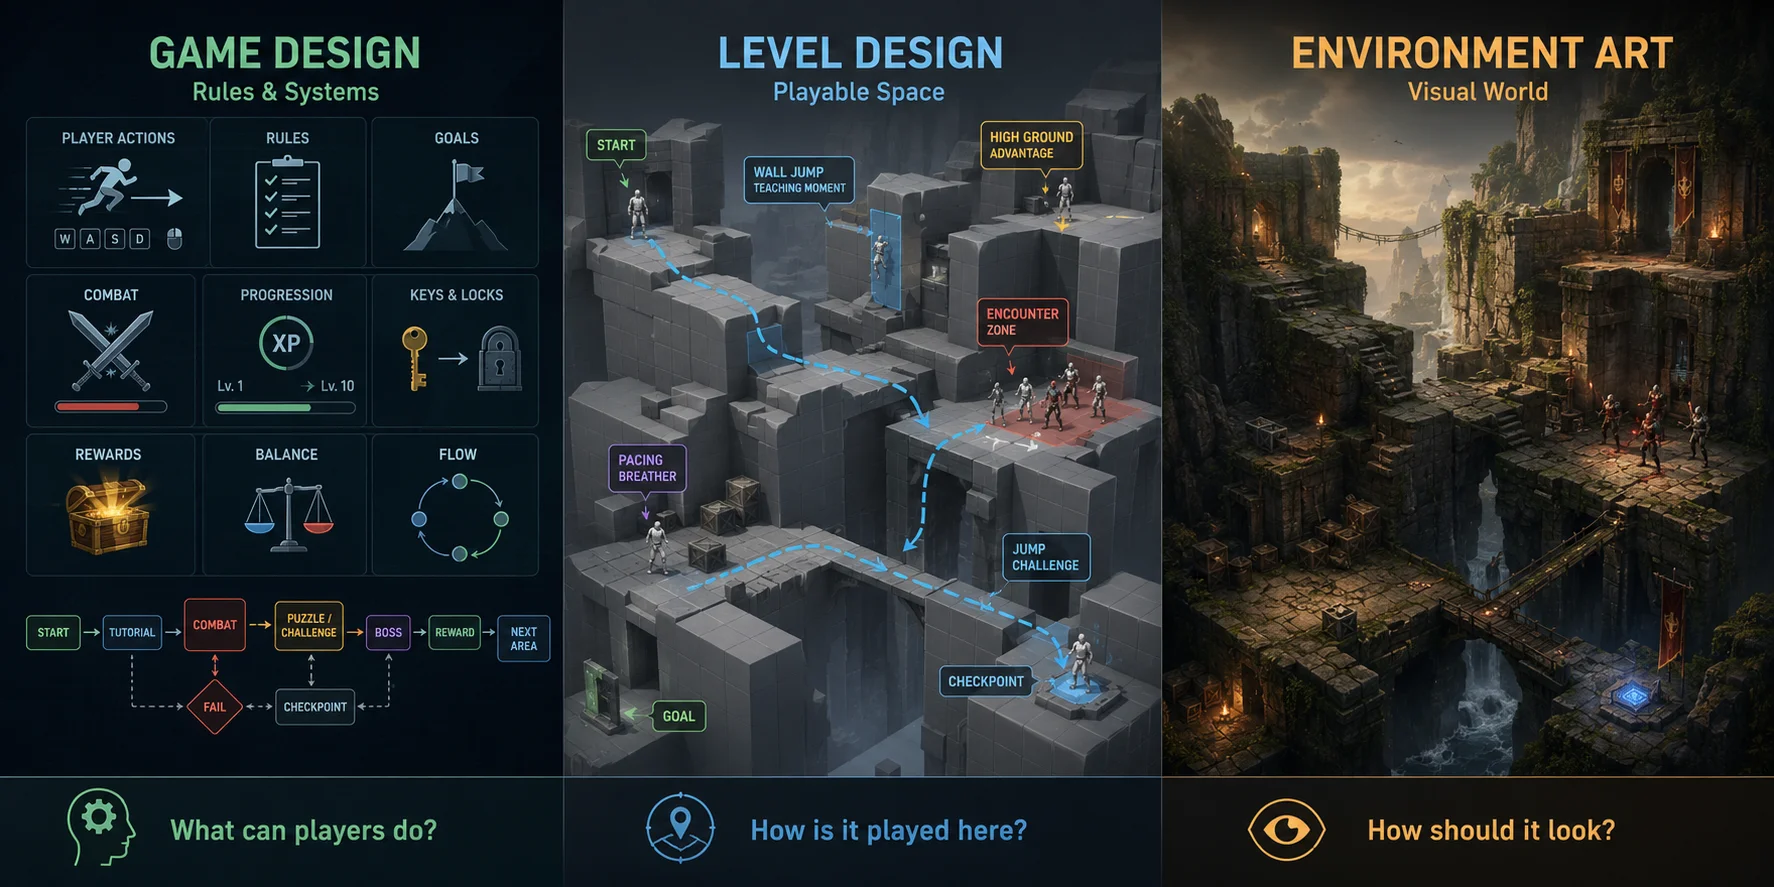
A game designer might decide that the player can wall-jump, collect keys, and unlock shortcuts. A level designer decides where the first wall-jump appears, how safely the player learns it, where they fail, and how the challenge develops. An environmental artist then makes that space look like a cliffside ruin, industrial tower, or underground laboratory.
The distinction matters because a beautiful room is not automatically a good level.
A visually impressive environment can still confuse the player, hide the objective, create boring combat, or provide no reason to explore. Likewise, a graybox made from cubes can be an excellent level if its routes, encounters, and pacing work.
In a small team, one person may perform all three roles. That is common. Even then, it helps to separate the questions:
- What does the game allow the player to do?
- How does this space make that action interesting?
- How should the space look after the gameplay works?
Keeping those questions separate prevents a common mistake: polishing art before the layout has been tested.
Core Principles of Level Design
Good levels are not built by placing objects randomly until a space looks busy. They are built around player attention, player learning, challenge, movement, and emotional rhythm.
Pacing: Alternate Pressure and Relief
Pacing is the rhythm of tension and release across a level.
Players need variety. If every room contains a difficult fight, the experience becomes exhausting. If every room is safe, the game becomes flat. Strong pacing alternates pressure, discovery, recovery, preparation, surprise, and reward.
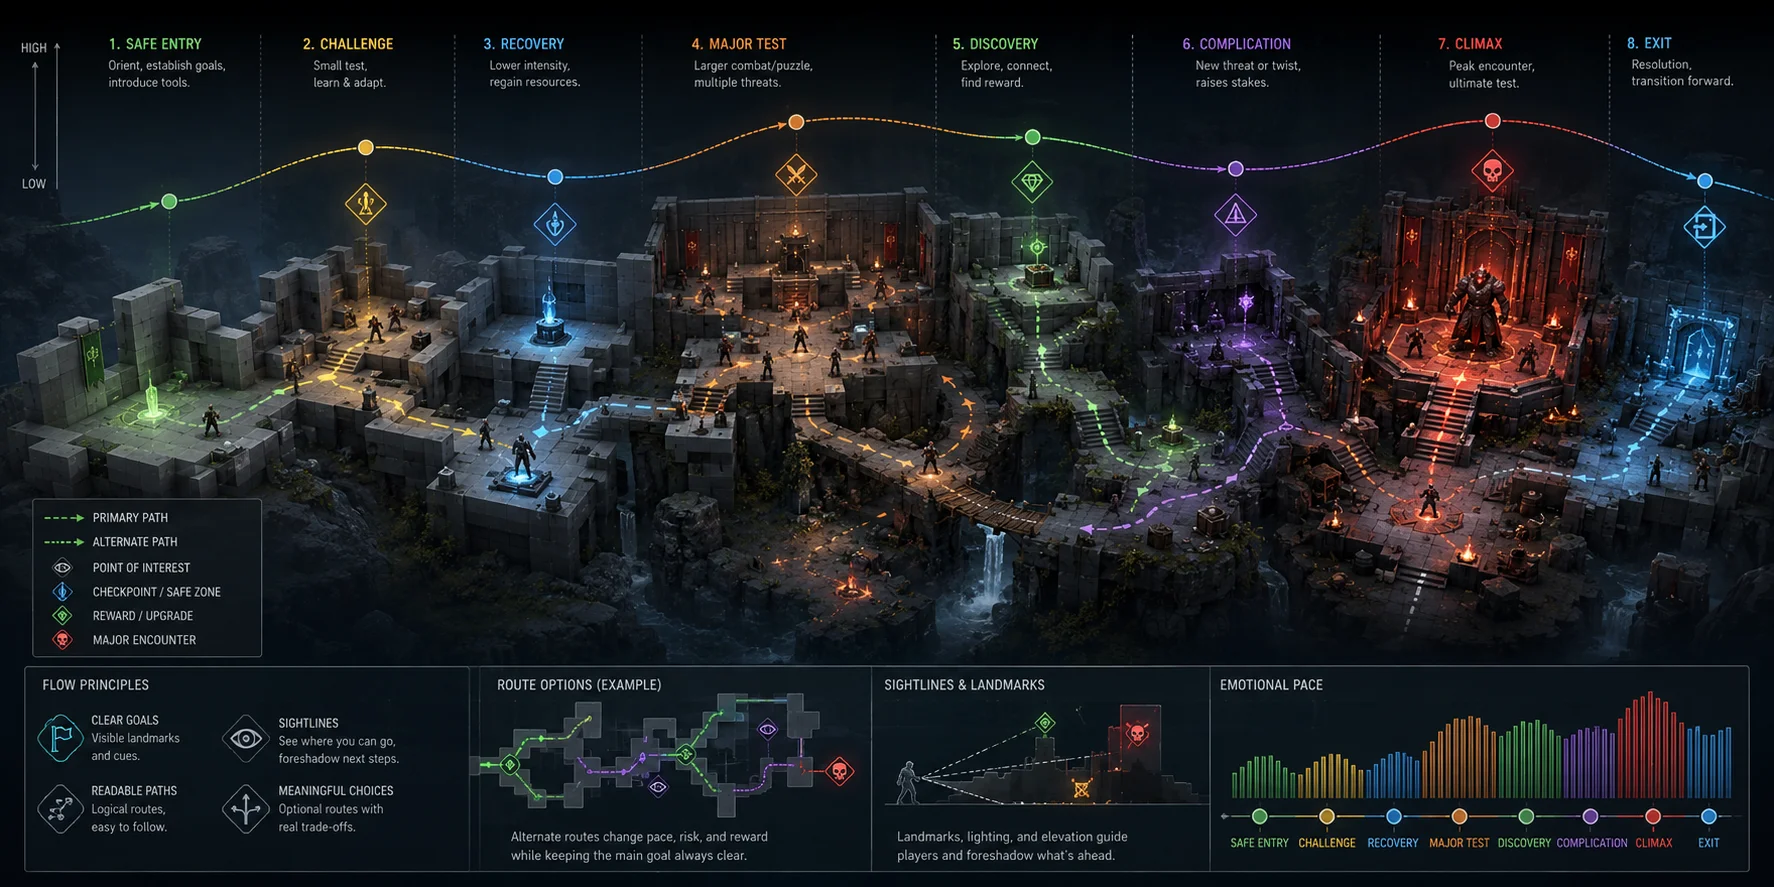
A common rhythm might look like this:
- Safe entry or visual setup
- Small challenge
- Brief recovery
- Larger test
- Discovery or reward
- New complication
- Climax
- Exit or transition
This does not mean every level follows the same structure. It means the player should feel movement between emotional states.
Consider a survival-horror level. A quiet corridor may create anticipation because the player expects danger. A small room with ammunition may provide relief. A sudden sound cue may create uncertainty. A chase sequence then becomes more effective because it follows a period of restraint.
The same principle applies to platformers and puzzle games. A platforming level may introduce a new hazard in a safe space, let the player practice it, create a harder combination, then provide a calm collectible area. A puzzle level may begin with a simple version of a mechanic, introduce a complication, then ask the player to combine both ideas.
For indie developers, pacing does not require cinematic scripting or expensive set pieces. It can be created with layout, enemy placement, resource placement, lighting changes, sound, sightlines, and room scale.
Ask these questions while reviewing a level:
- Where does the player feel safe?
- Where do they become uncertain?
- Where do they feel capable?
- Where do they need time to recover?
- Where is the emotional peak?
- Does the level have one dominant mood, or does it move through several?
A useful exercise is to sketch the intensity of your level on paper. Mark low, medium, and high tension moments. If the graph is completely flat, the level may need more contrast.
Flow: Keep Players Moving With Purpose
Flow is the feeling that the player understands what to do next and remains engaged without feeling pushed through a rigid corridor.
A level with good flow gives players enough direction to avoid confusion, but enough freedom to feel agency. The player should usually understand the immediate goal, even when the larger objective remains uncertain.
Flow depends on spatial clarity, movement options, pacing, feedback, and challenge balance.
Poor flow often appears when:
- the player does not know where to go;
- the objective is hidden without enough clues;
- the path is too long without new information;
- repeated obstacles feel identical;
- combat interrupts movement too often;
- exploration offers no reward;
- the level asks for a skill it has not taught.
Good flow does not always mean fast movement. A slow exploration game can still have excellent flow if players understand the purpose of each space and receive meaningful discoveries.
In a platformer, flow may come from visible jumps, readable landing areas, and movement that chains naturally. In a stealth game, flow may come from clear patrol routes, visible cover, and multiple ways to approach an objective. In a tactical game, flow may come from readable terrain, enemy positions, and understandable risk-reward choices.
A practical technique is to design “forward momentum.” Every major room should offer at least one of the following:
- a visible destination;
- a new route;
- a new threat;
- a new tool;
- a new piece of information;
- a reward;
- a question the player wants answered.
If the player enters a room and nothing changes, they may stop feeling progress.
For small teams, flow is one of the highest-value areas to test early. You can identify a confusing route with a simple graybox long before final art exists.
Player Guidance: Lead the Eye Without Forcing It
Player guidance is how a level designer helps players notice the important path, object, threat, or destination.
The best guidance often feels natural. Players should feel that they discovered the route, even though the environment quietly directed their attention.
Common guidance tools include:
- lighting;
- color contrast;
- landmarks;
- framing;
- movement;
- lines in the environment;
- enemy placement;
- sound cues;
- camera direction;
- door shape;
- architecture;
- terrain slope;
- object repetition;
- negative space.
A brightly lit doorway in a dark room is a basic example. A red object in a mostly blue environment can suggest importance or danger. A large tower visible from several locations can become a landmark that helps players orient themselves. A broken bridge, a line of lights, or a trail of objects can lead the eye forward.
Super Mario Bros. 1-1 is frequently used as an example because it introduces movement and interaction through level arrangement rather than lengthy instructions. The early layout encourages the player to move right, encounter a Goomba, see blocks overhead, and learn from the result. The level teaches through placement.
Guidance should not become over-explanation. If every objective has a giant arrow, players may stop reading the world. If nothing provides direction, players may become frustrated.
The balance depends on genre and audience. A puzzle game may intentionally hide information. An open-world game may use distant landmarks rather than direct markers. A fast action game may need stronger visual cues because players have less time to look around.
When testing guidance, watch rather than explain. If a playtester walks past the intended route, resist the urge to tell them where to go. Ask what they noticed, what they expected, and what information was missing.
Difficulty and the Challenge Curve: Teach, Test, Twist
A level should not ask players to master a mechanic before they understand it.
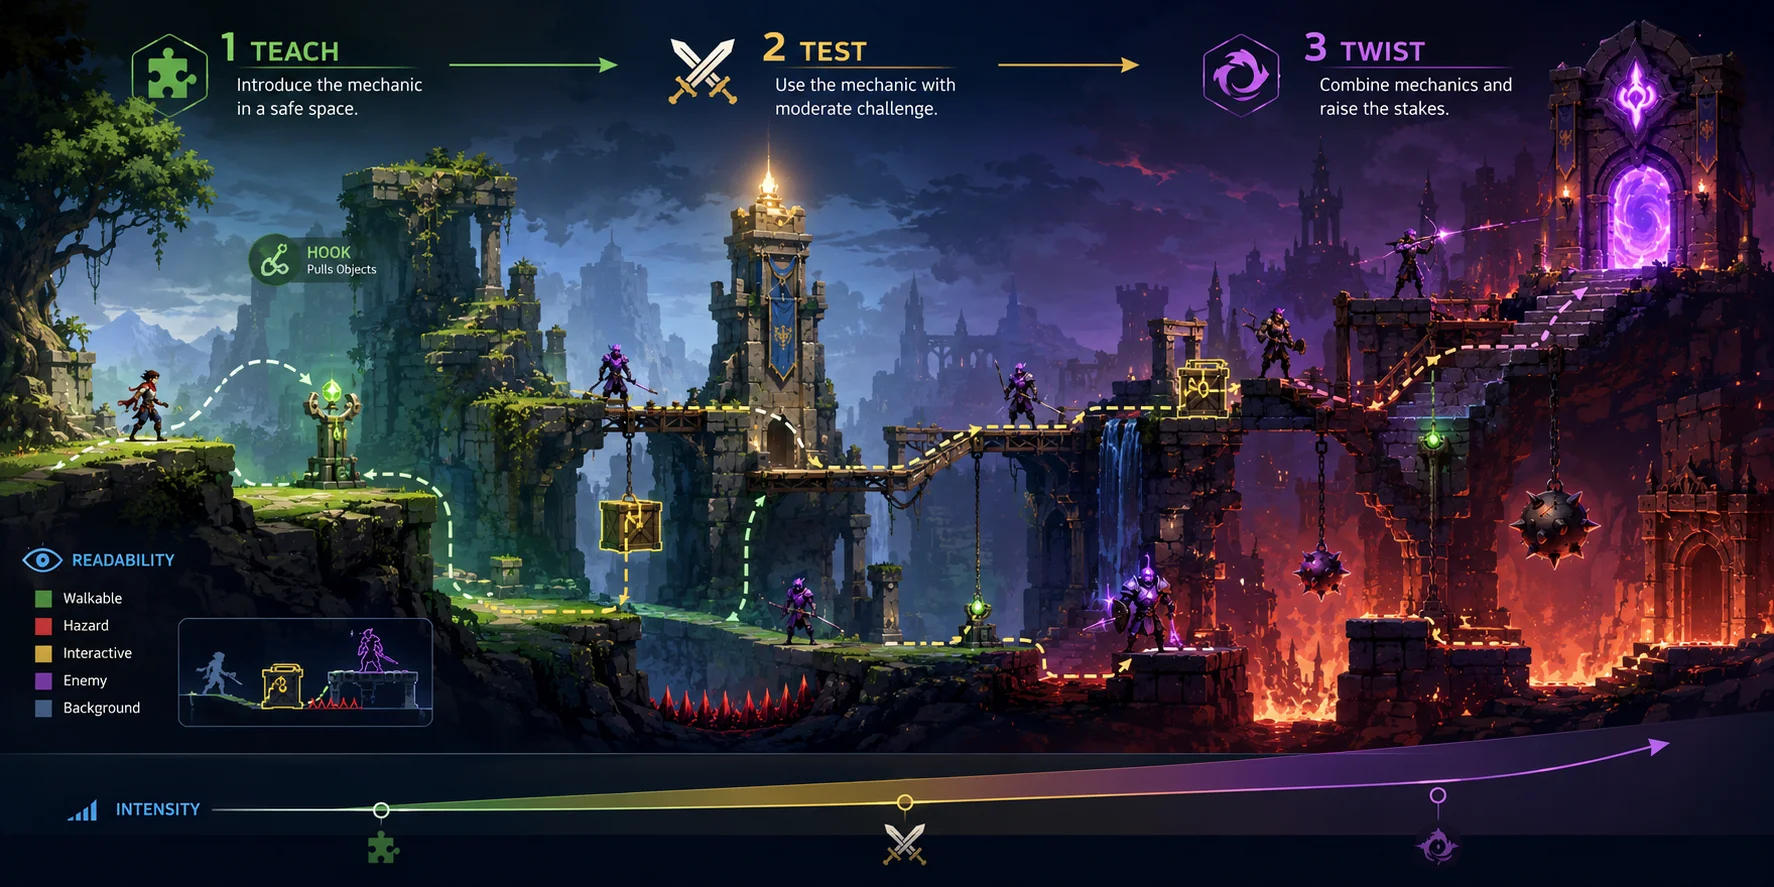
A reliable structure is:
- Teach — Introduce one idea safely.
- Test — Ask the player to use it with modest pressure.
- Twist — Combine it with another challenge, reverse expectations, or add a new condition.
For example, a platformer may first introduce a moving platform above a safe floor. The player learns that it moves and can be ridden. The next section asks them to jump onto it over a small gap. Later, the level combines the moving platform with enemies, hazards, wind, or a timed door.
This approach creates learning without a tutorial popup for every mechanic.
Difficulty is not only enemy health or puzzle complexity. It can come from:
- timing;
- visibility;
- route choice;
- resource scarcity;
- enemy combinations;
- terrain;
- movement precision;
- information limits;
- consequence of failure;
- decision pressure.
A fair challenge allows the player to understand why they failed. If a player dies because the game hid essential information, the challenge may feel unfair. If they fail because they mistimed a jump they could clearly see, they are more likely to try again.
For indie developers, do not assume a mechanic is obvious because it is obvious to you. You built the game. Your players did not.
Readability: Make the Space Understandable at a Glance
Readability is the player’s ability to understand what a space is, what it contains, and what matters.
A readable level communicates:
- where the player can walk;
- what can be interacted with;
- what is dangerous;
- what is decoration;
- where the likely path is;
- where the player came from;
- what the next goal might be.
Readability matters in every genre, but it becomes critical in fast games, multiplayer maps, action games, and complex environments.
Use contrast to separate important information from background detail. Keep collision boundaries understandable. Avoid placing visually similar objects with completely different gameplay behavior unless the difference is taught clearly.
For example, if one red barrel explodes and another identical red barrel is purely decorative, players may not understand the rules. If a climbable ledge looks identical to a background ledge, players may waste time trying to reach the wrong place.
Readability also includes scale. A hallway may feel like a route, a wide plaza may feel like an arena, and a narrow doorway may suggest a transition. Space communicates function before the player acts.
The Level Design Process: Step by Step
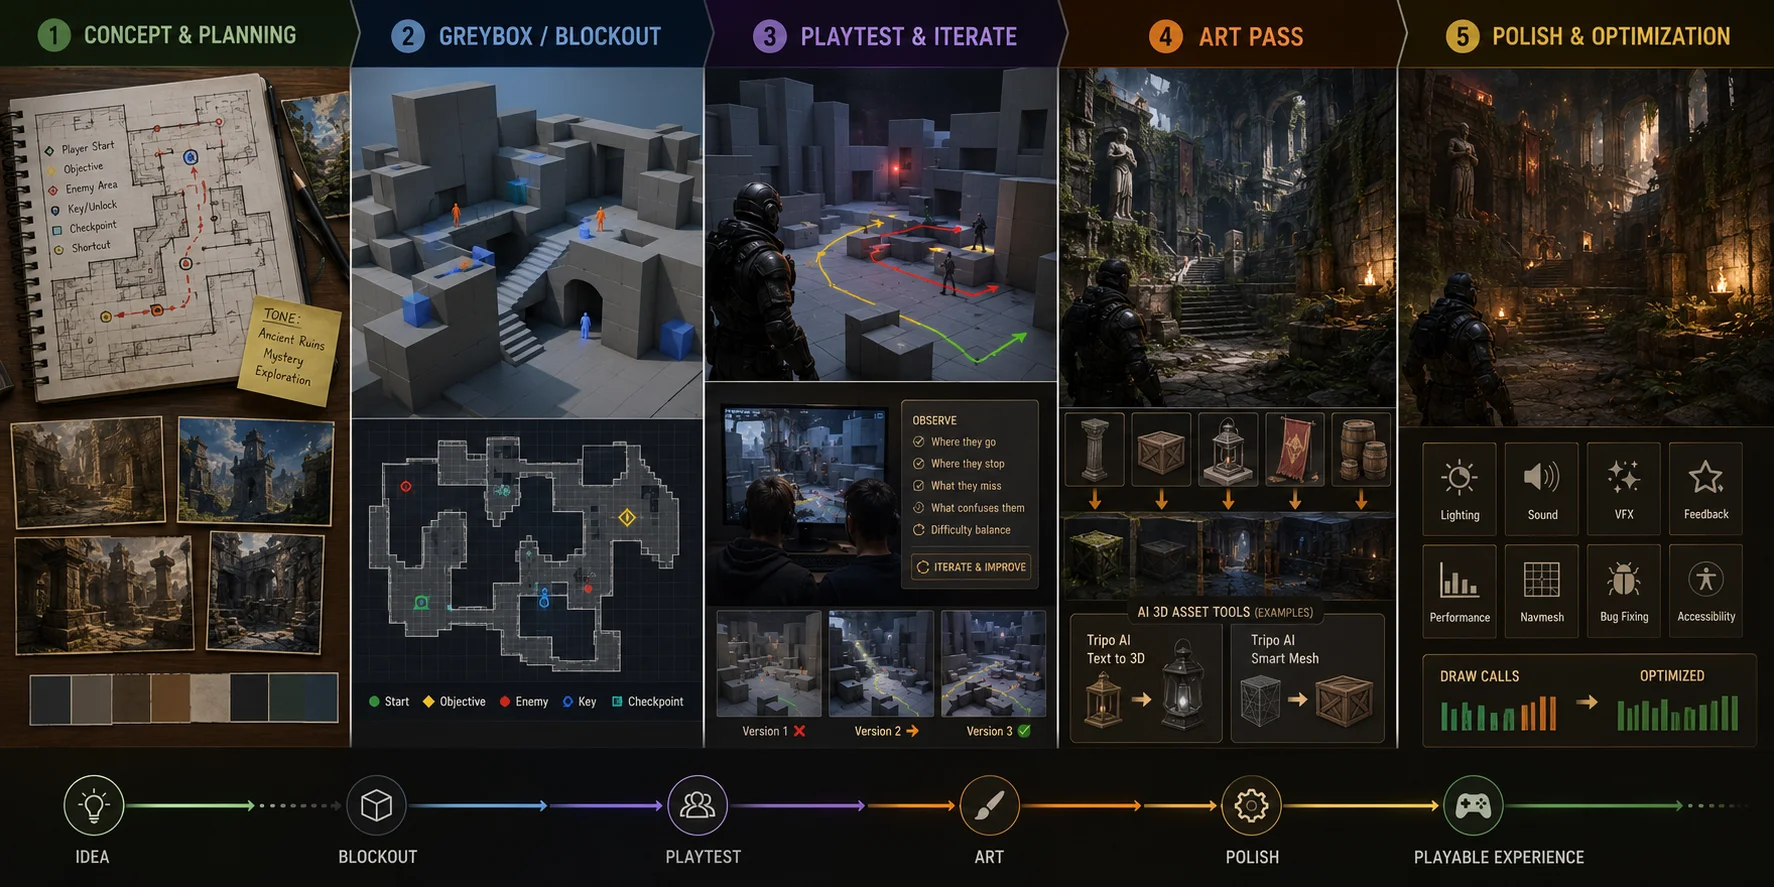
A strong workflow protects the team from expensive rework. The principle is simple:
Test gameplay before investing heavily in final art.
1. Concept and Planning
Start by defining the level’s purpose.
A level brief should answer:
- What is the player trying to accomplish?
- What mechanic is introduced or tested?
- What emotional tone should the level create?
- What is the beginning, middle, and end?
- What is the main challenge?
- What reward or discovery completes the level?
- What assets or systems are required?
You do not need a long document. A single page can be enough.
Next, gather references. These may include real architecture, game spaces, films, photographs, paintings, or earlier levels in your project. References are not a reason to copy layouts. They help define mood, material, scale, route structure, and visual language.
Then create a rough 2D plan. Use paper, a whiteboard, a diagram tool, or a simple top-down layout. Mark entrances, exits, major encounters, checkpoints, landmarks, locked doors, shortcuts, and important sightlines.
The output of this stage is not art. It is intent.
2. Greybox or Blockout
A graybox is a rough playable version of the level built from simple shapes such as cubes, ramps, stairs, walls, platforms, and placeholder doors.
It may look ugly. That is the point.
The graybox lets you test movement, visibility, distance, pacing, jumping, combat, cover, and route choices before the team spends time on art assets.
At this stage, focus on:
- room size;
- corridor width;
- jump distance;
- cover placement;
- enemy approach routes;
- sightlines;
- player speed;
- traversal rhythm;
- checkpoint placement;
- objective visibility.
Do not wait until the environment looks finished to discover that a hallway is too narrow or an arena is too large. Those changes are easy in a blockout and expensive after art production begins.
Use simple labels. A cube may represent a crate, a pillar, a building, a tree, or a machine. A colored plane may represent a hazard. A bright object may represent a key item.
The level should already be understandable without final assets. If players cannot navigate the graybox, decoration will not solve the problem.
3. Playtest and Iterate
Playtesting is where level design becomes real.
Your first layout will almost never be correct. Players may get lost, ignore the route you expected, exploit unintended shortcuts, misread a jump, avoid a combat space, or fail to notice a clue.
That feedback is not failure. It is the process.
During playtests, observe:
- Where players stop moving;
- Where they look confused;
- Which routes they choose;
- Which spaces they ignore;
- Whether they understand the objective;
- Whether difficulty rises too quickly;
- Whether they run out of resources;
- Whether a puzzle has unintended solutions;
- Whether the level is too long or too short.
Avoid asking only, “Did you like it?” Instead ask:
- What did you think the goal was?
- Where did you expect to go next?
- What made you choose that route?
- Which part felt easiest?
- Which part felt unfair?
- What did you notice first in this room?
Then revise one problem at a time. Change layout, lighting placeholders, object placement, enemy placement, or cues. Test again.
Good level design is iterative. The first graybox is a hypothesis. Playtesting reveals whether the hypothesis works.
4. Art Pass: Replace the Greybox With Real Assets
Once the layout works, the art pass turns the functional blockout into a finished environment.
This is where environment art, props, materials, lighting support, architecture, vegetation, clutter, decals, and visual storytelling enter the level.
The art pass should preserve gameplay clarity. It should not bury routes under detail or make important objects blend into the background. Before adding detail, identify what each space needs to communicate:
- Is this a safe room, combat arena, puzzle space, traversal route, or story location?
- What should the player notice first?
- What landmarks help orientation?
- Which surfaces are walkable?
- Which objects need collision?
- What props reveal the history or purpose of this space?
For small teams, this stage can become the largest production bottleneck. A graybox may require dozens of unique props: crates, lamps, pipes, doors, barrels, benches, signs, machines, rocks, vegetation, shelves, debris, furniture, and architectural pieces.
Reuse modular assets where possible. A wall kit, trim sheet, prop family, or material library can create variety without requiring every object to be unique.
This is also where teams start thinking about the assets that will replace placeholder cubes. AI 3D tools can help explore early prop ideas during the art pass, but every asset still needs design review before it belongs in the level.
The role of these tools is not to design the level for you. They can accelerate asset exploration during the art pass: generating an initial lantern, market stall, stone statue, industrial valve, ruined column, sci-fi crate, or decorative prop that can then be reviewed, edited, and placed deliberately.
The level designer still decides whether that prop supports readability, route guidance, performance, mood, and gameplay. A prop is useful only when it serves the space.
5. Polish and Optimization
Polish is the final stage where the level becomes more coherent, responsive, and stable.
Typical polish tasks include:
- final lighting;
- ambient sound;
- music transitions;
- particle effects;
- visual effects;
- interaction feedback;
- objective markers;
- collision cleanup;
- navmesh checks;
- spawn tuning;
- performance optimization;
- bug fixing;
- accessibility review.
Polish should reinforce the level’s intent. A sound cue can guide the player toward an objective. A light flicker can warn of danger. A particle effect can make a collectible easier to notice. A subtle camera shift can emphasize a landmark.
Optimization matters because a level is only successful if it runs well enough to be played. Remove unnecessary geometry, use level-of-detail systems, reduce excessive draw calls, manage texture sizes, and test performance on the target hardware.
Do not treat optimization as something that happens only at the end. Keep performance in mind from the first blockout, especially in large 3D spaces.
Level Design Software & Tools
Level design tools should support fast iteration first. The best choice depends on your game type, target platform, team size, and whether you are building 2D maps, 3D spaces, multiplayer arenas, or open environments.
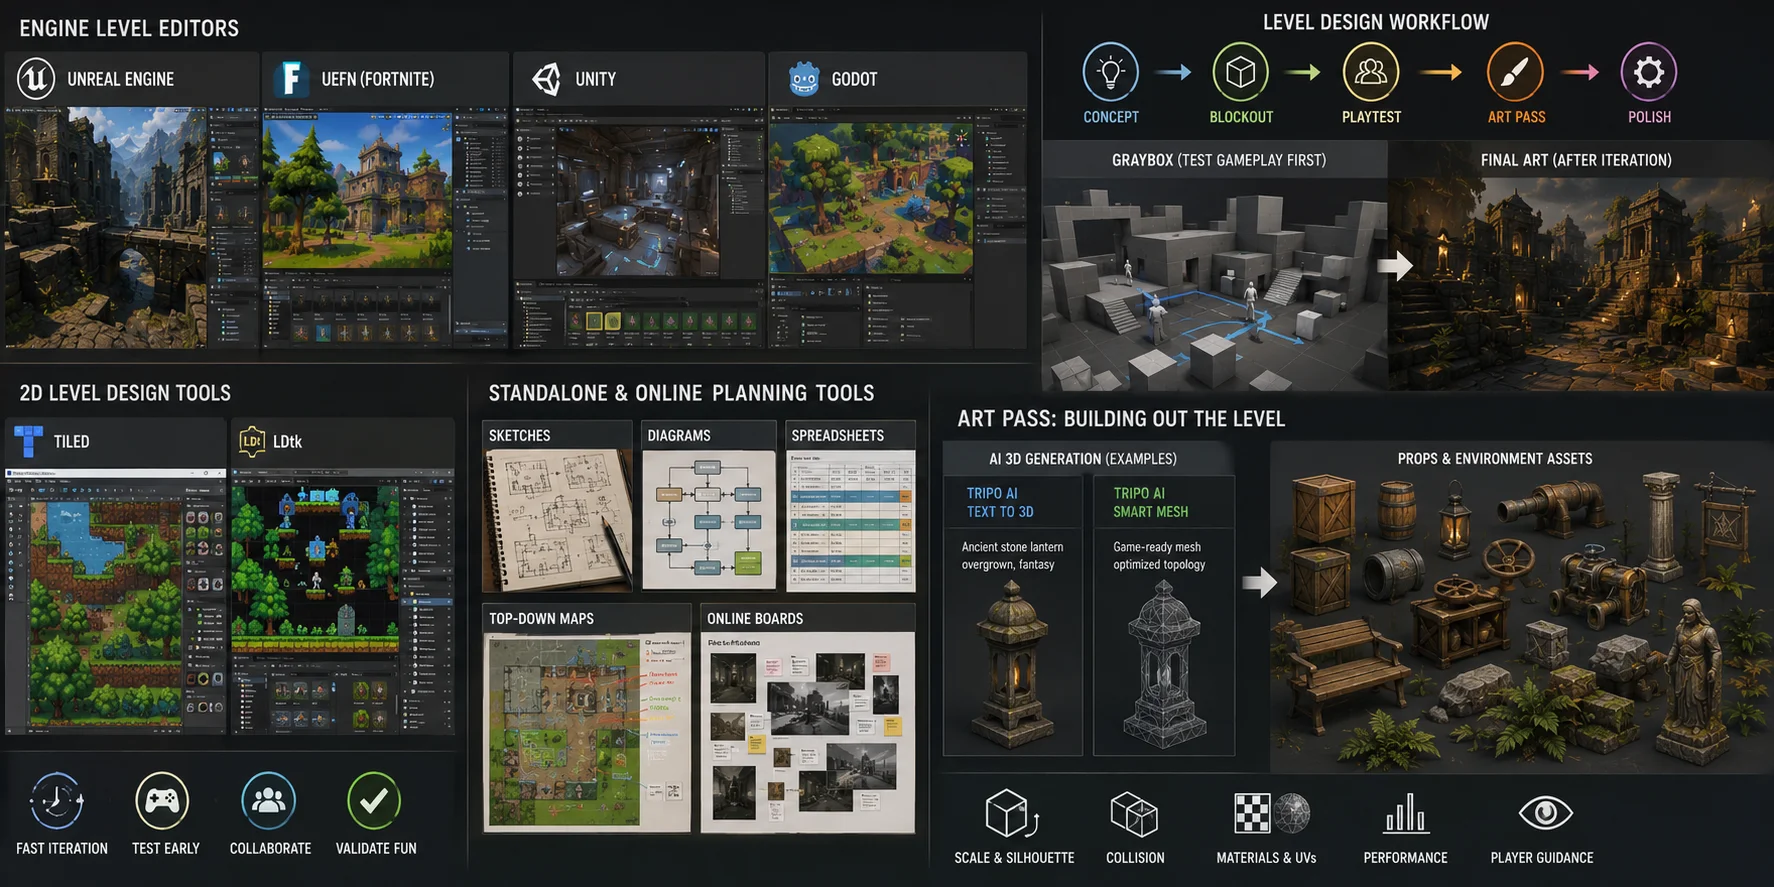
Engine Level Editors
Unreal Engine is widely used for 3D level design because its editor supports blockouts, terrain, lighting, Blueprints, modular environments, and large-world workflows. It is a strong option for action games, first-person projects, cinematic scenes, and visually detailed 3D environments.
UEFN (Unreal Editor for Fortnite) is useful for creators who want to design, test, and publish playable experiences inside the Fortnite ecosystem. It provides a practical way to learn multiplayer layouts, encounter design, device logic, and live-play iteration.
Unity is a flexible engine for both 2D and 3D projects. Its scene editor, prefab workflow, tilemaps, and large plugin ecosystem make it suitable for prototypes, stylized games, mobile projects, and small-team production.
Godot is a free, open-source engine with approachable 2D and 3D workflows. It is especially useful for smaller projects, rapid prototypes, tile-based games, and developers who prefer a lightweight editor and open tooling.
2D Level Design Tools
For level design in 2D games, dedicated map editors can speed up tile placement, collision setup, object layers, and world organization.
Tiled is a popular standalone editor for tilemaps, object layers, collision shapes, triggers, and gameplay markers. It works well for platformers, top-down RPGs, tactics games, and retro-style projects.
LDtk is a modern 2D level editor built around structured worlds, reusable layers, entities, and data-driven workflows. It is useful when a project contains many connected levels, repeated gameplay objects, or large tile-based maps.
Unity, Godot, and Unreal can also support tile-based level creation directly inside their editors. A dedicated 2D tool is helpful when you want cleaner map organization or a workflow that separates level layout from engine implementation.
Standalone and Online Planning Tools
Not every level begins inside an engine. Early planning often happens in lightweight tools that make it easy to sketch routes, encounters, pacing, and objectives before building a playable blockout.
Useful options include:
- paper sketches and whiteboards for quick layout ideas;
- diagram tools for routes, branching paths, and quest flow;
- spreadsheets for encounter pacing, asset lists, and difficulty planning;
- image editors for top-down maps and annotated screenshots;
- collaborative online boards for references, feedback, and team reviews.
For many indie teams, the most effective level design software is simply the tool that lets them test an idea quickly. A rough map made in a diagram tool is more useful than a polished environment plan that has never been played.
Building Out the Level During the Art Pass
Once a graybox has been tested and approved, the art pass replaces placeholder cubes with props, architecture, environmental storytelling objects, vegetation, furniture, decals, lighting elements, and set dressing.
This stage often creates an asset bottleneck for small teams. A single level may need dozens of supporting objects: crates, pipes, lamps, signs, ruins, doors, debris, benches, machines, rocks, shelves, or decorative landmarks. Reusing modular kits remains essential, but teams may still need fast ways to create missing props that fit a specific theme.
AI 3D generation can be useful here as one production option. Tripo AI Text to 3D can turn a text prompt into a 3D starting asset, while an AI 3D model generator for game developers can help teams explore early replacements for graybox objects such as a sci-fi supply crate, market lantern, ruined statue, industrial valve, stone pillar, or custom environmental prop.
For real-time projects, Tripo AI Smart Mesh is designed to generate clean, optimized topology for game-oriented workflows. The generated asset should still be reviewed for scale, silhouette, collision, material setup, UV quality, performance, and whether it supports player guidance rather than obscuring it.
AI-generated props do not replace level design. They can help populate a validated layout faster during the art pass, while the designer remains responsible for readability, pacing, navigation, landmarks, and the player’s experience of the space.
How to Become a Level Designer
Becoming a level designer is less about having the perfect degree or job title and more about showing that you can build playable spaces, explain your choices, and improve your work through feedback.
Build Core Skills
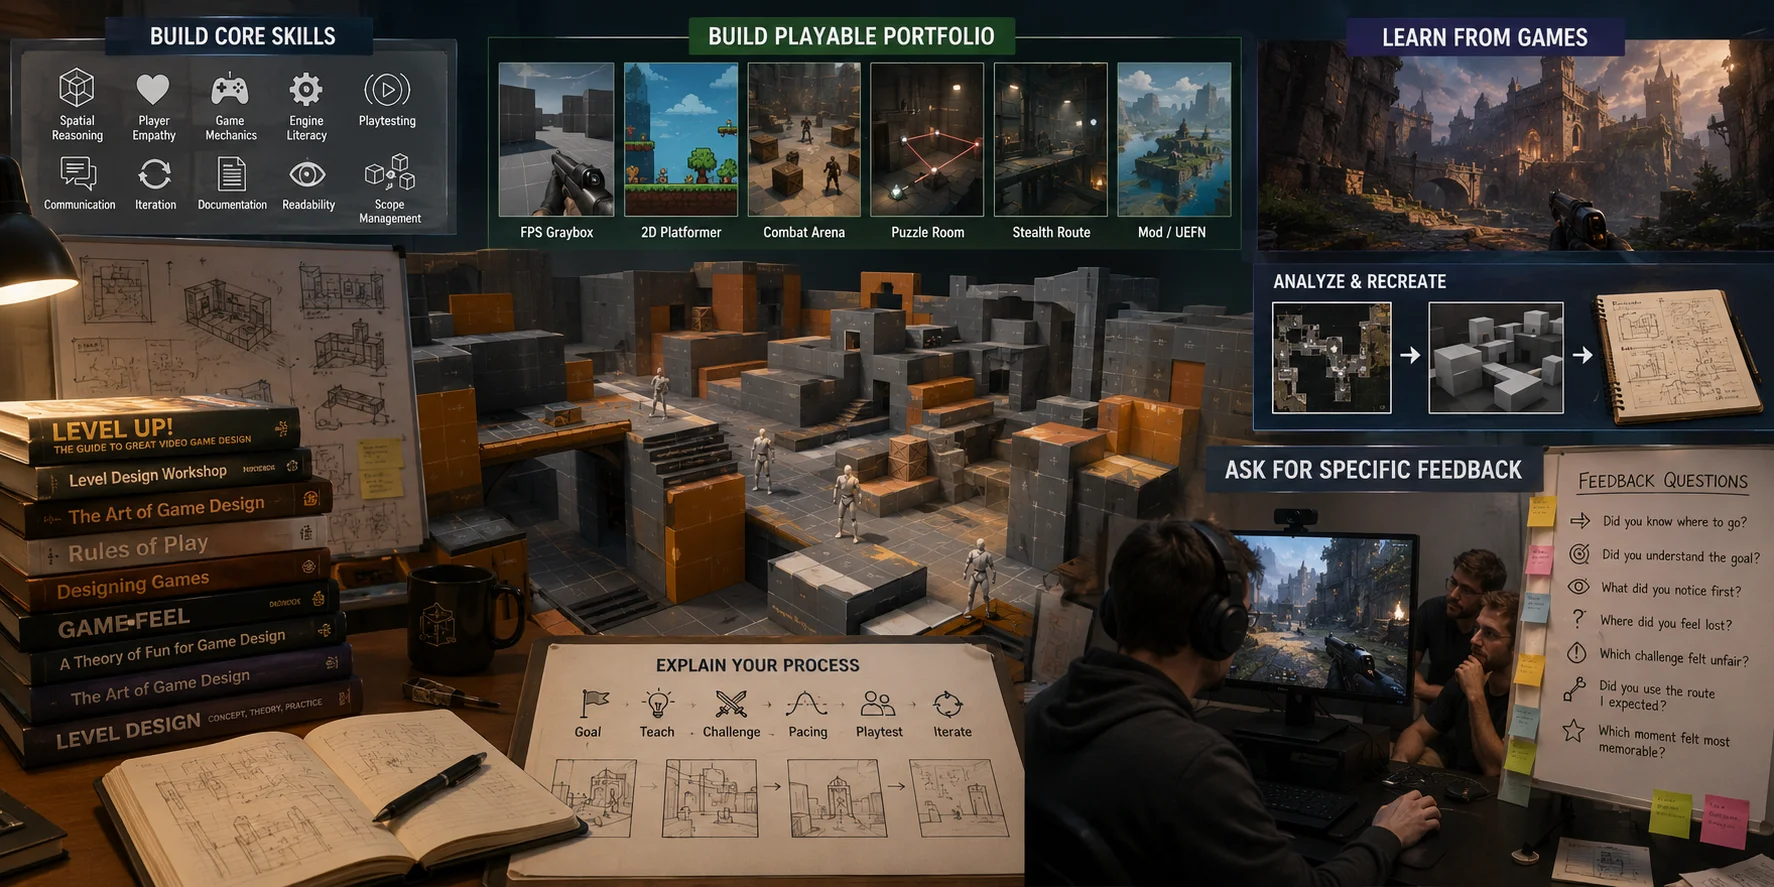
The most important skills include:
- spatial reasoning;
- player empathy;
- understanding of game mechanics;
- basic engine literacy;
- playtesting;
- communication;
- iteration;
- documentation;
- visual readability;
- scope management.
You do not need to be the best artist or programmer to become a level designer. But you should understand enough art and technical production to communicate with artists, programmers, and designers.
Learn one engine deeply enough to create a complete small level. Practice blockouts before final art. Study why players move through spaces the way they do.
Build a Portfolio of Playable Work
A level design portfolio should show playable examples, not only screenshots.
Good portfolio projects include:
- a short first-person graybox;
- a 2D platforming level that teaches a mechanic;
- a combat arena with several encounter waves;
- a puzzle room;
- a stealth route with multiple approaches;
- a mod for an existing game;
- a small UEFN experience;
- a Godot or Unity prototype.
For each project, explain:
- the player goal;
- the mechanic being taught;
- the level’s pacing;
- the main design problem;
- what changed after playtesting;
- what you would improve next.
Employers, collaborators, and mentors want to see your thinking process. A simple graybox with clear documentation can be more valuable than a beautiful but unplayable environment.
Learn From Books, Courses, and Existing Games
A level design book or course can give structure, but study should always include practical analysis.
When playing a game, ask:
- How did the game teach me this mechanic?
- Why did I notice that route?
- Why did this combat encounter feel fair?
- Where did the level give me rest?
- Which landmark helped me navigate?
- What changed when the level became harder?
Take screenshots, sketch layouts, and recreate small sections in graybox form for practice. Do not publish copied levels as your own work, but rebuilding a space privately is an excellent way to understand proportions and player guidance.
You can also learn through game jams, online communities, Discord groups, local meetups, portfolio reviews, and feedback exchanges. The fastest improvement often comes from watching real players interact with your level.
Ask for Specific Feedback
Do not ask only whether a level is “good.”
Ask testers:
- Did you know where to go?
- Did you understand the goal?
- What did you notice first?
- Where did you feel lost?
- Which challenge felt unfair?
- Did you use the route I expected?
- Which moment felt most memorable?
Specific questions produce useful revision notes.
Frequently Asked Questions
What is the meaning of level design?
Level design is the process of planning and building playable spaces that support a game's mechanics, pacing, objectives, and player experience. It covers routes, encounters, navigation, landmarks, challenge placement, and the way a player understands a space through play.
How does level design work?
Level design usually starts with a goal, a layout idea, and a rough greybox or blockout. Designers test how players move, where they get confused, and whether the pacing works before adding final art, lighting, audio, and optimization.
What are the core principles of good level design?
Strong level design uses pacing, flow, player guidance, readability, and a fair challenge curve. A good level teaches players what matters, gives them meaningful choices, and makes each space feel purposeful rather than decorative.
What is greyboxing in level design?
Greyboxing, also called blockout or whiteboxing, means building a rough playable version of a level with simple shapes before final art. It helps teams test movement, scale, sightlines, combat space, and puzzle flow before spending time on polished assets.
What software is used for level design?
Common level design tools include Unreal Engine, UEFN, Unity, Godot, Tiled, LDtk, diagram tools, whiteboards, and spreadsheets. The right tool depends on whether the project is 2D, 3D, multiplayer, open-world, or focused on rapid prototyping.
Is level design different for 2D and 3D games?
Yes. 2D level design often focuses on tile layout, jump arcs, screen-by-screen readability, and side-scrolling or top-down routes. 3D level design adds camera direction, verticality, sightlines, navigation landmarks, spatial scale, and performance constraints.
How do you test whether a level works?
Playtesting is the main test. Watch players without explaining the route, then note where they hesitate, miss objectives, get lost, find unintended shortcuts, or misunderstand the challenge. Good questions include what they noticed first, where they expected to go, and which moment felt unfair.
What skills do you need to become a level designer?
You need spatial reasoning, player empathy, engine literacy, communication, iteration, documentation, and the ability to turn feedback into better layouts. You do not need to be the best artist or programmer, but you should understand how design, art, and technical constraints affect one another.
What should be in a level design portfolio?
A level design portfolio should show playable work, not only screenshots. Include small greyboxes, mods, puzzle rooms, combat arenas, or 2D stages, and explain the player goal, the mechanic being taught, the pacing plan, playtest findings, and what changed after iteration.
Will AI replace level designers?
AI can speed up supporting production tasks such as generating prop ideas, creating early environment assets, organizing references, or exploring art-pass options. It does not replace the central design judgment behind pacing, flow, player guidance, challenge structure, emotional rhythm, and what the player should experience in a space.
Conclusion
Great levels start with gameplay, not assets. Begin with a clear player goal, build a rough graybox, test it early, and revise the layout until movement, pacing, guidance, and challenge work together.
Only then should the level move into the art pass. When you reach that stage, you can generate game-ready props and environment models from a prompt or image to replace placeholders and build out the space faster. Start in Tripo AI Studio when you need a practical way to explore and prepare those environmental assets without interrupting the core level-design workflow.