STL Repair Guide: How to Prepare AI 3D Models for Printing
TL;DR
A "broken" STL usually has one of six issues: non-manifold edges, holes, flipped normals, overlapping shells, thin walls, or too many polygons. Start with the fastest fix: let your slicer auto-repair, then escalate to a dedicated tool only if it fails. Pick a tool by job: one-click online (3D Builder, Formware) for quick fixes; Meshmixer/Blender/MeshLab for control; Netfabb/Magics for production. AI-generated meshes need extra prep: check watertightness, scale to mm, and confirm wall thickness before slicing. If a mesh is beyond repair, regenerate or rebuild it instead of fighting it.
To repair an STL file for 3D printing, first diagnose the error—non-manifold edges, holes, flipped normals, or thin walls—then fix it with the right tool. Try your slicer's auto-repair first; escalate to Meshmixer, Blender, or Netfabb if needed. This guide walks through every step, plus how to prepare AI-generated models so they print cleanly the first time.
Why STL Files Need Repair (and What "Broken" Means)
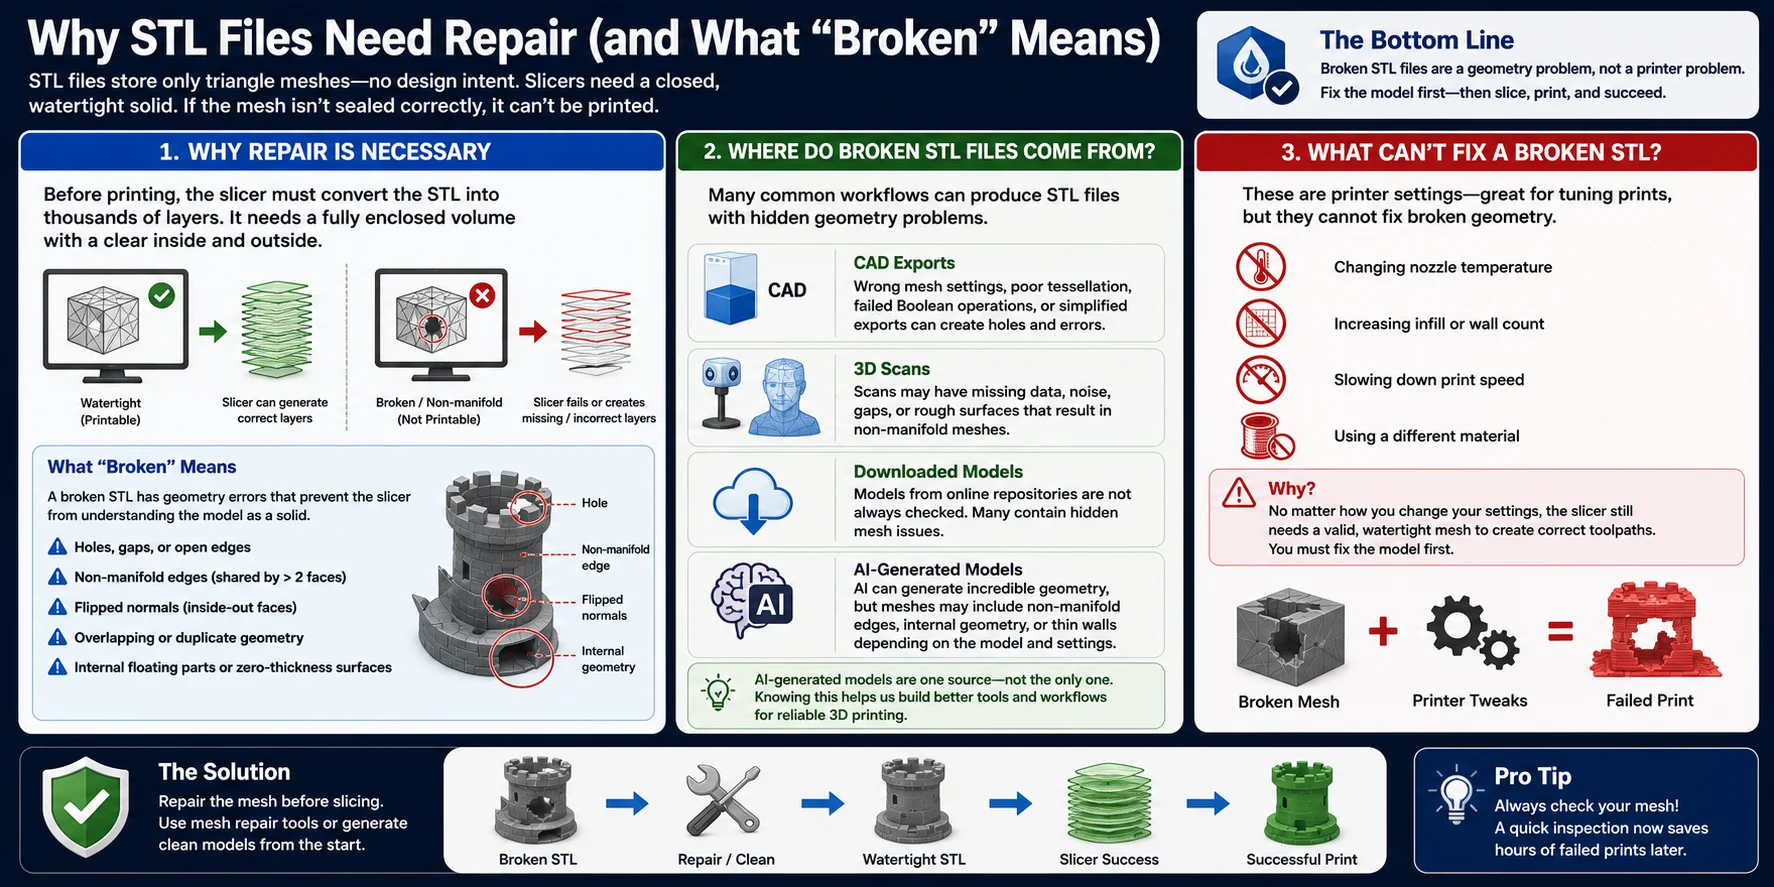
An STL file may look like a solid 3D model, but it doesn't actually know what the object is supposed to be. Unlike CAD files, which preserve design history and geometric intent, an STL stores only a collection of triangles that describe the surface of an object. For a slicer, that's enough—but only if those triangles form a complete, watertight mesh.
Before printing, the slicer must convert the STL into thousands of individual layers. To do that, it needs a fully enclosed volume with a clearly defined inside and outside. If the triangle mesh contains holes, non-manifold edges, flipped normals, or overlapping geometry, the slicer can no longer interpret the model as a solid object. In other words, the STL is considered "broken."
A broken STL doesn't necessarily look damaged on screen. Many geometry errors are hidden inside the mesh and only become apparent during slicing. Common symptoms include missing walls, incomplete layers, unexpected holes, or warnings that the model is non-manifold. In severe cases, the slicer may refuse to generate toolpaths altogether.
So where do broken STL files come from? There are several common sources:
- CAD exports with incorrect mesh settings or failed Boolean operations.
- 3D scans that contain gaps, noisy surfaces, or incomplete data.
- Downloaded models from online repositories that were never properly checked.
- AI-generated models, which can occasionally produce non-manifold meshes, internal geometry, or thin surfaces depending on the generation method.
It's important to understand that these are model-side geometry problems, not printer problems. Changing your nozzle temperature, infill percentage, print speed, or material cannot repair missing triangles or invalid topology. The mesh itself must be fixed before slicing.
Fortunately, most broken STL files can be repaired. Small defects are often solved with automatic repair tools, while more complex meshes may require manual editing or remeshing. Better yet, starting with clean, high-quality source geometry—whether from CAD or an AI workflow designed for 3D printing—can eliminate many of these problems before they ever reach your slicer.
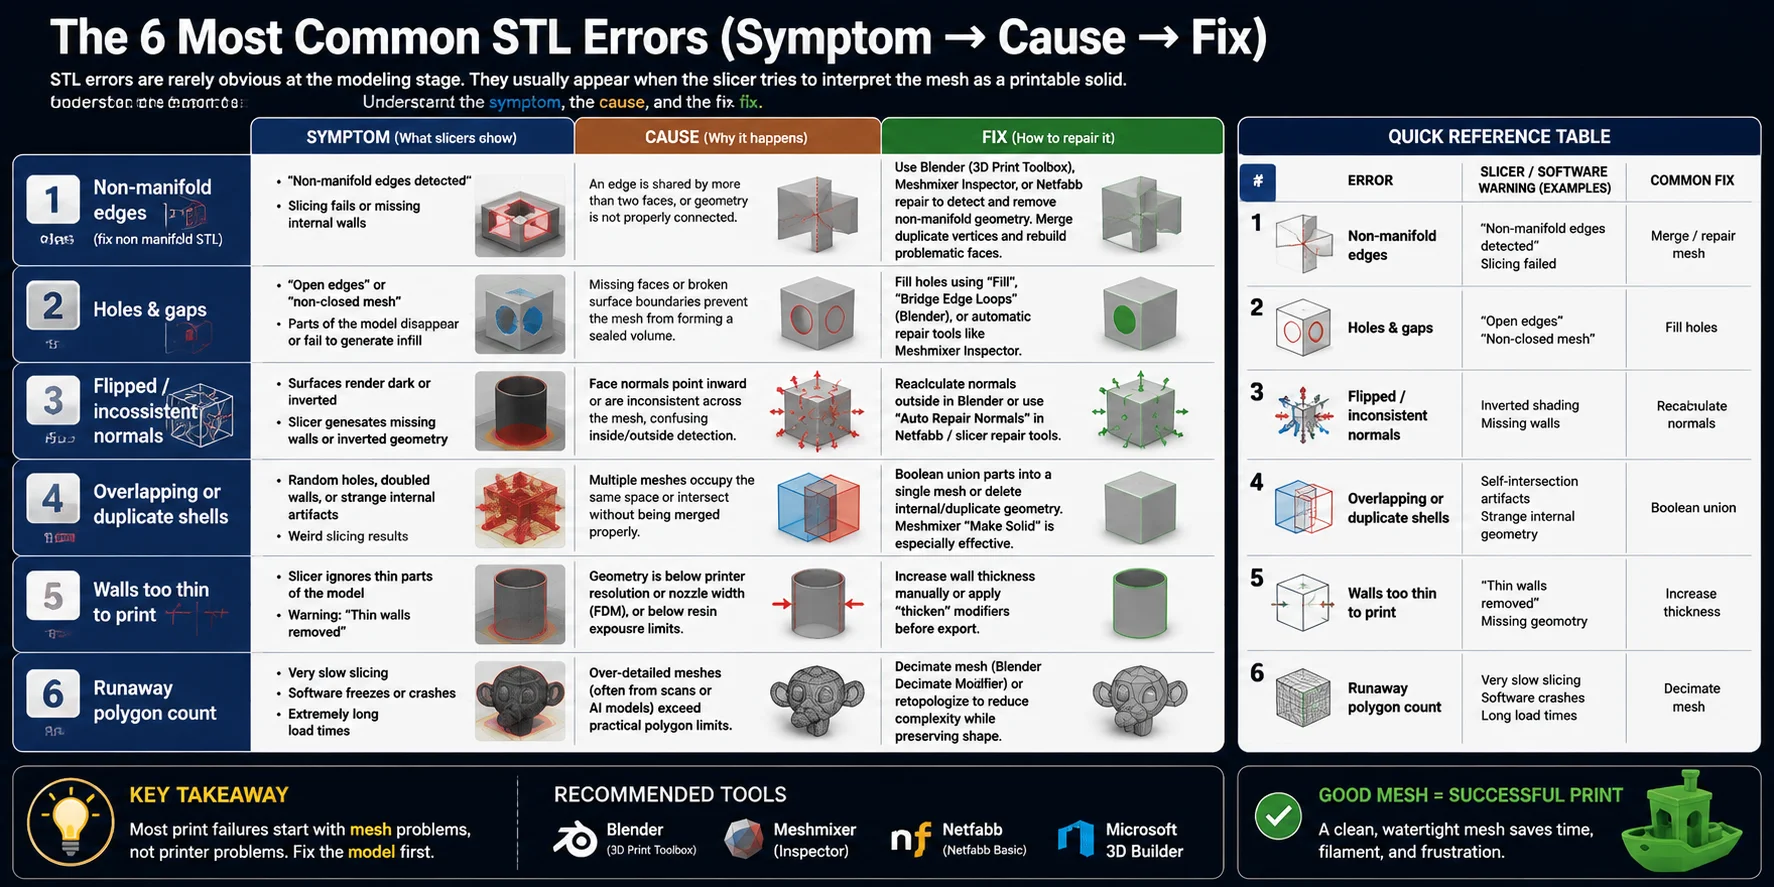
The 6 Most Common STL Errors (Symptom → Cause → Fix)
STL errors are rarely obvious at the modeling stage. Most of them only become visible when the slicer tries to interpret the mesh as a printable solid. The key to troubleshooting is understanding three layers of information: how the error appears (symptom), why it happens (cause), and how to fix it (solution).
Non-manifold edges (fix non manifold STL)
Symptom (what slicers show): Cura / PrusaSlicer may display "non-manifold edges detected", slicing failures, or missing internal walls. The model may preview incorrectly or refuse to generate toolpaths.
Cause: An edge is shared by more than two faces, or geometry is not properly connected. This breaks the rule that a mesh must form a clean closed surface.
Fix: Use Blender (3D Print Toolbox), Meshmixer Inspector, or Netfabb repair to detect and remove non-manifold geometry. Merge duplicate vertices and rebuild problematic faces.
Holes & gaps
Symptom: Slicer warns "open edges" or "non-closed mesh". Parts of the model disappear or fail to generate infill.
Cause: Missing faces or broken surface boundaries prevent the mesh from forming a sealed volume.
Fix: Fill holes using "Fill", "Bridge Edge Loops" (Blender), or automatic repair tools like Meshmixer Inspector.
Flipped / inconsistent normals
Symptom: Surfaces render dark, inverted, or partially invisible. Slicer generates missing walls or inverted geometry.
Cause: Face normals point inward or are inconsistent across the mesh, confusing inside/outside detection.
Fix: Recalculate normals outside in Blender or use "Auto Repair Normals" in Netfabb / slicer repair tools.
Overlapping or duplicate shells
Symptom: Random holes, doubled walls, or strange internal artifacts appear in preview or print.
Cause: Multiple meshes occupy the same space or intersect without being merged properly.
Fix: Boolean union parts into a single mesh or delete internal/duplicate geometry. Meshmixer "Make Solid" is especially effective.
Walls too thin to print
Symptom: Slicer ignores parts of the model or warns "thin walls removed".
Cause: Geometry is below printer resolution or nozzle width (FDM), or below resin exposure limits.
Fix: Increase wall thickness manually or apply "thicken" modifiers before export.
Runaway polygon count
Symptom: Slow slicing, software crashes, or extremely long load times.
Cause: Over-detailed meshes (often from scans or AI models) exceed practical polygon limits.
Fix: Decimate mesh (Blender Decimate Modifier) or retopologize to reduce complexity while preserving shape.
Understanding these six STL failure modes turns debugging from guesswork into a structured workflow. Instead of randomly adjusting print settings, you can directly identify whether the issue comes from geometry, topology, or scale—and fix it before it ever reaches the slicer.
The STL Repair Workflow (From Diagnosis to Clean Mesh)
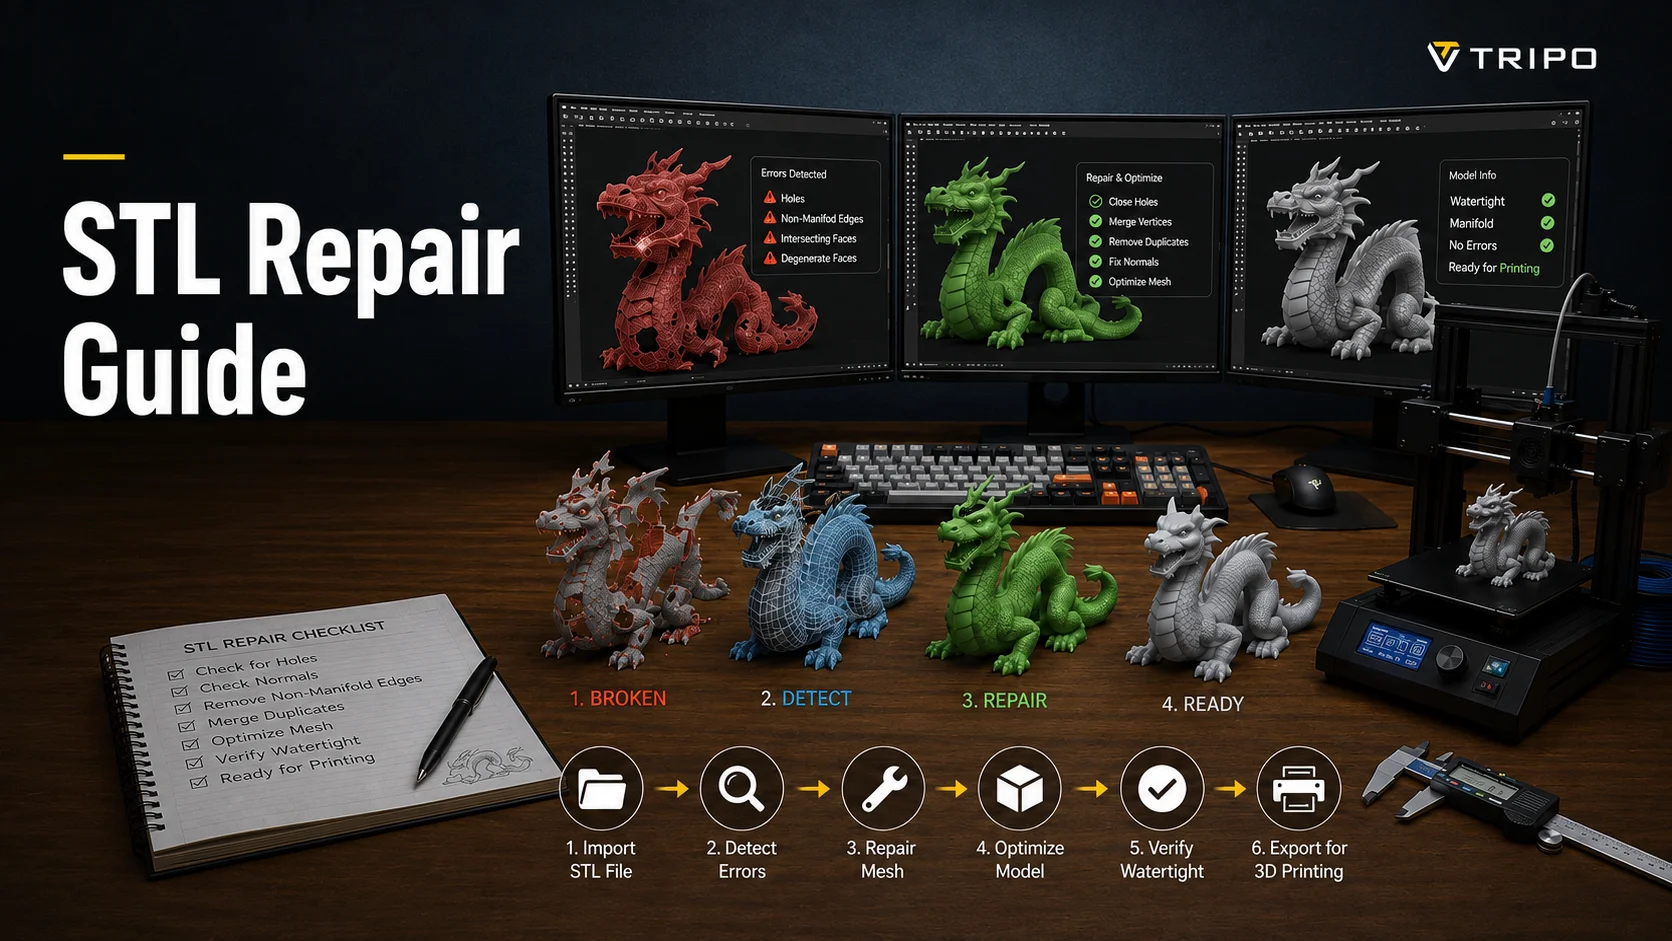
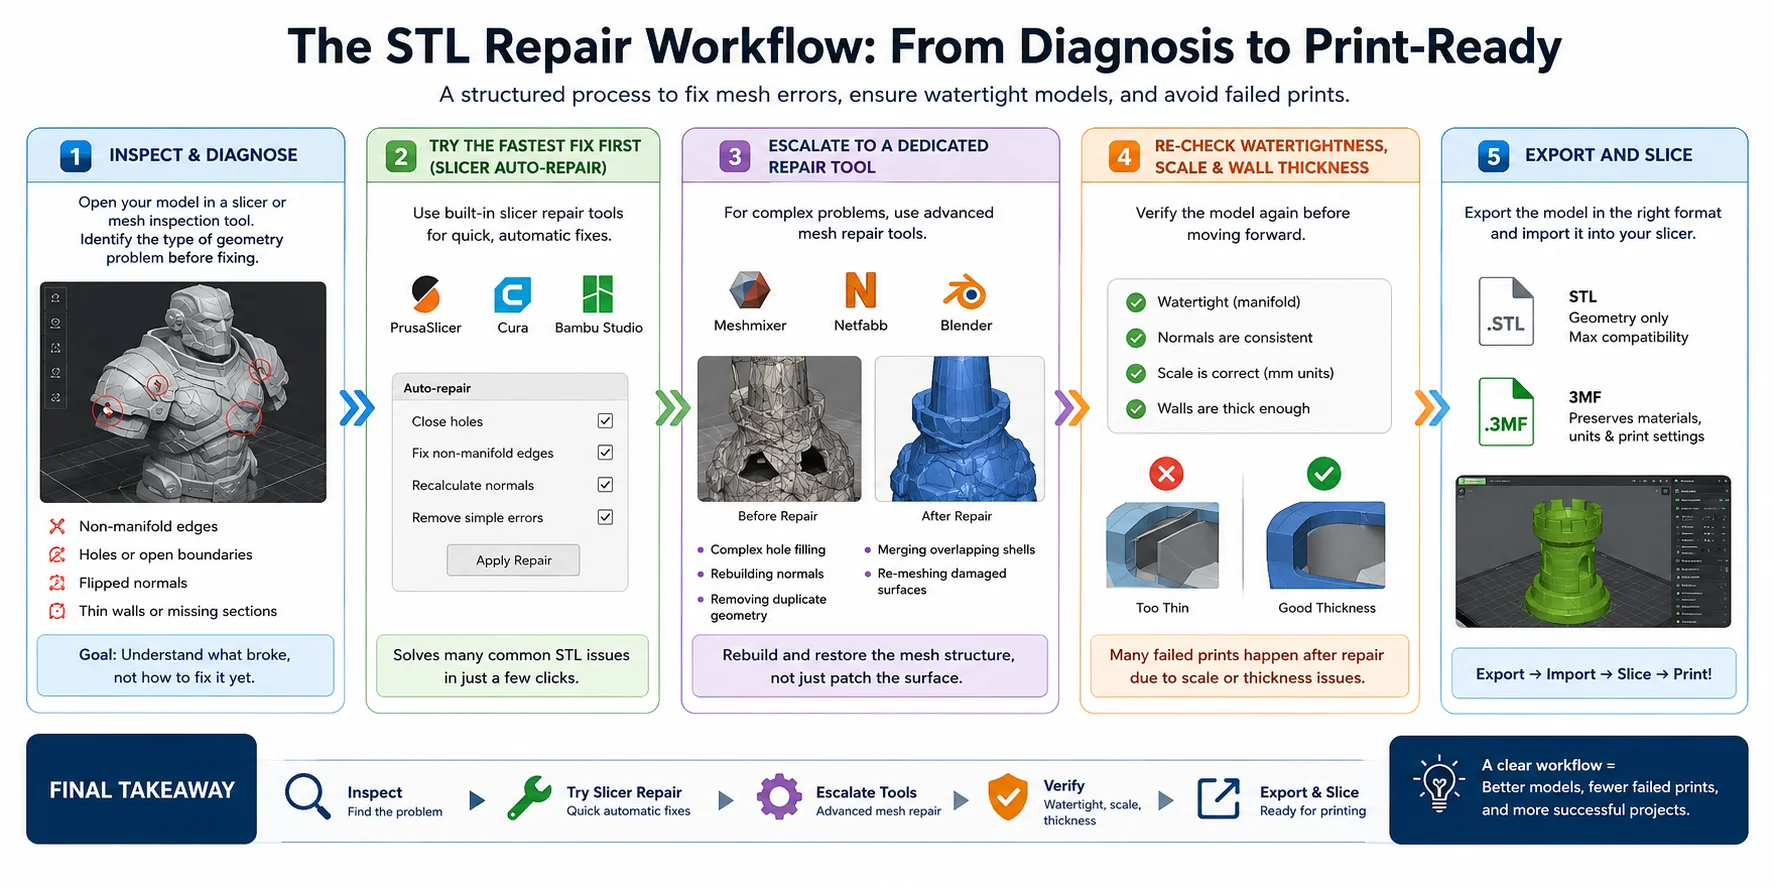
Repairing an STL file is most effective when treated as a structured workflow, not a random set of fixes. Most failed prints happen because users jump straight into "repair tools" without first understanding what kind of geometry problem they are dealing with. A reliable process always moves from diagnosis → quick fixes → advanced repair → verification → export.
Step 1 — Inspect & diagnose
Start by opening your model in a slicer (Cura, PrusaSlicer, Bambu Studio) or a mesh inspection tool like Blender or Meshmixer.
At this stage, you are not fixing anything—you are identifying the problem type:
- Non-manifold edges
- Holes or open boundaries
- Flipped normals
- Thin walls or missing sections
The goal is to understand what broke, not how to fix it yet. Most slicers can already highlight errors or warn you during import.
Step 2 — Try the fastest fix first (slicer auto-repair)
Before opening heavy software, always try the built-in repair tools in your slicer.
Modern slicers like PrusaSlicer, Cura, and Bambu Studio can automatically:
- Close small holes
- Fix minor non-manifold geometry
- Recalculate normals
- Remove simple mesh inconsistencies
This step solves a large percentage of everyday STL issues, especially for downloaded models or small scan artifacts.
Step 3 — Escalate to a dedicated repair tool
If slicer repair fails, move to dedicated mesh tools like:
- Meshmixer (Inspector / Make Solid)
- Netfabb repair
- Blender (3D Print Toolbox)
These tools can handle more serious issues:
- Complex hole filling
- Rebuilding normals
- Removing duplicate geometry
- Merging overlapping shells
- Re-meshing damaged surfaces
At this stage, you are actively rebuilding parts of the mesh structure, not just patching it.
Step 4 — Re-check watertightness, scale & wall thickness
After repair, always verify the model again before proceeding.
Check:
- Is it fully watertight (manifold)?
- Are normals consistent?
- Is the scale correct (use mm units)?
- Are walls thick enough for your printing method?
Many failed prints happen after repair because scaling or thickness issues were introduced during editing.
Step 5 — Export and slice
Once the model passes all checks, export it in the appropriate format:
- STL for geometry-only compatibility
- 3MF for preserving materials, units, and print settings
Then import into your slicer and proceed with slicing as normal.
Final takeaway
The most reliable STL repair strategy is simple:
Inspect → Try slicer repair → Escalate tools → Verify → Export
This workflow prevents wasted print time and ensures that every fix actually improves the mesh instead of introducing new errors.
Which STL Repair Tool Should You Use?
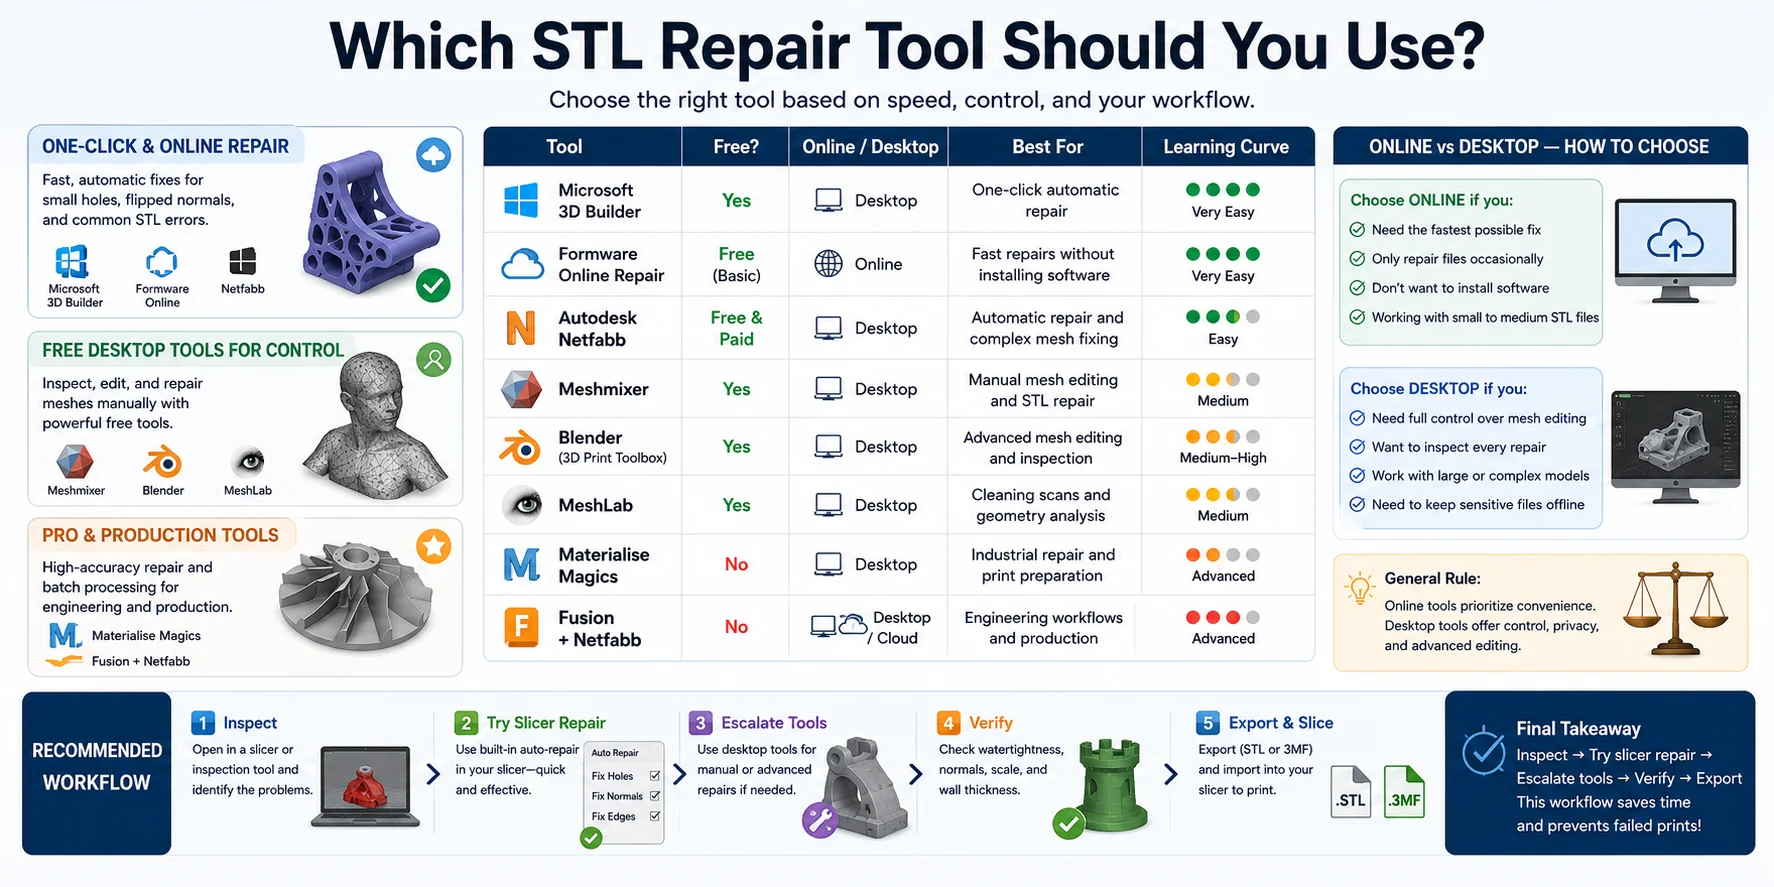
There isn't a single "best" STL repair tool for every situation. The right choice depends on how quickly you need a fix, how much control you want over the mesh, and whether you're preparing one model or repairing dozens for production.
As a general rule:
- Need a fast automatic repair? → Use an online service or a slicer's built-in repair.
- Need to edit and inspect the mesh yourself? → Use a desktop mesh editor.
- Need production-quality repairs? → Use professional software.
One-click & online repair
If your STL only has small holes, flipped normals, or minor non-manifold errors, start with an automatic repair tool.
Microsoft 3D Builder has long been popular because it detects broken meshes as soon as you open the file and usually offers a one-click repair. For many downloaded models, that's all that's required.
Online repair services, such as Formware's STL Repair, are another convenient option. Simply upload the model, let the service repair common mesh errors, and download the corrected STL. They're ideal when you don't want to install software or only repair files occasionally.
Netfabb also includes highly capable automatic repair routines that can fix many complex issues while requiring very little manual work. It's often the next step if your slicer's auto-repair wasn't enough.
These tools are best when your priority is speed rather than fine control.
Free desktop tools for control
Sometimes automatic repair isn't enough. If parts of the model are missing, shells overlap, or scan data is messy, you'll need a desktop editor that lets you inspect and modify the mesh manually.
Meshmixer remains one of the most recommended free STL repair tools. Its Inspector feature quickly finds holes, while Make Solid can rebuild damaged meshes into printable geometry. It's especially useful for repairing scanned objects and downloaded models.
Blender, together with the built-in 3D Print Toolbox, offers much more control. You can inspect non-manifold edges, recalculate normals, merge duplicate vertices, and manually rebuild damaged geometry. Although it has a steeper learning curve, it's one of the most powerful free options available.
MeshLab is another excellent choice for cleaning scanned meshes, removing duplicate geometry, simplifying dense models, and analyzing mesh quality before printing.
If you like understanding exactly what changed during repair, desktop tools provide far more control than automatic online services.
Pro & production tools
For engineering, manufacturing, or commercial 3D printing, professional repair software offers greater accuracy and automation.
Materialise Magics is widely used in industrial additive manufacturing. It can automatically repair complex meshes, optimize geometry, prepare support structures, and process large batches of models with high reliability.
Fusion combined with Netfabb provides an integrated workflow for CAD design, mesh repair, and print preparation. This is especially useful when STL repair is only one part of a larger engineering or production pipeline.
While these solutions require a paid license, they save significant time when working with complex assemblies or high-volume production.
Online vs desktop — how to choose
The biggest decision isn't which repair tool has the most features—it's whether you should repair online or locally.
Choose an online repair tool if you:
- Need the fastest possible fix
- Only repair files occasionally
- Don't want to install software
- Are working with relatively small STL files
Choose a desktop application if you:
- Need full control over mesh editing
- Want to inspect every repair
- Work with large or complex models
- Prefer to keep sensitive design files offline
In general, online tools prioritize convenience, while desktop software offers greater control, privacy, and advanced editing capabilities.
For most hobbyists, a practical workflow is simple: try your slicer's automatic repair first, use an online repair tool if the problem is minor, and move to Meshmixer or Blender only when manual editing becomes necessary. Professional software is usually worth the investment only when repairing models is a regular part of your workflow.
Preparing AI-Generated 3D Models for Printing
Why AI meshes need extra care
AI-generated 3D models are designed to recreate shapes, not necessarily to produce manufacturing-ready geometry. As a result, the mesh often requires additional preparation before it can be printed reliably.
Some of the most common issues include:
- Open edges or small holes that prevent the mesh from being watertight
- Internal floating faces or duplicate geometry left inside the model
- Flipped or inconsistent normals that confuse slicers
- Extremely thin walls that are impossible to print
- Small disconnected islands created during generation
- Incorrect scale because AI models typically have no real-world dimensions
These problems may not be visible in a viewport, but they often appear as warnings when you import the model into a slicer. Running a quick inspection before printing can save hours of failed prints and unnecessary troubleshooting.
A pre-print checklist
Whether the model comes from text-to-3D or image-to-3D generation, run through this checklist before exporting your final file.
1. Check watertightness
Make sure the mesh is manifold with no holes or open boundaries. Most slicers can detect these automatically, and dedicated repair tools can close small gaps if necessary.
2. Scale the model to real-world units
AI-generated models usually don't have meaningful physical dimensions. Set the correct size in millimeters and confirm the orientation before slicing. A model that looks correct on screen can easily print at the wrong scale if units are ignored.
3. Verify wall thickness
Thin decorative details may disappear during printing or create fragile parts. Use your slicer's wall-thickness analysis or a mesh inspection tool to confirm that every feature is printable for your chosen technology, whether FDM or resin.
4. Separate or complete the model if needed
Some AI models generate multiple disconnected shells or leave hidden internal pieces. Separate individual parts when appropriate, remove floating geometry, and reconnect broken sections before exporting.
5. Export the right format
Choose STL when you only need printable geometry and maximum compatibility with different slicers. Choose 3MF if you want to preserve color information, units, materials, or print settings for supported software and printers.
Once the model passes these checks, it is much more likely to slice cleanly and produce a successful print.
Generate print-ready meshes from the start
The easiest repair is the one you never have to perform. Choosing the right generation settings can dramatically reduce the amount of cleanup required later.
For the best printable results, start with a high-detail mesh rather than a low-resolution preview. Higher polygon counts preserve fine geometry and reduce unwanted artifacts that often appear after AI generation.
If your workflow supports preprocessing, grayscale conversion and clean segmentation can also improve image-to-3D reconstruction by reducing background noise and helping the AI better understand the object's boundaries. Likewise, filling missing areas in the input image before generation can produce a more complete mesh with fewer gaps.
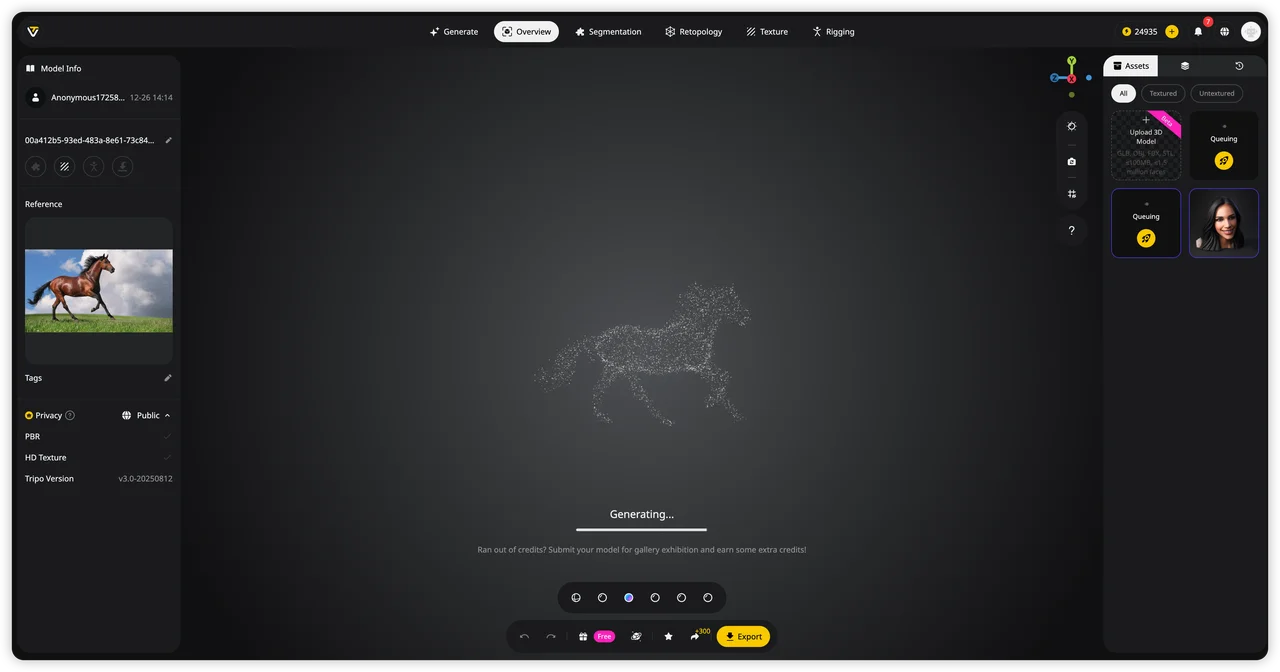
When using Tripo AI Studio for 3D printing, follow the recommended workflow:
- Select High-Detail Model mode.
- Upload your text prompt or reference image.
- Turn Texture OFF for print-focused models.
- Choose Ultra (or High) quality.
- Set the mesh resolution to around 2M polygons when available.
- Generate the model, inspect it, then export it as STL or 3MF depending on your printing needs.
Remember that AI generation is not deterministic—the same prompt can produce different meshes on different attempts. If the first result contains defects or missing geometry, regenerate the model or make small adjustments to the prompt before spending time repairing it. Starting with a cleaner mesh is almost always faster than fixing a poor one afterward.
STL vs 3MF — Which Should You Print?
Both STL and 3MF are excellent formats for 3D printing, but they serve different purposes. The best choice depends on what information you need to preserve and which printer or slicer you're using.
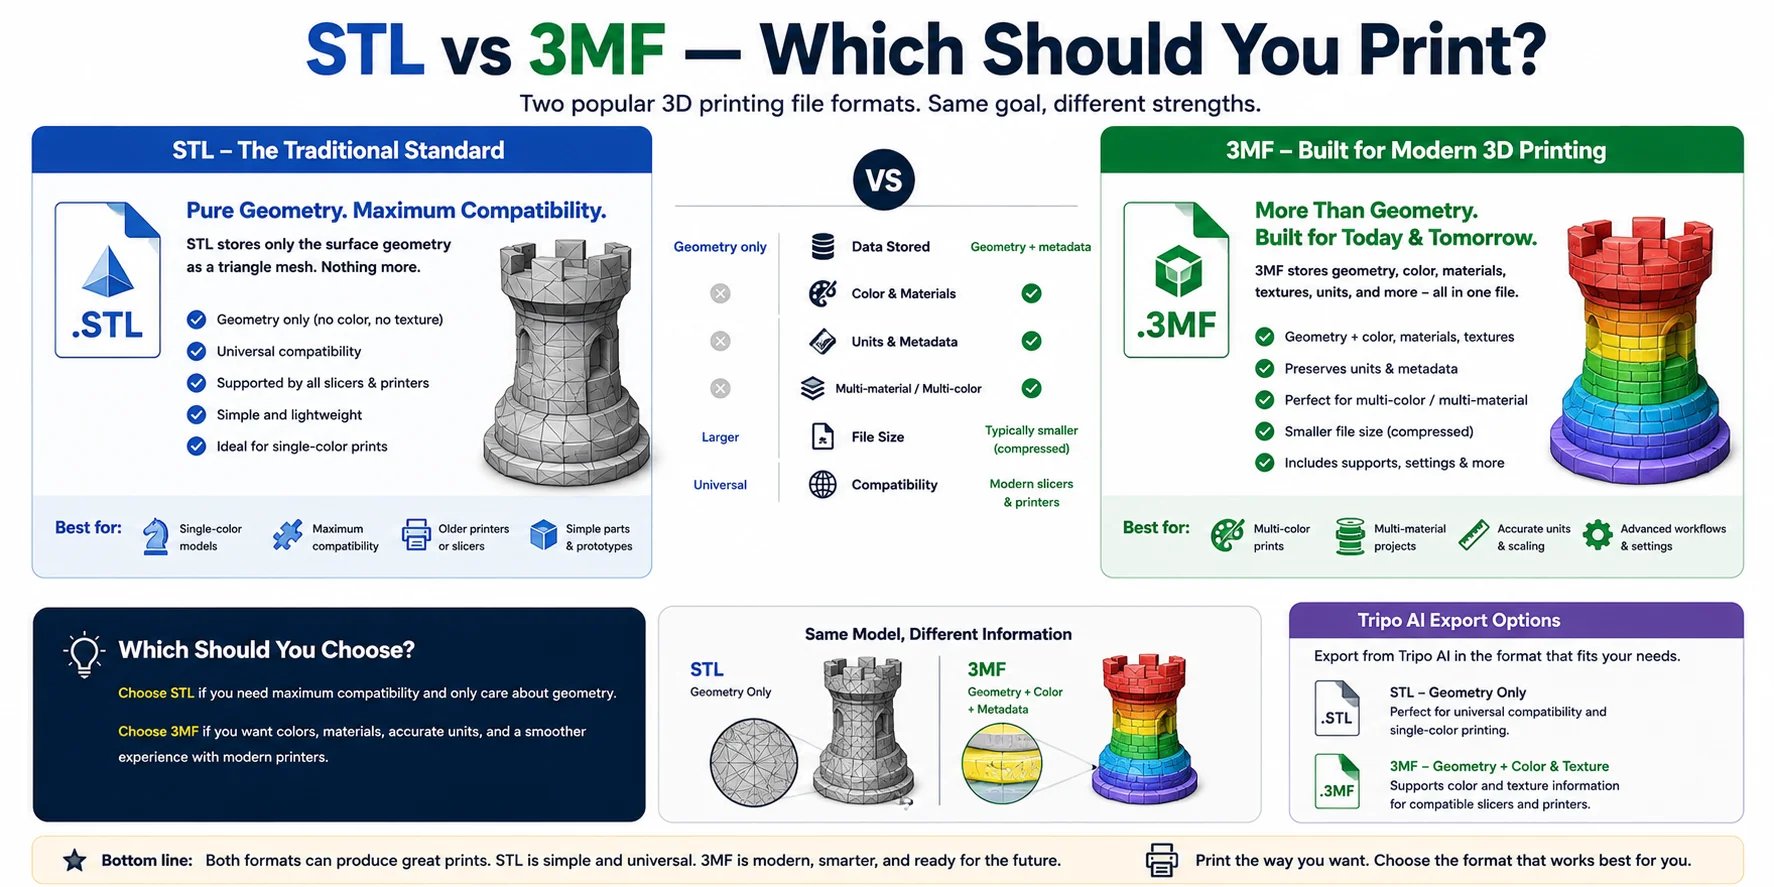
STL is the traditional standard for 3D printing. It stores only the model's geometry as a triangle mesh, making it highly compatible with virtually every slicer and printer. However, it does not include colors, materials, textures, units, or print settings. If your model is a single-color object and you only need the shape, STL is usually the simplest option.
3MF is a newer format designed specifically for modern additive manufacturing. In addition to geometry, it can store colors, materials, textures, units, object hierarchies, and other metadata in a single file. This makes it ideal for multi-color and multi-material printing, while also reducing the risk of scaling errors because measurement units are preserved.
If you're exporting models from Tripo AI, the same distinction applies. Export STL when you only need printable geometry for maximum compatibility. Export 3MF when you want to preserve color and texture information for compatible slicers and printers, or when working with more advanced printing workflows.
In short, STL remains the best choice for simple, universal printing, while 3MF is the better option for modern printers, colored models, and projects that need to preserve more than just geometry. If your workflow supports it, 3MF is generally the more future-proof format.
When to Repair vs. Rebuild (Limits)
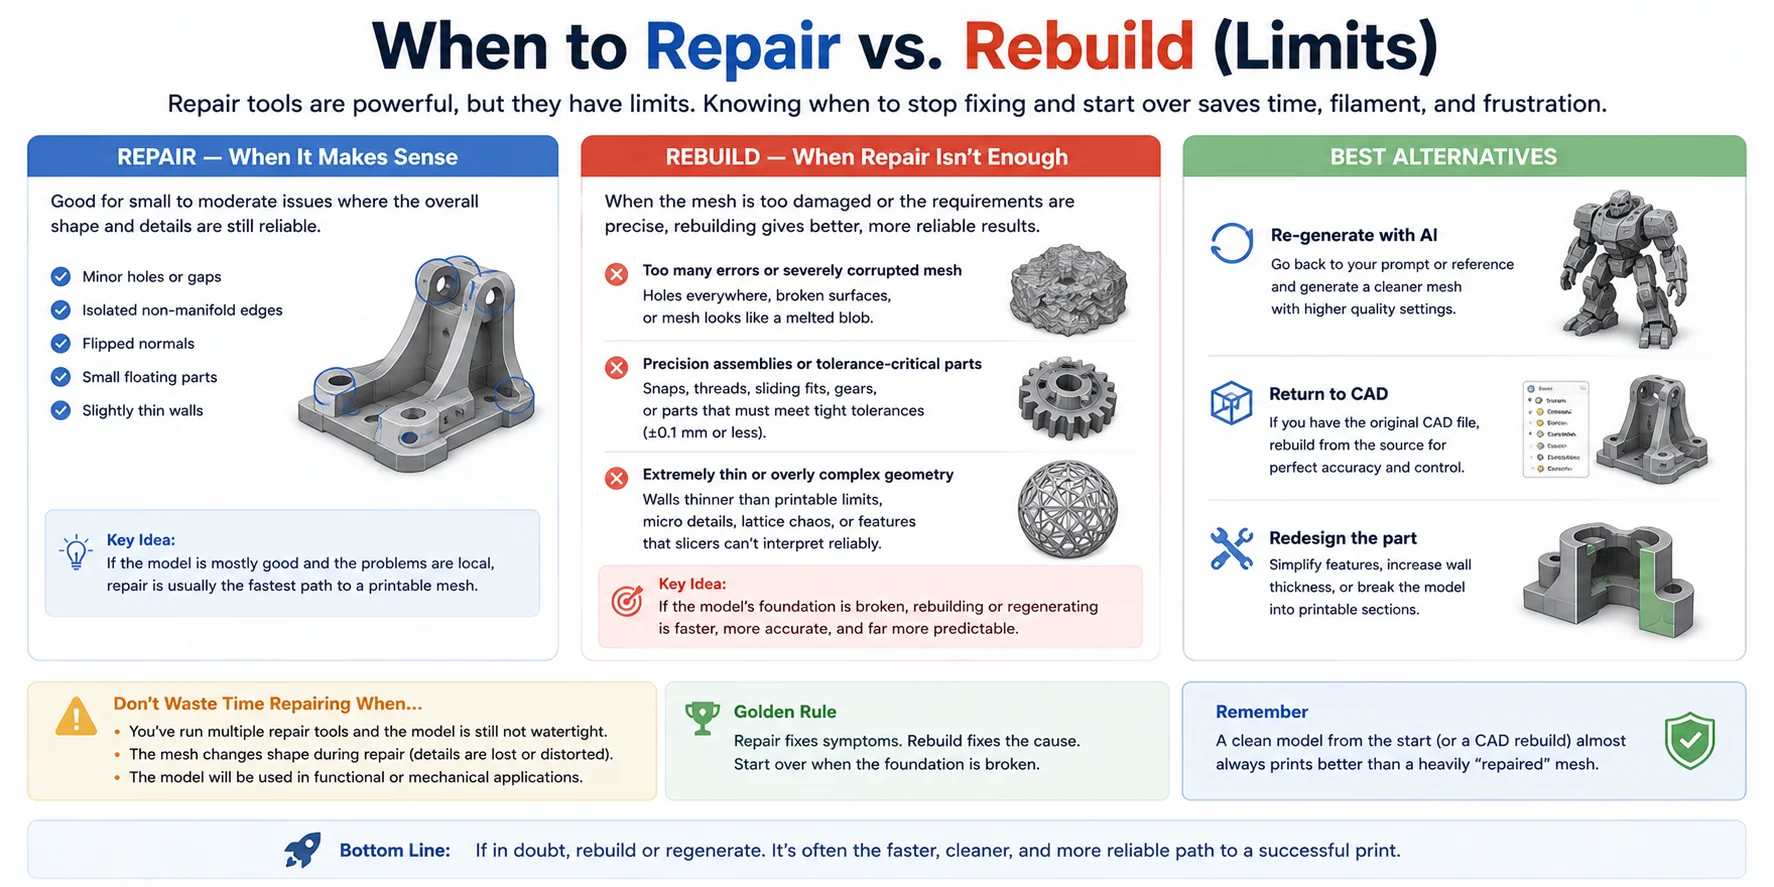
Repair tools are remarkably capable, but they aren't magic. Some STL files can be fixed in minutes, while others require so much reconstruction that starting over is actually faster and produces a better result. Knowing when to stop repairing is just as important as knowing how to repair.
If the mesh is full of holes, overlapping surfaces, self-intersections, and broken geometry, repeatedly running repair tools often creates new artifacts instead of solving the underlying problem. When a model has become an unrecognizable collection of triangles, regenerating it with an AI model or returning to the original CAD design is usually the smarter choice.
The same principle applies to functional parts. Components that must fit together precisely—such as gears, threaded parts, snap-fit joints, or mechanical assemblies with tight tolerances—should not rely on mesh repair to restore dimensional accuracy. Even a successful repair may slightly change surfaces or edges, making the finished print unsuitable for precision applications.
Extremely thin features or highly complex geometry are another warning sign. If walls are below your printer's minimum printable thickness or the model contains intricate details that continuously break during repair, redesigning or rebuilding the geometry is often more reliable than patching it.
This is especially true for AI-generated models. If the original mesh contains widespread defects, generating a new version using higher-quality settings is frequently faster than spending hours trying to repair an unusable mesh.
A simple rule of thumb is: repair local problems, rebuild fundamental ones. When the overall shape is sound, repair tools work well. But when the model's structure, dimensions, or manufacturability are compromised, rebuilding from CAD—or regenerating a cleaner AI mesh—will usually save both time and failed prints.
Frequently Asked Questions
How do I repair a corrupted STL file?
Open the STL in a slicer first and try its auto-repair. If the errors remain, fix the mesh in a repair tool by closing holes, correcting normals, and making it watertight before exporting and slicing again. If the mesh is severely damaged, regenerating or rebuilding the model is often faster than repairing it.
What software repairs STL files?
For quick fixes, try the built-in repair tools in PrusaSlicer, Bambu Studio, or Cura. For more complex mesh problems, tools like Meshmixer, Blender, and Netfabb offer more advanced repair options.
Are STL or 3MF better for 3D printing?
STL is best for maximum compatibility and simple single-color prints. 3MF is recommended for modern workflows because it also stores colors, materials, units, and print settings in a single file.
Why do STL files need to be repaired?
STL files often need repair because they can contain mesh errors like holes, non-manifold edges, or flipped normals. Repairing the model makes it watertight and ensures it slices and prints correctly.
How do I fix non-manifold edges in an STL?
Open the STL in a slicer or repair tool and try auto-repair first. If needed, use Meshmixer, Blender, or Netfabb to fix non-manifold edges, then verify the model is watertight before exporting it again.
Is there a free online STL repair tool?
Yes. Free online STL repair tools can automatically fix common mesh errors like holes and non-manifold edges. For more complex repairs, Meshmixer, Blender, or Microsoft 3D Builder provide greater control.
Can my slicer repair an STL automatically?
Yes. Bambu Studio, PrusaSlicer, and Cura can automatically repair many common STL errors during import. For severely damaged models, you'll usually need a dedicated repair tool such as Meshmixer, Blender, or Netfabb.
Conclusion
Repairing an STL doesn't have to be complicated. The key is to follow a consistent workflow: diagnose the problem, repair it with the appropriate tool, verify watertightness, scale, and wall thickness, then slice with confidence. If you're starting from an AI-generated model, generating a high-detail, print-ready mesh from the beginning can significantly reduce the amount of repair work. Explore Tripo AI Studio to create cleaner 3D models and streamline your path from idea to successful print.