Creating Demon Slayer Hinokami Chronicles 3D Models: Expert Workflow
скачать 3d модель для chicken gun
Creating 3D models in the style of Demon Slayer: Hinokami Chronicles demands a blend of artistic sensibility and technical discipline. In my experience, the workflow hinges on nailing the anime-inspired look, optimizing for real-time engines, and leveraging AI tools to accelerate production without sacrificing quality. This guide is for artists and developers aiming to replicate the game’s stylized visuals efficiently, whether for fan projects, mods, or professional pipelines. I’ll break down my process, from visual analysis and base mesh blocking to advanced texturing, rigging, and final game integration, with practical tips throughout.
Key takeaways
- Reference and style analysis are crucial for anime-accurate models.
- Block out forms quickly, then iterate details—don’t get bogged down early.
- Efficient UVs and stylized textures are as important as sculpting.
- AI-powered tools like Tripo can dramatically speed up model generation.
- Always optimize topology and check engine import before delivery.
- Avoid common pitfalls: over-detailing, inefficient UVs, and rigging shortcuts.
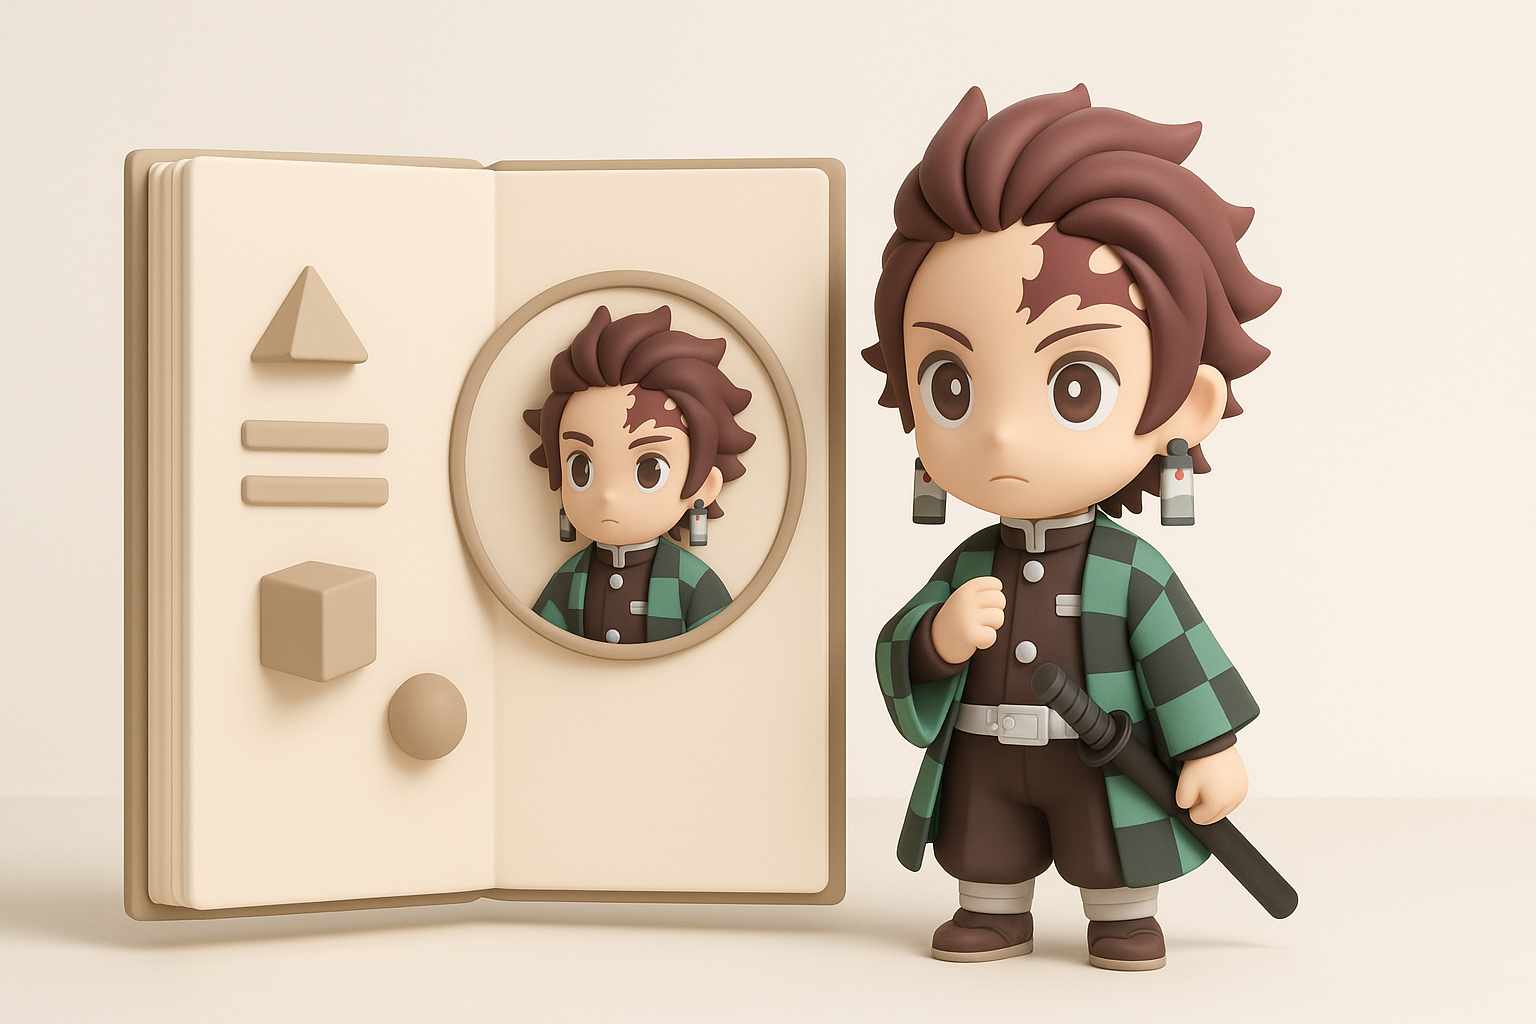
Understanding the Hinokami Chronicles 3D Model Style
Key Visual Features and Art Direction
The Hinokami Chronicles models strike a balance between stylized anime aesthetics and game-ready optimization. Key visual features include:
- Clean, exaggerated silhouettes that read well from a distance.
- Hand-painted, cel-shaded textures with clear linework and color blocking.
- Expressive facial geometry and eyes, often with unique topology for anime expressions.
In my workflow, I always start by analyzing these features. I pay close attention to edge flow on faces and how clothing folds are simplified, ensuring the model supports bold outlines and dynamic shading in-engine.
Reference Gathering and Analysis
Gathering references is non-negotiable. I build a folder of:
- Official game screenshots and promotional art.
- Turnarounds and model sheets from the anime.
- Fan rips or breakdowns (for research only).
I use PureRef to organize my references. What I’ve found is that having front, side, and 3/4 views drastically improves proportion accuracy. I also take notes on color palettes and shader nuances for later texturing stages.
My Step-by-Step Process for 3D Model Creation
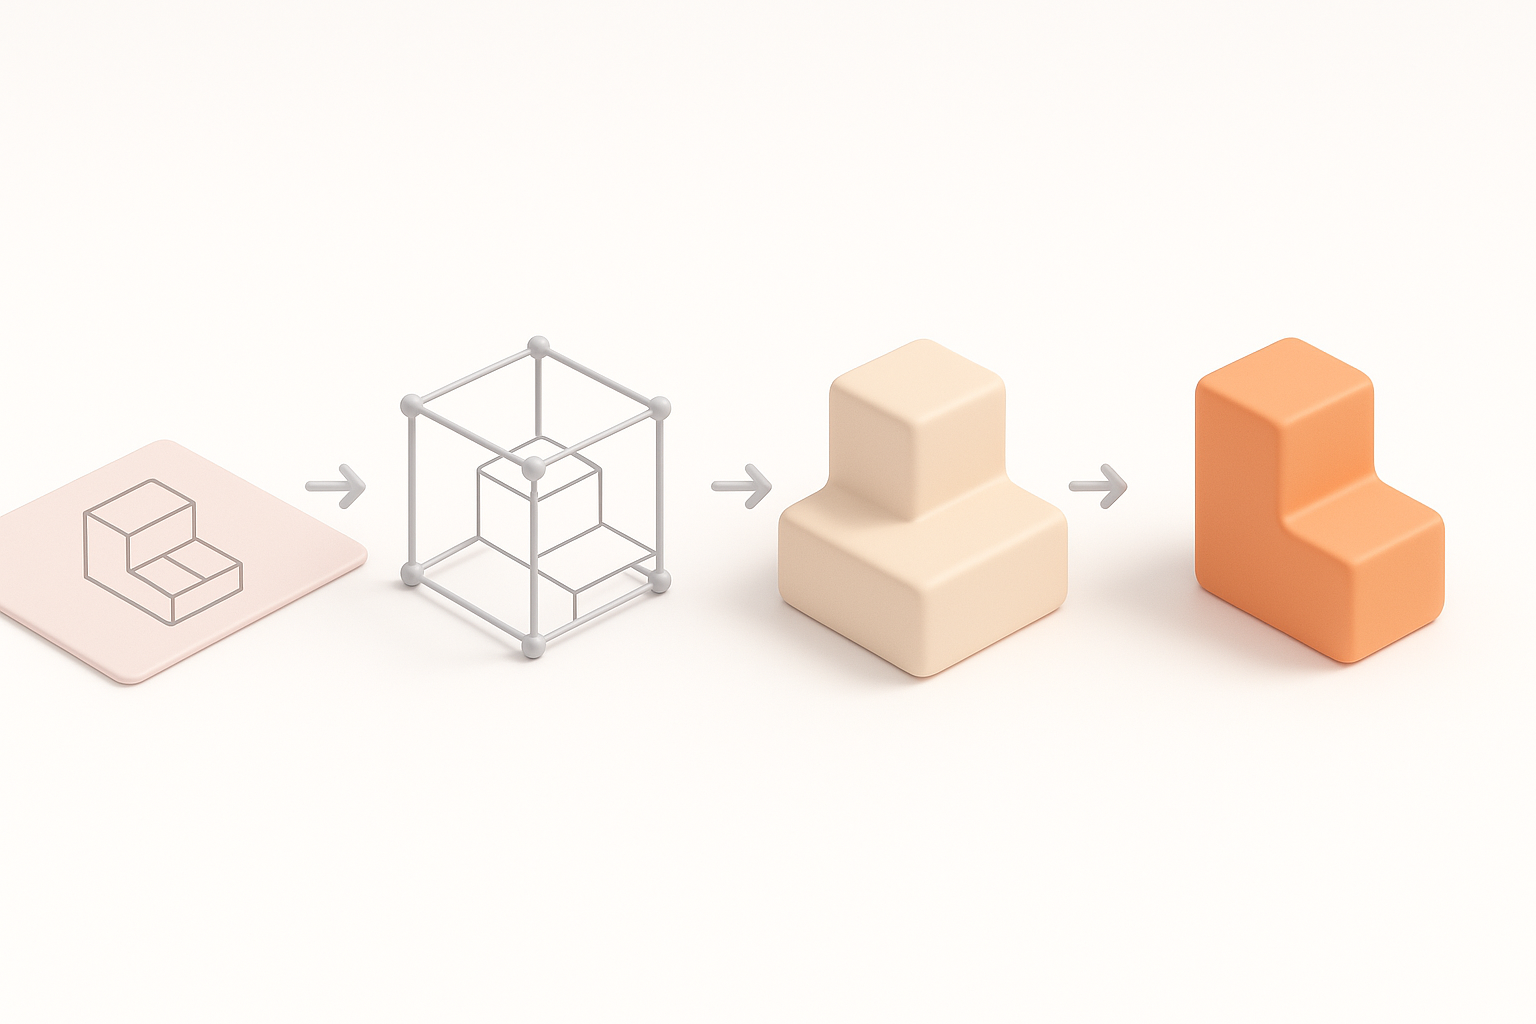
Blocking Out the Base Mesh
I start with a simple base mesh, focusing on proportion and gesture rather than detail. My steps:
- Rough out the body and head using primitive shapes.
- Establish silhouette and pose early—anime models rely on strong shapes.
- Use symmetry but break it for asymmetrical elements (hair, clothing).
Quick tip: I often use Tripo AI to generate a starting mesh from a sketch or text prompt, then adjust the output as needed. This saves hours compared to manual box modeling.
Sculpting and Refining Character Details
Once the base is solid, I move into sculpting:
- Refine facial features, prioritizing the eyes and mouth.
- Add secondary forms: hair tufts, clothing folds, accessories.
- Keep details stylized and avoid excessive realism.
Checklist for this stage:
- Are proportions matching references?
- Is the silhouette readable and dynamic?
- Have I left enough geometry for expressive areas?
Texturing, Rigging, and Animation Best Practices

Efficient UV Mapping and Stylized Texturing
Anime-style models demand clean, efficient UVs:
- Minimize seams, especially on faces.
- Prioritize UV space for eyes and face details.
- Use 2K maps as a sweet spot for quality/performance.
For texturing, I hand-paint diffuse maps and use gradient ramps for cel shading. What I’ve found: baking AO and subtle shadows helps anchor the model, even with stylized shaders.
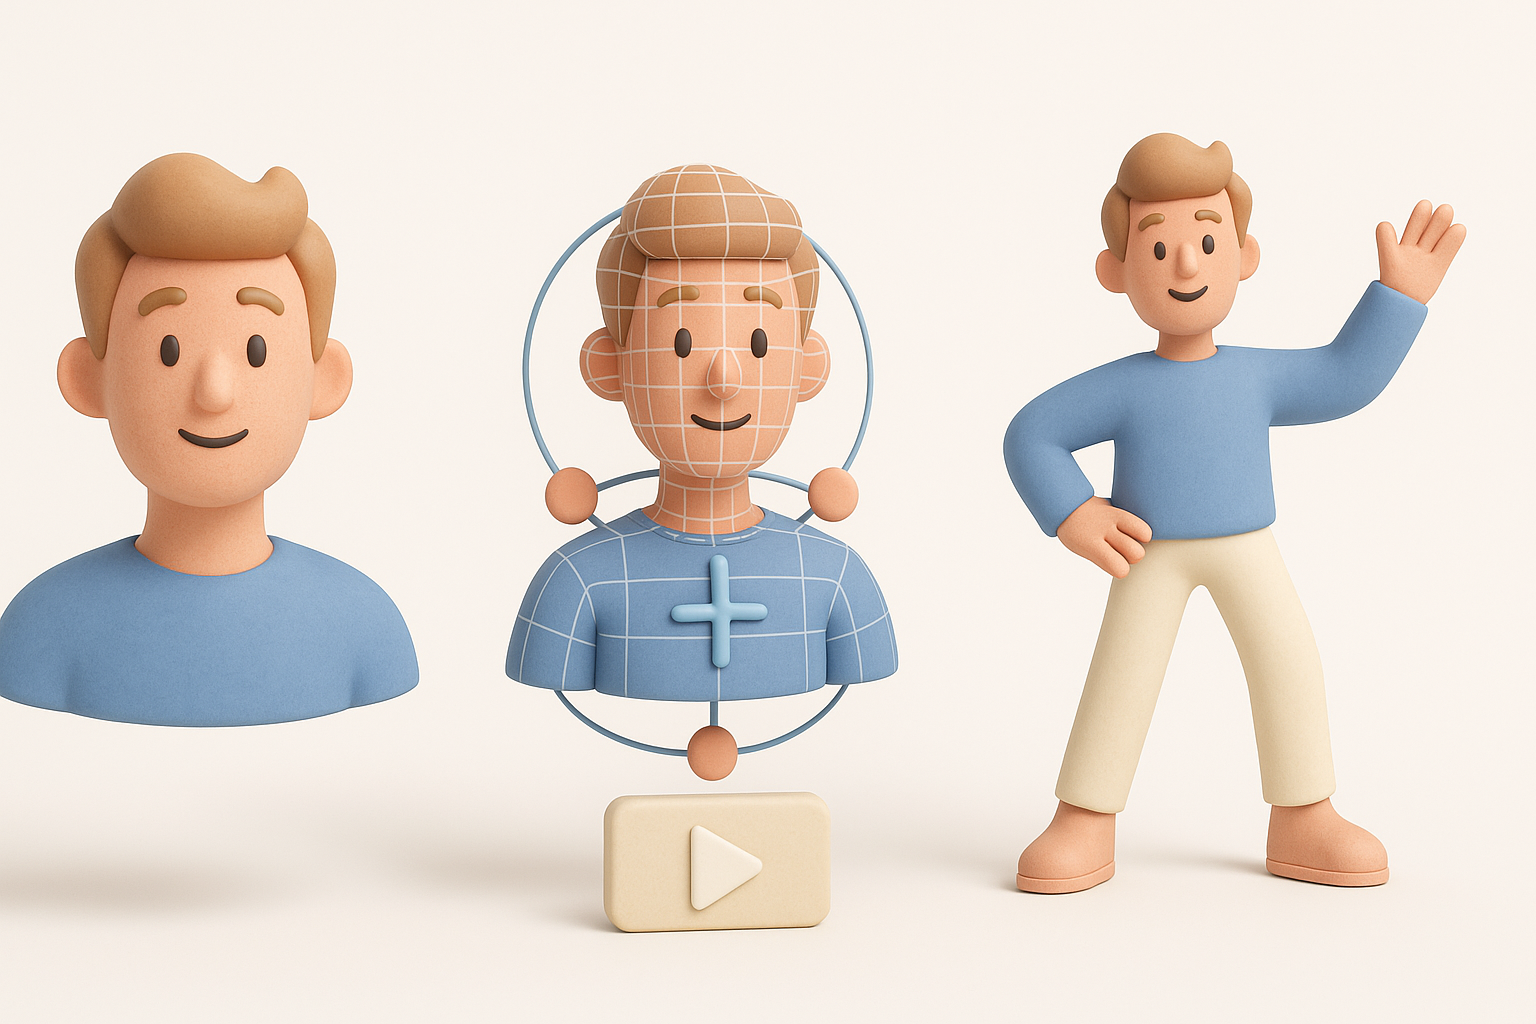
Rigging for Dynamic Anime-Style Animation
Rigging for anime characters means:
- Extra bones for facial expressions and hair.
- Simple, robust skeletons for body and limbs.
- Shape keys or blendshapes for exaggerated mouth/eye movements.
I test rigs with sample animations early—bad deformations are easier to fix before skin weighting is finalized.
Using AI-Powered Tools to Accelerate 3D Workflows

Integrating Tripo AI for Model Generation
Tripo AI fits naturally into my workflow:
- Generate base meshes from text/image/sketch prompts.
- Use segmentation tools to isolate clothing, hair, or props.
- Quickly retopologize and unwrap outputs for texturing.
I typically generate a draft, then refine topology and details manually. This hybrid approach combines speed with control.
Comparing AI Tools and Manual Techniques
AI tools excel at:
- Rapid prototyping and iteration.
- Generating base meshes and variations.
Manual techniques are still best for:
- Final stylization and cleanup.
- Custom topology for animation.
My advice: Use AI for the heavy lifting, but always review and polish outputs by hand before moving to texturing and rigging.
Exporting, Optimization, and Game Engine Integration

Retopology and Polycount Management
For game-ready assets:
- Retopologize to keep polycount within engine budgets (typically 10–20k for main characters).
- Maintain edge loops around joints and facial features.
- Bake normal maps from high-res sculpts to preserve detail.
I use Tripo’s built-in retopology to get a clean base, then tweak edge flow as needed for animation.
Importing Models into Popular Game Engines
Before export:
- Apply transforms and freeze scale.
- Check for flipped normals and stray vertices.
- Export in FBX or glTF for compatibility.
In my experience, importing into engines like Unity or Unreal is smoother when skeletons and materials are named clearly. Always test shaders and animations in-engine before final delivery.
Lessons Learned and Expert Tips
Common Pitfalls and How I Avoid Them
- Over-detailing: Anime models need clarity, not micro-detail. I regularly zoom out to check the silhouette.
- Messy UVs: Clean UVs save hours in texturing and prevent seams.
- Rushed rigging: I always test deformations early—fixing bad weights late is painful.
Final Quality Checks Before Delivery
Before I call a model done:
- Review topology, UVs, and texture seams.
- Test all animations and facial expressions.
- Check in-game performance and LODs.
Final tip: Peer reviews or fresh eyes often catch issues I missed—never skip this step.
By following this workflow and leveraging AI tools like Tripo, I consistently deliver stylized, game-ready anime models efficiently and at high quality.


