From Prompt to Playable: A Complete Guide to AI 3D Characters in Unreal Engine
Most AI 3D model generators create characters that break the moment you import them into Unreal Engine. Non-manifold geometry errors, unusable topology, polygon counts that would crash a supercomputer—if you've tried it, you know the pain.
This guide shows you exactly how to turn a text prompt to 3D character Unreal Engine ready, including all the cleanup and rigging steps that actually make it work. We'll cover the complete professional workflow: generating with proper settings, fixing mesh errors in Blender, auto-rigging with AccuRIG, and importing correctly into Unreal Engine 5.
By the end, you'll know how to create game-ready characters in under 2 hours instead of days—characters that actually animate properly and won't tank your frame rate. Let's get started.Template
The Big Problem: Why AI-Generated Models Break in Game Engines
Let's be brutally honest about what happens when you import a raw AI 3D model for games into Unreal Engine. That gorgeous character you generated? It's probably riddled with issues that make it about as game-ready as a chocolate teapot.
Bad Topology: The Animation Killer
Topology is the underlying structure of your 3D model—think of it as the skeleton beneath the skin. Good topology follows natural muscle flow with clean edge loops. AI 3D model generators, however, typically produce what we call "blob mesh"—a chaotic mess of triangles that deforms like melting plastic when you try to animate it.
Here's what you're dealing with:
- Random triangle soup instead of organized quad-based geometry
- No edge loops around joints for proper deformation
- Poles and stars (vertices with 5+ edges) in critical animation areas
- Dense, uneven polygon distribution that wastes resources
Non-Manifold Geometry: The Invisible Destroyer
This technical term describes geometry that can't exist in the real world—and Unreal Engine hates it. Common issues include:
Performance Nightmares: When 2 Million Polygons Meet Reality
That detailed character from your image to 3D conversion? It probably has enough polygons to bring a PS5 to its knees. AI models routinely generate meshes with:
- 500,000 to 2 million polygons for a single character
- No LODs (Level of Detail variations)
- Unoptimized UV layouts waste texture space
- Baked lighting in textures that conflict with Unreal's dynamic lighting
A game-ready character should have 15,000-30,000 polygons for current-gen consoles. See the problem?
Pro Tip: How to Get a Cleaner Start with Tripo AI
Before we dive into fixing these issues, let's talk prevention. Not all AI 3D model generators are created equal. While most platforms prioritize speed over quality, some focus on creating cleaner, more production-ready meshes from the start.
When using advanced platforms like Tripo AI, you can leverage features designed specifically for game development:
Tripo Algorithm 3.0: Built for Real-World Use
The latest generation of AI algorithms (like Tripo's Algorithm 3.0, now in public beta) addresses many traditional problems:
Cleaner initial topology with better edge flow
Reduced non-manifold errors through improved generation logic
Optimized polygon distribution that's closer to game-ready specs
10-second generation with optional refinement for professional outputs
Smart Prompt Engineering for Better Results
Instead of typing "fantasy knight," try this approach:
"Low poly game character, medieval knight, T-pose, clean topology,
stylized proportions, PBR ready, front facing, symmetrical design"
The more specific your prompt, the better your starting point. Keywords like "game character," "clean topology," and "T-pose" signal the AI to generate with animation in mind.
Export Settings That Save Hours
When exporting from any AI 3D model generator:
- Choose FBX format for maximum compatibility
- Enable "Game Ready" presets if available
- Export at medium resolution first (you can always add detail later)
- Keep textures separate for easier PBR setup
Step-by-Step Tutorial: Creating Your Game-Ready AI Character
Now for the meat of this guide—we'll show you two paths: the smart way using Tripo Studio, and the traditional cleanup method for other AI 3D model generators.
The Smart Path: Using Tripo Studio (Recommended)
Why start with problems when you can avoid them? Tripo Studio offers an integrated workflow that eliminates most cleanup work.
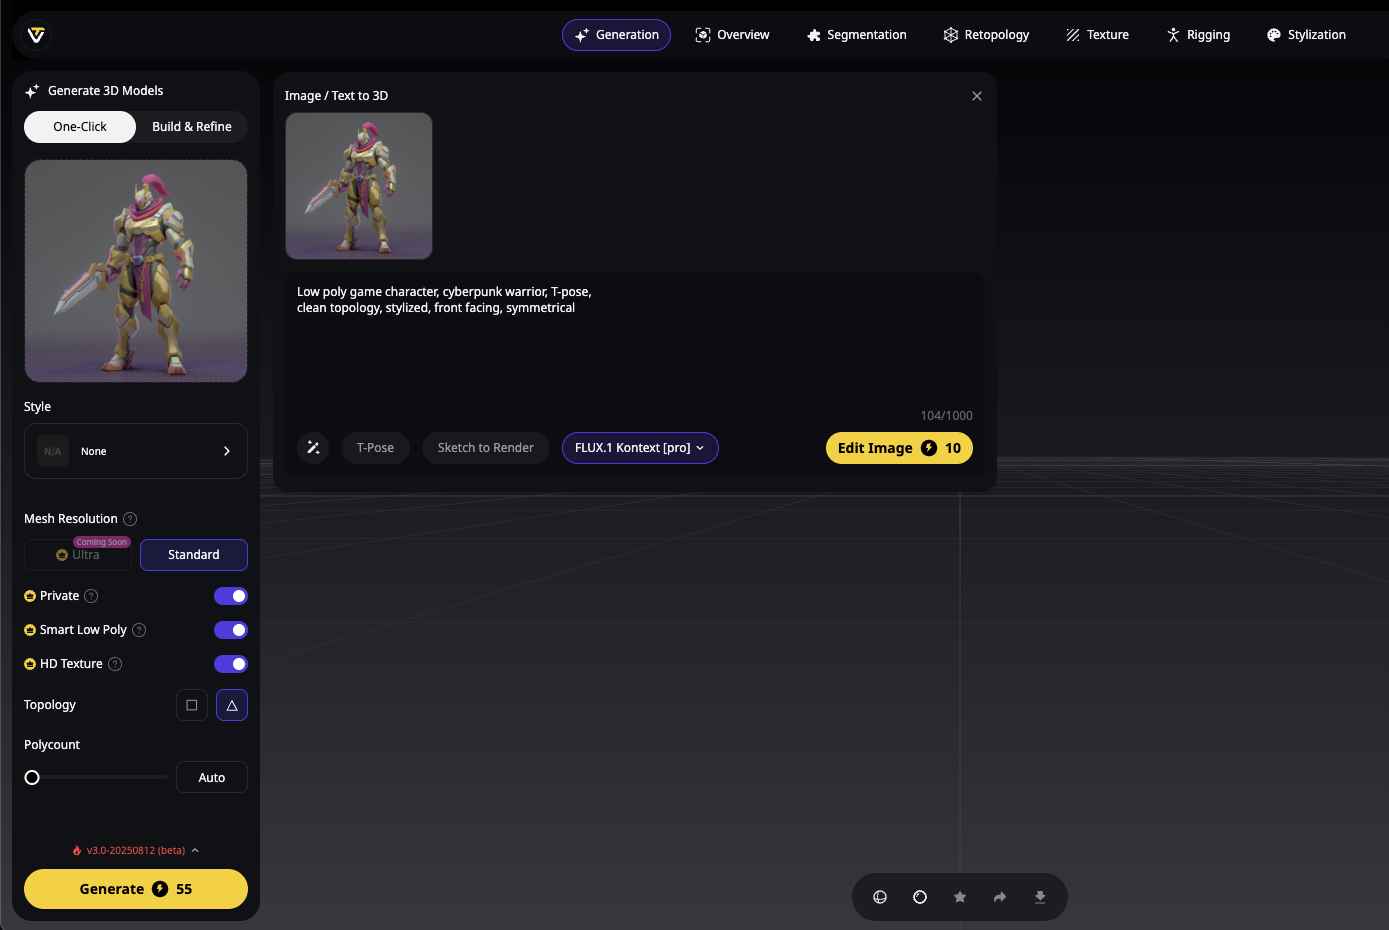
Step 1: Generate Your Character in Tripo Studio
- Open Tripo Studio at studio.tripo3d.ai/home
- Click "Text to 3D" in the workspace
- Enter a game-optimized prompt:
Low poly game character, cyberpunk warrior, T-pose,
clean topology, stylized, front facing, symmetrical
- Click Generate - Algorithm 3.0 creates your base model in 10 seconds
Step 2: Optimize with Smart Low Poly
This feature is a game-changer for an AI 3D model for games:
- Select your generated model in the workspace
- Click "Low Poly" in the editing toolbar
- Choose your polygon target:
- Mobile: 5,000-10,000 polygons
- PC/Console: 15,000-30,000 polygons
- High-end: 30,000-50,000 polygons
- Apply - Tripo intelligently reduces polygons while preserving shape and detail
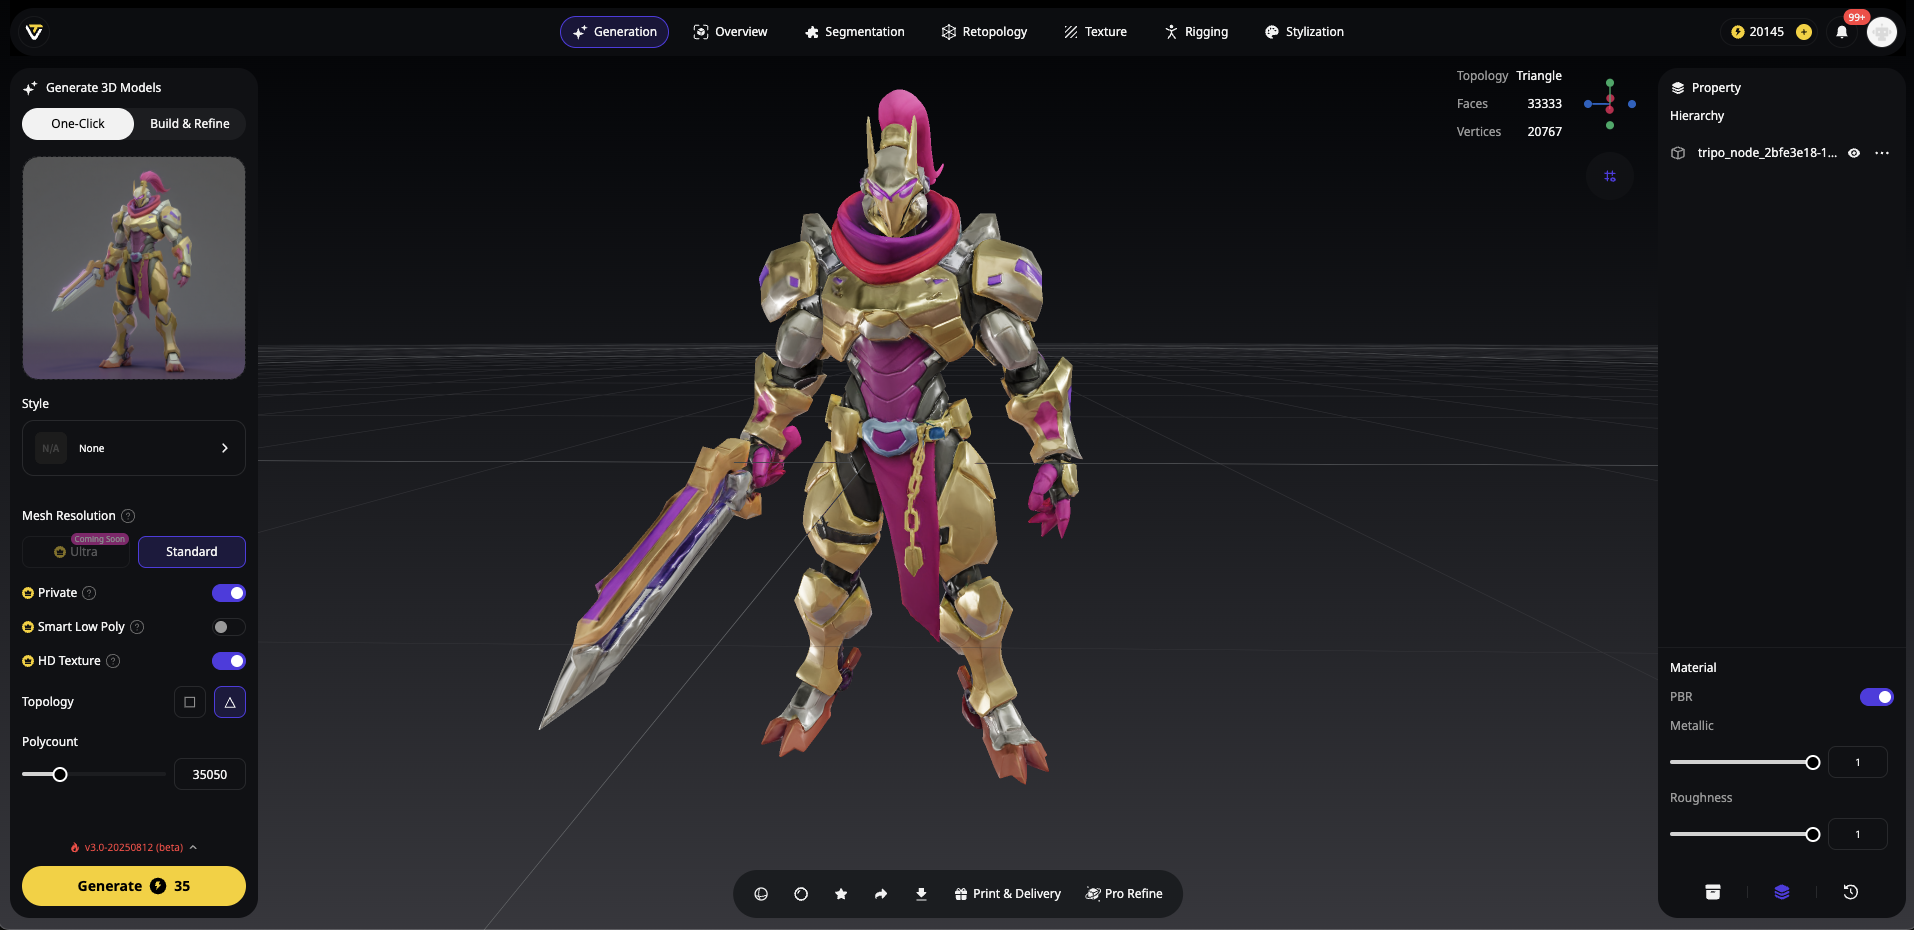
The Smart Low Poly feature maintains:
- Clean edge loops around joints
- Proper topology flow for animation
- UV preservation for texturing
Step 3: Quick Edits in Tripo Studio

Before rigging, make any needed adjustments:
- Use Magic Brush to modify textures
- Adjust pose if needed using the transform tools
- Check mesh integrity with the built-in viewer
- Preview in different lighting to ensure quality
Step 2: Auto-Rigging Your Character
The best part? If you're using Tripo Studio, you can rig your character without leaving the platform.
Option A: Rigging Directly in Tripo Studio (Fastest)
Skip the export-import hassle and auto rig 3D model Unreal compatible right in Tripo:
- Select your optimized model in the workspace
- Click the "Rig" button in the toolbar
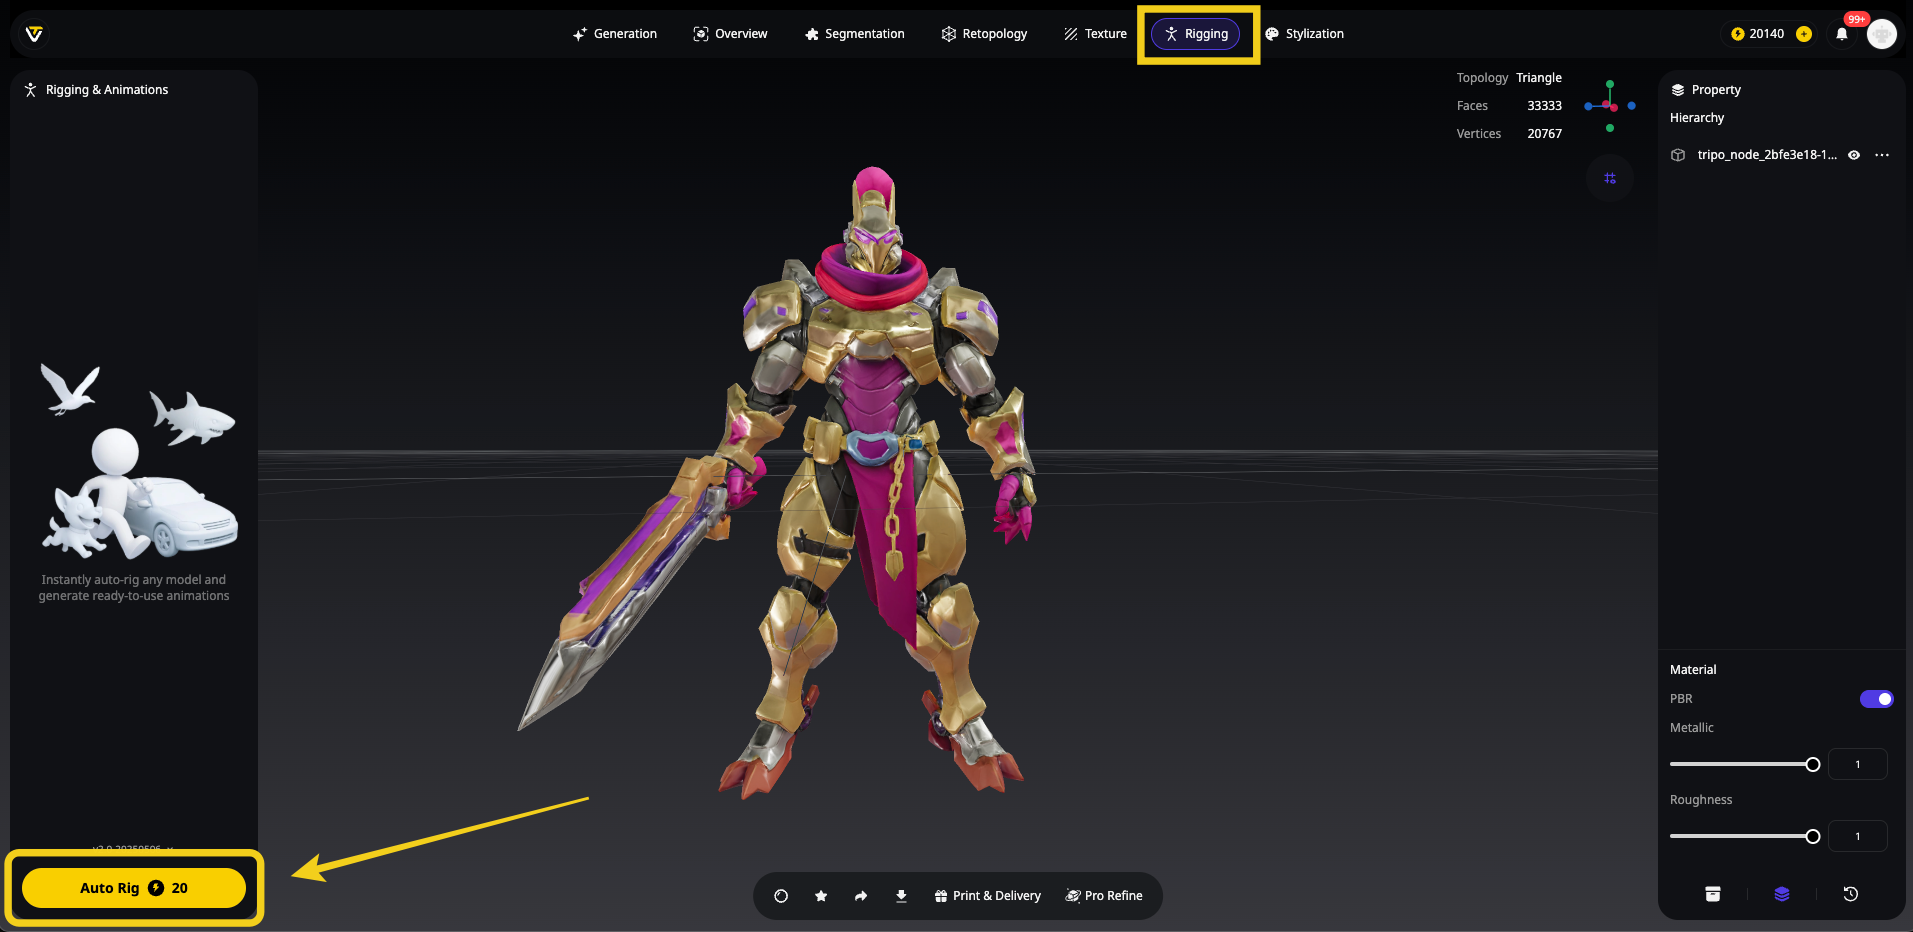
- Tripo's AI automatically:
- Places bones in optimal positions
- Calculates skin weights
- Sets up IK/FK controls
- Names bones for Unreal compatibility
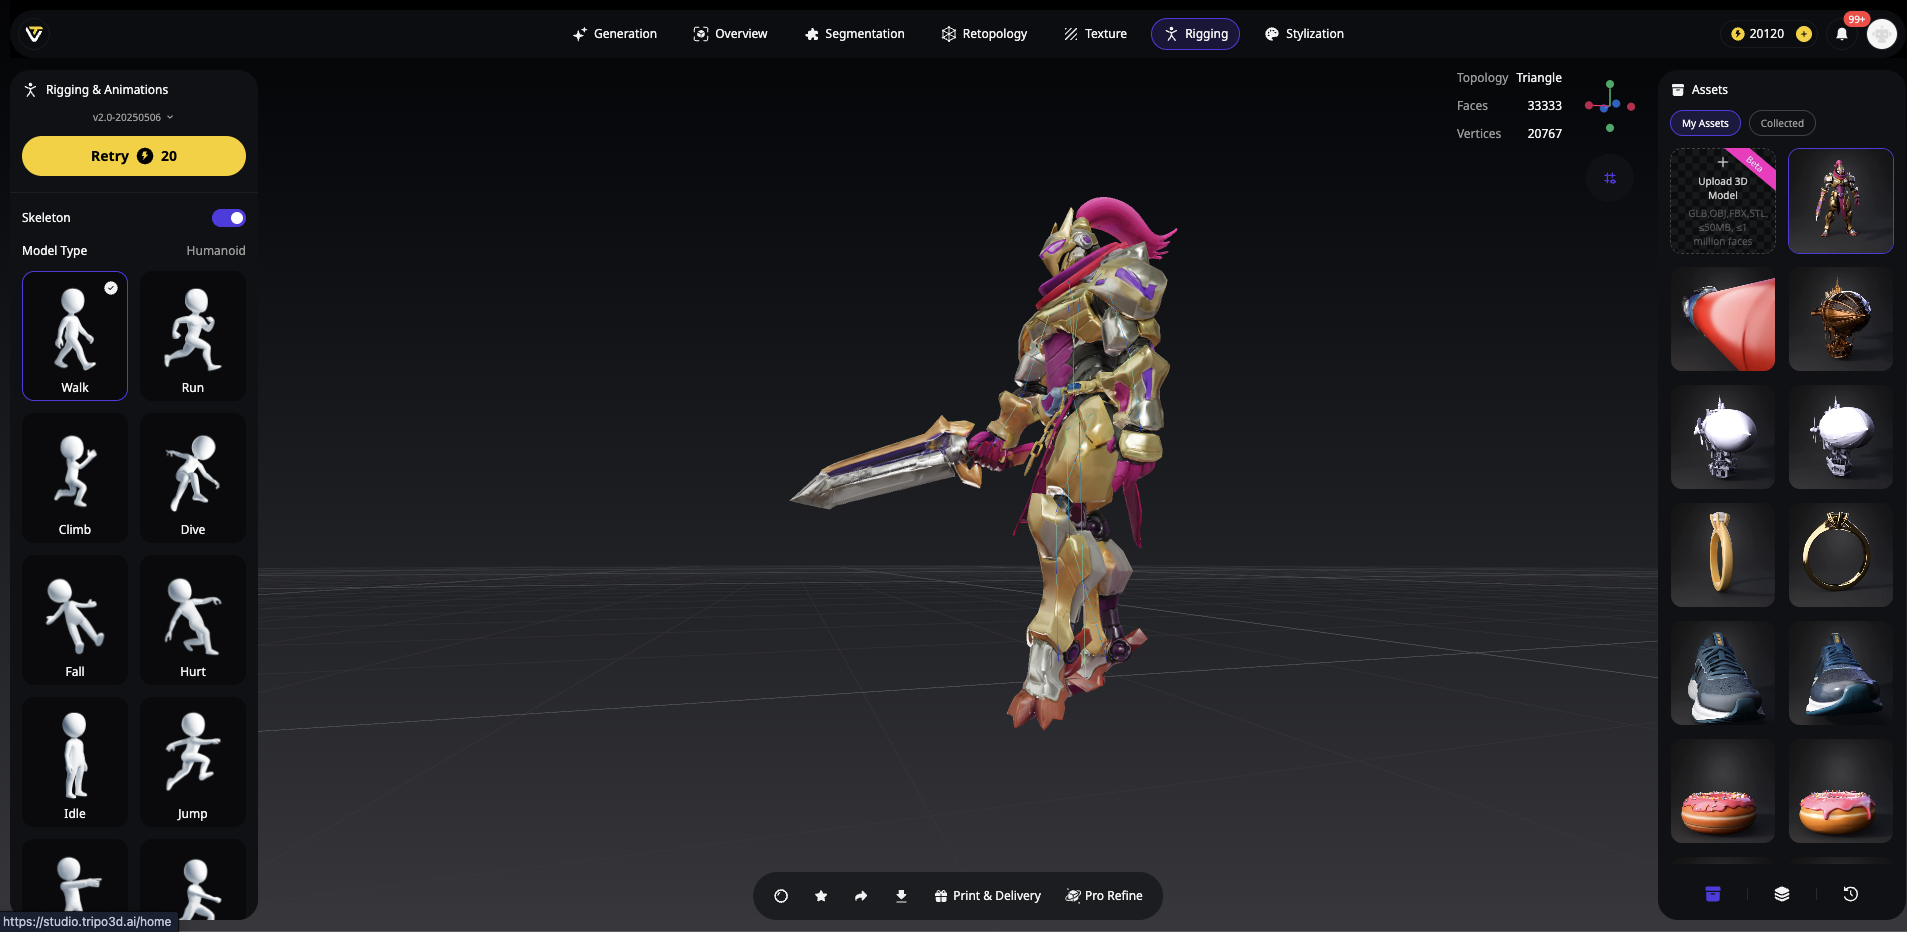
- Test with built-in animations to verify deformation
- Export as rigged FBX - ready for Unreal Engine
This integrated approach means:
- No quality loss from multiple exports
- Consistent bone naming for Unreal's mannequin
- Optimized skin weights for your specific topology
- 5-minute total process from model to rigged character
Option B: Using AccuRIG
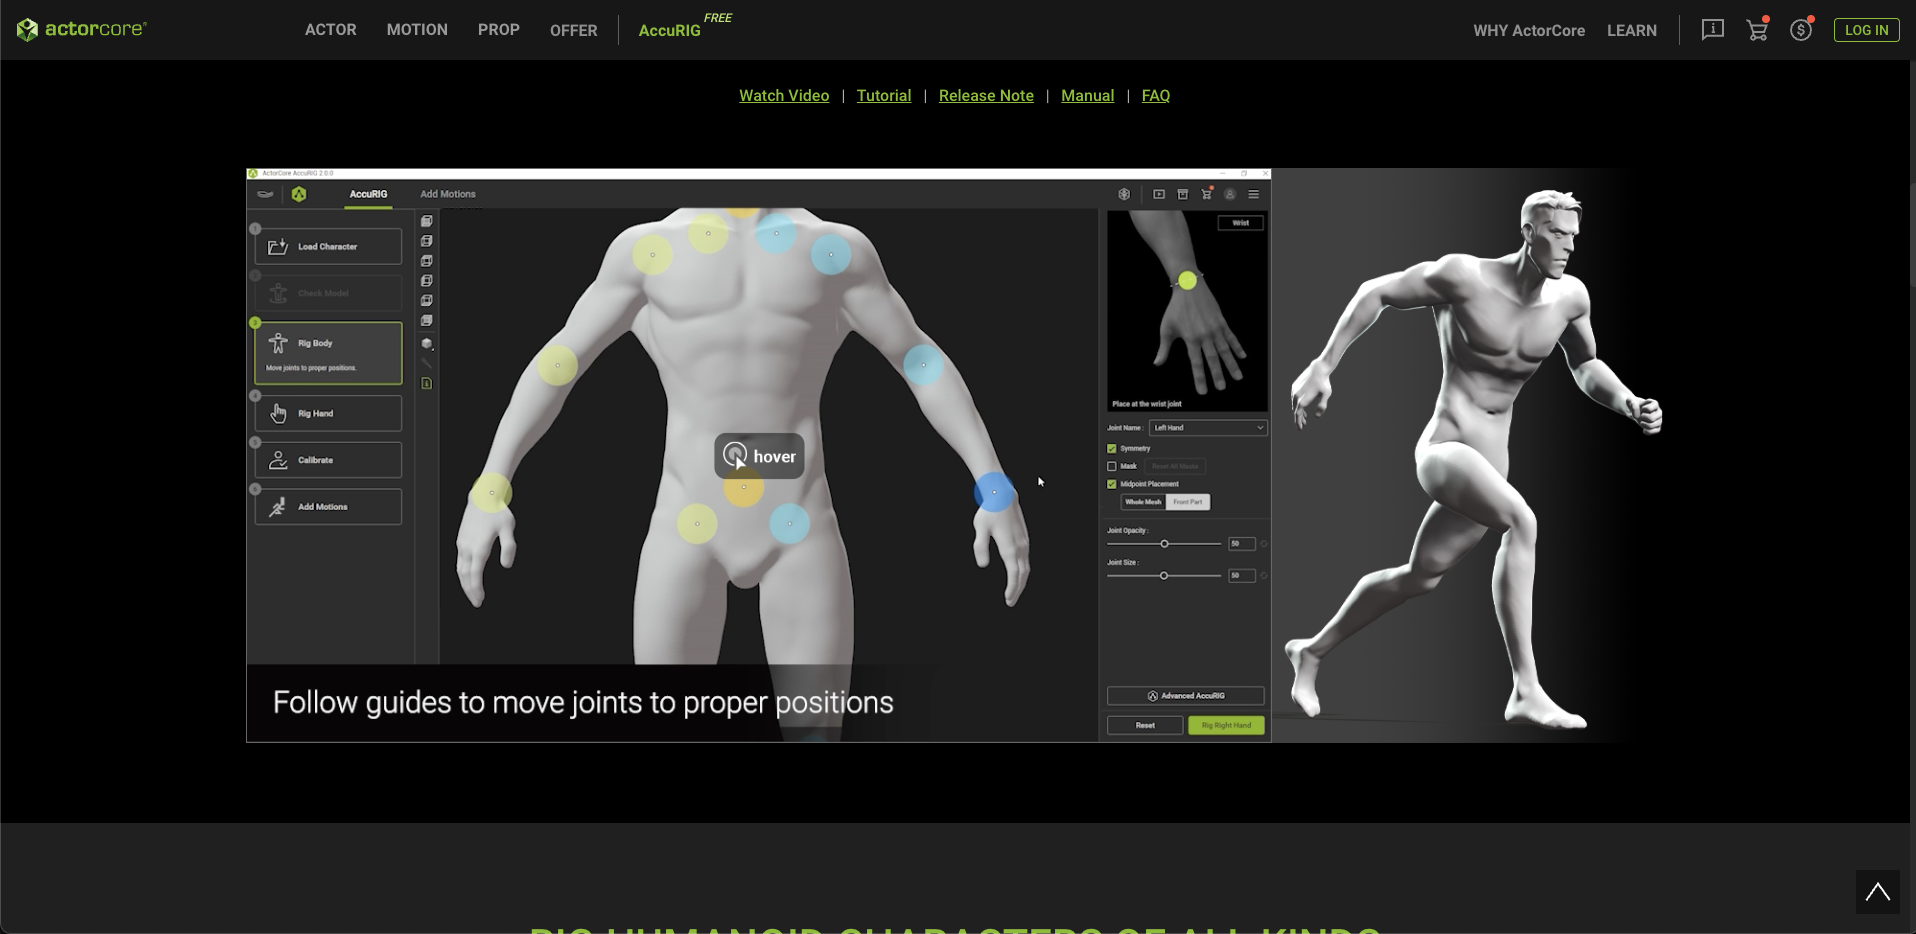
- If you're working with models from other AI 3D model generators:
- Export your cleaned model as FBX
- Upload to AccuRIG (web or standalone)
- Place 5 markers: chin, wrists, knees, groin
- Generate rig - AI creates full skeleton
- Export rigged FBX with Unreal-compatible bone names
Option C: Mixamo (Quick Alternative)
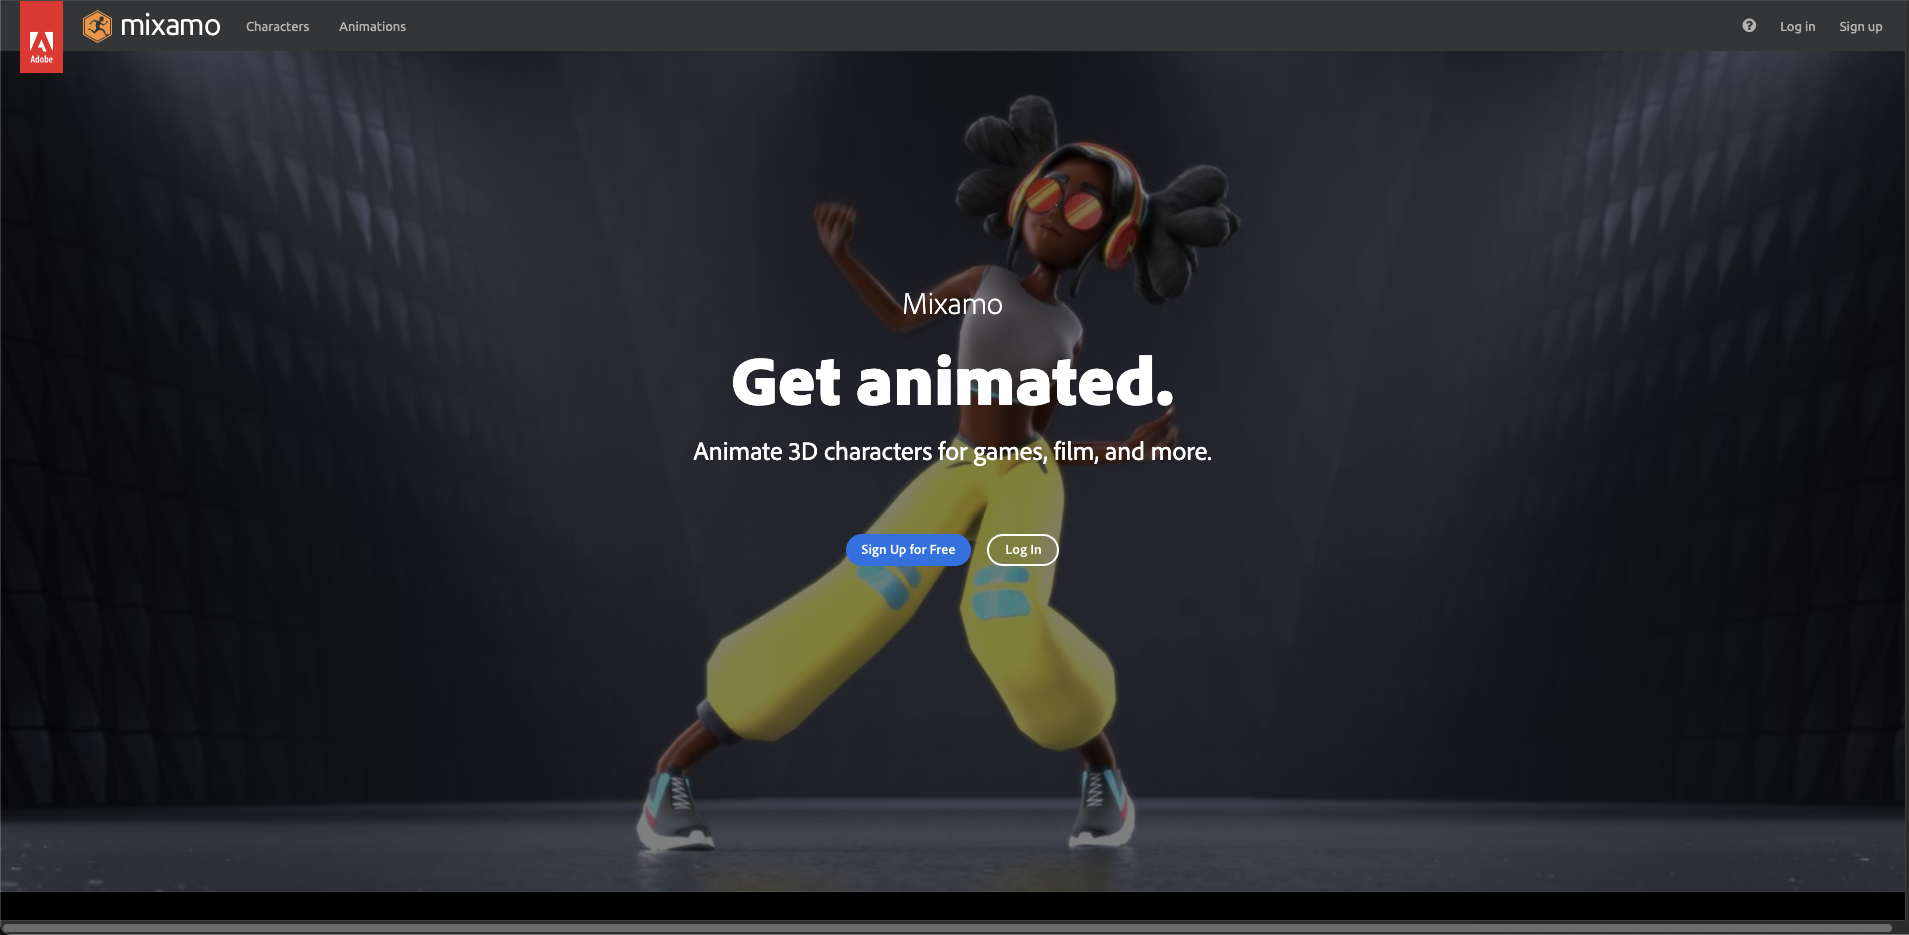
- For rapid prototyping:
- Upload to Mixamo.com
- Auto-rig in one click
- Preview animations
- Download with skin weights
Pro Tip: Why Tripo Studio Rigging is Superior
When you rig inside Tripo Studio, the system already knows your model's topology because it generated it. This means:
- Better weight painting - no weird deformations
- Proper joint placement - bones align with your mesh flow
- Instant compatibility - exports perfectly for Unreal Engine
- One-click process vs. multiple software jumps
The Traditional Path: Fixing Models from Other Generators
If you're using other AI 3D model generators or working with existing models, here's the cleanup workflow:
Step 1: Initial Mesh Cleanup in Blender
First, let's fix 3D model for Unreal Engine compatibility. Import your model into Blender and assess the damage.
Quick Diagnostics:
- Enable Statistics (Overlays dropdown → Statistics)
- Check for:
- Polygon count (aim for under 50k)
- Non-manifold edges (Edit mode → Select → Select All by Trait → Non Manifold)
- Multiple objects (should be single mesh)
The Essential Fixes:
For Holes and Gaps:
- Enter Edit Mode (Tab)
- Select hole edges (Alt+Click edge loop)
- Use Grid Fill (Face menu → Grid Fill) for clean topology
- Avoid simple Fill (F key) as it creates n-gons
For Non-Manifold Geometry:
- Enable 3D-Print Toolbox addon
- Run "Check All" to find issues
- Use "Make Manifold" cautiously (can be destructive)
- Manual cleanup often gives better results
For Proper Shading:
- Object Mode → Right-click → Shade Smooth
- Object Data Properties → Normals → Auto Smooth (30°)
- Mark hard edges manually for mechanical parts
Step 2: Importing into Unreal Engine 5
Now let's get your character—whether from Tripo Studio or cleaned manually—into Unreal Engine and game-ready.
Pre-Import Checklist
Before importing, ensure your FBX file has:
- ✓ Single mesh (not multiple objects)
- ✓ Proper scale (1 unit = 1cm for Unreal)
- ✓ Skeletal rig if animated
- ✓ Clean UVs (no overlapping)
- ✓ Textures exported separately
The Import Process
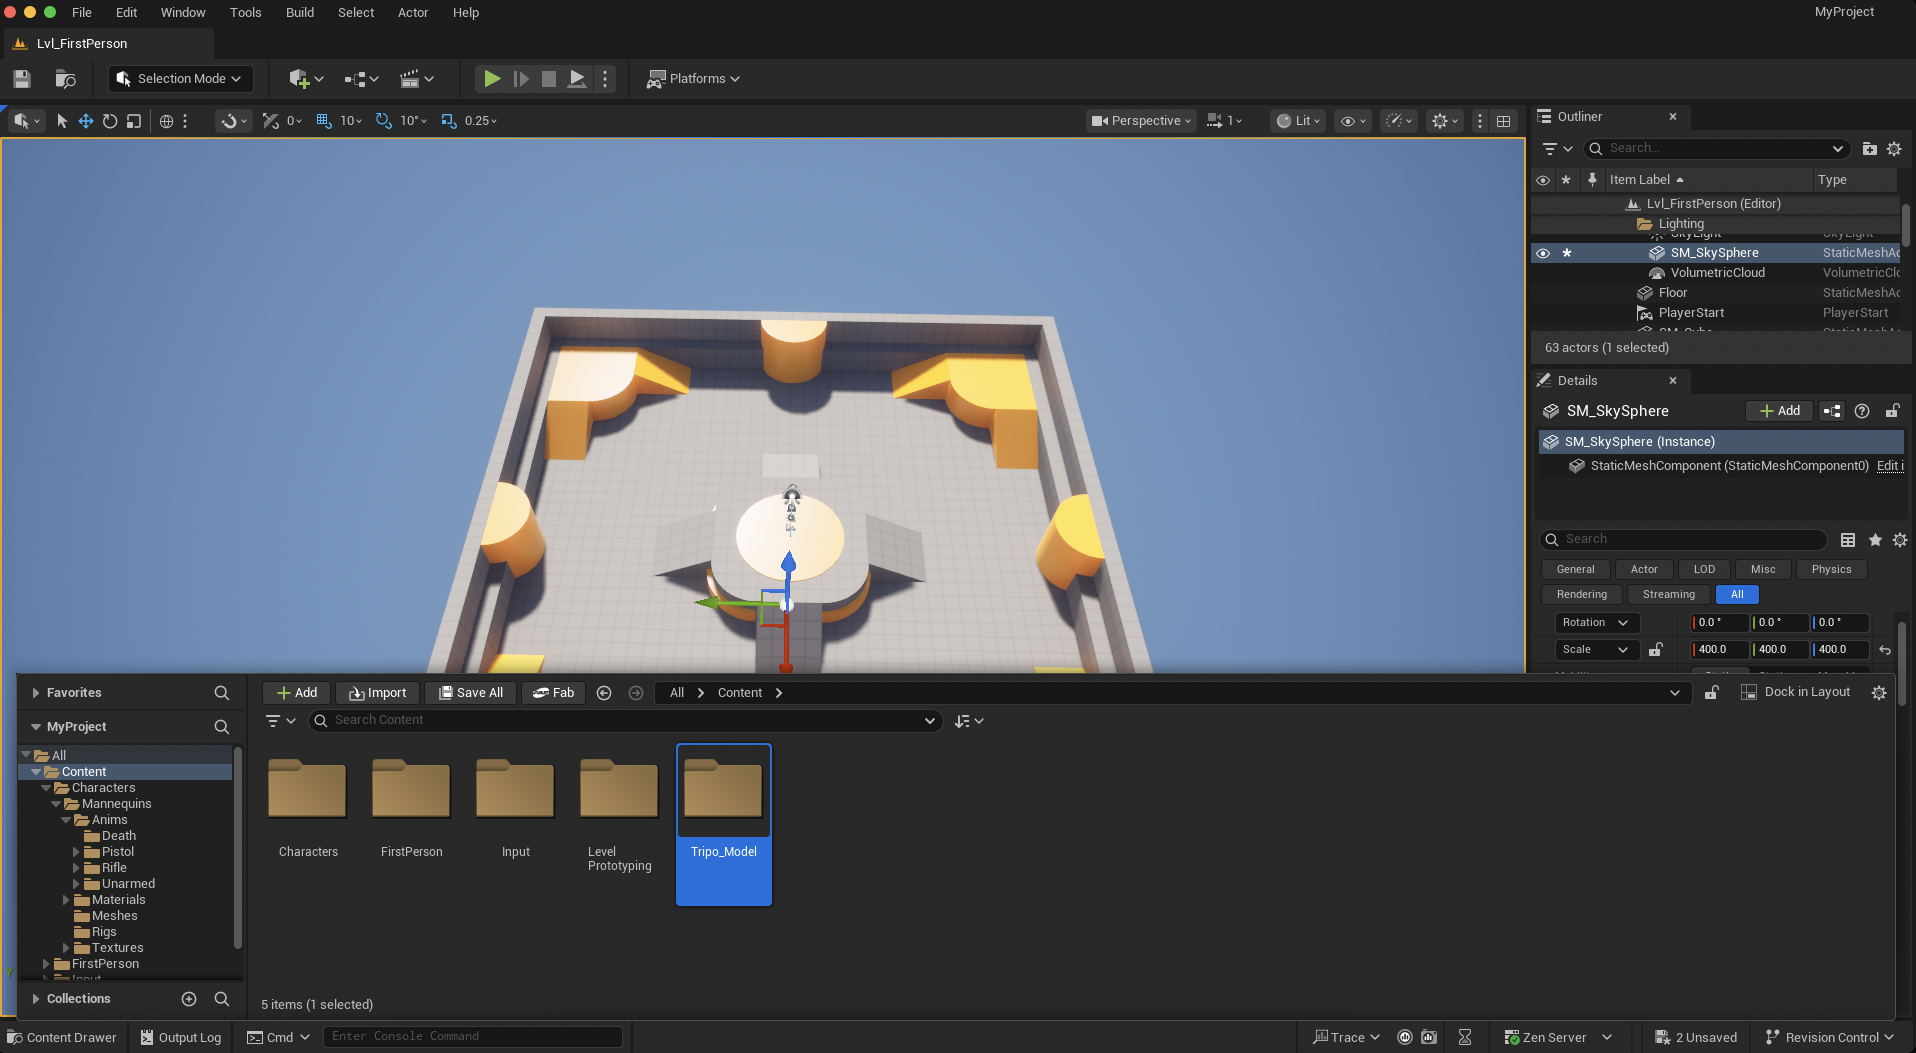
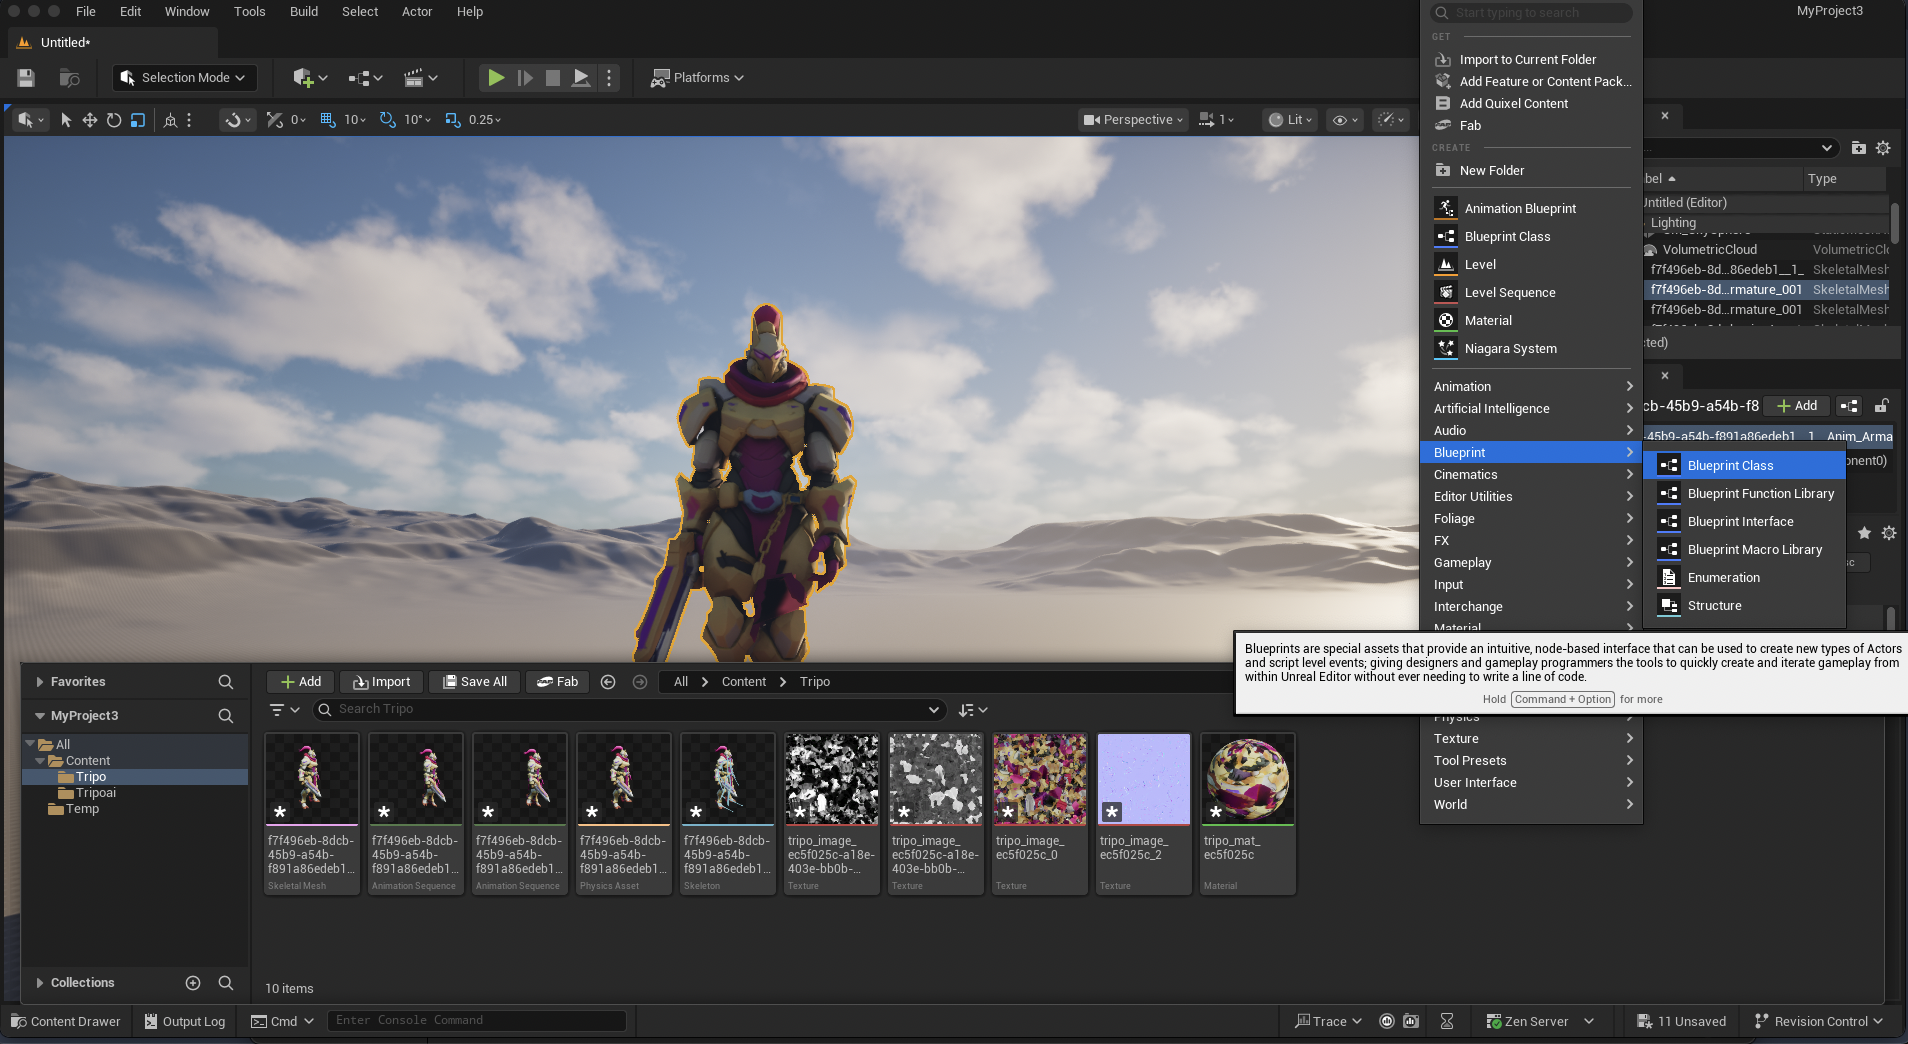
- Open your Unreal Project
- Navigate to Content Drawer (Ctrl+Space if hidden)
- Create a folder
- Drag your FBX into the Meshes folder
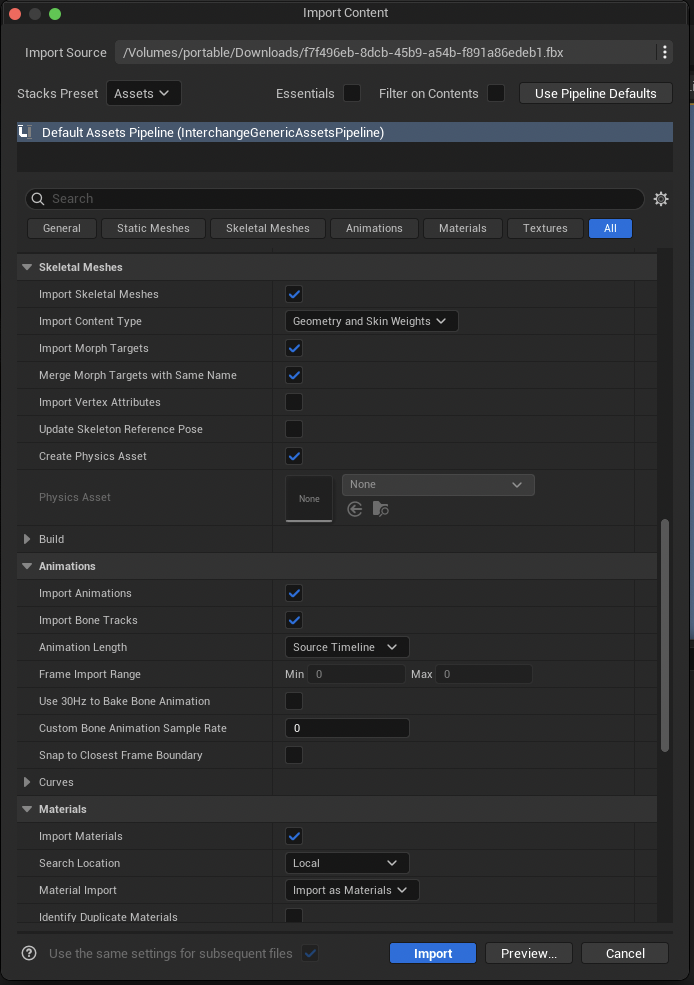
Critical Import Settings
The import dialog is where most issues happen. Here's what matters:
Setting Up Materials Properly
After importing, your materials need a proper setup:
- Import textures to the Textures folder
- Open each Material Instance
- Connect textures correctly:
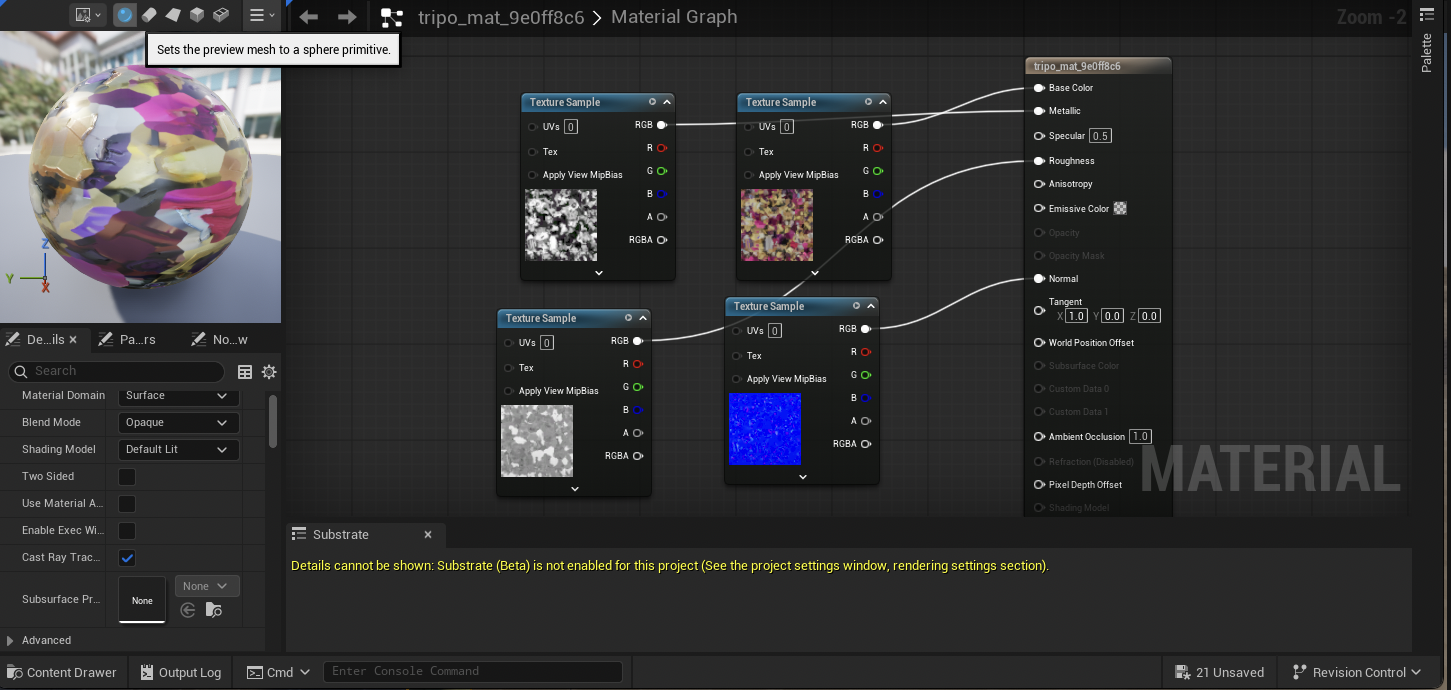
Pro Tip: If you have an ORM texture (Occlusion, Roughness, Metallic packed):
- Set to "Masks" compression
- Use a "BreakOutFloat3Components" node
- Connect R→AO, G→Roughness, B→Metallic
Creating a Character Blueprint
To make your character playable:
- Right-click in Content Drawer → Blueprint Class → Character
- Name it BP_YourCharacterName
- Open the Blueprint
- In the Components panel:
Select Mesh component
Set "Skeletal Mesh" to your imported character
Adjust the capsule to fit
- Compile and Save
Advanced Optimization for Production
Getting it working is step one. Making it performant is where professionals separate from hobbyists.
LOD Generation
Your detailed character needs Level-of-Detail variations:
- Select your Skeletal Mesh
- Open in Mesh Editor
- LOD Settings → Generate LODs
- Configure:
LOD0: Full detail (your import)
LOD1: 50% reduction
LOD2: 75% reduction
LOD3: 90% reduction (distant view)
- Set screen size for each LOD transition
Texture Optimization
For mobile or performance-critical games:
- Reduce texture sizes:
Diffuse: 2048x2048 max
Normal: 1024x1024 often sufficient
Others: 512x512 for roughness/metallic
- Use texture atlasing for multiple characters
- Enable texture streaming
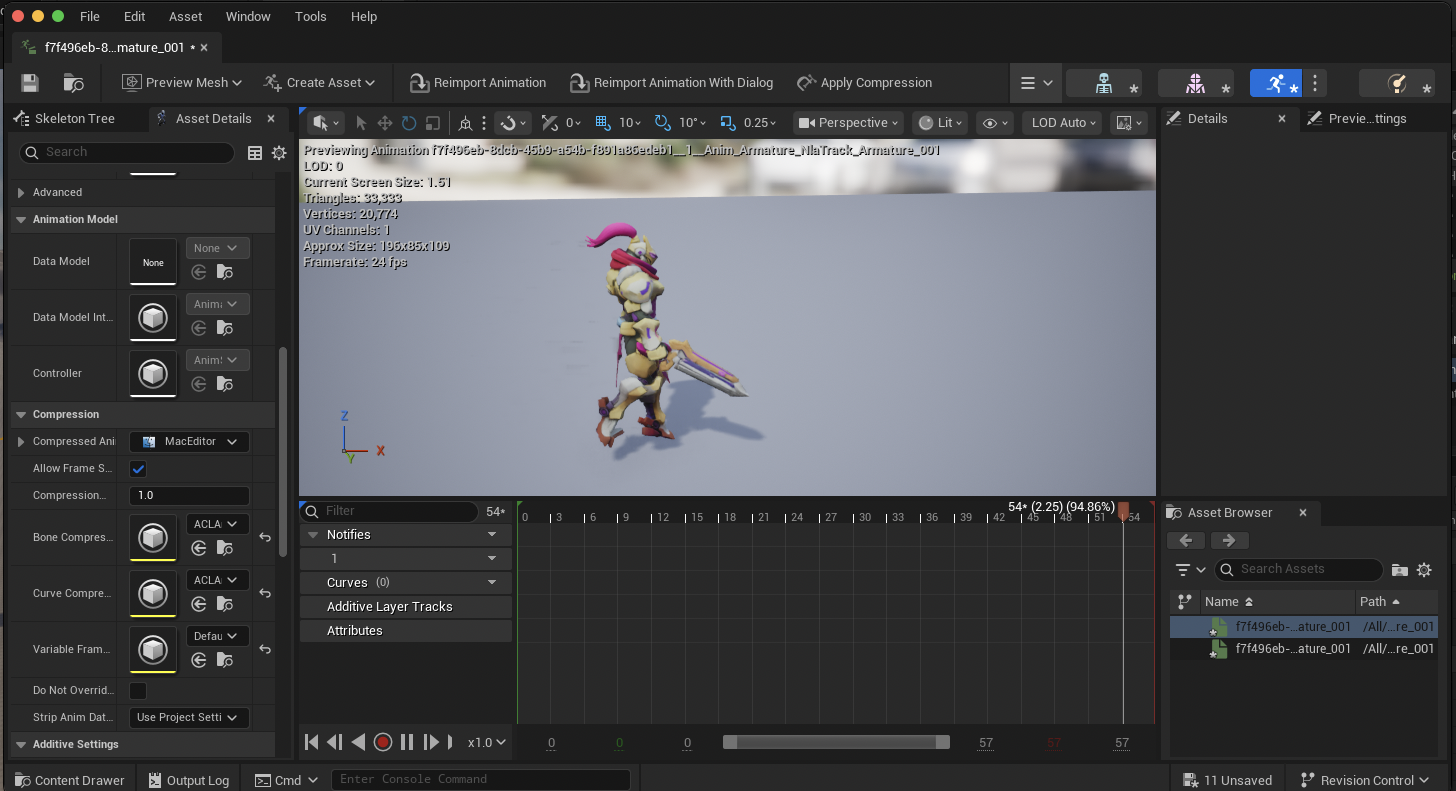
Animation Blueprint Setup
To use Unreal's animation system:
- Create Animation Blueprint
- Set up State Machine:
Idle state
Walk/Run blend
Jump states
- For retargeting: Use IK Rig system to map to Unreal skeleton
Testing Your Character
Before calling it done:
- Place in level and check scale
- Test all animations if rigged
- Check performance with Stat FPS
- Verify in different lighting conditions
- Test on target platform (mobile, console, etc.)
With this workflow, your prompt to 3D character Unreal Engine pipeline is complete—from AI generation to a fully functional game asset!
Conclusion: The Future of AI in Your Game Dev Workflow
We've covered the complete journey from prompt to 3D character Unreal Engine integration. Yes, it requires work beyond the initial generation, but here's the key insight: even with cleanup, you're still 10x faster than traditional modeling.
The AI 3D model generator landscape is evolving rapidly. Tools like Tripo AI with Algorithm 3.0 are already addressing many pain points we've discussed. As these platforms mature, expect:
- Better initial topology requiring less cleanup
- Built-in rigging during generation
- Direct engine export with proper optimization
- Style-consistent asset libraries for complete games
The question isn't whether to use AI in your game development—96% of studios already are. The question is how to use it effectively. Master this workflow, and you'll be creating characters in hours instead of weeks.
Ready to revolutionize your character pipeline? Start with Tripo AI's latest Algorithm 3.0 beta and experience the difference clean topology makes. Your future self (and your framerate) will thank you.
Frequently Asked Questions
Q: Can you use AI models in commercial games?
- A: Yes, most AI 3D model generators grant commercial usage rights, but always check the specific platform's license. Tripo AI, for example, allows full commercial use of generated assets.
Q: Is AI-generated topology good for animation?
- A: Raw AI topology typically needs work, but newer algorithms are improving rapidly. With the cleanup workflow in this guide, you can achieve professional animation-ready results.
Q: How do you clean up an AI 3D model?
- A: Use Blender's mesh cleanup tools: Grid Fill for holes, 3D-Print Toolbox for non-manifold geometry, and proper smoothing groups. The full process takes 30-60 minutes for most characters.
Q: What is the best AI for 3D characters?
- A: For game-ready characters, look for AI 3D model generators that prioritize clean topology and proper UV mapping. Platforms focusing on "image to 3D" conversion with game development features tend to produce better results.
Q: Why does my AI model look broken in Unreal?
- A: Common causes: non-manifold geometry, inverted normals, wrong scale, or missing smoothing groups. Follow our cleanup workflow to fix 3D model for Unreal Engine compatibility.
Q: How long does the entire process take?
- A: From prompt to playable character: 10 seconds for generation, 30-60 minutes for cleanup, 5 minutes for auto-rigging, 10 minutes for Unreal setup. Total: under 2 hours for a production-ready character.
Advancing 3D generation to new heights
moving at the speed of creativity, achieving the depths of imagination.
 Text & Image to 3D models
 Free Credits Monthly
 High-Fidelity Detail Preservation