How to Turn an Image Into a 3D Model: A Step-by-Step Guide
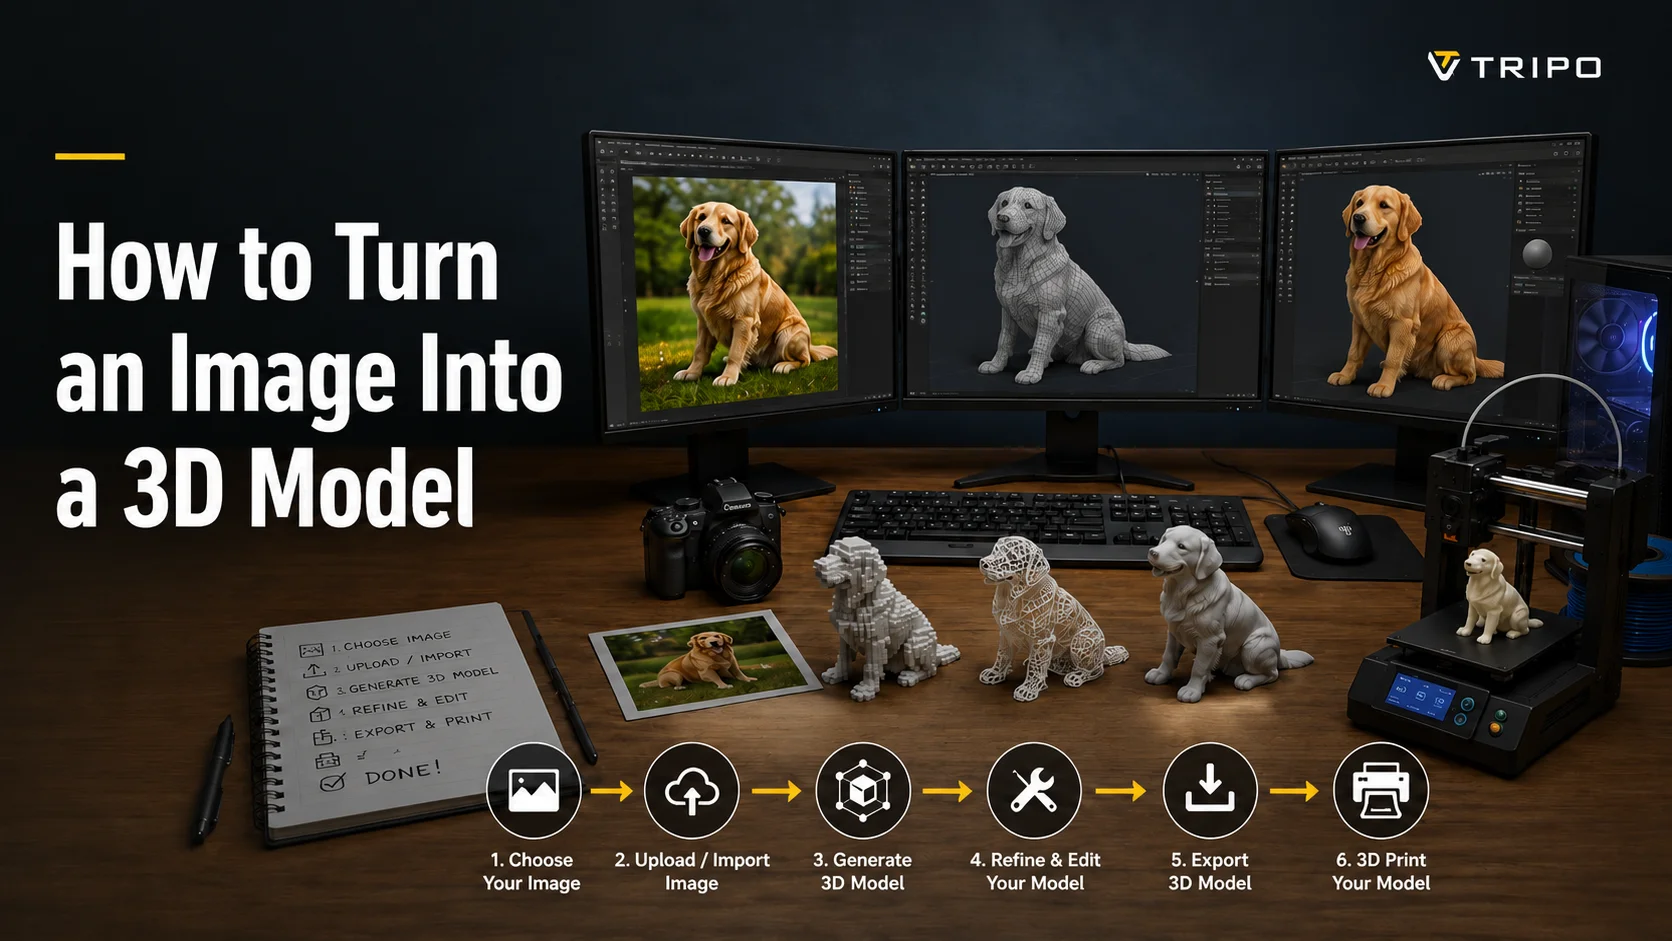
To turn an image into a 3D model, the fastest way is an AI image-to-3D tool: upload your photo, let the AI estimate the shape and texture, then download a 3D file in minutes. Other routes—heightmap extrusion, photogrammetry, and manual modeling—suit different goals. This guide walks through all four and gives you a simple step-by-step workflow.
TL;DR
- There are 4 ways to turn an image into a 3D model: AI generators (fastest), heightmap/extrusion (best for flat logos & prints), photogrammetry (best for exact replicas from many photos), and manual modeling (most control).
- For a single photo, an AI image-to-3D tool is the quickest path—upload, generate, download in minutes.
- Use multi-view (2–4 photos) when you need accurate backsides and proportions.
- Clean input wins: one centered subject, even lighting, plain background.
- Export to GLB/FBX/OBJ for engines, or STL/3MF for 3D printing—then clean up the mesh before use.
Can You Really Turn an Image Into a 3D Model?
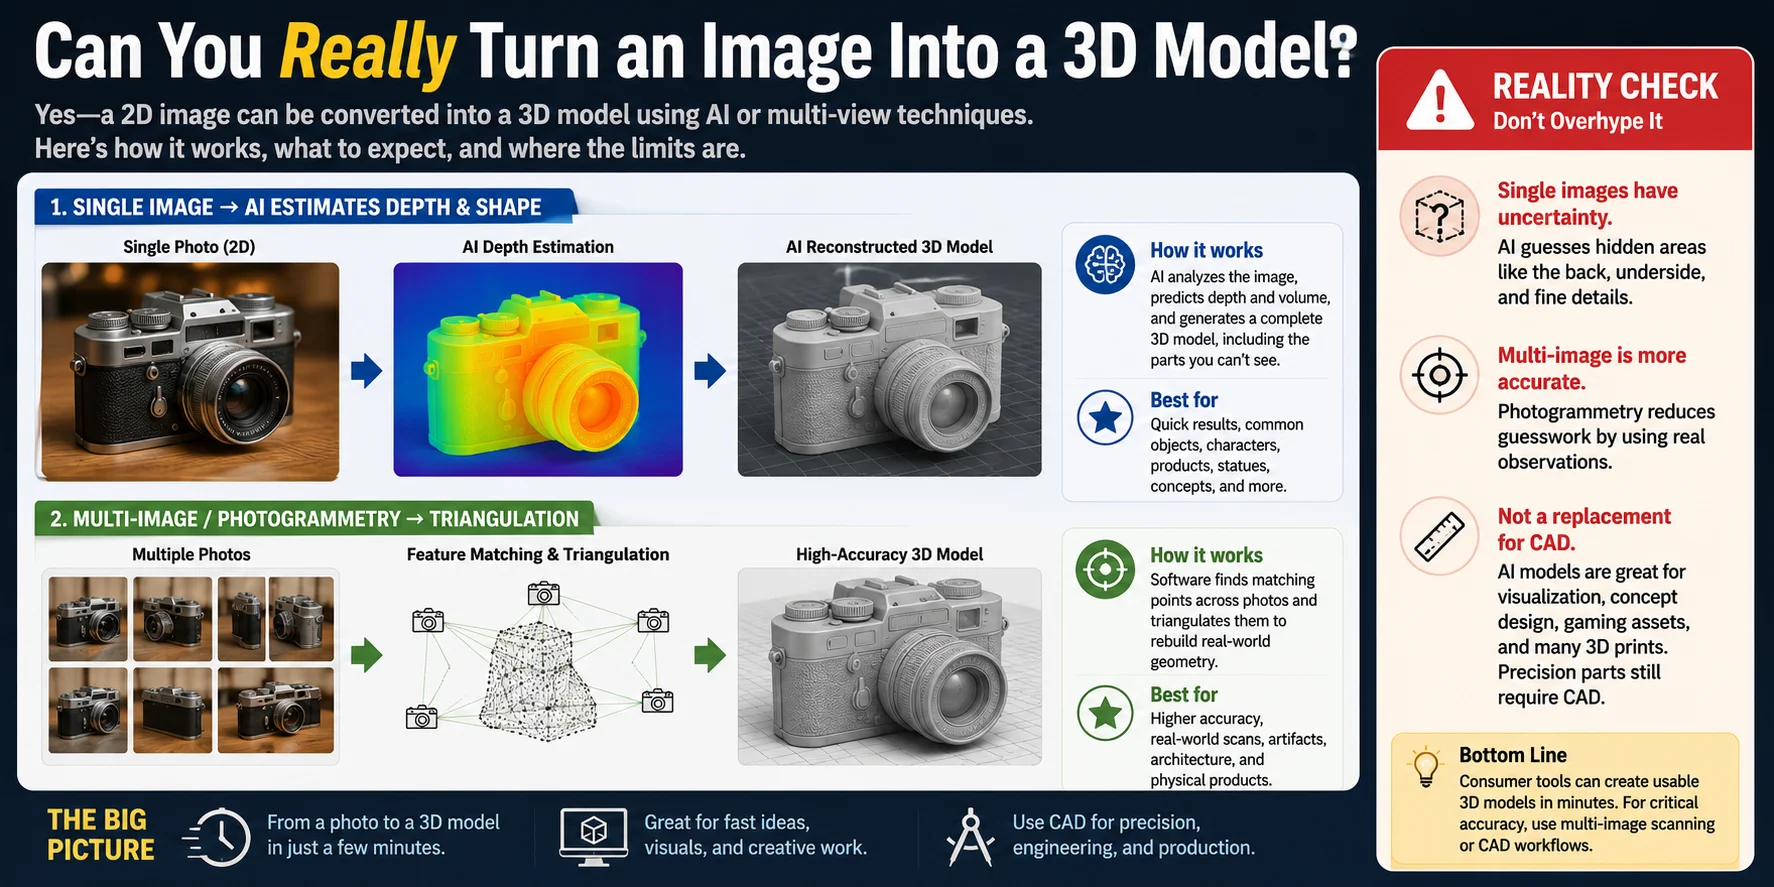
Yes—you can turn a 2D image into a 3D model, and modern AI tools have made the process much easier than it was a few years ago. Depending on the workflow, software can either estimate depth and volume from a single image or reconstruct geometry from multiple photos taken from different angles. This means a simple photo can often become a usable 3D model in just a few minutes.
When using a single image, AI must infer parts of the object that are not visible, such as the back, underside, or hidden details. By analyzing shape, lighting, and patterns learned from large datasets, the AI generates a complete 3D representation. The results can be surprisingly good, especially for common objects, characters, products, and statues, but there is always some uncertainty because the missing areas are essentially educated guesses.
For higher accuracy, multi-image reconstruction—often called photogrammetry—uses several photos captured from different viewpoints. The software triangulates matching points across the images to calculate real-world geometry, producing a model that is usually more faithful to the original object. This approach is commonly used for scanning artifacts, architecture, and physical products.
The key expectation to set is that consumer-grade tools can generate useful 3D models quickly, but they are not a replacement for professional CAD workflows. AI-generated models are excellent for visualization, concept design, gaming assets, and many 3D-printing projects, while precision engineering parts still require dedicated CAD software and manual design work.
Reality Check: A single photo can produce an impressive 3D model, but the AI cannot truly "see" hidden surfaces. If accuracy is critical, use multiple photos or a CAD-based workflow instead.
The 4 Ways to Turn an Image Into a 3D Model
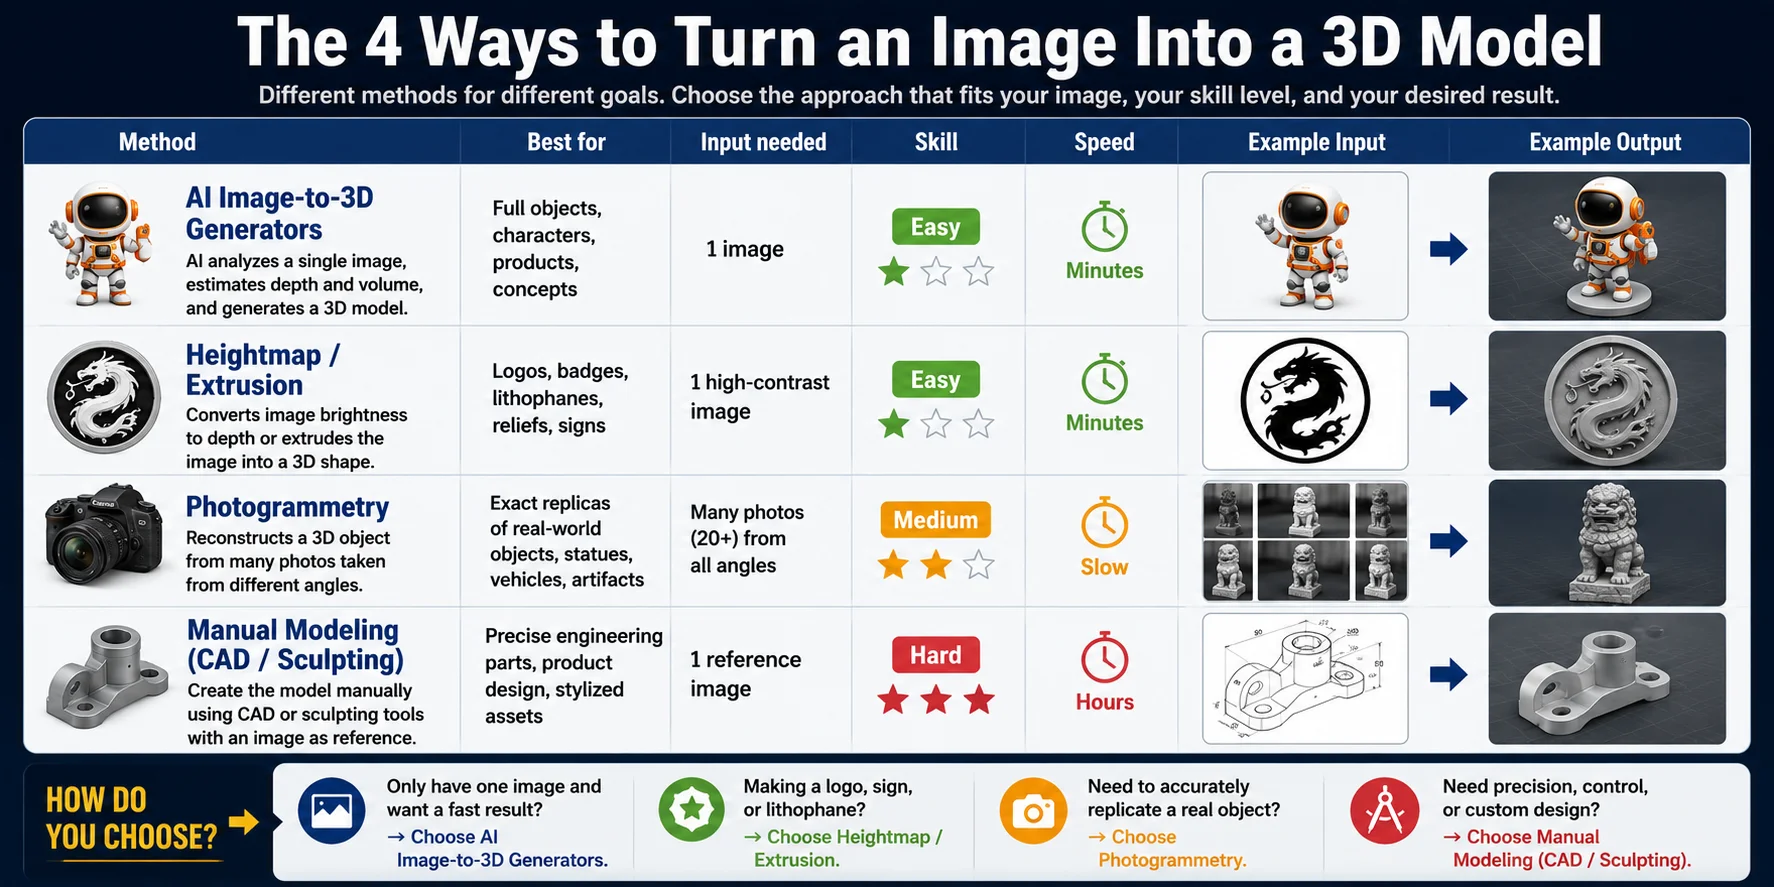
There isn't just one way to convert an image into a 3D model. The best method depends on what you're trying to create: a printable logo, a realistic scan of a physical object, a stylized game asset, or a fully generated 3D character. Some workflows rely on AI, while others use geometric reconstruction or traditional modeling techniques.
1. AI Image-to-3D Generators
This is currently the fastest and most beginner-friendly option. Modern AI tools can analyze a single image, estimate depth and volume, and generate a complete 3D model in minutes.
Best for:
- Characters
- Toys and figurines
- Consumer products
- Concept designs
- Creative projects
The biggest advantage is speed. You can often go from a photo to a usable 3D model without learning CAD or 3D modeling software. However, because the AI must guess hidden surfaces, results may not always be perfectly accurate.
2. Heightmap and Extrusion Workflows
If your image is mostly flat—such as a logo, icon, line drawing, or black-and-white graphic—a heightmap or extrusion workflow is often the easiest solution. The software converts brightness values into depth or simply extrudes the image into a solid shape.
Best for:
- Company logos
- Nameplates
- Lithophanes
- Relief artwork
- Signs and badges
Because the geometry is relatively simple, models can often be generated and printed within minutes.
3. Photogrammetry
Photogrammetry reconstructs a 3D object using many photographs captured from different angles. The software identifies matching points across images and triangulates them to rebuild the object's geometry.
Best for:
- Real-world objects
- Statues and artifacts
- Vehicles and architecture
- Reverse engineering reference models
4. Manual Modeling (CAD or Sculpting)
Manual modeling remains the most flexible approach. Using CAD software or sculpting tools, artists and engineers create the model directly while using an image as a visual reference.
Best for:
- Mechanical parts
- Product design
- Stylized characters
- Professional game assets
- Precision manufacturing
How Do You Choose?
If you only have a single image and want the fastest result, choose an AI image-to-3D generator. If you're creating a printable logo, sign, or lithophane, a heightmap or extrusion workflow is usually the simplest option. If your goal is to accurately reproduce a real object, photogrammetry is often the best choice, while CAD and sculpting tools remain the standard for precision design and professional-quality assets.
Method 1 — Use an AI Image-to-3D Generator (Step by Step)
For most people, the fastest way to turn an image into a 3D model is with an AI image-to-3D generator. Instead of manually modeling the object or capturing dozens of photos for photogrammetry, AI can analyze one or more images and generate a complete 3D mesh in minutes.
Modern tools are capable of reconstructing objects, characters, products, toys, and many other subjects from a single photo. While the results are not always perfect, they are often good enough for visualization, game assets, concept work, and even 3D printing.
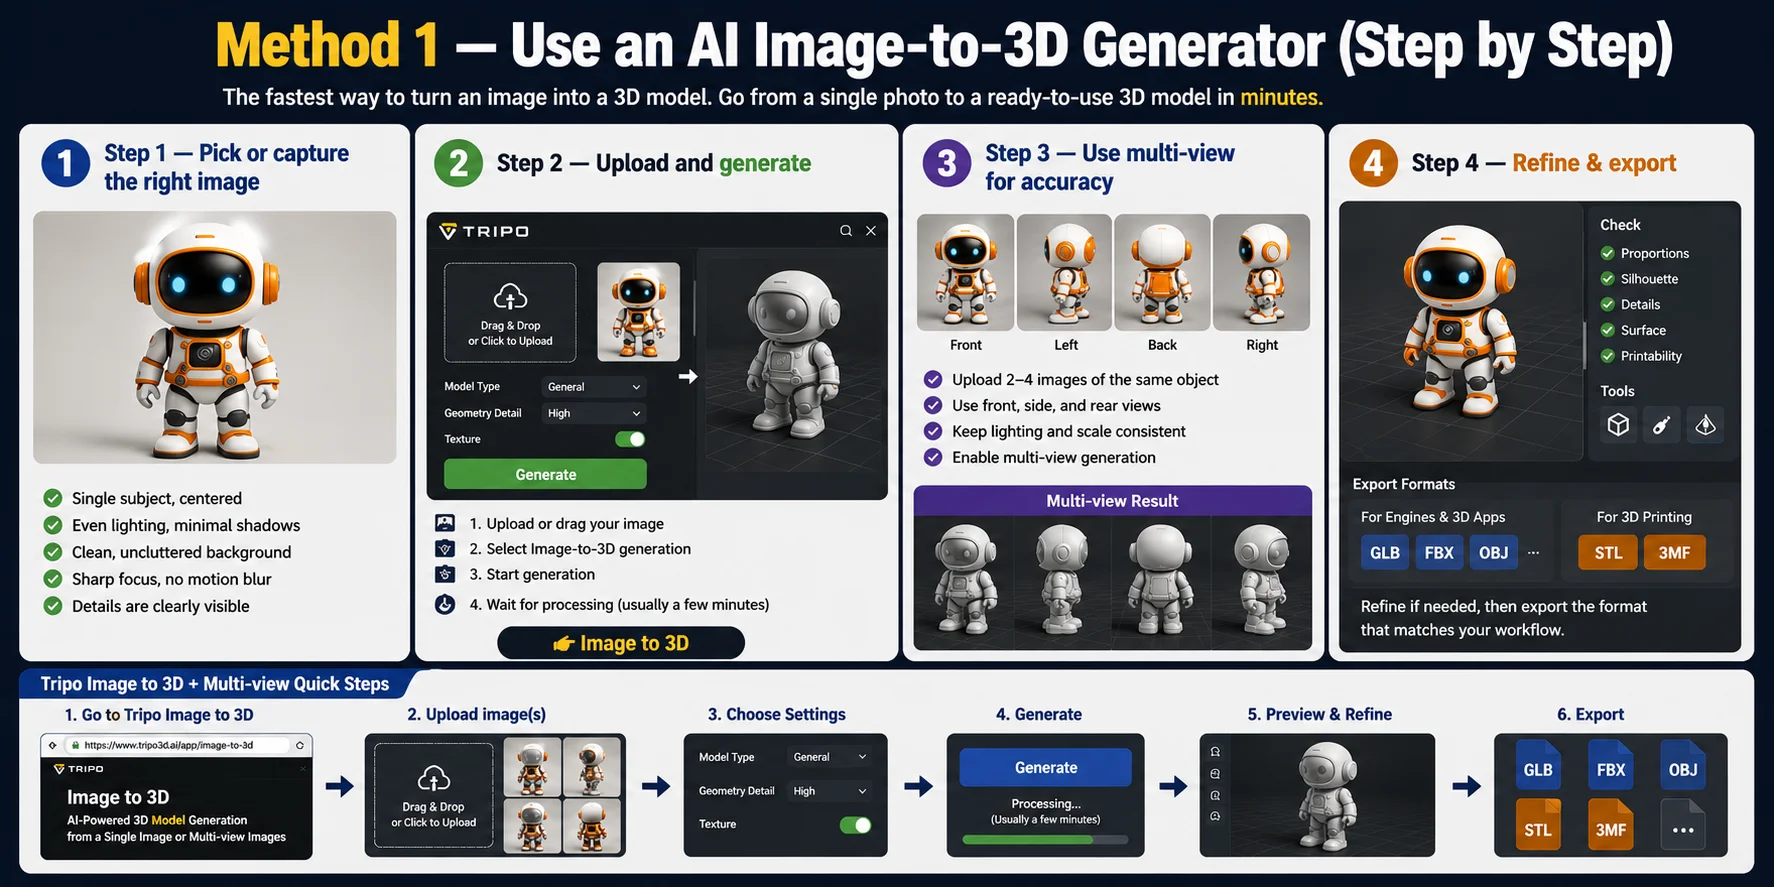
Step 1 — Pick or Capture the Right Image
The quality of the input image has a major impact on the final model.
For best results:
- Use a single, clearly visible subject
- Keep the object centered in the frame
- Use even lighting with minimal shadows
- Avoid motion blur
- Choose a clean, uncluttered background
- Make sure important details are visible
A sharp, well-lit image gives the AI more information to work with and usually leads to better geometry reconstruction.
Step 2 — Upload and Generate
Once your image is ready, upload it to an AI image-to-3D tool such as Tripo Image to 3D.
The typical workflow is:
- Upload or drag your image into the workspace
- Select the image-to-3D generation option
- Start generation
- Wait for processing to complete
In most cases, the AI analyzes the image, estimates depth and volume, reconstructs hidden surfaces, and generates a complete 3D model within a few minutes.
Step 3 — Use Multi-View for Better Accuracy
If you have additional images, use them. A single image only shows one side of an object, so the AI must guess what the hidden areas look like. Multi-view generation reduces that uncertainty.
Typical workflow:
- Upload 2–4 images of the same object
- Use front, side, and rear views when possible
- Ensure lighting and scale remain consistent across images
- Enable multi-view generation
Step 4 — Refine and Export
After generation, inspect the model carefully before exporting. Check overall proportions, silhouette accuracy, missing details, and surface artifacts.
When you're satisfied with the result, export in the format that matches your workflow:
- GLB, FBX, or OBJ for game engines and 3D applications
- STL or 3MF for 3D printing
Method 2 — Heightmap & Extrusion (Best for Logos and 3D Printing)
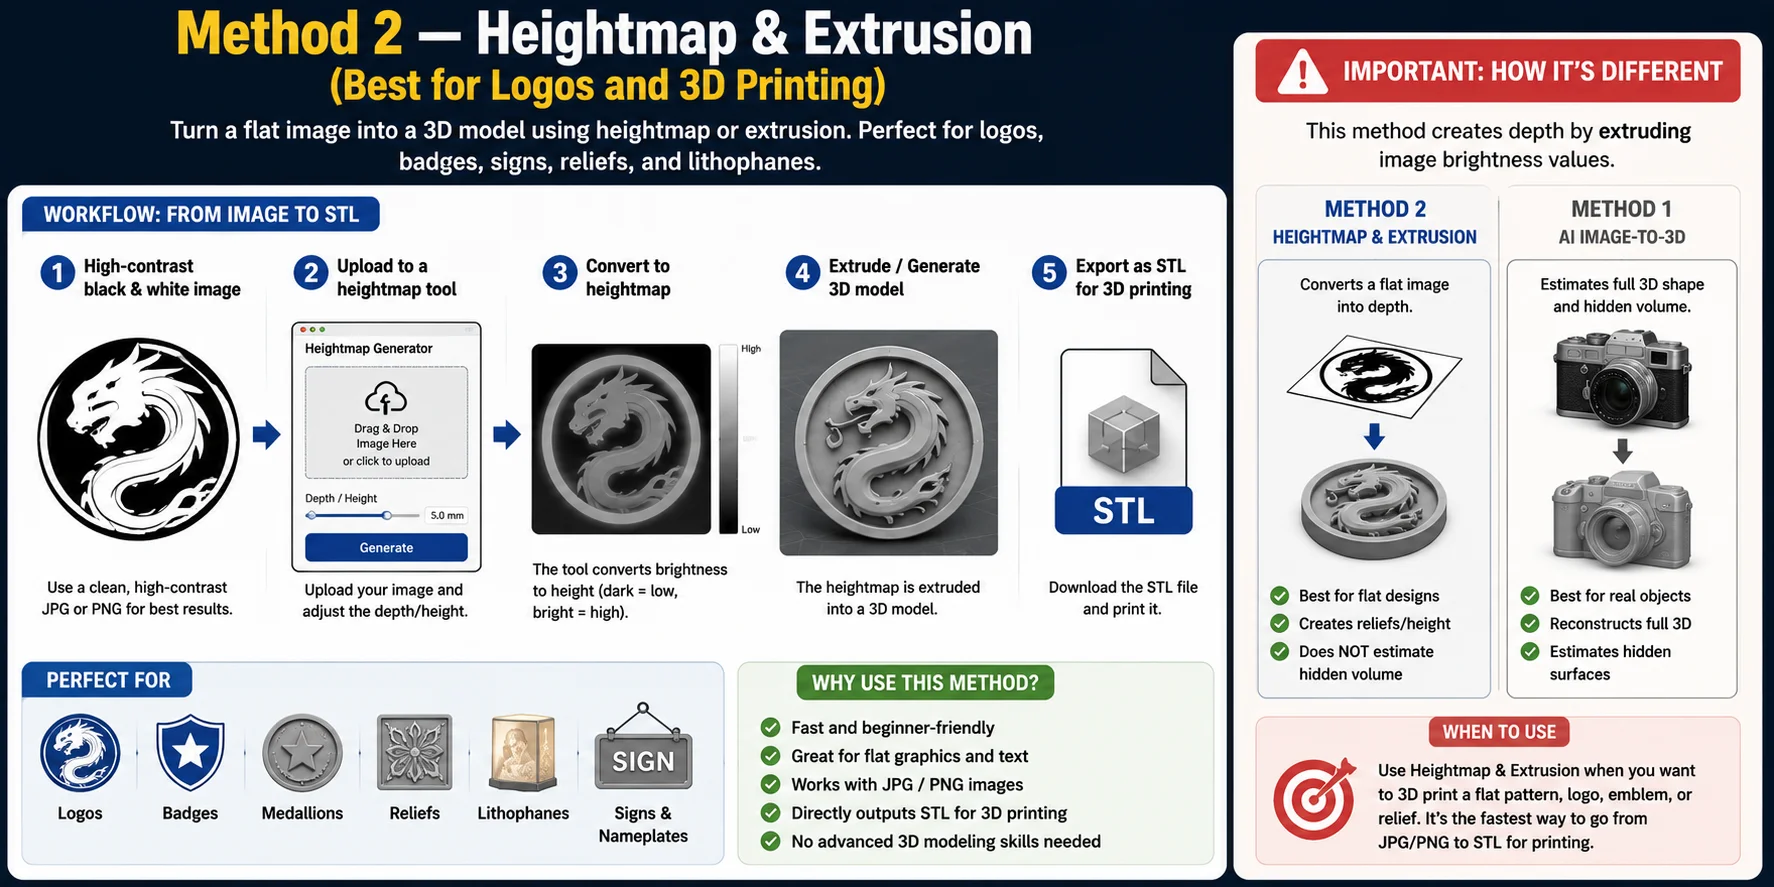
If your goal is to turn a logo, badge, sign, lithophane, or relief image into a 3D model, a heightmap or extrusion workflow is often the easiest solution. Unlike AI image-to-3D generators, which try to reconstruct a full three-dimensional object, this method simply converts a flat image into depth.
The process is straightforward:
- Start with a high-contrast black-and-white image
- Upload the JPG or PNG to a heightmap or image-to-STL tool
- The software converts brightness values into height
- Dark and light areas become raised or recessed surfaces
- Export the finished model as an STL file
This workflow is especially popular for company logos, nameplates, coins and medallions, decorative reliefs, lithophanes, and signs.
The most important factor is image quality. Clean edges, strong contrast, and minimal background noise produce the best results. Complex photographs generally work less well than logos, icons, and line art because the software is interpreting brightness rather than understanding the actual shape of an object.
Important: This method creates depth by extruding image brightness values. It does not estimate the volume of a real object or reconstruct hidden surfaces. If you need a complete 3D object from a photo, use an AI image-to-3D generator instead.
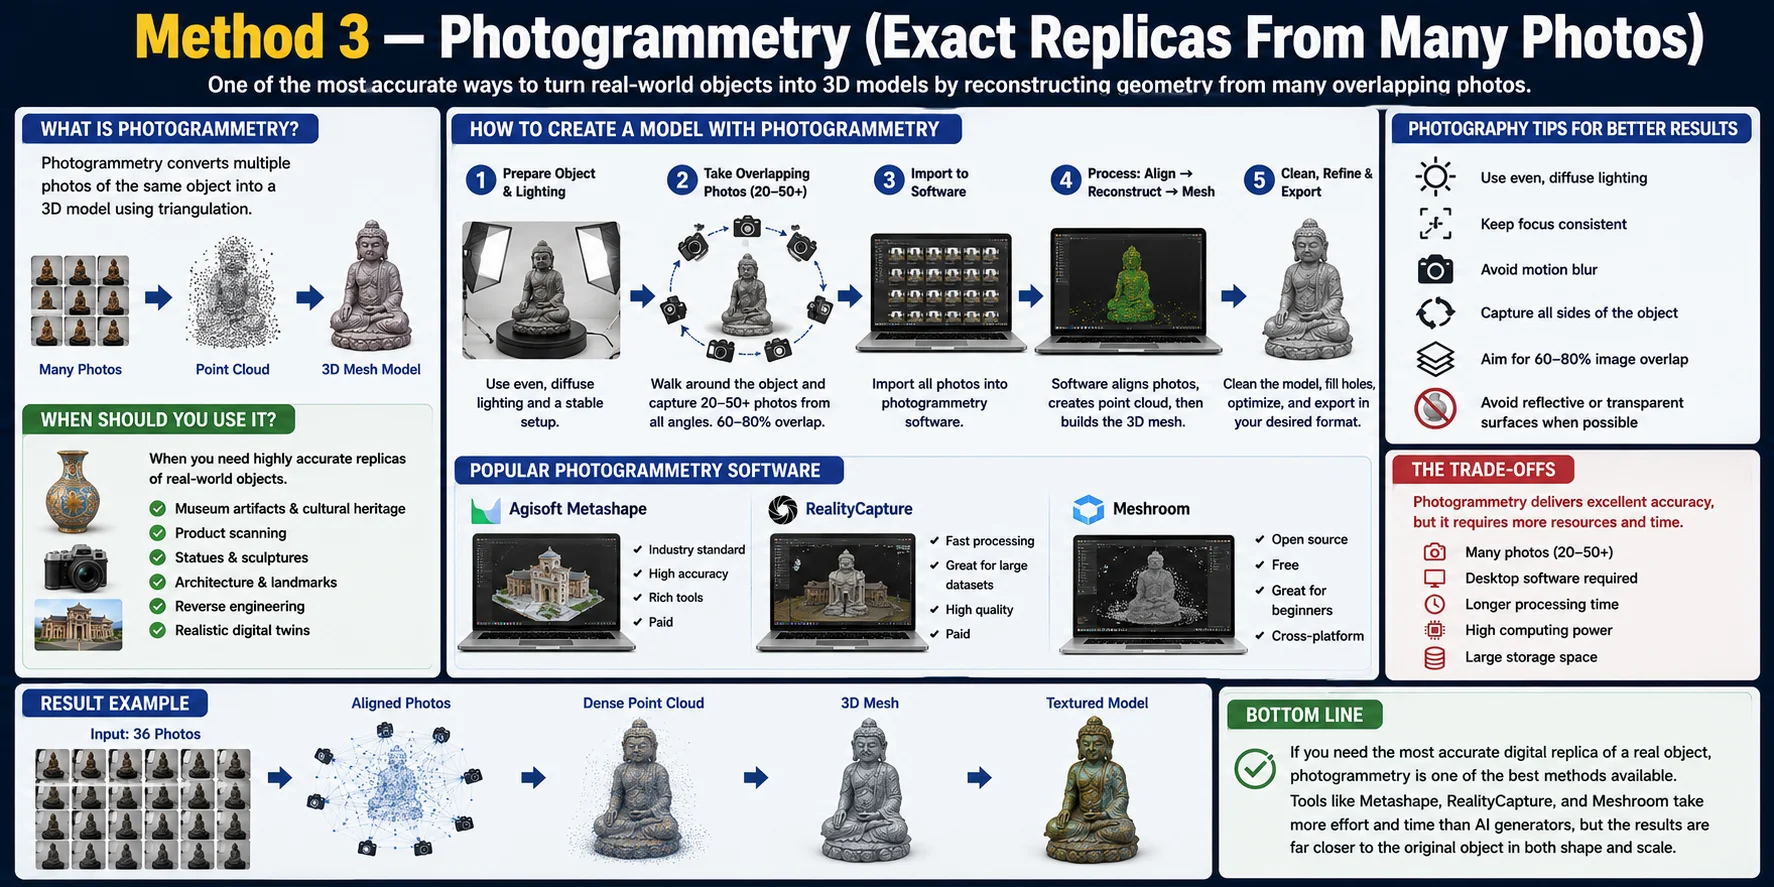
Method 3 — Photogrammetry (Exact Replicas From Many Photos)
Photogrammetry is one of the most accurate ways to turn real-world objects into 3D models. Instead of estimating shape from a single image, photogrammetry reconstructs geometry by analyzing many photographs of the same object taken from different angles.
The software identifies matching points across the photos and uses triangulation to calculate their position in 3D space. The result is a detailed digital replica of the original object.
When Should You Use It?
Photogrammetry is ideal when accuracy matters. Common use cases include museum artifacts, product scanning, statues and sculptures, architecture and landmarks, and reverse engineering reference models.
How to Create a Model with Photogrammetry
A typical workflow:
- Place the object in consistent lighting
- Walk around it while taking overlapping photos
- Capture 20–50+ images from multiple angles
- Ensure each photo overlaps significantly with the previous one
- Import the images into photogrammetry software (Agisoft Metashape, RealityCapture, Meshroom)
Photography Tips
For the best reconstruction quality: use even diffuse lighting, avoid motion blur, keep focus consistent, capture all sides of the object, aim for 60–80% image overlap, and avoid reflective or transparent surfaces.
The Trade-Offs
Compared with AI image-to-3D generation, photogrammetry typically requires more photos, desktop software, longer processing times, and greater computing power. However, the resulting models are usually far closer to the original object in both shape and scale.
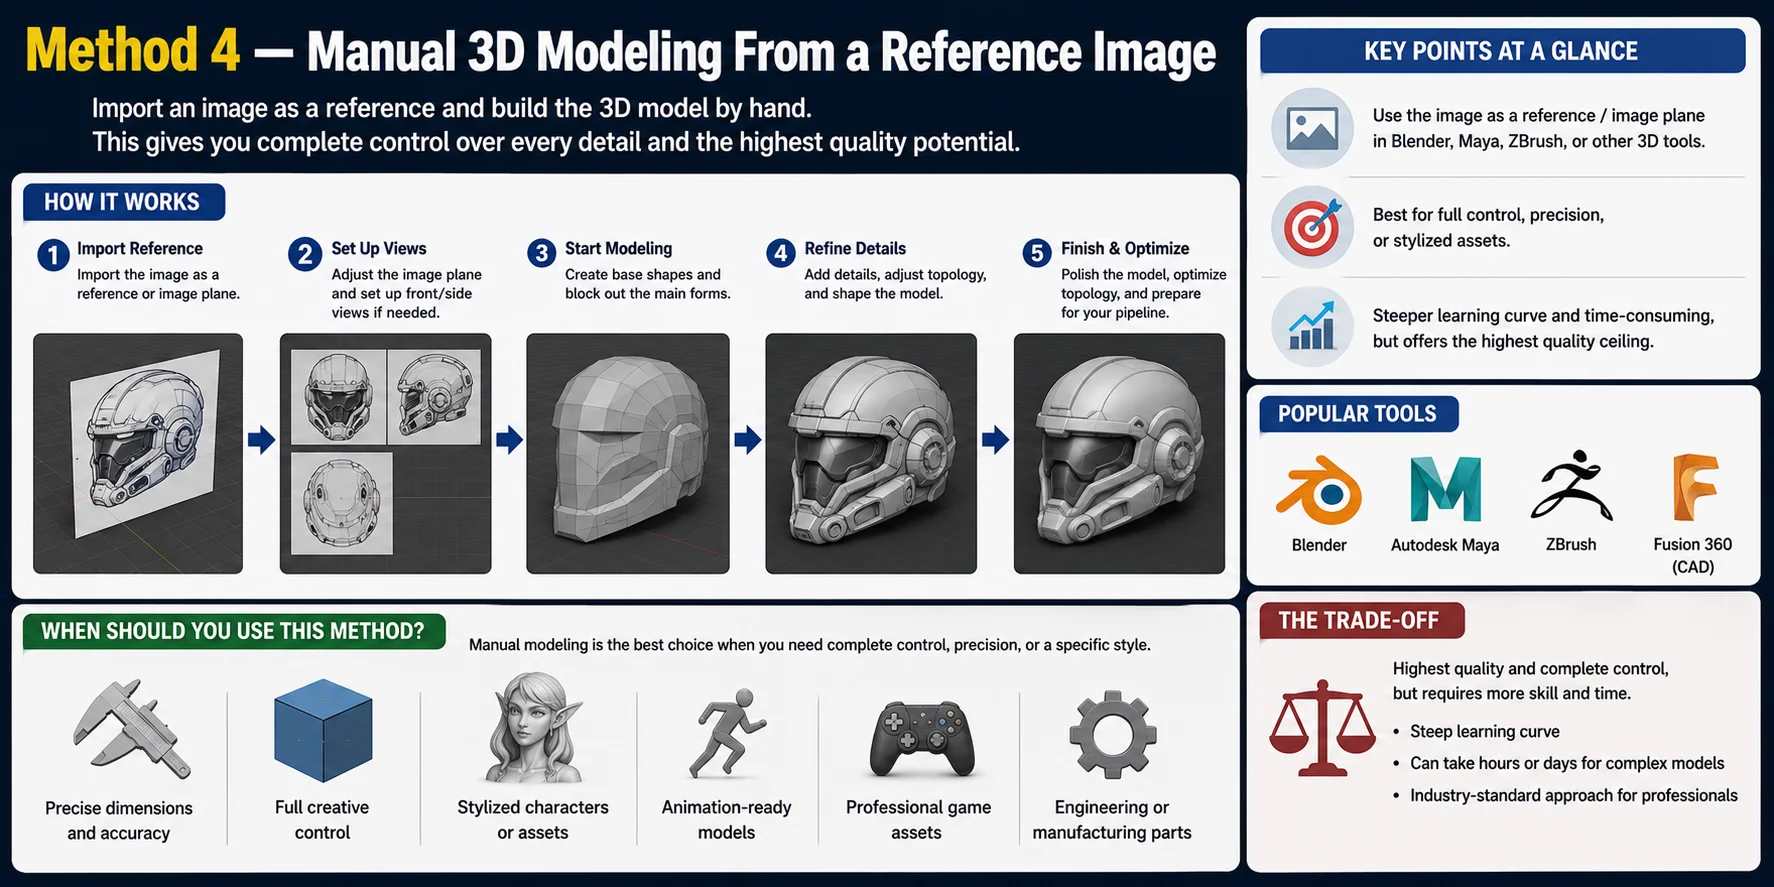
Method 4 — Manual 3D Modeling From a Reference Image
Before AI image-to-3D tools became popular, the traditional way to turn an image into a 3D model was to build it manually. This workflow is still widely used today when maximum control, precision, or artistic direction is required.
The process is simple in concept: import an image as a reference or image plane inside a 3D modeling application, then manually create the geometry based on that reference. Popular tools include Blender, Autodesk Maya, ZBrush, and Fusion 360 for CAD workflows.
When Should You Use This Method?
Manual modeling is the best choice when you need precise dimensions, full creative control, stylized characters or assets, animation-ready models, or professional game assets.
Because the geometry is built from scratch, the final result can be optimized exactly for the intended use. The biggest downside is time and complexity—it has a much steeper learning curve and can take hours for complex projects.
Cleaning Up and Exporting Your 3D Model
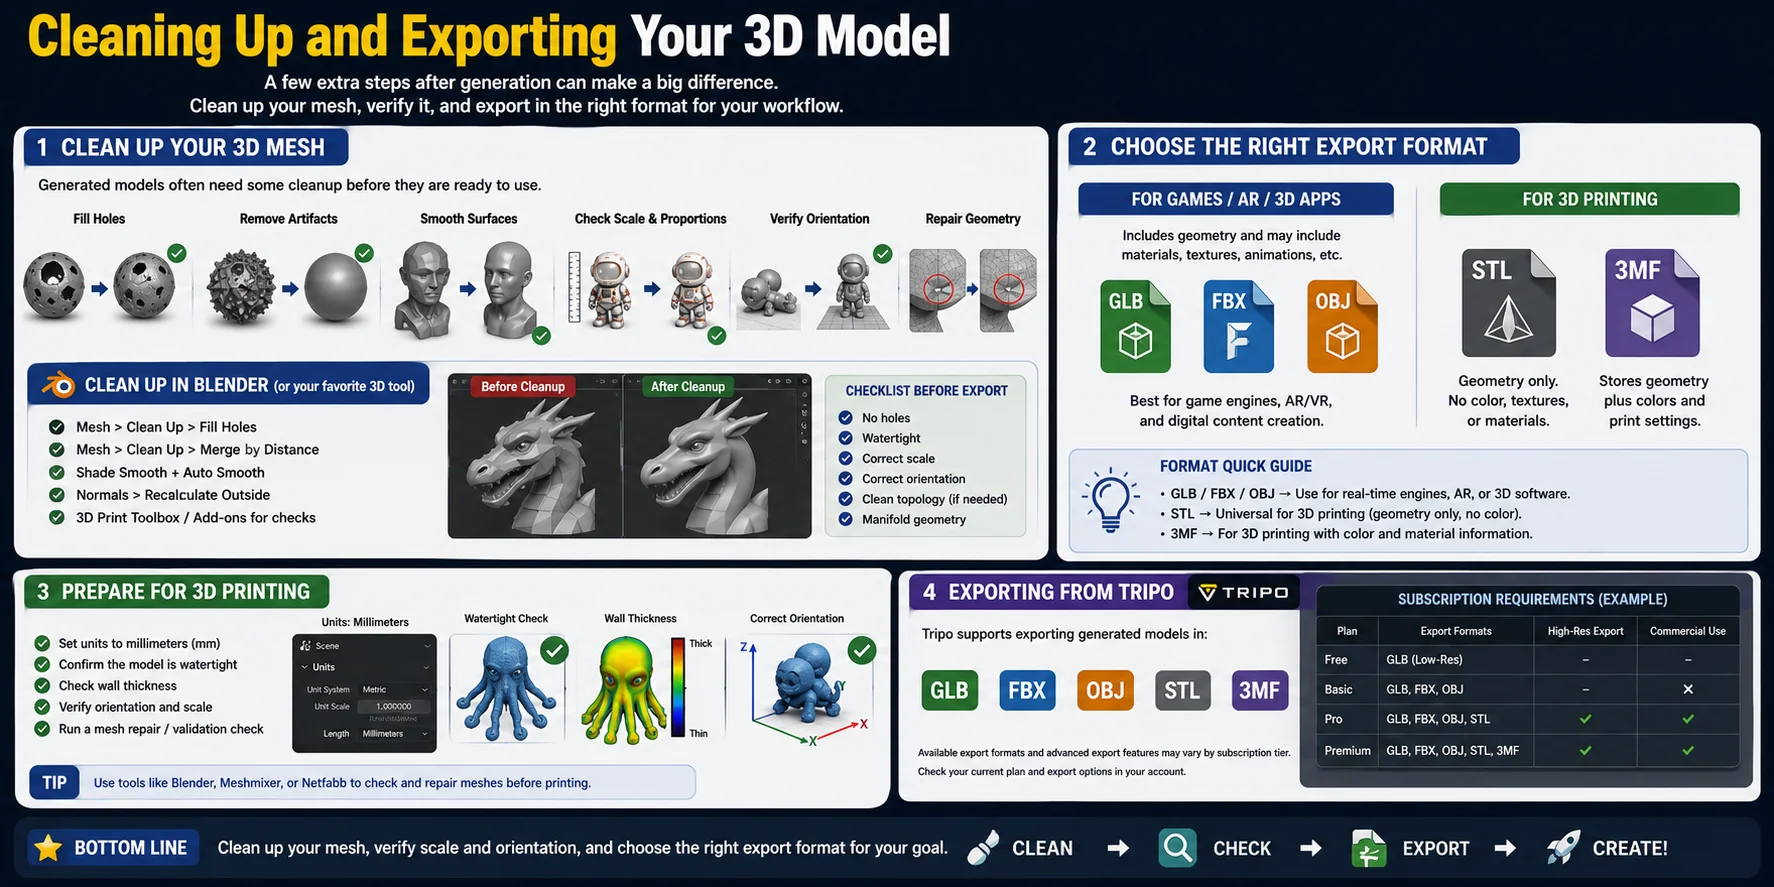
Generating a 3D model is only the beginning. Whether the model comes from AI generation, photogrammetry, or manual modeling, it often needs a quick cleanup before it is ready for printing, rendering, or use in a game engine.
Common cleanup tasks include filling holes in the mesh, removing unwanted artifacts, smoothing rough surfaces, checking scale and proportions, and repairing non-manifold geometry. Tools such as Blender are commonly used for mesh cleanup and optimization.
Choose the Right Export Format
For game engines, AR, and 3D applications: GLB, FBX, OBJ
For 3D printing: STL, 3MF
STL stores geometry only and does not preserve colors, textures, or materials. If you want to keep color and material information, 3MF is usually the better choice.
Prepare Models for 3D Printing
Before exporting for printing:
- Set units to millimeters (mm)
- Confirm the model is watertight (fully closed)
- Check wall thickness
- Verify orientation and scale
- Run a mesh repair check if necessary
Exporting from Tripo
Tripo supports exporting generated models in formats such as GLB, FBX, OBJ, STL, and 3MF. Available export formats and advanced export features may vary by subscription tier.
When This Doesn't Work (Limitations to Know)
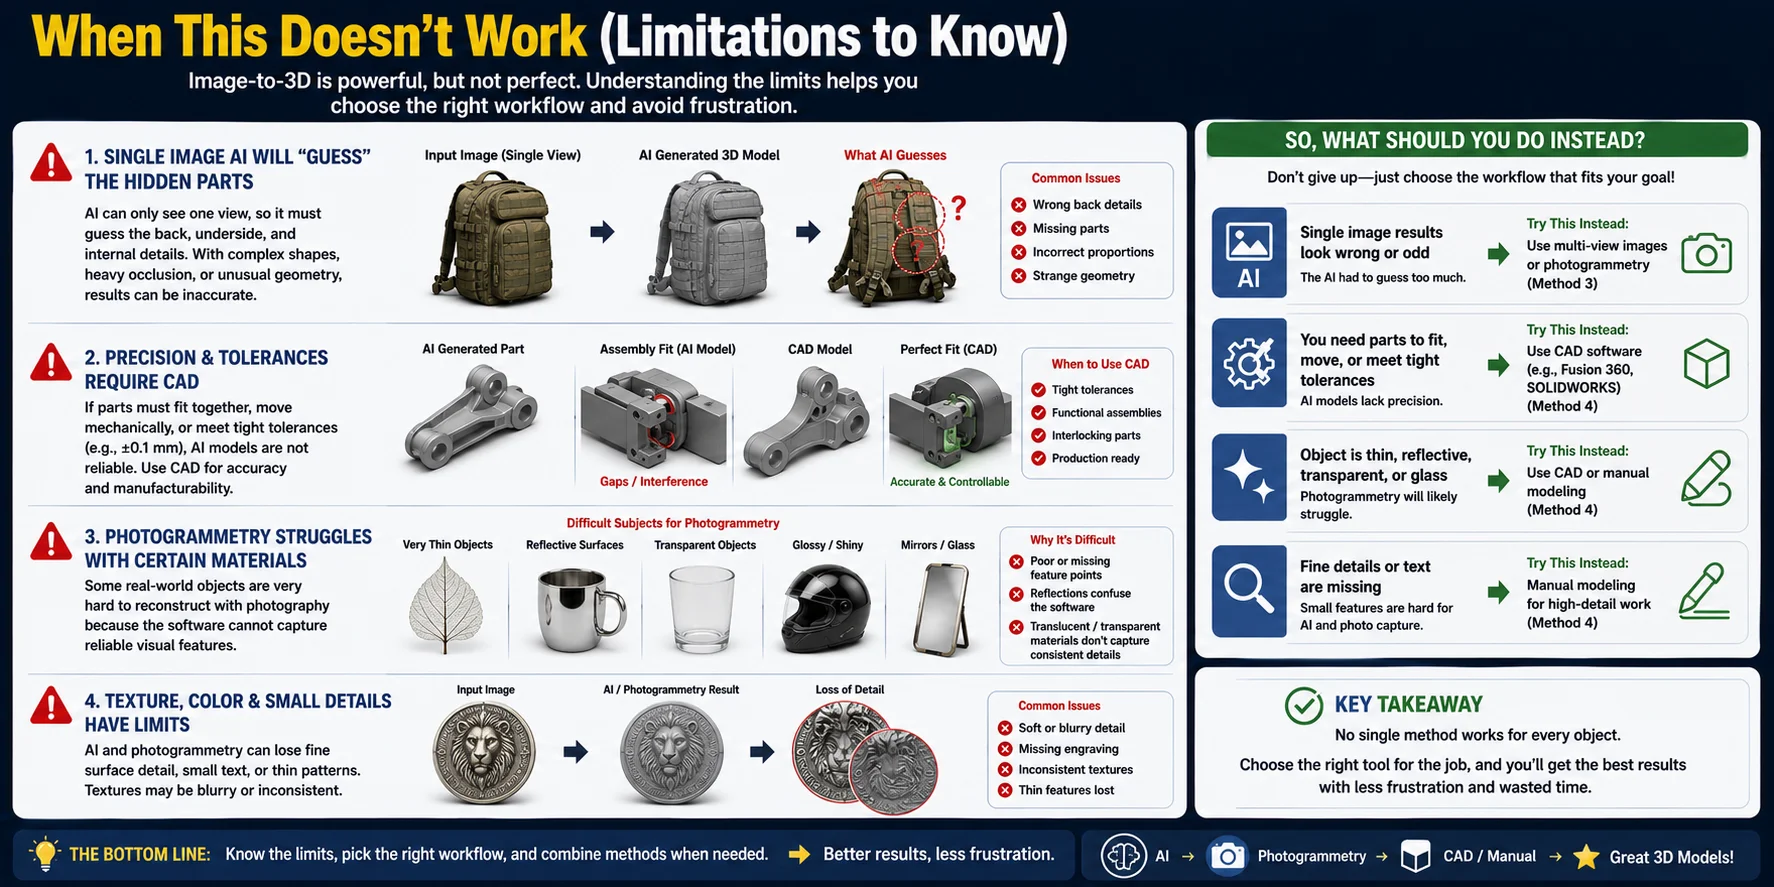
Image-to-3D technology has improved dramatically, but it's important to understand its limitations. Not every image can be converted into a perfect 3D model.
The biggest challenge with single-image AI generation is that the software can only see one side of an object. To create a complete model, it must guess the hidden surfaces—including the back, underside, and internal details. For simple objects this often works well, but complex geometry, heavy occlusion, or unusual shapes can lead to inaccurate results.
Precision is another important consideration. If you're designing mechanical parts, engineering components, or assemblies that require tight tolerances, AI-generated geometry is usually not a substitute for CAD modeling.
Photogrammetry also has limitations. Extremely thin objects, reflective surfaces, transparent materials, mirrors, and glass are notoriously difficult to reconstruct.
If One Method Fails, Try Another
Don't treat these limitations as a dead end. If a single image produces inaccurate geometry, try a multi-view workflow. If photogrammetry struggles with reflections or transparency, consider manual modeling. And if precise dimensions matter, move the project into a CAD workflow.
Frequently Asked Questions
Can I convert a photo to a 3D model?
Yes, you can convert a photo into a 3D model using AI image-to-3D tools or photogrammetry software. AI works well from a single image for fast results, while photogrammetry uses multiple photos to create a more accurate reconstruction of real objects.
How do I build a 3D model from an image?
You can build a 3D model from an image by uploading it to an AI image-to-3D generator, which creates the model automatically. For higher accuracy, especially with real objects, use photogrammetry with multiple photos taken from different angles.
Is image-to-3D modeling free?
It depends on the tool. Many image-to-3D platforms offer free tiers with limited generations, while higher-resolution exports and commercial licenses usually require a paid plan. Free alternatives like Blender and Meshroom are available, but they typically require more manual work.
Can ChatGPT create a 3D model?
ChatGPT can help you create 3D models by generating prompts, design ideas, or working with AI 3D generation tools, but it is not a traditional 3D modeling program. For precise engineering or CAD models, dedicated modeling software is still the better choice.
How many photos do I need for photogrammetry?
For most photogrammetry projects, 20–50 photos are enough, while complex objects or large scenes may require 100+ photos. More important than the number of images is good coverage, with 60–80% overlap between photos taken from multiple angles.
What file format should I export for 3D printing?
For most 3D printing projects, STL is the best choice because it is supported by almost every slicer and printer. If you need to preserve colors, multiple materials, or print settings, use 3MF instead.
Conclusion
Turning an image into a 3D model is easier than ever. Choose the method that best fits your goal—whether that's AI generation, photogrammetry, heightmaps, or manual modeling—and for most photos, an AI image-to-3D generator can produce a usable model in just a few minutes. Upload your image to Tripo AI Studio, generate your model, and export it in the format that matches your workflow, whether that's STL for 3D printing or GLB, FBX, and OBJ for digital projects.