3D Print File Types Explained: STL vs OBJ vs 3MF
TL;DR
- STL is the universal file format for 3D printing and works with nearly every slicer.
- 3MF stores colors, materials, and print settings, making it the preferred choice for modern slicers like Bambu Studio and OrcaSlicer.
- OBJ is best for textured or full-color models, while STEP is best for editable CAD designs.
- Your printer doesn't read STL or 3MF directly—the slicer converts them into G-code.
- Whether you download, design, or generate a model with AI, the workflow is the same: Model → STL/3MF → Slicer → G-code → Print.
The standard 3D print file type is STL — it stores the surface geometry of a model as a mesh of triangles and works with virtually every 3D printer and slicer. 3MF is the modern alternative, packing color, materials, units and print settings into one file. OBJ adds texture/color, while STEP is an editable CAD format that must be exported to STL or 3MF before printing.
What Is a 3D Print File Type?
A 3D print file type is a digital format that stores the information needed to describe a three-dimensional object before it is printed. Depending on the format, that information may include the model's shape, color, texture, material assignments, or other metadata. Common examples include the 3D printer file format STL, OBJ, and 3MF. Choosing the best file type for 3D printing depends on your workflow, printer, and whether you need features beyond basic geometry.
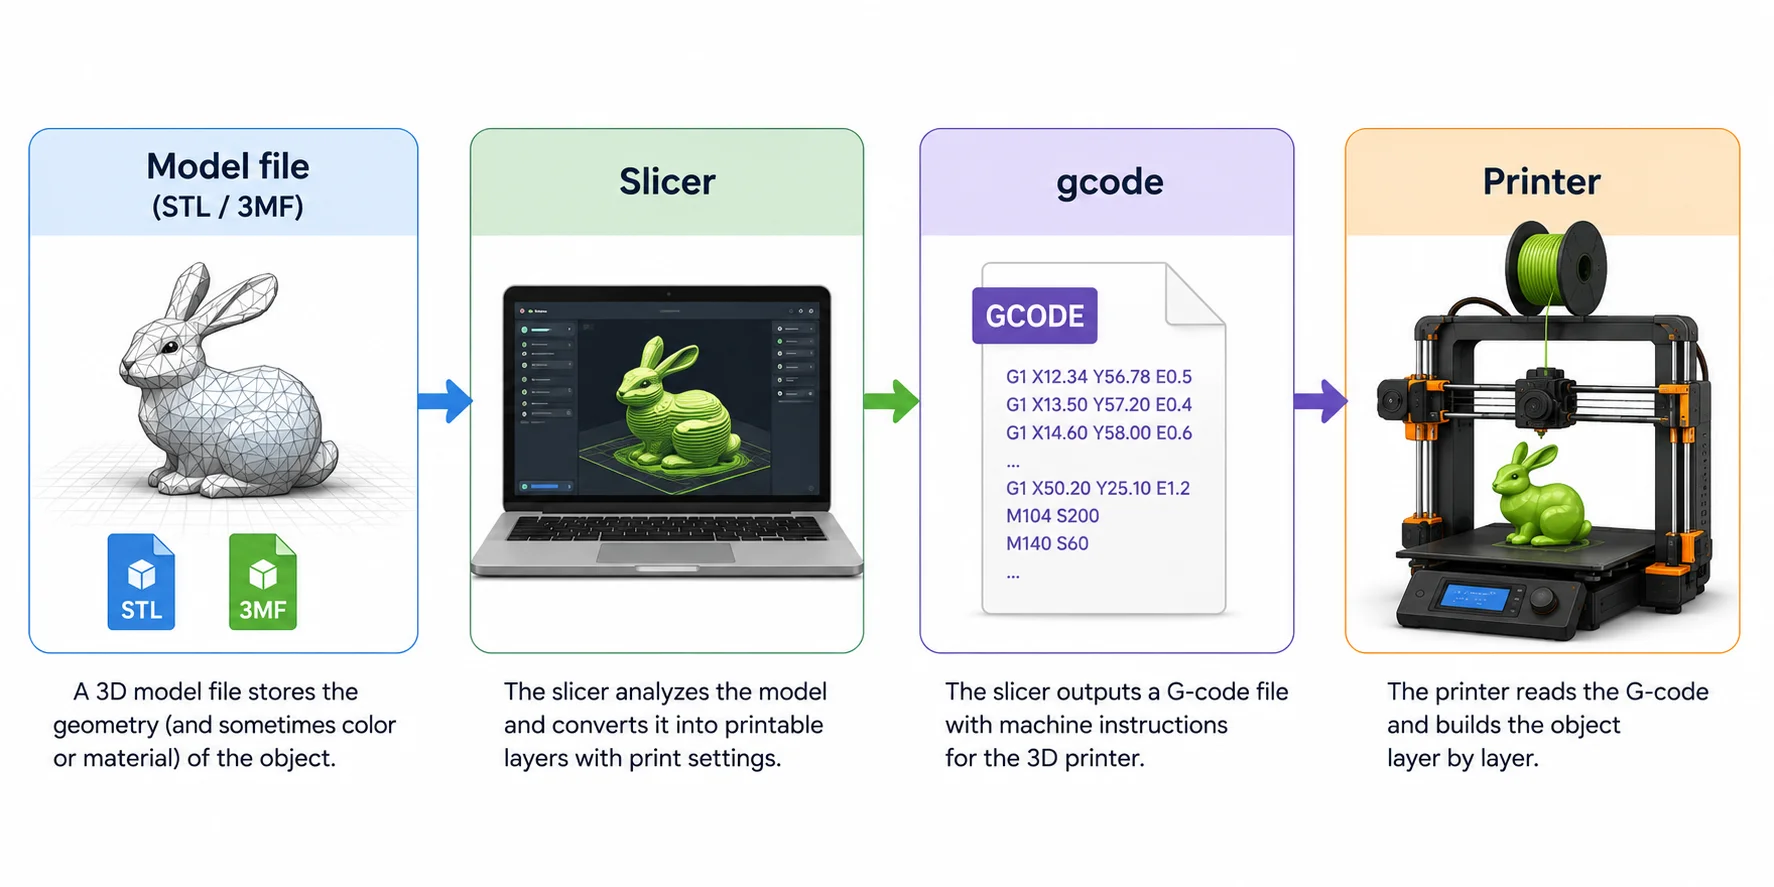
One of the biggest misconceptions is that an STL file is ready to print. It isn't. A model file such as STL, OBJ, or 3MF only describes the 3D object itself. Before a printer can build that object, the file must be processed by a slicer, which converts the model into G-code—the machine instructions that tell the printer where to move, how much filament to extrude, and what temperatures to use. In other words, STL is not G-code. Every standard FDM workflow follows the same basic pipeline:
Model file (STL / OBJ / 3MF) → Slicer → G-code → 3D Printer
Most 3D model formats represent objects as a mesh made of thousands of tiny triangles. This mesh accurately approximates the surface of the model and is the reason STL has remained the industry standard for decades. CAD formats, by contrast, use mathematical surfaces and solid geometry rather than triangles, allowing precise edits before the model is exported for printing. Once exported, the model is typically saved as STL, OBJ, or 3MF so slicing software can prepare it for fabrication.
Understanding the difference between a model file and a printer instruction file makes the rest of the 3D printing workflow much easier. In the following sections, we'll compare STL, OBJ, and 3MF in detail, explain when each format is the best choice, and help you decide which file type fits your printer and project. We also cover which formats each major slicer prefers by printer brand, how to convert between formats, and how to get a print-ready file — whether you download one, design it yourself, or generate it with AI.
How a 3D Print File Becomes a Printed Object
How a 3D Print File Format Works (Mesh vs CAD)
Not all 3D print file formats describe models in the same way. The biggest distinction is between mesh files and CAD (parametric) files. Understanding this difference explains why some files can be sliced immediately, while others must be converted first.
Mesh formats—including STL, OBJ, 3MF, and PLY—represent a model as a collection of thousands (or even millions) of tiny polygons, usually triangles. Together, these triangles approximate the surface of the object. This is why the 3D printer file format STL has been the industry standard for so many years: it is simple, lightweight, and supported by virtually every slicer and printer.
Low-Poly vs High-Poly Mesh Comparison

The number of triangles directly affects model quality. A low-resolution mesh uses fewer triangles, resulting in a smaller file but visible flat faces or jagged curves. A high-resolution mesh contains many more triangles, creating smoother surfaces at the cost of a larger file size and longer processing time. The goal is to find a balance—enough detail for your print without creating unnecessarily large files that slow down your workflow.
CAD formats work very differently. Files such as STEP, IGES, and SLDPRT do not store triangles at all. Instead, they describe objects using precise mathematical surfaces, dimensions, and feature history. A hole is stored as a true cylinder, and a curve remains mathematically smooth regardless of zoom level. Because of this, CAD files are fully editable—you can change dimensions, modify features, or update parameters without rebuilding the entire model.
However, 3D printers cannot print mathematical surfaces directly, and most slicers cannot generate toolpaths from a STEP file alone. Before slicing, the CAD model must be exported as a mesh, usually in STL or increasingly in 3MF. During this export process, the CAD software tessellates the smooth mathematical surfaces into thousands of tiny triangles that the slicer can understand. In other words, exporting a STEP file to STL is not changing the model itself—it is converting exact geometry into a printable polygon mesh.
This distinction also explains why the best file type for 3D printing depends on where you are in the workflow. Use CAD formats while designing and editing your model. Once the design is finished, export it as STL or 3MF so your 3d print file type software—such as OrcaSlicer, Cura, PrusaSlicer, or Bambu Studio—can slice it into G-code for your printer.
The Most Common 3D Print File Types (Format by Format)
Before choosing the best file type for 3D printing, it's helpful to understand what each format was designed to do. Some formats are optimized for compatibility, others preserve colors and materials, while CAD formats prioritize precision and editability. The table below summarizes the strengths of each format before we dive into them individually.
| File Type | Stores | Textures / Colors | Opens Directly in Most Slicers? | Best For | Notes |
|---|---|---|---|---|---|
| STL | Geometry only | ❌ No | ✅ Yes | Everyday 3D printing | Universal standard |
| 3MF | Geometry + colors + materials + print settings | ✅ Yes | ✅ Yes | Modern FDM & resin workflows | Preferred by Bambu Studio, OrcaSlicer, PrusaSlicer |
| OBJ | Geometry + UVs + textures (.MTL) | ✅ Yes | ✅ Usually | Full-color models & visualization | Requires companion files |
| AMF | Geometry + colors + materials | ✅ Yes | ⚠️ Limited | Research & legacy workflows | Mostly replaced by 3MF |
| STEP | Exact CAD geometry | ❌ No | ❌ Export first | Engineering & product design | Must export to STL/3MF |
| IGES | CAD surfaces | ❌ No | ❌ Export first | Legacy CAD exchange | Less common today |
| SLDPRT | SolidWorks design history | ❌ No | ❌ Export first | Editing CAD models | Native SolidWorks format |
| PLY | Mesh + vertex colors | ✅ Vertex color | ⚠️ Sometimes | 3D scanning | Common in photogrammetry |
| VRML (.WRL) | Mesh + colors | ✅ Yes | ⚠️ Limited | Color powder printing | Mostly legacy |
| G-code | Printer instructions | N/A | Already sliced | Printing | Final machine file—not a model |
| X3G | Machine instructions | N/A | Generated by slicer | Older MakerBot printers | Legacy format |
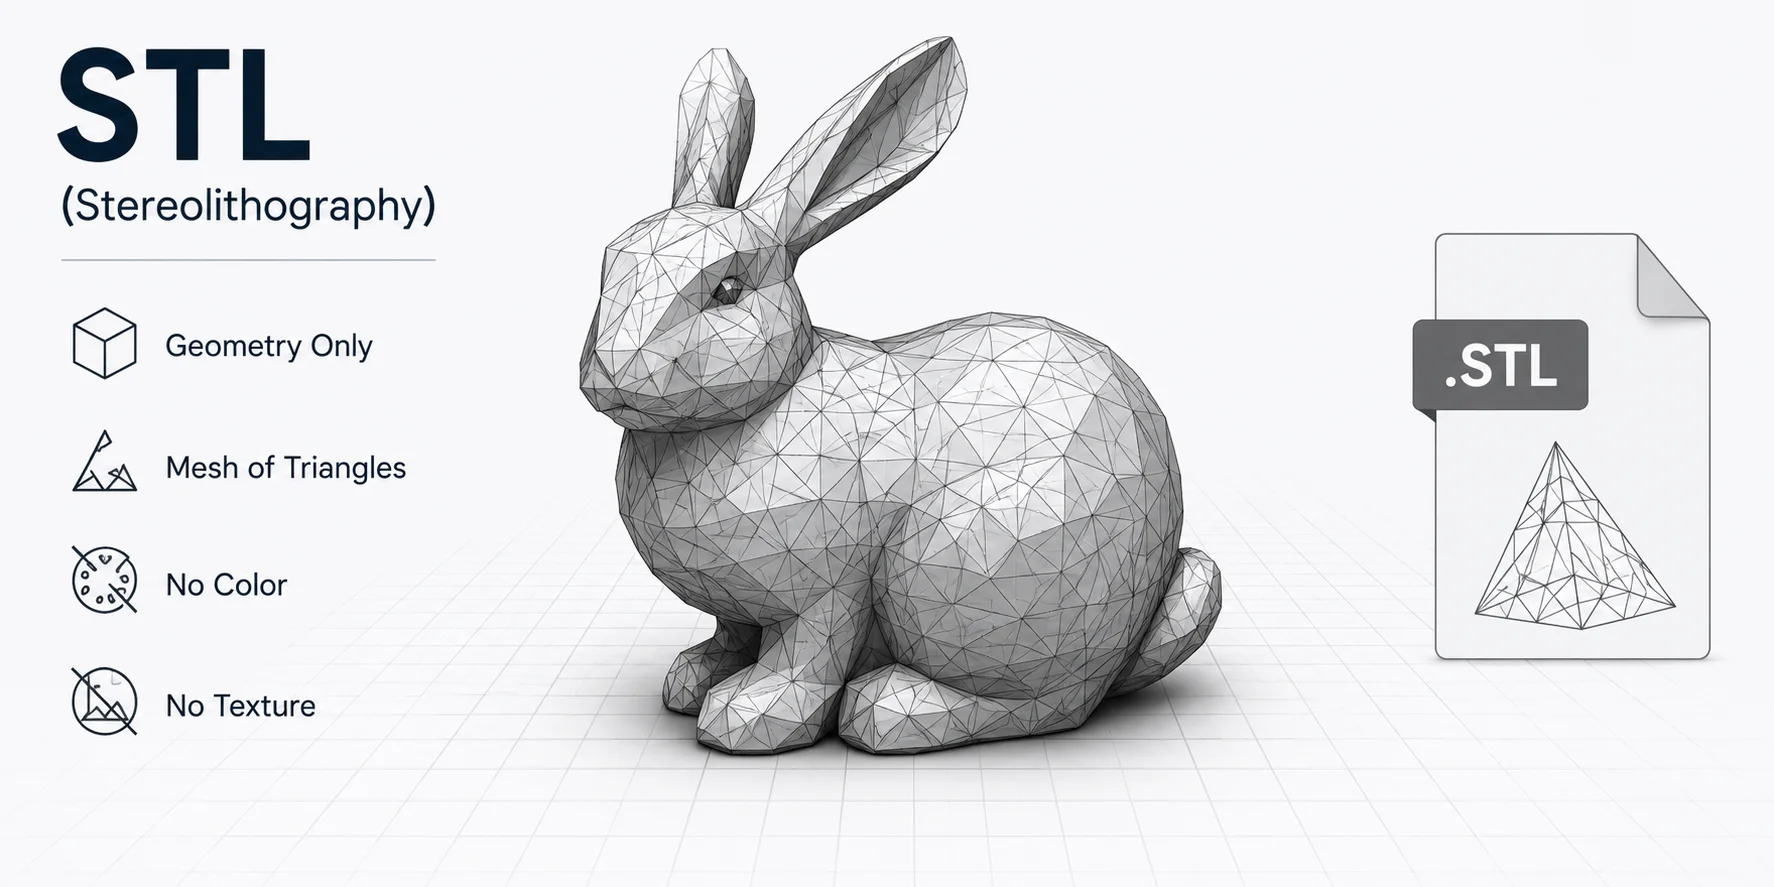
STL (Stereolithography)
STL (Standard Tessellation Language or StereoLithography) is the most widely supported 3D printer file format and remains the default download option on sites such as Printables, Thingiverse, and MakerWorld. Instead of storing curves or CAD features, an STL describes only the outer surface of an object as a mesh of tiny triangles.
Its biggest advantage is compatibility. Virtually every slicer—including Cura, OrcaSlicer, Bambu Studio, PrusaSlicer, and Creality Print—can open STL files immediately, making them an excellent choice for hobbyists and professional makers alike.
The trade-off is that STL stores geometry only. It contains no color, textures, materials, units, or print settings, so those must be recreated inside the slicer every time.
Best for: Everyday FDM and resin printing.
Textures/Colors: ❌ No
STL Stores Geometry Only
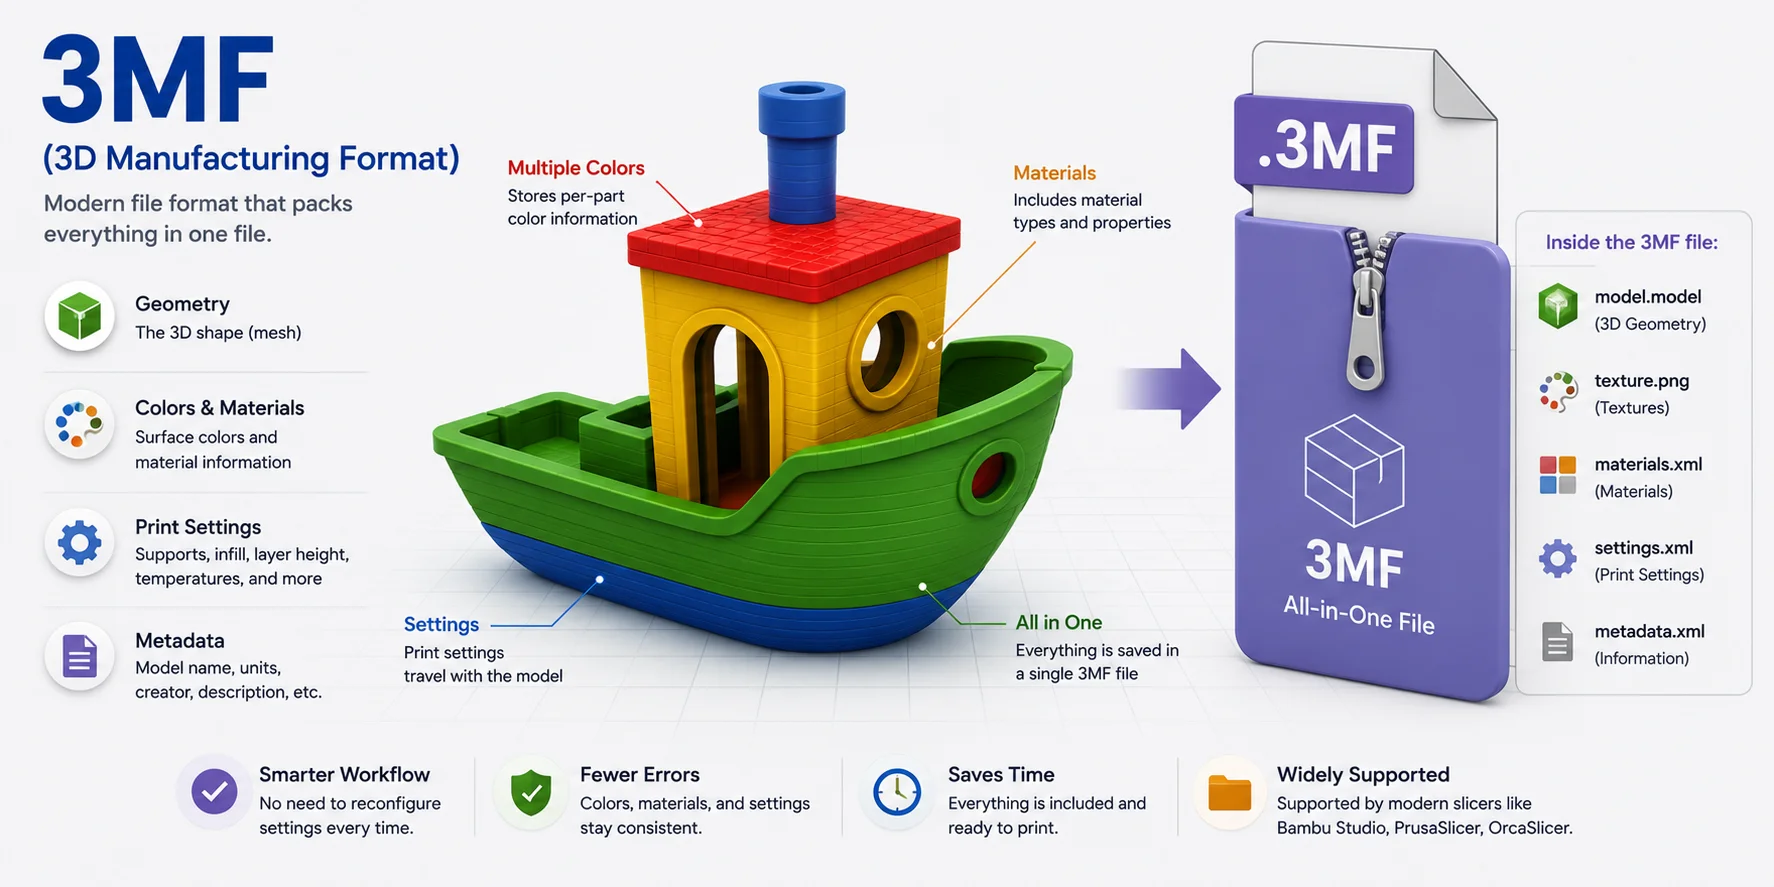
3MF (3D Manufacturing Format)
Developed by Microsoft and the 3MF Consortium, 3MF was designed to replace STL with a smarter, more complete format. Like STL, it stores geometry, but it can also package colors, textures, materials, units, support settings, and even project metadata into a single compressed file.
Because everything travels together, 3MF reduces import errors and preserves your slicer setup. This is why modern slicers such as Bambu Studio, OrcaSlicer, and PrusaSlicer increasingly recommend 3MF as the default save format.
If you're wondering about the best 3D print file type for Bambu printers, 3MF is usually the preferred option because it retains AMS colors, build plates, supports, and many print settings.
Best for: Modern printing workflows and repeatable projects.
Textures/Colors: ✅ Yes
3MF Packs Everything into One File
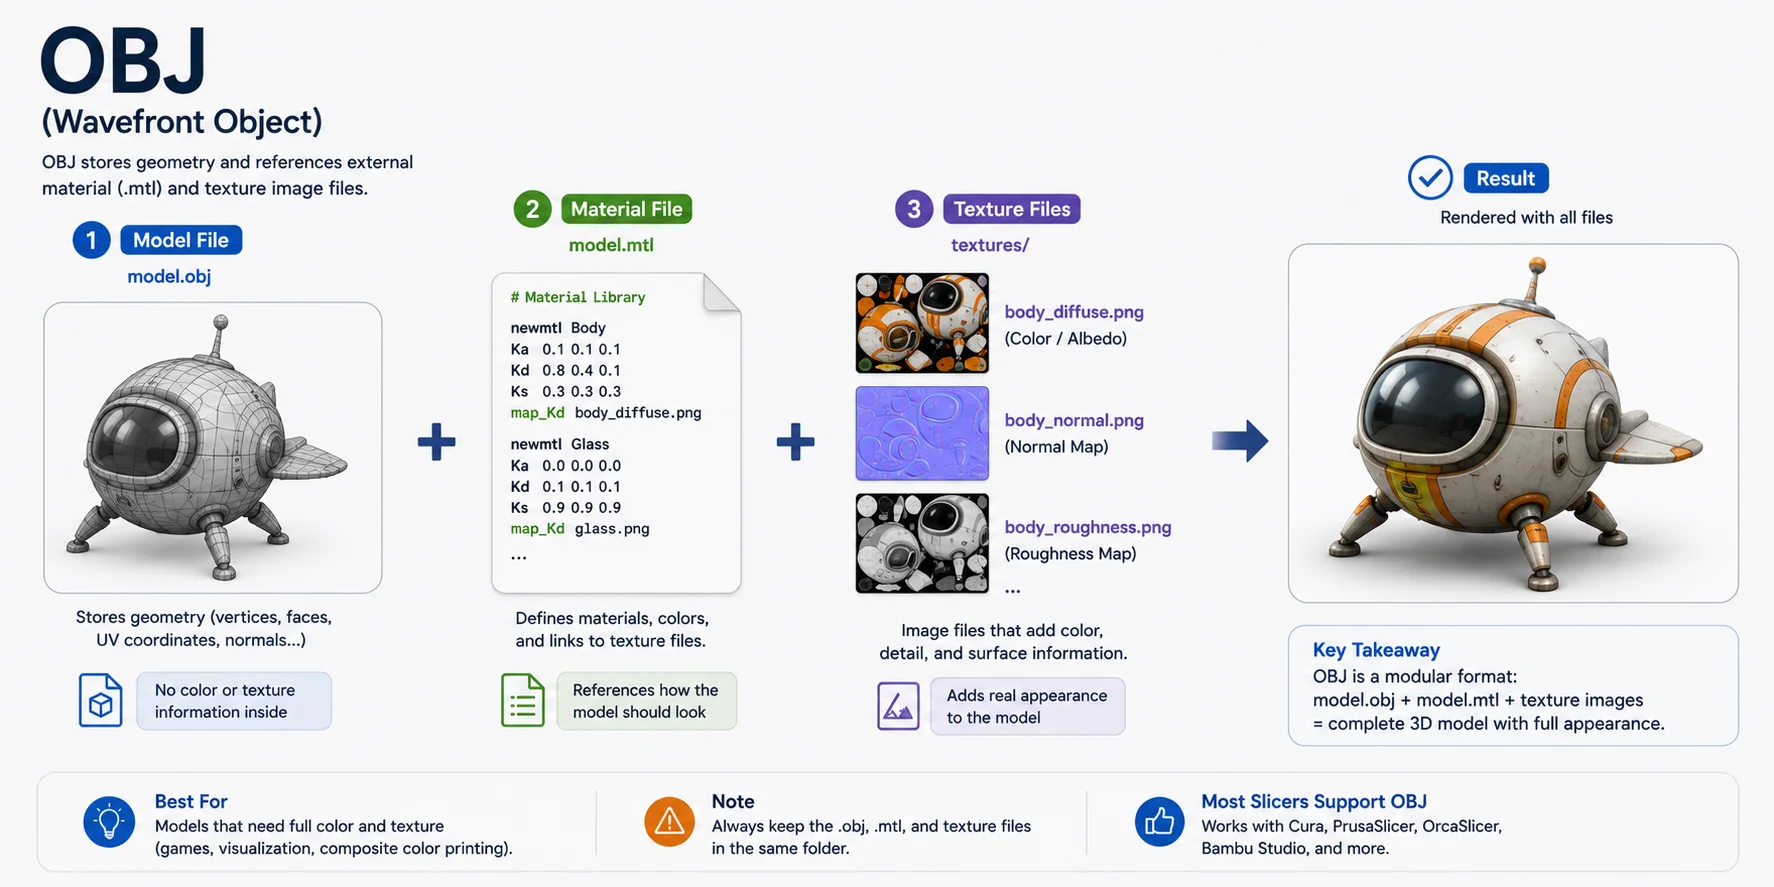
OBJ (Wavefront Object)
OBJ is another mesh format, but unlike STL, it supports UV mapping and texture files. An OBJ model is typically accompanied by an .MTL file that defines materials, plus one or more image textures.
Because of this, OBJ is common in game development, CGI, photogrammetry, and full-color 3D printing. However, managing multiple companion files makes it slightly less convenient than 3MF.
Many slicers can import OBJ files, but color support depends on both the slicer and the printer.
Best for: Color models, textured scans, and visualization.
Textures/Colors: ✅ Yes (with .MTL and texture images)
OBJ Uses Separate Material and Texture Files
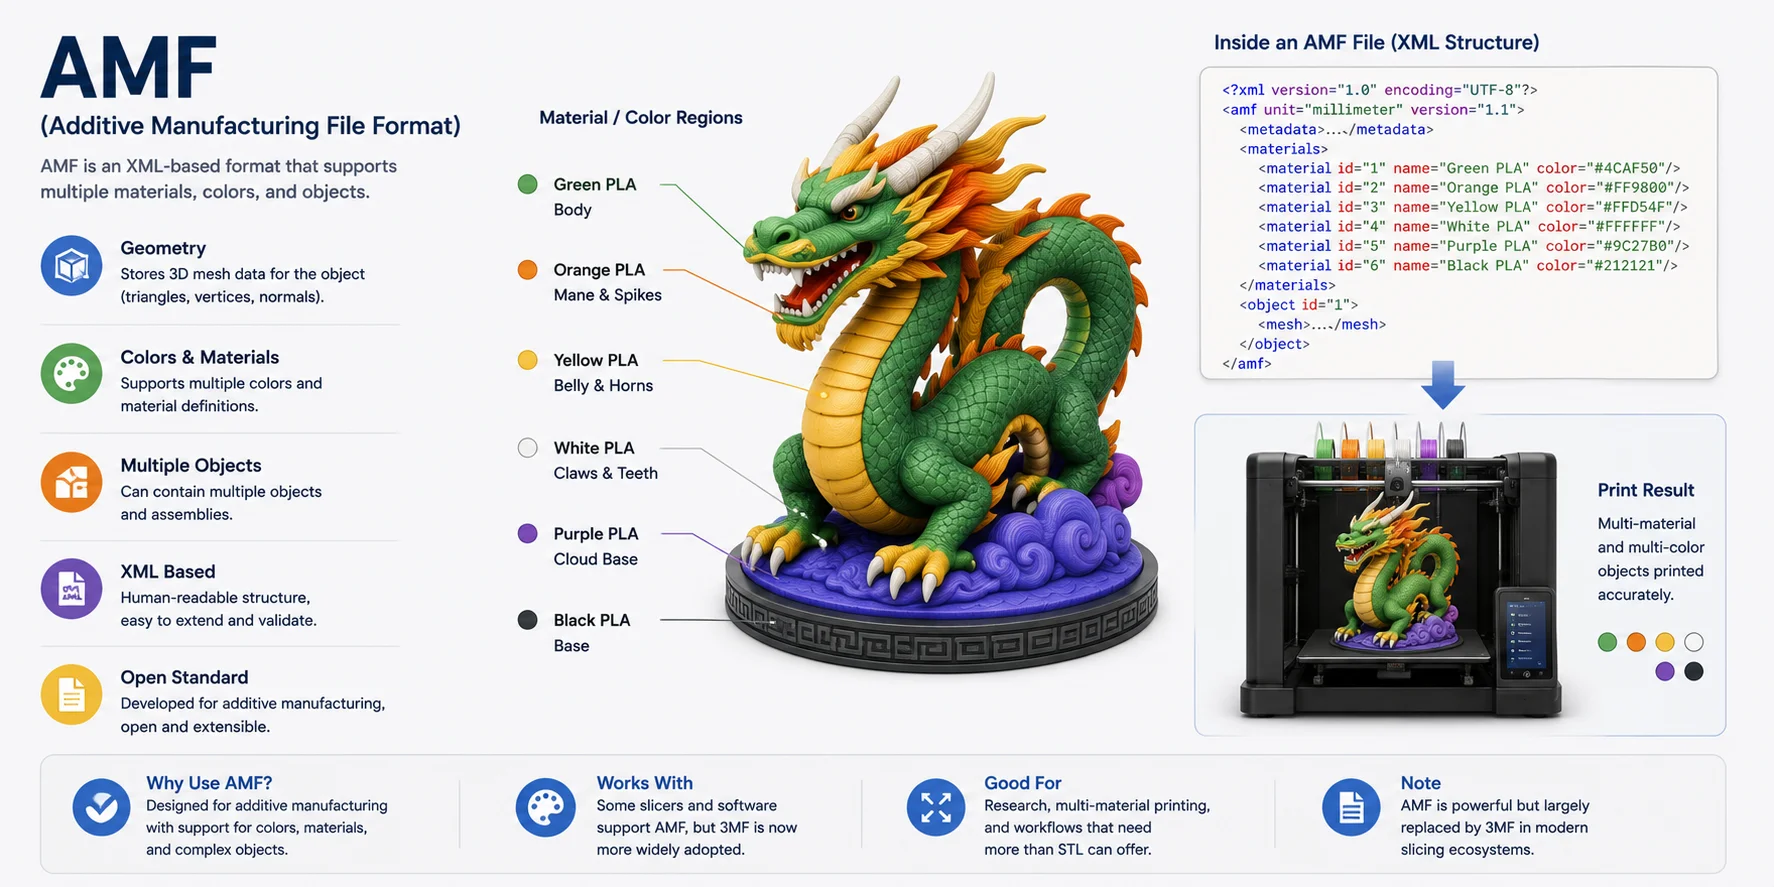
AMF (Additive Manufacturing File Format)
AMF is an XML-based open standard created specifically for additive manufacturing. Compared with STL, it supports curved surfaces, colors, materials, lattices, and multiple objects in a single file.
Although technically more capable than STL, AMF never gained widespread industry adoption. Today, most software developers and printer manufacturers have shifted their focus to 3MF, which offers similar features with broader ecosystem support.
Best for: Legacy workflows and research projects.
Textures/Colors: ✅ Yes
AMF Supports Materials and Colors
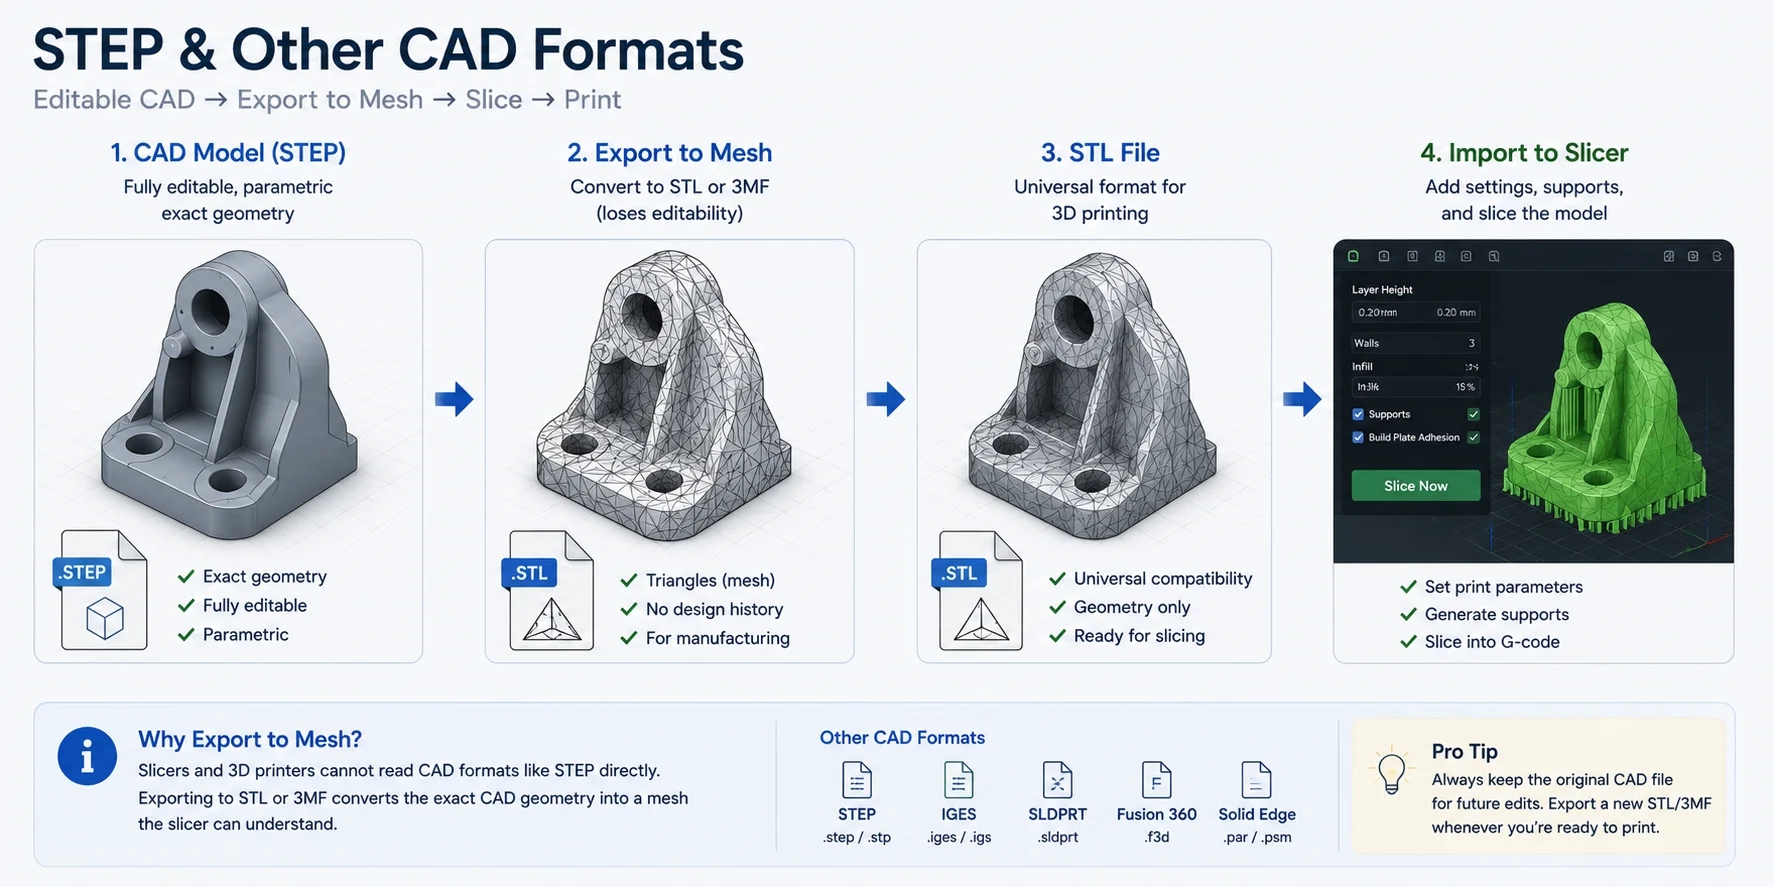
STEP & Other CAD Formats (STEP, IGES, SLDPRT)
Unlike mesh formats, CAD files store mathematically exact geometry rather than triangles. STEP is the most common neutral CAD exchange format, while IGES is an older alternative and SLDPRT is the native format used by SolidWorks.
These formats are fully editable—you can modify dimensions, fillets, holes, and design history—but they cannot usually be sliced directly. Before printing, they must be exported as a mesh, typically STL or 3MF, so the slicer can generate toolpaths.
This is why engineers often keep a STEP file as the "master" design while exporting STL or 3MF copies for manufacturing.
Best for: Mechanical design, engineering, and CAD collaboration.
Textures/Colors: ❌ No
STEP Must Be Exported Before Printing
Honorable Mentions
- PLY — A mesh format commonly used by 3D scanners and photogrammetry. Supports vertex colors but is less common for everyday printing.
- VRML (.WRL) — Stores colors and textures for full-color printing, especially older binder-jet printers, but has largely been replaced by 3MF.
- G-code — Not a model format. It is the machine instruction file generated by your slicer and read directly by the printer.
- X3G — A legacy machine-code format used by older MakerBot printers. Most modern printers use standard G-code instead.
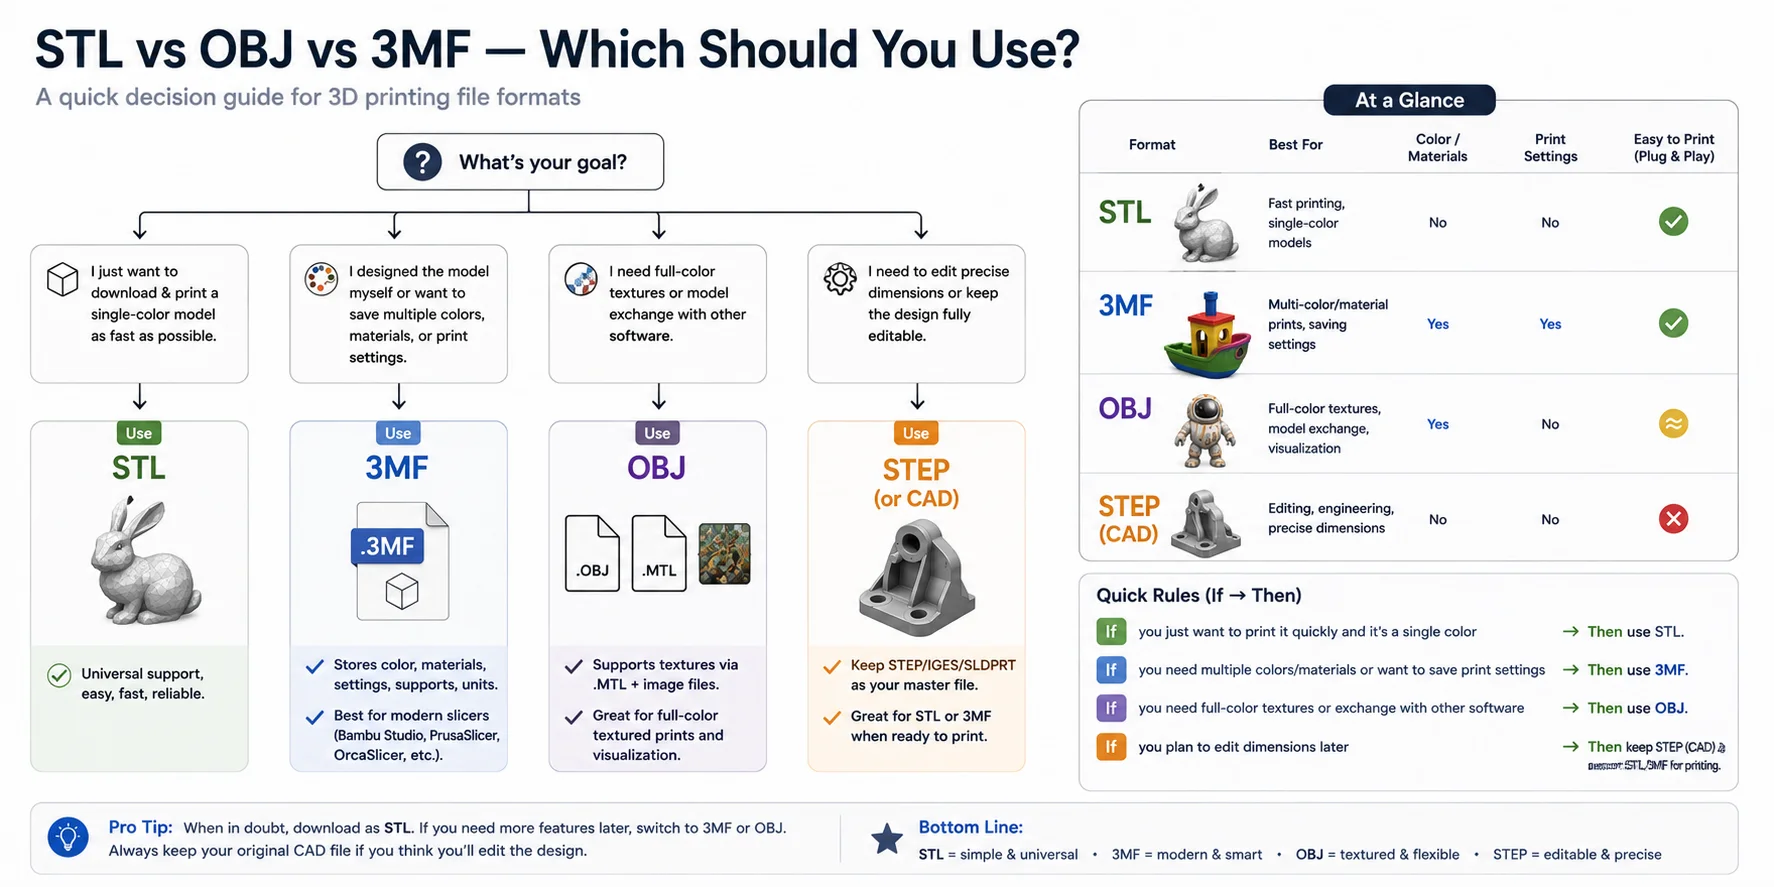
STL vs OBJ vs 3MF — Which Should You Use?
After learning what each format does, the next question is simple: Which one should you actually use? There isn't a single "best" file format for every situation. Instead, the right choice depends on what you're trying to accomplish—whether that's printing a downloaded model, preserving multi-color settings, sharing textured assets, or continuing to edit a CAD design. The decision guide below helps you choose the right format in just a few seconds.
Quick Decision Guide (If → Then)
| If... | Then use... | Why |
|---|---|---|
| You downloaded a model and just want to print it quickly | STL | Universal compatibility and supported by virtually every slicer. |
| You designed the model yourself and want to keep print settings | 3MF | Saves colors, materials, supports, units, and slicer settings in one file. |
| You're printing a textured or full-color model | OBJ | Supports UV mapping, materials, and texture images through .MTL files. |
| You'll continue editing dimensions later | STEP (master file) | Keeps exact CAD geometry. Export an STL or 3MF only when you're ready to print. |
Choose STL for Fast, Everyday Printing
If your goal is to download a model from sites like MakerWorld, Printables, or Thingiverse and start printing as quickly as possible, STL is still the safest choice. It opens directly in nearly every slicer, works with almost every FDM and resin printer, and is ideal for single-color prints. This is also the recommended format for most Ender 3, Creality, and other entry-level printers.
Choose 3MF for Modern Printing Workflows
If you're creating your own models or regularly tweak print settings, 3MF is usually the better long-term format. Unlike STL, it can remember support structures, build orientation, layer height, materials, colors, and other slicer settings. Modern slicers—including Bambu Studio, OrcaSlicer, and PrusaSlicer—are designed around 3MF projects, making it the preferred 3D print file type for Bambu printers and multi-color workflows.
Choose OBJ for Textured and Full-Color Models
OBJ is best when appearance matters as much as geometry. It stores the mesh in an OBJ file while referencing materials through an .MTL file and textures through image files such as PNG or JPG. This makes OBJ popular for game assets, photogrammetry scans, digital visualization, and full-color 3D printing. If you're simply printing a monochrome PLA part, however, OBJ usually provides no practical advantage over STL or 3MF.
Keep STEP as Your Master Design File
For engineering parts and functional products, keep the original STEP (or another CAD format such as SLDPRT) as your editable master file. Whenever you're ready to print, export a fresh STL or 3MF from that CAD model. This workflow lets you change dimensions later without degrading the model through repeated mesh editing.
The Bottom Line
Think of the formats as serving different stages of the workflow rather than competing with one another:
- STL → Best for fast, universal single-color printing.
- 3MF → Best for preserving print settings, colors, and modern slicer projects.
- OBJ → Best for textured or full-color models and software exchange.
- STEP → Best for editing and engineering; export to STL or 3MF only when it's time to print.
For most hobbyists, a simple rule works well: download in STL, save projects in 3MF, exchange textured assets as OBJ, and always keep a STEP file if the design may change in the future. This approach gives you maximum compatibility today while preserving flexibility for tomorrow.
What File Type Does My Printer / Slicer Need? (Bambu, Creality, Ender 3)
A common misconception is that you need to export a different file type for each printer brand. In reality, you don't export for the printer—you export for the slicer. The slicer is responsible for opening your 3D model, applying print settings, and converting it into G-code, which is the only file your printer actually reads.
Whether you own a Bambu Lab, Creality Ender 3, Prusa, or another FDM printer, the workflow is essentially the same:
Model (STL / 3MF / OBJ) → Slicer → G-code → Printer
The difference lies in which model formats each slicer handles best.
Recommended File Format by Slicer
| Slicer | Recommended Format | Also Supports | Why |
|---|---|---|---|
| Bambu Studio | ⭐ 3MF | STL, OBJ | Preserves build plates, AMS colors, materials, supports, and print settings. |
| OrcaSlicer | ⭐ 3MF | STL, OBJ | Native project format with full printer and profile settings. |
| Creality Print | ⭐ STL (3MF also supported in newer versions) | 3MF, OBJ | STL offers the widest compatibility for Creality printers. |
| Cura (Ender 3) | ⭐ STL | 3MF, OBJ | STL is the safest and most commonly shared format; newer Cura versions also support 3MF. |
| PrusaSlicer | ⭐ 3MF | STL, OBJ | Uses 3MF as its native project format while importing STL and OBJ seamlessly. |
Bambu Studio: Use 3MF Whenever Possible
If you're using a Bambu Lab printer, 3MF is the recommended file format. Bambu Studio saves much more than the model itself—it remembers build plates, support placement, AMS color assignments, print profiles, and other slicer settings. When you reopen a 3MF project, everything is restored exactly as you left it, making it ideal for repeat prints and multi-color jobs.
STL and OBJ also work perfectly well in Bambu Studio, but they don't preserve those project-specific settings.
If you generate your model in Tripo AI Studio, you can send it directly to Bambu Studio in one click — no manual download, save, or re-import needed. The model transfers in 3MF format, keeping your color assignments and print settings intact.
Ender 3 & Creality: STL Is Still the Safe Choice
For Ender 3, Ender 3 V3, and most other Creality printers, STL remains the safest default. If you're downloading models from MakerWorld, Printables, or Thingiverse, they'll almost always be available as STL files and can be opened directly in Cura or Creality Print.
Recent versions of Cura and Creality Print also support 3MF, so if you're creating your own projects and want to save print settings, 3MF is becoming an increasingly practical option.
PrusaSlicer: Built Around 3MF Projects
PrusaSlicer treats 3MF as its native project format, allowing it to store the model together with supports, modifiers, print profiles, and layout information. Importing STL or OBJ files works just as well, but once you've configured a print, saving it as 3MF makes it much easier to reopen and continue later.
So Which Format Should You Choose?
You don't need to memorize different file types for different printer brands. Instead, choose the format that best matches your slicer:
- Using Bambu Studio or OrcaSlicer? → Choose 3MF for projects, STL for simple imports.
- Using Cura or Creality Print? → STL is the safest default; use 3MF if you want to preserve slicer settings.
- Using PrusaSlicer? → Save projects as 3MF, import STL or OBJ whenever needed.
Bottom Line
Your printer doesn't care whether the original model was STL, OBJ, or 3MF—it only prints the G-code produced by the slicer.
As a general rule:
- STL = Maximum compatibility. Works virtually everywhere.
- 3MF = Best modern workflow. Saves colors, materials, supports, and print settings.
- OBJ = Best for textured or full-color models, but rarely necessary for standard FDM printing.
If you're unsure which format to download, choose STL. If your slicer fully supports 3MF, it's usually the better format for saving and sharing complete printing projects.
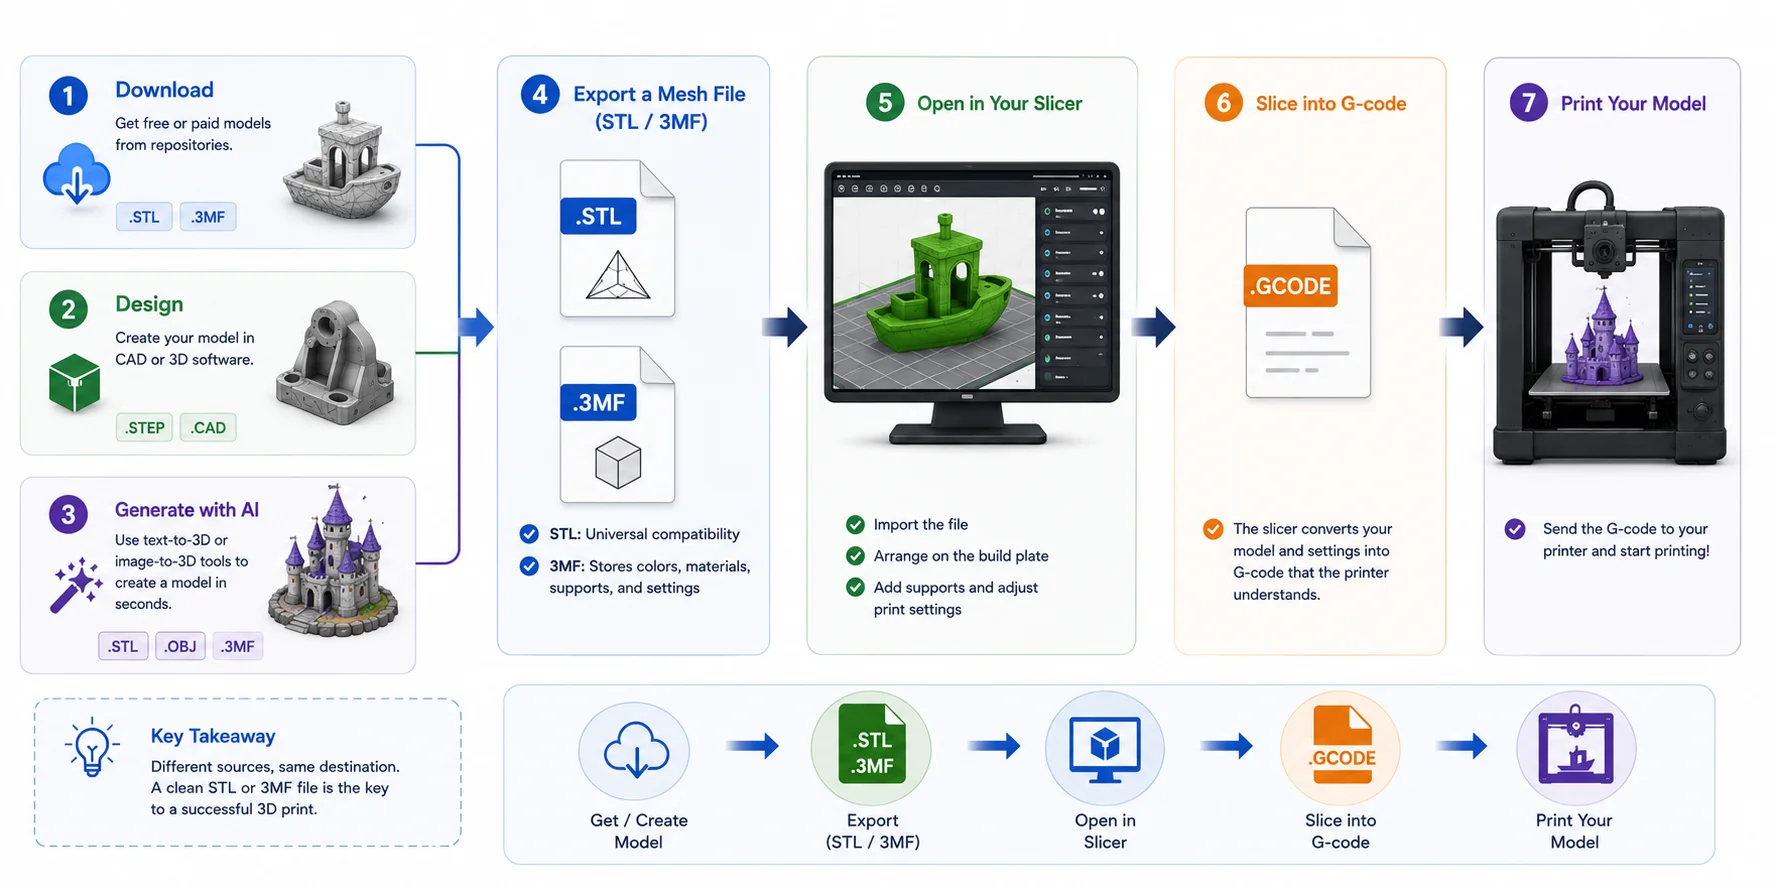
How to Create or Get a Print-Ready 3D File
Now that you know which file format to use, the next question is: Where do you actually get a printable 3D model? Whether you're downloading an existing design, creating one from scratch, or generating it with AI, the end goal is always the same—a mesh file (usually STL or 3MF) that your slicer can convert into G-code.
Option 1: Download Ready-Made Models
The easiest way to start 3D printing is to download a model that someone else has already created. Popular repositories such as MakerWorld, Printables, Thingiverse, and Cults3D offer millions of free and paid designs for everything from replacement parts to tabletop miniatures.
Most downloadable models are provided as STL files because they're compatible with virtually every slicer. Some creators also include 3MF projects, which preserve supports, colors, and slicer settings. If your slicer supports 3MF, it's often the more convenient download.
Best for: Beginners who want to start printing immediately.
Option 2: Design the Model Yourself
If you need a custom part or want complete control over the design, you can create it in CAD or 3D modeling software such as Fusion, SolidWorks, Blender, or FreeCAD. During the design stage, your project is typically saved in a native CAD format like STEP or SLDPRT.
When the model is finished, export it as STL or 3MF before opening it in your slicer. This converts the editable CAD geometry into a printable mesh while preserving the original design file for future edits.
Best for: Functional parts, engineering projects, and custom designs.
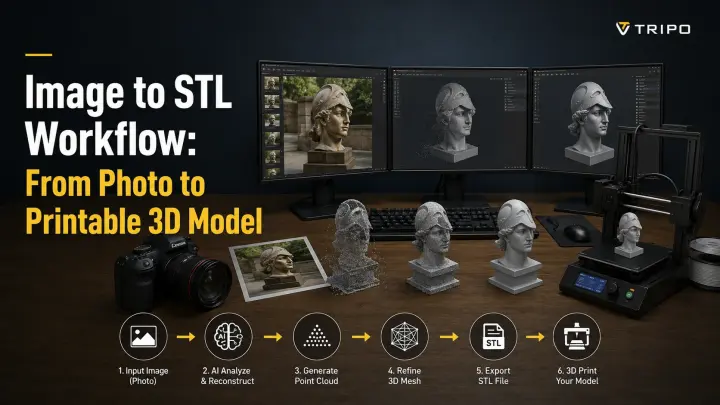
Option 3: Generate a Model with AI
The fastest option today is to let AI generate the model for you. Instead of learning traditional 3D modeling, you can describe an object with text or upload a reference image, and an AI model creates a printable mesh in seconds.
For example, Tripo AI Text to 3D can generate a 3D model from a simple prompt, while Tripo AI Image to 3D reconstructs a model from a single photo or illustration. After generation, you can refine the model if needed and export it in common formats such as STL, OBJ, or 3MF (export requires an eligible paid subscription), making it ready for slicing or further editing in your preferred workflow. The complete process is available through Tripo AI Studio, where generation, editing, and export are handled in one place.
This AI-first workflow is especially helpful if you've ever wondered, "Can I convert a JPEG into an STL file?" The answer is yes—but not by simply changing the file extension. AI reconstructs the 3D geometry from the image first, then exports it as a true printable mesh.
Best for: Beginners, rapid prototyping, concept models, and creators without 3D modeling experience.
No Matter Where the Model Comes From, the Last Step Is Always the Same
Every printable model follows the same final workflow:
Download / Design / Generate with AI
↓
Export as STL or 3MF
↓
Open in Your Slicer
↓
Slice into G-code
↓
Print
Whether your model comes from a free repository, a CAD program, or an AI generator, the printer never sees the original design file. It only receives the G-code created by your slicer. As long as you finish with a clean STL or 3MF file, the printing process is exactly the same.
The 3D Printing Workflow
How to Convert Between 3D Print File Formats
At some point in the 3D printing workflow, you'll probably need to convert one file format into another. The good news is that most conversions are simple—but not every format keeps the same information. For example, STL stores only geometry, so colors and textures are lost when converting from OBJ.
| From | To | How | Notes |
|---|---|---|---|
| STEP / IGES / SLDPRT | STL / 3MF | Export from CAD software | Standard workflow before printing. |
| OBJ | STL | Blender, MeshLab, or online converter | Geometry stays, textures are removed. |
| STL | OBJ | Modeling software | Mesh only—no colors are recovered. |
| JPEG / PNG | STL | Image-to-3D AI or lithophane tool | A 2D image must become a 3D model first. |
STEP → STL / 3MF
This is the standard conversion for 3D printing. CAD files store precise geometry, while slicers require a mesh. Simply export your finished design as STL or 3MF, then import it into your slicer.
OBJ ↔ STL
OBJ and STL both store mesh geometry, but only OBJ supports materials and textures. Converting OBJ to STL removes all color information, while converting STL to OBJ does not recreate textures that never existed.
JPEG → STL
You cannot convert a JPEG into a printable STL by simply changing the file extension. A photo contains only 2D pixels, not 3D geometry. Instead, use an image-to-3D AI tool—such as Tripo AI Image to 3D—to generate a mesh first, then export it as STL, OBJ, or 3MF. For photo reliefs rather than full models, lithophane or heightmap generators are another option.
Rule of thumb: Keep your editable master file (STEP or OBJ), and export STL or 3MF only when you're ready to slice and print.
Common 3D Print File Problems (and Fixes)
Even if you've chosen the right file format, your model may still fail to slice or print correctly. Most problems are easy to fix once you know what's causing them.
| Problem | Likely Cause | Fix |
|---|---|---|
| Non-manifold edges or holes | Broken or incomplete mesh | Repair the mesh in Blender, Meshmixer, or your slicer's repair tool before slicing. |
| File is too large | Excessive triangle count or high-resolution mesh | Decimate the mesh or export a lower-resolution STL/3MF while preserving the overall shape. |
| Slicer can't open the file | Unsupported format or incompatible CAD file | Export or convert the model to STL or 3MF, which are supported by nearly all modern slicers. |
Most file issues are related to the original format. For example, a high-resolution OBJ from a 3D scan may contain millions of triangles, making it slow to load or slice. Exporting a simplified STL or 3MF usually solves the problem without noticeably affecting print quality.
As a general rule, keep your original design or scan for editing, then create a clean STL or 3MF version specifically for printing. This gives you the best balance of compatibility, performance, and print reliability.
Frequently Asked Questions
What file type do I use for 3D printing?
For most people, STL is the safest choice because it works with virtually every slicer and printer workflow. If your slicer fully supports 3MF, it's often the better option because it can also save colors, materials, supports, and print settings. Whichever format you choose, the slicer will convert it into G-code before printing.
Is STL or OBJ better?
Neither format is universally better—they serve different purposes. STL is ideal for fast, single-color 3D printing because it stores only the model geometry and offers maximum compatibility. OBJ is the better choice when you need textures, materials, or full-color models, but those extra features are unnecessary for most standard FDM prints.
Do all 3D printers use STL files?
Not exactly. Most slicers accept STL files, and many also support 3MF and OBJ. However, the printer itself doesn't read STL. Instead, the slicer converts the model into G-code, which contains the machine instructions the printer follows layer by layer.
Can I convert JPEG to STL?
Not by simply renaming the file extension. A JPEG is a 2D image, while an STL is a 3D mesh. You first need to generate 3D geometry using an image-to-3D AI tool or a lithophane/heightmap generator, then export the resulting model as an STL file for slicing and printing.
What is the difference between STL and 3MF?
STL stores only the surface geometry of a 3D model as a mesh of triangles — no color, materials, units, or print settings are included. 3MF is a newer format that packs geometry, colors, materials, support structures, and slicer settings into a single compressed file. For everyday single-color prints, STL works fine. For multi-color workflows or repeatable projects where you want print settings preserved, 3MF is the better choice.
What file format does Bambu Lab use?
Bambu Studio supports STL, OBJ, and 3MF, but 3MF is the recommended format for Bambu printers. A 3MF project file preserves AMS color assignments, build plates, support placement, and print profiles so everything is restored when you reopen it. If you generate your model in Tripo AI Studio, you can send it directly to Bambu Studio in 3MF format with one click.
Can I use an OBJ file for 3D printing?
Yes. Most slicers accept OBJ files, and OBJ is the right choice when your model has textures, materials, or full-color appearance data. For standard single-color FDM printing, however, OBJ offers no practical advantage over STL. The .MTL material file and texture images that accompany an OBJ also make it less convenient to share than a self-contained STL or 3MF.
How do I create a 3D printer file?
There are three main ways to get a printable file. You can download a ready-made model from repositories like MakerWorld, Printables, or Thingiverse, which usually provide STL or 3MF files. You can design one yourself in software such as Fusion 360, SolidWorks, or Blender, then export it as STL or 3MF. Or you can generate one with an AI tool — Tripo AI Studio converts a text prompt or reference image into a printable mesh and exports it as STL, OBJ, or 3MF.
Conclusion
Don't have a model yet? Generate a print-ready 3D model from a photo or text prompt with Tripo AI and export it as STL, OBJ or 3MF — then drop it straight into your slicer.