How to Use AI 3D Models in Roblox Studio (Beginner's Guide)
TL;DR
- Two paths: Roblox's built-in Cube 3D (text-to-mesh inside Studio) or import a model from an external AI generator.
- Export external AI models as FBX, OBJ, or glTF, which Roblox's 3D Importer supports.
- Roblox allows up to 20,000 triangles per individual mesh, but lower budgets are safer for mobile performance.
- Generate game-ready low-poly topology up front to skip most cleanup.
- After import, apply materials/SurfaceAppearance so the mesh isn't a blank gray shape.
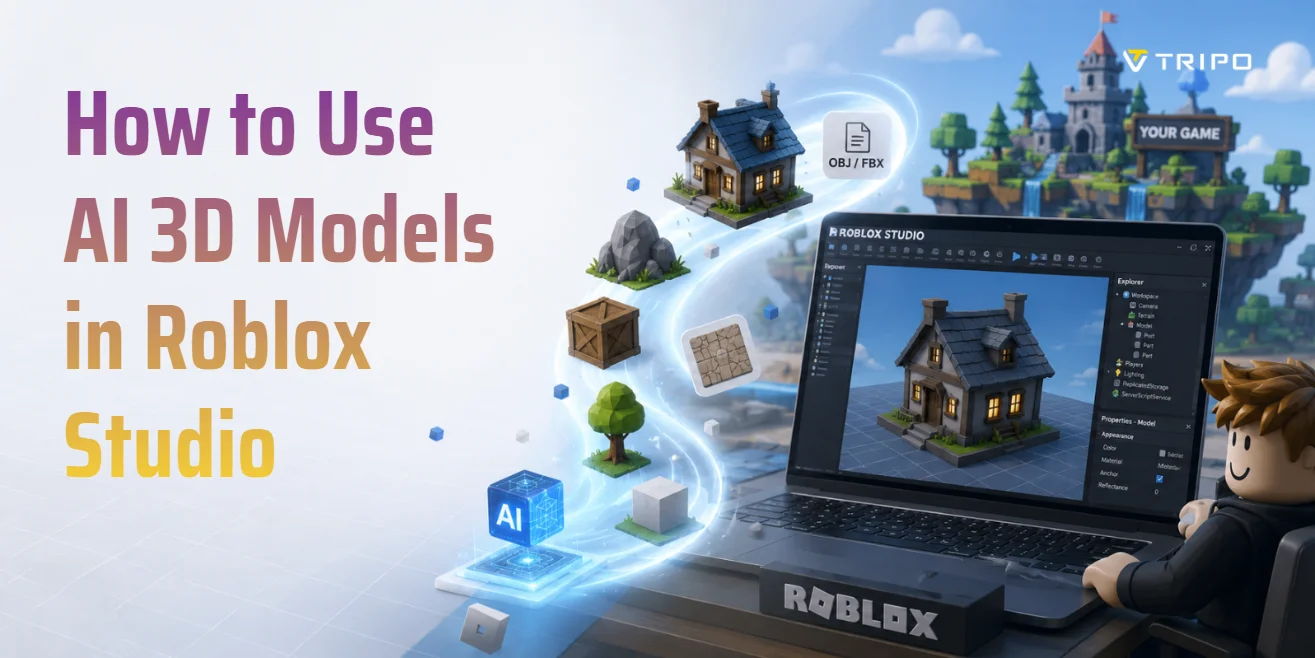
To use AI 3D models in Roblox Studio, you can generate a mesh through Roblox Assistant, powered by Cube 3D, or create one in an external AI 3D tool and import it as FBX, OBJ, or glTF. The external route also requires geometry optimization and PBR material setup. This guide walks through both paths.
Two Ways to Use AI 3D Models in Roblox Studio
There are two practical routes: generate a mesh inside Studio with Roblox Assistant, or create an asset in an external AI tool and import it. The first is faster for prototypes; the second gives you more control over geometry, textures, and reuse.
Path A — Roblox's Built-in Cube 3D
Roblox Assistant can generate a mesh from a natural-language prompt without a separate export or import step. It is a convenient choice for beginners, placeholder props, and rapid gameplay tests.
The main trade-off is control. Assistant-generated meshes are fast to create, but they may not match a project's established art direction or topology standards. Treat the first result as a draft: inspect the silhouette, regenerate when proportions are wrong, and replace or refine the asset before shipping if it will appear close to the player.
Path B — Import from an External AI Generator
For more detailed or reusable assets, generate the model outside Studio with a tool such as Tripo, Meshy, or Sloyd. Export it as FBX, OBJ, or glTF, then bring it into Studio through the 3D Importer.
The external route adds a few steps, but it gives you time to inspect topology, reduce polygons, organize texture maps, and correct scale before the model enters the game. It also makes the source asset reusable in Blender or another engine. This is usually the better route for hero props, a consistent asset set, or models that need several rounds of art review.
Which path should you choose? Use Roblox Assistant for quick prototypes. Choose an external generator when you need stronger art direction, more topology control, or an asset that can move between Roblox and other 3D tools.
AI 3D Models for Roblox Studio
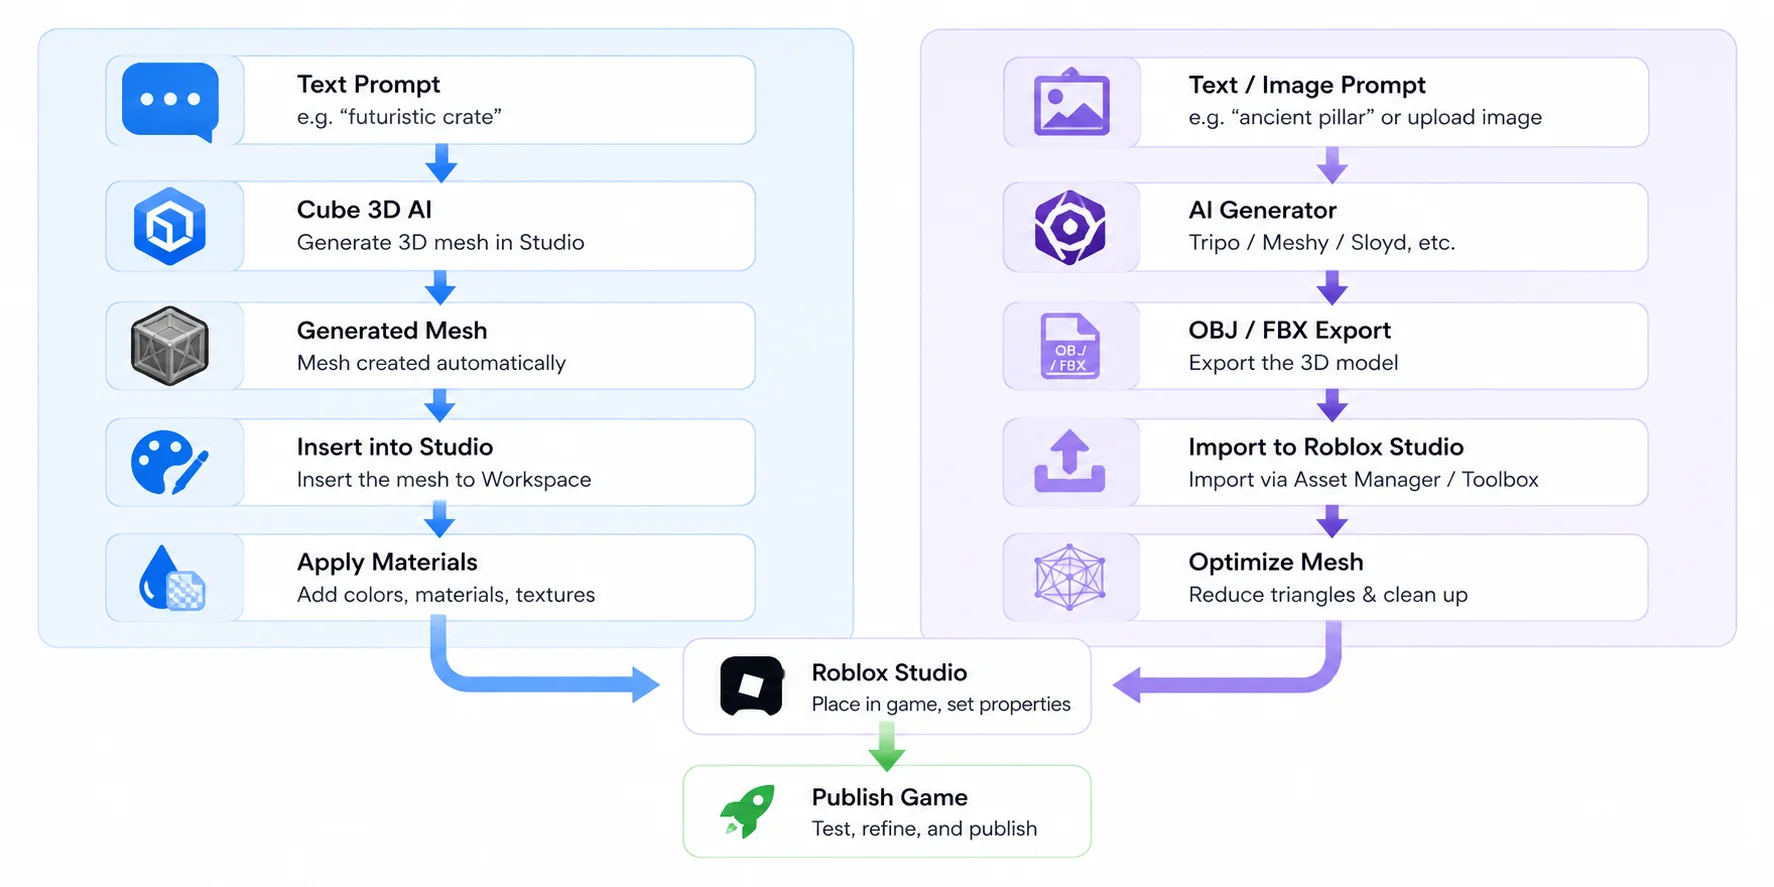
Path A — Generate a Model with Roblox Cube 3D (No Plugins)
If you want to learn how to use AI 3D models in Roblox Studio with the fewest steps, Roblox's built-in Cube 3D assistant is the easiest place to start. Because the AI is integrated directly into Studio, you can generate simple meshes from text prompts without installing third-party plugins or exporting files. This makes it ideal for beginners, rapid prototyping, and testing gameplay ideas before investing time in polished assets.
Open Roblox Assistant
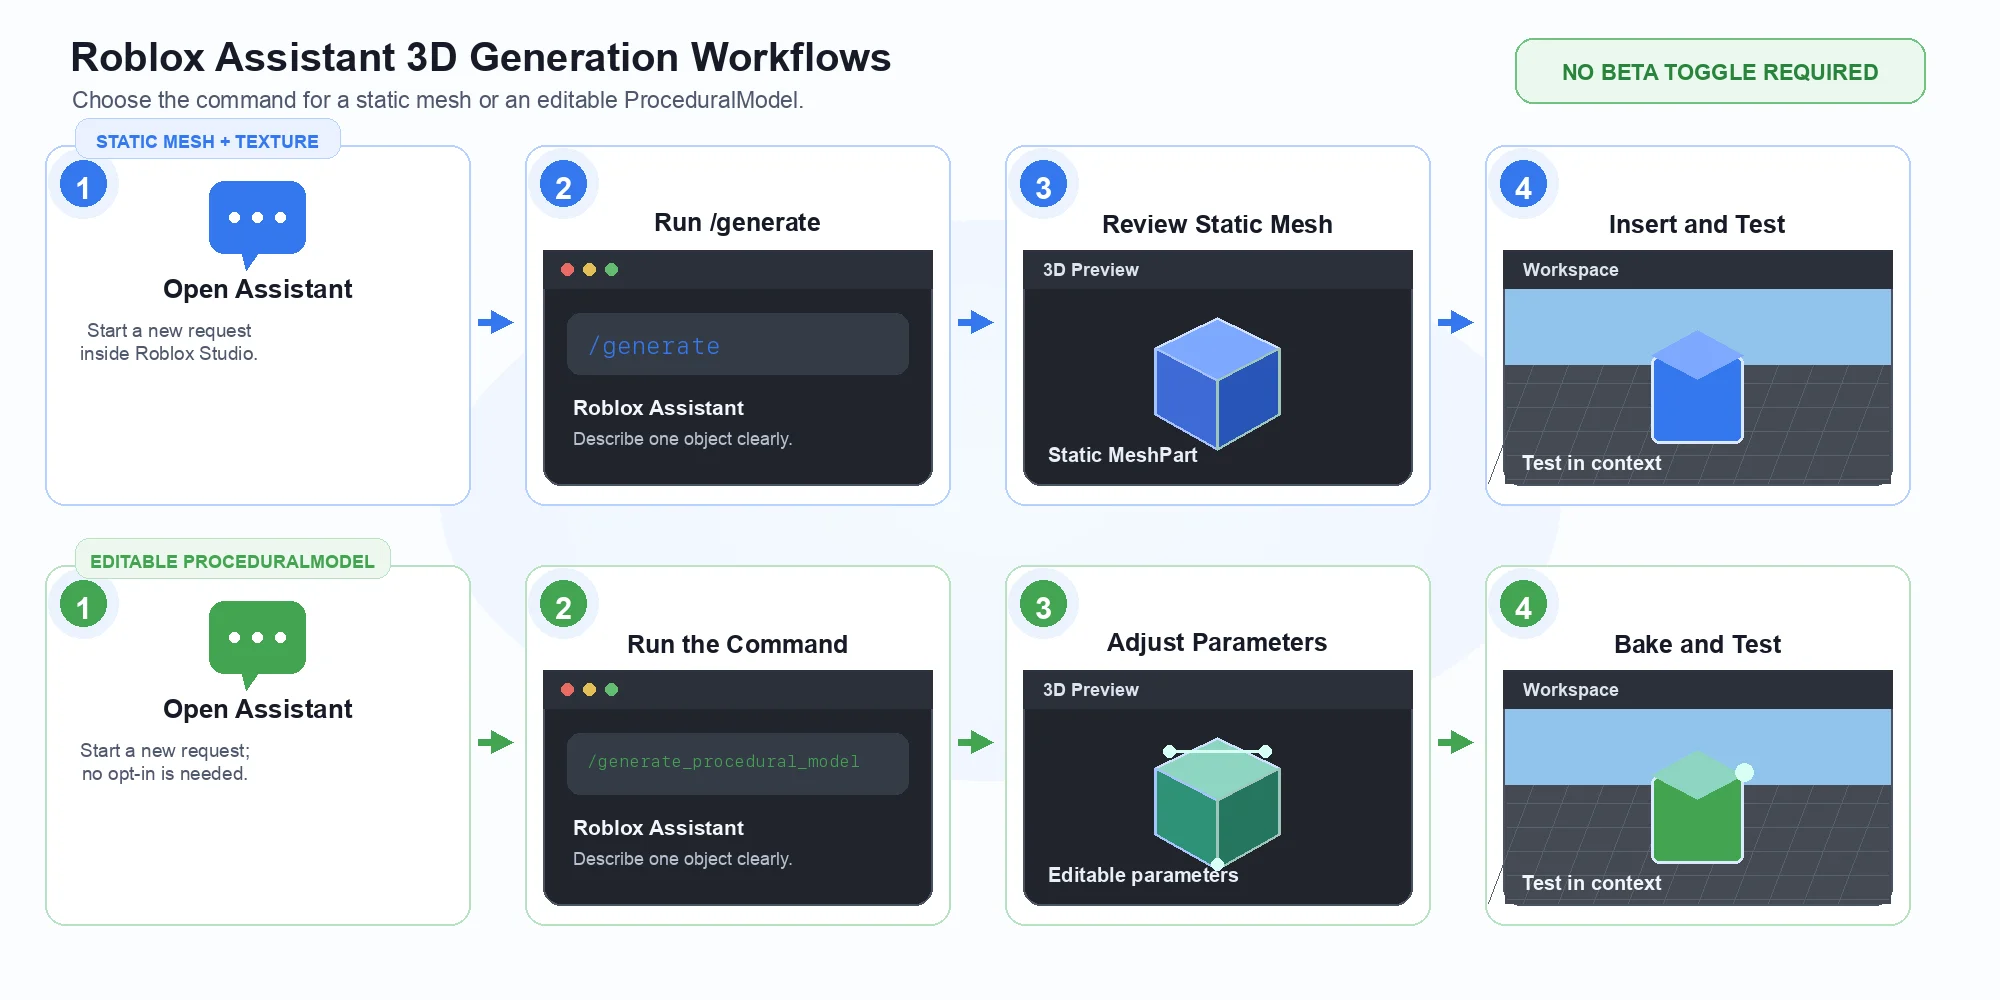
Open the Assistant panel in Roblox Studio and start a new request. Mesh generation no longer depends on enabling Edit-Time Procedural Models in Beta Features. Procedural Models are also available by default; they are a separate, parameter-driven workflow that you can start with /generate_procedural_model.
Roblox Cube 3D Workflow: From Prompt to Playable Asset
Generate a Mesh with a Text Prompt
In the Assistant panel, enter /generate followed by a concise description of one object. Prompts such as "a low-poly wooden treasure chest," "a medieval stone well," or "a futuristic sci-fi crate" work better than long, story-like descriptions. Review the generated mesh, insert it into Workspace, then resize, rotate, and test it. Use /generate_procedural_model only when you specifically want an editable ProceduralModel with parameters.
Best Use Cases—and Current Limitations
Cube 3D works best for placeholder assets, environmental props, and simple objects that help you block out a level quickly. It significantly speeds up early development because you can iterate on ideas without searching asset libraries or modeling everything manually.
However, it is not designed for every asset type. Complex characters, intricate weapons, highly detailed architecture, or production-quality props often require cleaner topology, more accurate proportions, and greater artistic control than Cube currently provides. You may also need to regenerate several times before getting a usable result. If your goal is a polished, reusable asset for a long-term Roblox 3D model workflow, an external AI generator usually produces higher-quality meshes and offers much more flexibility. That's the workflow covered in Path B.
Path B — Generate a Model with an External AI Tool
External AI 3D Model Workflow for Roblox Studio
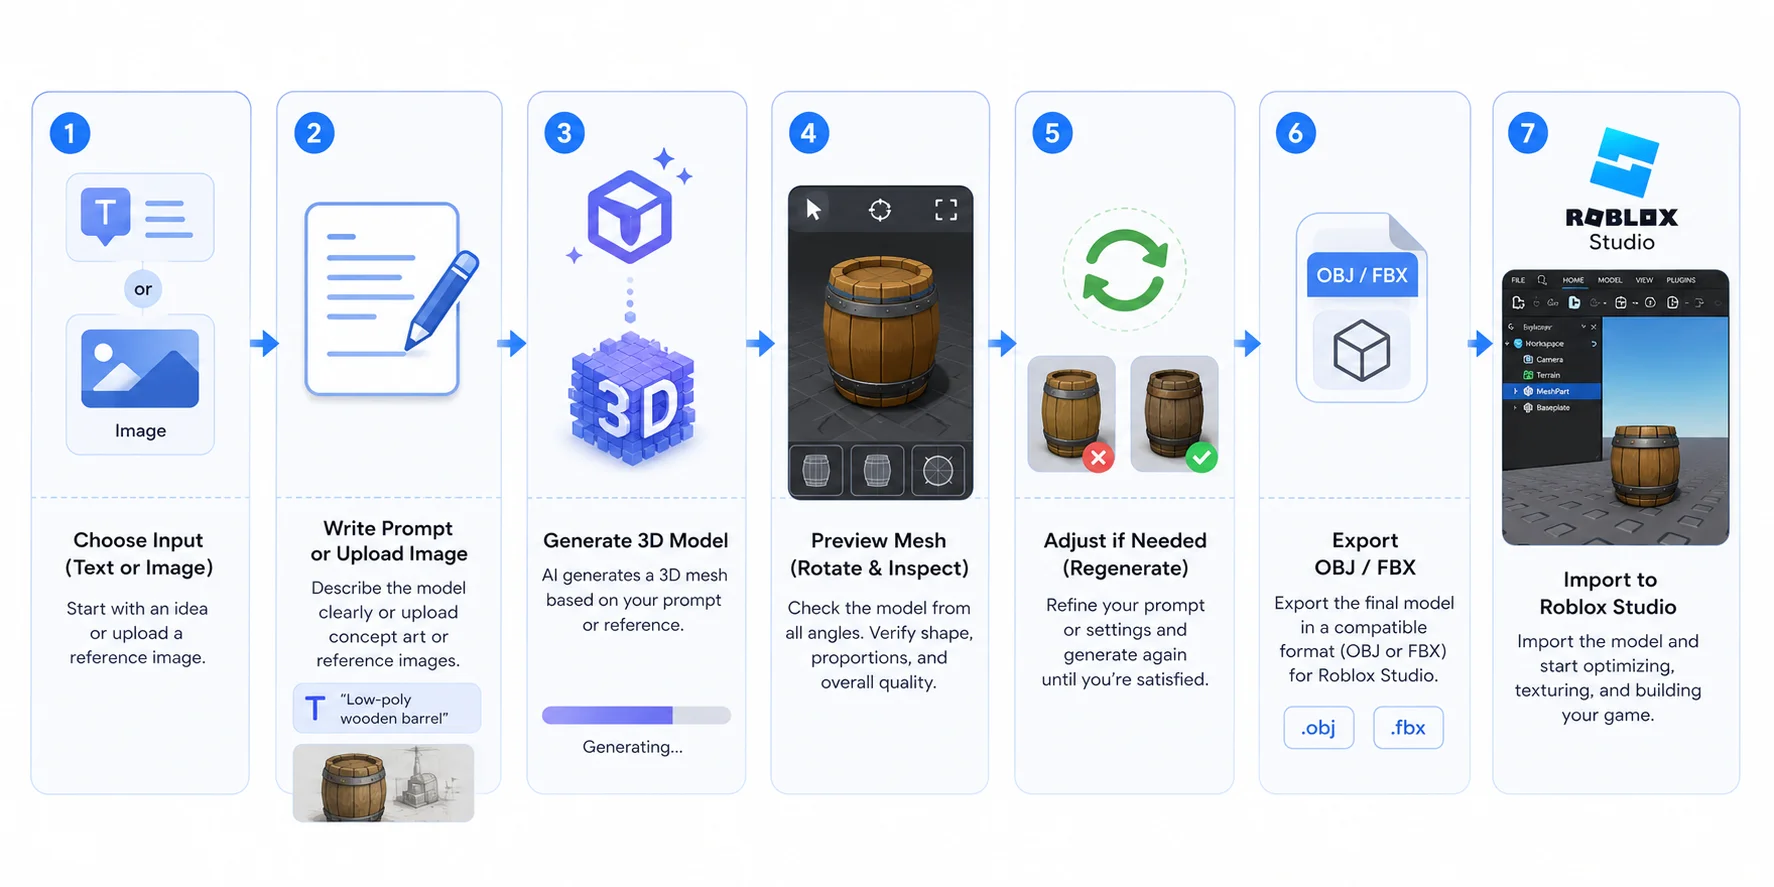
If you need higher-quality assets than Roblox Cube 3D can typically produce, an external AI generator is the better choice. This workflow gives you more control over shape, topology, and style before the model ever reaches Roblox Studio. It's especially useful for reusable game assets, stylized environments, or hero props that need a consistent look across your project. Many creators choose this approach when building a professional Roblox 3D model workflow because the same asset can also be used in Blender, Unity, Unreal Engine, or other pipelines.
Choose Text-to-3D or Image-to-3D
Most AI generators offer two creation methods. Text-to-3D is useful when you are starting with an idea and want to describe the object in natural language. Image-to-3D is often more predictable when you already have concept art, a sketch, or a reference image, because the source helps preserve proportions and silhouette. For a production asset, begin with a clean reference that shows the object clearly.
Use Game-Friendly Generation Settings
Before generating the model, configure the AI for real-time game assets rather than cinematic renders. Keep the prompt focused on one subject, request clean low-poly topology or a game-ready mesh when available, and avoid unnecessary background objects or decorative elements that may become part of the geometry. If the tool supports texture generation, leave enough UV space for materials instead of relying entirely on baked lighting. These settings usually produce cleaner Roblox mesh generation results that are easier to optimize later.
Preview Before You Export
Before downloading, rotate the generated model and inspect every side. Check scale, forward direction, floating geometry, missing surfaces, and stretched textures while you are still in the AI tool. Fixing these issues before export is usually faster than repairing them after import.
Export the Right File Format for Roblox
Before importing an external AI model, export it in a format Roblox Studio supports. The current 3D Importer accepts FBX, OBJ, and glTF.
Choose FBX, OBJ, or glTF
Use OBJ for simple static meshes. Choose FBX or glTF when you need multiple mesh objects, hierarchy, PBR textures, rigs, or animation data. Tripo provides several export formats, but download access, supported model versions, and commercial-use conditions can vary by plan and may change over time. Check the current pricing and terms before building a production workflow around a feature.
Export Textures Together
If your model includes materials, export the texture files along with the mesh. Most AI tools save textures as separate image files, so keep them in the same folder as your OBJ or FBX. Missing textures can cause your model to appear gray or untextured after import.
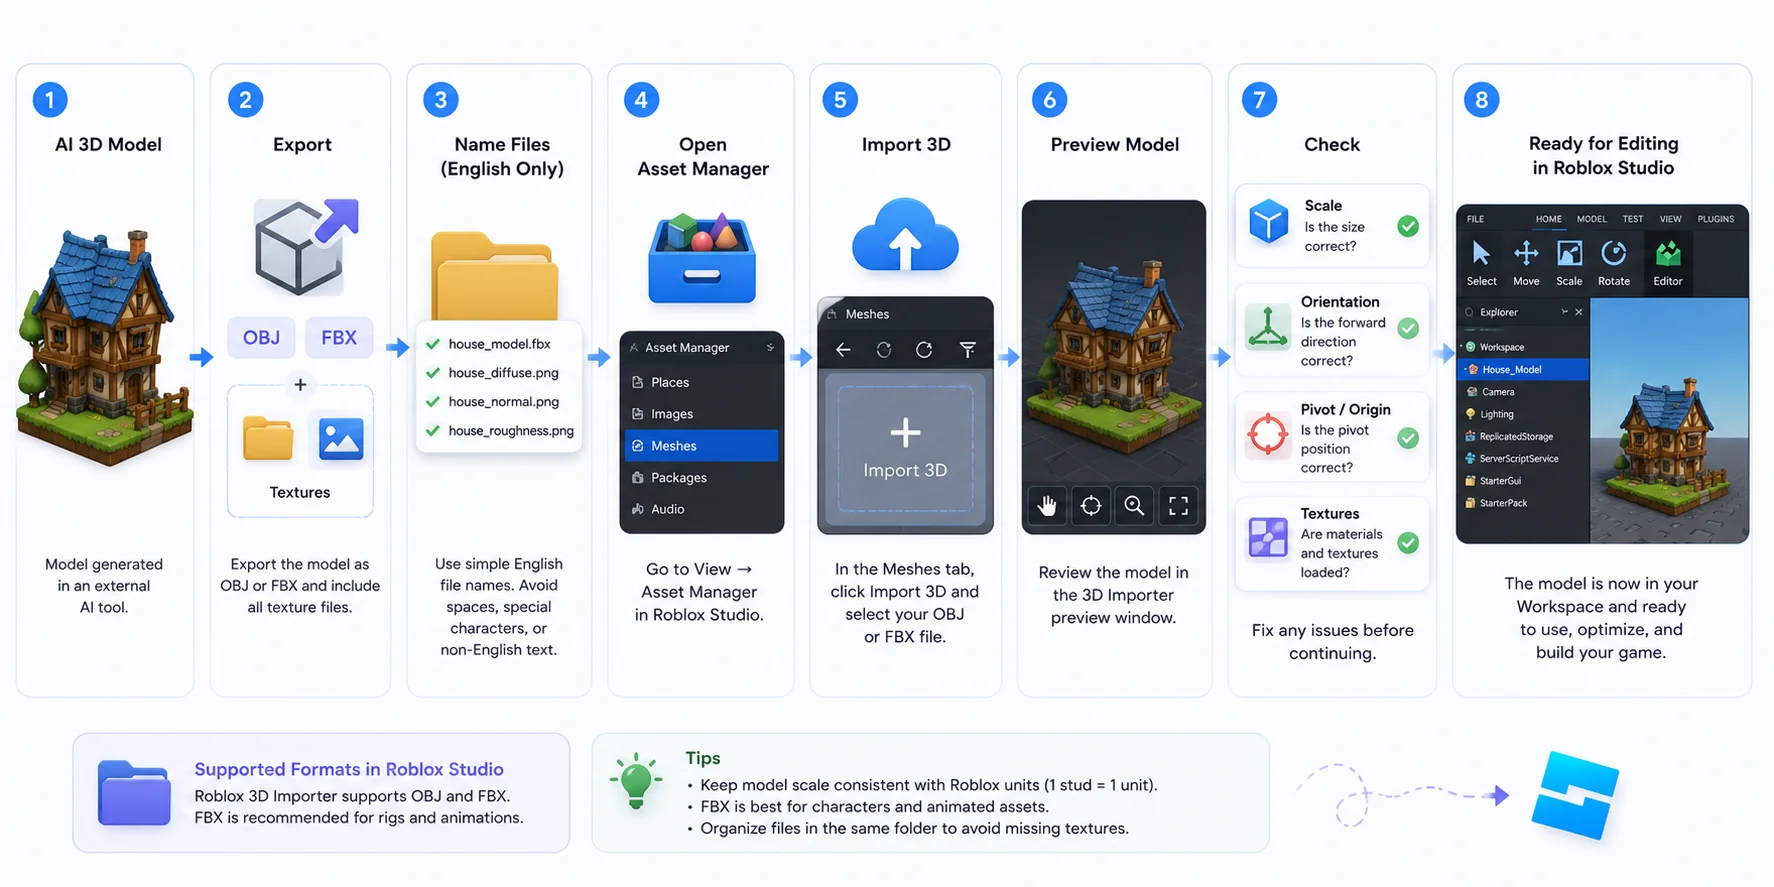
Use Simple File Names
Use short, descriptive file names such as wooden_crate.fbx or stone_wall.obj, and keep the mesh and texture files together. A simple folder structure makes reimporting and troubleshooting easier.
Import the Model into Roblox Studio
If you generated the asset externally, import the exported file into Roblox Studio and review the preview before adding it to your experience. Meshes created directly by Roblox Assistant are already in Studio and do not need this import step.
Use File → Import
Open Roblox Studio, choose File → Import, and select an FBX, OBJ, or glTF file. The 3D Importer shows a preview and lets you review the scene hierarchy and import settings. Confirm the preview, complete the import, and place the resulting MeshPart or model in Workspace.
First-Look Checks
Before continuing, inspect the imported model carefully. Check that the scale matches other Roblox assets, the forward direction is correct, and the pivot point (origin) is positioned where you expect. Also verify that all textures and materials loaded successfully—if the model appears gray, you may need to reassign the texture files. Catching these small issues immediately makes the rest of your Roblox 3D model workflow much smoother and reduces time spent fixing assets later.
Export and Import Workflow for Roblox Studio
Fix the Triangle Limit & Optimize for Performance
AI-generated models often look great, but they're not always ready for real-time games. Before using them in Roblox Studio, it's important to reduce unnecessary geometry and optimize the asset for smooth performance. This step is one of the biggest differences between a good-looking AI model and a game-ready one.
Check the 20,000-Triangle Limit
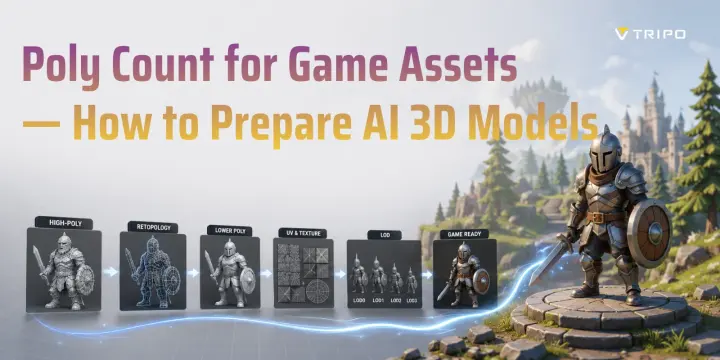
Roblox limits a general individual mesh to 20,000 triangles. AI-generated models can exceed that limit, which may cause import errors. A mesh can still be technically valid below 20,000 triangles and be too expensive for a busy scene, especially on mobile, so treat the limit as a ceiling rather than a target.
Reduce Polygon Count
If your model is too dense, simplify it before importing. Many AI tools include a decimation or polygon reduction option that removes unnecessary faces while preserving the overall shape. Another approach is to generate a game-ready mesh using tools such as Tripo Smart Mesh, which automatically creates cleaner, lower-poly topology in seconds and lets you choose a target face count (for example, around 5K polygons for many game assets). For very large objects, splitting the asset into multiple meshes can also help keep each mesh within Roblox's recommended limits.
Performance Tips
Optimization doesn't stop at polygon count. Keep the number of meshes and parts as low as possible, use LOD (Level of Detail) for larger scenes, and avoid unnecessarily high-resolution textures if smaller maps provide similar visual quality. Finally, import the model into a simple test scene and check frame rate before adding it to your main project. Catching performance issues early makes your Roblox 3D model workflow more efficient and helps ensure the game runs smoothly across desktop and mobile devices.
Apply Materials & Textures to the Imported Mesh
An imported mesh may appear gray even when the export included textures. In Explorer, select the imported MeshPart, add a SurfaceAppearance child, and connect the PBR texture maps to the matching properties:
- ColorMap — the base color or albedo texture.
- NormalMap — small surface detail without extra geometry.
- RoughnessMap — controls whether areas look matte or glossy.
- MetalnessMap — identifies metallic and non-metallic areas.
Upload the texture images to Roblox, then assign their asset IDs in SurfaceAppearance. Tripo can export Base Color, Normal, Roughness, and other PBR maps; use the maps included with your model and preview the asset under the lighting used by your experience. If a map is missing, leave that slot empty rather than assigning an unrelated image.
If the texture looks incorrect, confirm that each image is connected to the matching property and that the model uses suitable UV coordinates. A normal map placed in ColorMap, for example, will produce obviously wrong colors. Also test the material at the final in-game scale and on a lower-end mobile target device: very large textures can waste memory, while maps that are too small may blur on a close-up prop. Adjust texture resolution according to how much screen space the asset occupies and reuse maps when several nearby props share the same type of surface.
AI Models vs the Roblox Toolbox — Which to Use?
Both AI-generated models and the Roblox Toolbox can speed up development, but they solve different problems. The best choice depends on whether you value originality or convenience.
Speed & Uniqueness
The Roblox Toolbox gives you instant access to thousands of free models, making it a fast way to prototype a game. However, popular assets are often reused across many experiences, and community-uploaded models may contain unnecessary scripts or other content that should be reviewed before use. AI-generated assets, by contrast, are created specifically for your project. They give you unique props, characters, and environments while offering more control over style, topology, and overall consistency.
When the Toolbox Still Wins
The Toolbox is still the fastest option for common assets such as basic furniture, trees, roads, or temporary placeholders. If you only need a standard object for testing gameplay, downloading an existing model is usually quicker than generating one with AI. A practical workflow is to use the Toolbox for generic assets and reserve AI generation for custom content that defines your game's visual identity. This combination delivers both speed and originality without slowing development.
When This Workflow Doesn't Work (Limits)
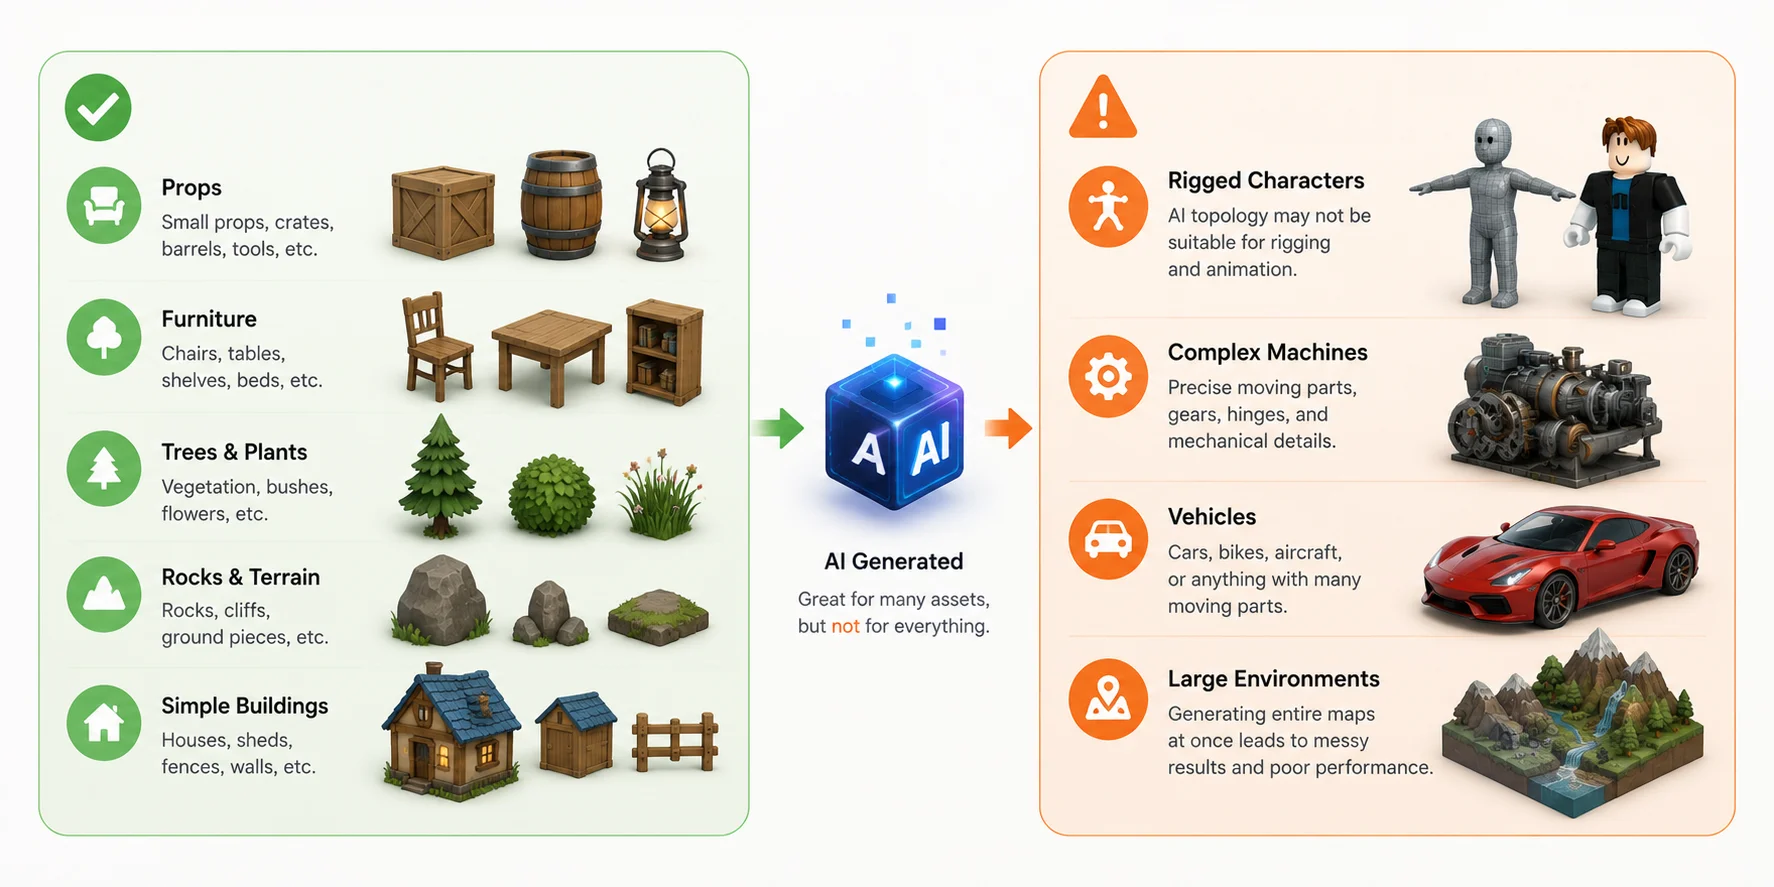
AI can dramatically speed up asset creation, but it is not the right solution for every Roblox project. Understanding its limitations helps you choose the right workflow and avoid spending time fixing assets that would be easier to build manually.
Complex Mechanical Objects
AI-generated models are not ideal for machines with precise moving parts, such as doors with multiple hinges, gears, engines, or mechanical puzzles. These assets often require exact dimensions, collision boundaries, and separate components that AI models may not produce reliably. In these cases, traditional modeling tools usually provide better control.
Rigged Characters and Animation
Although AI can generate character meshes quickly, the topology is not always suitable for rigging or animation. Poor edge flow around joints can lead to unnatural bending in elbows, knees, or facial expressions. If you plan to animate a character, expect to clean up the topology or retopologize the mesh before adding a skeleton.
Large Environments
Generating an entire map in one prompt rarely produces the best results. Instead, create the scene as smaller assets—such as buildings, rocks, trees, and props—and assemble them inside Roblox Studio. This modular workflow makes optimization, editing, and reuse much easier while improving overall game performance.
Best Uses and Limitations of AI 3D Models for Roblox
Frequently Asked Questions
How do I make Roblox models using AI?
You can generate a mesh inside Studio with Roblox Assistant, or create one with an external text-to-3D or image-to-3D tool. For the external route, export the asset as FBX, OBJ, or glTF, import it through File → Import, then optimize the geometry and assign materials.
Can I use AI in Roblox Studio?
Yes. Roblox Studio includes Assistant-based 3D generation. Use /generate for a generated mesh, or /generate_procedural_model for a parameter-driven ProceduralModel. Neither workflow currently requires the old Edit-Time Procedural Models beta toggle.
Can Roblox's new AI model generate 3D objects?
Yes. Roblox's Cube 3D technology powers mesh generation through Assistant. Enter /generate with a natural-language description to create a mesh in Studio. It is useful for quick props and prototypes, while complex production assets may still need external modeling or cleanup.
What file format do I export for Roblox?
Roblox Studio's 3D Importer supports FBX, OBJ, and glTF. OBJ is a straightforward choice for a single static mesh, while FBX and glTF can carry richer scene structure, PBR textures, rigs, and animation data.
What is Roblox Studio's maximum triangle limit for imported meshes?
The maximum for a general individual mesh is 20,000 triangles. For good performance, especially on mobile or in scenes with many assets, use the lowest triangle count that preserves the silhouette and important details.
How do I reduce the polygon count on an AI 3D model?
Most AI 3D tools include a decimation or polygon reduction feature that removes unnecessary faces while preserving the model's overall shape. You can also generate a lower-poly version using game-focused tools such as Smart Mesh, or manually retopologize the asset in 3D software like Blender. After optimization, preview the model and verify that the silhouette and important details are still preserved before importing it into Roblox Studio.
Conclusion
Roblox Assistant and external AI generators lead to different workflows. Assistant can place a generated mesh directly in Studio, while an external asset must be exported, imported, optimized, and connected to its PBR textures. In both cases, test the result in context and keep geometry and texture costs appropriate for your target devices. To build an external asset, generate a model in Tripo AI Studio, export a Roblox-supported format, and bring it into your experience.