How to Edit STL Files: Best Software & Step-by-Step (2026)
TL;DR
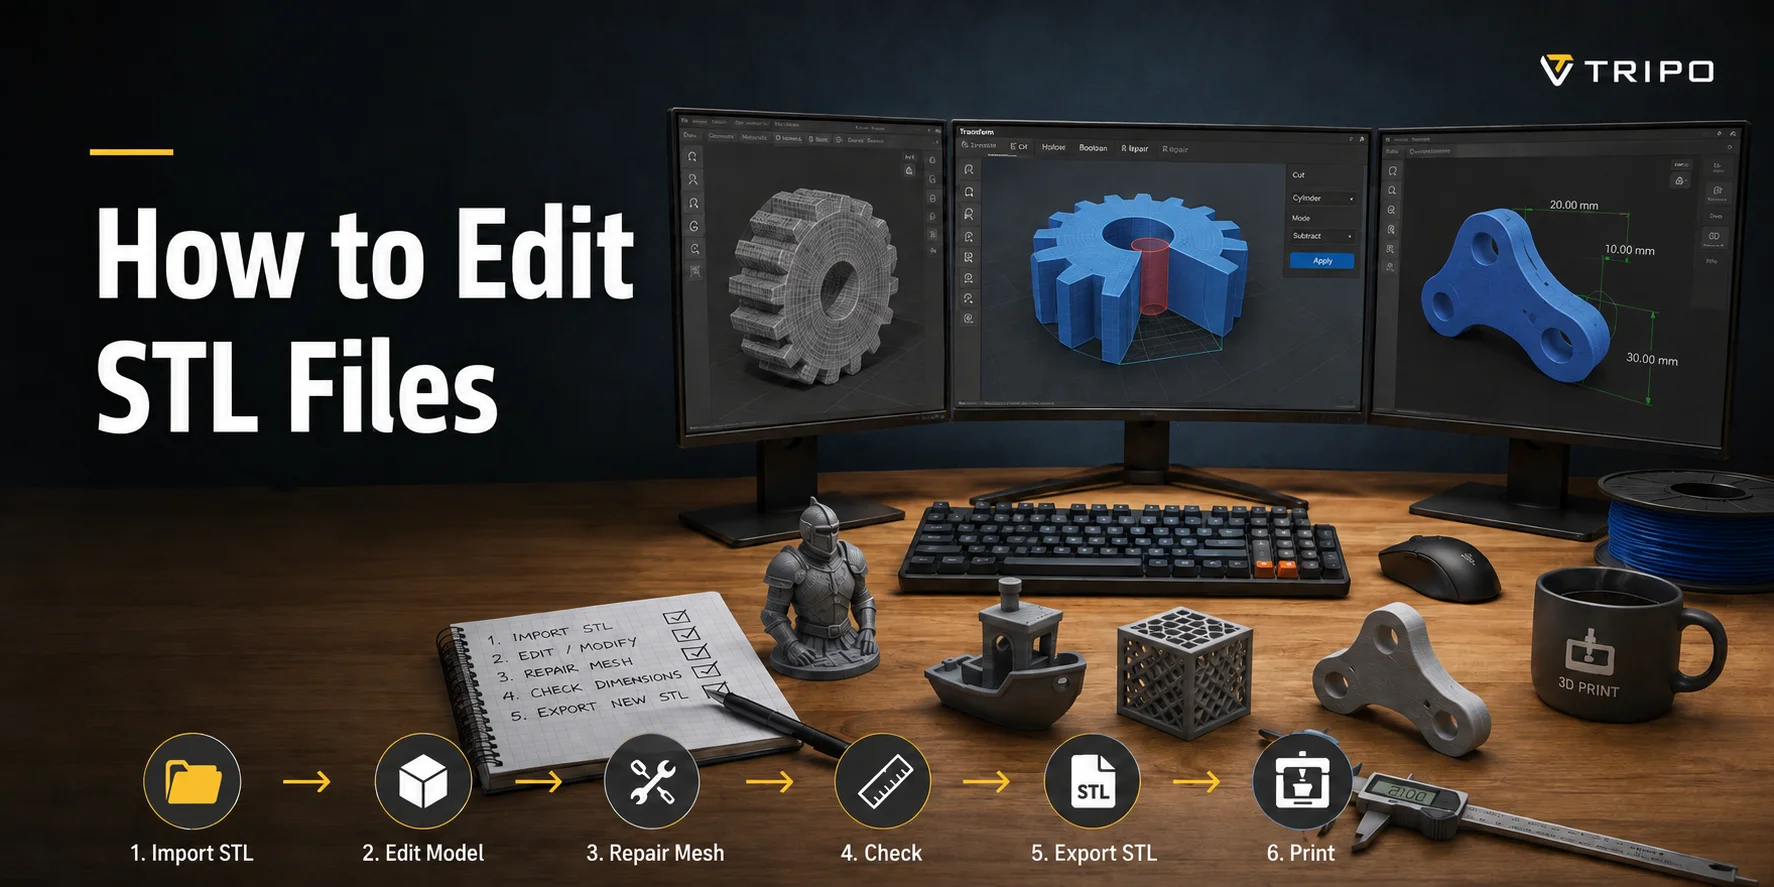
STL files are widely used for 3D printing, but they can be difficult to edit because they store only mesh geometry rather than editable CAD features. Depending on the change you need to make, you may edit the mesh directly or convert it into a solid model first.
For simple edits, tools like Tinkercad and Meshmixer are great for adding holes, text, resizing, or combining models. Blender is ideal for sculpting and organic shapes, while Fusion 360 is best for precise engineering changes.
Before printing, check for mesh issues such as holes, non-manifold geometry, and flipped normals. Repair tools like Meshmixer, MeshLab, and Netfabb can quickly fix many common STL problems.
If a mesh is too messy to edit manually, rebuilding it can be faster than repairing it. Tools like Tripo AI Studio can help generate cleaner 3D models that are easier to edit, optimize, and export as STL files.
To edit an STL file, import it into a mesh or CAD tool that can modify it: use Tinkercad or Meshmixer for quick edits (cut, hollow, add holes), Blender for sculpting organic shapes, or Fusion 360/FreeCAD to convert the mesh into a solid for precise, dimensional changes. The right tool depends on the edit you need.
What Is an STL File (and Why It's Tricky to Edit)?
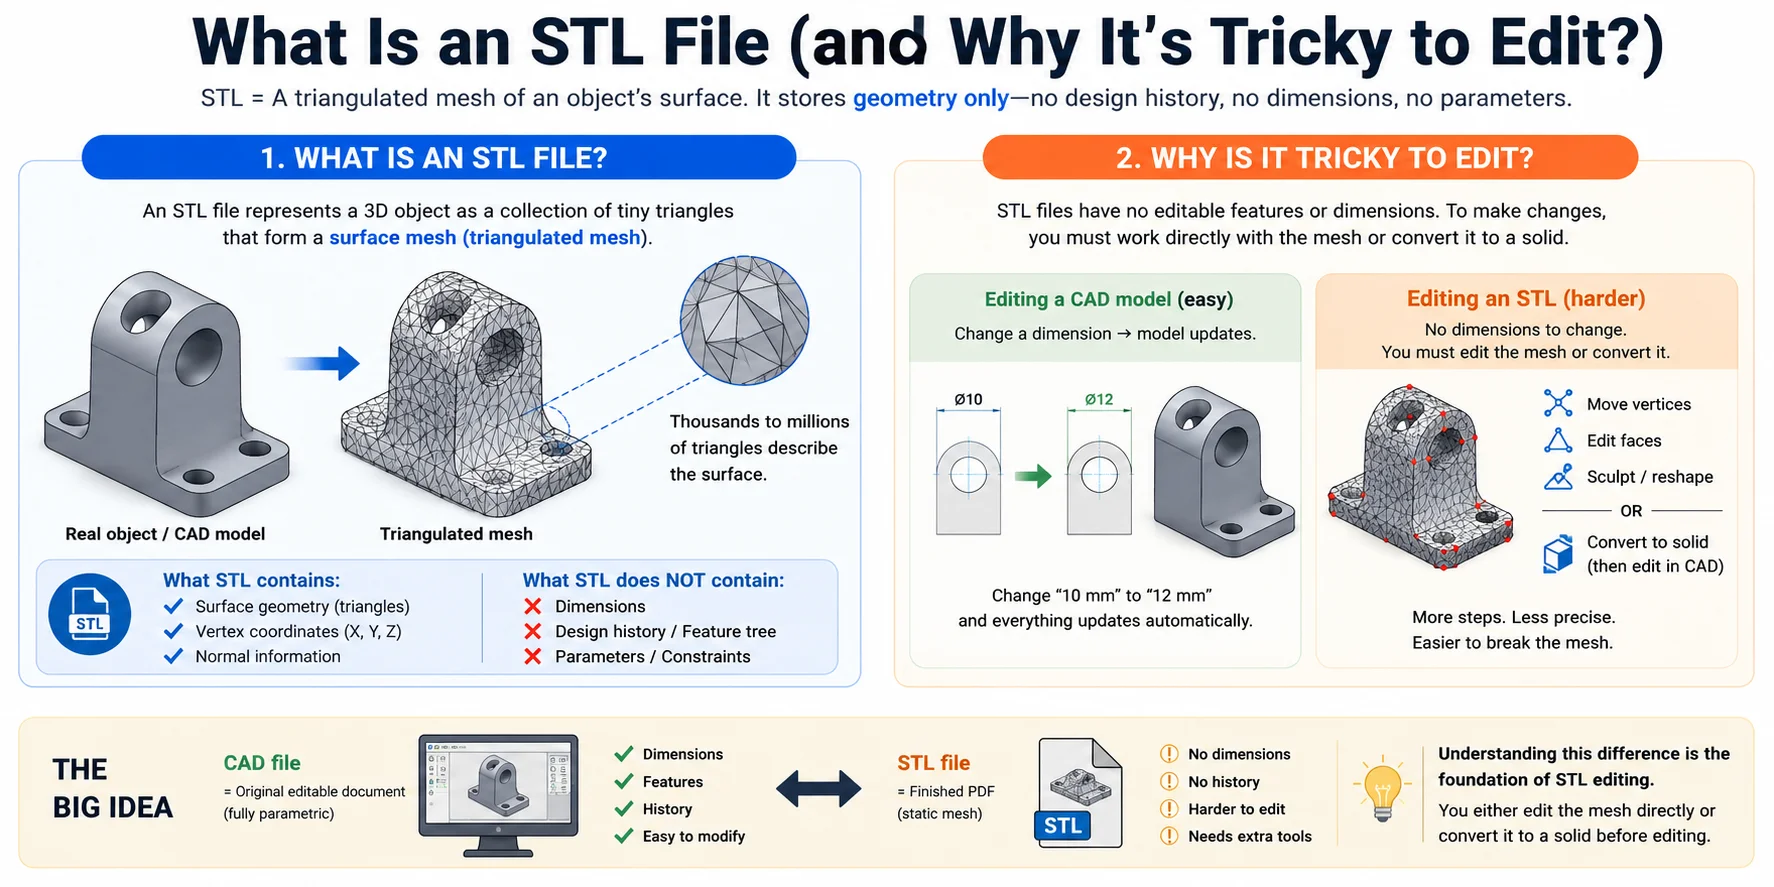
An STL file is the most common file format used in 3D printing. Instead of storing a model as editable features, dimensions, or design history, an STL represents an object as a collection of thousands (or even millions) of tiny triangles. These triangles form a surface mesh, also known as a triangulated mesh, that describes the shape of the model.
The key limitation of STL is that it only stores geometry. It does not contain the parametric information found in CAD files, such as sketches, dimensions, feature trees, holes, fillets, or design history. Once a model is exported to STL, all of that editable information is essentially flattened into a static mesh.
This is why editing an STL file is often more difficult than editing a CAD model. In a CAD program, you can simply change a dimension—such as increasing a hole diameter from 10 mm to 12 mm—and the model updates automatically. With an STL, there are no dimensions to modify. Instead, you must manually move vertices, edit mesh faces, sculpt the geometry, or convert the mesh back into a solid body before making precise changes.
Think of it this way: a CAD file is like the original editable document, while an STL is more like a finished PDF. You can still make changes, but the process is less direct and often requires additional tools or conversion steps.
Understanding this difference is the foundation of STL editing. In most cases, successful STL modification involves either editing the mesh itself or converting the STL into a solid model that can be modified using CAD tools.
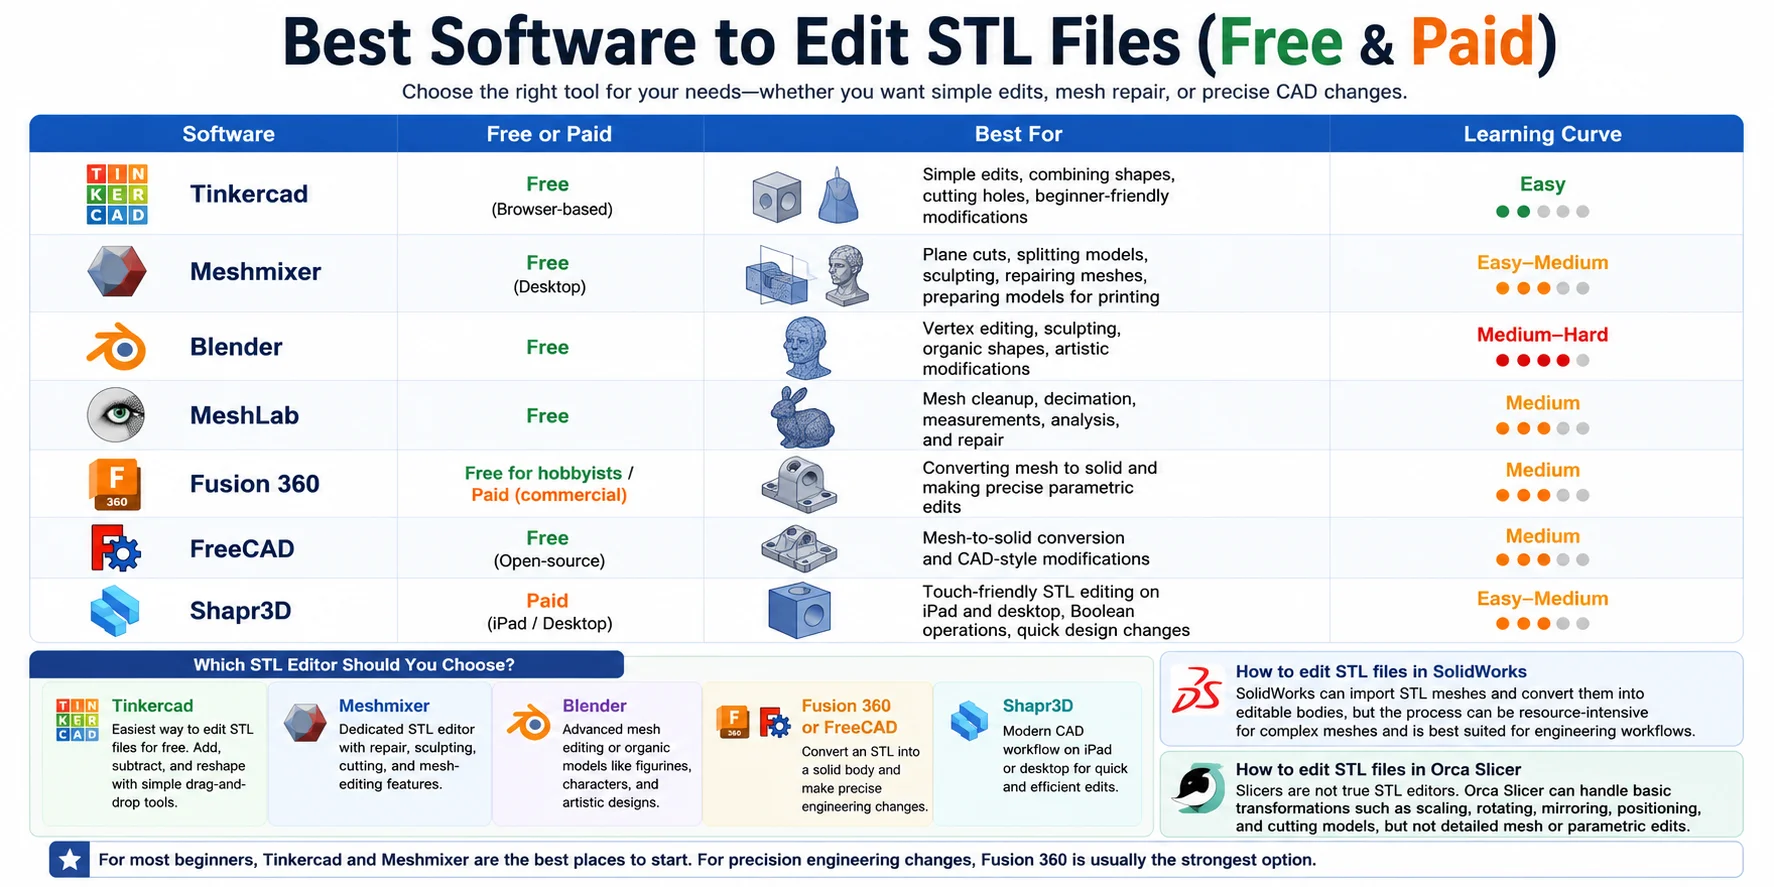
Best Software to Edit STL Files (Free & Paid)
If you're wondering how to edit STL files, the best software depends on the type of changes you want to make. Some tools are ideal for simple mesh edits, while others can convert an STL into a solid model for more precise CAD-style modifications.
Which STL Editor Should You Choose?
- Choose Tinkercad if you need the easiest way to edit STL files for free. It's browser-based and lets you add, subtract, and reshape models using simple drag-and-drop tools.
- Choose Meshmixer if you want a dedicated STL editor with repair, sculpting, cutting, and mesh-editing features.
- Choose Blender for advanced mesh editing or organic models such as figurines, characters, and artistic designs.
- Choose Fusion 360 or FreeCAD if you need to convert an STL into a solid body and make precise engineering changes.
- Choose Shapr3D if you prefer a modern CAD workflow on an iPad or desktop device.
For users searching for how to edit STL files in SolidWorks, SolidWorks can import STL meshes and convert them into editable bodies, but the process can be resource-intensive for complex meshes and is generally best suited for engineering workflows.
If you're looking for how to edit STL files in Orca Slicer, keep in mind that slicers are not true STL editors. Orca Slicer can handle basic transformations such as scaling, rotating, mirroring, positioning, and cutting models, but it cannot perform detailed mesh editing or parametric modifications.
For most beginners, Tinkercad and Meshmixer are the best places to start. For precision engineering changes, Fusion 360 is usually the strongest option.
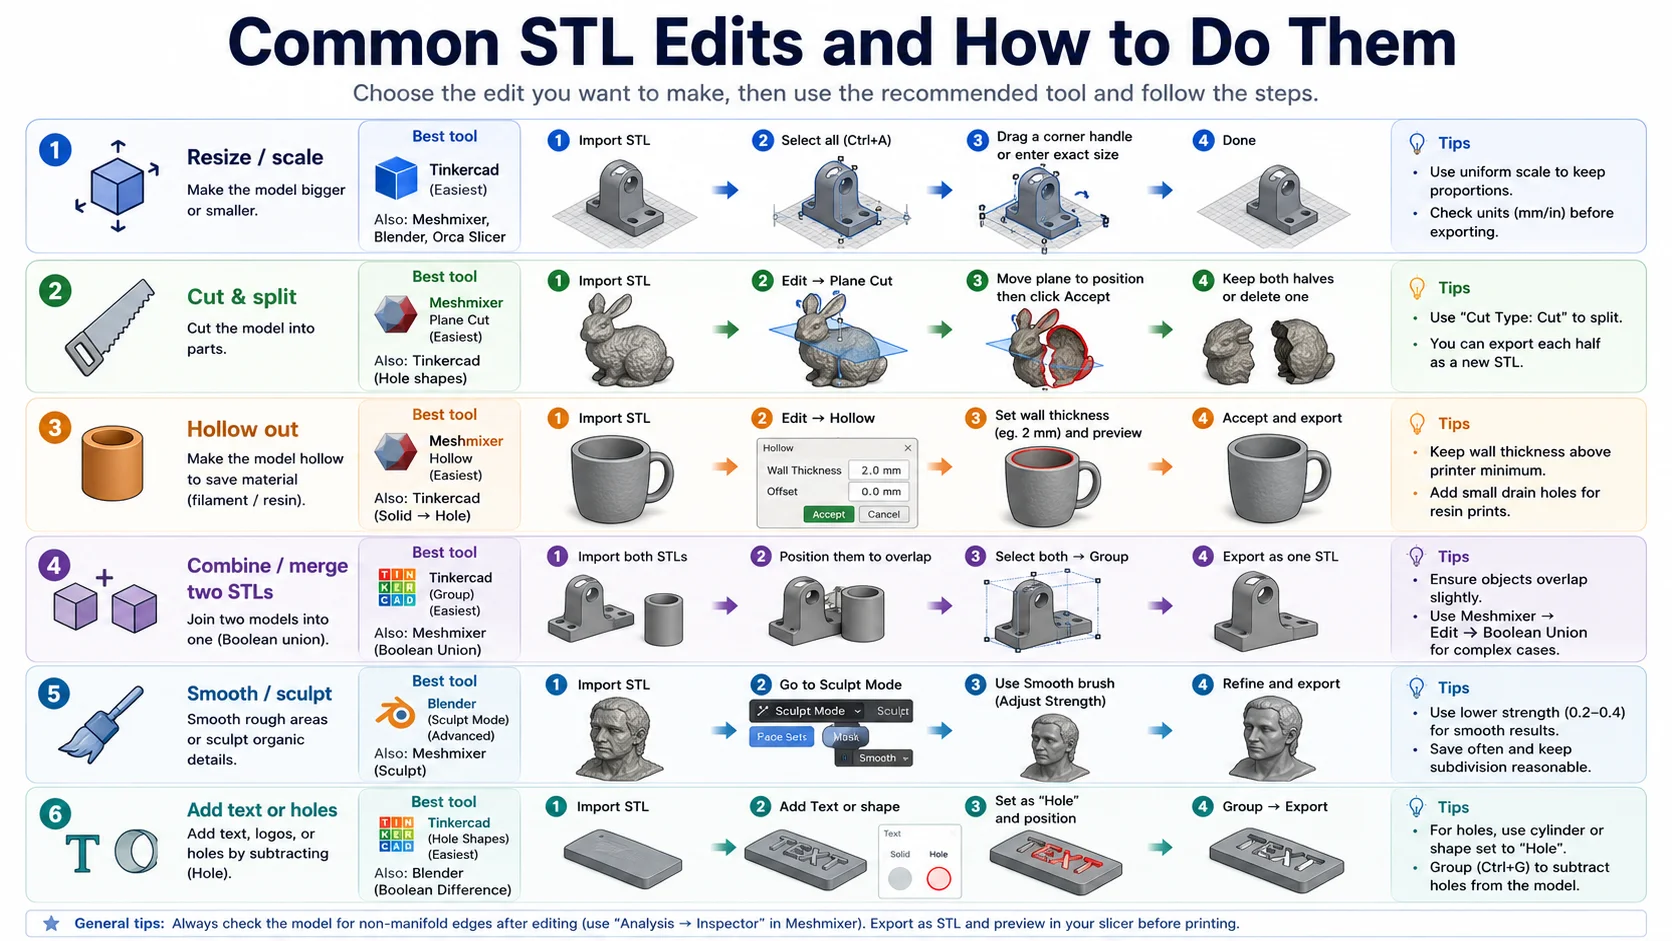
Common STL Edits and How to Do Them
Most people don't actually want to "edit an STL file"—they want to make a specific change. Maybe you need to resize a model, cut it into parts, add a mounting hole, or combine two designs. The easiest workflow depends on the edit you're trying to make.
Use the guide below to jump directly to the task you need.
Resize or Scale an STL
Best tool: Tinkercad, Meshmixer, Blender, or even Orca Slicer
If your model is the wrong size, scaling is usually the fastest fix.
How to do it:
- Import the STL file.
- Select the model.
- Use the Scale tool.
- Enter an exact size or drag the scale handles.
- Export the updated STL.
Good for: Enlarging miniatures, shrinking cosplay parts, correcting unit mistakes, or fitting a model to your printer's build volume.
Tip: If you're only changing size before printing, Orca Slicer can do this directly without editing the STL itself.
Cut and Split an STL
Best tool: Meshmixer (Plane Cut)
Large models often need to be divided into smaller pieces for printing.
How to do it in Meshmixer:
- Import the STL.
- Select Edit → Plane Cut.
- Move and rotate the cutting plane.
- Choose whether to keep one side or both sides.
- Click Accept.
- Export each section as a separate STL.
Good for: Splitting helmets, props, large cosplay parts, and oversized prints.
Tip: If you keep both halves, you can add alignment pins later for easier assembly.
Hollow Out a Model
Best tool: Meshmixer
Hollowing reduces material usage and can significantly lower resin printing costs.
How to do it:
- Import the STL.
- Choose Edit → Hollow.
- Set the wall thickness (typically 2–3 mm).
- Preview the result.
- Add drain holes if printing in resin.
- Export the new STL.
Good for: Statues, busts, figurines, and large decorative models.
Tip: Always check that the wall thickness is strong enough for your printing process.
Combine or Merge Two STL Files
Best tool: Tinkercad (easy) or Meshmixer (advanced)
Want to attach a bracket, combine multiple parts, or create a custom remix? Use a Boolean union.
How to do it in Tinkercad:
- Import both STL files.
- Position them so they overlap slightly.
- Select both objects.
- Click Group.
- Export the merged model as a new STL.
How to do it in Meshmixer:
- Import multiple meshes.
- Select them.
- Choose Edit → Boolean Union.
- Accept the result and export.
Good for: Kitbashing models, adding mounting features, and creating custom assemblies.
Smooth or Sculpt an STL
Best tool: Blender
When a model looks rough, blocky, or needs artistic adjustments, sculpting tools provide much more control than traditional CAD software.
How to do it in Blender:
- Import the STL.
- Switch to Sculpt Mode.
- Use the Smooth brush to soften surfaces.
- Use sculpting brushes to reshape details.
- Export the modified STL.
Good for: Characters, miniatures, statues, creature models, and organic shapes.
Tip: Use lower brush strength for subtle changes and avoid over-smoothing important details.
Add Text or Holes
Best tool: Tinkercad
Adding a name, logo, serial number, or mounting hole is one of the most common STL modifications.
How to add text:
- Import the STL.
- Drag a Text object onto the workspace.
- Position and resize it.
- Group the objects together.
- Export the STL.
How to add a hole:
- Drag a cylinder or shape onto the model.
- Change the shape type to Hole.
- Position it where material should be removed.
- Select both objects and click Group.
- Export the result.
Good for: Personalized gifts, nameplates, mounting points, cable-routing holes, and custom branding.
Quick Tool Guide
The fastest way to edit an STL is usually not choosing the most powerful software—it's choosing the tool that matches the specific change you want to make.
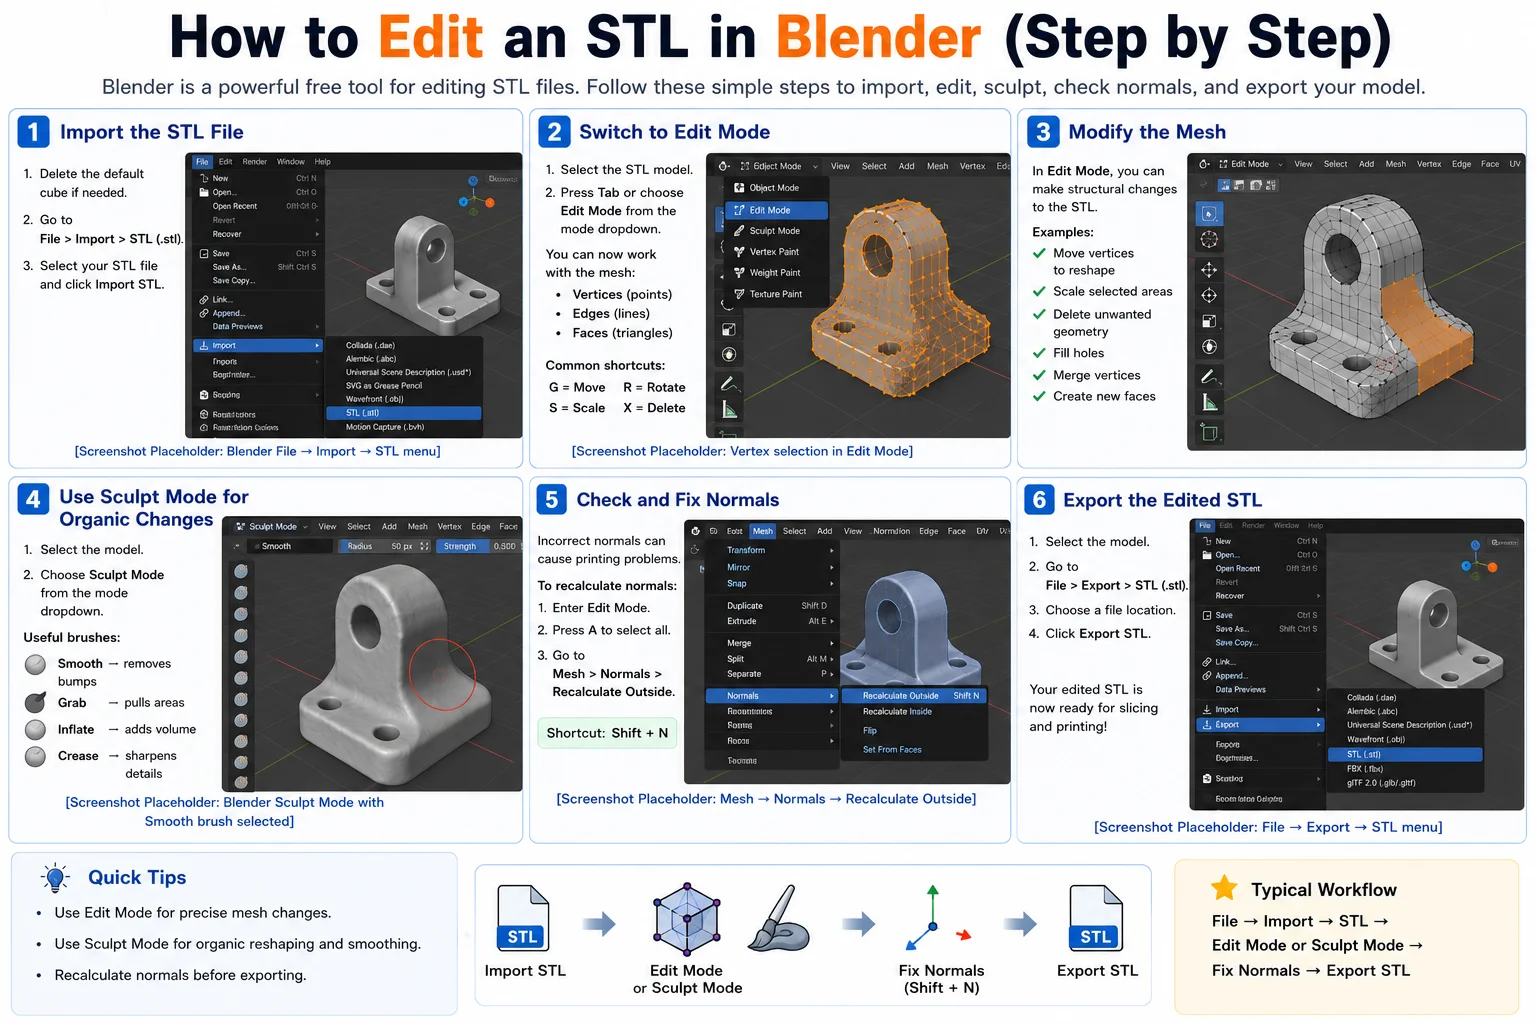
How to Edit an STL in Blender (Step by Step)
Blender is one of the most powerful free tools for editing STL files. Unlike CAD software, Blender works directly with mesh geometry, making it ideal for reshaping, sculpting, smoothing, and repairing STL models. If you're searching for how to edit STL files in Blender, the workflow is surprisingly straightforward once you know where the key tools are located.
Step 1: Import the STL File
Open Blender and start with a new project.
- Delete the default cube if needed.
- Go to File → Import → STL (.stl).
- Select your STL file and click Import STL.
Your model will appear in the viewport as a mesh object.
Step 2: Switch to Edit Mode
For precise mesh editing, enter Edit Mode.
- Select the STL model.
- Press Tab or choose Edit Mode from the mode dropdown in the upper-left corner.
You can now work directly with the mesh's vertices (points), edges (lines), and faces (triangles). Use the selection icons in the toolbar to switch between these modes.
Common shortcuts: G = Move, R = Rotate, S = Scale, X = Delete
Step 3: Modify the Mesh
Once in Edit Mode, you can make structural changes to the STL, including moving vertices to reshape the model, scaling selected areas, deleting unwanted geometry, filling holes, merging vertices, and creating new faces.
Step 4: Use Sculpt Mode for Organic Changes
If you need to smooth, reshape, or add organic details, switch to Sculpt Mode.
- Select the model.
- Open the mode dropdown.
- Choose Sculpt Mode.
Useful brushes: Smooth (removes bumps), Grab (pulls areas into new shapes), Inflate (adds volume), Crease (sharpens details). This workflow is especially useful for miniatures, characters, statues, and scanned models.
Step 5: Check and Fix Normals
To recalculate normals: enter Edit Mode, press A to select all geometry, go to Mesh → Normals → Recalculate Outside (shortcut: Shift + N). This ensures face directions are consistent and outward-facing.
Step 6: Export the Edited STL
- Select the model.
- Go to File → Export → STL (.stl).
- Choose a file location.
- Click Export STL.
The edited STL is now ready for slicing in software such as Bambu Studio, Orca Slicer, PrusaSlicer, or Cura.
Quick Tips for STL Editing in Blender
- Use Edit Mode for precise mesh changes.
- Use Sculpt Mode for organic reshaping and smoothing.
- Recalculate normals before exporting.
- Keep an eye on mesh quality after major edits.
- Test the exported STL in your slicer before printing.
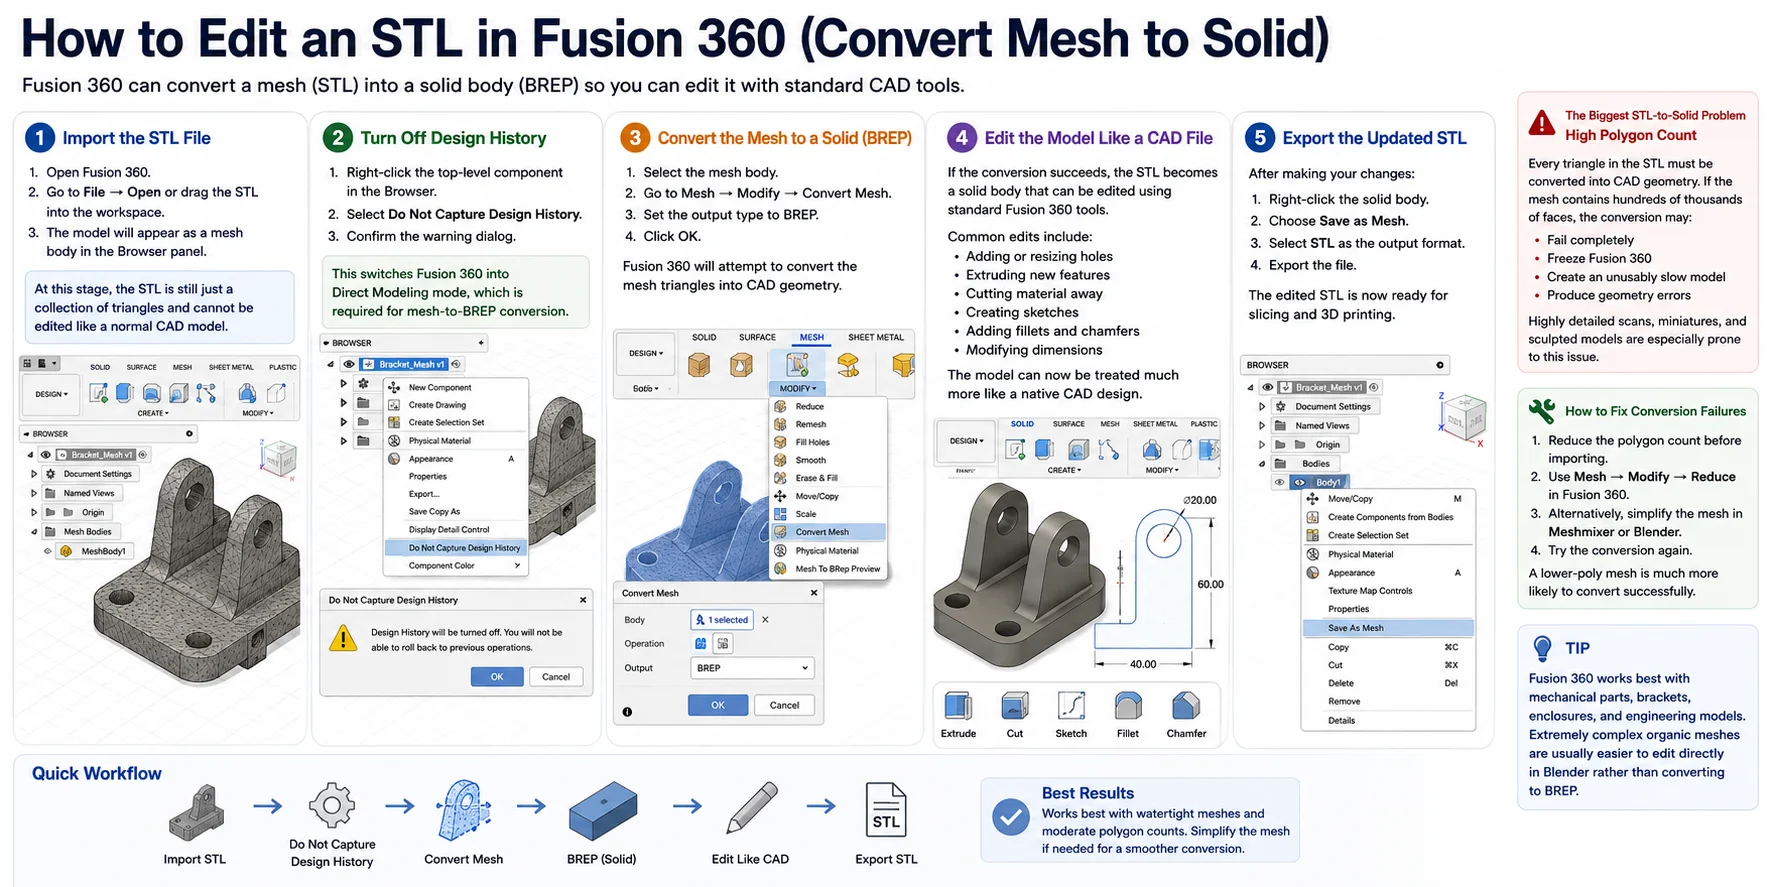
How to Edit an STL in Fusion 360 (Convert Mesh to Solid)
Fusion 360 is one of the best tools for making precise changes to an STL file because it can convert a mesh into a solid body (BREP). Once converted, you can edit the model much like any native CAD design—adding holes, changing dimensions, creating sketches, and modifying features with standard CAD tools.
Step 1: Import the STL File
- Open Fusion 360.
- Go to File → Open or drag the STL into the workspace.
- The model will appear as a mesh body in the Browser panel.
At this stage, the STL is still just a collection of triangles and cannot be edited like a normal CAD model.
Step 2: Turn Off Design History
Before converting the mesh, Fusion 360 requires Design History to be disabled.
- Right-click the top-level component in the Browser.
- Select Do Not Capture Design History.
- Confirm the warning dialog.
This switches Fusion 360 into Direct Modeling mode, which is required for mesh-to-BREP conversion.
Step 3: Convert the Mesh to a Solid (BREP)
- Select the mesh body.
- Go to Mesh → Modify → Convert Mesh.
- Set the output type to BREP.
- Click OK.
Step 4: Edit the Model Like a CAD File
If the conversion succeeds, the STL becomes a solid body that can be edited using standard Fusion 360 tools: adding or resizing holes, extruding new features, cutting material away, creating sketches, adding fillets and chamfers, and modifying dimensions.
Step 5: Export the Updated STL
- Right-click the solid body.
- Choose Save as Mesh.
- Select STL as the output format.
- Export the file.
The Biggest STL-to-Solid Problem: High Polygon Count
Every triangle in the STL must be converted into CAD geometry. If the mesh contains hundreds of thousands of faces, the conversion may fail completely, freeze Fusion 360, create an unusably slow model, or produce geometry errors. Highly detailed scans, miniatures, and sculpted models are especially prone to this issue.
How to fix conversion failures: Reduce the polygon count before importing using Mesh → Modify → Reduce in Fusion 360, or simplify the mesh in Meshmixer or Blender first, then try again.
Tip: Fusion 360 works best with mechanical parts, brackets, enclosures, and engineering models. Extremely complex organic meshes are usually easier to edit directly in Blender.
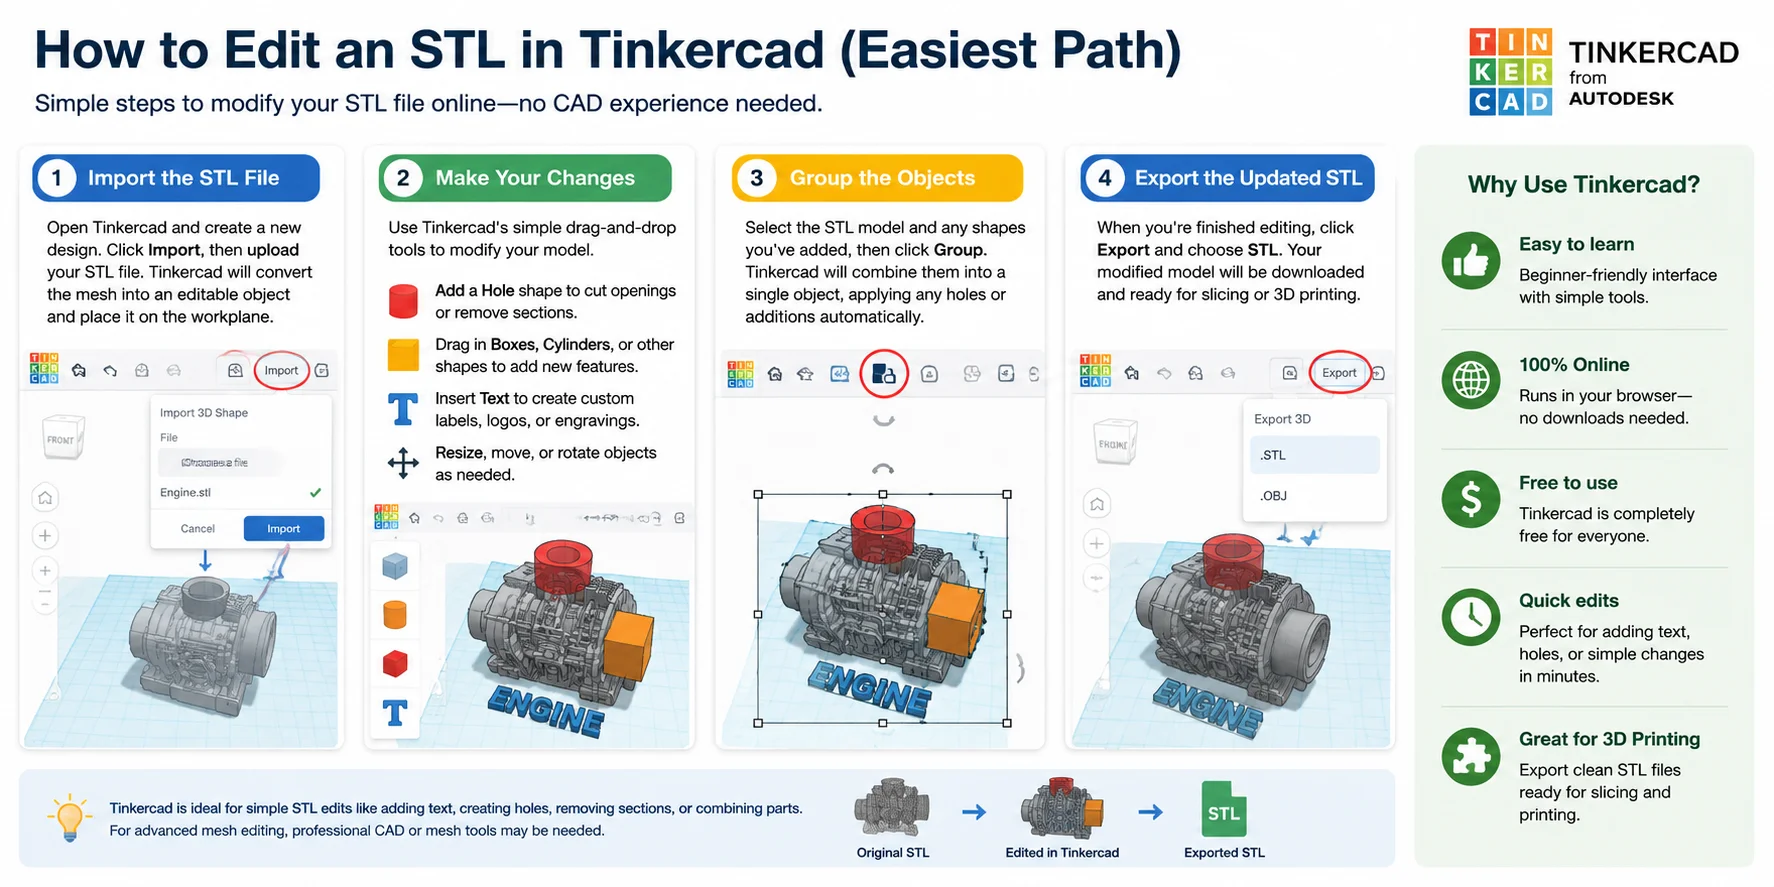
How to Edit an STL in Tinkercad (Easiest Path)
If you already have an STL file and just need to make simple changes, Tinkercad is one of the easiest tools available. It runs entirely in your browser, is free to use, and requires no prior CAD experience.
Step 1: Import the STL File
Open Tinkercad and create a new design. Click Import, then upload your STL file. Tinkercad will convert the mesh into an editable object and place it on the workplane.
Step 2: Make Your Changes
Once the model is loaded, you can use Tinkercad's simple drag-and-drop tools to modify it:
- Add a Hole shape to cut openings or remove sections of the model.
- Drag in Boxes, Cylinders, or other shapes to add new features.
- Insert Text to create custom labels, logos, or engravings.
- Resize, move, or rotate objects as needed.
Step 3: Group the Objects
Select the STL model and any shapes you've added, then click Group. Tinkercad will combine them into a single object, applying any holes or additions automatically.
Step 4: Export the Updated STL
When you're finished editing, click Export and choose STL. Your modified model will be downloaded and ready for slicing or 3D printing.
For simple edits such as adding text, creating holes, removing small sections, or combining parts, Tinkercad is often easier than professional CAD software. It won't replace advanced mesh-editing tools, but for quick STL modifications, it's one of the most beginner-friendly options available.
Repairing Broken or Non-Manifold STL Files
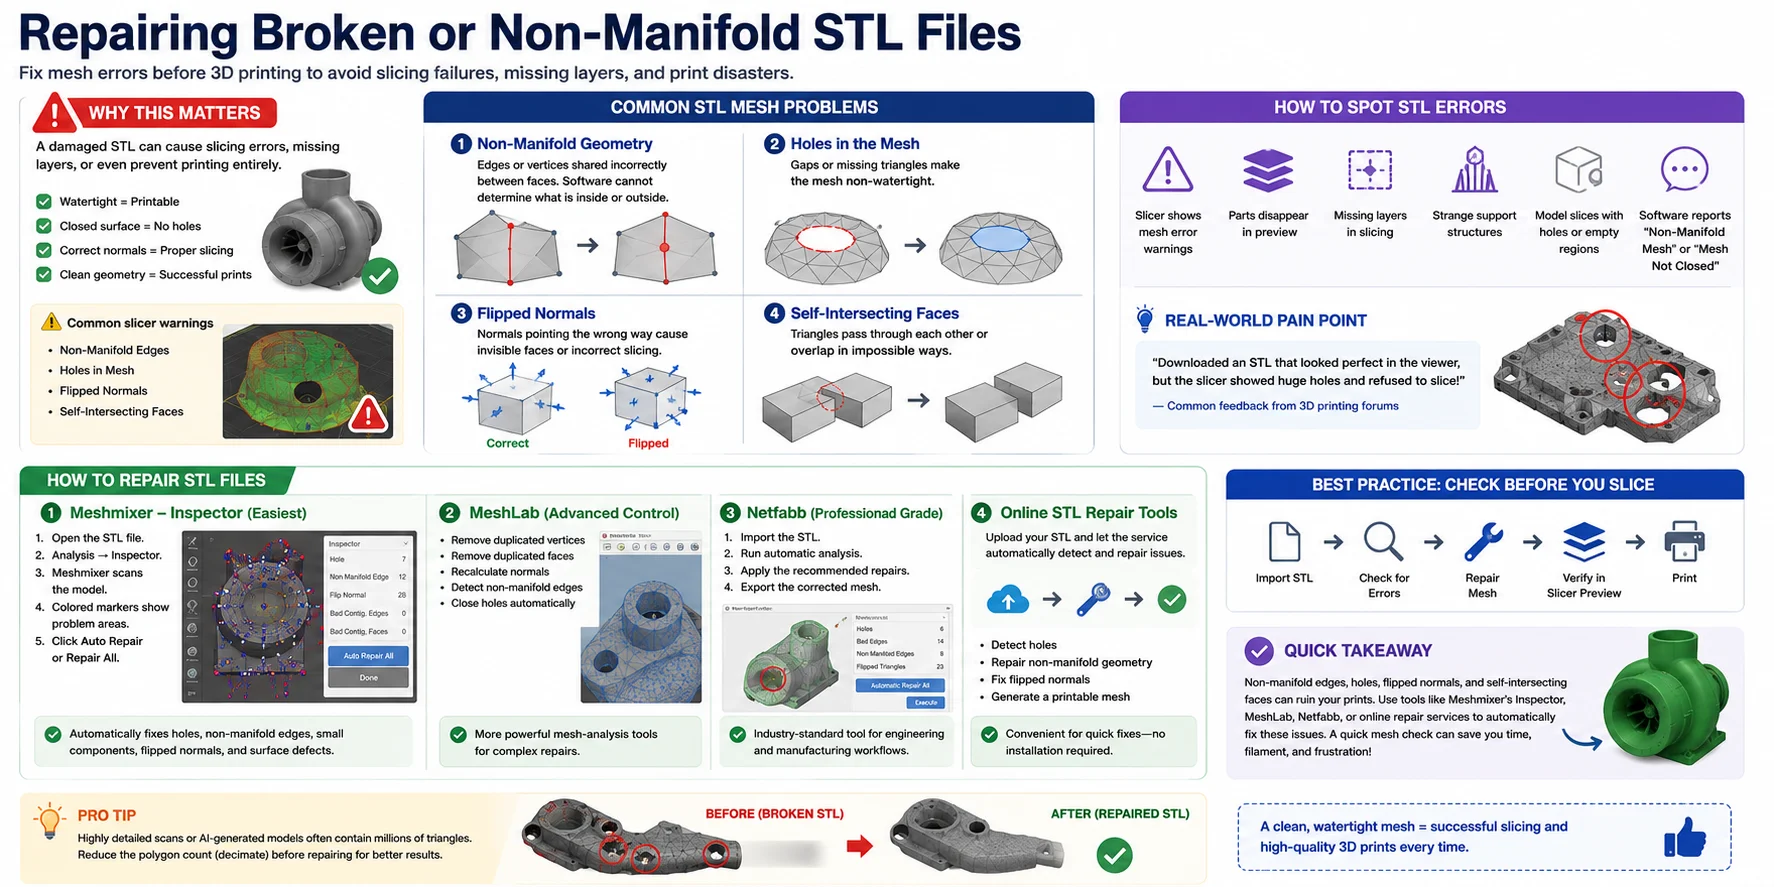
One of the most common reasons a 3D print fails before it even starts is a damaged STL file. If the mesh contains errors, your slicer may display warnings, generate missing layers, create strange toolpaths, or refuse to slice the model altogether.
Common STL Mesh Problems
STL files must form a completely closed, watertight surface. When they don't, the mesh becomes "non-manifold" or otherwise broken.
Non-Manifold Geometry — A mesh with edges or vertices shared incorrectly between faces. The software cannot determine what is inside the model and what is outside. Examples: multiple faces sharing a single edge, internal hidden faces, floating geometry, zero-thickness surfaces.
Holes in the Mesh — Gaps or missing triangles that break the closed volume. Common causes: failed Boolean operations, corrupted exports, incomplete scans, editing mistakes.
Flipped Normals — Every triangle has a direction (normal) indicating which side faces outward. When flipped, parts may appear invisible, slicers may interpret surfaces incorrectly, and solid areas can become hollow.
Self-Intersecting Faces — Triangles passing through each other or overlapping. Often happens after aggressive mesh editing, poor Boolean operations, or combining multiple STL files.
How to Spot STL Errors
Common warning signs: your slicer displays mesh error warnings; parts disappear in preview mode; missing layers appear during slicing; strange support structures are generated; the model slices with holes or empty regions; the software reports "Non-Manifold Mesh" or "Mesh Not Closed."
Repair STL Files with Meshmixer
- Open the STL file in Meshmixer.
- Select Analysis → Inspector.
- Meshmixer scans the model for defects.
- Colored markers appear where problems exist.
- Click Auto Repair or Repair All.
The Inspector tool can automatically fix holes, non-manifold edges, small disconnected components, and surface defects. For many broken STL files, this single button solves the problem in seconds.
Repair STL Files with MeshLab
MeshLab provides more advanced mesh-analysis tools: remove duplicated vertices and faces, recalculate normals, detect non-manifold edges, and close holes automatically. The interface is less beginner-friendly than Meshmixer but offers greater control over complex repairs.
Repair STL Files with Netfabb
Typical workflow: import the STL, run automatic analysis, apply the recommended repairs, export the corrected mesh. Netfabb is particularly effective for engineering models and manufacturing workflows where mesh integrity is critical.
Online STL Repair Tools
If you don't want to install software, several online repair services can automatically analyze and fix STL files—detecting holes, repairing non-manifold geometry, fixing flipped normals, and generating a printable mesh.
Best Practice: A good workflow is: Import STL → Check for Errors → Repair Mesh → Verify in Slicer Preview → Print. Spending a minute repairing a damaged STL is often much faster than discovering a failed print halfway through a multi-hour job.
AI-Assisted Alternatives & Cleaning Up Messy Meshes
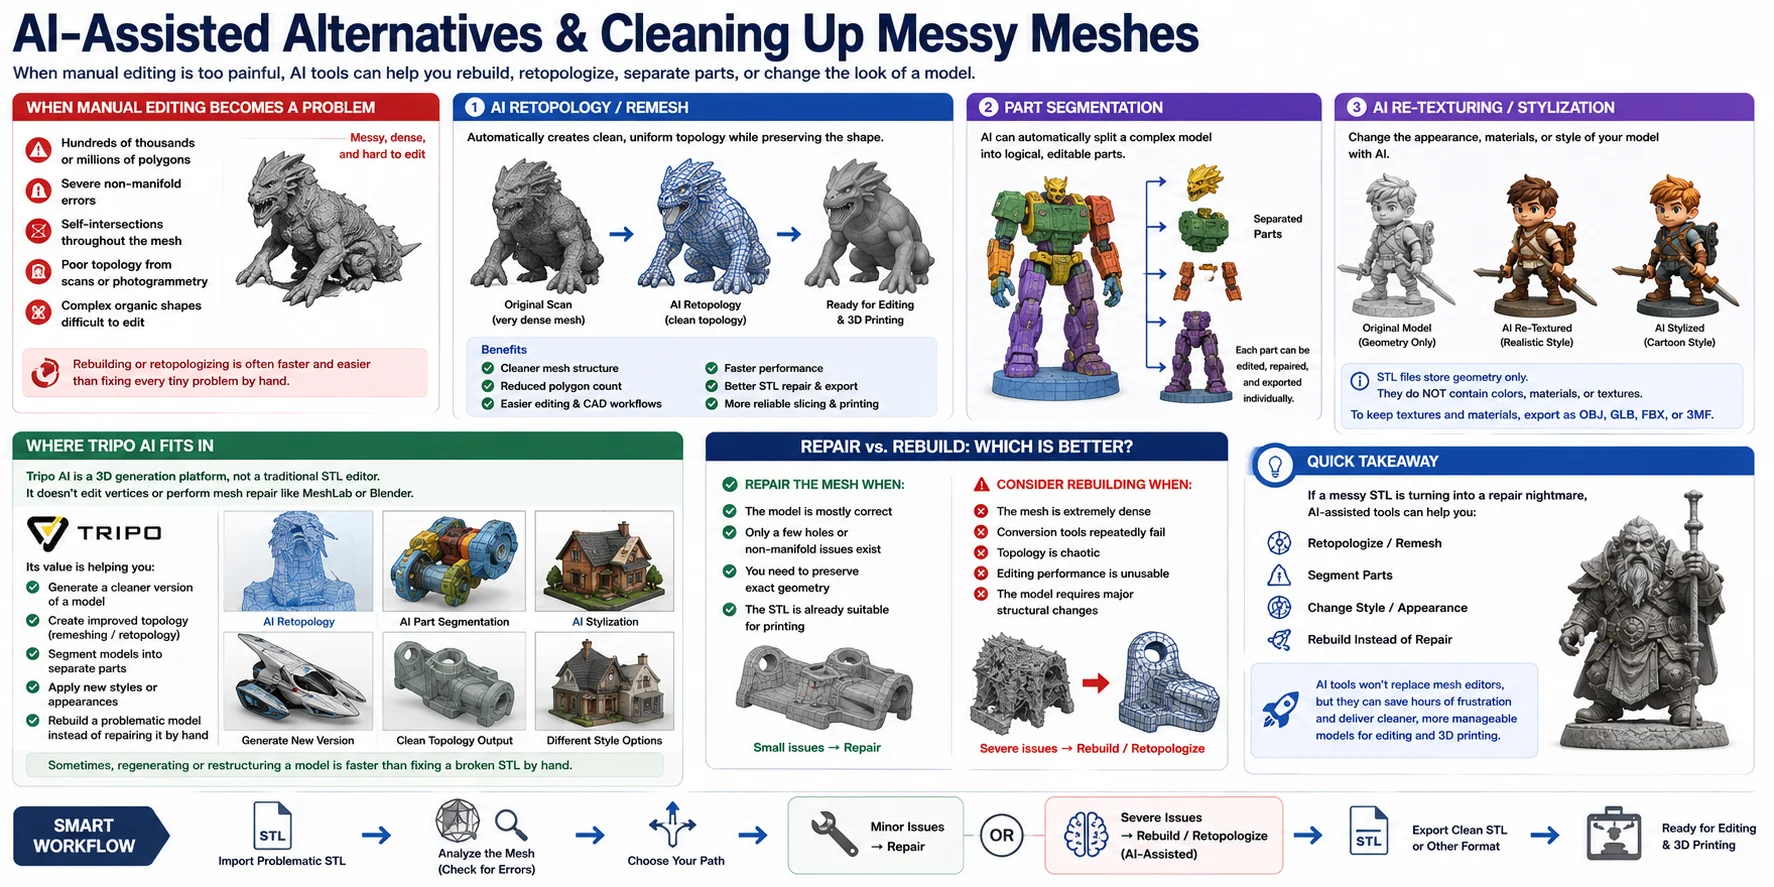
Sometimes, editing an STL file manually simply isn't worth the effort. If you're dealing with a dense scan, a badly damaged mesh, millions of triangles, or a model with severe topology problems, manually repairing vertices and faces can quickly become frustrating. In these situations, generating a cleaner mesh is often more effective than trying to fix the existing one.
When Manual Mesh Editing Becomes a Problem
Traditional mesh-editing workflows work well for small repairs, but they become difficult when a model has hundreds of thousands or millions of polygons, severe non-manifold errors, self-intersections throughout the mesh, poor topology from photogrammetry or 3D scanning, or complex organic shapes that are difficult to edit manually.
AI Retopology and Remeshing
Retopology creates a cleaner polygon structure while preserving the overall shape of the model. Instead of working with a chaotic mesh full of irregular triangles, you get a more organized surface that is easier to edit, repair, and export. Benefits include cleaner mesh structure, reduced polygon count, easier CAD or sculpting workflows, faster STL repair and export, and better performance in modeling software.
Part Segmentation: Breaking a Model into Editable Pieces
AI-based part segmentation tools can automatically identify logical parts of a model and separate them into individual pieces. For example, a character model might be divided into head, torso, arms, accessories, and base. Or a mechanical assembly might be split into housing, brackets, fasteners, and moving components. Once separated, each part can be edited independently and exported as its own STL file if needed.
Where Tripo AI Fits In
Tripo AI is primarily a 3D generation platform rather than a classic STL editing application. It is not designed to directly edit individual vertices, repair non-manifold edges, or perform detailed mesh surgery like MeshLab, Blender, or Meshmixer.
Instead, its value is often in helping users generate a cleaner version of a model, create improved topology through remeshing workflows, segment models into separate editable parts, apply new styles or appearances, and rebuild a problematic model instead of repairing it manually.
Repair vs. Rebuild: Which Is Better?
Repair the mesh when: the model is mostly correct, only a few holes or non-manifold issues exist, you need to preserve exact geometry, or the STL is already suitable for printing.
Consider rebuilding or retopologizing when: the mesh is extremely dense, conversion tools repeatedly fail, topology is chaotic, editing performance becomes unusable, or the model requires major structural changes.
If a messy STL file is turning into a repair nightmare, don't assume manual editing is the only option. AI-assisted retopology, remeshing, part segmentation, and stylization tools can often produce cleaner, more manageable geometry. While platforms such as Tripo AI are not traditional STL editors, they can be useful when rebuilding or regenerating a model is easier than fixing a broken mesh triangle by triangle.
Frequently Asked Questions
Can you modify an STL file?
Yes, you can modify an STL file, but the process depends on the complexity of the changes. For simple edits such as adding text, cutting holes, or combining parts, tools like Tinkercad work well. For precise engineering changes, software such as Fusion 360 can convert the STL mesh into a solid body for more advanced editing.
What is the easiest program to edit STL files?
For most beginners, Tinkercad is the easiest program to edit STL files. It runs in your browser, is free to use, and lets you make simple changes like adding text, creating holes, resizing parts, or combining models with drag-and-drop tools.
Can you edit STL files in Adobe?
Adobe's standard apps like Adobe Photoshop and Adobe Illustrator are not designed for editing STL files. While some Adobe 3D features can view or work with 3D assets, they generally don't provide the mesh-editing tools needed to modify STL models.
Can an STL file be converted to a STEP file?
Yes, an STL file can be converted to a STEP file, but the results depend on the quality of the mesh. Since STL stores only triangle geometry, the conversion typically involves turning the mesh into a solid or surface model using software such as Fusion 360 or FreeCAD.
Conclusion
Editing an STL file is easier when you choose the right tool for the job: use Tinkercad or Meshmixer for simple cuts and modifications, Blender for organic sculpting, and Fusion 360 when you need precise dimensions and engineering-level edits. If the mesh is broken, repair non-manifold errors, holes, and flipped normals before sending it to your slicer.
If a mesh is too messy to hand-edit, it can be faster to start clean—generate a fresh, cleanly-topologized 3D model and export it as STL. Tools such as Tripo AI Studio can help you generate or rebuild 3D models with cleaner topology, making them easier to edit, optimize, and prepare for 3D printing.